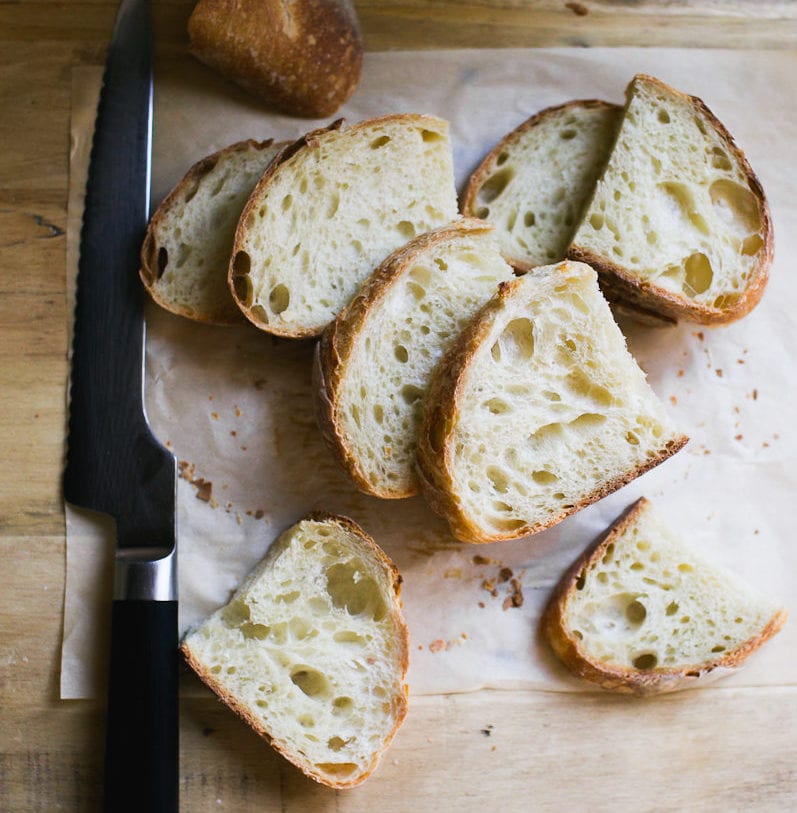
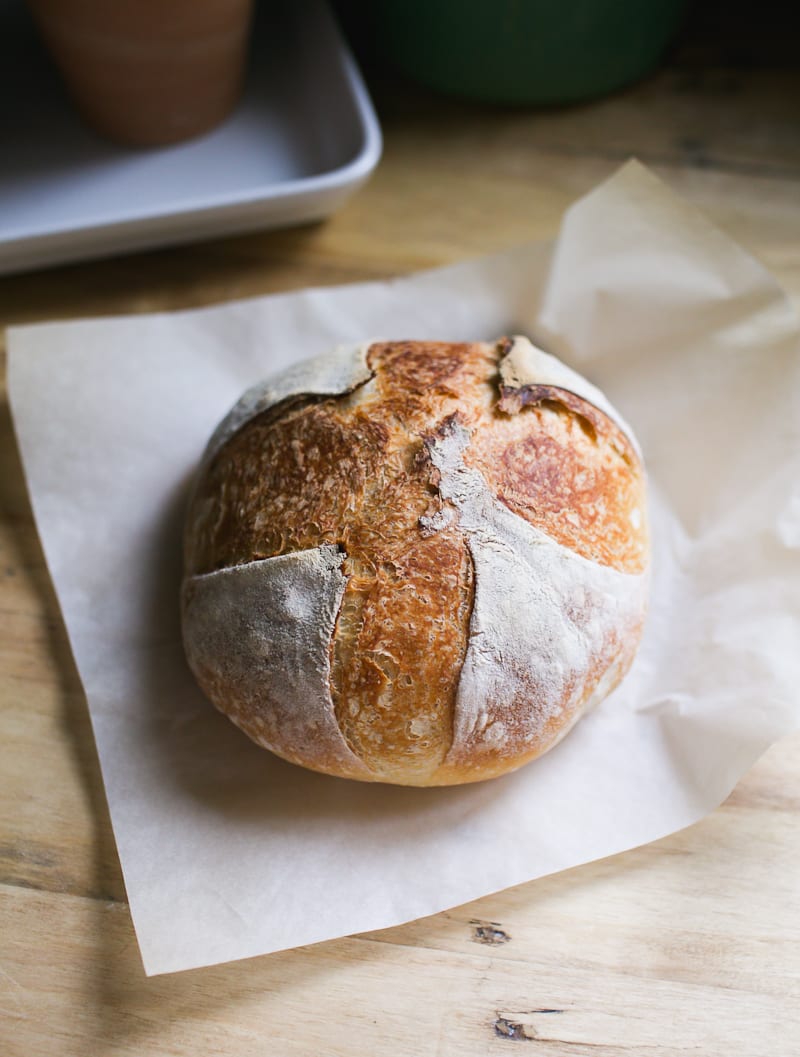
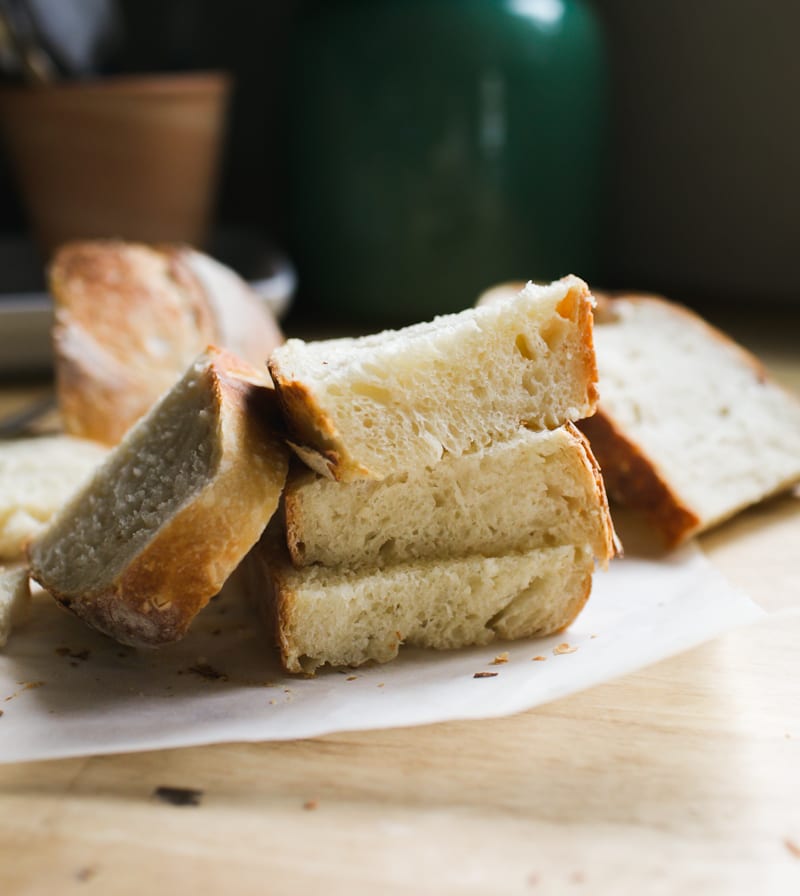
No bread flour? No problem! Learn how to bake artisan sourdough bread using all purpose flour and active sourdough starter. This easy-to-follow recipe features step-by-step photos, helpful tips, and a simple baking schedule to help you create delicious, naturally leavened loaves at home. It’s light crisp and airy!
Bakers all over the world choose bread flour to create exceptional sourdough bread at home. It’s prized for its high protein and gluten content, which helps to create a lofty-high rise. But what if you don’t have any bread flour? Can you make light, airy artisan sourdough with all purpose flour instead?
In this post, you’ll find a clear, step-by-step guide to mastering sourdough with all purpose (or plain) flour with a few key adjustments. You’ll gain the tools and confidence you need to bake delicious bread every time.
All-Purpose Flour vs. Bread Flour: Key Differences
It all boils down to protein content. Bread flour has a higher protein content than all purpose flour, which affects gluten development and the bread’s rise.
I typically use King Arthur flour for bread baking. Their bread flour contains 12.7% protein, and their all purpose flour contains 11.7%. This recipe was formulated to work with King Arthur and Trader Joe’s all purpose flours, which are comparable. (learn more about choosing flour in this post).
Tip: Protein content varies between brands, so stick to one brand first to understand how it behaves. It will be your reference point for future adjustments as you continue to bake.
How to Use All Purpose Flour in Bread Baking
Swapping all-purpose flour for bread flour is not always an even exchange. Because all-purpose flour absorbs less water, you’ll need to reduce the total water in your dough to avoid stickiness. Too much water makes the dough hard to handle, which can cause flat, dense, or gummy bread- you don’t want that.
Ok, So Reduce the Water by How Much?
I typically suggest reducing the water by 15-30g to start. The range depends on the specific sourdough recipe, the amount of sourdough starter, and the flour brand you use.
You’ll have to play around with the texture of the dough, adjusting the flour/water as needed until it “feels right,” which can be frustrating if you lack experience. But stick with it: success requires practice, patience and persistence. For now, let’s focus on visual and tactile cues to guide you through the process.
How to Make Artisan Sourdough Bread with All Purpose Flour {Step-By-Step Recipe}
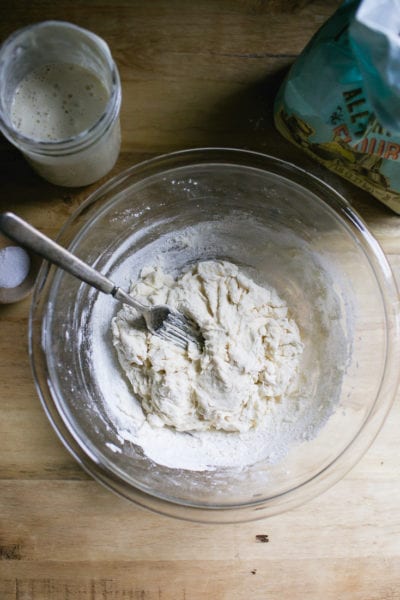
Step 1: Mix the Dough
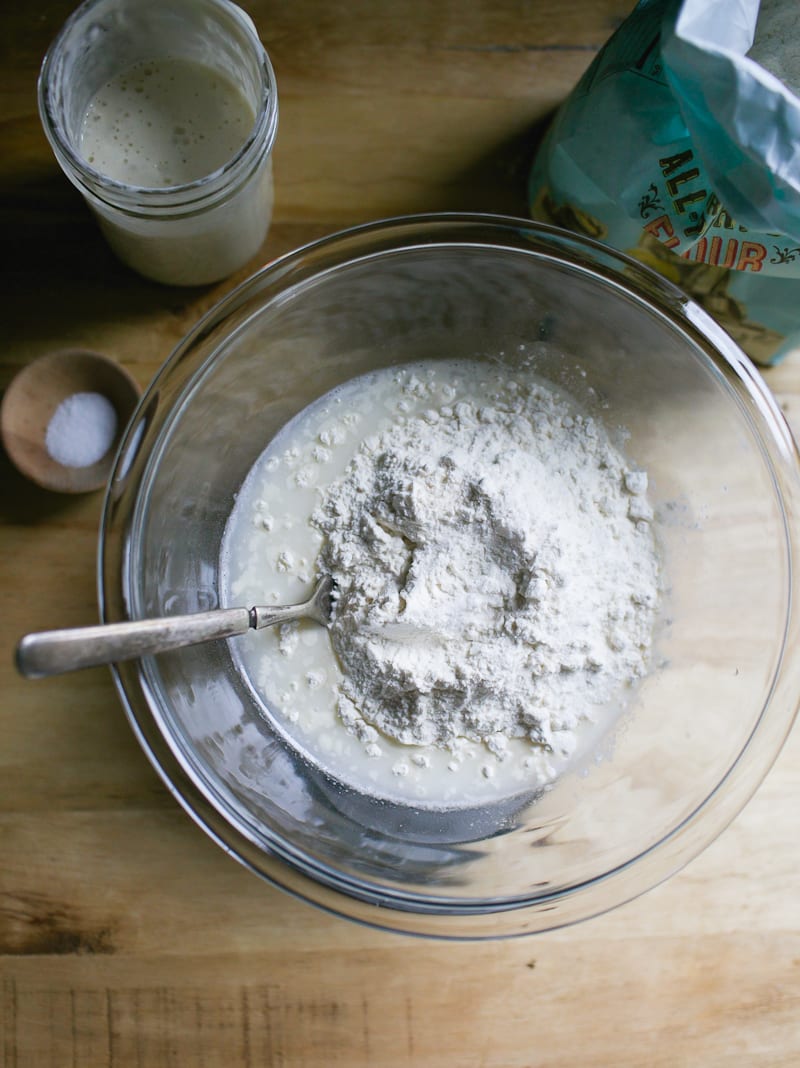
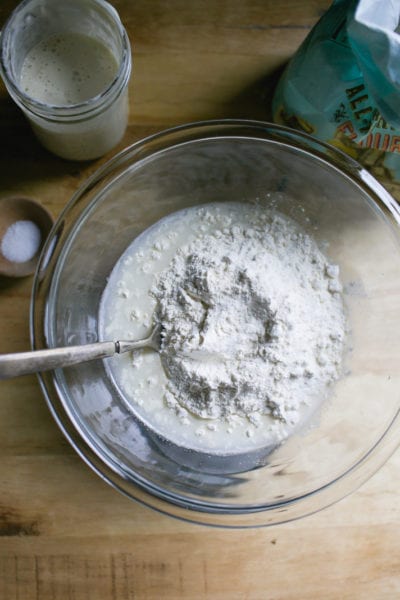
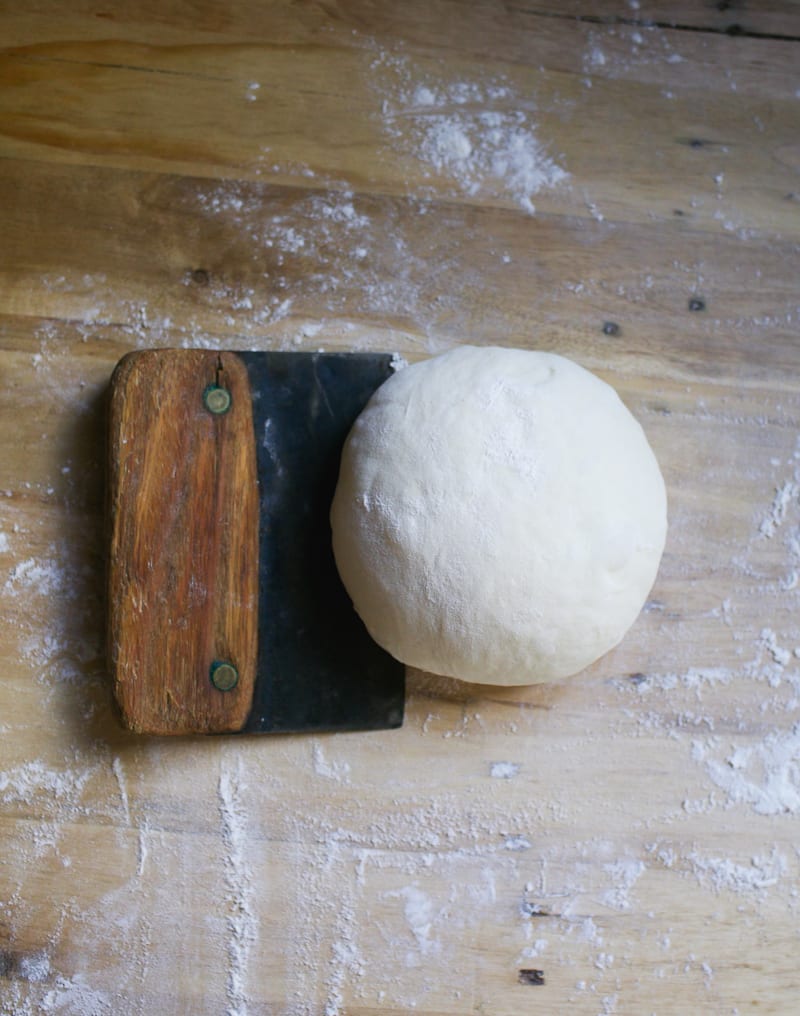
- In a large bowl, whisk your bubbly starter and water together. Add the flour and salt, then mix with a fork until combined. When the dough becomes too stiff to mix with a fork, switch to your hands and knead gently until a rough, shaggy dough forms. This texture is what you’re looking for: slightly sticky but holding together (see images above). Now, cover the bowl with a damp towel or plastic wrap and let rest at room temperature for 30 minutes.
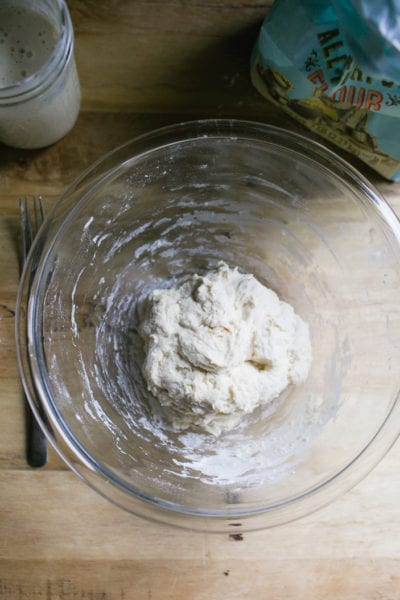
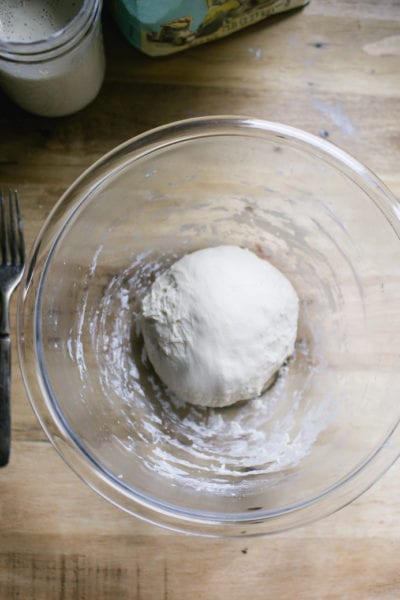
- After the dough has rested, work it into a ball. The surface will appear mostly smooth with a few tears. This is your last chance to adjust the dough’s texture before the bulk rise, so pay attention to how it feels. The dough should be soft and stretchy- not wet, overly sticky, or soupy.
A Few Notes: This recipe makes a small sourdough loaf, ideal for 2–4 people. Smaller loaves are easier to handle, especially if you’re new to sourdough baking. Instructions for a larger loaf are at the end of this post. For best results, you’ll want a digital kitchen scale to measure ingredients accurately, and a Dutch oven (or similar lidded oven-safe pot) for baking. You can find these tools in my shop.
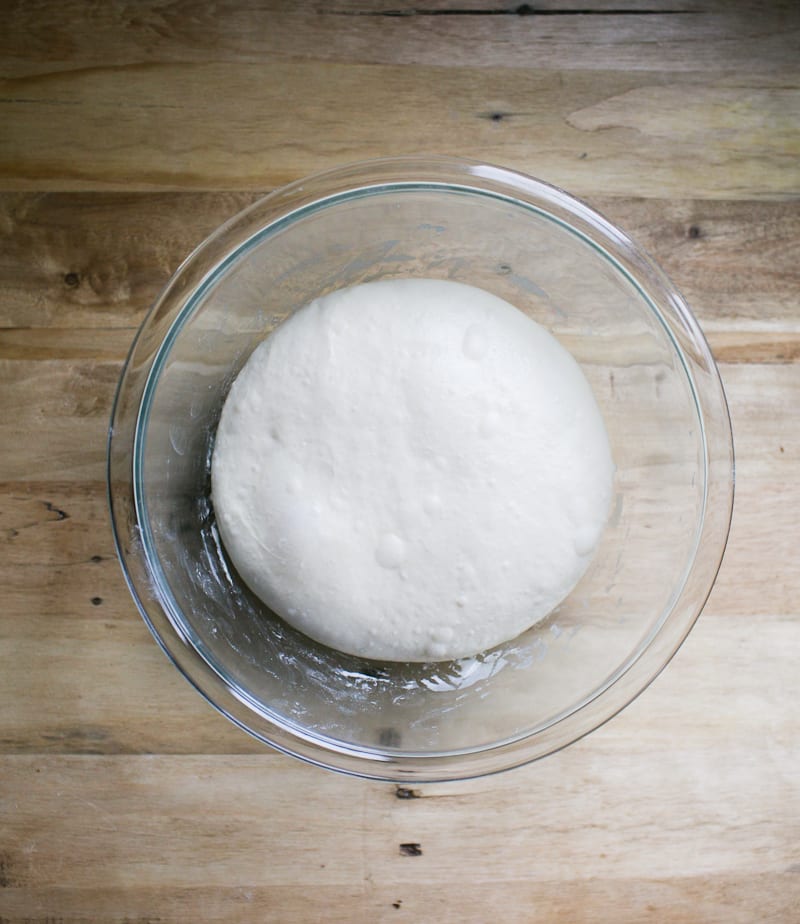
Ste 2: Bulk Rise
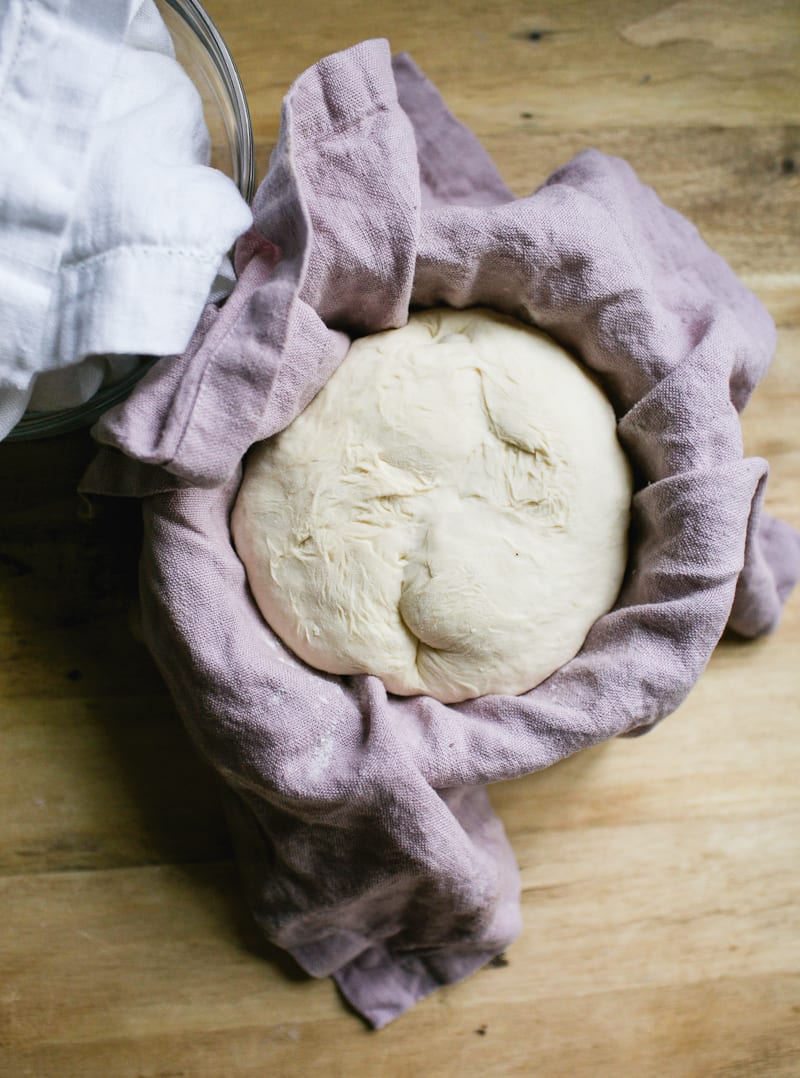
Cover the bowl and let rise overnight, about 10-12 hrs. at room temperature (68 F). The dough is ready when it has doubled in size and looks light and airy. If you’re using a standard 8-inch mixing bowl, the dough should rise to about halfway or two-thirds up the sides, which is perfect for this small loaf.
Optional: Stretch and Fold
This step, done during the bulk rise, helps to strengthen the gluten, improve structure, and give your loaf more height. Watch the video below for additional guidance. Or read the full tutorial: How to Stretch and Fold Sourdough, step-by-step.
About 30 minutes into the rise, perform your first stretch and fold:
- Gently grab one side of the dough, stretch it upward, then fold it over toward the center.
- Rotate the bowl a quarter turn and repeat.
- Continue until you’ve completed four folds (one full set).
- Repeat once more, 30 to 60 minutes later.
Step 3: Shape The Dough
- Line a small bowl with a cotton or linen cloth. Sprinkle generously with flour. Now, you’ll shape the dough twice: first to preshape it, then to build strength and structure.
- Preshape: Remove the dough onto a floured surface. Gently fold the top edge of the dough toward the center. Turn it slightly and repeat, working in a circle until the dough forms a round. Use a bench knife to flip the dough over (smooth side up), then cover and let rest for 20–30 minutes.
- Final Shape: After resting, flip the dough again so the smooth side is facing down. Repeat the folding process to form a tight round. Then flip it back over. With floured hands, gently pull the dough toward you in a circular motion to tighten the shape. Place the dough into the lined bowl, seam side up. Cover the dough with the cloth overhang.
Step 4: Second Rise
Let the dough rest at room temperature for 30 minutes to 1 hour. It’s ready when it looks plump and slightly puffed—it won’t double in size during this stage. While the dough is rising, preheat your oven to 450°F.
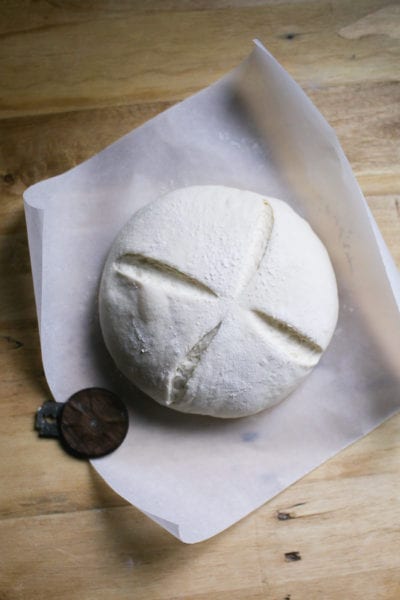
Step 5: Score The Dough
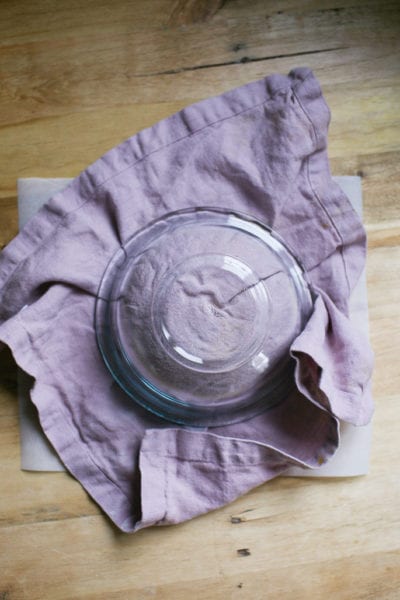
- Invert the bowl of dough onto a sheet of parchment paper. Remove the bowl and cloth.
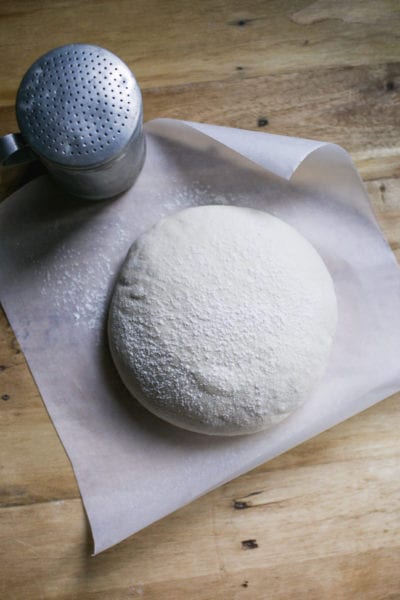
- Sprinkle the dough with flour and smooth the surface with your hands.
- Using a bread lame or a small serrated knife (I used my UFO lame), make four, quick, shallow cuts at 12, 3, 6 and 9 o’clock, turning the parchment paper as you go. Use the tip of the blade as a guide.
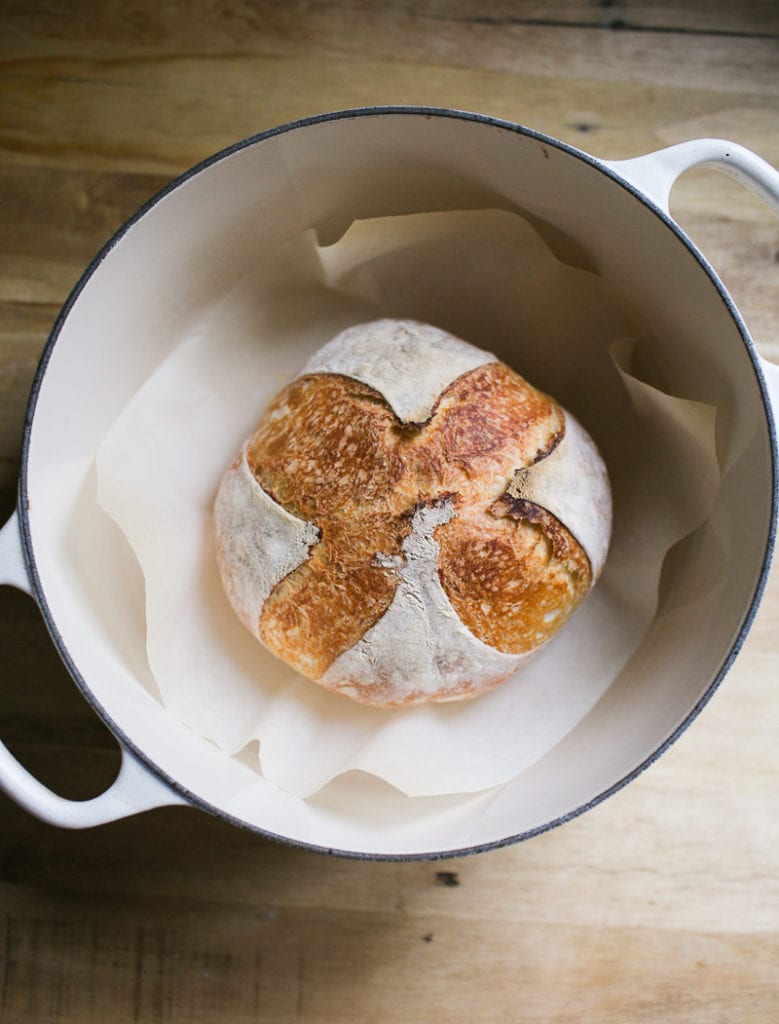
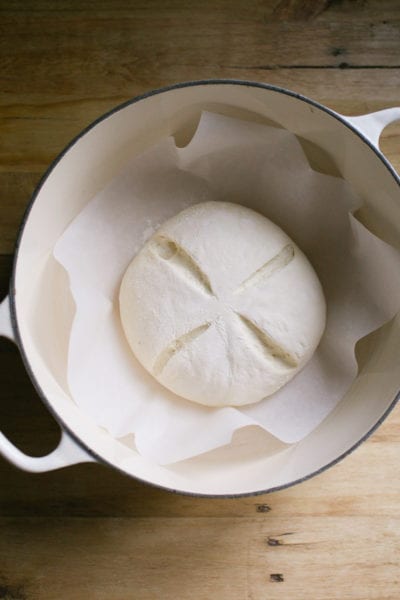
- Lift the dough (still on the parchment) and carefully place it into your Dutch oven. Cover with the lid.
Step 6: Bake The Bread
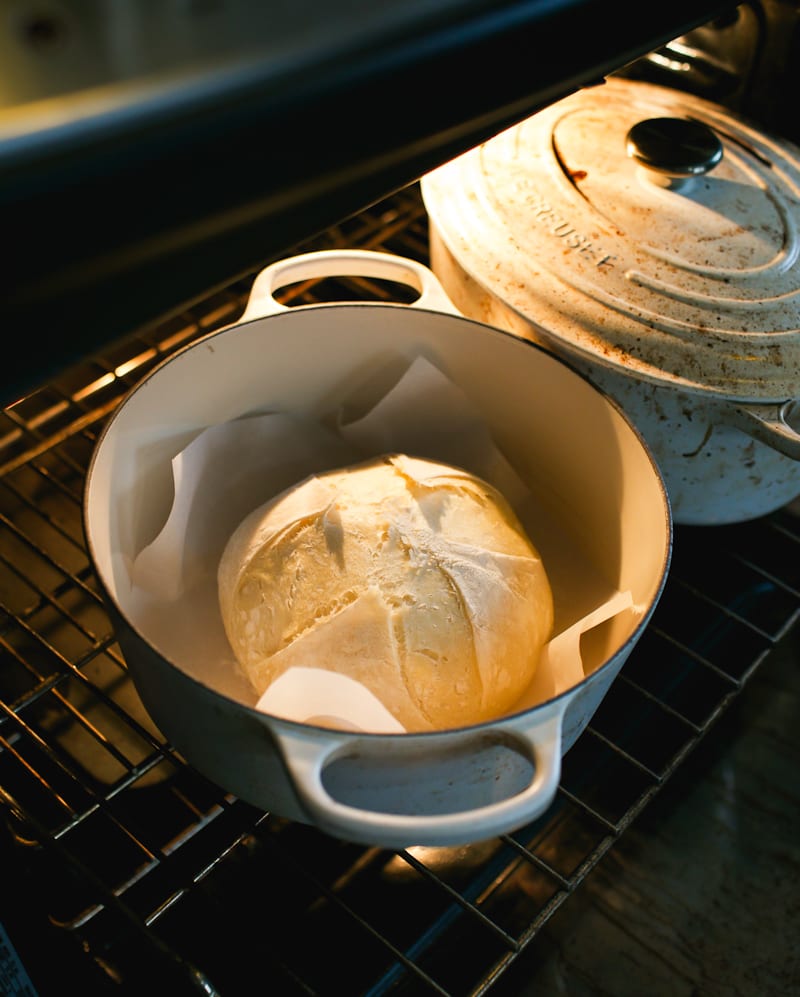
Place the Dutch oven into the preheated oven, center rack. Reduce the temperature to 425 F. Bake covered for 20 minutes. Then, remove the lid and continue baking for 30–35 minutes, or until the crust is deep golden brown. Cool on a wire rack for 1 hour before slicing.
Sourdough Bread Baking Schedule
Here’s a flexible overnight schedule that works well in most home kitchens (around 68°F). If your kitchen runs warmer, simply start a bit later to prevent over proofing the dough.
The Night Before
7:00 PM – Mix the dough and let rest (30 min)
8:00 PM – First stretch and fold (optional)
9:00 PM – Second stretch and fold (optional)
Cover the bowl and let the dough rise at room temperature (10–12 hours)
The Following Morning
7:00 AM – Check the dough (it should be doubled in size)
7:05 AM – Preshape
7:30 AM – Final shape
7:35 AM – Begin second rise + preheat oven
8:05 AM – Bake
By signing up, you agree to receive emails from The Clever Carrot. Unsubscribe at any time.

Artisan Sourdough Bread Recipe with All Purpose Flour
- Cook Time: 50 minutes
- Total Time: 50 minutes
- Yield: 1 small loaf (2–4 ppl) 1x
- Category: Sourdough Bread
- Method: Oven-Baked
- Cuisine: American
- Diet: Vegetarian
Description
No bread flour? No problem! My artisan sourdough bread recipe with all purpose flour is an excellent substitute. This recipe yields a smaller sized loaf (perfect for up to 4 people) with a crisp crust and a smooth, interior crumb.
Notes & Substitutions
This recipe was formulated to work with King Arthur & Trader Joe’s all purpose flour, which contains 11.7% protein. If using another brand, please see my tip in the recipe below for adjusting the texture of the dough, if needed.
For accuracy and best results: please weigh your ingredients using a kitchen scale.
Ingredients
For a small loaf:
- 50 g (1/4 cup) bubbly, active sourdough starter
- 165 g (1/2 cup + 3 tbsp) water
- 5 g (1 tsp) fine sea salt
- 250 g (2 cups + 1 tbsp) all purpose flour (Trader Joe or King Arthur)
For a larger, standard size loaf:
- 50 g (1/4 cup) bubbly, active sourdough starter*
- 330 g (1 1/3 cup + 1 tbsp) water
- 9 g (1 1/2 tsp) fine sea salt
- 500 g (4 1/4 cups) all purpose flour (Trader Joe or King Arthur)
*Note: I use 50 g of starter for both the small AND standard size loaf. Using a smaller amount of starter with an long, overnight rise will help to prevent over proofed dough in the morning.
Instructions
Make the Dough
In the evening, whisk the starter and water together in a large bowl. Add the flour and salt. Mix with a fork until a stiff dough forms, then finish by hand to fully incorporate the flour. It will feel rough and shaggy, and slightly sticky. Cover with a damp towel or plastic wrap and let rest at room temperature (68 F) for 30 minutes.
After the dough has rested, work the dough into a ball. To do this, grab a portion of the dough and fold it over, pressing your fingertips into the center. Repeat, working your way around the dough until it begins to tighten.
TIP: If the dough feels too wet (and this can happen depending on the brand of flour you’re using), add 1 tbsp. of flour. Mix thoroughly by hand, adding more flour as needed. If you think it’s too dry, add 1 tbsp. of water and see how you go.
Bulk Rise
Cover the bowl (damp towel or plastic wrap) and let rise overnight at room temperature. This will take about 10 to 12 hours at 68 F. The dough is ready when it no longer looks dense and has doubled in size. If using a standard 8-inch bowl, the dough will rise about 1/2 way up the sides.
Optional Step: about 1 hour into the bulk rise, do 1 set of stretch and folds. Repeat 1 hour later. This will increase the overall volume of the bread.
Shape the Dough
The following morning, line a small bowl with a cotton or linen cloth. Sprinkle with flour.
Important: You’re going to shape the dough twice to build extra strength.
Preshape
Remove the dough onto a floured surface. To shape the dough into a round, starting at the top, gently fold the dough over toward the center. Give it a turn and fold over the next section. Repeat until you have come full circle. Using a bench knife, scoop up the dough and flip it over (the smooth side should be facing up). Cover and rest for 20-30 minutes.
Final Shape
After the dough has rested, flip it over again (the smooth side should be facing down now). Shape it again following the steps above. Flip it back over. With floured hands, gently cup the dough and pull it toward you in a circular motion to tighten its shape.
Place the dough into the lined bowl, seam side up. Cover the dough with the cloth overhang.
Second Rise
The dough needs to rise again. Rest for 30 minutes to 1 hour. The dough is ready when it looks puffy and has risen slightly, but has not yet doubled in size.
Preheat your oven to 450. Cut a sheet of non-stick parchment paper to fit the size of your baking pot, leaving enough excess around the sides to remove the bread.
Score the Dough
Place the parchment over the dough and invert the bowl to release. Sprinkle the dough with flour and gently rub the surface with your hands. Using the tip of a bread lame, small, serrated knife or a razor blade, make four shallow 4-inch long cuts at 3, 6, 9, and 12 o’clock around the dough. Use the parchment paper to transfer the dough to the baking pot.
Bake the Dough
Reduce the heat to 425 F. Bake the dough on the center rack for 20 minutes, covered. Remove the lid, and continue to bake for 30-35 minutes and golden brown (40 minutes uncovered for the larger, standard loaf).
When finished, transfer to a wire rack. Cool for 1 hour before slicing, for best texture.
Notes
Sourdough is best consumed on the same day it is baked. To maximize freshness, cool completely and store at room temperature wrapped in plastic, reusable beeswax wrap or bread bag for 1-2 days. Sourdough can also be frozen, for up to 2-3 months. Defrost at room temperature and warm @ 300 F before serving.

Comments
Vicki says
Well, well, well, Emilie! So glad I found your site. First time bread maker here as of this week, and your recipe was fantastic. Easy to follow with excellent results. Rye’An has been brewing for 2 weeks and getting very active so it was about time I pushed down my fear and made some bread!
For my 1st loaf I followed the recipe as-is, except I heated my oven with the dutch oven inside and after putting my dough in the dutch oven, I added 3 ice cubes between the parchment paper and the dutch over to let off steam and help create air bubbles in the crust – a tip I read on another blog. They were beautiful. Anyway, the dough felt a bit too sticky so I was worried, but it worked!! The loaf was devoured.
I tried a different recipe for my 2nd loaf and the dough texture was way stickier, but the recipe kept saying “Don’t add flour” so I didn’t hoping it would come together. Even at the end, it was still very sticky. It looked pretty after baking, but noticed it didn’t rise as much as yours and seemed a bit heavier. I gave that loaf to my neighbor and she reported back that it was way too dense. Read another blogger and read it could have been dense because the dough was to wet. Tossing that recipe! Plus, she called for A LOT of starter.
So for my 3rd loaf, I came back to your recipe. The consistency was different from the first loaf, not as wet. I added a smidge more flour and the dough was amazing to work with this time. It baked perfectly again! This was our loaf, but I gave my neighbor a few slices and she said it was perfect! I thought it was even better than the 1st loaf!
I’ve been doing a lot of reading, and decided to continue using your recipe since I’ve had such good luck – even using a store brand AP flour – but go for a longer proofing in the fridge. For my 4th loaf, I started my dough late morning and let it bulk rise at room temp. It took a good 10 hours for the bulk rise to complete. I also added in more stretch and folds beginning one hour into the bulk rise, every 15-20 minutes for a total of 6 sets. I had a beautiful window pane appearance. I pre-shaped and let it rest room temp. 30 minutes later I did my final shape, and threw it in the fridge for 12 hours. Now, I cannot tell you how it how it tasted as I gave that one away to a different friend. She sent me a pic after she sliced into it and it looked great. She said the flavor had just enough sourness and the texture was perfectly chewy. She was concerned the crust would be too hard to eat since she struggled to cut it, but once eaten, she said it was awesome! She toasted a slice and had one as-is.
I’m doing a 5th loaf right now – scored 15# of KA AP Flour. I’m really getting the hang of this thanks to your recipe and tips. Thank you!
Emilie Raffa says
Hi Vicki! Thanks so much for sharing your experience with us. Isn’t sourdough fun? All of the possibilities! It’s such a rewarding craft that continues to amaze me everyday. I’m so excited for you ;)
Omer says
Hey!
Did my first sourdough with this receipt and turned out amazing!!!! Thank you!
I did a 6 hours bulk rise instead of over night. The temperature in my house is more like 83 F.
Can I still do an overnight bulk rise outside? What do you recommend?
Emilie Raffa says
Hi Omer! What you did is perfect. At some point, every baker will have to adjust the rise time based on their specific environmental temperature.
Doing an overnight bulk at 83 F is tricky. If the dough is ready in appx. 6 hrs, you’d have to start the dough way later in the evening AND use cooler water to slow down the rise (otherwise, the dough will be ready at 3 AM). Make sense? Alternatively, rise the dough during the day and when it just about doubles, cover with lightly oiled plastic wrap and chill overnight.
Nastassja Thomas says
Let me tell you, this recipe resulted in a beautiful loaf! I was so worried about not having a good flour but this worked perfectly with a generic brand AP flour. Thank you so much for sharing!!
Emilie Raffa says
Amazing! So glad it worked out for you! xx
Briana says
Hi! I have been loving your website! I used your recipe to make my own starter and have a lovely, growing, bubbling 16 day old starter that I am very attached to :) I made my first loaf of bread today and step by step my dough looked like your pics so I thought I was golden! But I just took my loaf out and instead of being this beautiful rounded dome, mine looks more like a disc and is about half the height of yours. I don’t know what I did wrong! I used my starter when it was really high and bubbly. Any insight would be amazing! Thank you!!
Emilie Raffa says
Hi there! Could be several factors. But it sounds like the dough was over proofed (rose for too long). Make sure it doubles in size during the bulk rise and possibly shorten the second rise to 30 minutes. Hope this helps!
Sabrina says
I baked my first loaf using the amounts for the smaller loaf. The crust is quite hard and the middle is quite dense. I’m using an All Purpose Stone Ground Organic Flour (that’s all I have right now). What do you recommend for softening the crust? Should I add more water when I’m mixing the dough? Will this also help with the dense crumb?
(FYI…I followed your recipe for the starter, and it rose and passed the float test before using)
Thank you.
Emilie Raffa says
Hi Sabrina! It’s the flour. Stone ground has the germ and bran attached so it can make the bread more dense. I haven’t tested the specifics, but my guess is that you’ll need to add more water to this recipe when using that type of flour. But also keep in mind, the finished loaf will always be heartier and not quite high as mine. Hope this helps!
Anna says
Hi,
Your recipe is very easy to follow. I tend to over mix anything with yeast in it, my learning curve is to quit mixing earlier on. I used to think that the bulk rise would correct my over mixing so I didnt have to change my habit… lol! How untrue that is, the more i bake with yeast (of any type) the more I learn technique is important. All that to say, it’s getting better and better Yay!
So for my questions:
I’d like to try making this loaf with seeds and nuts. I tend to also over indulge in ingredients like this… is there a point of adding too much nuts and seeds? And at what point could I add them in at? I like making the standard size as we are a family of 4… it doesn’t last long.
My second question is along the same line just with figs and kalamata olives… I was thinking ¾ cup roughly chopped dried figs and the same amounts of olives…. is that too much? Also at what point can I add it in?
Thank you for your advice!
Your Canadian friend,
Anna
Emilie Raffa says
Hello Anna! For any type of add-ins (olives, seeds, nuts etc), fold them in right after the 30 minute first rest; they will be easier to incorporate. You can always extend the first rest to 45 minutes to make it even easier to incorporate. It’s up to you. Regarding the quantity, this will vary. For the olive/fig combo I’d do 1 cup total. For the nuts and seeds, again maybe 1 cup total. But soak them in water first so they do not absorb all the water in the dough. Olives and wet add-ins do not need to be soaked.
Anna says
Great! Thank you, I wouldn’t have even thought of soaking the nuts and seeds first. The timing of adding them in is exactly what I was thinking. So excited to try this! :) Take care
Lori says
Thanks for this tip! I will definitely try that – I typically move the oven rack up to top 1/3 of oven for this reason but wanted to stay true to the recipe and use my dutch oven. I made your cranberry pecan loaf earlier this week and it is amazing (it’s basically still winter up here in New England lol). A loaf of your easy sandwich bread is rising as we speak – she looked so beautiful in the kitchen aid bowl after the overnight rise!
Emilie Raffa says
Fantastic, Lori! Isn’t sourdough fun? Enjoy!
Stephanie Berntsen Croft says
Hi there! I want to try your recipe ASAP! Is there a part in your schedule advice where I could put the dough in the fridge to slow it down? If I start the process during the morning/day maybe I could put it in the fridge before the overnight proof at room temp after doing the two sets of folds?
Emilie Raffa says
Hi there! You can definitely do that. :)
Jen says
Hi! I’ve made this recipe twice now and love it! Can you do a mix of whole wheat and AP flour? Or do you suggest only AP for this recipe? Thanks!
Emilie Raffa says
Hi Jen! See comment below! But yes, I’d do only 20% whole wheat flour in this recipe. Stay tuned for more!
Charlene Paris says
Do you preheat your dutch oven & lid prior to baking the bread?
Emilie Raffa says
Hi Charlene! I do not preheat my pot and lid prior to baking. You can if you want.
Kel says
I’ve been spreading spores with friends who can’t find yeast and guiding them to your blog as a one-stop-shop for awesome sourdough guides (and lots of ideas beyond bread), so thank you for all your awesome tips and guidance! I’ve been in sourdough heaven since my starter came of age a month or so back.
One question, though…do you have any wisdom on using whole wheat flour (AP or bread)? I try to stick to whole wheat carbohydrates when I can, but I don’t have the strength to resist that sourdough love!! How can I have the best chance for success in changing over to whole wheat?
Emilie Raffa says
Thank you so much, Kel! Much appreciated :) Changing over to whole wheat requires additional adjustments to the original recipe you’re trying to convert. Here, you can try swapping out 20% ap flour for whole wheat possibly adding more water if the dough seems too dry. I wouldn’t go any higher than that though. I’m working on a ww sourdough for the blog, so stay tuned. I also have several recipes in my book Artisan Sourdough Made Simple.
Elyse says
I just have to say I loved this recipe? I have been trying to make a sourdough for a month now and it has always been trail and error. Your recipe was me getting gold! I did double it to make a larger bread and did do more folds then mentioned during its 12hr rest. Will use this recipe again!
Emilie Raffa says
Fantastic! That’s what it’s all about- make it your own! Thanks Elyse!
amanda says
Elyse, I also want to double the small loaf recipe but I am pretty new to baking bread and such so I am a little worried. Did you simply double all the amounts required in the recipe? Thanks!
Emilie Raffa says
Hi Amanda: everything you need to know is in the recipe at the bottom of the post :)
Stephanie says
I just made this bread last night! I know it said that it’s more ideal to start at night because of the proofing time, but I’m so darn impatient! So I started it yesterday morning around 730 or 8 and had a delicious snack of hot fresh bread before I went to bed. This is the absolute best sourdough bread I’ve ever had, and I’m literally about to make more to give to family!
I also used your starter guide! I had someone ask for a recipe and I recommended your page because you made it so easy to follow.
Thank you for the recipes!
Emilie Raffa says
Hi Stephanie! You can totally make this dough in the AM. Just calculate and revers the rise time to make it work for you. No worries! Thanks so much for your support :)
Ross says
Hi – this recipe turned out great, fantastic rise and the taste was perfect. The only issue I had was there were massive air bubbles in the bread, towards the top of the bread where it had risen. Any tips on how to remove those large bubbles? Thanks!
Emilie Raffa says
Hi Ross! It’s hard to say without seeing a picture to be sure. But based on what you’ve described, it sounds like your dough was over proofed. We typically see large air bubble towards the top of the loaf when this happens. Either shorten the bulk rise and/or second rise to counter act this.
Ai says
Thank you for sharing your knowledge, I have made my first two loaves this past week and they turned out great! May just be beginner’s luck but I think all your tips are so key.
Emilie Raffa says
Fantastic! And you’re very welcome! :)
Antonette says
Hello! This is my first time making bread and I followed your guide because all I had was bleached/unbleached AP flour and I realized that most sourdough recipes don’t work the same way using whole wheat/bread flour/etc due to the protein content and high hydration dough. Either way, I was very successful using this recipe twice and will continue to use this one going forward. Your instructions are really clear and easier to follow. Thank you again so much!
Emilie Raffa says
Excellent, thanks for your feedback Antonette! :)
Val says
Well iam new to this bread making but I did make 2 different batches of the sour dough not sure why one rose nice and the other one not so much oh well at least one looks ok just have them baking in the oven now,but wondering those basket that they use for sour dough mine have cloth inserts are you to wash them out after each use and also wash the baskets to get the flour out ,,can wait to see my bread iam sure one leaf should be ok so glad I made 2 just to compare,,thanks again for a great recipe very easy to follow
Val
Emilie Raffa says
Hi Val! I don’t wash the cloth inserts in between uses (at least in the beginning). The flour build up adds an extra layer of non-stick protection.
Rae says
It’s hard to find bread flour these days so this recipe has been awesome! I’ve made it twice now, but I have a question concerning a problem I’ve run into: Gummy bread. I made a double batch of the recipe for 2 loaves. I followed the recipe exactly except I used 100 g starter (mine is still young so I thot I might need it …?) instead of just 50g. I mixed the dough and let it bulk rise at room temp (around 68 degrees) for 12 hours overnight. It doubled beautifully. Then I pre-shaped, bench rested for 30 minutes, and final shaped and rested in baskets for about 45 minutes. I used the poke test and then baked them as outlined in the recipe. They rose and browned BEAUTIFULLY! But upon cutting into the loaves, the texture is gummy. It has nice holes but you can almost see a shine to some of the bread. Any ideas why this happened?? Maybe overproofing in the bulk rise or final proof? Any insights you have would be helpful. Thanks again for a delicious recipe!
Emilie Raffa says
Hi Rae! In my experience, there’s a distinct difference between a crumb that’s “gummy” vs. “shiny.”
We see gummy crumbs when the dough is either undercooked or the loaf was cut too soon after baking. A shiny crumb occurs when proper gluten development has occurred, usually in higher hydration doughs which creates this gelatinous, shiny look. This is actually a sought after look for some bakers.
So, while it’s hard for me to diagnose the issue without a picture it’s most likely one of these things. Bottom line: monitor your baking time & temperature, wait for the loaf to cool completely before cutting, and/or reduce the water slightly for a dryer dough.
Tonia Amaral says
It took me a few tries (okay, it took 9, 9 tries) but I have successfully made this delicious mini-loaf of sourdough with all-purpose flour! Now that I’ve figured out the water and the proofing time for my house I’m going to attempt some larger loaves! Thank you!
Emilie Raffa says
Fantastic, Tonia! That’s the way to do it! xx
Ili says
One last quick question! My dough always flops a little when it comes out of the towel lined bowl. I always have to tuck the bottom of the dough back in so that it isn’t so spread out. Still comes out amazing but was wondering if you have any recommendations?
Emilie Raffa says
Hi there! It could be a shaping issue (needs to be tighter), could be that the dough is slightly over proofed during the second rise (shorten the timing if needed), could be the type of flour you’re using (might need to reduce the water just a touch for a dryer dough)…. See if any of these suggestions ring a bell and experiment next time!
Ili says
Oh good idea I’ll try that! I usually do the second proof for an hour so I will cut down to half. Does scoring it 4 times clock wise make a difference to the one scoring line on the other recipe?
Emilie Raffa says
Hi there! Great! The scoring pattern should not a make a difference :)
Stefan says
I always feel like I’m ruining the dough taking it out of my mixing bowl. It’s so stuck. But it turns out great regardless. I’m just working on getting more air pockets.
Emilie Raffa says
Hi there! I know what you mean. Two things you can do: either lightly oil the bowl or stretch and fold the dough throughout the bulk rise. The more you fold the dough, the less it will stick to the bowl. Try it!
joanna says
Thank you for this recipe, I made my first sourdough using it and it was so easy and came out perfect!
Emilie Raffa says
AMAZING! Thanks for your feedback, Joanna!
Jen says
I’ve made this recipe twice now and both times it turned out perfect!! It was my first attempt making any type of bread and you do a wonderful job explaining everything! Quick question, I’m running out of unbleached AP flour, will bleached AP flour work the same? Thanks!
Emilie Raffa says
Hi Jen! Thank you! Yes: bleached flour will work. If for some reason the dough feels stickier than usual because of this, just add a sprinkle of flour.
Laura says
Hi there! Just wondering if you’re supposed to put your Dutch oven or baking pot into the oven while it’s preheating or just when the bread is ready to go in?
Emilie Raffa says
Hi Laura! I don’t preheat my pots anymore. But some bakers do. Totally up to you!
Myrna says
First success today with this! I got some starter from a friend, it was whole wheat. I fed it with white and I fed it with whole wheat that I had but they both turned out to have bleach, etc. I found some rye flour in the cupboard and my starter likes it. I have used my discard to make some yummy things so far. My first bread was done in a day, didn’t turn out great. Dough was way too wet and sloppy, bread tasted good but that was all. But this one today is a slam dunk, can’t believe I made it! It looks and acts like a whole wheat because of the rye starter I think. It was so bubbly and did all of the right things. I had to add more to most of your timing, but this little thing sprung in the oven and developed a great crust and crumb, even ears!! I don’t have a bit dutch oven, will be my next purchase I think. Thanks for all of the clear instructions and encouragement. Next I’ll make a bigger loaf, learning so much.
Emilie Raffa says
You are very welcome! Sounds like you are well on you way! Enjoy :)
Myrna says
Made a second success! I made the larger loaf, over baked it at the end, but the flavour is so amazing. It was the best part about our dinner tonight! Thank you for all of the great tips that make us successful, so appreciated :)
dimitra says
Hi, I love the simplicity of the sourdough compared to others. I have been lucky enough to secure 2 packets of KAF Bread Flour and I specifically bought them to make Sourdough bread, what changes would I have to make to this recipe to be able to use the bread flour. Many thanks. Your sourdough Banana Bread recipe is happening tomorrow, and I am from Australia and have visited the Boathouse but never tried their banana bread …. my loss :-((. thank you dimitra
Emilie Raffa says
Hi Dimitra! If you’re working specifically with KAF bread flour you can increase the water to 350g total. PS: I think you will love the banana bread! No trip to the Boathouse needed (although, it’s such a pretty spot!).
Val says
Hi there new to sour dough bread making ,,one question after I feed my sour dough when can I start to make the bread as it did double in size after 1 hour then it started to fall so just not sure when to start making the bread like how long after you feed just when it doubles
Emilie Raffa says
Hi there! Make the dough when you starter doubles in size. If you’re unsure, do the float test to see if it’s definitely active. The length of time your starter will stay at peak height is different for everyone. But count on 1 hr to be on the safe side.
Ian says
Hi. I added a little extra flour as felt wet. In Ireland so plain flour could have less protein content? When I turned it over before 2nd proof it has a few cracks – wondering if that means it’s actually now too dry. Are the oven temps 450 and 425 for a non fan or fan assisted oven. Thanks.
Emilie Raffa says
Hi Ian! Perfect- you did the right thing. It’s very possible that your flour has a lower protein content. Regarding your question, I’m not sure I understand? At what point did you turn it over? Was it uncovered? Thanks!
Ian says
Hi .I meant when i flipped it over after the final shape and before the second rise. More cracks in it than your image .Finished product is lovely. I made the double amount today but only used 300g water to 500g flour (as i think my flour has less protein). Seems to work. I cooked for 20 mins with lid on and 20 mins with lid off. 210C which would be 410F (fan assisted). Are your temp’s fan assisted or not as i note you cook for 40 mins with the lid off? Great recipe and delighted i no longer have to search for bread flour….
Emilie Raffa says
Ahhh…. got it thanks! The cracks could be due to how the dough was shaped. Next time, after shaping, leave it on the bench for a few minutes before transferring it to the bowl for the second rise; it will allow the dough seam to “seal” a bit more. Regarding the oven temperature, my recipes are written for conventional ovens (not fan assisted/convection). They can be adjusted though.
Sandy says
Would I be able to add some roasted red pepper paste into this recipe? Would the make the dough not rise?
I’ve made this recipe many times and I love it but wanted to experiment with flavours.
Emilie Raffa says
Hi there! I’ve never used roasted red pepper paste before but it sounds lovely. I don’t believe it will effect the rise. Typically fat, sugar and certain spices will slow it down instead. Let us know how it tastes if you experiment! x
Sandy says
I tried it with 1 tablespoon of roasted red pepper paste (Ajvar) and it was so good! It didn’t affect the rise or the loaf at all!
Emilie Raffa says
Ahhh…thanks for coming back to let us know. Glad it worked! It probably added such a pretty color, too. x
suzanne brazell says
Finally!!! A sourdough recipe that works and is easy to follow!! Thank you, thank you. I followed your recipe from January using bread flour but only had all-purpose. It still turned out great. I will follow this one next time. It rose, has a great crust and good flavor. I cannot tell you how tickled it am!! I cannot wait to get a print copy of your book. You should be very proud. My husband and i both loved it – thanks again
Emilie Raffa says
Suzanne, this is wonderful! Makes me so happy! I’m glad you found the recipe easy to follow and that your sourdough loaves have been successful. Fun, isn’t it? xx
Emilie Raffa says
Hi Debra! It sounds like your dough is over proofed. And I believe it’s happening during the second rise; it’s too long. Shorten the rise time to about 30 minutes or so, but no longer than 45 minutes. Flat bread could be due to shaping issues as well. Go slow, and make sure it’s nice and even!
Hanna says
Hi Emilie,
Thank you so much for this recipe! I made my starter 3wks ago and it’s ready to try a bake for my first loaf of sourdough! I’m wondering if the rise needs to be longer than 12hrs for the recipe to be low-FODMAP (to improve digestibility)? I’m going to make it this afternoon, so my plan was to let it rise until it doubles, pop it in the fridge overnight, and bake in morning (as you mentioned in response to a prior comment). But wanted to check first whether I should do a second rise to be low-FODMAP?
Thank you!!
Emilie Raffa says
Hi there! What you mentioned above will definitely work for the bulk rise! No need to lengthen the second rise as well- the dough might overproof. Hope this helps!
Liz says
Thanks for this easy to follow recipe. I just finished a loaf (my second bread ever) and it is great! I have all purpose flour and whole wheat bread flour at home. Could I replace some of the all purpose flour with whole wheat bread flour in this recipe? What other changes would I need to make? Thanks!
Emilie Raffa says
Hi there! You can replace up to 20% with whole wheat flour. See how you go with that. Might need a splash more water if the dough seems a bit dry. Keep in mind, the texture won’t be the same as the original recipe; it will be slightly more hearty.
debbied says
Thank you! Should I still use the finger-poke test to determine the readiness of the bulk rise? Or do I stop the bulk rise short? I really appreciate all the advice you give! This has helped keep me sane and happy during the shut-down.
Emilie Raffa says
No problem! The dough should double in size when ready. This is the visual indicator that I use, instead of the poke test, to determine the dough’s readiness. The poke test is not always accurate.
debbied says
Thanks again!
Debbied says
Hi,
Thanks so much for your blog. I learned how to do a sourdough primarily from your site. I made my own starter and used this recipe because I can only find KAF All-purpose during the pandemic. My starter is beginning to mature. I have made about four breads in the last month, all somewhat successful. The first sourdough was not tangy enough for my taste. So I have done the final proof by retarding in the fridge for the last couple. (I bulk ferment for about 12 hours and use the poke test to determine when it is ready to pre-shape and shape). I then put the dough in a plastic mixing bowl into the fridge. (I don’t have a banneton). My question has to do with the fact that the bread seems to spread and flatten out during the retarding in the fridge. I have to reshape before baking. It does have spring, but not as much as when I did the final proof for only about half and hour at room temperature. I do prefer the more sour taste from the retarded bread. Do you have any tips about retarding? I let it go about 16 hours in a cold fridge, but it has already flattened by about ten hours. Do you suggest doing something different if I want to retard? If you are retarding, how can you tell when the bread is proofed?
Thanks so much!
Emilie Raffa says
Hi there! Your dough sounds over proofed. I would shorten the bulk rise (12 hrs is too long followed by a 16 hrs slow rise in the fridge), doing it at a warmer temperature. You’ll need a proofing box, or heat up your oven to 80 F and then shut it off immediately. Then shape and chill overnight. Hope this helps!
Deborah says
Tried this recipe yesterday and this morning. My loaf came out flat and very dense. It did not spring in the oven like it should have. I am trying it again tonight to see if it will come out better.
Emilie Raffa says
Deborah, it sounds like your dough was over proofed (rose for too long). Try to shorten the bulk rise time and/or the second rise. Make sure to weigh your ingredients as well. Hope this helps!
Debbied says
Thanks!
Debra Bonnefin says
Hi I am a total sourdough newbie! I followed this recipe twice now the first time making the small loaf and last night/today the double size. Each time the taste and smell are amazing. Beautiful crust and crumb but no rise. Both of them are pretty flat. This morning when I got up the dough had risen to the top of the bowl but never got high again. I feel like I’ve done everything you’ve said but no rise when baking. Any ideas what I might be doing wrong? And thank you for such detail in your recipes!
Emilie Raffa says
Hi Debra! It sounds like your dough is over proofed. And I believe it’s happening during the second rise; it’s too long. Shorten the rise time to about 30 minutes or so, but no longer than 45 minutes. Flat bread could be due to shaping issues as well. Go slow, and make sure it’s nice and even!
Debra Bonnefin says
Thanks! I will try that.
Catherine Lowrey says
I baked this loaf today after taking a week to make the starter per your recipe. It is delicious! Everyone loves it. Came home and had another piece and I think it tastes even better about 7 hours later! Thanks so much for making bread baking simple. (This is my first bread baking attempt in about 20 years). Definite success!
Emilie Raffa says
You are very welcome. Thanks so much for your feedback! xx
Chloe says
Hi Emilie, thank you for these detailed instructions. I am about to start my first ever sough dough (experiment) I have the starter ready. my question is, I have a mixer with a dough hook? I was wondering if it would make it easier? and also help with the gluten, as I noticed
someone said that British flour has a lower protein content.
Emilie Raffa says
Hi there! You can definitely use a mixer with the dough hook. It’s totally up to you. And yes, it will help with the gluten development.
Lilly says
Just a quick question before I start this recipe tomorrow (using your starter instructions and currently on day 6). Can I add a little vital wheat gluten to this recipe if using all purpose flour but want a bit more chew?
Emilie Raffa says
Hi Lilly! I haven’t done it myself, but I do believe it can be done! FYI- this bread does have a nice chew to it already :)
Chantal Chiddle says
This is my second attempt at the sourdough. Should be interesting. My starter never doubles in size but I do use the water drop test and it has been ready
In all my reading and researching, somehow I missed this post with the all purpose flour. I used your recipe with bread flour but used all purpose. Which means, this is not going according to plan.
So far today, my dough is not holding a shape, but after reading this post, it is likely a bit more wet than it should be or it overproofed. It is in the baking dish resting. I made the dough last evening. It fermented all night. Looked nice and puffy this morning – maybe too puffy. Fingers crossed the taste is right – my first loaf was a little odd in taste (I cut back the salt – BIG mistake).
I figure by my 5th or 6th attempt, I should have the process down.
Love the tips and the posts. Looking forward to more fun on my bread making journey! I am more of a visual person – a video to see the consistency would be fantastic – or more pictures at more of the steps. Also – do you wet your hands when handling the dough?
Emilie Raffa says
Hi there! Thanks so much! Regarding wet hands, it depends on the dough. You run the risk of making a wet dough even wetter if not done correctly. But it does help with sticking.
Safwa says
Hi! Thanks so much for the recipe! When I made it, after the bulk rise, I found that all the volume kind of deflated once I started to shape the dough and it came out a lot smaller in size than yours. Any tips for this not to happen again?
Emilie Raffa says
Hi there! It hard for me to say without seeing a picture. The loaf in this post is a small one to begin with, serving 2-4 ppl. If your loaf was smaller than mine, that means it was a roll! LOL. Perhaps there was some confusion between the small loaf and standard size recipe?
Sarah Jane says
This recipe is fantastic and has not failed me yet. I love that you have a small loaf option, since before I got a commercial bag of flour from my aunt, flour was in short supply. I’ve been sending this recipe to everyone who wants to try sourdough bunker baking. I’ll say that I’ve definitely noticed an improvement in crumb with “fancier” AP from King Arthur (versus generic AP from Target). Thanks for posting this!
Emilie Raffa says
Hi there! So wonderful to hear! Thanks for sharing re: the flour. It’s very helpful to other bakers :) x
Stephanie says
Thank you for this recipe. Due to covid19 and an increased demand for flour, I have not been able to find any bread flour recently. I successfully made my first starter and was so excited to make my first loaf of sourdough bread. Unfortunately, I substituted all purpose flour for bread flour in another recipe and ended up with dough that was too wet and a bread that tasted good but was more flat than round. I’m going to try this recipe next if I still can’t find bread flour at the grocery store.
Emilie Raffa says
Sounds great! Enjoy the recipe :)
Solange says
Hi Emilie,
Thanks so much for your wonderful sourdough recipes. Your starter recipe really appealed to me because it didn’t waste as much flour In feeding it as others I had read about. I have been using it to make the beginner sourdough bread (but with ap flour) for a couple of months now with great success. My family loves the bread!! I have even given the starter and bread recipe to family and friends who are enjoying baking their own delicious loaves. I am going to try the Artisan bread recipe tonight but was wondering if using less starter (50g vs 150g) affects the sour flavour of the bread? I like the idea of using less starter but don’t want to sacrifice the flavour.
Emilie Raffa says
Hi there! More starter in a bread recipe doesn’t necessarily mean more sour flavor. The sourness comes from a variety of factors including flour type, temperature, starter quality etc. You’ll be fine with 50g here! x
mary says
nowhere on this post do I see ingredients list (i.e. quantities) for the water, starter, flour.
where do i find this.
Emilie Raffa says
Mary, all of my recipes (with ingredients, quantities etc.) are posted at the bottom of each post.
claire says
Thank you so much for writing and sharing this recipe and detailed instructions. I am totally new to baking bread and you made it so easy for me to make a winner the first time!! The timed agenda for planning out the steps is brilliant.
Steph says
I followed your recipe almost exactly starting at around 8 last night and I started my first shape at 8am. It seemed smaller than your pics. Do you think it proofed too long because it’s hotter here? I looked and it says 73. I’m still going to bake but it looks a lot smaller than your pics.
Emilie Raffa says
Hi there! What version did you follow: smaller loaf? Or Standard?
Lori says
Just had to pop in and say thank you for this recipe and the detailed post! I received some (contactless drop off) starter from a friend and realized I was out of bread flour. Given the shortages of flour, I was so happy to see a recipe that specifically addressed using AP flour, including the tip to decrease the water. My third loaf is rising as we speak and the first two came out perfectly (except for slightly burnt bottom which was my own fault and I’m still trying to adjust cook times with my oven). The pictures and bakers’ schedules are also so appreciated – I love the first rise overnight at RT method as it feels less stressful than the second overnight in fridge method. I’ve been devouring all of your sourdough related posts for tips and tricks as well and I am excited to try your cranberry pecan loaf next. THANK YOU!
Emilie Raffa says
Lori, you are very welcome! The flour shortage is exactly why I wrote this post. Bread is adaptable when given the right formulas! For slightly burnt bottom crusts, place an inverted baking sheet on the rack directly below your baking pot (not underneath it). This will help shield the heat from the bottom up.
Kendall says
Hi Emilie, thank you for this recipe! Ive made this bread twice already, and it turned out great both times. I am wondering if I can add green olives? If so, do I add them before bulk fermentation, or after? Thanks!!
Emilie Raffa says
Absolutely! It will be delicious! Add the olives after the first 30 minute rest (not after the bulk fermentation). Enjoy!
Angi B says
I have one bag of King Arthur AP flour I finally decided to bake with it. The bread came out amazing with this recipe. What a difference the type of flour makes!! I am so happy I found this website, I can not stop baking:)
Emilie Raffa says
Thank you! xx
Melanie Elliott says
Just to clarify this recipe doesn’t use levain just straight up starter?
Emilie Raffa says
Hi Melanie! Both will work. A levain is just an offshoot of the “mother” starter (meaning a portion of it is fed separately in another bowl). Whatever method is easiest for you to do, go for it.
Melanie Elliott says
Thank you!
This is my second attempt and my loaves keep coming out so flat and dense. I don’t know what I’m doing wrong. My starter is very active. Any ideas? Could it be that I’m putting it in too big of bowl for the resting/proofing? Or should that not affect it much?
Emilie Raffa says
Hi there! Sounds like your dough is over proofed (rose for too long). Try using an 8-inch bowl for the bulk rise; it’s easy to judge when the dough has doubled with this size bowl because it’s not too large. Additionally, if you’re doing an overnight rise make sure to start in the evening (not the afternoon!). This will help with the timing. Hope this helps :)