Learn how to shape a round sourdough boule using the envelope technique. It’s simple, straightforward and can be used on any type of dough. Don’t forget to watch the video!
There are many ways to shape sourdough bread. If you’re just starting out (or looking to brush up on your skills) dough shaping videos are a great place to begin. They are mesmerizing to watch!
Here you’ll learn how to shape a round sourdough boule using the envelope technique. It can be used on any type of dough ranging from 65-75% hydration.
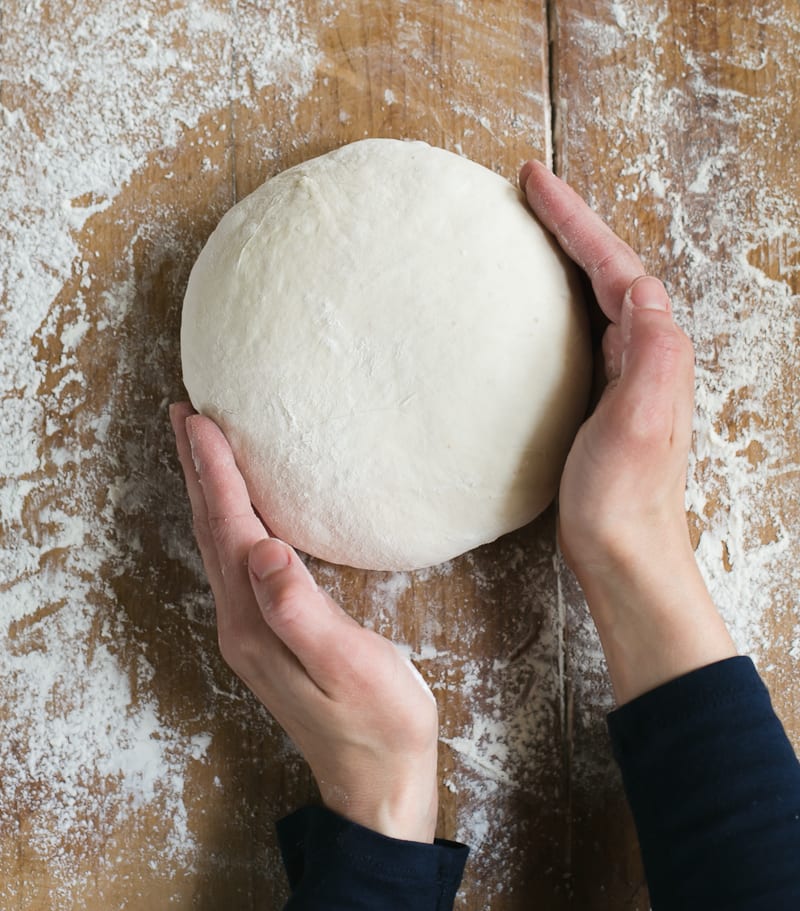
- Remove the dough
Gently coax the dough from your bowl onto a lightly floured work surface.

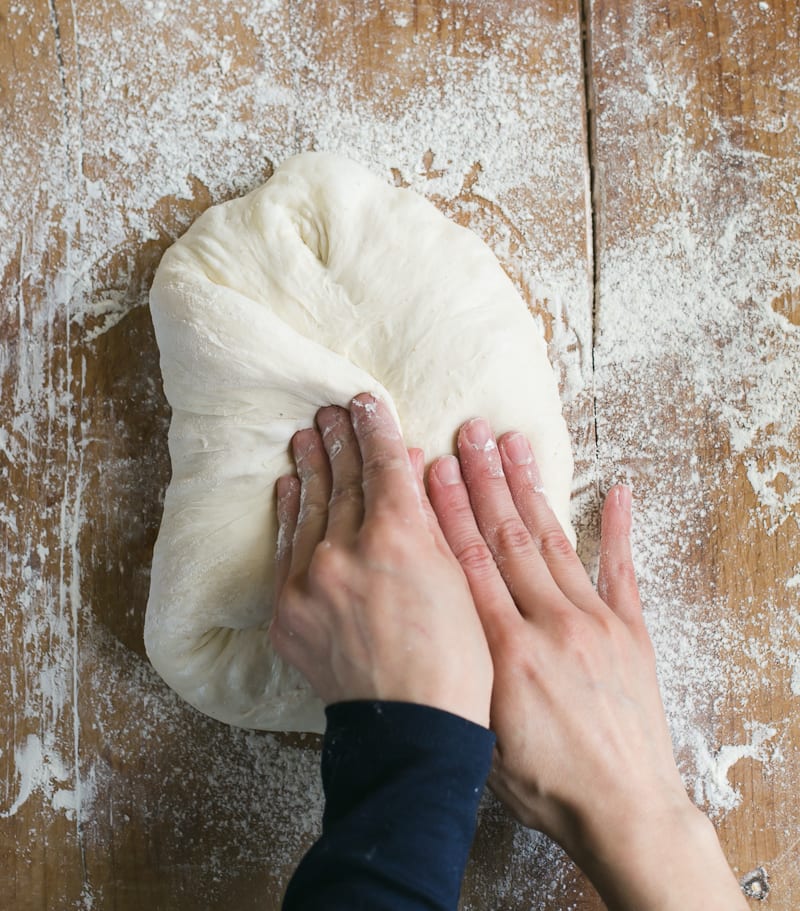
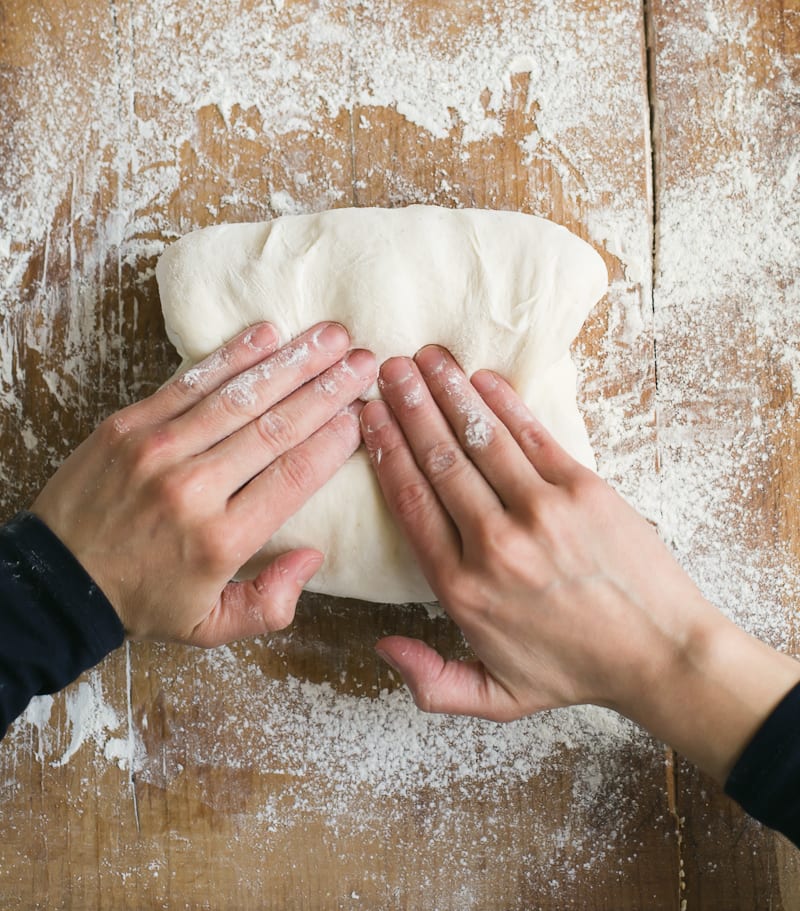
- Begin to shape the dough
Starting on the left (or right) side, stretch the dough outward and fold it over toward the center.
- Shape the dough (con’t)
Repeat on the opposite side.
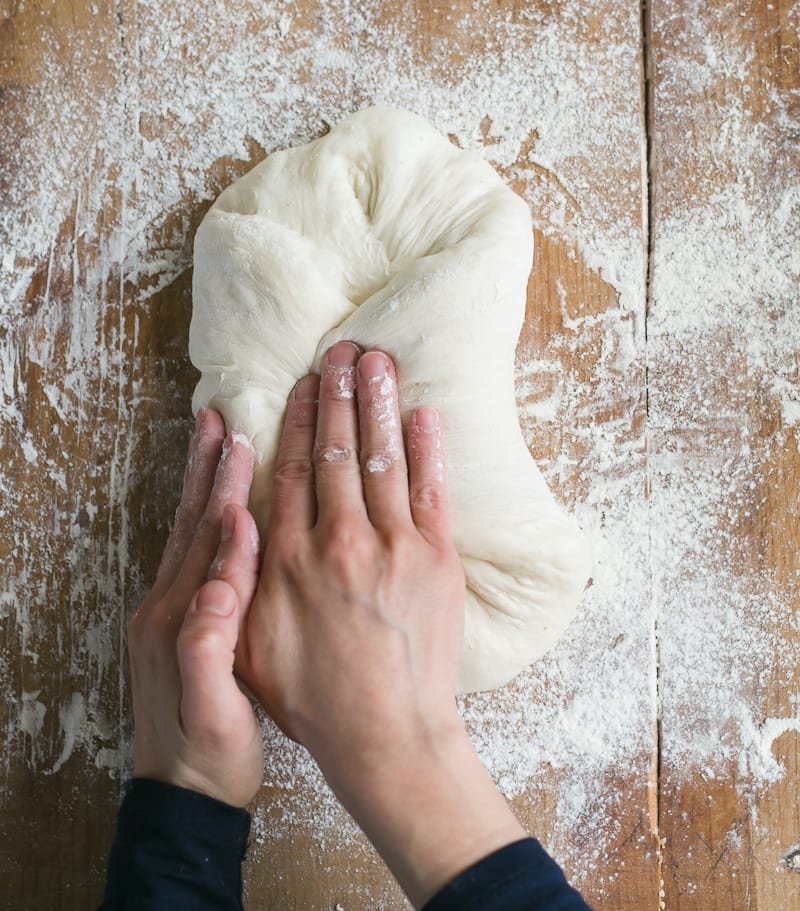
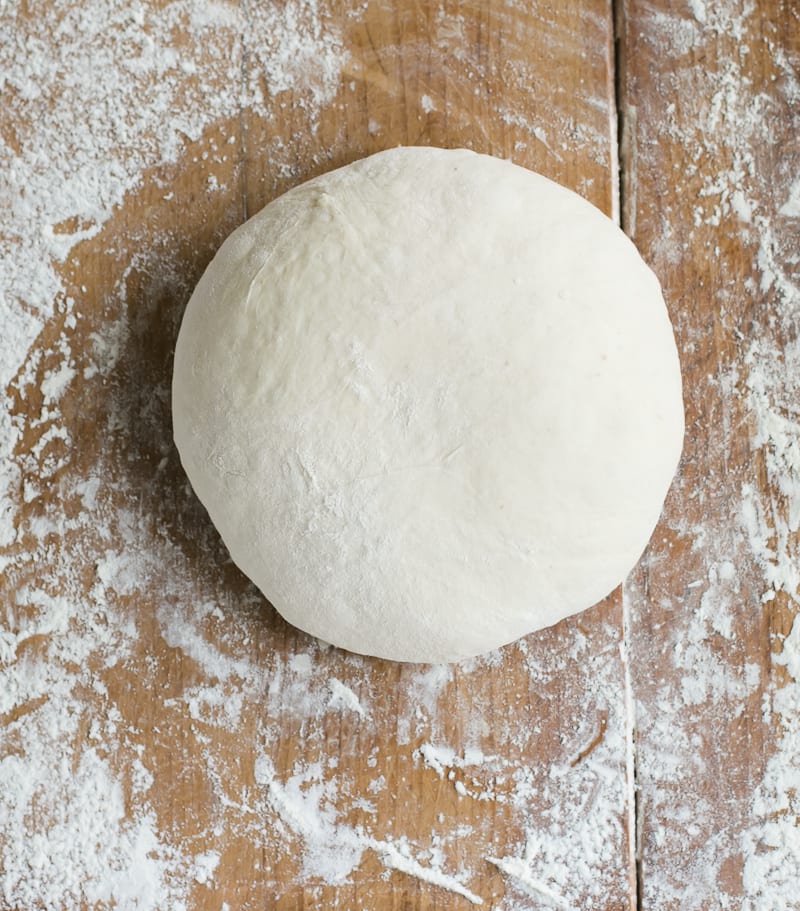
- Shape the dough (con’t)
Stretch and fold the dough from the bottom to the center.
- Shape the dough (con’t)
Repeat at the top.
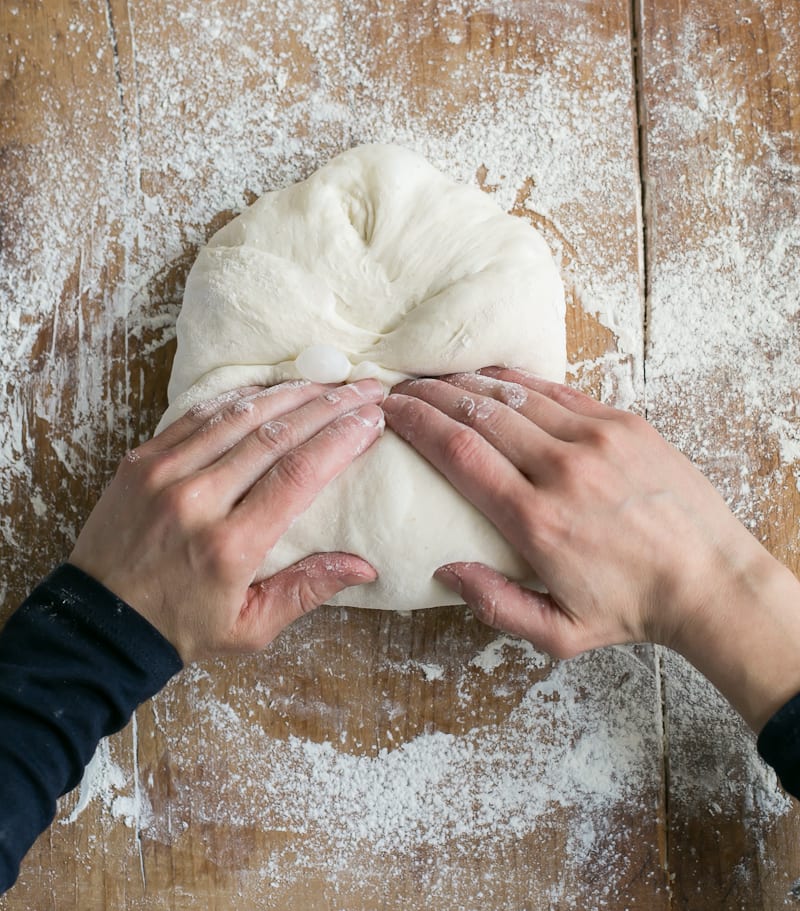
- Let the dough rest
Using a bench knife, flip the dough over and let it rest for 5 to 10 minutes to relax the gluten.
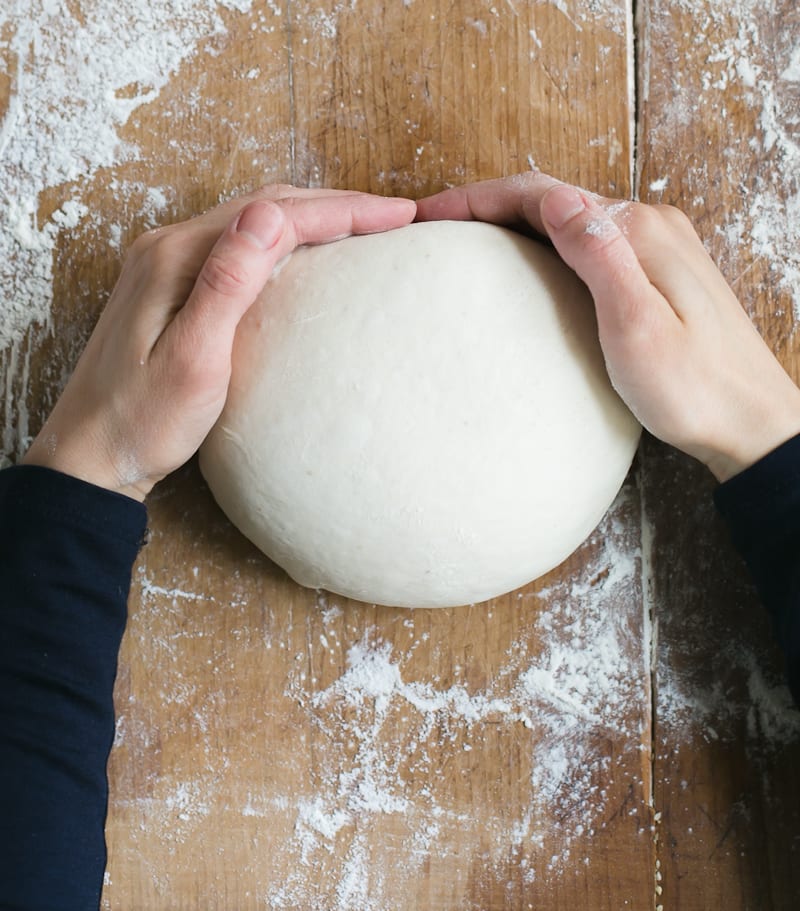
- Tighten the shape
With floured hands, gently cup the dough and move it around in a circular motion to tighten the shape.
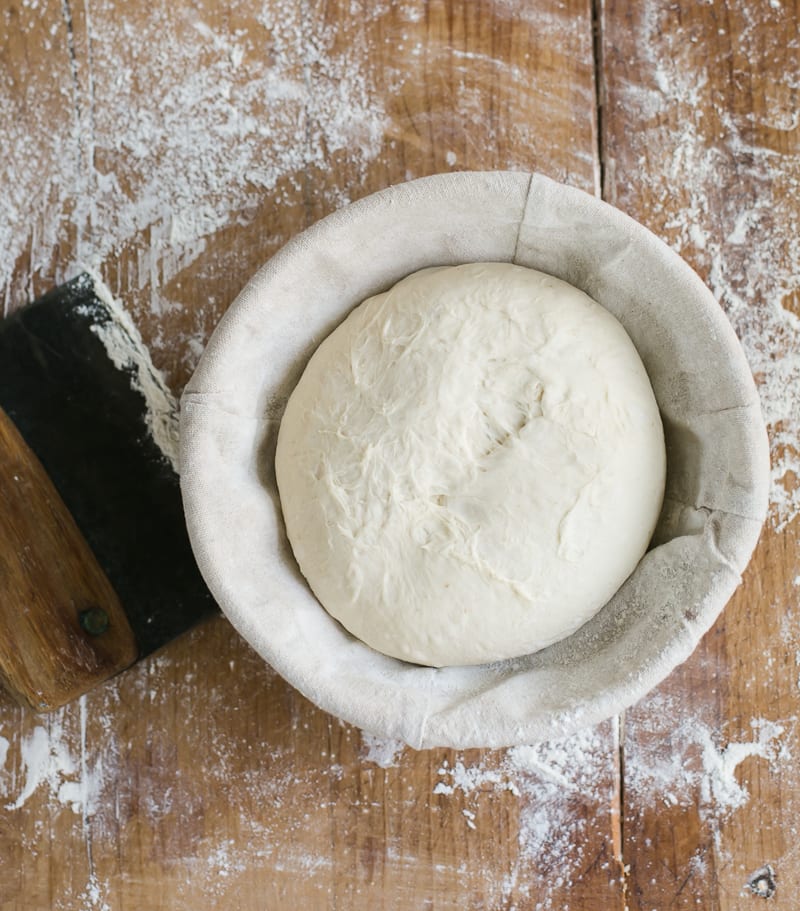
- Prepare the second rise
Place the dough into a lightly floured lined bowl or proofing basket, seam side up.

A few Dough shaping tips
- Do not over flour your work surface. The dough will just slide around and drive you crazy. I use a flour shaker to lightly dust the area. If you are not gaining enough surface tension (which is essential when shaping the dough), wipe your work area with water, dry it and start again.
- Use a bench knife. This tool is extremely useful when handing wet and sticky doughs. Use it to scoop up and move the dough around as needed. Many of you have asked about the wooden bench knife in Artisan Sourdough (pictured above); it’s a vintage find I purchased on Etsy ages ago! Check out this inexpensive bread knife instead.
- Be gentle, yet firm with your shaping technique. If you are too lax, the dough will look lopsided or lack oven spring when baked. If you’re too aggressive, you’ll deflate all of those beautiful air bubbles. Your technique will only improve with practice and repetition.
- Make smaller loaves. When making a standard size sourdough boule, you only have one opportunity to shape. That’s it. Why not divide the dough in half and shape two smaller loaves all in one session? This way, you’ll have another opportunity to practice (and more bread to eat, freeze or share).
- Do not compare. Ok, so this is the hardest tip to follow. Your dough may or may not look like mine in the video or to someone else’s on Instagram. All doughs are different. They will have different hydration levels (flour to water ratio), different flour types, different temperatures and so on, which effect the overall look and feel of the dough. For now, focus on your own dough until you get a handle on shaping.

Comments
Kathy M. says
I am 66 years old and an experienced baker and cook, but have never baked bread other than quick breads. After retiring, one of my goals was to learn how to make sourdough bread. I’ve heard of so many disasters that I really shied away from it. After browsing through the Internet, I thought I would follow your recipe and walla…success on my first attempt. Thank you for your full proof recipe and your wonderful step-by-step instructions, including videos.
Anna says
What about baking it in the oven? How many degrees and for how long?
Emilie Raffa says
Hi there! It depends on the specific bread recipe you’re following. They are all different. To get an idea, check out my beginner sourdough bread recipe post (linked here).
Peter Ferre says
I’m interested in making sourdough communion bread call prosphora. Do you have a recipe to make a 6- 9 inch round. The bread needs to be stamped with a seal so the Priest can cut out certain elements for communion. The left over parts are cut into antidoron to be distributed after church for those how did not receive communion.
Kimberly Kitchen says
Good morning Emilie! First I would like to thank you for taking the time to post a recipe using all purpose flour! Second I would like to know why this recipe didn’t call for preheating the Dutch oven. Is it because of the smaller size of the loaf?
CJ says
I am trying your sourdough and getting ready to divide & shape it in a banneton. My question is, can I refrigerate the other half & bake it in couple days?
Emilie Raffa says
Hi CJ! Yes: you can do this. I typically chill the divided dough for up to 12 hours with 50 g of sourdough starter. It works well. The dough isn’t over proofed in the morning. In your case, the length of time you can chill the divided dough will vary based on the recipe you’re following, and the strength of your sourdough starter. Just something to keep in mind!
Suzy says
I have just started my sourdough after a long break and appreciate your step by step simple instructions. Can’t wait to give it another go. So far the starter is looking great. Thanks again Suzanah
Emilie Raffa says
You’re very welcome, Suzy! Enjoy :)
Iris says
I would like to make the raspberry tea twist to take to friends for lunch I make and rise then put in fridge overnight ?
Denise says
If you want to make two loaves and only have one dutch oven .. Where do you put the second portion after you have divided and shaped two for baking? Thank you for your help.
Emilie Raffa says
Hi Denise! You can put the second dough (in a cloth lined proofing basket/bowl) in the fridge. Remove it when the first dough comes out of the oven.
Denise says
Thank you so much for your reply . I actually left it out on the counter proofing as I did the first one . Baked the first one then baked the second . It seemed to work . Next time I till try the refrigerator instead . Thank you !!
Emilie Raffa says
Yes! You can absolutely do that too. The fridge just buys you more time since the temperature is cold- it slows down the second rise. Glad it worked out, Denise :)
Veronica says
Really helpful and great videos to show what is described. Great resource!
Liesl Coates says
PS.- the spot to leave the Star Rating disappeared so I wasn’t able to rate it all stars:(
Liesl Coates says
Hello Emilie,
I made the high hydration loaf for a dinner party and left some comments about doing so on your site with Irish Soda bread (still haven’t made but can’t wait) and I’m leaving a comment here because shaping is what my most recent challenge is in my progress. I love your video and instructions, and they are very helpful for the lower hydration doughs, but for this particular loaf I struggled with the high hydration dough. Previously I haven’t had too many problems, but I switched flour brands (you warned of this) and the dough was much wetter, and thus so much stickier. You should have seen me- I looked like I was wrestling it! Fortunately the bread came out “good enough,” and dinner was a success (double cut pork chops over pumpkin and sage bread pudding) but I have a new question. What do you think about lightly oiling the bench scraper? Also, another site said that with hight hydration dough it becomes less sticky as you do the stretch and folds, only she was taking the entire dough out each time? Do you think this is worth it? Or just carry on with practice- and maybe add a touch more flour to the initial dough? Thank you for your wonderful insight and patience with me!
Emilie Raffa says
Hello! Yes: high hydrations doughs are definitely more challenging to handle when compared to dryer, low hydration doughs (especially when you switch flours). But, this is how we learn and experience the beauty of sourdough in real time, so it’s all good. Practice and persistence.
As for handling sticky doughs: you can absolutely oil the bench scraper. Spray oil (I get mine from Trader Joe’s) will be the easiest. Alternatively, dip the bench scraper in water for a similar effect.
Stretch and folds will make the dough less sticky and easier to manage as you go. But this is not to be confused with a dough that actually needs more flour to maintain its shape; does that make sense? As you stretch and fold, high hydration dough becomes more cohesive and elastic, usually after 4 sets. Most bakers do their sets directly in the bowl. Others will take the dough out of the bowl and do it on the counter. One technique is neither right or wrong. Just different (or confusing, lol).
With the bowl method, it helps to wet your hands first when doing the stretching. With the counter top method, in addition to wetting your hands, you can lightly wet the surface of the counter to prevent sticking.
In your case, stick with the bowl method and master it. Get to know the dough. See what it looks and feels like at different stages. Do it 100 times before trying a new technique. And yes, add a touch more flour to the initial dough if it seems incredibly difficult to work with.
Hope I’ve answered your questions, Liesl! xx
Liesl Coates says
Thank you so very much Emilie- yes, it did make sense and was very helpful! And as a PS.: I realized that not only did I switch brands of flour (Gold medal to Bob’s Red Mill) but I realized that I went from Bob’s Red Bread flour to new Bob’s all purpose. I switched brands on the all purpose and forgot and used that with the recipe- oops! No wonder it was different! Haha. Have a great day:)
Karen M Smith says
Hi, I have your book and I love it. My starter seems to me to be very good and my bread has been coming out nice, a little dense at times but overall very pleased. Thank you for your book and website, both have been very helpful. I do have one question…
If for some reason my baking schedule is interrupted, can the dough be put into the fridge for a cold ferment for a long period of time? If yes, when in the baking process is a good time to do this and what steps are needed to get the dough back into the baking process?
Maggie Anderson says
My son just gave me your artisan sourdough made simple book for my birthday today. I want to make the cinnamon raisin swirl, but I’d like to make it in my Dutch oven which is round. Can you tell me how to shape it so that it won’t be a log after I have rolled the cinnamon and sugar up in it?
Emilie Raffa says
Hi there! In order to create a swirl, the dough actually needs to be shaped into a log. The round shape doesn’t hold it as well. However, I’ve seen some bakers shape the dough into a round, per the instructions here (with a swirl) with pretty good results! So, it’s up to you if you want to try it! Alternatively, you can bake the dough in a loaf pan instead. For this option you’ll need to roll the dough into a 6 x 20- inch rectangle in order for it to fit in a standard 9 x 5-inch loaf pan.
Jennifer says
Thanks so much for this video. It really does help to ‘see’ this in action. I’ve watched it a few times already! Will you be making more videos with other techniques?
Patricia says
Hello Emilie,
Great post & video lesson; thanks very much for images…helps so much! I look forward to trying this folding technique again; previous times, dough didn’t stretch smoothly like in your images…mine had more resistance.
1) I’m trying to get dough to be pillowy and so lovely like yours in the blog videos! How is it that the dough does not stick to fingers when folding in your videos? Is final dough supposed to be tacky or is it dryer than that? I’m thinking if I add little more flour to make dough less wet/sticky, then will the bread result too dry and/or heavy?
2) Book Cover Photo: Which bread recipe it the bread on your book cover?
Thank You!
Adri says
What a terrific lesson. Brava! (And yes, it has been a long time. I hope all is well with you and yours.
Erica says
If you make two smaller loaves, does that affect baking time?