
Yes! Yes! Yes!
You can totally do this!
Even if you’re not a professional bread baker, you can still make incredible brioche at home.
Traditional brioche is a soft enriched bread, made with eggs, butter, and a touch of sugar. My version is not quite as rich, making it suitable for everyday fare. Everyone goes crazy for brioche in our house.
My secret?
Use a stand mixer for easy, hands-off kneading. Personally, I wouldn’t make these rolls without one (total prep time, 10 minutes!).
This step-by-step tutorial will show you exactly how to do it. It’s geared towards both beginners and seasoned bakers alike.
And because time is of the essence, I’ve also included 2 simple ways to fit bread baking into your busy, everyday schedule.
Ready?
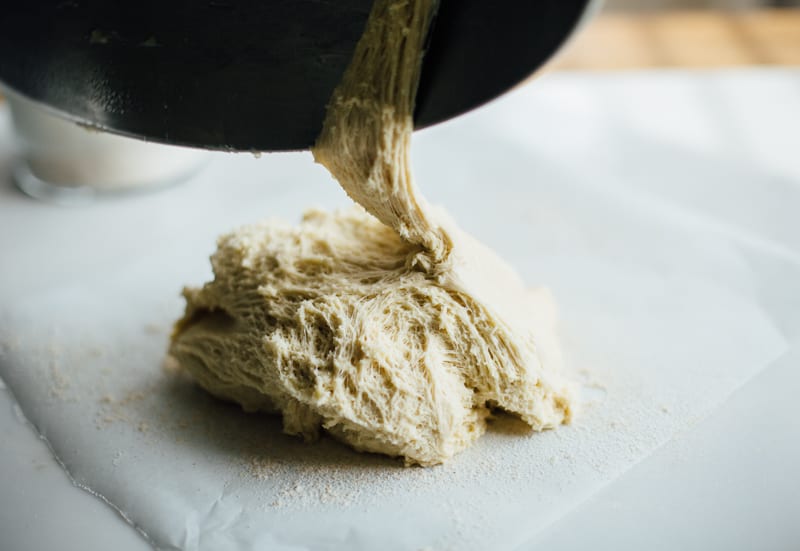
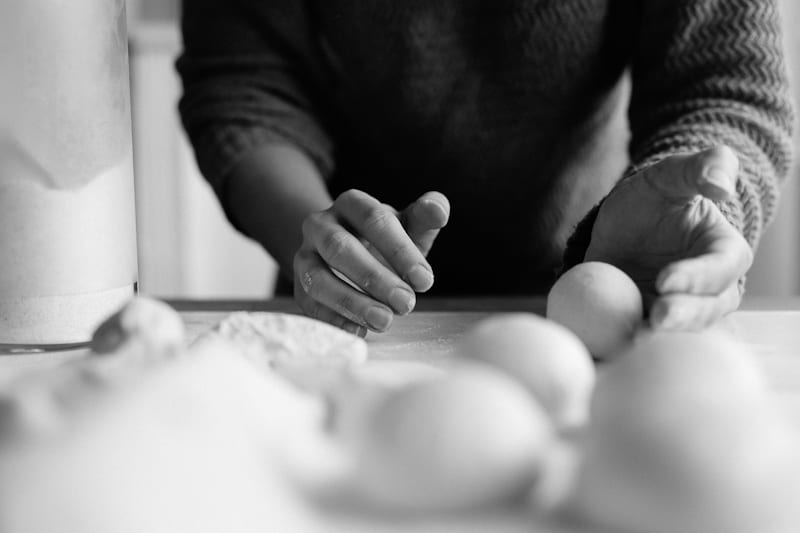
The Dough
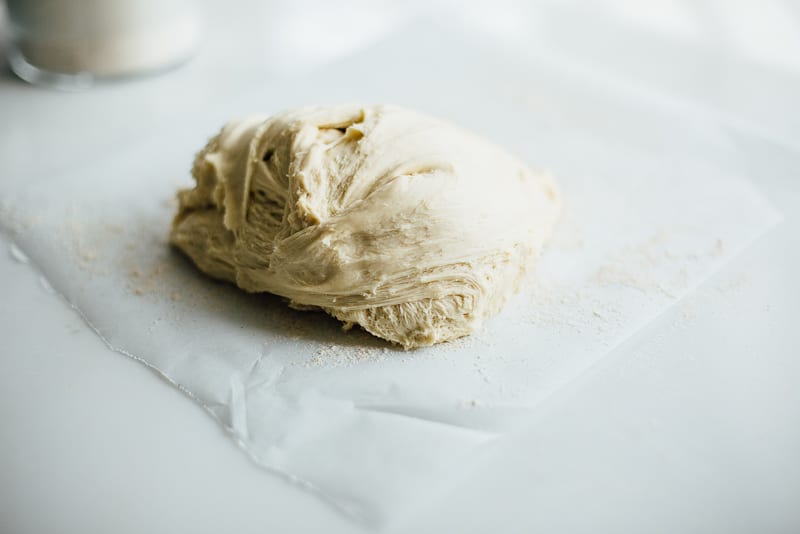
Tip your fully risen dough onto a lightly floured work surface.
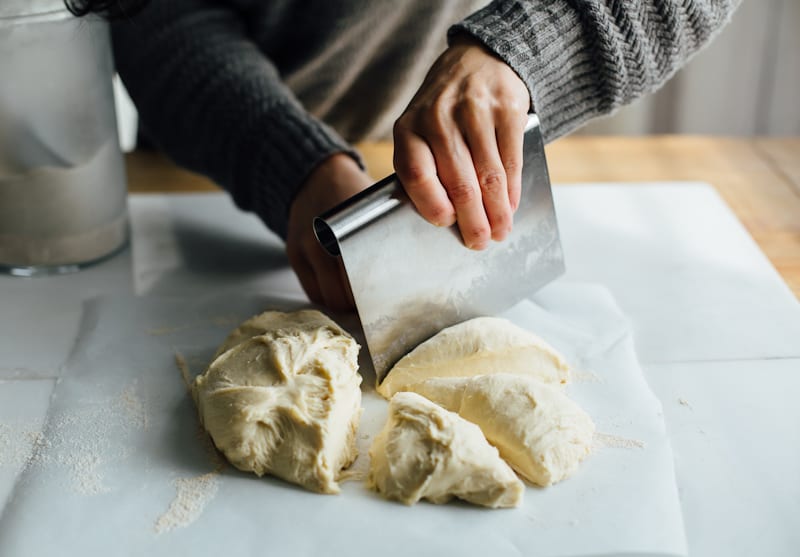
Cut into 10 pieces. I like to use a floured bench scraper for this, but a large knife or even a pizza wheel will do the trick.
Take two pieces of the dough and cut them in half, creating 4 smaller pieces. These smaller pieces will fill the center of your brioche (think: center of a sunflower).
You now have 12 pieces in total.
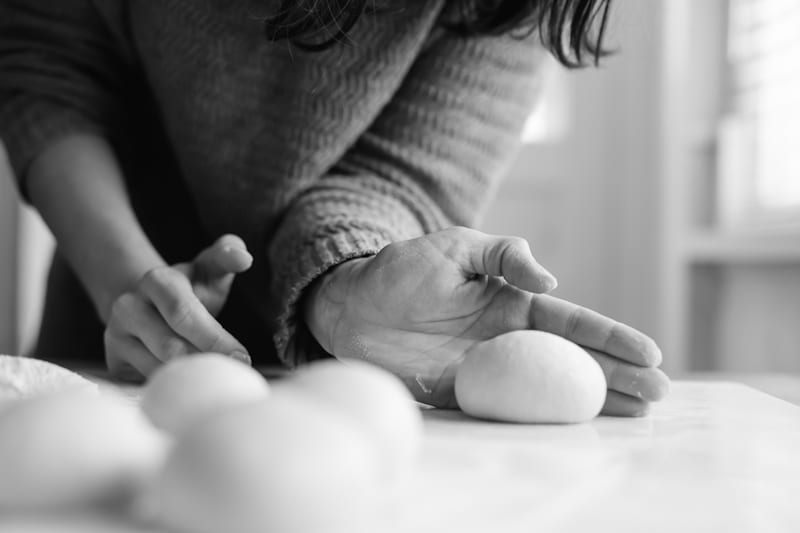
Shaping & Assembly
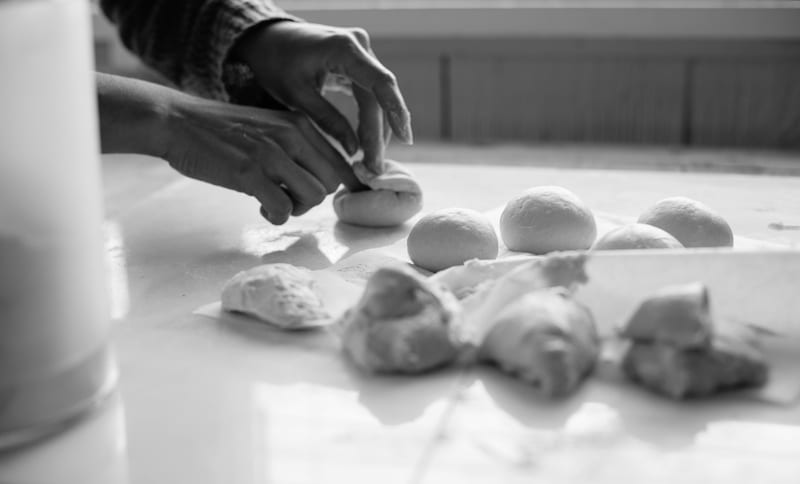
To shape each piece of dough, gather up the sides and tuck them in towards the center.
Flip the dough over (seam side down) and cup with the palm of your hand. Then, roll into a ball. If it’s too sticky to handle, sprinkle extra flour over the top, but not too much.
The trick here, is to create enough surface tension to shape the ball nice and tight. Do this on an un-floured work surface for best results. Too much flour present will make them slide around.
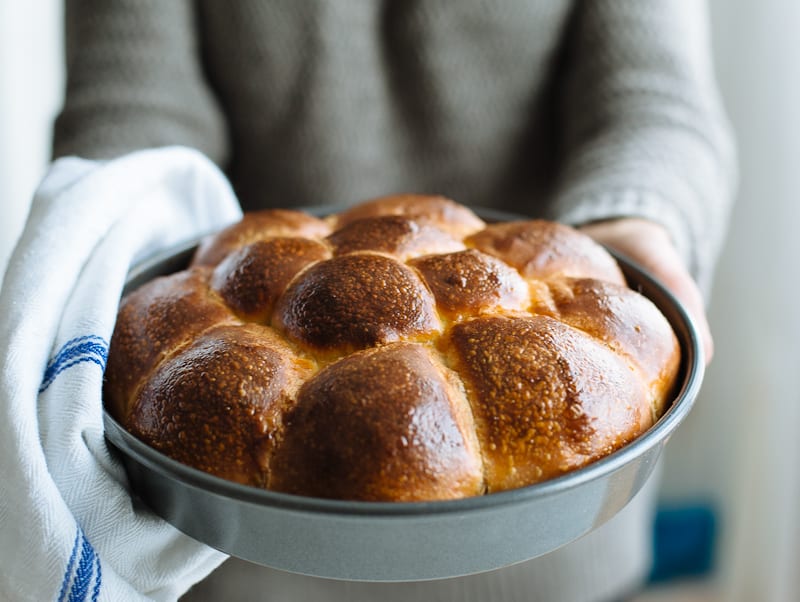
To assemble your brioche, generously coat a 9″ cake pan with butter.
To the pan, place 1 ball of dough at 12 o’clock, 3 o’clock, 6 o’clock and 9 o’clock.
Fill in the gaps with the remaining dough, placing the 4 smaller balls (you made earlier) in the center. Doing it this way will ensure that the dough is evenly spaced.
You don’t want lopsided brioche.
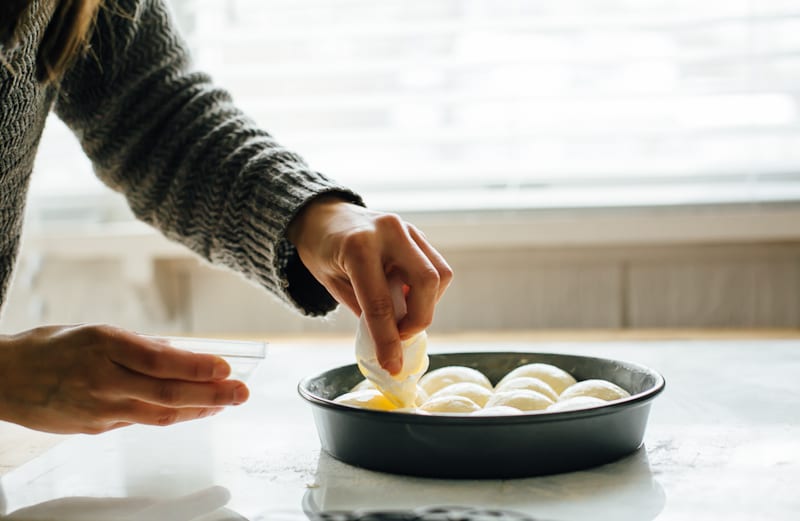
Egg Wash & Short Rest
For the egg wash, lightly beat 1 egg with a splash of water or cream. Brush the dough with your mixture.
If you don’t have a pastry brush, use a folded napkin or paper towel instead. I do this all the time.
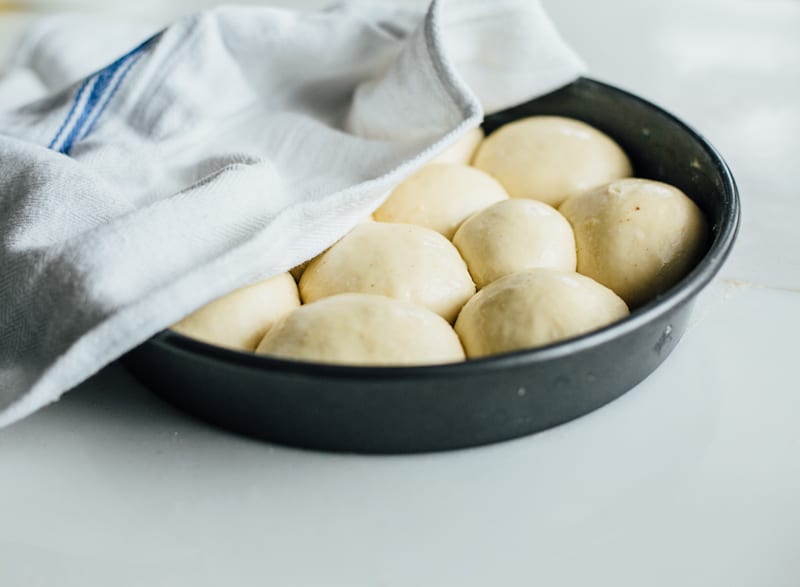
Next, cover the pan with a clean kitchen towel. Let it rest for about 30 minutes.
Your dough should looked slightly puffed, relaxed, and no longer dense.
Baking
Bake your brioche at 400 F for 20-25 minutes, until golden brown.
Your kitchen will smell sweet and buttery, like a French Patisserie!
Cool for 10 minutes in the pan and then transfer to a wire rack.
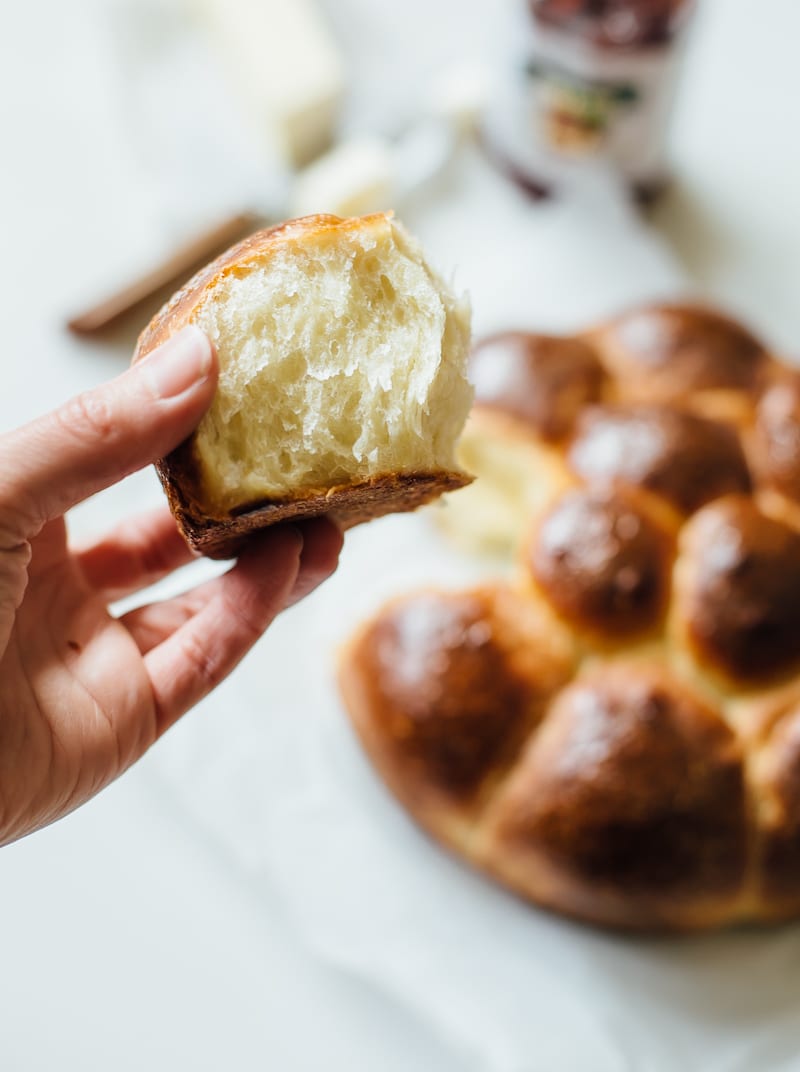
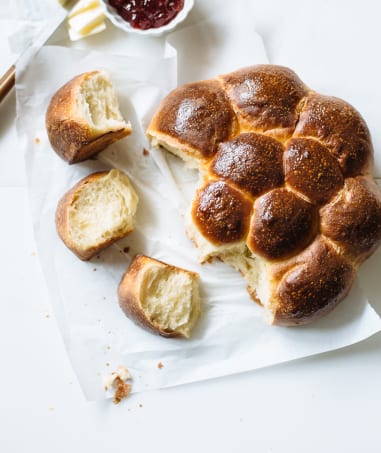
Enjoy your warm, homemade brioche ‘share & tear’ style with butter, jam, or creamed honey. Eat plain with soup or salad, make mini sandwiches, etc.
Good luck eating just one.
Baking Schedules
Now that you understand how to make brioche share n’ tear rolls, let’s find the time to actually do it.
Here are two options to fit bread baking into your busy, everyday schedule.
Option #1: Overnight Rolls
Let’s say you want warm, fresh rolls for Saturday morning breakfast.
Here’s what you do:
On Friday evening, when you get home from work, mix up a batch of dough (alternatively, make the dough in morning before you leave the house).
The dough will be ready in 1-3 hours depending how warm your kitchen is. To speed up the rising process, either place your dough in the oven (proof setting), or near a heater.
When the dough is ready, shape into balls, place in your greased pan, and chill (covered) overnight in the fridge.
The following morning, brush with egg wash and bake cold.
Option #2: Overnight Bulk Dough
Let’s say you have every intention of baking on particular day, but life hijacks your plans and you’re suddenly out of time.
Here’s what you do:
Mix up the dough as directed.
Instead of the dough rising at room temperature for 1-3 hours, chill the bulk dough overnight. It will continue to rise even in a cold environment. It just happens at a slower rate. I allow the dough to rise directly in my stand mixer bowl (covered). For best results, leave the dough at room temperature for 2-4 hours, then pop it in the fridge.
The following day, cut and shape the cold dough into balls (if it hasn’t doubled in size yet, let it rest at room temperature until ready). Brush with egg wash. Allow to rest again 30 minutes-1 hour, or more. The dough should looked puffy, not dense before baking.
Note:
The secret to baking great bread at home is embracing flexibility.
On some days your dough will rise faster than others, whereas on other days, it will take forever to rise no matter what you do. Sometimes your dough will require extra flour to prevent stickiness, whereas on other days, you barely need any at all.
It’s just the way it is.
Go with the flow and you will excel.
So, what do you think?
Are you ready to make brioche rolls?!
By signing up, you agree to receive emails from The Clever Carrot. Unsubscribe at any time.
how to make brioche rolls
- Cook Time: 20 mins
- Total Time: 20 mins
- Yield: 12 rolls 1x
Ingredients
- 1 1/4 c. warm milk
- 2 teaspoons active dry yeast
- 2½ tablespoons sugar
- 3 large eggs, divided
- 3 1/3 cups bread flour
- 1½ teaspoons salt
- 2½ tablespoons unsalted butter, cut into cubes, plus more for coating the pan
Note: This is a sticky dough. After the initial mixing process it will not come together into a ball; the dough will be smooth, elastic, but still ‘wet.’ Once fully risen, it will be easier to handle.
Instructions
- Preparing the dough:
- In a large glass measuring cup, add the milk, yeast, and sugar. Whisk well. Let stand until foamy, about 5 minutes. Then, add 2 of the eggs and whisk to combine.
- In the bowl of a stand mixer, add the flour, salt and butter. Using the paddle attachment, mix until the butter blends into the flour. You don’t want large chunks.
- On low speed, add the milk & yeast mixture to the bowl. Once combined, increase the speed (I use #2 or #3 on my Kitchen Aid) until a dough forms, about 5-8 minutes. It will not come together into a ball; the dough will be smooth, elastic, but still wet or sticky resembling thick ‘batter.’ Once fully risen, it will be easier to handle. Scrape down the sides with a rubber spatula.
- Cover the bowl with a damp kitchen towel and allow to rise in a warm spot until it has doubled in size, 1- 3 hours* (see note below). Alternatively, refer to the baking schedules outlined in the post above.
- Cutting, Shaping & Assembly:
- Preheat your oven to 400 F. Generously coat a 9″ cake pan with butter. Set aside.
- Tip your fully risen dough onto a lightly floured work surface. It should feel slightly wet and sticky.
- Using a floured bench scraper (large knife or pizza wheel) cut the dough into 10 pieces.
- Take two pieces of the dough and cut them in half, creating 4 smaller pieces. These smaller pieces will fill the center of your brioche (think: center of a sunflower). You now have 12 pieces in total.
- To shape into balls, gently flatten each piece of dough. Pull up the sides tucking them in towards the center. Flip the ball over (seam side down) and move to an un-floured part of your work surface (it’s easier to roll this way). Place your palm over the top and gently roll into a smooth ball. If your dough is too sticky, sprinkle with a little bit of flour for easier handling.
- To assemble the brioche, to the coated pan, place 1 ball of dough at 12 o’clock, 3 o’clock, 6 o’clock and 9 o’clock. Fill in the gaps with the remaining dough, placing the 4 smaller balls (you made earlier) in the center. Doing it this way will ensure that the dough is evenly spaced.
- With the remaining egg, beat together with a splash of water. This is your egg wash.
- Brush the dough with your mixture. If you don’t have a pastry brush, use a folded napkin or paper towel instead.
- Loosely cover the pan with a kitchen towel. Rest for about 30 minutes. Your dough should look slightly puffed, relaxed, and no longer dense. Adjust the time here, if necessary.
- To Finish:
- Bake 400 F. for 20-25 minutes or until golden brown.
- Cool in the pan for 10 minutes, then transfer to a wire rack to finish cooling.
- Enjoy warm or at room temperature.
Notes
*Giving your dough enough time to rise is crucial in bread baking. Rise times will vary, so be patient. Remember to watch your dough and not the clock! To speed up the process, either place your dough in the oven (proof setting), or near a heater.

Comments
Debi says
These rolls are moist, rise well and are delicious.
Ali says
Is there a search key on website thanks
Phil says
Your recipe looks wonderful. Would it make with brioche to substitute some fresh milled whole grain flour for some of the bread flour. Appreciate any suggestions on what grain and how much. I have several grain berries available… various hard red versions, spelt, emmer, einkorn, kamut, durum, soft white
Also, I wanted to let you know that your Sourdough Carrot Cake is wonderful. I modified it to use 100% fresh mille flour (various grains usual soft white and spelt mix), increased spice quantities, and in a fancy 10 cup Bundt pan format. It is just amazing!
Anonymous says
LISA E TAN says
I don’t have a stand mixer. Are there any adjustments to the recipe or the instructions, other than mixing by hand, that you would recommend to me if I tried to make it without the stand mixer?
Ela says
Hi, I tried making it today but the dough is liquid… Maybe I put too much milk? 1 1/4 c. warm milk is cups or tablespoon? Thanks XOXO
Oliver says
What internal temp do you look for with your rolls to know they are fully cooked?
Oh, and love your sourdough book. It’s been a lot of fun to work with.
Anhdao Matticola says
I have made your buns and brioche rolls about 3x in the last week. I LOVE THEM! The only question I have is, is there anyway I can have a softer crust on top? Like angel fluff soft? I don’t want to take them out too early because I don’t want to undercook but when I follow directions, the tops are usually too hard for my liking. Ps. I use convection baking and monitor temp with a therm, always 25deg less. Any recommendations?
Emilie Raffa says
Hi there! Could be a temperature issue. You could try lowering the oven temp and/or when they come out of the oven drape a kitchen towel over the buns; it will slightly steam the tops. Other option is to brush melted butter over the buns while still warm.
Jenny says
Hands down the best burger buns so far! Followed the recipe to tee except that I used AP flour (did not have bread flour), thanks a lot Emilie. This ones a keeper :-) any chances of coming up with a good bread loaf recipe? Am still looking for that perfect loaf!
Emilie Raffa says
Hi Jenny! I have tons of bread recipes here on the blog and in my book Artisan Sourdough Made Simple. Check it out!
Anna says
Have you tried using this dough or your sourdough brioche dough for doughnuts? I want to try it for Hannukah.
Emilie Raffa says
Hi Anna! Great question. This yeasted dough would make excellent doughnuts. I haven’t used my sourdough brioche for doughnuts; I would try my sourdough sweet dough recipe instead (it’s the dough I use for the Raspberry Gingersnap Twist in the book). Please let me know if you experiment- I’d love to hear about it :)
kris says
Help…I want to make this but want to use sourdough starter instead of yeast. Any ideas if it is possible? I have a great starter that is active that I used for bread from your recipe.
Emilie Raffa says
Hi Kris! I haven’t tested it yet, but off the top of my head, I would swap out the yeast for 50 g of bubbly, active starter Without having to make any other changes to the original recipe. Now, you will have to adjust the rise tines (it’s going to take longer than what’s listed), but if you’re a sourdough baker then you’re most likely used to adjusting your method here and there. Hope this helps!
Katie says
I baked these today and hey turned out wonderfully! The only question I had was that they turned out to be massive should I not allow hen to rise as long? What is your suggestion?
Kathy Greenawalt says
I printed this recipe before you added the word “warm”. I made this today and of course I did not warm the milk. Thought unusual not to warm the milk but you did not have it on your original recipe.
Heather says
Yum! Will definitely be trying this. Thanks!
Emilie says
Oh yes! I remember that. So good. I think there’s going to be some gelato stuffed sandwiches in our future… yum!
Rakhee@boxofspice says
You make it sound so easy Emilie and thanks to you I fear bread making no more! I love you for that!! I felt like supergirl when I first tried your brioche buns and these look just as good!!! I’m definitely making these this weekend… Pinned girl! <3
Adri says
Lovely, as always, and ever so tempting. This is one time when saying a woman’s rolls are great is OK! Your brioche looks beautiful, with a shine, deep caramel exterior and a perfect texture inside. I love brioche, and I often make an Italian version – filled with nuts and spices. The thing that is so good about breads like these, ones that reign supreme at breakfast, is that as you note, one can do them overnight and enjoy them with no hassle the morning of. For so long that aspect of the bread making equation was ignored by food writers. I am pleased to see it addressed here. Bravissma!
Jessie Snyder | Faring Well says
These in the making photos are gorgeous Emilie! You truly are the brioche roll master ;). Hope you had a sweet weekend! I have a handful of “The Clever Carrot Cookbook” recipes to make this week thanks to you (YAY!) xoxoxoxo.
Traci | Vanilla And Bean says
Beautiful work, Emilie and I can smell the scent of these rolls wafting through the house! You’ve reminded me that it’s been far too long since I’ve made brioche. It is divine. You always inspire me. Thank you for this my dear! xo
Emilie says
Thank you, Traci! Isn’t brioche something special? What’s nice about this particular version is that it’s not egg & butter heavy (not necessarily a bad thing, but you know) so it’s great for everyday stuff. I even went out and bought more loaf pans to bake the masses! xoxo
Lisa | Chocolate Meets Strawberry says
Wow, it’s true that these aren’t hard to make at all! I love brioche, and so does my French mister (naturally!), so I know we would absolutely devour these!!
Emilie says
Hello Lisa! Thank you! I hope you try (and eat!) the recipe :)
Bill says
Hi – lovely looking rolls. I started making them tonight (overnight fridge bulk rise) but oddly my dough was more like batter at the end of eight minutes of mixing. Adding another whole cup of flour (a fourth) got me to a very sticky dough that’s now in the fridge. Any thoughts about what the issue may be in this case?
Thanks, Bill
Emilie says
Hello Bill!
Sticky dough is 100% normal! What you experienced is correct, even the thick ‘batter’ like appearance. I never thought to describe it this way, but it’s a great observation so I made a notation to my instructions (thank you!). Now to clarify further- this particular dough does not come together in a stiff ball, which is what gives this brioche its light and fluffy characteristics in the first place. Adding an additional 1 cup of flour to compensate is fine, but keep in mind- if the dough is too stiff, it changes the texture. Sticky dough takes a little getting used to ;) Hope this info helps!
PS- once the dough is fully risen, especially when cold, sticky dough is much easier to handle.
Elaine @ foodbod says
Beautiful brioche and great tips :) and congratulations on Amazon! xx
Emilie says
Thank you, Elaine! xoxo
Aysegul says
OMG! You did it again girl. I make my own brioche in a loaf pan, but never tried the rolls version. But with this tutorial, it is a piece of cake.
Thank you my friend. I am putting this on my short list of recipes to try.
Cheers!
Emilie says
Hey you! I bet you could even use your own brioche recipe for these rolls. It’s all good! I know they will be beautiful either way! xoxo
Racine says
Hi Emilie!
Thank you for sharing this recipe. I have been dying to try bread baking and I absolutely LOVE a good brioche.
In the initial dough cutting instructions you say to cut it into 8 pieces, then take 2 of the 8 (leaving 6 original pieces) and cut those 2 in half which I thought makes 10. Your instructions say I would have 12 pieces. What step am I missing?
Emilie says
Hi!
Oh my goodness- you are not missing anything! It’s not you, it’s me! I can’t count! Cut the dough into 10 pieces, remove 2 of the 10 (leaving 8 original pieces) and cut those 2 in half to make 12! Does that make sense? Adjusting instructions now. Thanks so much for pointing this out!
Andrea says
My dough mixed up way too wet and sticky to shape into balls, but I baked it as it was and the taste and texture were perfect, so I guess I wouldn’t change anything. We ended up with a 9-inch loaf yesterday, and I feel sheepish about admitting that it is almost gone.
Emilie says
Hi Andrea!
Wonderful! Yes, the dough is definitely wet and sticky. As a solution, maybe a sprinkle of extra flour might help next time when shaping the balls? That seems to do the trick for me, especially when my kitchen is warm (my hands too).
I’m glad your loaf worked out- no shame in eating the whole thing ;) xx
Laura (Tutti Dolci) says
These rolls are just stunning, I love the pull apart style too… all too easy to eat one or two more than I should ;).
Emilie says
Thank you, Laura! Isn’t pull apart fun? And they’re small too, so you CAN eat more. xo
Alice @ Hip Foodie Mom says
Emilie! I love brioche! I’ve only made it at home once and this post is reminding me that I need to make it again. . and this time, try your recipe! beautiful post! AND I got your book yesterday and your card today! you are so sweet!!! and your book is beautiful! (I knew it would be!) it’s going to be my weekend reading this weekend! Cheers! I’m so happy for you!
Emilie says
Eek! Oh my goodness! So exciting, Alice! Thanks for letting me know. I do hope you like the book! xoxo
Sheri Nugent says
Hi Emilie! I would love to make a brioche loaf. For sliced sandwich bread. Have you tried that using this recipe? If so, any tips on baking time or if it would even work? Thanks!
Emilie says
Hi Sheri! Absolutely!
Before you begin, below are two methods for shaping the dough into loaves. Both require a generously buttered loaf pan (9×5).
1.) When your dough is fully risen, cut into thirds. Roll each piece into a ball (follow directions above). Place into your prepared pan one at a time (like a snowman). This is the most traditional method for brioche loafs.
2.) Shape dough into a fat ‘log’ about the same length or a tiny bit shorter than your loaf pan.
Regardless of which method you choose, allow the dough to rest in the pan until it rises about 1 1/2- 2 inches above the top. Time will vary depending on how warm your kitchen/house is, about 1-2 hours or more. Be patient. Do not rush this step. Brush with eggs wash before baking.
Bake at 375 F for 15 minutes. Then, reduce temp to 350 F and bake for another 30-35 minutes or so. If the top browns too quickly, and it might, loosely tent with foil. Do not remove from the oven too soon because of its dark color; it will be under cooked in the center. I’ve done this a million times. Check internal temp with a thermometer- 190 F is good.
Sheri Nugent says
Oh Emilie – Thanks so much for the help! I will try it this weekend. I love your blog, read it every day and cannot wait for you book!!
Cristie says
Perfect timing. I was only just looking for a brioche roll recipe to make sliders. This recipe looks just perfect. I’ll let you know how I go. Xx
Emilie says
Hi Cristie!
Don’t you love when that happens?!
FYI- for sliders, you might want to bake them on a sheet pan (instead of using a cake pan). These rolls are ‘taller’ than typical sliders, if that makes any sense.
You can see how to do this here: https://www.theclevercarrot.com/2013/05/light-brioche-hamburger-buns/
If you have any questions, let me know! And if you take a pic, I would love to see! xoxo
Megan Stern says
Mmm, I do love brioche. I’ll give this recipe a try! One thing I do to help the rising process along is to put a warm rice pack under or wrapped around the base of the bowl holding the dough.
Emilie says
Megan, that is a fantastic idea! Sometimes, I’ll even take the bowl of dough in the shower (not actually in the shower- just left on the counter) and allow the hot steam to do its thing! The things we do for homemade bread, right? ;)
Sabine - Sweet Lemons and Lilikoi says
Oh yum! So perfect for a (rainy – here, yes) weekend. If I make these (well, I will make them) it will be my first time EVER working with yeast. Yes, as a devoted cook & baker, I am so embarrassed to admit this. Always have managed to tiptoe around recipes with yeast ;) Any advice? Thank you for sharing this beautiful recipe. Have a lovely weekend everyone
Emilie says
Hello Sabine! Don’t be embarrassed at all ;)
Here are two important tips to keep in mind when working with yeast & dough. They have helped me tremendously.
1.) Make sure your yeast is fresh. You’ll find an expiration date on the back of the packet. If it’s old, it won’t work. Always start fresh.
2.) The key to successful bread (whether leavened with yeast or sourdough culture), is that you cannot rush the initial rising process. And this is tricky, because recipes can be misleading. For example, some directions might say, ‘leave the dough to rise until it has doubled in size, about 1 hour.’ So, you follow the directions, bake your bread, and it comes out hard as a rock! Why? Because your dough wasn’t actually ready at the 1 hour mark. Regardless of the directions, the dough needed more time for the gluten to develop. Fully risen dough will yield light bread.
So, the key here, is to watch your dough (not the clock). You’ll find in the recipe below, I give a range (1-3 hours) for the initial rise time. The warmer the temperature, the faster the dough will rise. Sometimes, I’ll mark the bowl with a piece of masking tape to visually judge how much the dough has risen. That helps a lot!
Good luck with the recipe! Hope this helps! Have fun, and let me know if you have any other questions! xo
Sabine - Sweet Lemons and Lilikoi says
Thank you so much! This is tremendously helpful. I will def let you know how it went. Gracias :) Sabine
Beverley says
thank you Emilie I am in the same boat as Sabine and have never made my own bread. Now I am excited to give it a go xoxo
Emilie says
Hi Beverly, bread baking can definitely seem foreign or intimidating at first, but once you understand a few details (like yeast) you will be that much closer to nailing it! It’s all about being flexible and getting to know your dough. But you are a fabulous baker- I’m sure you already know this! xo
Gretchen says
We absolutely love brioche and will give this recipe a try. It certainly wouldn’t last long once the boys saw it, bread disappears in a heartbeat around them. Brioche is a brunch favorite here with a piece of chocolate in the middle or dried fruit. Your step by step instructions are fantastic. I make here boys who will want to help make this soon. Overnight is perfect for a special school day breakfast.
Emilie says
Oh, I know. The boys devoured it here too! I like your idea of putting chocolate in the middle of the brioche. I’ll have to try that next. The overnight version is fantastic; it’s so easy to just pop them in the oven! And then you can sit back, relax, and dust off your cape ;)
Celia Becker @ After Orange County says
Those rolls look so good! You are a master bread baker so I have absolutely no doubt they are scrumptious! My mouth is literally watering.
Katrina says
These rolls sound SO wonderful! And I absolutely love all the detail you put into this post. Definitely saving this recipe for a weekend project :)
Emilie says
Thank you, Katrina. I appreciate that very much. I do hope you find this guide helpful! Happy baking! xo
Kelly @ Inspired Edibles says
Quelle beauté! sweet & buttery ~ swoon…perfect for soup season. You sure make it look easy, approachable and most of all, desirable. That is one gorgeous looking brioche. Love the illustrated photos too – very helpful. ps. beautiful hands Emilie.
Emilie says
Merci beaucoup! Kelly, you are always so kind! Thank you! You know I love my bread, and this (lighter) buttery brioche is soft, tender and scrumptious. And it’s funny you mention my hands- apparently, so I’ve been told, they look just like my mom’s. xo
Christine says
Delicious!! Have to try this recipe! Thankyou.
Emilie says
Hello, Christine! Wonderful! Have fun with the recipe :)