
Once you start, you just can’t stop.
And I’m not talking about potato chips.
I’m talking about bread baking!
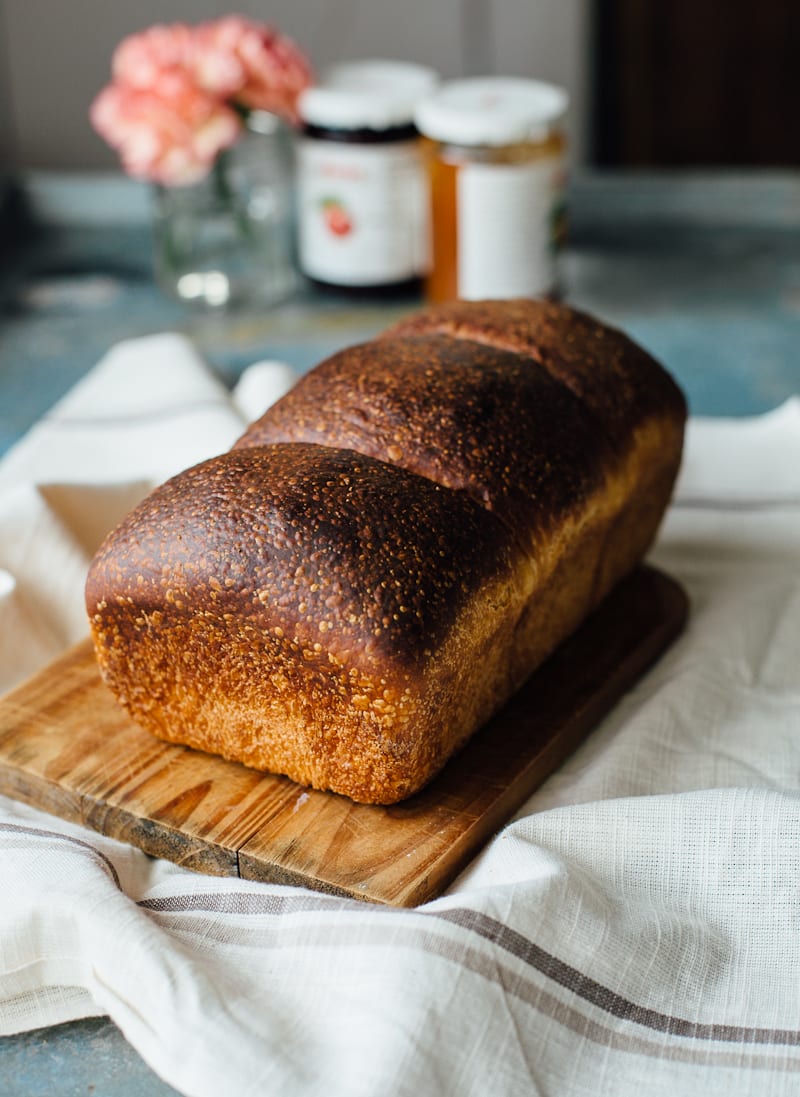
This towering, golden stack is a follow up to my homemade brioche rolls. It’s the same recipe, just shaped into a loaf.
The versatility of brioche bread is endless: you can make beautiful sandwiches, fluffy bread pudding, the ultimate French toast- the flavor is light and buttery.
But first, let’s go over a few things.

Understanding the Dough
The key to mastering this brioche recipe is understanding the dough.
The dough is sticky. It’s wet. It’s not easy to handle. Intuitively, you’ll want to add more flour to make it manageable.
But wait!
These fickle characteristics are what makes brioche, brioche.
Adding too much flour to compensate will make the brioche stiff, and it will lose its signature soft and fluffy texture.
That doesn’t mean you can’t add any flour at all; the quest for the ‘perfect’ loaf is highly personal. However, it’s important to have a basic understanding of the dough in a traditional sense as a benchmark for comparison.
On that note, I’ve found that using a stand mixer is best when dealing with sticky doughs. It does all of the work for you. No mixing or kneading by hand required! Keep in mind, the dough won’t come together into a tight ball like other bread recipes; it will be smooth, elastic, and ‘relaxed.’
Once fully risen, after a few hours or so, you are ready to shape the dough.
How to Shape Brioche Bread
My favorite method is outlined below.
To assemble, cut the fully risen dough into thirds. Shape each piece into a ball and place them next to each other in a well buttered loaf pan (think: building a snowman). If the dough is too sticky when shaping, sprinkle some flour over the top to help you along.
When the dough rises, it will look like this…
Baking Schedules
Once you understand brioche dough and shaping, it’s important to establish a baking schedule.
Timing is key.
You can certainly bake brioche from start to finish in one day, but you might find the overnight method helpful as well.
Here are two options:
Option #1: Overnight Loaf
*This is the method I used in the above pictures.
Let’s say you want fresh bread to make sandwiches for the upcoming week.
Here’s what you do:
For example, on Saturday mix up a batch of dough. Cover, and leave in a warm spot to rise.
The rising time will vary depending on how warm or cold your kitchen is. It could take anywhere between 1-3 hours, or more. To speed up the rising process, either place your dough in the oven (proof setting), or near a heater.
Keep your eye on the dough- not the clock!
Once the dough is fully risen, cut and shape. Place into your buttered loaf pan. Cover with plastic wrap and refrigerate overnight.
The following morning, the dough should have risen to about 1 1/2 inches above the rim of the pan. If not, rest at room temperature until it rises a bit more.
Brush with egg wash and bake.
Option #2: Overnight Bulk Dough
Let’s say you intended to bake on a particular day, but plans changed (i.e. Anthropologie was having a sale!) and you ran out of time.
Here’s what you do:
Mix up the dough as directed, preferably in the morning.
Instead of rising the dough at room temperature for 1-3 hours, chill the bulk dough overnight. It will continue to rise even in a cold environment. It just happens at a slower rate. I do this directly in my stand mixer bowl (covered). For best results, leave the dough at room temperature for 2-4 hours to give it a boost, then pop it in the fridge.
The following day, cut and shape the cold dough (if it hasn’t doubled in size yet, let it rest at room temperature until ready). Place into your buttered loaf pan. Allow the dough to rise about 1 1/2 inches above the rim of the pan, about 30 minutes- 1 hour (or more) depending on the ambient temperature.
Brush with egg wash and bake.
Note #1:
An egg wash (mixture of egg and water) is usually brushed over the dough to create a golden, shiny exterior.
However, for this particular post I skipped the egg wash. I wanted you to see what a ‘matte’ crust lookes like. It’s okay to skip the egg wash if you’re out of eggs, or don’t feeling like wasting your last one on a single loaf.
Either way, your brioche will taste and smell fantastic.
Note #2:
The secret to bread baking is flexibility.
On some days, your dough will rise faster than others. On other days, it will take forever to rise no matter what you do. Sometimes, your dough will require extra flour to prevent stickiness and sometimes it won’t.
It’s just the way it is.
Go with the flow and you will excel.
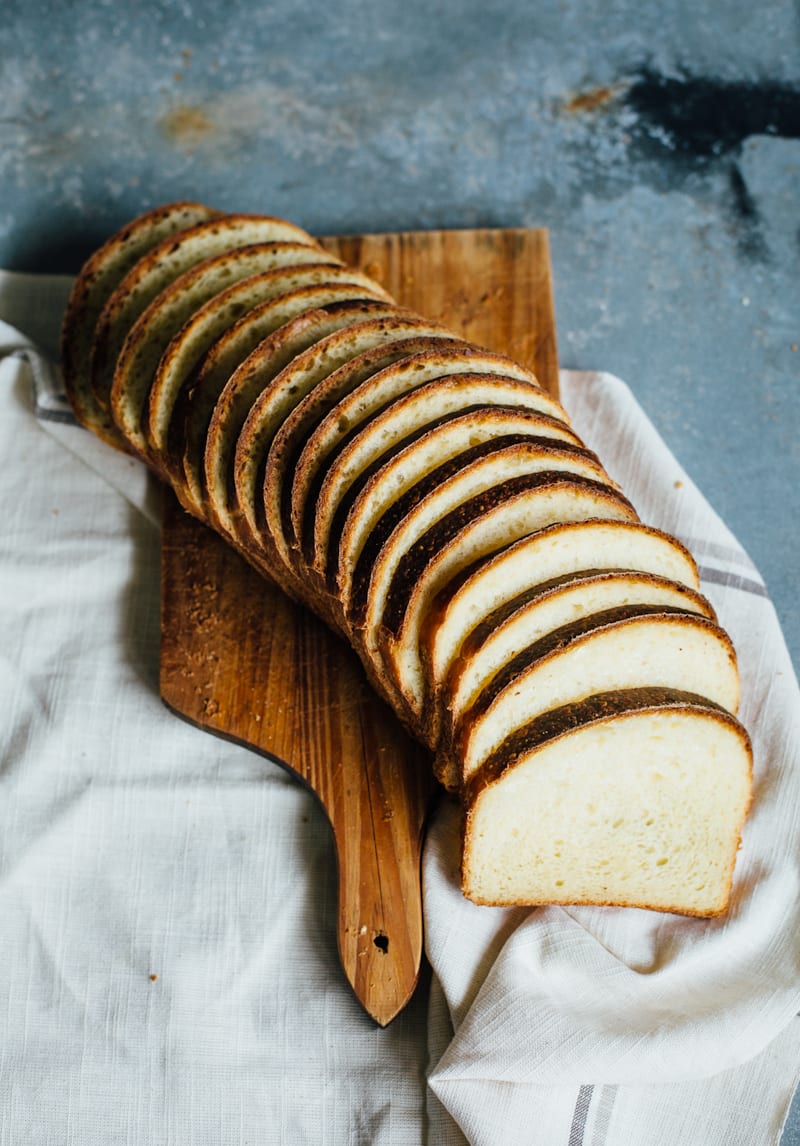
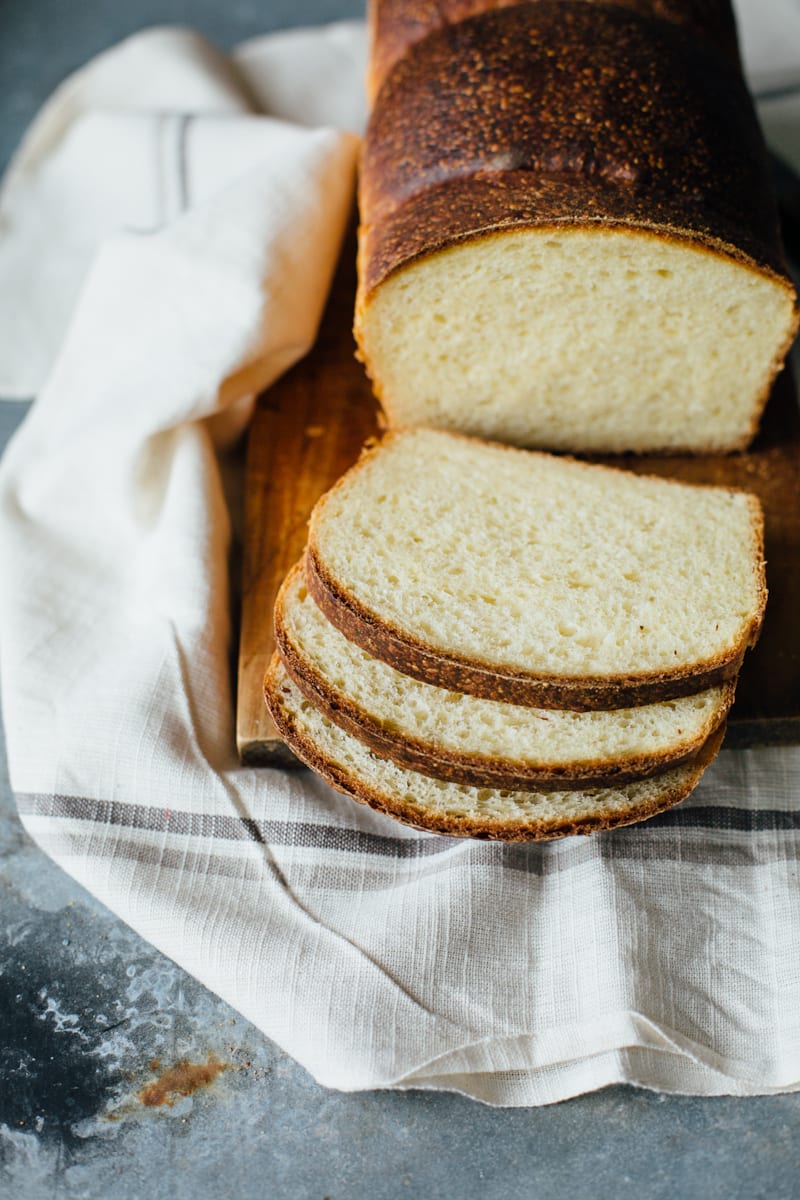
Slicing & Storage
Once your brioche has finished baking, cool completely before slicing.
I prefer to wait at least 1 hour. Maybe 2. This loaf was actually cold when I cut it.
A large serrated bread knife works best, and the desired thickness is up to you. I was able to get about 18 slices from my loaf.
For storage, wrap your cooled bread in plastic wrap and leave out at room temperature. It’s best consumed within the first 1-2 days of baking.
If it even lasts that long…
By signing up, you agree to receive emails from The Clever Carrot. Unsubscribe at any time.

how to make a brioche loaf
- Prep Time: 10 mins
- Total Time: 10 mins
- Yield: 1 loaf 1x
- Category: Bread
- Method: Baking
- Cuisine: French
- Diet: Vegetarian
Ingredients
- 1 1/4 c. warm milk
- 2 teaspoons active dry yeast
- 2½ tablespoons sugar
- 3 large eggs, divided
- 3 1/3 cups bread flour
- 1½ teaspoons salt
- 2½ tablespoons unsalted butter, cut into cubes, plus more for coating the pan
Note:
This is a sticky dough. After the initial mixing process it will not come together into a ball; the dough will be smooth, elastic, but still ‘wet.’ Once fully risen, it will be easier to handle.
Instructions
- In a large glass measuring cup, add the milk, yeast, and sugar. Whisk well and set aside for 5 minutes. Add 2 of the eggs (save the remaining egg for the egg wash) and whisk to combine.
- In the bowl of a stand mixer, add the flour, salt and butter. Using the paddle attachment, mix until the butter blends into the flour. You don’t want large chunks.
- On low speed, add the milk & yeast mixture. Once combined, increase the speed (I use #2 or #3 on my Kitchen Aid) until a dough forms, about 5-8 minutes. The dough will not come together into a ball; it will be smooth, elastic, but still wet or sticky resembling thick ‘batter.’ Once fully risen, it will be easier to handle. Scrape down the sides with a rubber spatula.
- Cover the bowl with a damp kitchen towel and allow to rise at room temperature until it has doubled in size, 1- 3 hours* (see note below). Alternatively, refer to the baking schedules outlined in the post above.
- Preheat your oven to 400 F. Generously coat a 9×5″ loaf pan with butter. Set aside.
- Remove the fully risen dough onto a lightly floured work surface. It should feel slightly wet and sticky.
- Using a floured bench scraper (large knife or pizza wheel) cut the dough into thirds.
- To shape into balls, gently flatten each piece of dough. Pull up the sides tucking them in towards the center. If your dough is too sticky to shape, sprinkle a little bit of flour over the top for easier handling. Flip the ball over (seam side down) and move to an un-floured part of your work surface (it’s easier to roll this way). Cup the dough with your hands and gently roll into a smooth ball.
- To assemble, add one ball at a time to your prepared pan (it’s like building a snowman). Cover loosely with plastic wrap and allow the dough to rise about 1 1 /2 inches above the rim of the pan, about 30 minutes- 1 hour (or more). The amount of time will depend on the ambient temperature.
- If using an egg wash, beat together the remaining egg with a splash of water. Brush the dough with your mixture. If you don’t have a pastry brush, use a folded napkin or paper towel instead.
- Loosely cover the pan with a kitchen towel. Rest for about 30 minutes. Your dough should looked slightly puffed, relaxed, and no longer dense. Adjust the time here, if necessary before baking.
- Bake at 400 F for 10 minutes. Reduce the heat to 375 F and continue baking for 30-35 minutes. If the top is browning too fast, loosely tent with foil. Check the internal temperature with a thermometer, it should read about 195-200 F.
- When finished, cool in the tin for about 10 minutes or so. Transfer to a wire rack to cool completely, about 1-2 hours. Then, cut into slices. A large serrated bread knife is best for this. Store the cooled bead in plastic wrap at room temperature. This brioche is best consumed within 1-2 bays of baking.

Comments
Aline Libasai says
you don’t mention the size or what kind of loaf pan? you used
Emilie Raffa says
Hi there! You can use a 9×5 or 8×4 inch pan.
TJ says
I just got your book this weekend, “Artisan Sourdough Made Simple”, and am LOVING it! I just made my first everyday sourdough loaf and we are in heaven!! I want to make the Kight & Fluffy Brioche Loaf next BUT I have a Emile Henry Loaf pan that measures 5.5” x 13” … it is a bit bigger obviously than the recipe calls for. Can it still be used? Should the recipe be adjusted? If so, what would those measurements be? I appreciate any help you can offer and thank you for this amazing book!
Sandra Rocha says
Great recipe. I baked a brioche bread for the first time using your recipe. It came out perfect. Thank you!
Emilie Raffa says
Glad you liked it Sandra, thank you!
Connie says
In your instructions, you say to separate the eggs, and later you say to add two of the eggs. Do you mean just the egg yolk or both the egg yolk and the egg white? Can you please clarify? Thanks
Lizeth Durvin says
Hello Emilie, I made the brioche and I am dissapointed it’s not fluffy as it should be. It is more like a bread than a brioche. I have looked onto french recipies and they used cake flour equivalent instead. Do you think this recipe can work with cake flour to have the traditional brioche vendeene?
thanks for your amaizing book.
Liz
Ian says
I don’t see any quantities in the recipe. Where can I get those?
Emilie Raffa says
Thanks for bringing this to my attention. They’re missing! I will look into this. Stay tuned.
Marsha Abe says
I am confused by the egg quantity. Do you use two in the dough and the third for the egg wash? or all three in the dough?
Emilie Raffa says
There are 3 eggs total. 2 eggs are for the dough, and the remaining egg is for the egg wash. Updated the recipe to clarify :)
Marilyn says
I have made the brioche buns and the brioche loaf many times, They come out perfect EVERY time, Thank you so much!
Nicholas says
I’ve always wanted to try our baking but I never have the courage to do so. No idea why! This looks absolutely gorgeous!
d says
looks amazing! how much sourdough would you recommend using in place of commercial yeast?
Emilie says
Hi there!
I haven’t tested this recipe using my sourdough starter, so unfortunately, I do not have an exact measurement for you. But I plan to give a try!
Amy says
I don’t know if you ever did try the sourdough…I did today with great results! I used 100g starter with the rest of the recipe the same. It took the longer baking time to get the beautiful crust color. If you haven’t tried it, you should!! It’s very delicious. Thank you for a great recipe.
Amy says
I should have said just to be clear…I used sourdough in place of the yeast.
Emilie says
Got it! ;)
Emilie says
Yes! I’ve been experimenting with sourdough in place of yeast too! Glad to hear you had good results. Sometimes the swap doesn’t work out the first time. You are quite welcome for the receipt, and thank YOU for the feed back :)
CB says
Thank you, Clever Carrot! This recipe is incredibly good. While my cooking experience is longer than I care to recall, my baking experience only goes back a few years. I was very interested in preparing a lower fat brioche, but I was initially put off by this recipe when I read about “stickiness” of the dough. So, my first foray was using a food processor recipe that I found in the L.A. Times. The result was lackluster and dry. I revisited this recipe, and decided to forge ahead, conducting the initial bulk ferment in the mixer bowl as you suggested. When I turned out the dough, I was quite surprised to find that it was exceptionally easy to handle and shape. With an extended oven preheat and the silicone loaf pan I used, the oven spring was incredible. I found that a total bake time on the order of 30 minutes produced a wonderful loaf for me, using an instant read thermometer to ensure proper internal temperature. The crust was a great color, nice and flaky, and the crumb was fluffy and soft throughout. This will certainly become regular Sunday breakfast fare at our home. Thank you again.
Emilie says
This is absolutely wonderful feedback, THANK YOU!!!! I’m delighted that you had success with the recipe. The pictures you sent me were incredible- that loaf rivals any good bakery! I really appreciate you taking the time to comment. :)
Laura (Tutti Dolci) says
I love brioche, what a gorgeous loaf!
Rakhee@boxofspice says
I am going to make this tomorrow Emilie! Oh how gorgeous it looks. Will you cross your fingers for me that mine comes out looking like yours? xoxo
Emilie says
Of course it will! You already know this recipe- it’s the same/ slightly tweaked version of the light brioche hamburger rolls! Same method. You got this. Take a pic and show me! xoxo
Emilie says
PS- I used the overnight method #1 for this loaf. It will give you a more pronounced shape because it is baked cold! xo
Asha says
What an extensive explanation my friend, really awesome job. I cannot get over your cutting skills here my dear. So impressive and love love it.
Bread baking is just amazing. Love making them. I love baking brioche just for french toast, and I hear ya, it’s so sticky and the urge to add flour is huge. I remember I taught a class in SF about basic breads and brioche, it was such a mess, the moment I turned, I had people doing something they shouldn’t..haha. Fun though.
Great post Emily.Pinning for sure.
xx
Emilie says
Hello Asha! Thank you very much. I really appreciate it. I waited until the loaf was entirely cool to cut the brioche into slices- this is key. And my knife isn’t the best either!
You taught a class about bread? How fun! It’s not easy though, getting people to follow instructions lol. Too funny… xoxo
Aysegul says
Oh how much I love your step-by-step, “foolproof” recipes. I do have a brioche recipe I use, but I am going to try this one next time I make it because mine doesn’t look as good.
Well done, my friend. Your photos make me want to make a trip to Long Island. :P
Emilie says
I think I remember yours… yes I do! And it’s BEAUTIFUL! Don’t be sill! Your work is gorgeous. And you have an open invite to LI anytime, you know that ;) xo
lynn @ the actor's diet says
Brioche loaf!!! I’m incredibly impressed with you!!!
Emilie says
Hello Lynn! Thank you very much! I hope you give it a try ;)
Allyson says
Brioche is such a magical bread. I’ve seen it used for bread pudding (both before being baked and after), french toast, even cinnamon rolls. Thank you for this thorough and thoughtful guide. Now I want to make some for myself at home.
Christine says
Thank you so much for all your brioche tips. I’ve made a gluten free brioche before, pretty early in my gluten free baking adventures, and I remember being so proud because it turned out really well. I used the recipe in Artisan Bread. I think I will try it again, but this time using your tips – I’m excited to see how it goes! Really beautiful photos here, by the way <3
Emilie says
Hi Christine! That’s sounds incredible. I’m curious- what kind of flour did you use? Was it a standard cup-for-cup GF all-purpose flour or a combination of a few things? I might have to try it! I’m sure you can apply the same method here with your GF recipe. You’ll have to let me know how it turns out! Happy Baking! And thank you! xo
Amisha Gurbani says
I love your recipe, and the details you have put in it at every step of bread baking. Its really well written and instructed! I agree that its so important to have patience while bread baking. Although I have made challah, and some other kinds of breads, not made brioche and am certainly intrigued to try! Your loaf looks absolutely perfect! :) And those slices!! yummmm!!
Emilie says
How kind of you to say- thank you friend! Bread is something I could go on and on about. It deserves a detailed description because it really is an understanding more than just a specific recipe. There are so many variables to take into consideration! I have not made challah in a while- might have to try that one next. Thanks for the inspiration! xo
Pam says
Could you use this recipe for slider buns?
Emilie says
Hi Pam! Yes, you can!
For step-by-step instructions, see this post (the ingredients are essentially the same, just slightly tweaked).
https://www.theclevercarrot.com/2013/05/light-brioche-hamburger-buns/
PS- for sliders/mini rolls, just make sure to divide the dough into your desired quantity.
Cathy says
Can you use skim milk in this recipe?
Emilie says
Hi Cathy! Great question! Although I haven’t tested this myself, I don’t see why not. From memory, I believe I used 1% milk for this recipe; skim should be fine!
Ruby88 says
Wow, you really have a way of inspiring me to try what otherwise would make me say “I would never make that!” . The color of your bread is so perfect. If I ever get mine to look like yours I would be so thrilled!!
Emilie says
Hi Ruby! That’s wonderful to hear! Comments like these always make me smile, and more importantly, inspire me to keep on going ;) Thank you. xo
Tina says
Hi Emilie,
I made your brioche rolls last night to go with my homemade lentil soup. The recipe was perfect and the rolls were delicious! My family loved them. Thank you so much! I am definitely going to try making the loaf also. Hope you have a wonderful day and thanks for sharing your recipes!
Emilie says
Hi Tina! Amazing! Thank you so much for your feedback- love it! I’m so glad you and your family enjoyed the rolls. Have fun with the loaf version- it’s just as good ;)
Adri says
Another day. Another glorious loaf of bread. Nice slicing job, too amica!
Emilie says
Couldn’t have said it better! Bread baking is my therapy. And thank you- I waited until the loaf was completely cooled/cold before cutting into slices. It does the trick!
Sheri Nugent says
Yes! Thank you for this. I will be trying this soon.
Emilie says
You inspired me to write this.Hope you enjoy! Please let me know if you have any questions.