This recipe for light brioche hamburger buns proves that you can make seriously good hamburger buns at home. With a dough that’s simple to make and easy to handle, you’ll never buy brioche burger buns from the store again!

We like our burgers on soft, buttery brioche-style rolls and this NY Times recipe looked like a great starting point to experiment.
What’s interesting, is that this brioche burger bun is lighter than most traditional brioche recipes (hence the title). It’s still soft and fluffy, but not quite as eggy and rich. Even the color is a bit lighter.
In my opinion, nothing beats all natural bread. Whether it’s a thick slice of sourdough bread or sandwich bread, good-quality hamburger buns from scratch are absolutely life changing. The taste, quality, and healthiness can’t be beat. These buns are the perfect vessel for sandwiches too! Let me show you how to make them.


How to Make Light Brioche Hamburger Buns {Step-By-Step Recipe}
Step 1: Make the Dough & Let it Rise
- Whisk the warm water, milk, yeast and sugar in a small bowl; set aside. Beat the egg in a separate bowl.
- To a stand mixer fitted with the paddle attachment: add the bread flour, all purpose flour, salt and butter. Mix the ingredients until the butter is the size of pebbles.
- Add the yeast mixture and the beaten egg. Run the mixer on medium-low speed (I used #3 on my Kitchen Aid) until a dough forms, about 5-8 minutes.
- Scrape down the sides of the bowl and shape the dough into a ball. It will be sticky.
- Cover bowl with plastic wrap and let the dough rise until it has doubled is size. Depending on how warm your kitchen is, this will take about 1-3 hours (mine took 1 1/2 hrs @ 70 degrees F.)
Tip: Giving the dough enough time to rise is crucial in bread baking. In the past, I have rushed this step which caused my bread to be very dense. Rise times will vary, so be patient. Remember to watch your dough and not the clock!

Step 2: Cut The Dough
- Once your dough has risen, dump it out onto a lightly floured work surface.
- Then, gently flatten the dough to get rid of any air bubbles. Using a bench scraper (or a chef’s knife) cut the dough into 8 equal portions.
- If you have a digital kitchen scale weigh each portion so that they’re all the same size. Do this by weighing the entire ball of dough first, and then divide by the number of rolls you want to make.

Step 3: Shape The Dough Into Balls
- To shape, gently flatten each piece of dough like a pancake.
- Pull up each side pinching it together in the center. Repeat until the ball is sealed. Flip the ball over (seam side down) and move to an un-floured part of your board. It will be easier to roll this way.
- To finish, place your palm over the top and gently roll into a smooth ball.
- Transfer each ball onto a parchment lined baking sheet.


Step 4: Second Rise
- The dough will need to rise again, this time for a shorter period than the initial rise.
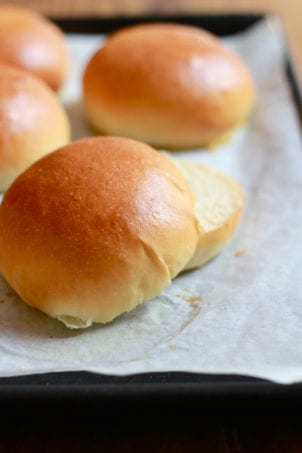
- The balls should look puffy and slightly risen, about 1- 1/2 hrs. When they’re ready, gently brush each one with egg wash. See how puffy they are?
Tip: At this point, you could add sesame seeds to the top of your rolls if you’d like.

Step 5: Bake The Dough
- Preheat your oven to 400 F and place a shallow metal baking pan on the oven floor.
- Before the dough goes in, add about 1/2 cup of water to the pan to create steam. This will help keep the bread nice and moist.
- Bake for about 15-20 minutes or until golden brown. Transfer to a wire rack to cool completely.

More Delicious Brioche & Bread Recipes to Try!
Once you’ve mastered this recipe, branch out and try my soft brioche rolls and this incredible, sliceable brioche loaf – we love it toasted with strawberry jam!
By signing up, you agree to receive emails from The Clever Carrot. Unsubscribe at any time.
Light Brioche Hamburger Buns
- Prep Time: 15 minutes
- Rise Time: ~4 hours @ 70 F:
- Cook Time: 20 minutes
- Total Time: 4 hours and 35 minutes
- Yield: 8 buns 1x
- Category: Yeast Bread
- Method: Oven-Baked
- Cuisine: American
- Diet: Vegetarian
Description
Adapted from the NY Times, this recipe for light brioche hamburger buns is perfect for BBQ fare, sandwiches (try bacon, egg & cheese!) and so much more. You’ll never buy from the store again.
Ingredients
Dough
- 1 cup warm water, about 75–85 F
- 3 tablespoons warm milk (I prefer whole milk)
- 2 teaspoons active dry yeast
- 2 1/2 tablespoons granulated sugar
- 1 large egg
- 3 cups bread flour
- 1/3 cup all-purpose flour
- 1 1/2 teaspoons fine sea salt
- 2 1/2 tablespoons unsalted butter, softened
Egg wash
- 1 large egg
- splash of water
Toppings
- sesame seeds (optional)
Sourdough Variation
Converting the original yeast-based brioche buns to sourdough is not an even swap. This is my adjusted formula. It’s similar in taste and texture, but different due to the nature of sourdough. You’ll need to extend the total rise time to 4-7 hours at room temperature / 70 F (Step #4), increase the second rise to 1.5 -3.5 hrs (Step #6), and bake for a approximately 25 minutes total. As always, watch your dough, not the clock!
- 120 g active sourdough starter (100% hydration)
- 160 g warm water, about 75–85 F
- 44 g warm whole milk
- 30 g granulated sugar
- 1 large egg
- 300 g bread flour
- 33 g all purpose flour
- 1 1/2 teaspoons fine sea salt
- 35 g unsalted butter, softened
Instructions
- Whisk together the warm water, milk, yeast and sugar; set aside. Beat the egg in a separate bowl.
- Add the flours, salt, and butter to the bowl of a stand mixer. Using the paddle attachment, mix the ingredients until the butter is the size of pebbles.
- Add the yeast mixture and the beaten egg. Run the mixer on medium-low speed (I used #3 on my Kitchen Aid) until a dough forms, about 5-8 minutes.
- Scrape down the sides of the bowl if necessary, and shape the dough into a ball. It will be sticky. Cover bowl with plastic wrap or a very damp kitchen towel, and let the dough rise until it has nearly doubled is size, about 1- 3 hours @ 70 F. *See notes below.
- Line a baking sheet with parchment paper. Using a floured dough scraper (or chef’s knife), divide the dough into 8 equal pieces. If you have a scale, weigh each piece to guarantee that they’re all the same size.
- To shape the dough into balls, gently flatten each piece like a pancake. Gather the ends and pinch the dough to seal in the center. Flip the dough over, cup the surface with your palm, and roll into a ball. Transfer to your baking sheet, placing them a few inches inches apart. Cover with an inverted sheet pan and rest for 1-2 hours, or until puffy and slightly risen.
- To make the egg wash, beat the egg with a splash of water. When the buns are finished with the 2nd rise, gently brush each one with egg wash. At this point, you could add sesame seeds to the top of your rolls.
- Preheat your oven to 400 F. and place a skillet or metal baking dish on the oven floor. Before the dough goes in, add about 1/2 cup of water to the pan to create steam. This will help keep the bread nice and moist. Bake for about 15-20 minutes or until golden brown. Transfer to a wire rack to cool completely.
Notes
Giving your dough enough time to rise is crucial in bread baking. Rise times will vary depending on temperature, so be patient. Remember to watch your dough and not the clock!

Comments
Jillian says
So.i just posted a comment and I forgot to add some things. The buns came out amazing. I did add 1/2c of flour instead of 1/3c. I read it wrong and I used my mixer for about 1 minute or less. It came together quickly. Don’t follow how I made it lol. Just mistakes. Also let my yeast foam a lot. New to baking so I’m not sure if I even followed the instructions correctly but mine came out amazing..can’t wait to try them with the burgers.
Becky says
Just made these buns this morning. Started making dough around 8AM and took them out of the oven at 11:15.
They are gorgeous and so easy to make. I got 7 buns and baked 15 minutes. Cooling now and can’t wait to eat one!
💖 Emilie loved this comment!
Roman says
I usually hate baking, especially working with dough. This is one of the few recipes I’ll actually bother baking again; absolutely wonderful. It’s in the perfect spot flavor wise, not being too sweet like a lot of brioche tends to be.
And compared to some of the brioche recipes I’ve seen on the internet, this one is really simple and straight to the point. Big thumbs up!
💖 Emilie loved this comment!
Hal says
What are the nutrition facts for this recipe??
Kara Quismundo says
As someone on a sodium-restricted diet, store-bought hamburger buns just don’t work for me. I make this recipe regularly. Sometimes as hamburger buns, other times as lunch rolls to go with a salad. They never disappoint and come out perfect every single time!
I omit the salt and add 1 tablespoon of olive oil, but otherwise follow the recipe exactly. I’m so happy I found this recipe because it allows me to enjoy burgers a little more guilt-free without sacrificing taste or texture. Highly recommend!
💖 Emilie loved this comment!
Linda says
My oh my are these delicious!!! I’d maybe make them smaller the next time but are perfect for smashburger!!!
How would I freeze these?
Judith Cronin says
I’ve now burned out two KA stand mixers, so until I decide which brand I will buy I am without. How would I make this recipe without using a stand mixer?
Lens says
I think I have reviewed this recipe before, but I’m coming back again to say that I’m currently making a quadruple batch. I make 50 gram buns for sliders, and bake 24 on a 9×13 tray. These are just the best sandwich buns, ever.
💖 Emilie loved this comment!
Michelle says
Dough stuck to the plastic wrap on the second proof. Any tips for that?
Emilie Raffa says
Yes! I recommend lightly coating the plastic wrap with a little bit of oil to prevent sticking. Works like a charm. Alternatively, you can invert a rimmed sheet pan over the buns.
Amber says
Perfect. They ruined store bought buns for me.
Emilie Raffa says
Haha. I love this, Amber 😂
💖 Emilie loved this comment!
Mick Dundee says
Have searched for ages to find a great hamburger bun recipe – this is the one, hands down that beats them all! My wife is my greatest critic…and she loves it. Simple to make and delivers in spades.
Christina says
Best bun recipe I have ever tried! So soft and light
Emma says
So I’ve made these buns a few times, in fact, I literally just pulled a batch out of the oven. They are so good, I don’t think I can ever buy store bought buns again. They are very easy to make and come out perfectly. Definitely a must have recipe to have on hand.
Taniel says
Best fluffy and easy burger bun recipe! Have tried lots and this one is the best.
Emilie Raffa says
Thank you Taniel!
Grace says
These burger buns came out perfect, nice and fluffy and tasted great! The dough was easy to work with. I even made these without the stand mixer! Thanks so much! 🥰
Layla says
I found this recipe and we have made it AT LEAST weekly for the past two months. Delicious, easy to follow instructions, beautiful end result
Julie Messum says
I’m a new to sourdough.
I was lucky enough to have an excellent starter. It was ready at Day14 but I wasn’t! I found and read all kinds of conflicting advice. First loaf was a success. Then I made scones and English muffins. Next loaf was a lovely door stop. As was the following one
Then I found you and your amazing easy to follow recipes. I’m in sourdough heaven!!
Thank you, thank you, THANK YOU!!
Emilie Raffa says
Love this Julie! Thank YOU for sharing your feedback. Happy baking! 🥰
Danielle says
I made home made buns for the first time last week and didn’t love them, so I tried this recipe yesterday and they turned out exactly how I hoped they would. They were light, fluffy, soft, and not too bready (if that makes sense). This will now be my go to bun recipe!
Catherine says
At first I thought I forgot a cup or flour because it was so sticky after the first rise but I followed through and I’m glad I did. So good!
Curt Moffit says
I’ve made these twice and they came out dense and heavy. Of course, the second batch was better, but still. I’ve also made brioche bread (for French toast), and it came out delicious. These buns didn’t taste like brioche at all. Im not sure what Im doing wrong, but there you go.
Christi says
These turned out perfect! Could you freeze a batch?
Lonnie Appleby says
THANK YOU!!! I have been searching for months for THE recipe for those soft, restaurant-style, delicious buns. THIS…IS…THE ONE! I actually said those words as I pulled them from the oven and slid them onto the cooling rack as I could feel their perfection in the texture! THANK YOU! As a satisfied director would shout, “CUT! PRINT!”
Barbara Harteis says
Thanks for such clear directions. You explained the steps better than many others.
Emilie Raffa says
You’re very welcome, Barbara! Thank you 🥰
sam k says
Hi
Made these bins, were nice but would make them with plain / all purpose flour in future.
I used strong white bread flour which made them dense.
I also split the dough into 12 pieces, would make 24 pieces in future
thankyou
Kristine Kirsch says
As promised, I’ll never buy brioche rolls from the store again. These rolls are amazing! I’ve never made rolls before and they turned out perfectly! Thank you so much!
Emilie Raffa says
Kristine, I’m so glad you liked them! This recipe is special. And once you get the hang of it, like you said, there’s no going back. 🥰
Michelle says
can I freeze the dough that I don’t need until it’s time to make more rolls? We only need 2 at a time.
Ag and Jim says
Awesome 🙌 thank you
Jack says
Amazing recipe! Super soft and pillowy brioche buns! Made the best hamburger 🍔 ⭐️⭐️⭐️⭐️⭐️
Julie says
I can’t tell you how happy I am that I found this recipe! These buns turned out so perfect. We love brioche buns, and these are a bit lighter than store bought, but held together perfectly for burgers. They look beautiful and wish I could post a picture!! This will be my go to recipe, and will be passing it along to others!- Thanks
Laura says
This is literally the BEST bun recipe ever!!! I made 100 buns for a graduation party…perfect with Smashburgers! I make them often for BBQ parties! Thank you Emilie xo
Chay says
Thanks for this brilliant recipe, Emilie. I don’t like the slightly chemical taste (and overt richness) of supermarket brioche buns, but I absolutely love the flavour and texture of these! SO good for hamburgers and also with quick-pickled cucumber, lettuce, dill aioli and tempura snapper for fish burgers. OMG, never buying brioche again!
Megan says
Can this dough be tested in the refrigerator overnight?
Kim says
This is the best bun recipe, however I wouldn’t call it a brioche. Great for burgers it somehow has enough texture to hold up the all the toppings and sauce even though it’s light and has a chew to it. Closest recipe to a commercial bun without that weird commercial taste. I will definitely peruse all the other recipes as this was my first one. Thank you
Flo says
I am so looking forward to trying, they sound amazing. Once baked, how long would you say they last for? Many thanks
Chloe says
I NEVER comment on recipes but wow 5 stars does not do this justice. Every time I make these they just get better. Sometimes i accidentally forget the egg and realize as im mixing. I add it in before the first rise and it’s still perfect. My husband tries to eat these for dessert. I guard them like a good defensive dog.
Debbie says
I will never buy hamburger buns again! I followed the recipe to the T and they turned out to be the most beautiful looking and perfect textured buns I could have hoped for. I used two cups strong flour (type 65) and 1 cup semi-wholemeal flour. I live in France and hamburger buns are either horrible imported processed rubbish or proper brioche which is way to sweet and cake-like. My previous attempts at turning ‘normal’ homemade bread into buns resulted in buns that were too difficult to eat as a burger. The softness of these ones is utterly perfect. And gosh did they look good – my gobsmacked husband whipped out his phone to take a photo to send to foodie family members! So thank you!
Anna says
Perfect sized buns, lovely for burgers and breakfast sandwiches! Not difficult to make! I subbed unsalted butter for Salted Butter and just used 1 Tsp salt instead of 1&1/2.
Josh says
Is it possible to do this without a bread mixer? If so, how long would I be looking to knead?
Adrienne says
Do you switch to a dough hook or keep the paddle on when you add the yeast mixture?
Anna says
This recipe worked very well for me (thank you!) even though I didn’t have a mixer so had to work the dough by hand. It was very sticky, as you say in the recipe, so I added quite a bit of extra plain flour while shaping the brioche buns. I also ended up doing a double prove of the buns as they just spread too much after one prove (I maybe left them too long). But after a re-shape and second prove of 1 hour, they baked beautifully and look absolutely incredible. I can’t wait to have them with our wagyu burgers tonight!
Susan Saint says
Hi Emilie – The recipe is delicious and fairly easy to make, thanks! The problem was that the buns with beef patties fell apart. Any tips?
Meegan says
First time baking these burger buns and they turned out amazing!
Will definitely be using this recipe again:-)
Lynn Marie Stanley says
Is there a nondairy milk option that would work well with this recipe? I cannot eat dairy:( Thank you!
DJ says
Looked beautiful coming out of the oven….so hard to wait until they cool a bit to try them. Can these be successfully frozen for use in a few days?
Victoria Olszewska says
Can it be doubled and the buns frozen?
Emilie Raffa says
Absolutely. Just make sure you have a vessel large enough to accommodate double the dough (or make two separate batches). The buns freeze well individually wrapped in plastic wrap. Defrost at room temp.
Abigail says
These are genuinely the best buns I’ve had! So perfectly tender and fluffy, which is exactly what I’ve been wanting. I added dried, minced onion on top with the sesame seeds and it was delicious.
Thank you so much for the wonderful recipe!
Nancy says
The dough may be sticky, but, it is so nice to work with. My only error was not rotating the pan halfway through. Some buns were beautifully browned. Some were a bit light. It only affected the appearance not the taste.
These rolls are so easy to make and taste so good. I won’t be buying hamburger buns anymore! Next time, I will try to make half of the dough into hotdog buns.
Cristina says
I am so glad I came across this recipe. The buns came out delicious!
A says
Throw your other burger bun recipes away as these are phenomenal and so easy to do.
LindaO says
Finally!!!! I can’t tell you how many ‘Best’ burger bun recipes I’ve tried. Years, I’ve looked for this recipe. These buns came out soft and light and delicious! thank you for sharing.
Lisa says
Excellent recipe, exactly as described, light and airy. You will never buy shop bought burger buns again! Thank you so much for this recipe, I have baked countless baps and they were either too heavy or stodgy…. entirely useless. My search finishes here. Regards from Ireland 🇮🇪