This easy, step-by-step fresh pasta recipe and video will teach you how to make soft, silky, homemade pasta in 1 hour (with or without a machine). Fresh pasta is one of life’s greatest pleasures: use this versatile dough to make fettuccini, lasagna noodles, homemade ravioli, pappardelle pasta and more.
But here’s what I’ve learned after 5+ years of consistent practice: it’s all about the dough. Master the soft and supple texture (never dry or crumbly!) and the rest is easy.
In this post, I’ll teach you my exact method for perfect pasta dough, which can be used to make fettuccini, lasagna noodles, homemade ravioli, pappardelle pasta – whatever you love most. You can make it by hand, with a KitchenAid stand mixer, or in a food processor.
What Sets My Recipe Apart
A better formula for bigger batches. The classic pasta ratio “1 egg + 100 g flour per person” works fine for 1-2 servings, but not always when you scale up. My version delivers consistent results, whether you’re cooking for 2 or 6.
Higher hydration. Most pasta dough’s are 50-60% hydration. Mine is 61%, which makes it softer and easier to knead by hand. No more crumbly dough!
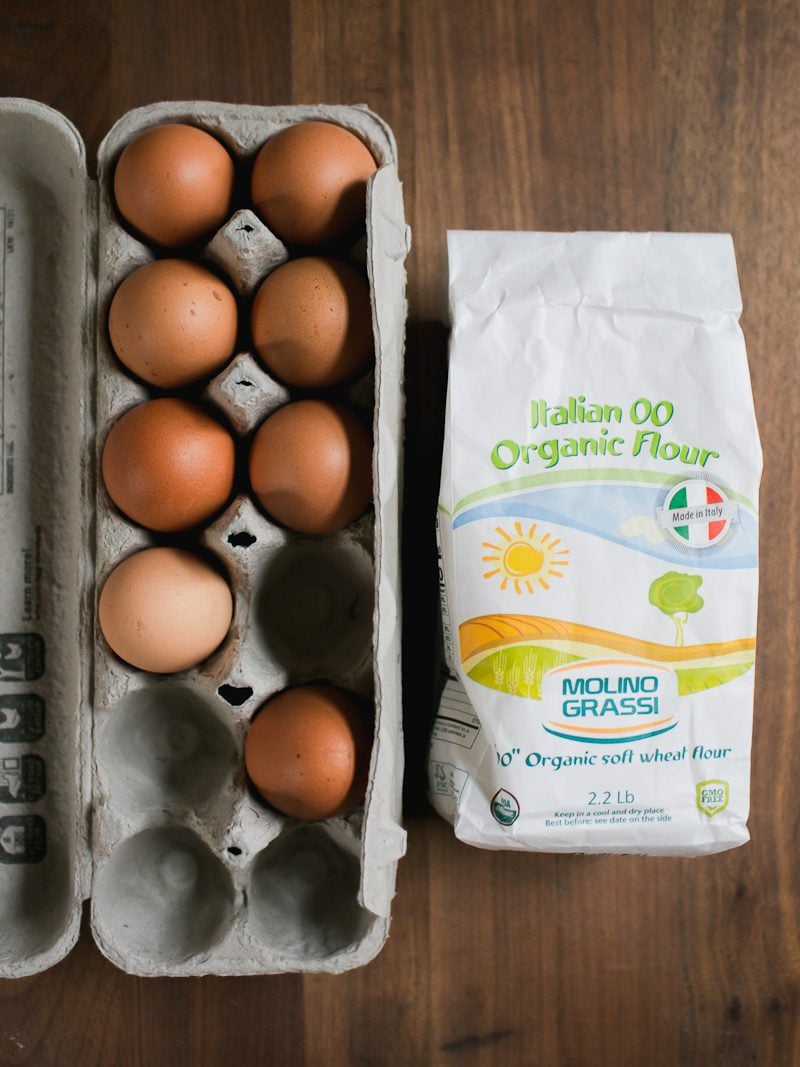
Homemade Pasta Ingredients
Because egg-based pasta dough contains only 2 ingredients, it’s important to understand the subtle nuances that makes a good dough even better. Below are my personal tested recommendations for flour types, brands, and egg size.
Italian Tipo 00 flour: this fine milled, soft wheat Italian flour creates light, tender pasta. The texture feels like baby powder. I like Molino Grassi or Caputo. For comparison, I tested this recipe with Bob’s Red Mill 00 flour and King Arthur’s Pasta Flour Blend and it wasn’t the same at all (too chewy). If you can’t find Italian 00 flour, substitute with King Arthur all purpose flour instead.
Large eggs + yolk: Size matters! I use large eggs (~55-58g each) to ensure the dough contains the correct amount of moisture. Too little egg = dry, crumbly dough.
My Best Homemade Pasta Tips
Make space. You’ll need a long, clutter-free surface to roll the dough. Pasta sheets can measure up to 3 ft long! The kitchen table is ideal.
Weigh your ingredients (including the eggs). This is my secret to soft, supple, never dry or crumbly pasta dough (note: if you’ve used measuring cups in the past, and the dough was dry, too much flour was packed into the cup. A digital scale will get you the most accurate results every time).
Wrap it up. Pasta dough dries out fast. I keep mine wrapped or covered with an upturned bowl.
How To Make Pasta {Step-by-Step Recipe}
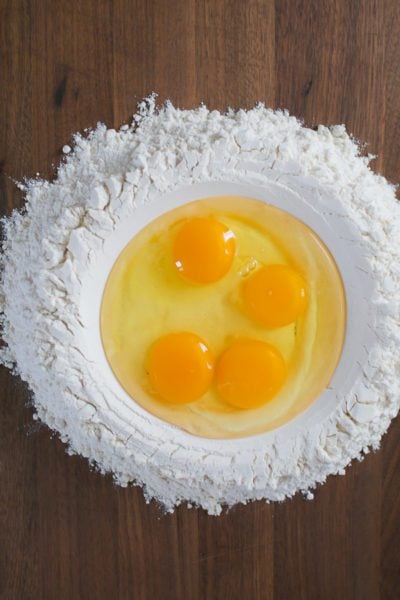
Step 1: Make Pasta Dough
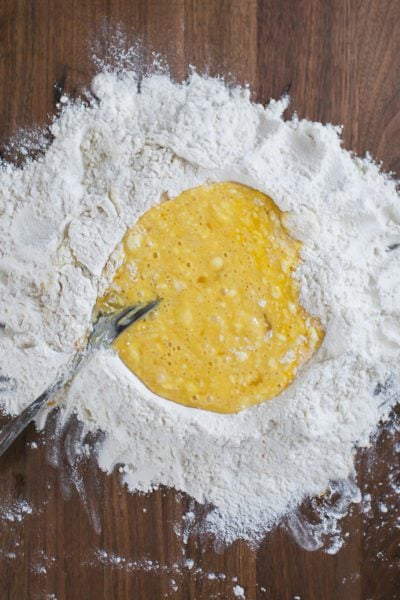
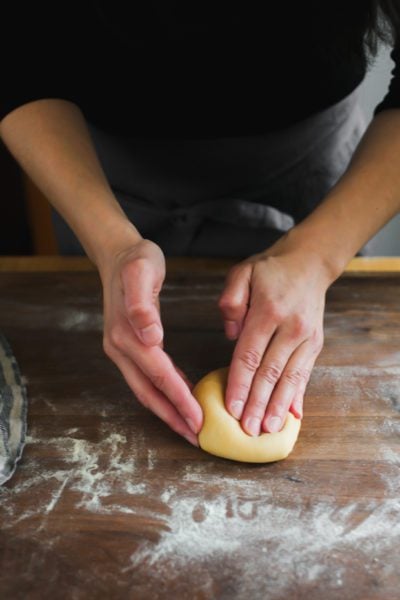
To Start: Mound 300g flour onto your work surface (or dump it into a large bowl for easier clean up). Make a well in the center, add 185g cracked eggs, and beat with a fork to mix in the flour. Then finish by hand to form a rough dough. Be patient! It’s a dry dough. If bits of flour remain, I’ve found that adding a few drops of water or olive oil helps it along.
Cover and rest for 10 minutes. This step is often skipped in most recipes, but it’s essential. Coming from my bread baker’s perspective: the dough needs time to hydrate (soften). It will be much easier to knead by hand.
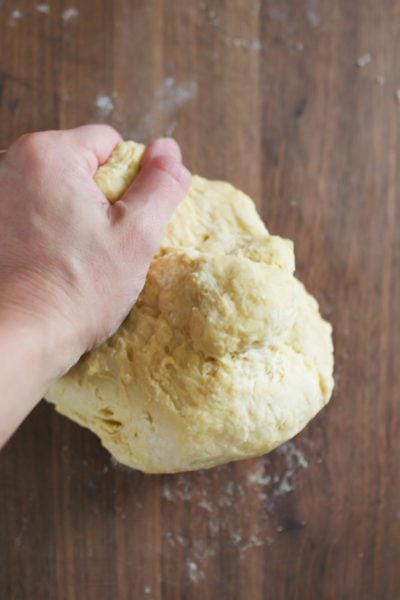
Now, knead the dough for 5-7 minutes using the heel of your hand. It will start out stiff and dense, but soften as you go. The goal is a smooth and pliable dough that springs back when poked.
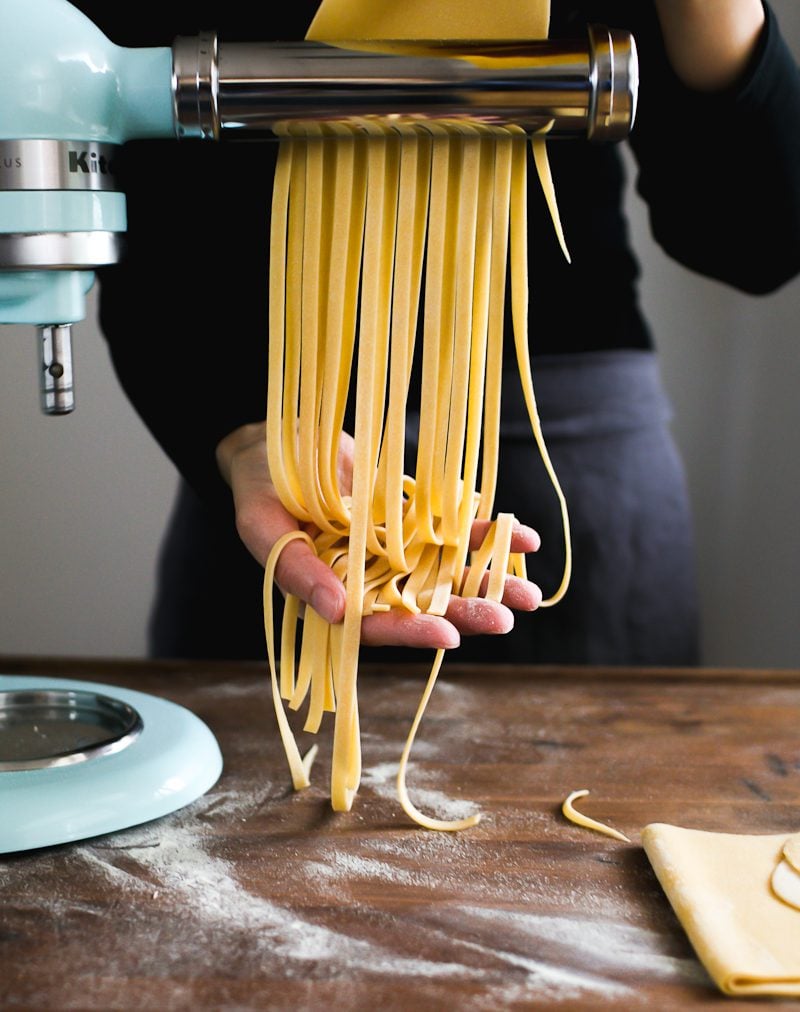
Step 2: Roll Fresh Pasta Sheets
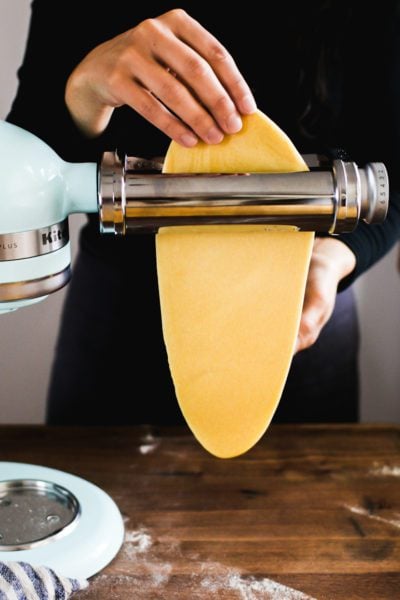
The next step is to cut the dough into 4 equal pieces. Flatten one piece into an oval disc and send it through the roller on the widest setting (#1 on the Kitchen Aid attachment). I like to send it through again for a smoother finish.
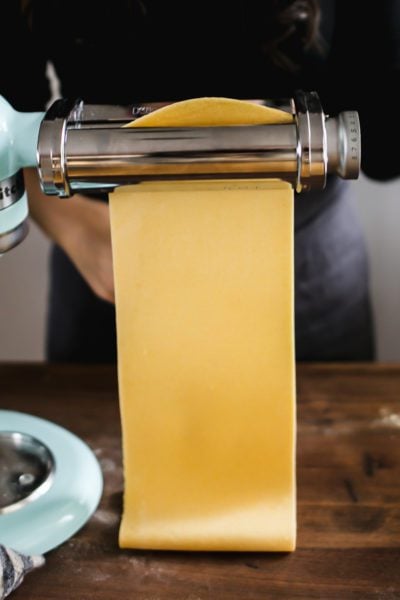
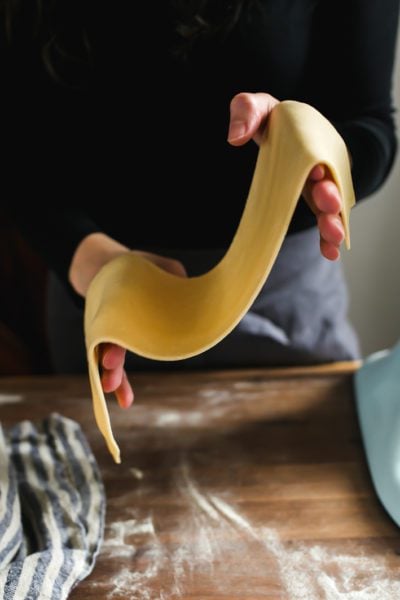
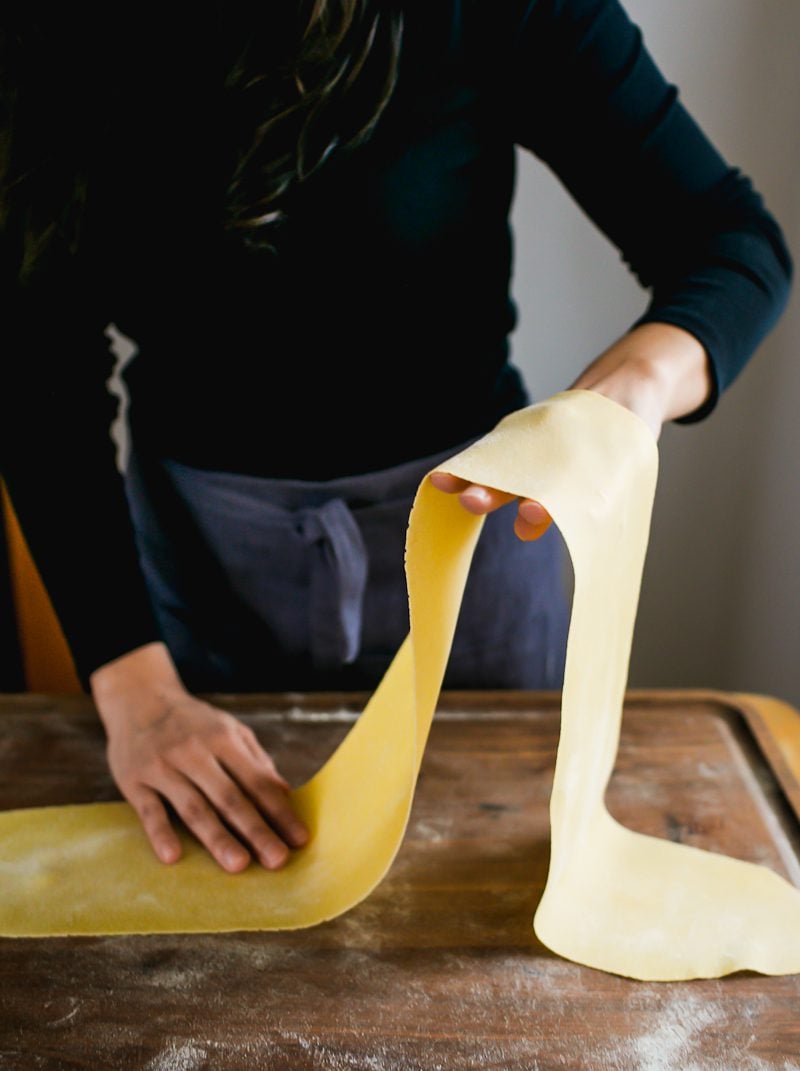
Then, continue rolling it through settings #2-4 (2x on each setting) for fettuccine, pappardelle and tagliatelle. Go up to #5 if you’re making homemade ravioli. The pasta sheet is ready when it’s slightly translucent and your can see your hand underneath.
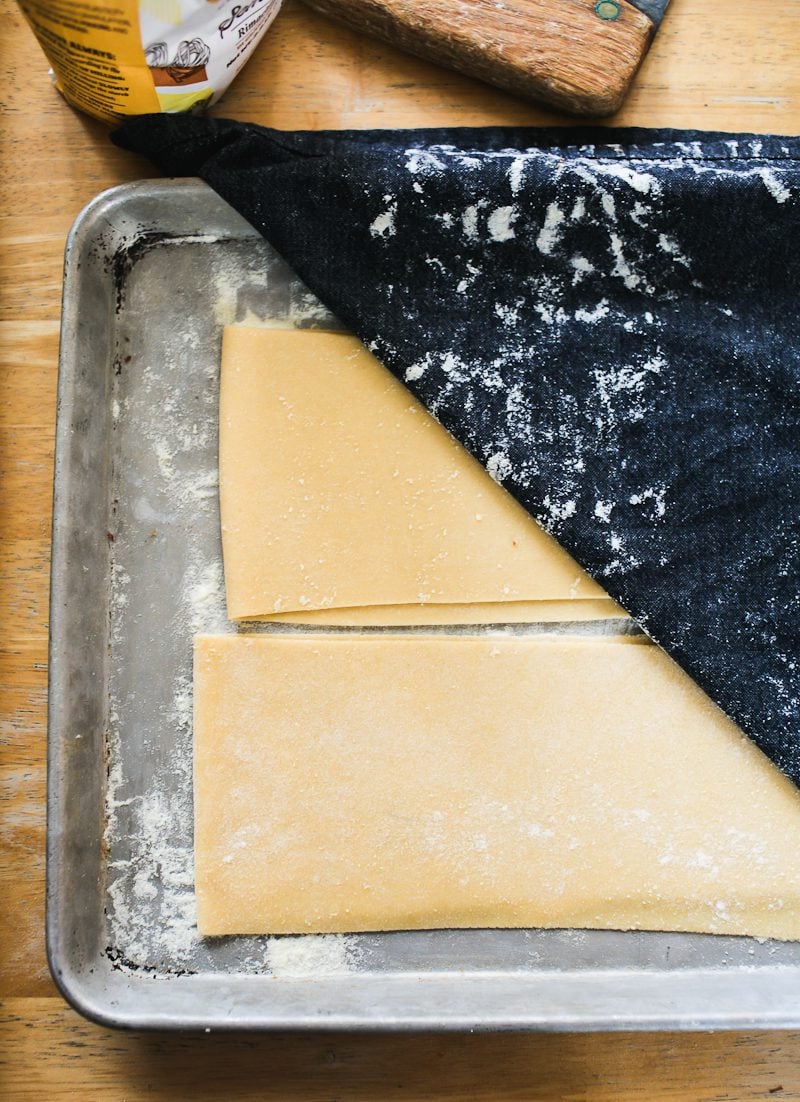
When you’re done, fold the pasta sheet in half and lay it on a semolina dusted sheet pan to prevent sticking.
Tip: Why Semolina Flour? It absorbs less moisture than regular flour and helps to prevent sticking. Rice flour works too. My surface is always covered in a blanket of semolina flour while I work!
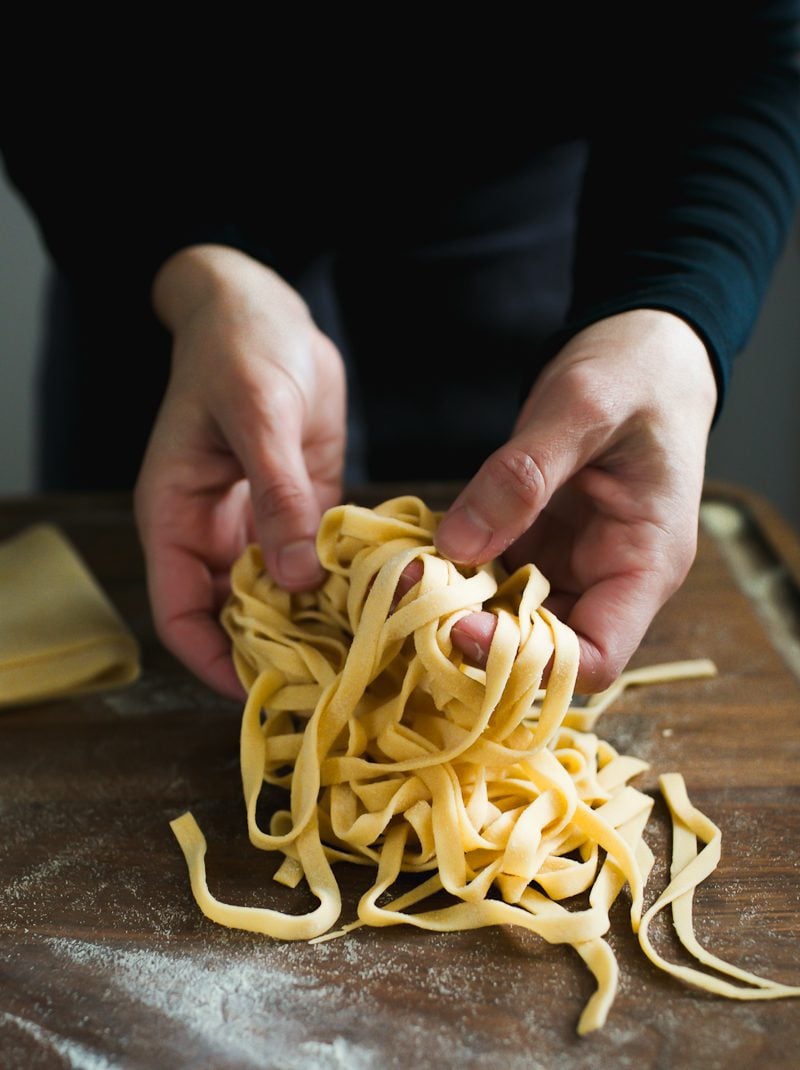
Step 3: Cut Sheets Into Pasta
Before cutting, I like to semi-dry the pasta sheets first but hanging them over a chair, rod, or on a hanger (~5-15 minutes). I’ve found that this simple step makes the dough easier to cut; they’re less soft and doughy, and it helps to prevent the pasta strands from sticking later on. They have a unique leathery feel to them!
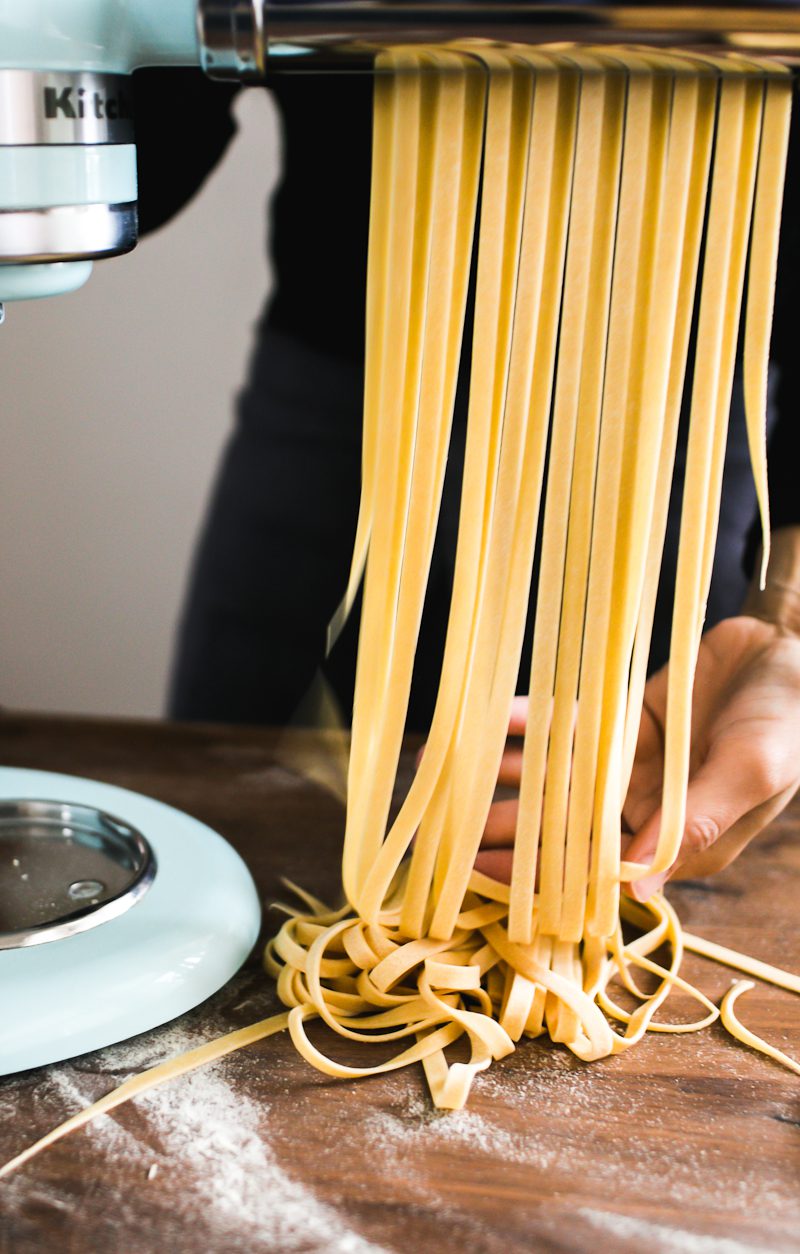
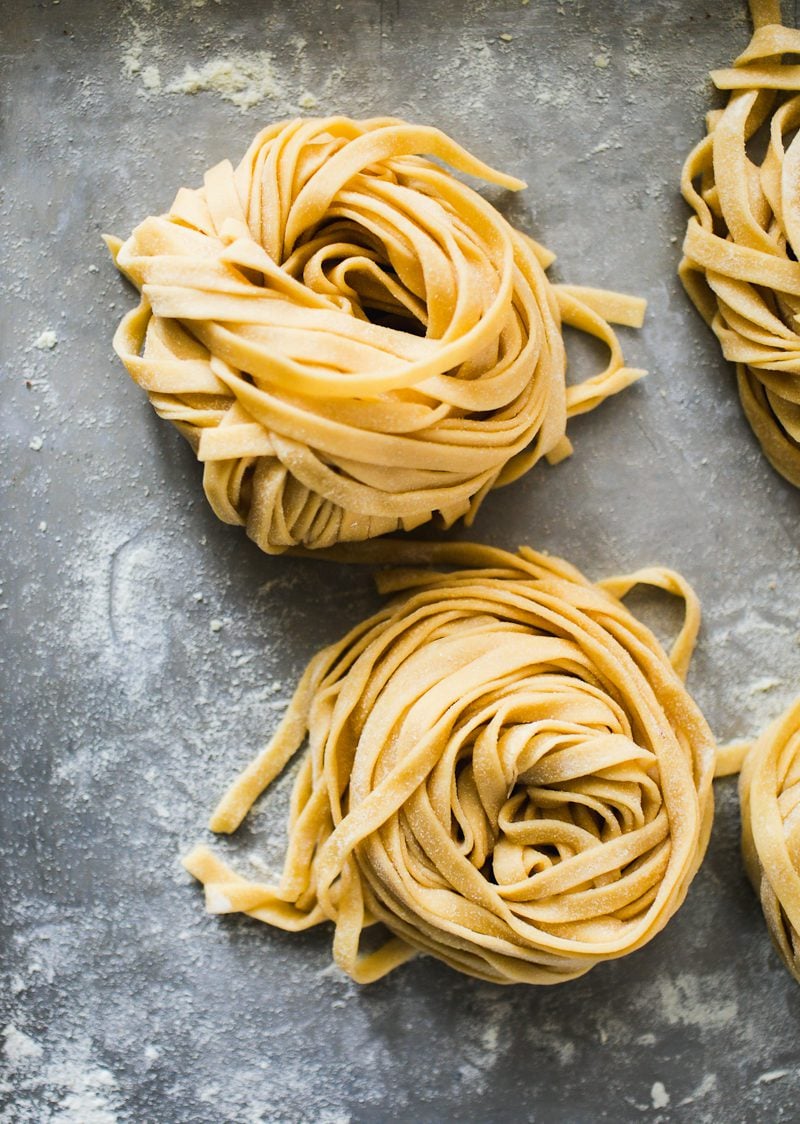
Once that’s done, cut a pasta sheet in half and send it through your desired cutter attachment. Dust the strands well with semolina, then form into nests or lay flat (I prefer the latter option for smoother, less wrinkly pasta).
Step 4: How To Cook Fresh Pasta
If you’re cooking right away, simply add your pasta to a large pot of boiling, salted water. Cook for ~2-5 minutes depending on thickness and shape. I always recommend tasting a pasta strand first to check for doneness (do so at the 2 minute mark and adjust from there).
Then, don’t drain it! Transfer your pasta directly into your sauce with tongs. Some of my favorite pasta sauce recipes include my Ragù Bolognese Sauce, Authentic Pomodoro Sauce (Fresh or Canned) and this vibrant Classic Italian Basil Pesto (Pesto alla Genovese).
How To Store & Freeze Homemade Pasta
On a personal note, I never make homemade pasta right before serving. I’ll do it earlier in the day or freeze some to get ahead.
To store (room temperature or chilled): Keep well-floured pasta on a tray, covered with plastic wrap or in an airtight container. Leave at room temperature if cooking within 1-2 hrs, or refrigerate fro up to 12 hrs. I recommend cooking homemade pasta on the same day it’s made to avoid discoloration or sticking if chilled past 24 hrs.
To freeze: Let pasta air-dry (uncovered) for 15-20 minutes to prevent sticking. Then portion into zip-top bags or containers and freeze for up to one month. In my experience, if left in the freezer for too long, the pasta will become dry and brittle. Cook straight from frozen, no need to defrost first.
What’s Next?
Once you’ve mastered this recipe, I’ve written how-to guides for homemade lasagna noodles, ravioli, and a signature, original sourdough pasta that can be made on the same day or fermented overnight.
By signing up, you agree to receive emails from The Clever Carrot. Unsubscribe at any time.

Beginner’s Guide To Fresh Homemade Pasta
- Prep Time: 1 hour
- Total Time: 1 hour
- Yield: Serves 4
- Category: Homemade Pasta
- Method: Handmade
- Cuisine: Italian
- Diet: Vegetarian
Description
This easy, step-by-step fresh pasta recipe will teach you how to make soft, silky homemade pasta made from flour and eggs, in just 1 hour (with or without a machine). It’s an all purpose pasta dough: use it to make homemade fettuccine, pappardelle, homemade ravioli and more.
For timing, the process is broken up into 3 parts: making the dough, rolling the dough into pasta sheets, and cutting the pasta into noodles. Tips shared below for using a Kitchen Aid Stand Mixer, food processor and doing it by hand.
Ingredients
- 300 g Italian Tipo 00 Flour (I recommend Molino Grassi or Caputo)
- 3 large eggs (see note below)
- 1 large egg yolk
- Semolina flour, for dusting (rice flour can be used)
*Note: the total combined weight for the eggs & yolk (cracked) should be 185 g. Because eggs size will vary, make up the difference, if needed, with an extra egg yolk or olive oil. Olive oil makes the dough more soft, supple and satisfying to work with.
Pasta Equipment (choose one)
- Kitchen Aid Stand Mixer (w/ pasta attachments)
- Pasta Machine
Tips:
- Make space. You’ll need a long, clutter-free work surface to handle the dough. The kitchen table or kitchen island is perfect.
- Weigh your ingredients (including the eggs). This will ensure the correct texture of the dough. If your eggs are too small, the dough will be dry and crumbly.
- Wrap it up. Pasta dough can dry out quickly. Keep it covered with wrap or a kitchen towel.
Instructions
Step #1: Make The Dough
The Traditional Way (by hand):
- Add the flour to a large bowl. Make a well in the center; add the eggs and yolk.
- Whisk together with a fork, and then combine with the flour. When the texture becomes stiff, finish by hand to form a rough dough. If dry bits of flour remain after a few minutes of mixing (be patient, it’s a dry dough) add a few drops of water or olive oil to bring the dough together.
- Form the dough into a ball, cover with an upturned bowl or with plastic wrap, and let rest at room temperature for 10-15 minutes- it will be easier to knead.
- Knead the dough for 5-7 minutes. Do this by folding the dough over itself, pushing it forward with the heel of your hand, turning slightly as you go. I literally rock the dough back and forth (watch the video). The texture will be very stiff at first- it’s not bread dough. But rest assured, by the 2 minute mark it will start to soften. Keep kneading until the dough is soft, malleable and has a talcum-like finish. It should “bounce back” slowly when poked.
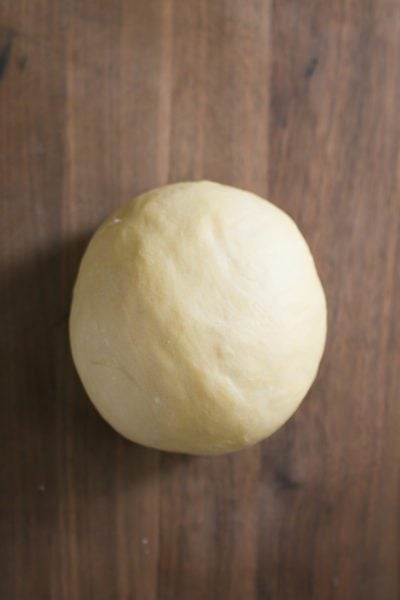
- Form the dough into a ball, cover tightly with plastic wrap, and rest at room temperature for 30 minutes.
Stand Mixer Instructions:
Fit the machine with the dough hook. Add the flour and eggs to the bowl. Mix until combined. Knead on speed #1 or #2, about 4-5 minutes. Form the dough into a ball, cover tightly with plastic wrap, and rest at room temperature for 30 minutes.
Food Processor Instructions:
Add the flour and eggs to the bowl. Pulse several times until the dough comes together. Remove the dough to your work surface and let rest for 1 minute. If the dough is a bit sticky after resting, add a sprinkle of flour. Knead by hand for 1-2 minutes (the food processor does most of the kneading for you). Form the dough into a ball, cover tightly with plastic wrap, and rest at room temperature for 30 minutes.
Step #2: Roll The Dough Into Pasta Sheets
Set up your station: Dust your work surface with semolina flour. Dust a sheet pan with semolina flour (your pasta sheets will land here). Fit the stand mixer with the roller attachment. Grab a kitchen towel. You’re ready to roll.
- On your work surface, cut the pasta dough into 4 pieces. Working with one piece at a time, flatten the dough into a 6-8inch oval patty. Keep the remaining doughs covered in wrap otherwise they will dry out.
- Set the pasta roller to #1 which is the lowest/widest setting on the Kitchen Aid. With the machine running, send the dough through the roller. Now, send it through again (so, 2x total). Note: if you are using a hand crank pasta machine, refer to the manufacture’s specific instructions for rolling the dough- the settings might differ but the process is the same.
- Continue to roll the dough through settings #2-4, (2x) on each setting. Do not pull on the sheet as it comes through the roller; just guide it along gently. If at any point the dough becomes sticky, dust with semolina flour. I keep my work surface dusted with semolina at all times. This way I can coat both sides of my pasta sheet easily and quickly while I work.
- Your pasta sheet is ready when it’s beautifully thin and somewhat translucent (you should be able to see your hand underneath). Don’t worry if the ends are not perfectly straight; you can always trim them with a knife.
- To finish, dust the pasta sheet generously with semolina, fold it in half, and place onto your floured sheet pan. Cover with a kitchen towel. Repeat the rolling process for the remaining 3 doughs.
Step #3: Cut The Pasta
- Before cutting, I like to dry my pasta sheets ever so slightly. This firms up the final texture giving the strands a more “leathery” finish, rather than a soft and doughy feel (this will prevent the pasta from sticking together later on).
- To Dry: Hang the pasta sheets over the back of a chair for about 10-15 minutes or so. Keep your eye on the time; you don’t want the sheets to dry out completely. You will be able to feel the difference.
- To Cut: take a pasta sheet and cut it in half. Trim the ends, if you like. Run the sheet through your desired pasta cutter attachment to create strands. Alternatively, cut the dough by hand.
To Store: Heavily dust the pasta strands with flour. Coil around your hand or arrange loosely on a tray. Cover with plastic wrap and hold at room temperature if cooking within 1-2 hours. Alternatively, store in the fridge for up to 12 hrs. checking occasionally, to make sure the strands are not sticking. Note: Pasta left in the fridge past 24 hrs might oxidize, discolor and/or stick together.
To Freeze: Allow the pasta to air-dry, uncovered, for 15-20 minutes before freezing. The helps to prevent sticking. Portion into ziptop bags, remove the air, and freeze, up to 1 month. Cook directly from frozen, no need to defrost first.

Comments
Juliana A says
Can I replace the flour with semolina instead? Just curious!
Thank you 😊
Eli says
I have been wanting to attempt to make noodles at home for quite some time now. I found this recipe in January and all I can say is THANK YOU!!! It was a bit tough finding the Italian Tipo flour in my city, but it was well worth the hunt. On my second attempt we made both Fettuccini and Spaghetti noodles. I tried freezing the Fettuccini and made a huge mistake by just vacuum sealing it and tossing them in the freezer(lesson learned). Unfortunately I discovered this error when removing the frozen blob formerly known as Fettuccini noodles right as my water started to boil. I ran to the pantry and found store bought noodles. I cannot believe how much better the home made noodles taste. It’s not even that complicated to make them, you just need to set the time aside. Thank you again, I will never buy noodles again!
Lynn McCain says
Can you dry the pasta so it can be stored like when purchased at the store?
shirley mcivor says
great recipe! Best fresh pasta I have ever tasted. Can I make this for larger number of servings by keeping the ratio of flour and egg the same, for 6 servings the ratio would be 450gr flour and 277 gr egg?
Emilie Raffa says
Thank you Shirley! Great question. Yes, that is correct for 6 servings.
Shirley says
Super easy recipe. It was my fist experience and my pasta turned out awesome. I am spoiled for anything else now. I just have a question, can this recipe be adjusted for larger amounts of servings?
Emilie Raffa says
Yes, absolutely! I think I answered your question above re: 6 servings. But it can be doubled as well.
Annie says
I would like to try your recipe. I cannot eat some foods, and was wondering if I could use gluten free flour?
Thank you
Emilie Raffa says
Hi Annie! Great question. Gluten free flour can be tricky to work with. Although I haven’t tested it, I’d start with a 1:1 all purpose GF flour. I’ve had great results with King Arthur’s Measure for Measure. Let us know if you experiment!
Annie says
Thank your Emilie for your reply.
Unfortunately, we don’t have access to King Arthur’s flour, so I will look around for something similar.
Annie
Delphine says
Can I use all purpose flour instead of 00 flour?
Emilie Raffa says
Hi Delphine! Great question. Yes you can use all purpose flour. I recommend King Arthur brand if you can find it.
Delphine says
Thank you! Also can you please tell me How much 300g equivalent to in cups?
Terry says
You can order King Arthur flour online.
Anthony Sheff says
Can this be used to make manicotti?
Emilie Raffa says
Yes it can!
Anthony Sheff says
For the manicotti, would I need to add water to the recipe since manicotti shells need to be pliable?
Emilie Raffa says
Hi Anthony! In my experience, additional water is not needed for this recipe. The sheets are pliable and easy to work with.
Melanie Zook says
I have a couple of questions- first, can this be adjusted to make pesto infused noodles- if so, should I use less egg? Also, I was thinking of using 50% white whole wheat and 25% each semolina and type 00- thoughts?
Emilie Raffa says
Hi Melanie! Great questions. I haven’t tested it, so I’m unable to advise with exact specifics. But off the top of my head, here’s what I’d do: for the pesto-infused pasta, omit the egg yolk and replace it with 1-2 tbsp of pesto (to start). Process in the food processor, adding more beaten egg as needed if the dough is too dry. Do this while the machine is running (it’s easier to judge the amount by eye). The dough can be made by hand too.
For the whole wheat/semolina/00 blend: still follow the 300g total weight for the flour + 185g total cracked weight for the eggs, adding more liquid (either beaten egg or water) to bring the dough together. Again, use a food processor if possible. For the semolina, please make sure it’s *fine* semolina flour, not coarse- otherwise the dough will be too gritty.
Rdccarpentry says
Finally won the pasta dough battle! Made crab meat raviolies. Definelty by a scale and weigh this out. For sure why i finally won!
Emilie Raffa says
Excellent! I agree with you- using a scale is the way to go for the most precise texture. It’s the difference between a dry and crumbly dough, vs a dough that’s just right (soft and pliable). The type of flour you use matters too, as they all absorb differently. But you got the idea. And crab meat ravioli sounds incredible! I have a master recipe & guide for homemade ravioli if you’d like aditonal assistance. Click here: Beginner’s Guide to Fresh Homemade Ravioli
Megan says
So great…know how to store it…..but now how do you cook it?
Darell says
Came here to thank you not only for the excellent video and instructions, but specifically for giving the weight (and in grams!) of how much liquid egg you use.
I have been done with volume measuring for quite some time, and I find it frustrating to have recipes still given in cups and liquid ounces (even mass ounces is annoying these days!). Add to that the wide variability of natural items like eggs (and fruit, etc) and knowing the actual measurement (vs the number quantity) of the product being added to the recipe is KEY! My first attempt at pasta was a disaster (too dry) because I followed the time-honored “three eggs to 300 g of flour”. Turns out my eggs were smaller than assumed. And when the recipe basically said “don’t worry if it feels dry, it’ll be fine!” Well, it WAS too dry and it was NOT fine. I made linear erasers since I had to over-work the dough for WAYY too long adding small amounts of water, afraid of making it too wet.
Giving the mass of ALL ingredients, combined with a great video showing what “dry” should look like was key to success this second time.
So all that to say a big “Thank You” for the excellent information and demonstration.
Jennifer Wildheart says
I’ve always been shy at making pasta from scratch because I hate touching flour.
Used my KitchenAid dough hook to make the process more manageable and did the rest by hand.
It was the best pasta I’ve ever had/made! I made ultra thin, angel hair style and it was silky, elastic and just perfect.
Made a sauce of homegrown tomatoes and oranges with plenty of olive oil.
Will 100% make again.
Martine S. says
This is the first home-made pasta recipe I ever tried, using my KitchenAid stand mixer and the pasta attachments we bought for it. (I even used regular enriched white flour!!) The instructions were so clear, I was successful from the get-go and *always* use this recipe now. The dough is never too sticky or too dry; weighing is the way to go.
Next up: spinach pasta.
Request: I would LOVE to see you come up with a Whole Wheat Pasta recipe, Emilie!
Kelly Taylor says
After I let the dough rest 30 minutes but at the end it was super sticky. What went wrong in the previous steps that mine was so sticky?
Rozel Robbertze says
Will try just don’t have pasta machine but a ba,d roller
Heather says
Great video and recipe! First time pasta maker and the fettuccine came out perfect!
Thank you so much for a fantastic post.
Nina says
Hi, after mixing the ingredients and forming into a ball, how long exactly does it needs to rest? On the recipe by hand it says 10-15 min, while on the recipe with a stand mixer it says 30 min? Thank you
Emilie Raffa says
Hi there! For pasta by hand: after forming the dough into a ball, you let it rest for 10-15 minutes (step #3). Then, you knead it (step #4), followed by a longer 30 minute rest (step #5). When using a stand mixer, the dough is kneaded in the bowl for for 4-5 minutes, followed by a 30 minutes rest. So, bottom line: both methods require a 30 minute rest after kneading; they just follow different steps to get there.
Kathie says
I used 1 cup AP flour and 1/2 cup of Semolina flour. Noodles came out perfect.
I am making a shrimp scampi.
Thank you for a wonderful tutorial.
Emilie Raffa says
This sounds sooooo good. Yum. Thanks for your feedback Kathie!
Nancy says
Recipe was so easy to follow. The detailed instructions and pictures really helped. Excellent recipe for beginner pasta makers. Thank you!
Bob says
Just followed this recipe for the first time.
Really simple to make and shape using my pasta maker.
Feedback from wife and daughter was that it was restaurant quality, really light.
BM says
Hi Emilie,
I’d like to dry my pasta to give as gifts. I read somewhere else that it’s dangerous to leave homemade pasta with eggs in it at room temperature for more than 2 hours, but I’m sure it will take at least 24 hours to fully dry for storage, so I’m confused. What’s the best process for this? And how long can my gift recipients keep their pasta before it goes bad?
Thank you!
Barry says
Hi I’m in the process of making this right now, since there’s only two of us and we don’t need a whole pound of noodles, I was wondering, when I take the dough ball and cut it into four pieces can I freeze two of those pieces as is to use later, or should they be processed and made into noodles before freezing?
Emilie Raffa says
Hi Barry! Great question. You can actually do both, although in my experience, you’ll get better results freezing the actual noodles. It’s very easy to do, and you cook them straight from frozen. Plus, it won’t take you that much longer to cut the dough into noodles now, while you’re processing the rest. Hope this helps.
Marge says
Your step by step instructions and video are wonderful and it is such a pleasure to see exactly how something so intimidating can be done so easily.
I would like to try making your dough recipe when I make pierogi. Do you think it would work? I normally make my pierogi dough with 8 cups of all purpose flour, 7 large eggs (1-1/2 cups) and 1-1/2 cups of water. This was my mother’s way of doing it but I tend to have a problem when sealing the edges. The edges become too thick in the process and I’m wondering if my ingredient ratio is causing the problem.
Any suggestions? Thanks so much
Emilie Raffa says
Hi Marge! This is a really interesting question. To start, your pierogi dough is notably different from this pasta dough recipe, mainly because it contains a good amount of water which makes the texture a lot softer. In comparison, pasta dough is dry (but malleable) like play-doh. And this recipe doesn’t contain water at all. So, if you used this pasta dough for pierogi, they might come out more like ravioli. They won’t be as soft and chewy either. Does that makes sense? It’s still doable. The end result will just be different.
You mentioned having trouble sealing the edges. They are too thick. I don’t think the ingredient ratio is the problem. I think the issue is technique. My sense is that you are either not rolling the dough thin enough and/or the dough shrinks back during the rolling process because the gluten is not relaxed enough. This will make the edges thicker. Because you are folding the dough over to create a seal, the initial roll has to be thin because the sealed side doubles up to create one single layer.
Going forward: Do you have a pasta machine at home? You might be able to use it to roll the dough nice and even. If not, a rolling pin is fine. I would let the dough rest after rolling; if it shrinks back let it rest and roll it again until you are happy with the thickness. Hope this helps!
Marge says
Those are excellent suggestions. I do all my rolling by hand and I will be making several batches in the coming days. I’ll let you know how they turn out after making the changes. Thanks so much, especially for your quick response!
Emilie Raffa says
No worries at all. My pleasure. I’m genuinely interested in how they’ll turn out!
RM says
love this recipe! One question for you:
If I’m making it and will have to leave it about 90 minutes before I can cook it, do I still do the 10-15 mins of drying/hanging before I cover in Saran Wrap?
or do I do the drying step immediately prior to cooking? (Or would I not have to dry at all since it will sit for 90 mins regardless?)
Emilie Raffa says
Hi there! I think I get what you’re saying 🥰 Let me back up to clarify: before cutting the pasta sheets into noodles, I semi-dry the sheets first, for 5-15 minutes depending on temperature. This makes cutting easier and the noodles less likely to stick together. Does that make sense? I’m assuming you did this step.
So then, once your noodles are cut (and you can’t cook them right away) I would just cover the tray with plastic wrap or an inverted sheet pan at this point. They should be semi-dry enough from the previous step. Alternatively, you could infact dry/hang them again if you want and then cover. It really just depends on what you want to do, and your timing. So you have options. Hope this helps!
Melissa says
Can this recipe be used for Whole Grain pasta? If so, what would the substitutions be?
Emilie Raffa says
Yes absolutely. Try 50/50 whole wheat flour + Tipo 00 flour by weight. The egg amount stays the same. For example: 150 g whole wheat flour, 150 g Tipo 00 flour + 185 g eggs/yolk cracked weight.
Heads up: comparatively speaking, whole wheat pasta dough made this way won’t feel anything like regular pasta dough. It will feel a bit strange at first when mixing. I found that it needed a longer rest, about 20 minutes or so, before kneading (admittedly, it was cold in my kitchen when testing this dough, so that could have been a factor too). Anyway. Knead it well and let it rest for a good hour afterwards. Whole wheat flour absorbs more water than Tipo 00 so it definitely needs time. Then roll into sheets and cut into pasta noodles. Spelt flour works too.
Ellie says
Hello :-)
I just want clarify the resting of this pasta dough;
first rest is 10 minutes after forming dough into a ball, then
the second resting (after kneading by hand) is 30 minutes?
Sorry, but I got confused .
However, I am over the moon because…this was my very first time making pasta dough.
My large eggs weighted 170 g, so I took out about 3 Tbs of 00 flour. Then did add 1/2 tsp olive oil because the dough felt a little dry.
In the end, it rolled out really good in pasta machine. Thank you, thank you, thank you for thorough tutorial of this recipe and the filling recipe for Ravioli! I made it for supper today and it was great!
Emilie Raffa says
Hi Ellie! You are correct: Mix the dough and let rest for 10 minutes (this short rest makes the dough MUCH easier to knead in the next step). Then after kneading, shape the dough into a ball, cover with wrap, and let rest again for at least 30 minutes before rolling into pasta sheets. PS: I’m so glad it worked out for you. Just read your comment elsewhere re: the rosemary in the meat filling. Yay!🥰
Sunny Zickefoose says
Emilie – Can I used AP flour for this? If so would it be the same measurements?
Emilie Raffa says
Yes. You can use AP flour instead of Tipo 00 (same amount by weight).
Tom says
Just made this recipe. First time making fresh pasta and it worked like a dream. Thank you so much. Just wondering if it is possible to scale up the ingredients to make a bigger batch for my hungry family.
Emilie Raffa says
Tom, this is excellent feedback. Thank you. To scale up, I would just double the recipe to make approximately 2 lbs. total.
Lori says
I thought the dough was a little dry but the pasta I made (ravioli with the Clever Carrot Mushroom Ravioli recipe) was really tender and delicious. I like the combo of semolina and AP flour as it takes some of the toughness out of the semolina only recipes I have tried. Thank you for sharing your recipe.
Emilie Raffa says
Hi there! Yes, the dough is supposed to be dry. This is perfect for pasta (although it might seem a bit weird). You are very welcome for the recipe and I’m so glad you tried it. Thanks for the feedback :)
Deb says
Hello, I’m about to start making pasta for the first time in many years. This is a great guide. I’d like to know if anyone has freeze dried fresh pasta? If so, what prep did you put in?
Emilie Raffa says
Hi there! Place well floured pasta onto a sheet pan. Air-dry for 15-20 minutes (this helps to prevent sticking). Transfer the sheet pan to the freezer. Place a clean kitchen cloth on top, and freeze until solid. Then portion the frozen pasta into zip top bags or a shallow container. Note: frozen fresh pasta can become brittle past 1 month in the freezer.
Fitri says
Hello,
Question, the grocery store by my house only have 00 pizza flour. Can I use this to make the pasta? Thank you for the recipe! I’m excited to try it.
Emilie Raffa says
Great question. Do you know the brand? I’ll look it up…
My answer: it depends.
For reference, in Italy “00” refers to the milling grade of the flour- it’s the finest. The texture feels like baby powder. However, the protein content % of 00 varies from brand to brand, anywhere from 8-12% depending on the type of wheat used. So you can have low protein 00 flour & high protein 00 flour.
For pasta, I prefer 00 flour made from soft wheat. Its low protein content (appx. 8-10 %) creates super silky, springy pasta. Anything higher than 11% you’ll get a chewier product (this is horrible for ravioli). So, have a look at the wheat variety and protein content of your particular 00 pizza flour, and make the call. When in doubt, good quality all purpose flour can be used in a pinch.
Vixen says
I enjoy sharing your tips & recipes. I am an influencer & was wondering if you send emails with recipes daily? If so I would like to share them on my platform.
Emilie Raffa says
Hi there! Thank you :) You can subscribe to my newsletter on the home page (at the very top). Recipes are published weekly.
Parker Westbrook says
A slam dunk on the first try! I used the KitchenAid mixer method, it was SO easy and delicious. Something came up after I made the dough but before ran it through the machine, and even though the dough sat in the fridge for 2 days the fettuccine was still delicious. I feel silly for being nervous to try making pasta now. The recipe steps are clear and easy to follow, both in print and in the video. Thank you so much!
Michelle says
Thank you for this great recipe. I made the dough via the KitchenAid mixer method and kneaded it by hand. Both work just as well and as easily! This was great for a beginner….turned out the very first time. I made absolutely no substitutions for this recipe. Thanks again!
Kasandra says
Hi :) can I make my fettuccine or spaghetti strands and then put them in the fridge until i want to cook them later on that day? And if so, do I put them straight from the fridge into the pot of boiling water? Or do I have to let them sit out for a bit first before cooking them?
Emilie Raffa says
Absolutely. Make sure they are very well floured so the strands don’t stick. Cover the tray with plastic wrap. Cook straight from the fridge; no need to let them sit out before boiling.
Kasandra says
Thank you very much for being so helpful and informative! And thanks for all your amazing recipes :)
Emilie Raffa says
My pleasure! xx
Kasandra says
Amber says
Can I make the dough ahead of time and cut it the day I will eat the pasta?
Emilie Raffa says
Yes. I would make the dough in the morning, wrap and chill in the refrigerator until ready to roll and cut in the evening. Be sure to let the dough rest for 30 minutes at room temperature prior to rolling, otherwise it will be too stiff.
Shane says
Hi, the recipe says to dry 10-15 minutes before cutting. If I’m freezing the pasta for later use, you are saying to dry for an additional 15-20 minutes, is that correct? Thank you in advance. P.s. huge fan, making your sourdough bread recipes this week and they are amazing, especially the cranberry almond.
Emilie Raffa says
Excellent question. Yes. First, semi-dry the pasta sheets for 10-15 minutes before cutting… Once the pasta is cut, air dry for 15+ minutes more before freezing.
Leeann Perrottet says
Do you think its ok if I just use a roller to roll out my pasta sheets? I am going to try and make raviolis. I do not have any sort of pasta making equipment.
TYIA
Emilie Raffa says
Yes, definitely. It’s the old school way ;) Keep in mind, for ravioli, the dough must be rolled very thin. This takes practice and time but it’s doable. For easier handling, cut the dough into 4 pieces (per the recipe instructions above) and roll each piece out separately (as opposed to rolling out the entire dough into one big sheet).
Jackie says
Hi there :).
How many cups to grams is 300g in your instructions? I purchased the exact same flour that you use in your video (same brand too).
Thank you so much!
Jackie
Ash says
I would personally recommend you to get a cheap scale from Amazon. Trust me, with grams recipes are much more accurate and thus work a lot better. Especially with pasta or pastry.
You can use this conversion chart here though:
https://www.allrecipes.com/article/cup-to-gram-conversions/
Alison says
Hi. So happy to find this detailed recipe with instructions. Thank you! My question is this: I just received the pasta press attachment for my Kitchenaid stand mixer. You make the dough into walnut-sized balls to feed through the press. Would this recipe be good for that attachment also? Thank you!!
Emilie Raffa says
Hi there! Yes, you can use this recipe. Just make sure to have extra flour on hand to prevent sticking, if needed. For reference, pasta extruder’s require a dough that’s a bit lower in hydration (i.e. drier) but it can be done. I might play around with a variation…. enjoy!
DCM says
Thank you for this detailed recipe which I can’t wait to try. A question regarding the cut pasta.. by following this recipe and rolling out with KitchenAide on setting 5, can you recall approximately how long will the strands of pasta be once they are cut? I ask because I am looking to minimize any wasted dough and looking for uniformity on the lengths.
Emilie Raffa says
This is a great question. I don’t recall the exact length of my cut pasta strands. However, to minimize waste and to increase uniformity: I would cut the rolled pasta sheets (#5 setting which is long and very thin) into thirds first, and then into strands. No trimming. They should be approximately the same length. No waste.
Meeeee says
Luv it
Emilie Raffa says
Thank you! xx
Rebecca says
Hello, we have been gifted a pasta maker/roller and I have been searching the internet for recipes for homemade dough and your recipe and video and photos have won my attention! We plan to make pasta hopefully this week. Question for you, if we wanted to make a herb pasta, say a basil flavor, when and how would I add that to the recipe? Thank you for your expertise and I look forward to trying this recipe VERY soon!
Emilie Raffa says
Hi there! Great question. I haven’t tested this recipe yet with fresh herbs (yum!). But off the top of my head, I’d do a variation of my spinach pasta dough with fresh basil instead.
https://www.theclevercarrot.com/2022/05/fresh-spinach-pasta-dough/
Alice Wyckoff says
Hello! I tried this for the first time the other day and loved it!
What is the drying rod set up you have that I see in your video? the one that is hanging under your wood shelf?? Would love to get a similar set up :)
thanks! Love your recipes!!
Emilie Raffa says
Hi Alice! Thank you so much. That’s so great to hear. Ok, so I absolutely love my little drying set up ;) It’s just a metal hanging rod, one that you would use to hand pots and pans. It’s SO convenient because it doesn’t take up any space at all. Plus, no need to purchase a separate pasta drying rack.
Alice says
That’s amazing! I’ll try and find one! :)
Cheryl says
Tonight I did my first attempt to making homemade pasta using your recipe and instruction. Wow! Super easy and pasta turned out fantastic!! Thank you!! I didn’t have any semolina so just used more of “00” for dusting. Delicious!!
Emilie Raffa says
Hi Cheryl! You’re very welcome! I’m glad to hear your pasta was a success ;)
CMR says
Who knew… weigh the eggs….Emilie’s details are truly amazing. I can spend hours reading her recipes and going to all the wonderful links Emilie provides on her website.
So talented and always puts so much care into her work. I am sure many of us agree that our kitchens are so much better with so many creative aspects Emilie teaches us. Clear videos and recipes!
Thanks Emilie!
Janice says
I made ravioli for the first time a couple of weeks ago, using your recipe for pasta dough. Enjoyed the process tremendously, and my meat-filled ravioli was a huge success, encouraging me to try ravioli again, this time with a 4-cheese filling. Thank you so much for a great pasta dough recipe, and for inspiring me to finally try making ravioli. One question, if I may: I found the dough to be a little “tacky” (for example, when I removed a 1/4 piece of dough from the plastic wrap, the dough pulls and sticks to the wrap). However, by sprinkling semolina before each pass thru the pasta roller, my dough is lovely. I guess that’s all that really counts, right? But… should it be that tacky to begin with? The dough in your video seems firmer.
Emilie Raffa says
Hi Janice! This is so great to hear. I’ve been experimenting with fresh ravioli at home. I’d love to hear about your fillings… what do you put in them? Yum!
To answer your question: tacky pasta dough is very normal (and sprinkling semolina flour on top to prevent sticking is the correct remedy). The main reason is temperature. For example, in the warmer months the pasta dough will be more doughy and tacky due to humidity. In winter, it will be more dry. Bottom line? Expect the texture to change according to season. Additional factors including flour type and/or if you weighed vs. measured your ingredients also come into play too. Make notes of any changes and adjust as you go. PS: in my video, the dough was more stiff because I was filming in winter! It was freezing.
Janice says
Thank you for shedding some light with respect to dough consistency. Much appreciate your rapid response to my question. As for my ravioli fillings, the meat one contained ground beef and hot Italian Sausage (3:1), as well as spinach, Parmesan, garlic, bread crumbs, parsley, olive oil, and egg. The 4-cheese one contained well-drained cottage cheese (since I couldn’t find lactose-free Ricotta), Parmesan, Fontina, and mozzarella, as well as roasted garlic, egg, and basil. Both served with a homemade marinara sauce. Thanks again for sharing your wonderful recipes…I have so many more I wish to try in the very near future.
Emilie Raffa says
This sounds incredible. I’ve been using roasted garlic in my fillings too. I love the soft, sweet caramelized taste with the sharp blend of cheeses. Yum. Thanks for sharing, Janice.
Todd says
I slightly altered by freeze drying some broccoli and then powdering it in the Vitamix. Then added 1 cup of powdered dry broccoli and compensated for the extra dry ingredient with a splash of water here and there. Came out very good but a little too soft, maybe I over boiled them (8-10 mins) or maybe just the added water, but either way excellent recipe, thanks worked great.
p.s.
Next time going to try with freeze dried powdered cauliflower.
Emilie Raffa says
Very smart. Excellent idea. I like the idea of cauliflower too! Out of curiosity, what sauce did you pair with the broccoli pasta? I was thinking about it, and the broccoli pasta might’ve cooked up soft because some of the flour (gluten/structure) was replaced. Not a big deal. I would just boil for less time if you make it again. PS: I have a fresh spinach pasta dough if you’re interested (linked here).
Todd says
Just a plain ole over the counter Hunts garlic flavor and a can of “sliced mushrooms” -or at a glance what I thought were sliced mushrooms that actually turned out to be cream of mushroom that I usually put on top of Jasmine rice-.
Emilie Raffa says
Haha! Sounds great!
Allane says
Hi! We tried this making spaghetti and loved it. Any tips or suggestions when using this recipe for lasagna noodles?
Emilie Raffa says
Hi Allane! I can’t believe you mentioned lasagna… this is on my list to finish testing ;) Here’s what I know: to adapt this master pasta recipe for lasagna, the key step is to roll the dough thinner to create lasagna sheets. I recommend setting #5 or #6 on the Kitchen aid (the settings will be different if using another pasta machine, just check the manufacturer’s instructions). The sheets need to be thin because they will soak up a good deal of sauce when the lasagna bakes. In fact, I recommend par boiling the sheets before assembling the lasagna (blanch for a few minutes in boiling salted water; transfer to kitchen dowels to dry.) This step gives the sheets a head start on absorption instead of soaking up the sauce.
Allane says
Thank you Emilie- I’ll give it a try! And I’ll keep an eye out for more lasagna information from you, hopefully coming soon :)
Emilie Raffa says
Hello! That sounds wonderful. I love passed down recipes :) Here is my Ragù Bolognese recipe. I don’t have a separate post for the bechamel sauce yet. However, I use 800 ml whole milk, 60 g butter, 60 flour, nutmeg, salt and pepper. The texture of the bechamel needs to be quite loose for lasagna. And then tons of Parmesan in between all the layers, of course! I cover the pan with foil to keep the moisture in, and bake at 350 F for 20-30 minutes.