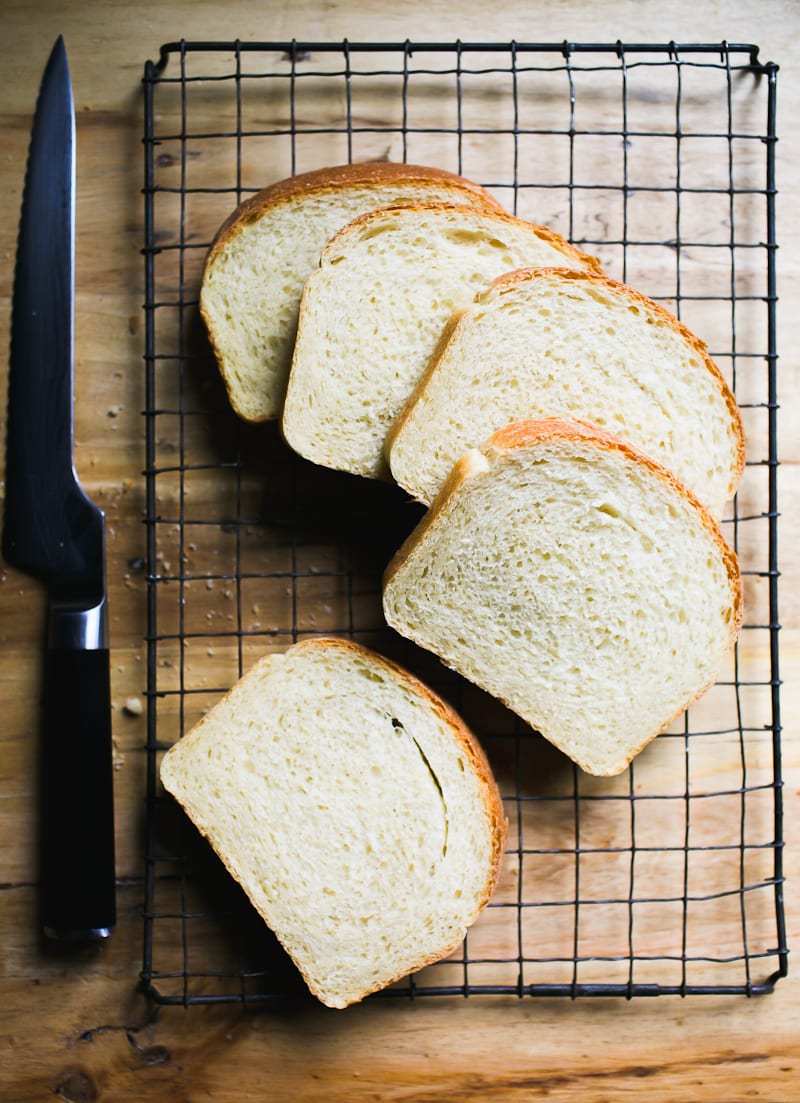
Made with all purpose flour and just a touch of butter, learn how to make soft, tender sourdough sandwich bread with bubbly, active sourdough starter. Recipe adapted from my bestselling book:
Artisan Sourdough Made Simple.
Out of all the sourdough bread recipes I make on repeat (my beginner sourdough bread recipe,
sourdough focaccia and sourdough pancakes to name a few!), this easy sourdough sandwich bread gets the most requests. Why? It’s soft. It’s buttery. It makes the kitchen smell like magic.
And the best part: you made it yourself. No junk or preservatives. Just simple sourdough with a soft crust, subtle tang and fluffy crumb that holds up to slicing, toasting and sandwiches (anything really).
Below, you’ll find my step-by-step walkthrough and baking schedule. You’ll also get three solid
variations (cinnamon raisin, whole wheat and bread flour) plus more sandwich loaf recipes in my book for inspiration.

Good To Know:
- What most bakers get wrong: the second rise goes for too long. This creates over proofed dough that bakes up flat. Follow my recommended timing and tips to master this step.
- Pan size matters. Want a taller loaf? Use an 8.5×4 inch pan instead of the standard 9×5 inch pan. Both work, but the smaller size will give the dough a nice upward boost.
- Use softened butter. If it’s cold, it won’t blend into the dough.
- Make it vegan. Swap in your favorite plant-based butter. Just check the label. Some brands are very salty.
- Temperature controls time. Warm kitchen? The dough will rise fast. Cold kitchen? Give it more time. Watch the dough and not the clock.
How To Make Sourdough Sandwich Bread {Step-By-Step Recipe}
Step 1: Mix the Dough
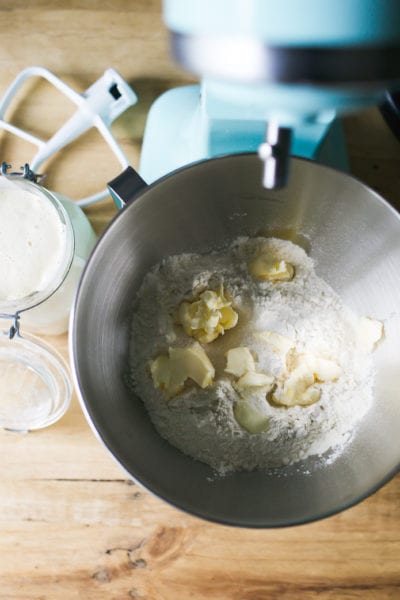
To Start: Add the flour, softened butter, sugar and salt to a bowl. I like using a stand mixer for this recipe. The dough is naturally a bit sticky; the machine makes it easier to handle. Mix with the paddle attachment until the butter looks like crumbs.
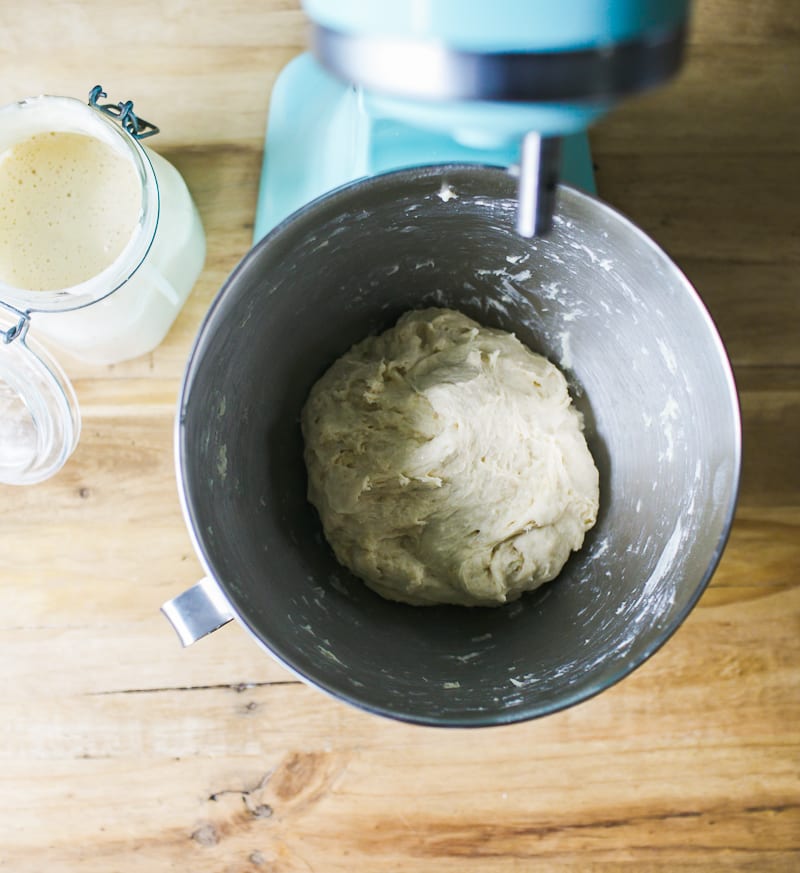
Mix in your bubbly, active sourdough starter and water until everything comes together. Cover and rest for 30 minutes to relax the dough before kneading.
Note: If you need assistance with your sourdough starter, read my companion articles Feeding Sourdough Starter: My Best Tips & Tricks and Troubleshooting Sourdough Starter.
After 30 minutes of resting…
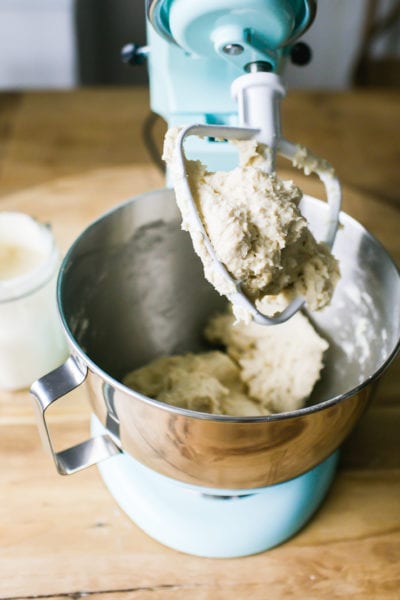
Remove the paddle attachment and switch to the dough hook. Knead until soft and supple, about 6-8 minutes. Note: on this particular day, my dough was stickier than usual so I added a sprinkle of flour to even it out. You can do that too.
No Stand Mixer? Knead the dough by hand on a lightly floured surface until it feels smooth, soft and elastic, about 8-10 minutes. Don’t worry about under/over kneading. If it’s springy (not sticky) you’re good to go.
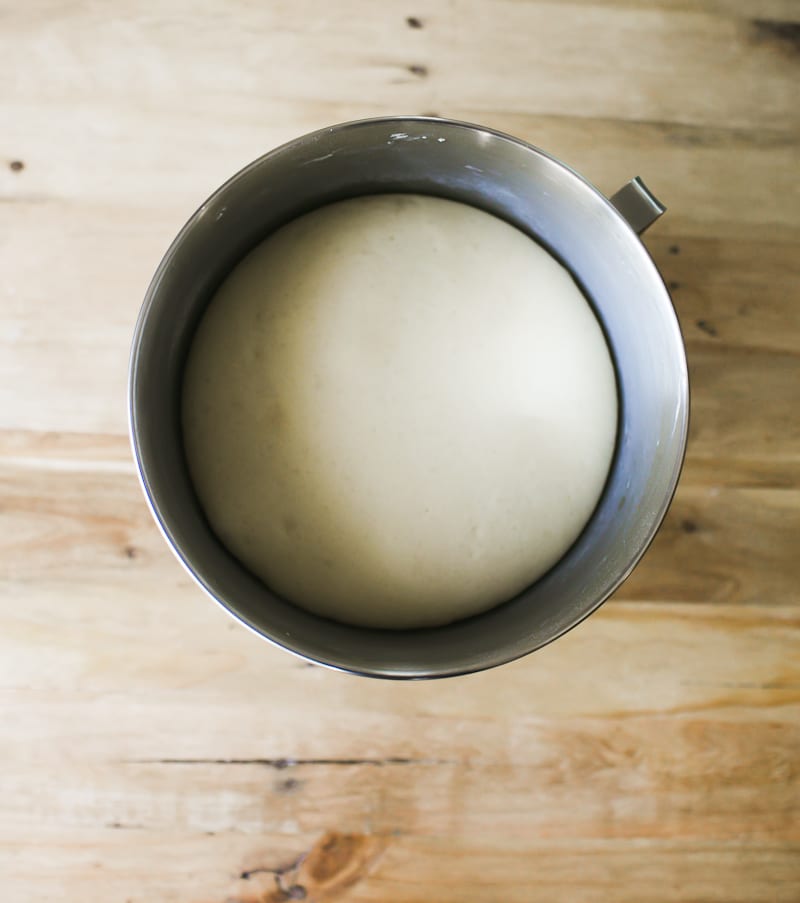
Step 2: Bulk Rise (Overnight)
Cover the bowl with plastic wrap and let the dough rise overnight at room temperature (68 F), about 10-12 hrs. The dough is ready when it’s puffy, airy and has doubled in size.
Tip: This is an overnight sandwich dough. However, you can do a same-day bake instead (see my Sample Baking Schedule).

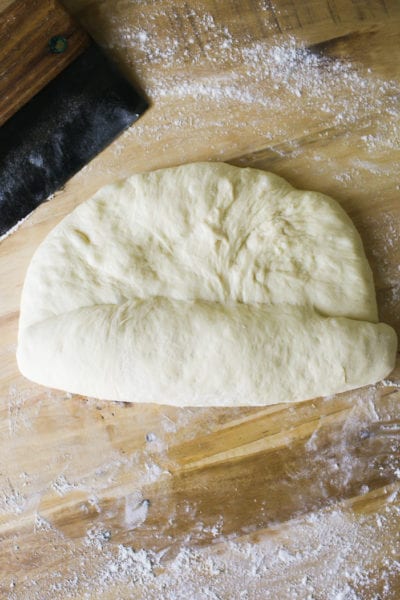
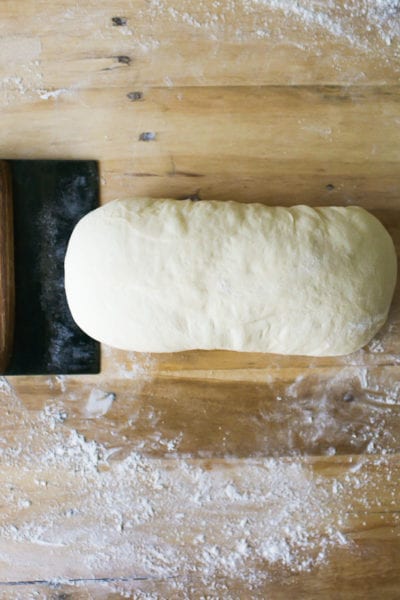
Step 3: Shape the Dough
Remove the dough onto a lightly floured surface. Gently flatten to release the air bubbles (you don’t want big holes like ciabatta!).
Roll the dough into a log, tucking the ends underneath. Then, with floured hands pull the dough towards you creating surface tension to tighten its shape. Place the dough into a buttered loaf pan, but make sure it’s seam side down.
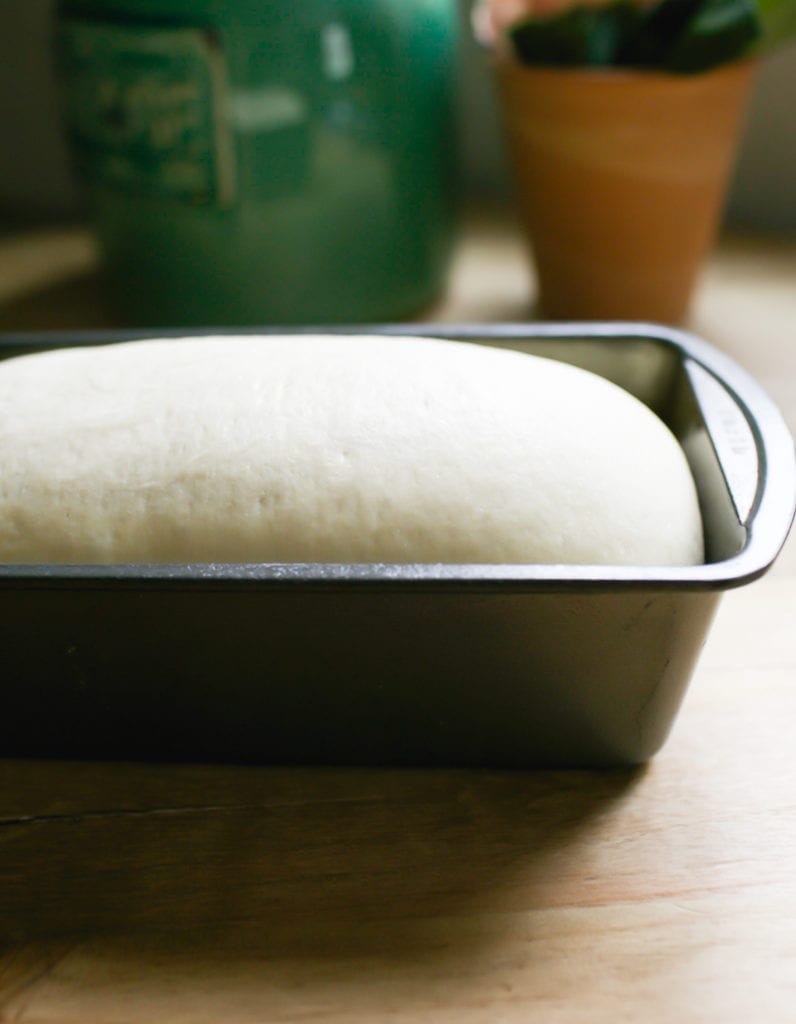
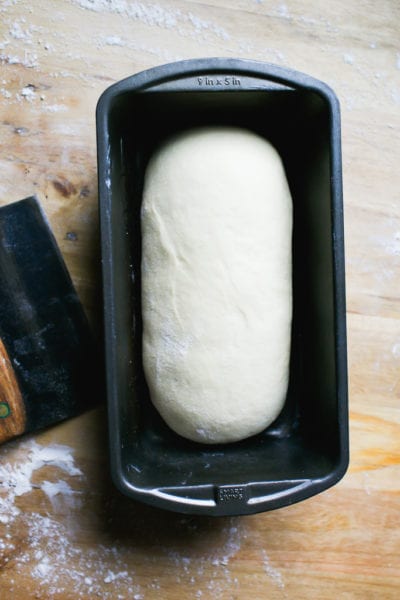
Step 4: Second Rise
This step is crucial. When done correctly, your loaf will build back additional strength needed for good oven spring. Cover the pan with lightly oiled plastic wrap so the dough doesn’t stick to the top. Let rise until the center domes about 1 inch above the rim of the pan. You’e not going for double in size or sky scraper height; just notably puffy and less dense.
Tip: Cold Kitchen? Your second rise might take longer than expected @ 68 F. Be patient with this step. Plan on 1 1/2 -2+ hours depending on your specific room temperature and starter strength. If you’re short on time, use a proofing box or my DIY warm oven trick to speed things up (see “Helpful Tips” in the recipe card below).

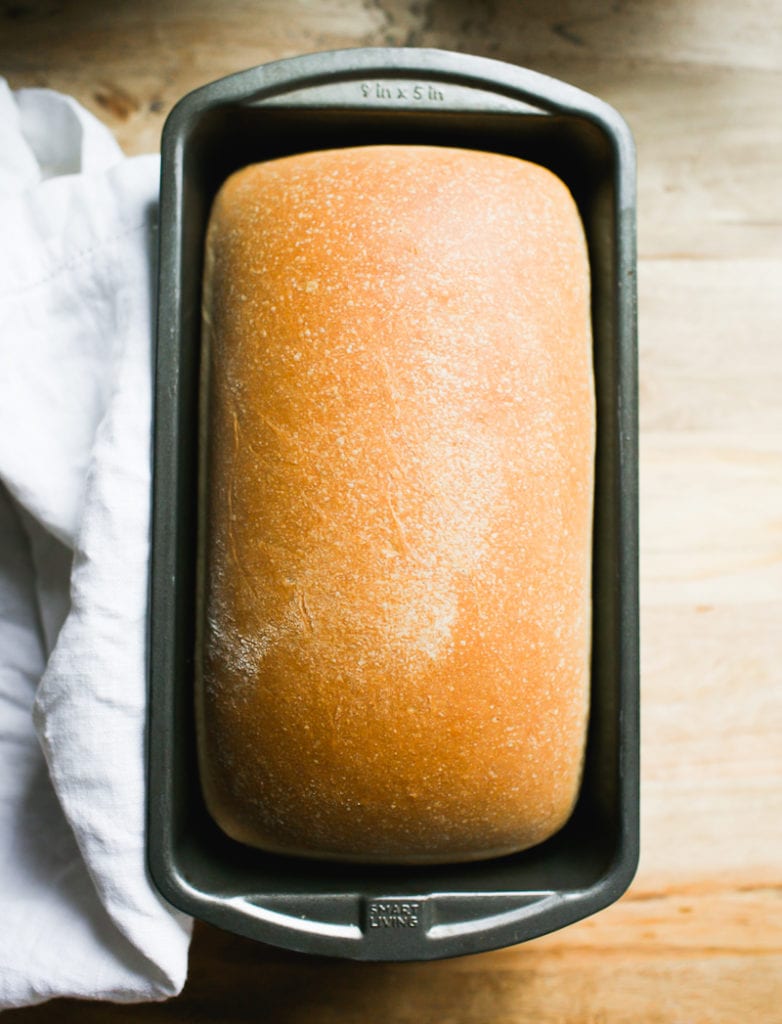
Step 5: Bake The Bread
Preheat your oven to 375 F. For better oven spring, preheat to 500 F instead, then lower the temperature to 375 F when the dough goes into the oven. Bake on the center rack for 45-50 minutes or until golden brown.
Cool in the pan, then transfer to a wire rack. Wait an hour before slicing (skipping this step can turn the inside gummy).
Tip: Have an extra loaf pan? Some bakers create a makeshift “lid” by placing a separate, upside loaf pan on top of their pan before baking. This traps steam inside, creating a humid environment for the dough to rise avoiding potential blow-outs or tears, and keeps the crust soft. It’s similar to using a Dutch oven for my sourdough bread recipe.
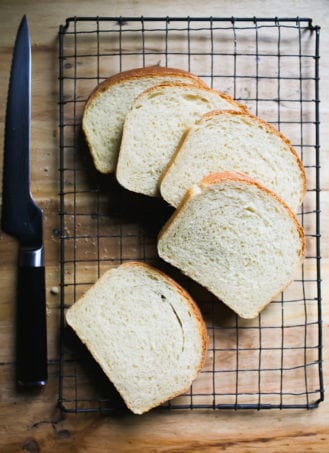
Slice & Store
You’ll need a good serrated knife (I use this one). For a moderately priced option, try this knife instead. If your bread slices are really uneven, consider this collapsable bread slicer with 3 different thicknesses: thin, medium and thick to guide you along.
What I do at home: If you have a large family, or just eat a lot of bread, I highly suggest doubling this recipe. Bake (2) loaves side by side and freeze whatever you don’t eat. This loaf can be frozen whole, covered tightly in plastic wrap or as individual slices.
Sourdough Sandwich Bread Variations
- Whole Wheat: Replace 20% of all purpose flour with whole wheat or white whole wheat flour. If the dough seems dry (whole grain flours absorb more liquid), add more water as needed to achieve a workable consistency. Do this 1 teaspoon at a time.
- Bread Flour: Do an even swap, adding more liquid if the dough is dry. For example, King Arthur Bread flour is very thirsty so more liquid might be needed. If using Gold Medal bread flour which is not as absorbent, additional adjustments might not be necessary.
- Sourdough Cinnamon Raisin Bread: You’ll find my step-by-step post here. The vanilla-soaked raisins make it a community favorite!
What To Bake Next
In addition to the above variations, a natural next step for sandwiches and breakfast fare would be my easy, NY-style sourdough bagels (they are so incredibly chewy and addictive) and these super soft sourdough english muffins. I’m excited to see what you make next.
Sample Overnight Baking Schedule (68 F)
Feel free to adjust the start times below as needed. It’s flexible. For a same-day bake, start early in the morning and bulk rise at a warmer temperature.
Day 1 (Evening)
- 4:30 PM: Feed sourdough starter (to activate)
- 8:00 PM: Mix dough
- 8:30 PM: Rat 30 minutes, then knead.
- 9:00 PM: Cover and bulk ferment, room temp @ 68 F overnight (10-12 hrs).
Day 2 (Morning)
- 7:00-8:00 AM: Check the dough (should be doubled)
- 8:15 AM: Shape dough
- 8:30 AM: Second rise (1 1/2 – 2+ hours)
- 10:30 AM: Preheat oven
- 10:45 AM: Bake
- 11:30 AM: Cool
By signing up, you agree to receive emails from The Clever Carrot. Unsubscribe at any time.
Easy Sourdough Sandwich Bread
- Prep Time: 12 hours
- Cook Time: 50 minutes
- Total Time: 12 hours 50 minutes
- Yield: 1 loaf 1x
- Category: Sourdough Bread
- Method: Oven-Baked
- Cuisine: American
- Diet: Vegetarian
Description
A simple and easy recipe for homemade sourdough sandwich bread. Made with all purpose flour and just a touch of butter. I like to make the dough at night so we can have fresh bread in the morning. This loaf freezes well (whole or sliced). I recommend this loaf pan.
Helpful Tips:
- For best results, weigh your ingredients with a scale instead of using measuring cups. Weight and volume measurements are not equal, only approximate! For example: If your starter is very bubbly, 1/4 cup might only weigh 30 g which is too little for this recipe (you need 50 g). The dough will take forever to rise. Same goes for the flour: 4 cups might weigh over 500 g depending on how tight the flour was packed into the cup. More flour = dry dough.
- This recipe works with Whole Foods 365 Everyday, King Arthur and Trader Joe’s all purpose flour. If using another brand with a lower protein content (i.e. Gold Medal, Pillsbury, Heckers) consider reducing the total water amount by 15 g.
- For a variation of this recipe with more sourdough starter, please choose one of the following adjustments below, keeping the rest of the ingredient quantities the same:
- 100 g starter + 255 g water
- 150 g starter + 250 g water
Additionally, because temperature controls time: you can also increase your surrounding temperature for the bulk or second rise, as needed. Place the dough in a proofing box set to 75-80 F. Or, preheat your home oven to 75-80 F and then shut it off immediately (use an oven thermometer to make sure it’s set to exactly 80 F and not higher!). Place the covered dough inside until it bulks up. Do no use this option overnight- it will be too warm.
Ingredients
- 500 g (4 cups) all purpose flour
- 60 g (4 tbsp.) unsalted butter, softened, cut into cubes
- 12 g (1 tbsp.) sugar
- 9 g fine sea salt
- 50 g (1/4 cup) bubbly, active sourdough starter (100% hydration)**
- 270 g (1 cup + 2 tbsp) warm water
Instructions
Baking Schedule: this is an overnight dough which takes approximately 10-12 hrs to rise @ 68 F. Start the night before, in the evening, and plan to bake the following day. If it’s warmer than 68 F the dough will take less time to rise. Alternatively, start in the morning and bake in the afternoon or evening.
Mix the Dough
In a stand mixer fitted with the paddle attachment, add the flour, butter, sugar and salt. Mix on low speed until combined; the butter should look like crumbs.
Add the starter and warm water. Mix until the flour is fully absorbed (get in there with your hands to finish mixing). The dough will feel slightly sticky and elastic at this stage. Cover with plastic wrap or a damp towel and let rest for 30 minutes. Meanwhile, replenish you starter with fresh flour and water.
After the dough has rested, switch to the dough hook and run the machine on medium-low (#3 on a KitchenAid) for 6-8 minutes. The dough will feel soft and supple and not stick to your hands. If it does, add a dusting of flour.
Note: If you do not have a stand mixer, the dough can be made by hand. After mixing and resting for 30 minutes, knead the dough on a lightly floured surface for 8-10 minutes, or until smooth, soft and elastic. Do not worry about under/over kneading. Relax into the process and focus on the texture, not the time.
Bulk Rise
Cover the bowl with plastic wrap and let rise overnight at room temperature (68 F) until double in size, about 10-12 hrs. Please refer to the Baking Schedule above for additional rise time options.
Shape the Dough
In the morning, coat an 8.5×4 inch loaf pan with butter.
Remove the dough onto a lightly floured work surface. Gently flatten the surface to release any large air bubbles.
Roll the dough into a log tucking the ends underneath. Rest for 5-10 minutes. With floured hands, gently cup the dough and pull it toward you to tighten its shape. Using a bench knife, place the dough into the loaf pan seam side down.
Second Rise
Cover the dough with lightly oiled or buttered plastic wrap. Let rest at room temperature until it has risen to about 1-inch above the rim of the pan (check the height by looking at the domed center portion of the dough). You are not looking for it to double in size. For timing, this can take anywhere from 1 1/2-2 hours (or more!) depending on temperature and the amount of sourdough starter used. Remember, the warmer it is, the faster the dough will rise. Refer to the “helpful tips” at the top of this post.
Preheat your oven to 375 F. Note: For higher oven spring, preheat to 500 F instead. Reduce to 375 F once the dough goes into the oven and bake as directed.
Bake the Dough
Bake the dough on the center rack for about 45-50 minutes, or until golden brown. Cool in the pan for at least 10 minutes, and then transfer to a rack to cool completely. This sandwich loaf will stay fresh for up to 3 days, stored in a plastic bag at room temperature.


Comments
Karron says
Excellent recipe, soft and flavorful, thank you so much.
💖 Emilie loved this comment!
Shelby says
As a newbie sourdough baker, I truly appreciate all the details, pictures, and tips in this recipe. I’ve made this twice now and it has turned out wonderfully each time. Definitely saving this as my go-to sandwich bread recipe!
Yvette Ruiz says
This is definitely going to be a regular recipe! This was very simple to put together and I appreciated that you gave alternate measurements – I used 100g of starter. I also used a combination of whole wheat flour (100g) and bread flour (400g). I made this a little early in the day and didn’t intend to bake until the following day, so I refrigerated the dough until evening and before I went to bed, I set it on the counter to continue bulk fermentation. I’m extremely happy with how this loaf turned out and will definitely make again!
💖 Emilie loved this comment!
Mary says
I’m new to sourdough and am wondering why there is an option to use more starter and less water? Does adding more starter help with rise, flavor, or just use up excess starter? Just curious, thanks!
Eileen says
Your recipes have been brilliant! Weight measurements in grams have been so helpful for accuracy. The bagels, cinnamon scrolls (I usually find these super sweet – yours are perfect 👌) and sourdough loaf have all turned out wonderfully. Thank you. One question is the sugar necessary in the sandwich loaf or can I just omit it? Thanks again.
💖 Emilie loved this comment!
Nell Scaletti says
Hey Emilie, help me please! I can’t for the life of me figure out the quants need for a 1kg pullman loaf tin. Given that 1kg =2.205. So if the loaf tin you use is 1lb, one can only assume that I should multiply the weights by approx 2.2 that adds up to about 2.15kg of dough. Does that sound like it’s too much?
Nina says
Absolutely, hands-down the best sandwich sourdough recipe. I never write reviews, but I have made this loaf more times than I can count—so I feel like I should give it the love it deserves. This is FOOL-PROOF. There have been times where I said “oops, not sure if I did this right,” and it ALWAYS has turned out. I’m pretty sure I’ve made each batch differently, due to timing or my situation, and I always say “time to see if it is actually fool-proof this time,” and it always comes out beautifully. I sent this recipe to my friends and they all agree that it is simple and wonderful (and fool-proof lol)! Thank you so much for an easy and yummy recipe!
💖 Emilie loved this comment!
B says
If I am not ready to bake it after it rises for 10-12 hours, can I put it in the loaf pan after that and stick it in the refrigerator until I’m ready to bake it? Have you ever done that before?
Sarah says
Could this be made into dinner rolls? The recipe is fantastic!
Jessica Bungay says
This turned out soooo good! It’s way easier than typical sourdough and less time consuming. I have my second loaf going now and I’m so excited!
Gail says
I try not to use refined sugar can I use honey?
Gabriela says
Did you end up using honey because I’m also avoiding refined sugar.
Gail says
I did. It tasted good, I just had trouble with my rise. The bread was dense and gummy inside but I dont think it had to do with the honey.
Karen says
Did this.. Turned out well. Thank you. I used your percentages but didn’t follow fully…
💖 Emilie loved this comment!
Amey says
After the bulk ferment, can I place in a banneton & put in fridge. Then take out of fridge next day & shape and continue your steps? If yes, does the dough need to rest for some time before shaping?
Jessi says
I followed this recipe exactly and add i was mixing the dry ingredients i was thinking ‘this is too much flour’ and when i added the wet ingredients I was right, it was dry and dense and I found myself mixing more water into it to try and achieve a better consistency…I hope it turns out OK
Kristin Parks says
Will this recipe work with a Pullman pan?
R. J. Harris says
yes, I baked mine in one last night. no lid.
Ellie says
Can I sub whole wheat flour?
Carmen Stutz says
I have not made it yet. I was wondering can you use bleached ap flour?
Aurora says
Love love love this recipe! So easy for beginners! If I wanted to use fresh milled flour do you think that it would turn out just as good?
CarolPitts says
I wish I could put a picture of my loaf on here. I did everything exactly like the recipe EXCEPT. I had to put my dough in the fridge overnight. For reasons unrelated. I took it out at 5 am. Let it warm up until 8 am. Shape it into a loaf and left it covered until 1230pm. Got home from work and it tripled in size. I put it in the oven and baked it.
It’s the tallest loaf I’ve ever made and it taste spectacular. Thank you for the recipe.
Tapashi says
This is the best sour dough sandwich bread recipe !
Have had great bread 3 times in a row- soft fluffy delicious loaves.
But the last 4 times- after the first 12h rise, the dough was so shaggy and sticky, just could not shape into the loaf pan.
The dough was perfect, not sticky after the flour etc was mixed in the mixer. Same active starter, no change in the flour, followed all the steps as in the recipe.
Am very disappointed… not sure what went wrong.
Would appreciate your comments and any help you can provide. Was so excited I had found my best sour dough sandwich bread recipe…but not anymore :(
Tapashi says
This is the best sour dough loaf I have made! Great rise, soft, delicious- followed the recipe about 3 times, great success.
Unfortunately the last 4 times, after the first 10 hr rise, the dough doubled, but the dough was so so wet could not shape into the loaf pan at all – a sticky messy dough!
Same active starter, same bread flour, same recipe …I did not change anything, but not sure what happened:(
Any help pleeeease… am so disappointed. Not sure where things went wrong. Look forward to any pointers please
StaceyO says
I love this bread! However my loaf doesn’t end up very tall. Could bulk fermenting too long be the issue? I’m definitely in the 12 hour realm. The second ferment after shaping takes 6 hours and it’s still not 1 inch over the pan. Help please.
Aurora says
This was my first time making sourdough, and it turned out amazing! Do you know how I might make this recipe with fresh milled flour?
Rachel says
Very easy to follow and my family told me it is a million times better than store bought bread. I’ll be making this for sure again.
💖 Emilie loved this comment!
Sue says
Baked this today and it turned out soft and delicious. This was to be my last ever try to make sourdough after all the previous failures but it was so easy. Thank you for the step by step instructions most helpful. I would like to make a Multigrain Sandwich loaf do you have a recipe for that. Thanks in advance. S
April says
This was the best loaf of bread EVER. Bread is soft and fluffly with a nice crust. My husband loved it. It will be my go-to from now on.
💖 Emilie loved this comment!
Corry says
What kind of luck do people have using a bread maker?
Chris Lane says
Thank you for your recipe. My loaf turned out less fluffy than I expected. Any ideas as to why?
Carolina says
I tried this recipe but ignored the part where says to cut in two because is two loaves, luckily I was using a sandwich shape Dutch oven huge and was enough, tastes pretty good and super fluffy
💖 Emilie loved this comment!
Lorraine says
I would like to make this after my starter is recipe and copied the recipe for the 9×5 scaling….I saw a comment in the recipe start that this recipe says one loaf 8×4 … where does it say it is for 2 loaves. Thank you
CR says
Can this recipe be used with bread flour? Also, if I wanted to add some whole wheat, what would the ratios be? Thank you!
💖 Emilie loved this comment!
Emilie Raffa says
This recipe can be made with bread flour – it will be slightly chewier. If you want to add whole wheat flour, start small and work your way up until you achieve the texture and taste you’re looking for. I recommend 15-20% whole wheat flour. For reference, too much whole wheat flour in any sourdough bread recipe without making additional changes (such as adding more water to the dough) will cause the loaf to be very dense.
Jacqueline Black says
I used 100 grams whole wheat flour and the rest in King Arthur unbleached. It’s is good for us
Maria says
Can I use olive oil or another oil instead of butter or a plant-based butter? If so, at what quantity? Appreciate your support! Excited to try this out! 🤗
💖 Emilie loved this comment!
Emilie Raffa says
Hi Maria! Yes, you can use olive oil or another oil of choice, such as avocado. While it’s technically not an even swap for butter, many bakers who have made this recipe have done so successfully. Plant-based butter is also fine to use.
Hazel Peters says
I just tried the 2 loaf pan method. I wish I could include a picture. It turned out great. I preheated the oven to 500, lowered it to 375 and baked it with the lid on for 40 minutes. Then I removed the lid until I achieved 205 degrees. Such a beautiful looking loaf!
💖 Emilie loved this comment!
Emilie Raffa says
Love this! Thank you for sharing (and so happy you’re happy!) 🥰
Mary says
Thank you for this comment! I want to try the double pan method, but wasn’t sure when to take the “lid” off. Now I know what worked!
💖 Emilie loved this comment!
Ana N says
In the recipe, it doesn’t mention to cover the pan while baking. But in the Tips section it mentions that you can use another pan to cover it. Why would I cover it? Which are the steps for that? Do I cover for the whole time or but just a few minutes? Thanks
Emilie Raffa says
Hi Ana! Covering the pan traps in steam which creates a humid environment for the dough to rise. This keeps the crust from setting too early, which can cause tears on the sides of the bread. Common practice is appx. 25-30 minutes covered for best results, then uncovered for the remainder of time.
Emily says
Could you use a bread machine with this recipe?
💖 Emilie loved this comment!
Emilie Raffa says
Yes, you can use a bread machine for this recipe.🥰
Leigh says
How exactly would you do it in a bread machine? There’s no setting for that long of a rise (on mine anyway).
Loren says
Today will be my third time doing this recipe, it’s my go-to now! I am stuck at home healing from surgery, and this recipe is simple enough for me to do it. It’s foolproof and I really appreciate that. Perfect beginner recipe.
My loaves have a lovely oven spring, beautiful crumb, good texture. I’ve had some recipes turn out crumbly, or too dense, but this one is perfect! It’s SO so so good! Perfect for French toast, grilled cheese, and PB&Js! I haven’t had to buy bread from the store in a while. Last night I fed my starter with whole wheat for the first time in a while, so I’m excited to see how the flavor might change.
Thank you for your recipes and all your hard work as a baker! Wish I could rate higher than 5 stars.
💖 Emilie loved this comment!
Emilie Raffa says
This is so kind of you Loren, thank you. I appreciate it. Wishing you a speedy recovery at home 🥰
Leah says
Why are some recipes a simple hand-mix and some use an electric mixer for longer?
💖 Emilie loved this comment!
Emilie Raffa says
Hi Leah! There are SO many different ways to make sourdough sandwich bread (confusing, I know). It all boils down to personal preference of both the author and the baker making it. I would experiment with a few to see what you like best.
StaceyO says
Can this be baked in a pullman loaf pan?
💖 Emilie loved this comment!
Emilie Raffa says
Hi Stacey! I haven’t tested it, but I know it can be done. Depending on the size of your pan, you might need to increase the dough.
Dana says
I am brand new to sourdough. My goal is to make sandwich bread so I don’t have to buy the crap the stores sell. I bought 3 different sizes of the pullman loaf pan. What size do you recommend for this recipe?
Cheryl Bowser says
I make this every week, I use the more active starter because it fit my lifestyle. I have substituted avocado or light olive oils for the butter. Any way you make it by hand or mixer it’s perfect!!
I also place a pan of water in the bottom of my oven preheated to 500 for 30 min, and I place a pan on top of my loafs for height turn oven down to 375* bake 40 min ck. Eternal temp. 200* -205*
PERFECT
💖 Emilie loved this comment!
Emilie Raffa says
These are such helpful tips, thank you Cheryl! The pan on top is great for height. 🥰
Pam says
Made this yesterday and it’s so delicious. Will be definitely making again. So much better than store bought bread.
💖 Emilie loved this comment!
Amanda says
I made this recipe the other day and it turned out perfect. I wrote down measurements and just made it again, but it’s early and I totally forgot to skip the rest period between initial mix and kneading. Should I continue and bake and hope for the best, or is this going to be a complete wash?
💖 Emilie loved this comment!
Laura says
Yes! 🙂
💖 Emilie loved this comment!
Becky says
Can this recipe be doubled?
💖 Emilie loved this comment!
Emilie Raffa says
Yes, you can easily double this recipe.
Wendy says
I made this recipe twice now and I LOVE it. It’s so soft and buttery.
I did have a question, I’m very new to sourdough, but was wondering, if I decrease the amount of butter to 40 grams, do I need to adjust the amount of water?
💖 Emilie loved this comment!
Emilie Raffa says
Hi Wendy! No, you do not need to change the amount of water if decreasing the butter. Keep the rest as is!
Hazel Peters says
My best success with sourdough so far was with this recipe. I’ve had lots of failures, but just lately I was given a great starter and tried this recipe. I was shocked!
💖 Emilie loved this comment!
Madeline Whitton says
Very forgiving recipe. Beginner friendly. I did my bulk fermentation during the day time, then did an overnight proof in the fridge, pulled it out of the fridge in the morning and baked it at noon when I was happy with the rise. Didn’t exactly follow the recipe. But it still came out perfect.
💖 Emilie loved this comment!
Trish says
Can you use olive oil in place of butter?
💖 Emilie loved this comment!
Emilie Raffa says
Hi Trish! Yes, you can do this. The texture will change slightly. But many bakers have done it successfully.
Trish says
Thank you!
💖 Emilie loved this comment!
Chastity says
I just made this recipe. I used bread flour since I didn’t have all purpose. This bread turned out perfect and it tastes amazing! Thanks so much for sharing it. I forgot to give it a rating in the first comment. 5 stars!
💖 Emilie loved this comment!
Emilie Raffa says
Thank you so much Chastity!
Priscilla says
I’ve been making our own bread for a long time. I was afraid to make sourdough bread because of the tedious process, but I finally worked up the courage—and it’s been a success! I used your recipes to create the sourdough starter, and it’s working perfectly. I made my first bread last week, the Beginner’s Sourdough Bread, and this week I made this Easy Sourdough Sandwich Bread; my family loves them!
💖 Emilie loved this comment!
Emilie Raffa says
I love this Priscilla, thank you for taking the time to comment. 🥰 Side note: the very first person who shared their starter with me, her name is Celia, guess what the name of her starter is? Priscilla.
Rick says
can this recipe be cold fermented overnight?
💖 Emilie loved this comment!
Emilie Raffa says
Hi Rick! Yes, you can shape the dough and ferment it overnight in the fridge. Make sure it’s covered with lightly oiled plastic wrap. Give it more time to rise (if needed) the next day at room temperature.
Alyssa says
Hello if I dont have an extra pan to put on top durring baking could I use tinfoil instead and just have it domed to leave room for the bread to rise?
💖 Emilie loved this comment!
Emilie Raffa says
Hi Alyssa! It won’t be quite the same since it’s not airtight. But you can definitely experiment with this and see how you go.
Cathy says
After the 10-12 hr bulk rise, is it ok to place in the fridge overnight and bake in the AM?
💖 Emilie loved this comment!
Emilie Raffa says
Yes, you can shape and place the dough in the fridge overnight (covered in lightly oiled plastic wrap). If it needs more time to rise the next day, give it time to do so at room temperature.