No bread flour? No problem! Learn how to bake artisan sourdough bread using all purpose flour and active sourdough starter. This easy-to-follow recipe features step-by-step photos, helpful tips, and a simple baking schedule to help you create delicious, naturally leavened loaves at home. It’s light crisp and airy!
Bakers all over the world choose bread flour to create exceptional sourdough bread at home. It’s prized for its high protein and gluten content, which helps to create a lofty-high rise. But what if you don’t have any bread flour? Can you make light, airy artisan sourdough with all purpose flour instead?
In this post, you’ll find a clear, step-by-step guide to mastering sourdough with all purpose (or plain) flour with a few key adjustments. You’ll gain the tools and confidence you need to bake delicious bread every time.
All-Purpose Flour vs. Bread Flour: Key Differences
It all boils down to protein content. Bread flour has a higher protein content than all purpose flour, which affects gluten development and the bread’s rise.
I typically use King Arthur flour for bread baking. Their bread flour contains 12.7% protein, and their all purpose flour contains 11.7%. This recipe was formulated to work with King Arthur and Trader Joe’s all purpose flours, which are comparable. (learn more about choosing flour in this post).
Tip: Protein content varies between brands, so stick to one brand first to understand how it behaves. It will be your reference point for future adjustments as you continue to bake.
How to Use All Purpose Flour in Bread Baking
Swapping all-purpose flour for bread flour is not always an even exchange. Because all-purpose flour absorbs less water, you’ll need to reduce the total water in your dough to avoid stickiness. Too much water makes the dough hard to handle, which can cause flat, dense, or gummy bread- you don’t want that.
Ok, So Reduce the Water by How Much?
I typically suggest reducing the water by 15-30g to start. The range depends on the specific sourdough recipe, the amount of sourdough starter, and the flour brand you use.
You’ll have to play around with the texture of the dough, adjusting the flour/water as needed until it “feels right,” which can be frustrating if you lack experience. But stick with it: success requires practice, patience and persistence. For now, let’s focus on visual and tactile cues to guide you through the process.
How to Make Artisan Sourdough Bread with All Purpose Flour {Step-By-Step Recipe}
Step 1: Mix the Dough
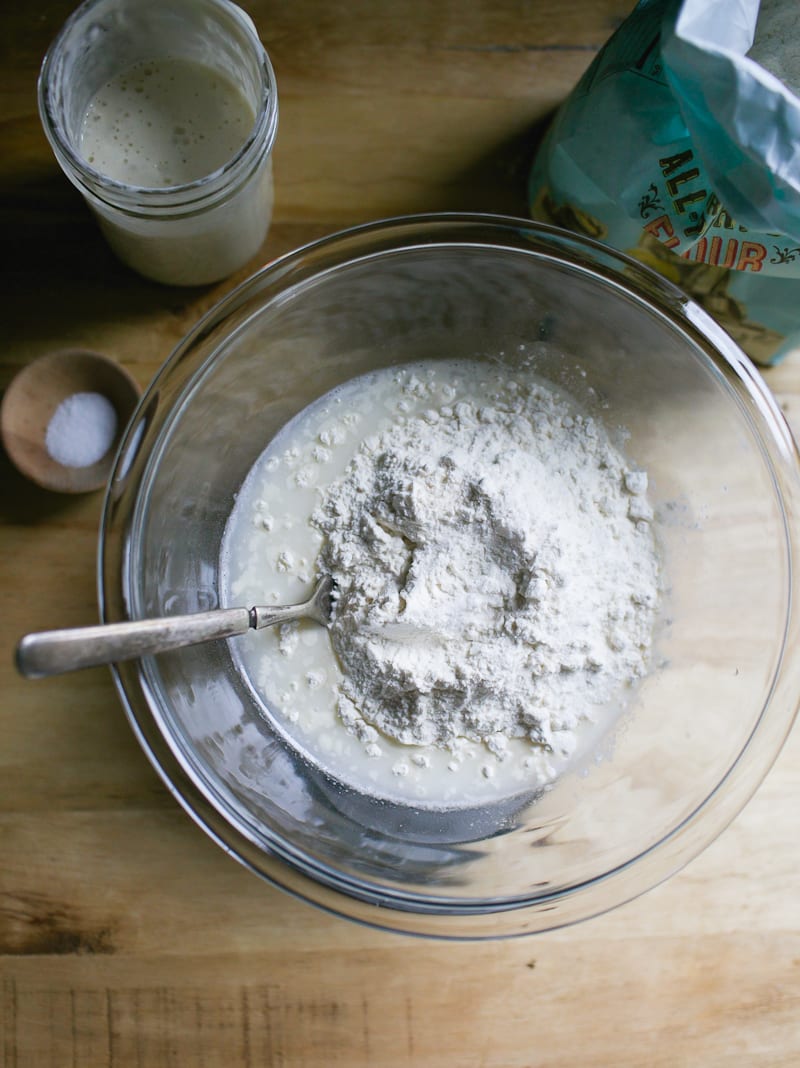
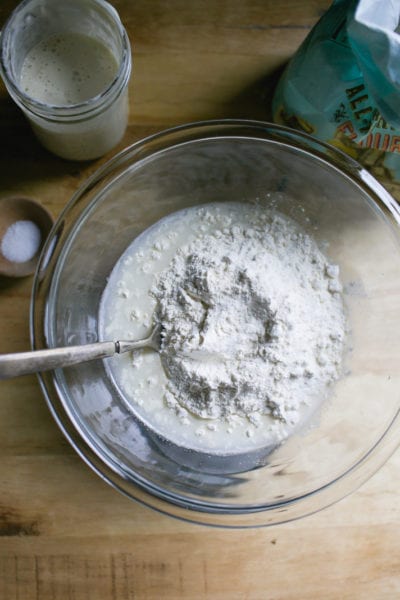
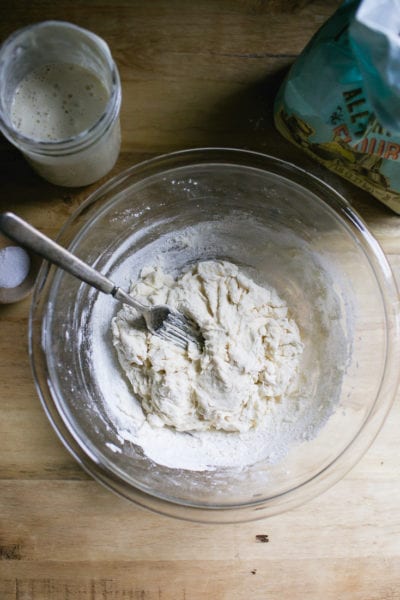
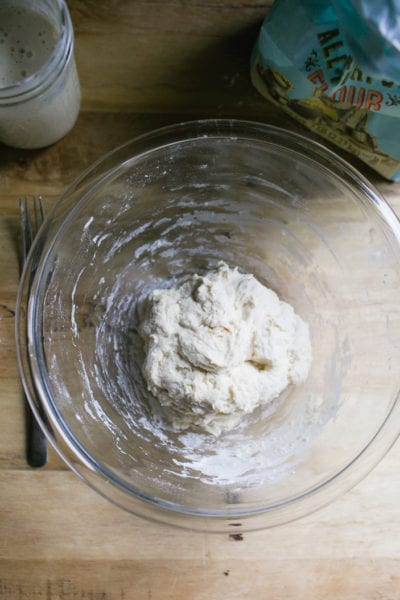
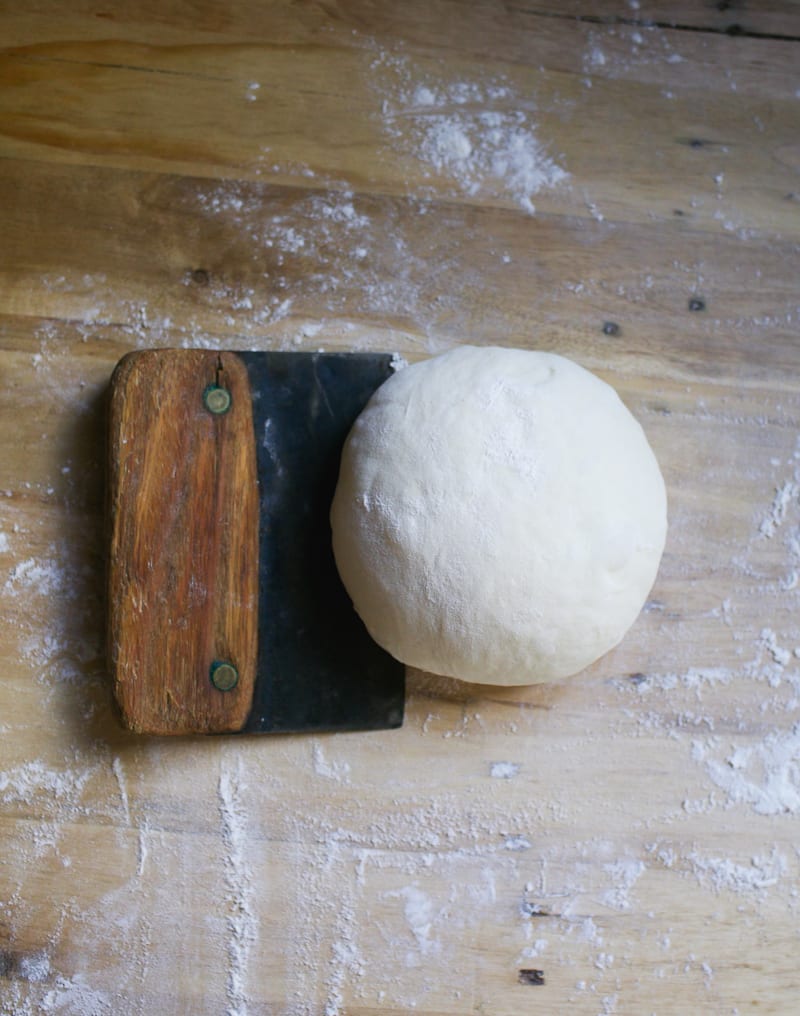
- In a large bowl, whisk your bubbly starter and water together. Add the flour and salt, then mix with a fork until combined. When the dough becomes too stiff to mix with a fork, switch to your hands and knead gently until a rough, shaggy dough forms. This texture is what you’re looking for: slightly sticky but holding together (see images above). Now, cover the bowl with a damp towel or plastic wrap and let rest at room temperature for 30 minutes.
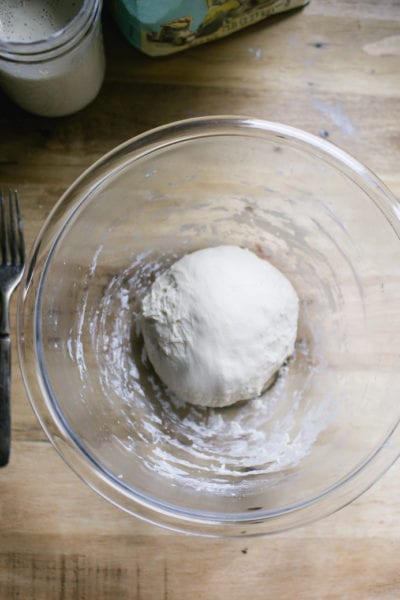
- After the dough has rested, work it into a ball. The surface will appear mostly smooth with a few tears. This is your last chance to adjust the dough’s texture before the bulk rise, so pay attention to how it feels. The dough should be soft and stretchy- not wet, overly sticky, or soupy.
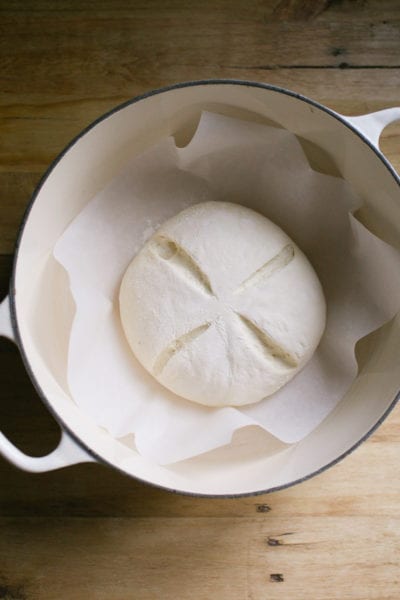
A Few Notes: This recipe makes a small sourdough loaf, ideal for 2–4 people. Smaller loaves are easier to handle, especially if you’re new to sourdough baking. Instructions for a larger loaf are at the end of this post. For best results, you’ll want a digital kitchen scale to measure ingredients accurately, and a Dutch oven (or similar lidded oven-safe pot) for baking. You can find these tools in my shop.
Ste 2: Bulk Rise
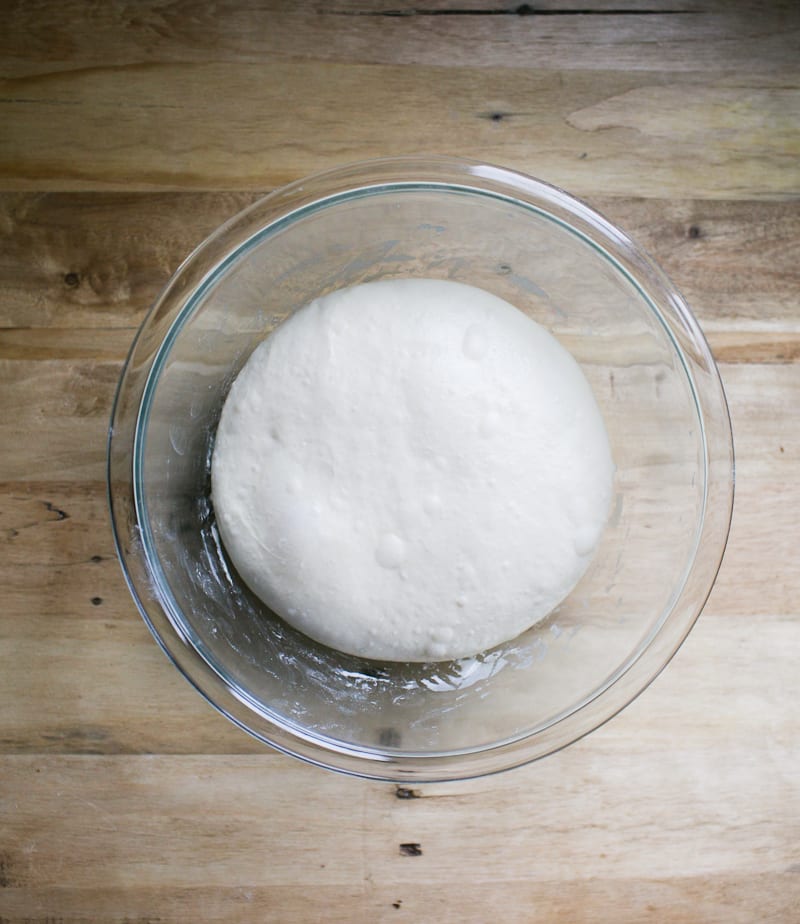
Cover the bowl and let rise overnight, about 10-12 hrs. at room temperature (68 F). The dough is ready when it has doubled in size and looks light and airy. If you’re using a standard 8-inch mixing bowl, the dough should rise to about halfway or two-thirds up the sides, which is perfect for this small loaf.
Optional: Stretch and Fold
This step, done during the bulk rise, helps to strengthen the gluten, improve structure, and give your loaf more height. Watch the video below for additional guidance. Or read the full tutorial: How to Stretch and Fold Sourdough, step-by-step.
About 30 minutes into the rise, perform your first stretch and fold:
- Gently grab one side of the dough, stretch it upward, then fold it over toward the center.
- Rotate the bowl a quarter turn and repeat.
- Continue until you’ve completed four folds (one full set).
- Repeat once more, 30 to 60 minutes later.
Step 3: Shape The Dough
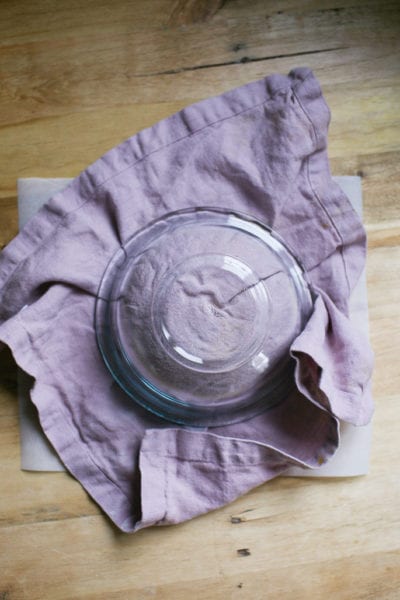
- Line a small bowl with a cotton or linen cloth. Sprinkle generously with flour. Now, you’ll shape the dough twice: first to preshape it, then to build strength and structure.
- Preshape: Remove the dough onto a floured surface. Gently fold the top edge of the dough toward the center. Turn it slightly and repeat, working in a circle until the dough forms a round. Use a bench knife to flip the dough over (smooth side up), then cover and let rest for 20–30 minutes.
- Final Shape: After resting, flip the dough again so the smooth side is facing down. Repeat the folding process to form a tight round. Then flip it back over. With floured hands, gently pull the dough toward you in a circular motion to tighten the shape. Place the dough into the lined bowl, seam side up. Cover the dough with the cloth overhang.
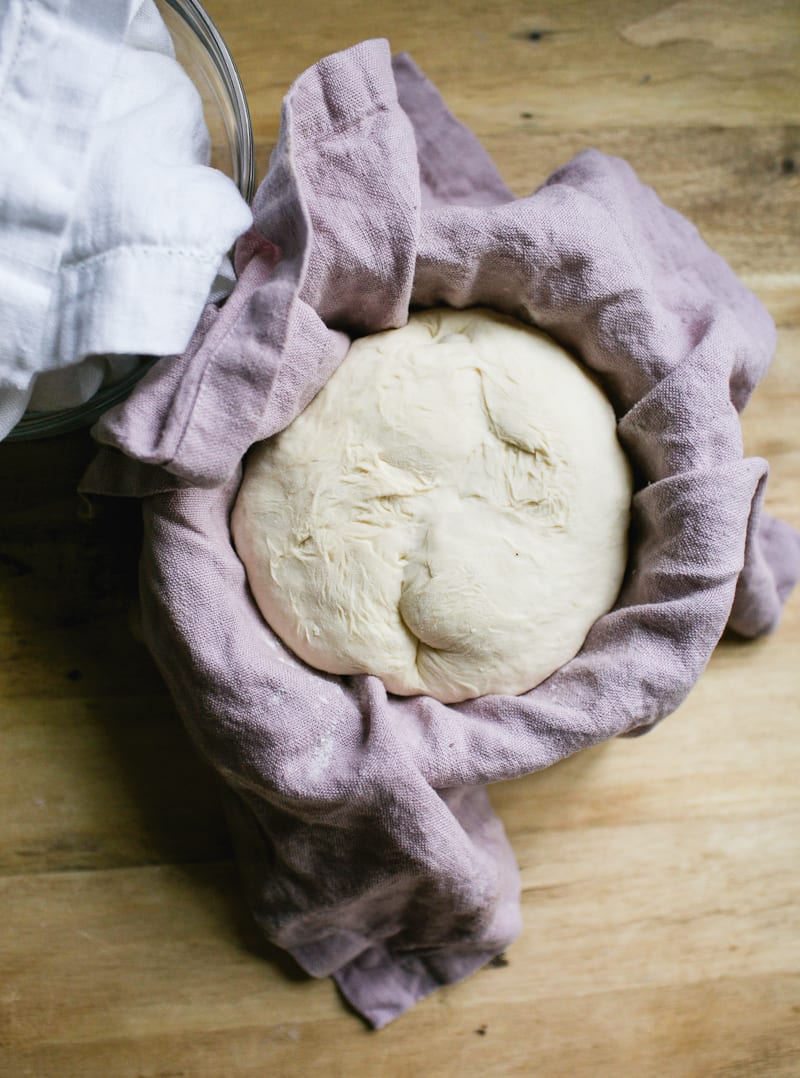
Step 4: Second Rise
Let the dough rest at room temperature for 30 minutes to 1 hour. It’s ready when it looks plump and slightly puffed—it won’t double in size during this stage. While the dough is rising, preheat your oven to 450°F.
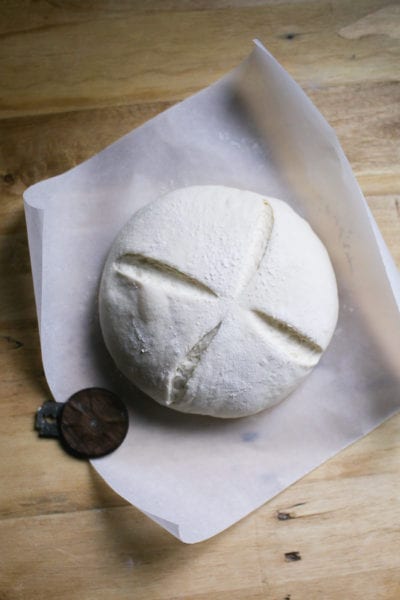
Step 5: Score The Dough
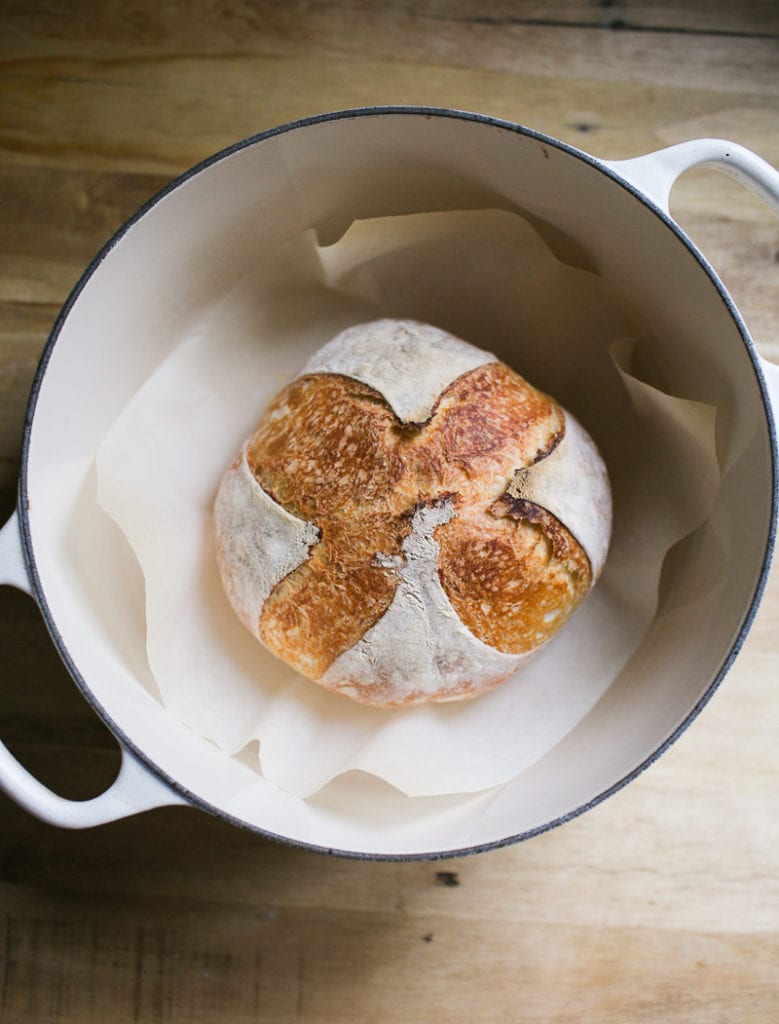
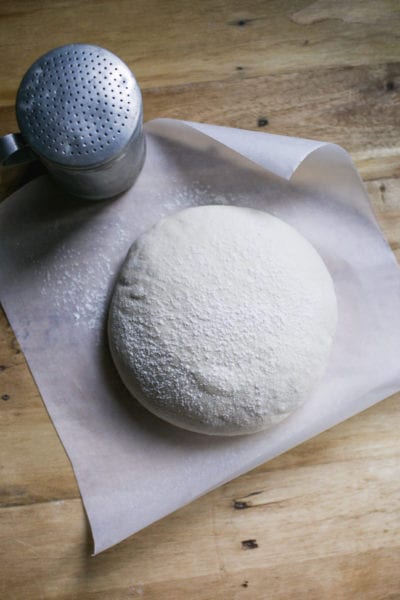
- Invert the bowl of dough onto a sheet of parchment paper. Remove the bowl and cloth.
- Sprinkle the dough with flour and smooth the surface with your hands.
- Using a bread lame or a small serrated knife (I used my UFO lame), make four, quick, shallow cuts at 12, 3, 6 and 9 o’clock, turning the parchment paper as you go. Use the tip of the blade as a guide.
- Lift the dough (still on the parchment) and carefully place it into your Dutch oven. Cover with the lid.
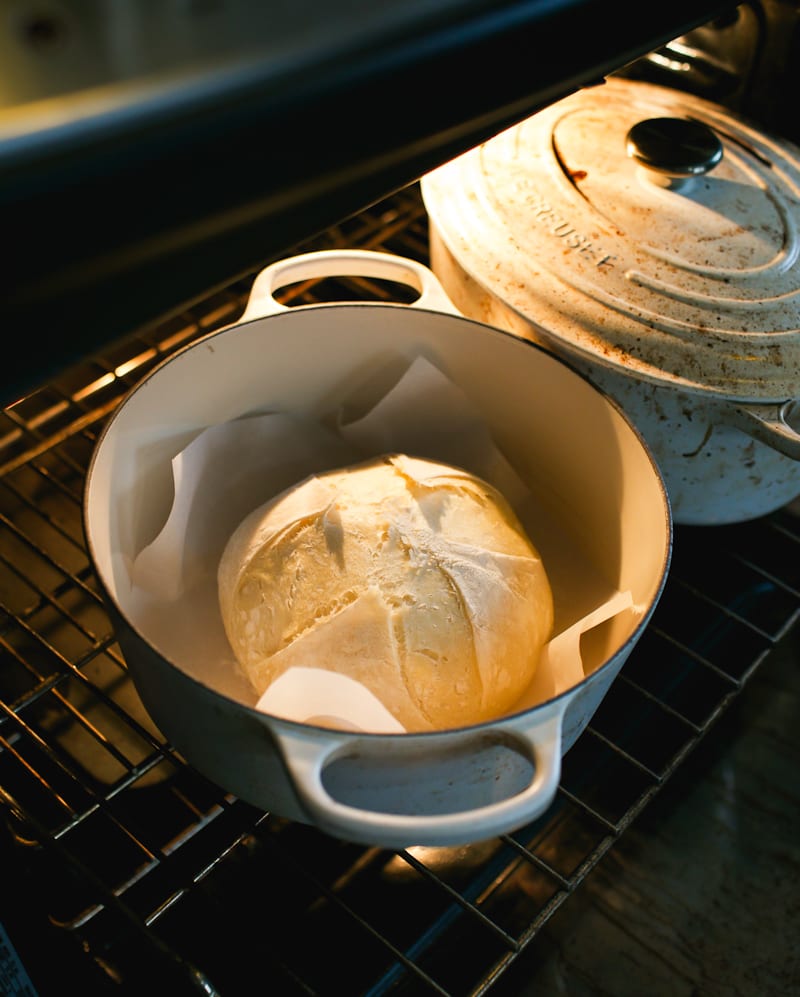
Step 6: Bake The Bread
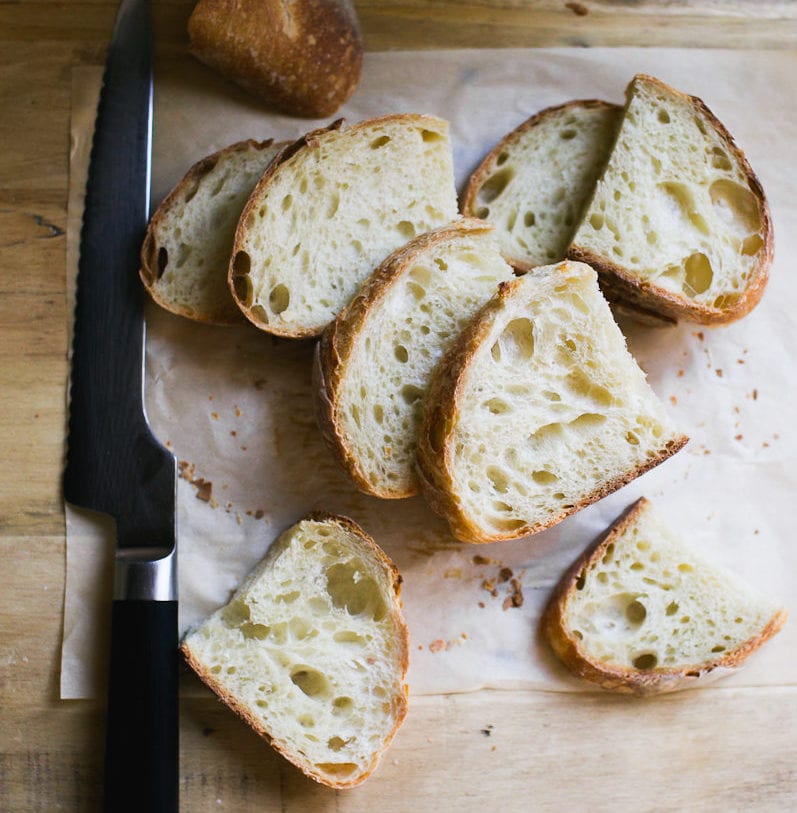
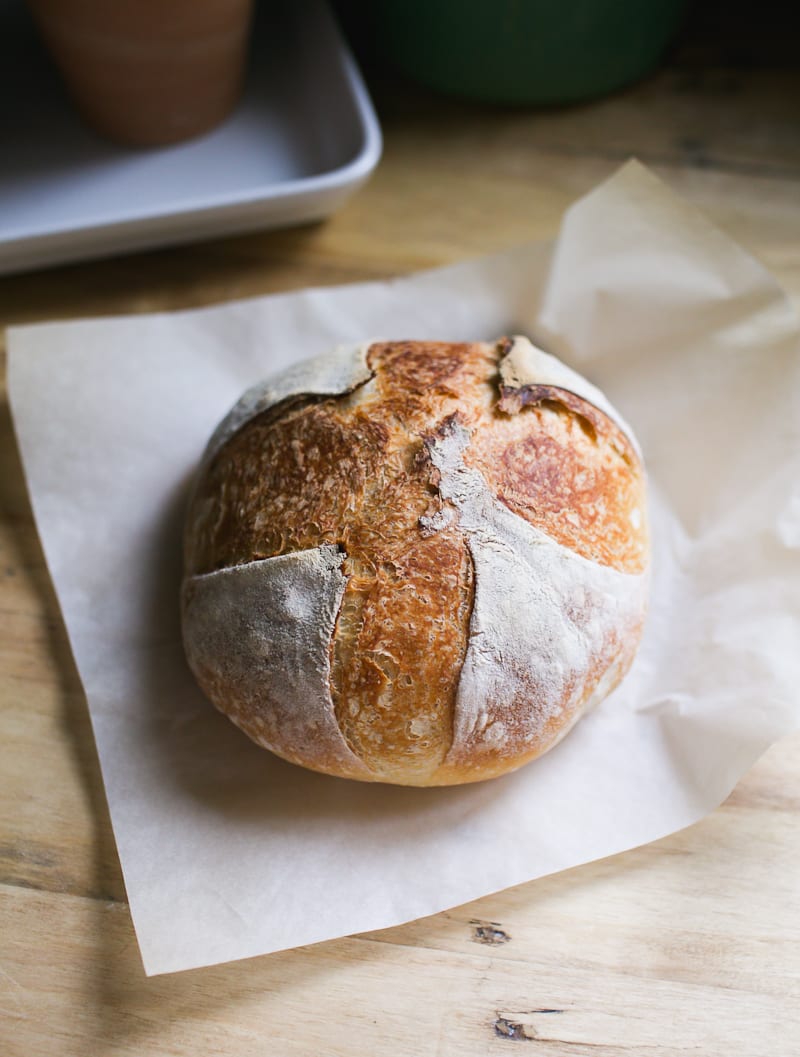
Place the Dutch oven into the preheated oven, center rack. Reduce the temperature to 425 F. Bake covered for 20 minutes. Then, remove the lid and continue baking for 30–35 minutes, or until the crust is deep golden brown. Cool on a wire rack for 1 hour before slicing.
Sourdough Bread Baking Schedule
Here’s a flexible overnight schedule that works well in most home kitchens (around 68°F). If your kitchen runs warmer, simply start a bit later to prevent over proofing the dough.
The Night Before
7:00 PM – Mix the dough and let rest (30 min)
8:00 PM – First stretch and fold (optional)
9:00 PM – Second stretch and fold (optional)
Cover the bowl and let the dough rise at room temperature (10–12 hours)
The Following Morning
7:00 AM – Check the dough (it should be doubled in size)
7:05 AM – Preshape
7:30 AM – Final shape
7:35 AM – Begin second rise + preheat oven
8:05 AM – Bake
By signing up, you agree to receive emails from The Clever Carrot. Unsubscribe at any time.

Artisan Sourdough Bread Recipe with All Purpose Flour
- Cook Time: 50 minutes
- Total Time: 50 minutes
- Yield: 1 small loaf (2–4 ppl) 1x
- Category: Sourdough Bread
- Method: Oven-Baked
- Cuisine: American
- Diet: Vegetarian
Description
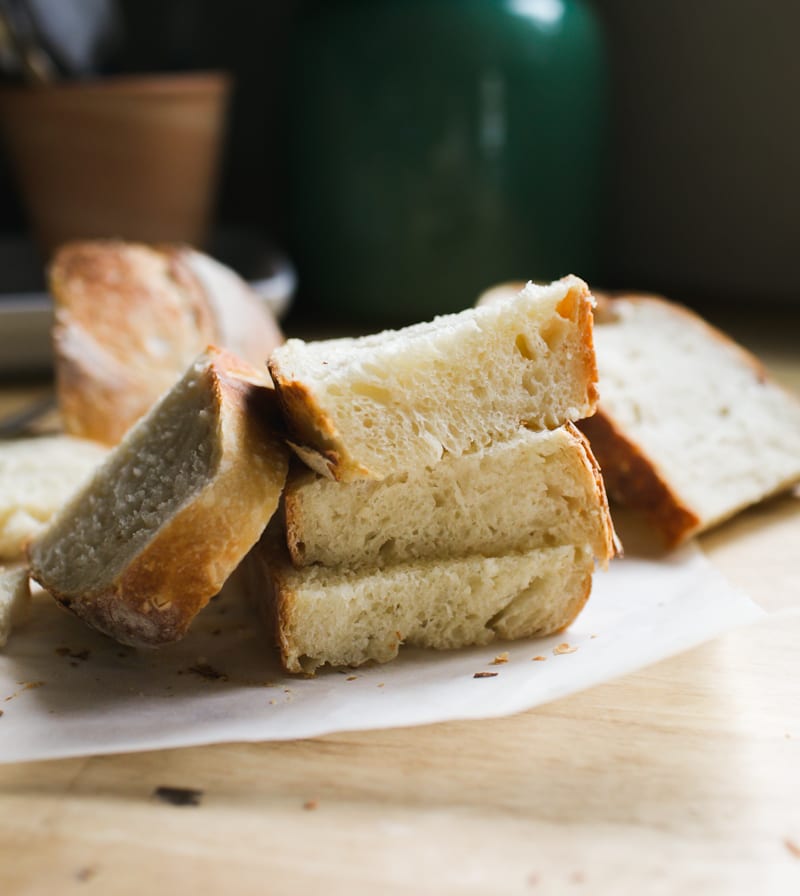
No bread flour? No problem! My artisan sourdough bread recipe with all purpose flour is an excellent substitute. This recipe yields a smaller sized loaf (perfect for up to 4 people) with a crisp crust and a smooth, interior crumb.
Notes & Substitutions
This recipe was formulated to work with King Arthur & Trader Joe’s all purpose flour, which contains 11.7% protein. If using another brand, please see my tip in the recipe below for adjusting the texture of the dough, if needed.
For accuracy and best results: please weigh your ingredients using a kitchen scale.
Ingredients
For a small loaf:
- 50 g (1/4 cup) bubbly, active sourdough starter
- 165 g (1/2 cup + 3 tbsp) water
- 5 g (1 tsp) fine sea salt
- 250 g (2 cups + 1 tbsp) all purpose flour (Trader Joe or King Arthur)
For a larger, standard size loaf:
- 50 g (1/4 cup) bubbly, active sourdough starter*
- 330 g (1 1/3 cup + 1 tbsp) water
- 9 g (1 1/2 tsp) fine sea salt
- 500 g (4 1/4 cups) all purpose flour (Trader Joe or King Arthur)
*Note: I use 50 g of starter for both the small AND standard size loaf. Using a smaller amount of starter with an long, overnight rise will help to prevent over proofed dough in the morning.
Instructions
Make the Dough
In the evening, whisk the starter and water together in a large bowl. Add the flour and salt. Mix with a fork until a stiff dough forms, then finish by hand to fully incorporate the flour. It will feel rough and shaggy, and slightly sticky. Cover with a damp towel or plastic wrap and let rest at room temperature (68 F) for 30 minutes.
After the dough has rested, work the dough into a ball. To do this, grab a portion of the dough and fold it over, pressing your fingertips into the center. Repeat, working your way around the dough until it begins to tighten.
TIP: If the dough feels too wet (and this can happen depending on the brand of flour you’re using), add 1 tbsp. of flour. Mix thoroughly by hand, adding more flour as needed. If you think it’s too dry, add 1 tbsp. of water and see how you go.
Bulk Rise
Cover the bowl (damp towel or plastic wrap) and let rise overnight at room temperature. This will take about 10 to 12 hours at 68 F. The dough is ready when it no longer looks dense and has doubled in size. If using a standard 8-inch bowl, the dough will rise about 1/2 way up the sides.
Optional Step: about 1 hour into the bulk rise, do 1 set of stretch and folds. Repeat 1 hour later. This will increase the overall volume of the bread.
Shape the Dough
The following morning, line a small bowl with a cotton or linen cloth. Sprinkle with flour.
Important: You’re going to shape the dough twice to build extra strength.
Preshape
Remove the dough onto a floured surface. To shape the dough into a round, starting at the top, gently fold the dough over toward the center. Give it a turn and fold over the next section. Repeat until you have come full circle. Using a bench knife, scoop up the dough and flip it over (the smooth side should be facing up). Cover and rest for 20-30 minutes.
Final Shape
After the dough has rested, flip it over again (the smooth side should be facing down now). Shape it again following the steps above. Flip it back over. With floured hands, gently cup the dough and pull it toward you in a circular motion to tighten its shape.
Place the dough into the lined bowl, seam side up. Cover the dough with the cloth overhang.
Second Rise
The dough needs to rise again. Rest for 30 minutes to 1 hour. The dough is ready when it looks puffy and has risen slightly, but has not yet doubled in size.
Preheat your oven to 450. Cut a sheet of non-stick parchment paper to fit the size of your baking pot, leaving enough excess around the sides to remove the bread.
Score the Dough
Place the parchment over the dough and invert the bowl to release. Sprinkle the dough with flour and gently rub the surface with your hands. Using the tip of a bread lame, small, serrated knife or a razor blade, make four shallow 4-inch long cuts at 3, 6, 9, and 12 o’clock around the dough. Use the parchment paper to transfer the dough to the baking pot.
Bake the Dough
Reduce the heat to 425 F. Bake the dough on the center rack for 20 minutes, covered. Remove the lid, and continue to bake for 30-35 minutes and golden brown (40 minutes uncovered for the larger, standard loaf).
When finished, transfer to a wire rack. Cool for 1 hour before slicing, for best texture.
Notes
Sourdough is best consumed on the same day it is baked. To maximize freshness, cool completely and store at room temperature wrapped in plastic, reusable beeswax wrap or bread bag for 1-2 days. Sourdough can also be frozen, for up to 2-3 months. Defrost at room temperature and warm @ 300 F before serving.

Comments
Sheila says
Hi..made my first loaf last week..was delicious. Kept starter in fridge and just gave it its weekly feed. I’m unsure do I put it straight back to fridge or leave at room temperature. Sheila
Sherri says
Love this recipe! I am a beginner and have made several great loaves using these instructions. I find I need to up the flour a bit or the dough is too sticky in my climate. I have used the amount of starter recommended for the large loaf and have also used more starter with a shorter bulk fermentation. Both worked well.
Mig says
Sherry may I ask how short your bulk fermentation period was with more starter? Thanks!
Sue says
Hi! This recipe has worked so well for me! I’m on my 7th loaf! If I want to add inclusions such as olives or nuts, how would I do this? Thank you!
Emilie Raffa says
Hi there! Add them after the first rest. Alternatively, if doing stretch and folds, you can add them during the first fold. Either approach is fine.
Sue says
Ok great! I will try this, thank you!
Alisa says
First time making sourdough bread and this recipe was great! I made the smaller loaf in case I ended up messing it all up, but so glad it worked out well. I was concerned when my dough after overnight proofing was kind of sticky when I did the poke test, but still snapped back like gum as I have seen other blogs mention. Beautiful spring in the oven and it seemed fairly airy despite me needing to add a couple TBSP extra of flour since I was using a probably very basic ap flour from Cash and Carry. Definitely going to make this recipe again before I start to experiment with other flours. Thanks!
Emilie Raffa says
FANTASTIC!
Samantha says
Hi Emilie,
Do you have to preheat your Dutch oven for this? Your recipe never mentions it and my bottom crusts have been really tough the past 2 loaves.
Emilie Raffa says
Hi Samantha! I do not preheat my Dutch ovens. Some bakers do. You can certainly preheat if you’d like, however it may (or may not) solve your issue. Tough bottom crusts could be a few things: improper gluten development, too much moisture in the dough, uneven heat source in the oven, dough baked for too long or even a combination of these factors.
Nicole Sweet says
Hi! If I am doing an oval shape and baking on a stone instead of doing a round loaf, do I need to change anything?
Emilie Raffa says
You don’t have to change anything. The recipe will work with either shape.
Carolyn says
Thank you so much for this recipe! The pictures and descriptions are so helpful. I’m new to making sourdough and your recipe helped me achieve a loaf that I was finally proud of! I have a question about bannetons. Is that something you would recommend using to proof at any point during this recipe? If so, when would you incorporate it?
Emilie Raffa says
Absolutely! Bannetons or proofing baskets are used during the second rise. I use them all the time. Alternatively, you can use an 8-inch bowl for a standard size loaf or a 5 to 6-inch bowl for the mini loaves.
Pattie says
My first attempt was a total SUCCESS! I followed the great instructions, but using the alternative route. Bulking during the day, refrigerate, bake in the morning. It came out looking almost identical to the finished one on the recipe. The bottom seam wasn’t quite smooth. I didn’t have a Dutch Oven so I used my Corningware French White 2.5 litre casserole dish with the glass lid. I did make the small loaf. Not sure if it would be big enough for a large loaf.
Thank you!
Emilie Raffa says
Perfect! Yay! Enjoy every last crumb :)
Leslie says
Where do I find those instructions..bulk during day
Emilie Raffa says
The printable recipe is at the bottom of this post. :)
Jessica says
I have been using your book for a several bakes and all but one has come out totally flat :(. I don’t know what I am doing wrong! The first clue is that I almost never see a decent rise after the bulk rise. Has this happened to anyone else? How can I salvage it if it didn’t rise after even 10-12 hours? (House temp says 72.) I so badly want to make an awesome loaf!
Emilie Raffa says
Hi there! Could be numerous things. Your first clue re: the rise is very helpful. If your bread doesn’t double in size, every loaf you bake will be flat. So, it might be the lack of rising strength in your starter or temperature (or both). Please read: “Why Won’t My Sourdough Rise?” for more info.
Reena says
Is there something I can bake the bread in if I have no Dutch oven?
Emilie Raffa says
Hi there! Any oven safe pot with lid that can heat up to 450 F will work. If you don’t have a baking pot at, you’ll have to find an alternative steaming method to add to your oven. Steaming methods can be cumbersome and inconsistent. However, if you google a bit you might come across something that suits you.
Shannon Mowry says
My dough is so dense and tough. This seems to always happen to me. My starter is about a month old. I have only successfully made waffles. Tips? Ideas as to why I am struggling?
Emilie Raffa says
Hi there! It could be many things. But I think it has to do with your bulk rise; the gluten is under developed. Try reading: “Why Won’t My Sourdough Rise?” There are many helpful tips in my article.
Greta says
What a lovely recipe Emilie! This recipe, especially with the time table and detailed step by step instructions with pictures made this sourdough recipe an excellent beginning for two beginner bread bakers! We have so enjoyed the experience and the product, both sizes of the recipe. I do have a question though, and if you have the time I’d greatly appreciate your help in some troubleshooting. Both times so far our bread has been a denser crumb/less airy than your photos and without the distinctive “sour” taste of sourdough loaves. I can possibly provide pictures but I was wondering if you could provide some insight on what step or process could be edited to develop more ideal flavor and texture. Thank you so much!
Emilie Raffa says
Thank you Greta! Dense bread is usually an indicator of gluten that has not been properly developed (bulk rise was too short) or dough that’s been over proofed (rose for too long). Check you rise times and see if anything rings a bell. The texture in crumb will follow once the step(s) beforehand have been corrected. Same with flavor. Go one step at a time. Hope this helps!
Monica says
The all purpose flour I use has a protein content of 13.5% per 100 grams. Should I be using this recipe or the one that uses bread flour since the protein content is so high?
Emilie Raffa says
Great question. Use this recipe and increase the water to 350g or even 360g total for the standard loaf.
David Altekruse says
An excellent Instructive recipe. Learning how to get my starter up to speed was a game changer. Fed mine daily for two weeks to salvage my sleepy stater and what a difference. The bread recipe required the AP flour as nothing else is available at the moment. Great to have that option available. The final result was a good looking and even better tasting loaf.Really great sourdough flavor. I used 150 gr. of starter since I had it. That work fine but I should have made two or three batches because the wife and I are devouring our first loaf. Great instructions throughout the process.
Thans
Stephanie says
Hi there!
Is it possible to refrigerate the dough for 8ish hours, give or take, at some point during the recipe? Around the second rise? My sourdough starter is ready in the morning and I’m hoping to do the bulk rise during the day, then refrigerate overnight, and second rise in the next morning. Please lmk, thank you:)
Emilie Raffa says
Yes, you can do that. Personally, I’d start the dough a bit later in the morning or afternoon to avoid over proofed dough in the morning. This can happen sometimes when doing the second rise in the fridge.
Alternatively, bulk the dough during the day, anytime, and when it has almost doubled cover and chill the whole bowl overnight. The next day, wait until it doubles or if it’s ready, move on to the next step. I’ve been doing this lately and the results are more consistent.
Marilyn says
Thanks Emilie! This is a great recipe. I tried with another recipe ( or rather method) 3 times since the ingredients were the same and the same quantities without success, but your method is excellent. The step by step details are very helpful and also the video on folding the dough. I think I was over kneading it previously. The bread was delicious.
Stephanie Irvine says
GAME CHANGER!!!! I tried many recipes and methods before and even though I knew my starter was awesome I couldn’t get the right balance of hydration and technique to make a decent loaf. Always flat and dense. Your guide has changed everything and made me feel like a sourdough master!!! First try and I had an awesome delicious loaf with great height, blistery thin but crispy crust, and soft chewy interior. THANK YOUUUU!!! 💕💕💕
Betsy says
Thank you so much for your instructions! I’ve been nurturing my starter for months, patiently waiting until I was ready to attempt the first real bak (my very first was a brick!) and stressing over how it would turn out. But OMG! Today I baked my first loaf and it is to die for! Thank you so much for your simply worded and thorough steps!
Nally says
Hello, I’m going to give this a try! Can I do the bulk rise overnight in the fridge since the weather is so hot right now? Also, can I shape the dough in a greased glass bowl if I don’t have a linen towel and basket?
Emilie Raffa says
Hi there! The dough won’t rise much in the fridge. To give it a boost, let it bulk at room temp for a few hours before chilling. Then, add additional time as needed before baking. You can use any kitchen dish towel for lining the bowl. Not sure if it will come out in a greased bowl.
Rebecca Schadt says
Hi,
Made this bread and it came out really good but doesn’t have the rise and fluffiness of your other artisan and sourdough still. I love you bread I bought your book and have been making your breads for years now!!!! Thank you so much!!! Any thoughts about adding vital wheat gluten to help with the all purpose?
Diane Jones says
Could this recipe be cut up into a bun , such as a hamburger bun? You show a picture of buns on a baking sheet for your glossary heading but no recipe! I have been searching for a recipe with all purpose flour and sourdough levain only. Thanks for your help, love your blog and have made the sandwich loaf and cinnamon buns regularly.
Emilie Raffa says
Hi there! Not sure if this recipe would be the best style for a hamburger bun. However, I do have a light brioche hamburger bun recipe here on the blog. The picture you’re referring too in the glossary is for bialys (recipe in my book). Hope this helps!
Jennifer E says
Super Yummy bread! I made this twice with organic all purpose flour and a 30yr old starter! Thank you for the perfect first sourdough recipe!
Question: I tried today to use Bobs Red Mill Whole Wheat Pastry Flour…the bread seemed to be doing great, but came out super dense. I am sure it’s the flour…do you have any tips when attempting to use a whole wheat pastry flour?
Beau says
Hi Emilie, So after 3 attempts at a starter I finally reached success! I am now making my first sourdough with your recipe above. My query is that I only have a glass pyrex dish with lid to bake it in. I have used it to bake many other Italian style breads which have come out beautifully in there but they generally call for the dish to be preheated and sprinkled with flour so that the dough is placed into a hot dish and does not stick. Could I use this method with this recipe above? I don’t have any quality parchment paper on hand – in-fact a few recent baked goods have stuck to our parchment paper and I don’t want that happening! Looking forward to returning with an update on how it turns out!! Thank you!
Ilker Oztop says
Amazing recipe! I wowed practically everyone as a first time ever bread maker. Do you have parbaking tips for this recipe? Would love to send a small loaf to my 6 yo cousin across the country to get him excited about baking his own food but don’t want the bread to go stale. Thank you again!
Emilie Raffa says
Oooo…. I do not have any partaking tips. Haven’t done it myself! Great idea though. If I experiment, I’ll update the post.
Myrna says
My dough is very slack as I prepare to put it into the baking pan. It still springs and bakes well, wonderful texture and taste. But it is so very soft, any ideas? Sourdough batard/boule 24-5-20IMG_1216.JPG
Emilie Raffa says
Hi there! I’m unable to see the image. However, if your dough is slack it might be over proofed and/or perhaps it’s a shaping issue? Don’t let the second rise go for too long and make sure to do both the preshape & shaping steps, respectively to build additional strength.
Stella says
Hi! Here in Texas, room temperature is around 78-80 F. I was wondering if I could shorten the rise and make this recipe in one day instead of doing the overnight rise. Would increasing the amount of starter (and decreasing the flour/water to maintain hydration) help shorten the rise enough to do it in one day?
Emilie Raffa says
Stella, absolutely! Personally, instead of changing the ingredient quantities, I would make the dough in the mooring and bake the dough in the evening. You don’t need to increase the starter unless you really want to; 50 g should rise nicely with a room temp of 80 F. Great question.
Kelly says
Hi! I made my first loaf ever today following your amazing and helpful recipe and it was fabulous! So exciting to do and I am eager to do more and experiment. I made the larger loaf and am wondering if I were to use the larger recipe but want to make the two smaller loaves, is there a point at which the dough can be divided? Or does it really need to be made as two individual loaves from the very beginning? Thank you so much!
Emilie Raffa says
Sure! Divide the dough after the bulk rise.
Kelly says
Awesome, thanks for the response and wonderful recipe!!
Christine says
I just used this recipe to make my first loaf with my starter and it turned out AMAZING! I’m having it now for lunch and may never buy store-bought bread again. I even have a second loaf in the oven now to test out how a slightly less active starter (still bubbly and passed the float test though) and bulk rise in the fridge and see how it compares. THANK YOU for the very detailed step by step, it was so easy to follow!
T Hartwig says
I followed your recipe precisely! Success! Thank you so much, it was actually quite informative to learn about different AP flours. I notice a huge difference between regular unbleached and a local mill’s organic unbleached. I think with that flour I will start at 450 grams, and add more if needed, as I had to add 4 tablespoons of water. However, your recipe gave me confidence, and I thank you very much.
Emilie Raffa says
Fantastic! xx
Mrs. H says
My daughter and I both began starters on the same day in mid April. We’ve since made artisan sourdough, pizza, sandwich bread, waffles and cinnamon rolls. Kit and Harry both seem to be happy and active, really taking off in the past week or so when hot weather hit in Mississippi. I’ve just pulled this small AP loaf (I added crushed rosemary added after the first 30 minute rest: thanks for that tip) out of the oven. In a time when we couldn’t see each other as much as we liked, we had a common project to share and compare. Thanks for your inspiration.
Emilie Raffa says
Thank you, Mrs. H. It’s comments like yours that continue to inspire me. It’s been an absolute privilege to be apart of connecting others through sourdough during these crazy, uncertain times. The feeling is pure joy and thankfulness. x E
Sandra says
I have achieved my first successful sourdough with 40% AP, 40% whole wheat flour and 20% semolina flour, thanks for the great recipe!
Danielle Sinclair says
The first time I tried this loaf (measuring ingredients) I ended up with an attractive sourdough doorstop. Second time I weighed my ingredients, and what a difference! Delicious, crispy but light crust, slightly tangy taste and fluffy chewy texture. An absolutely beautiful loaf. Directions, and especially the videos, are very helpful.
Kevin says
Why is there no olive oil in the all purpose flour recipe?
Emilie Raffa says
Hi there! It’s just a matter of preference. Up to the baker!
Maryann Selman says
I can’t wait to try your recipe. Would you please suggest what size proofing bowl I should buy for both the single and the double recipe? I have been using a stainless steel bowl that is the right shape and size but I think it may be part of the problem with temperature. Many thanks
Maryann
Emilie Raffa says
Hi there! For the bulk rise, I use an 8-inch glass mixing bowl for both sizes. For the second rise, you can use an 8-inch proofing basket (or bowl) for the larger size, and a 6-inch bowl for the smaller size. Hope this helps!
Leslie says
Hello! LOVE this recipe and your step by step guidance with pictures! My question is, when you double the recipe, do you then make two loaves? Or do you make one loaf just a larger one and the baking times are the same?
Thank you!!!
Emilie Raffa says
Hi Leslie! It will actually make (1x) standard size loaf. I’m going to update the wording to clarify. x E
Liesl Coates says
Succccccccess!! I am so happy to report that my loaf turned out absolutely beautiful! I have been learning so many lessons, but the biggest one is to watch your dough, and not hold to the letter of the law for the time expected in proofing. Emilie, you have perfect descriptions, so look at these, first and foremost. I did 9 hours and 40 minutes at 74.5 degrees (oven with light on) which is maybe more than many loafs need, but my dough needed it. Thank you for all of your kind words and patience! I can’t wait to move on to other recipes in your gorgeous book. :)
Katie Kapotsy says
Just wanted to drop by and say thanks. I’m using my “home” time to practice bread-making, as I love to cook but have always been intimidated by bread. I used your starter recipe and it’s a thing of beauty. When my starter was ready I googled sourdough recipes and again came to your website. I do not have a scale so I measure by volume… but I have come to know what consistency I want, generally, in my bread. I added just a bit more water to this dough. I of course am impatient and started in the morning so to quicken my bulk rise I placed it near my oven on low, and gave it about six hours. It rose wonderfully, shaped very well. When I finally sliced into it a bit ago, it was fluffy and delicious inside, and soooo wonderfully crusty on the outside! A keeper recipe— thank you!
Emilie Raffa says
Thank you so much Katie! I love hearing success stories like this. :)
Marcia Shimizu says
Hi Emilie,
I have made this recipe twice now, once with the smaller loaf and the second time with the larger loaf, and have a couple of questions for you!
1. Both times, I found the dough to be very sticky and had to scrape the dough out of the bowl at various points in the process of preparing to get it in the oven. The end result was good, but it I was wondering what suggestion(s) you might have to make it easier to take the dough out of the bowl.
2. When I made the larger loaf, I found the crust wasn’t very crunchy after letting it rest for an hour after removing it from the oven (although when I initially took it out of the oven, it felt quite firm). For the small loaf, I didn’t have this problem.
3. Have you ever made the larger recipe with doubling the amount of starter you used? I found that the smaller loaf I baked had a more tangy flavour than the larger loaf; does the amount of starter affect the taste? I love the tangy flavour :-)
This was a delicious recipe – thank you so much for sharing and for answering everyone’s questions!
Marcia
Emilie Raffa says
Hi there! Please see below:
1.) Some bakers lightly oil their bowl to prevent this problem. You can also purchase a bench scraper that will help guide the dough out of the bowl.
2.) When loaves cool, the steam has no place to go but through the crust which is why it might not have been crunchy. The temperature shock alone- from hot to room temp or cold- can effect the texture of the bread. Next time, cool the loaf directly in the oven (turned off) with the door ajar. Keep your eye on it. Don’t leave it in there for too long.
3.) In my experience, more starter doesn’t necessarily equal more flavor. The sour flavor comes from the condition of your starter, temperature of the dough, ambient temperature etc.
If you’re having more success with the mini loaf, you can always make (2x) batches in separate bowls instead of the (1x) standard size loaf.
Hope this helps!
Ian says
I’m afraid I’ve failed twice to make this receipe. The outside is nice and crusty but inside it is pretty dense. The first effort was definitely too wet so I reduced the amount of water to 140 g, still too wet perhaps. It had a good rise overnight but it didn’t hold its shape the next day. The white flour is 10.4% protein. What could it be? How can I adapt to my low-protein content flour? Reduce the water content further? Do I need to mix it for longer (10 mins)? Thanks for the help.
Emilie Raffa says
Ian, it sounds like there is too much water in the dough! Please weigh your ingredients for the most accurate results. You should still be able to make this recipe with the flour you have, reducing the water as needed. Mixing it longer won’t necessarily solve the issue. Hope this helps!
Paul Goodman says
Aloha Emilie
I noticed that your “doubled recipe” does no double the amount of starter. Is that a mistake?
Mahalo, Paul
Kula, Hi
Emilie Raffa says
Hi Paul! It’s not a mistake. See my note re: starter in the ingredients section. :)
Melissa says
Love this bread! Made several loaves today. I do have a question though…how can I keep the bottom from getting super dark and hard? I’ve tried several different Dutch ovens and the bottom gets super hard and near burnt every time.
Emilie Raffa says
Hi Melissa! Make sure you’re using an oven thermometer for accuracy. Additionally: place and cookie sheet on the rack directly below your baking pot (not underneath it); this will shield the heat from the bottom up.
Helen Ryan says
Hello! I am about to embark on my first ever sourdough effort! My son gave me a portion of his starter, so grateful! The starter is made with all-purpose flour and I plan to use your recipe for Artisan Sourdough. What I am not clear on is how to “feed” my starter, correct ratios of flour to water, do I need to mix it? Thanks for such a great website and clear instructions/videos!
Sally says
Hi!
I have done some looking and cannot find the answer to my question.
When should I use my starter? Right after feeding, as soon as it doubles, or once it has fallen? Or is there any other guide?
I have been trying to use as much as the starter as possible (pancakes, crackers, etc) as to not throw any away as well so any tips on that would be great too!
I am loving your recipes so far & currently my starter (Tulip) doubles in about 2 hours!
Thank you for any advice!
Liesl Coates says
May I add a PS.- since I already have ruined my resolve not to bother with more questions! I finally received your book in the mail from Amazon, just a month past my birthday! It is absolutely beautiful and I can’t wait to try some of the other exciting recipes- the pictures are gorgeous and I love your stories:). :).
Emilie Raffa says
Yay! Happy Birthday! I think you will enjoy it very much… x
Liesl Coates says
Hi Emilie,
I have posted on other parts of your website and I am sorry I have yet another question. Hopefully someone else might have the same one so it’s helpful. I continue to have problems with the bulk rise. I think I have over-proofed at times, but this last one when I tried the all purpose recipe I don’t think I proofed long enough. The reason it is confusing to me is that my dough spreads out instead of bulking up. I am very careful to use active starter, doing the float test and having it rise at least double. I use a glass Pyrex bowl that is 9″ across the top. I did the bulk rise during the day, but at 3 hours I did the poke test and it stayed in place so I thought it was done. Do you think I should try again and just let it go longer? It definitely didn’t go half way up the sides of the bowl, like you described, so my question is- if you wait long enough will it eventually rise up, and bulk upward?
Emilie Raffa says
Hi Liesl!
The problem is the poke test. I do not recommend it. It’s given you a false positive which is why the bulk rise was cut too short (not your fault). Sourdough dough will never be ready in 3 hours unless it’s really warm, about 85F!
Regarding the dough: it will spread out AND up when it rises. What you experienced was actually normal. It just needed more time!
Bottom line: watch the dough and not the clock. Do not do the poke test. If you’re using a 9″ bowl, the dough should rise 2/3-3/4 of the way up when ready. The dough will bulk upward, promise.
PS: I talk about this more in the book under “Sourdough Steps, Explained” :)
Amanda says
Hi,
Thank you so much for all of the helpful information! This is the best site I have found for a beginner trying to make sourdough and I just ordered your book! Do you have an opinion on using the “Proof” setting on an oven for the rise period? I have had significant issues getting my bread to rise appropriately even though my starter seems very happy and checks all the boxes for ‘ready’. My house is typically pretty cold – 65-67 degrees. I’m wondering if temperature is the issue?
Thank you!
Amanda
Emilie Raffa says
Hi Amanda! Thanks SO much! The proof setting is great. Not sure how high your specific temp. setting goes (shouldn’t be ore than 80 F I believe…) but it will definitely work. Your house is a little chilly, which is why the dough @ 65-67 is taking longer to rise. Keep in mind, if you use the proof setting the dough will be ready quicker than the timeframe indicated in the recipe.
Joe says
Hi, Thanks for the great information. Quick question: the sourdough recipe when using bread flour calls for olive oil. This one does not. Is that intentional or should you also use olive oil when making sourdough with bread flour? Thank you again!
Emilie Raffa says
Hi Joe! Totally intentional. Just two different recipes. It’s fun to play around!
Farah says
I’ve made this recipe several times, all with success! I was wondering if I could place the shaped dough (after overnight bulk ferment) in the refrigerator & if so, his long can I keep it there? Thanks!
Emilie Raffa says
Hi Farah! Yes, you can. You’ll need to make the dough in the afternoon, bulk at a warmer temperature, and then shape the dough in the evening to chill overnight. When you follow this method the dough will last up to 10 hrs in the fridge. However, pease be open to experimentation; the timing can change due to temperature. Oftentimes the dough will be over proofed by morning if not done correctly. Practice makes perfect!
Farah says
I came back to say I did it both ways. The first one I baked off this morning and the 2nd half I placed in the fridge all day and just baked it… They were both amazing!
I tagged you on IG with my first loaf, the oven spring was amazing. The 2nd loaf is even bigger, but not sure if it’s from the cold retard or it it was a slightly bigger dough (I didn’t weight the dough when I split it). Either way, this is my go-to recipe! AGAIN, THANK YOU!!
Emilie Raffa says
FANTASTIC! Thanks so much for coming back to share the details!
Sebastian Stolzenberger says
I am very excited to make your recipe. Can I follow the same directions if doubling the ingredients for larger loaf? How much should I increase the baking time?
Emilie Raffa says
Hi there! The info is provided in the recipe at the end of the post.
Julie Wood says
Hmmmmm. I’ve read through the entire post top to bottom about three times now and I’m not seeing any notes on doubling the recipe? Maybe it’s not showing up on the mobile version for some reason?
Julie Wood says
Ahhhh. My eyes must have skipped over it in the ingredients section. I was looking for it at the end!
Emilie Raffa says
No worries ;)
PH says
Hi there! I wanted to try using bread flour with higher protein (around 14-15%) than the KAF bread flour. Thoughts on any adjustments? Thanks! Love the site and guidance :-)
Emilie Raffa says
Hi PH! You’ll definitely need to increase the water. If you’re making the standard size loaf (not the mini) you can go up to at least 375g. Just feel the dough as you go; yu don’t want it to be stiff and dry. Hope this helps!
Katie says
Oh goodness. I’ve made sourdough before. But this recipe is a real winner. I don’t know if I just lucked into a strong starter this time around but I’ve never had my sourdough rise as much as I did following this recipe and your advice. We live in Hawaii, baked goods beyong white sandwhich bread is much more expensive than we were used to on the mainland. This is a real penny saver for us.
Emilie Raffa says
Ahhh love to hear this Katie! Thrilled for you. Making sourdough or any type of bread at home is incredibly rewarding, frugal and practical. Enjoy every last crumb.x
Emily Doan says
Just wanted to write in to say I’ve made this loaf literally 10 times and it turned out amazing every single time! Makes a crusty loaf that’s soft on the inside and holds up well to spreads. I’ve never made sourdough before this recipe so all the step-by-step instructions were a huge help. I have this recipe memorized now because I make it every 2-3 days. I also do my bulk rise in an Instant Pot, which shortens the proof time considerably.
Thanks for an awesome recipe!
Emilie Raffa says
Emily, wow! I’m so happy to hear this! Oooo… and an Instant Pot rise…. sounds effective and practical :)
Sabena says
Hi Emilie,
First, this is a great revcipe and very easy to follow. Because of you, I have been baking sourdough for about a month now. I have a few questions with the weather getting warmer in NYC.
1) Let’s say I start two breads Friday evening at the same time, allow them to bulk rise overnight, can I put one of the rounds in the fridge the following morning (Saturday) after the bulk rise and bake it first thing on Sunday? If yes, how long should I keep it out of the fridge before I can bake it. I’m assuming I would have to do the two rises/rests before baking?
2) With the weather getting warmer in NYC, how can I store my starter so that it doesn’t get rancid? I’m assuming the heat will make it ferment even more. If I were to put it in the fridge, how often must I feed it? And when would I take it out of the fridge to feed it before being able to use it for bread. Currently I bake bread ever two days.
3) my last question is, what do I do with my sourdough starter if I go on holiday and I cannot bring it with? How long can it last in my fridge without being fed?
Many thanks,
Sabena
Emilie Raffa says
Hi Sabena! Fantastic! Thanks so much, I’m glad it’s working for you :)
Please see below:
1.) To clarify: do you want to refrigerate the bulk dough before it’s shaped? Or after it has been shaped into a round and then placed into the proofing basket?
2.) You can still keep it at room temp if you want, it won’t go rancid. I do this all the time in the summer. Sometimes I’ll even transfer it to a cooler room if necessary. However, you can store it in the fridge. Feed it once a week to maintain its strength. When ready to make dough, feed it at room temperature for a day or two until it perks up.
3.) Just keep it in the fridge. It can actually last for months in the fridge without being fed. It will just take longer to wake back up. Do not confuse its sluggishness with it being dead!
Sabena says
Hi Emilie,
Thank you for the info. To clarify my first question, I wanted to know if I make a sourdough (AP recipe) bread in the evening as per your directions, could it be put in the fridge until the next morning , after the bulk rise? If so, would it be before or after shaping (meaning it would sit in the fridge for 24 hrs. Can that be done?
Also, if I leave my starter in the frigde for a few weeks untouched (while away) how long does it take to bounce back? So I know it’s not dead. Thanks again for your help. I prepped your sourdough panacake recipe this eveining. Can’t wait to make them tomorrow!
Emilie Raffa says
Hi there! You can do two things: wait for the dough to almost double in size and then refrigerate the whole bowl overnight to shape the next day. Or, make the dough in the afternoon, bulk at a warmer temperature (so that it’s ready faster), shape, and then refrigerate the shaped dough in the late evening to rise overnight. Regarding your starter, the bounce back timing depends on its own strength. For example, I had a fridge starter that wasn’t fed for almost 3 yeas (!). But it was so strong and vibrant, it only took two days to bounce back.