Looking for THE BEST soft sourdough cinnamon roll recipe from scratch? These easy, overnight rolls are it! Made with bubbly, active sourdough starter & tips shared for make-ahead options. Makes 8 rolls.
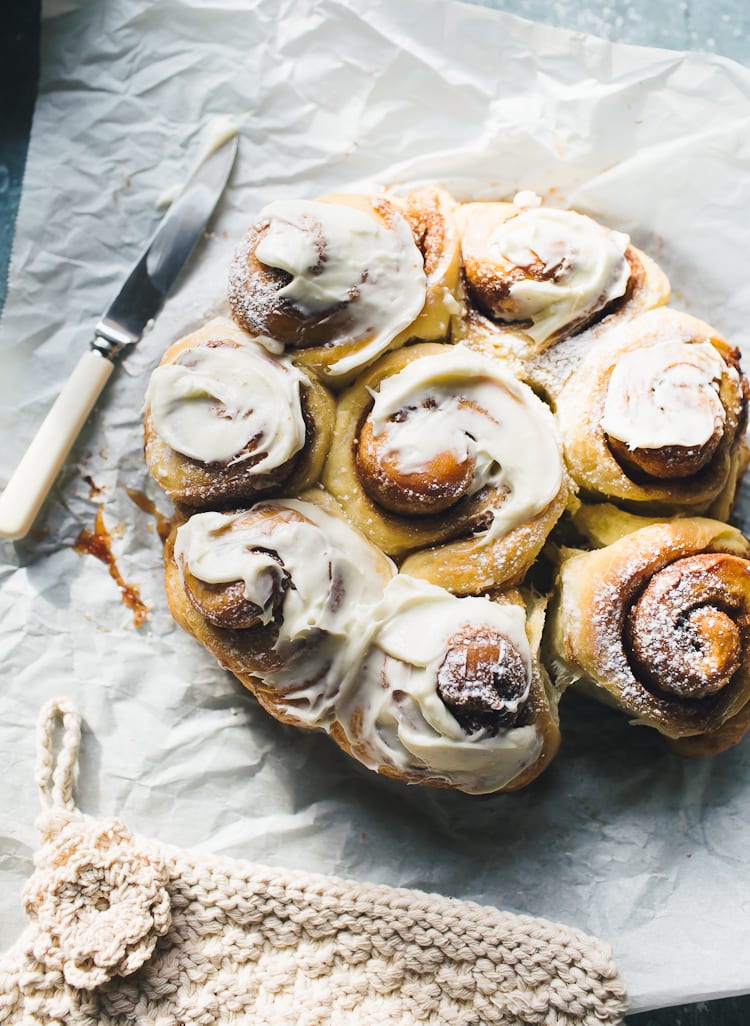
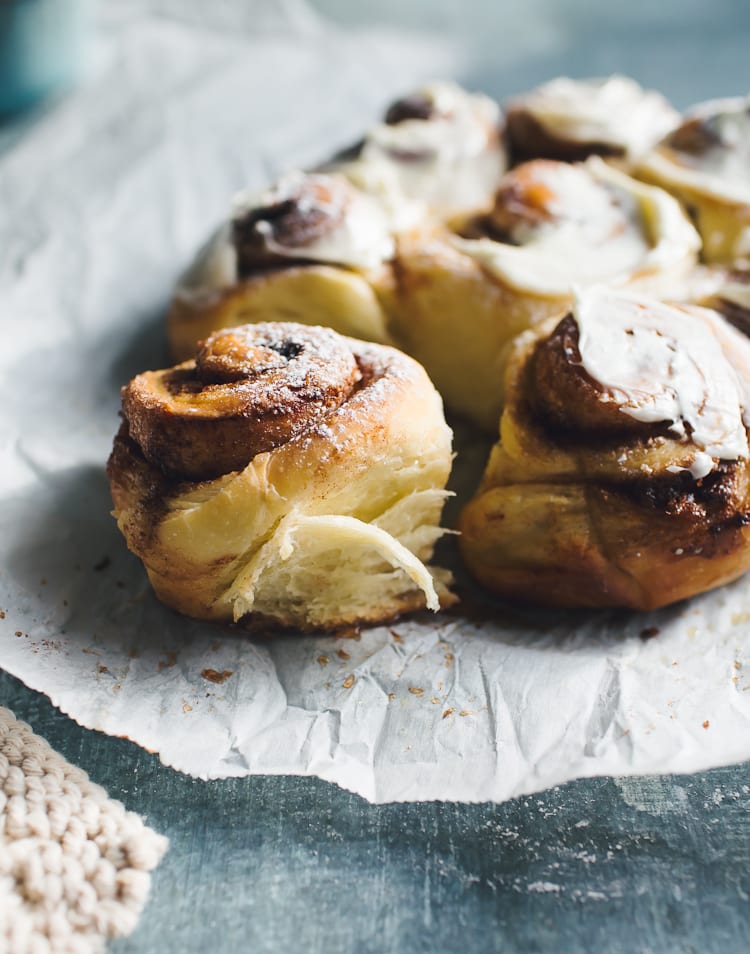
Sourdough cinnamon rolls: soft, feathery scrolls of luscious sweet dough filled with gooey swirls of warm cinnamon-sugar. Can you think of anything more cozy for breakfast besides a slice of toasted sourdough bread?!
I must confess however, I wasn’t always a fan. Traditional cinnamon rolls were too sweet for my taste and the heavy, sugary glaze was a bit much. And with all the recipes out there (and there are tons) I wondered: does the world really need another cinnamon roll recipe? Yes! It does, especially when it solves the problems most cinnamon rolls have.
Why My Recipe Works
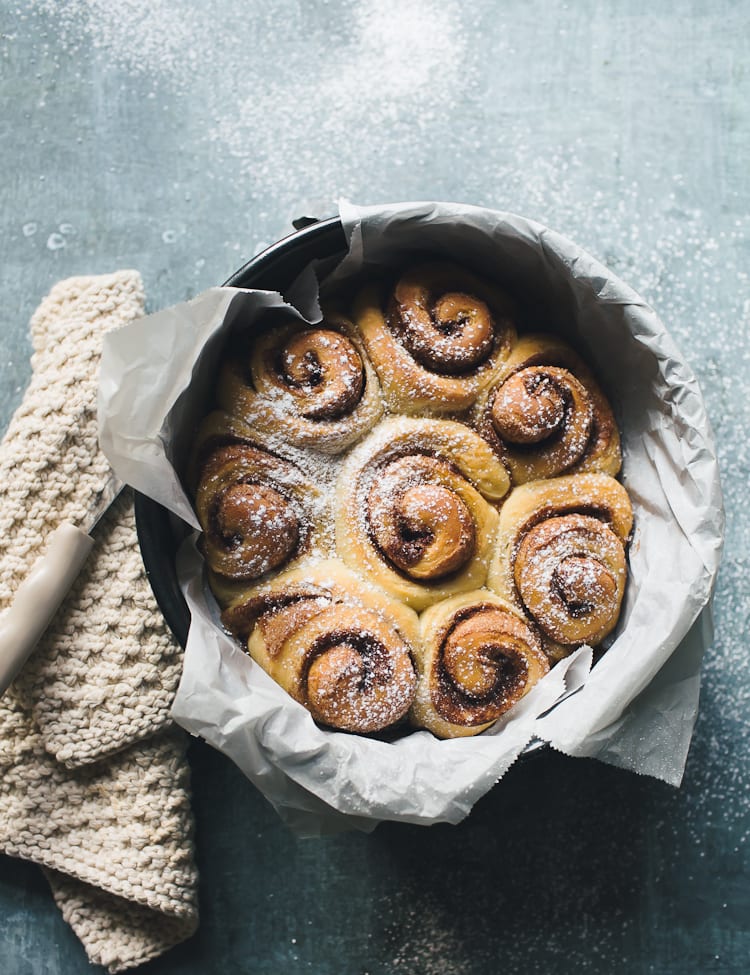
- Softer, taller rolls. Baking in a 9-inch springform pan is my secret. The higher sides traps in more moisture, making the rolls light and luxurious, with a squishy high rise.
- Subtle tangy flavor. Bubbly, active sourdough starter naturally leavens the dough and lends a lovely taste that will make you weak in the knees!
- Rolls can be made in advance. I’m sharing my fool-proof methods to fit any baker’s schedule.
How To Make The Best Sourdough Cinnamon Rolls {Step-By-Step Recipe}
Before your begin: check out my Baker’s Schedule. You’ll have a better idea of when to start the dough and how to prep ahead.
Step 1: Mix The Dough
To Start: Make the dough in the evening. I suggest using a stand mixer (the dough is sticky). If you don’t have one, mixing and kneading can be done by hand. The goal is a soft, supply, buttery dough.
Step 2: Bulk Rise
Cover the bowl with lightly oiled plastic wrap. Let the dough rise overnight at a cool room temperature (68 F) until double in size. The dough will look domed, puffy and airy when it’s done rising.
How long will it take to rise? Temperature controls time. For example, my dough took ~12 hrs. @ 67 F. Your room temperature may differ from mine which will effect the rise time. This is normal. Watch the dough and not the clock!
Step 3: Roll the Dough
The following morning, lightly oil and flour your countertop. This is THE BEST tip by the way. The dough won’t stick! I use an all natural olive oil spray from Trader Joe’s. Works like a charm.
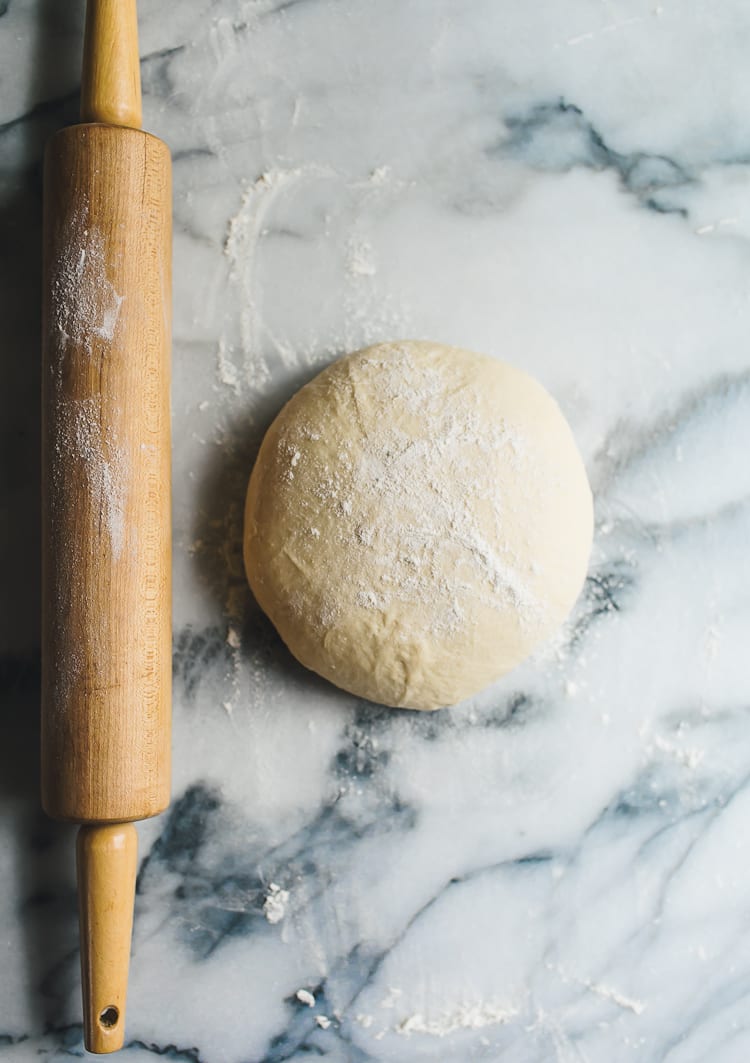
Ok, so now: remove the dough from the bowl. Gently pat into a rough rectangle and let rest to relax the gluten. It will be easier to roll out.
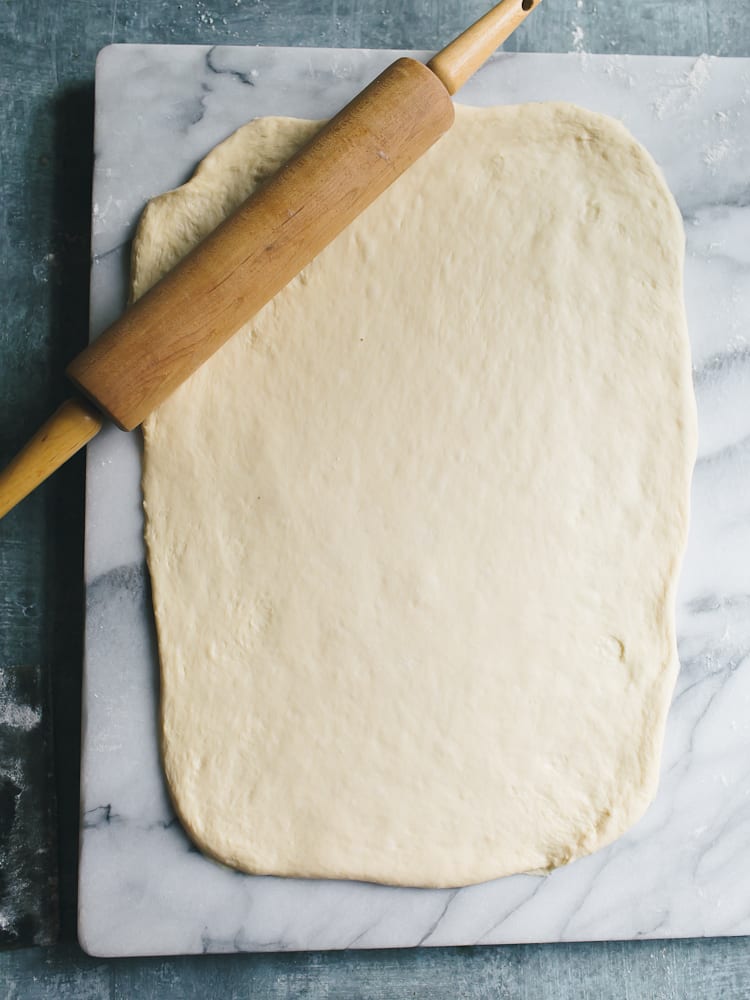
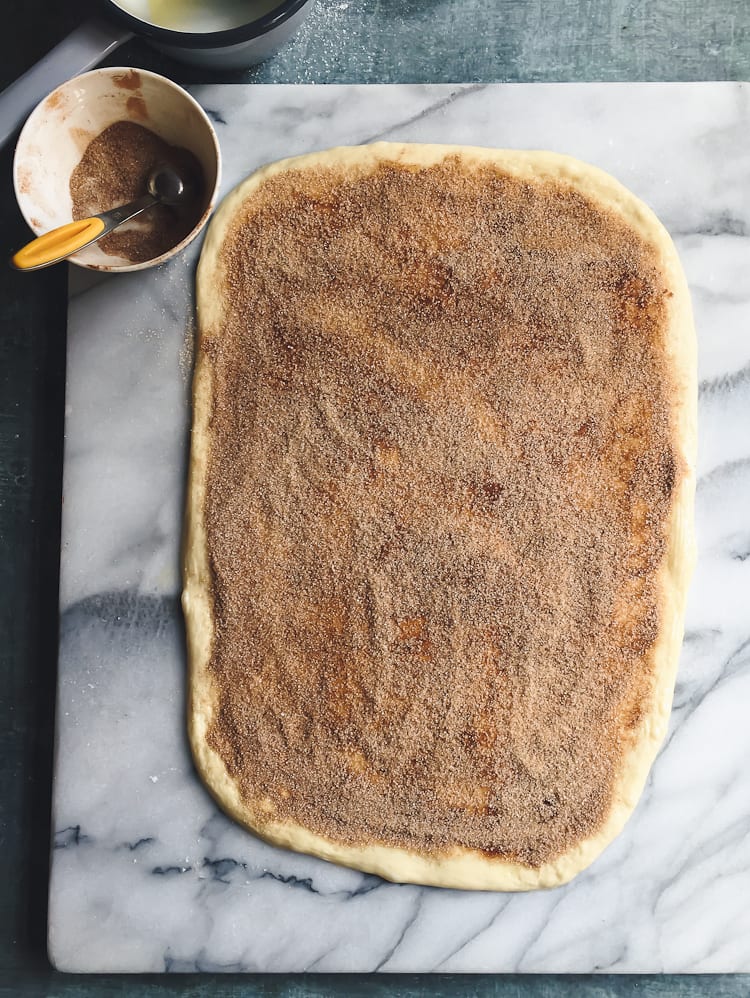
Lightly dust the dough and your rolling pin with flour. Roll the dough in a 16 x 12-ish rectangle. When first testing recipes, I never thought the above dimensions were that important. But it’s actually crucial: you’ll get ~8 rolls to fit a 9-inch springform pan.
Step 4: Make The Cinnamon-Sugar Filling
Melt 2 tbsp. of butter in a shallow pan or microwave; set aside. Combine the cinnamon, sugar and flour in a small separate bowl. Once the butter has cooled, brush the entire surface of the dough.
Sprinkle with the cinnamon-sugar mixture leaving a 1/2-inch border around the edges. Smooth it out with your hands. The texture will go from dry and sandy to almost wet-looking.

Step 5: Roll & Cut The Dough
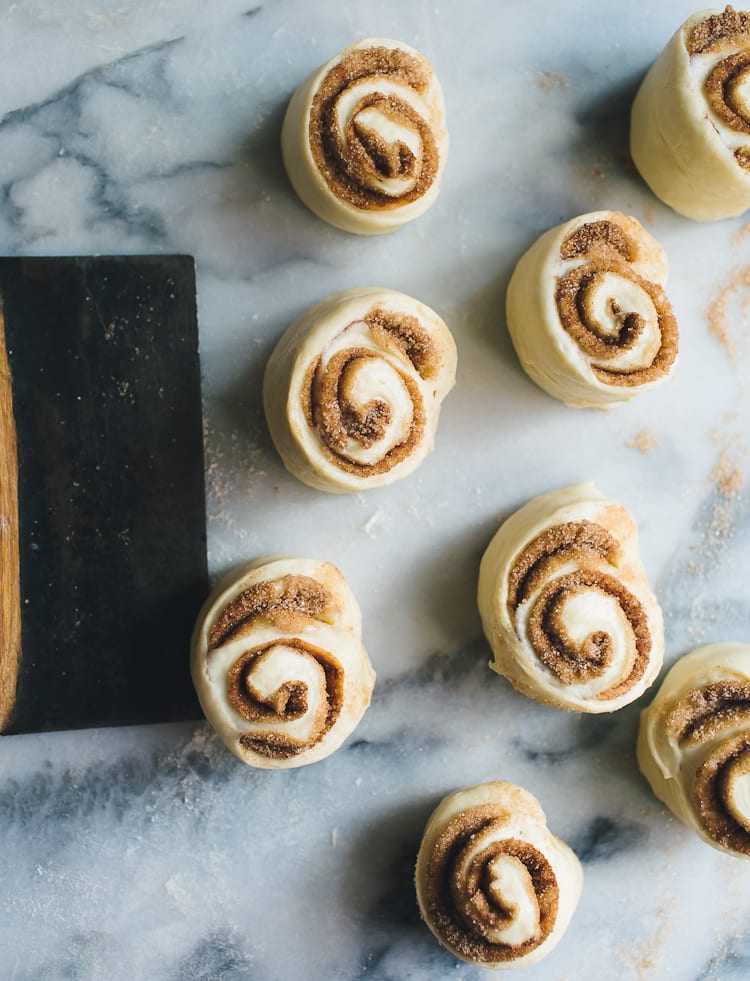
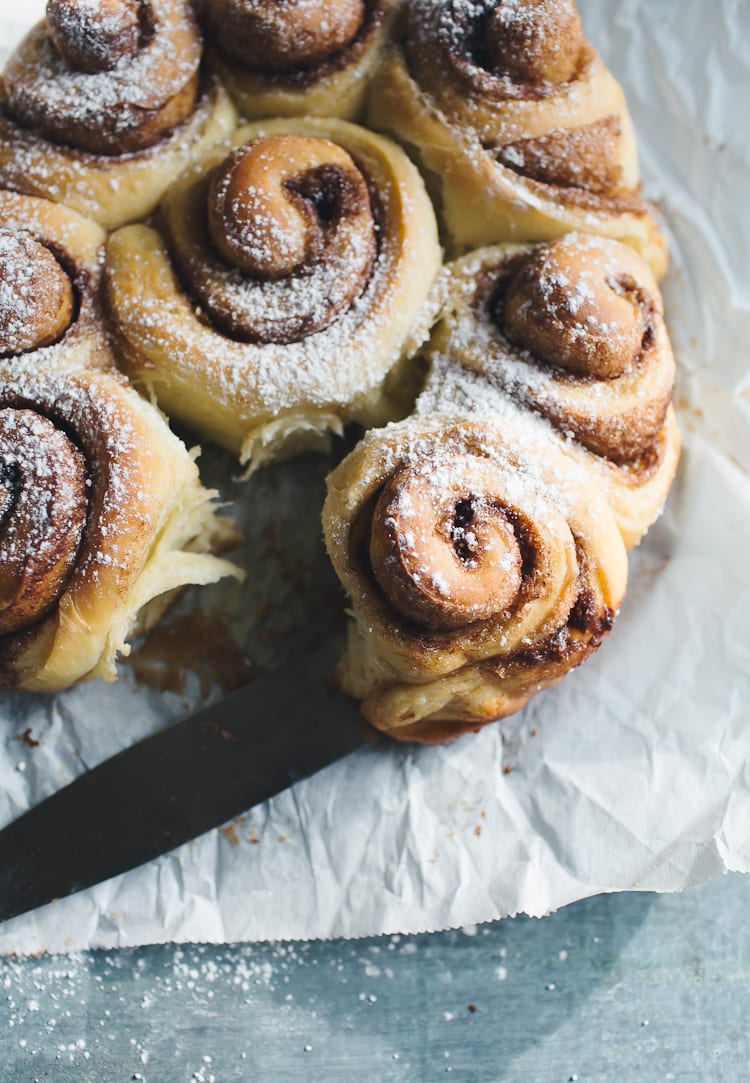
Working with the long side, roll the dough into a log pressing down as you go. Take your time with this step. You want the log to be tight to the swirls stay in tact when baked. Once you get to the end, face the dough seam side down.
Cut the log into (8) 2-inch sections using an oiled knife or bench scraper. I’ve found that gently “marking” the dough first ensures each piece is roughly the same size before cutting. I’m the worst at eyeballing this stuff.
Tip: If at any point the dough sticks (it tends to get warm from the heat of your hands), lightly oil or flour your finger tips and try working with it again.
Step 6: Second Rise
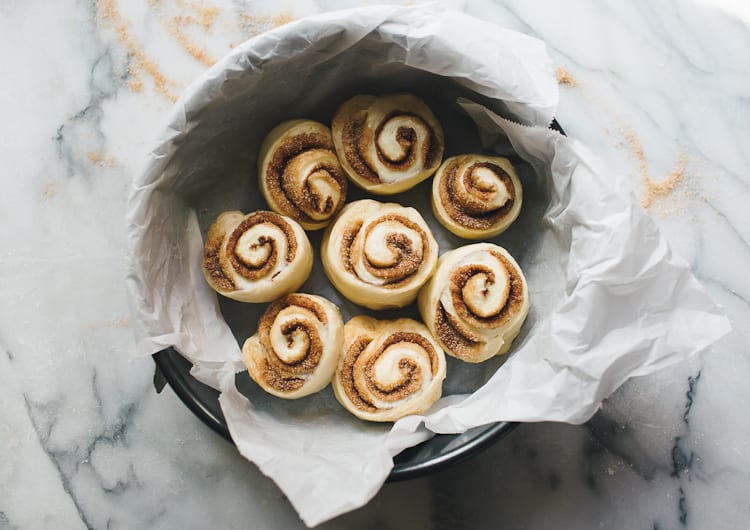
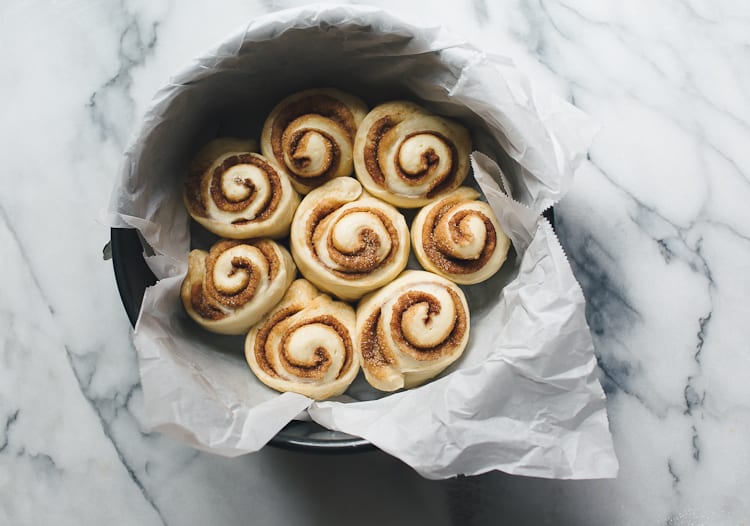
Place the rolls into a parchment-lined springform pan and let rest for about 1-2 hours, or until the dough puffs us.
Run out of time? After resting for 1 hour, cover the dough and chill in the fridge until ready to use. Before baking, give the rolls more time to plump up at room temperature. Alternatively, freeze the dough: skip the resting step, cover the pan in two layers of plastic wrap and freeze (see recipe below for defrosting instructions).
Here’s what the dough looked like before resting…
After resting…
Step 7: Bake The Cinnamon Rolls
Bake @ 350 F for 30-40 minutes, or until light golden brown. You can make the glaze while the rolls are in the oven. Once finished cool the cinnamon rolls in the pan for 15 minutes and then remove to a wire rack. The warm cinnamon will smell incredible!
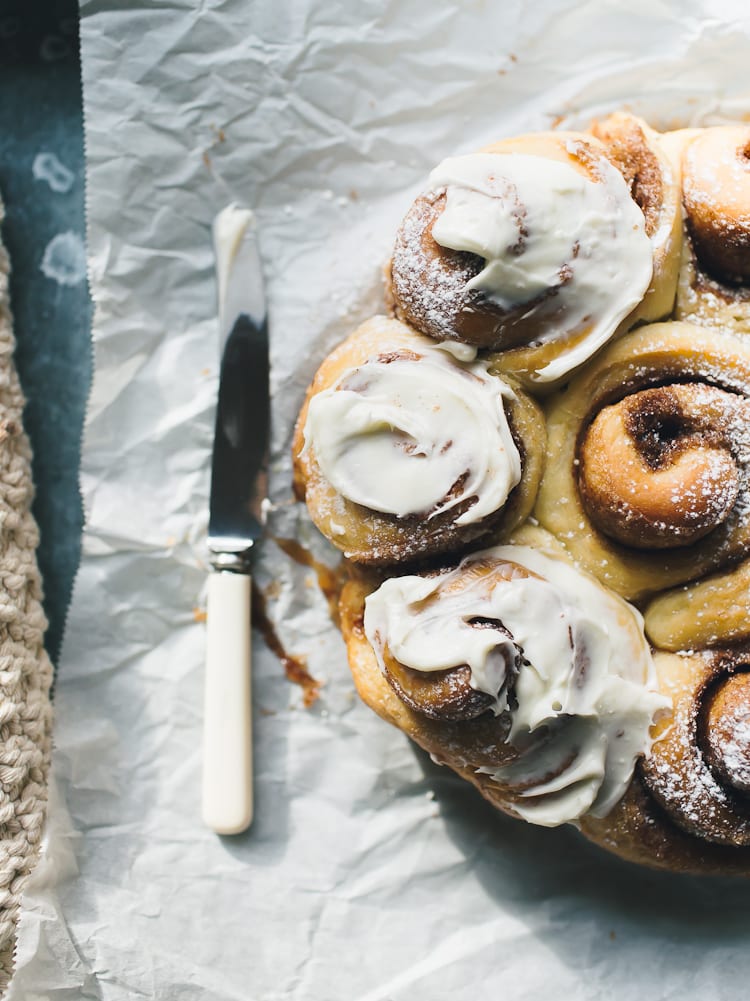
Step 8: Make The Glaze
Combine softened butter, whipped cream cheese, and sifted powdered sugar in the stand mixer. Beat until smooth, thinning out the consistency with a little milk as needed. You could also skip the glaze and dust with powdered sugar instead!
Time To Eat!
Close your eyes and take a bite… the warm, caramelized cinnamon sugar is absolutely out-of-this-world! And all that fluffy dough? You won’t be able to eat just one! And if you like this recipe, be sure to try my other homemade breakfast favorites: sourdough pancakes, waffles, crêpes and scones.
Sample Baker’s Schedule
Overnight Option: Make the dough in the evening and let rise overnight. The following morning, roll, cut and shape the dough. Rest for 1-2 hours (second rise) before baking.
Alternatively, after resting for 1 hour, cover the dough and chill until ready to use. Rest at room temperature before baking. The dough should be plump and puffy before baking.
Make-Ahead Option (Freeze): Place the cut & shaped cinnamon rolls into a parchment lined 9-inch springform pan. Cover with two layers of plastic wrap. Freeze until ready to use. The night before baking, remove the old plastic wrap and replace with fresh wrap (this will prevent any condensation from dripping onto the rolls). Defrost overnight, about 10-12 hrs. at room temperature, approximately 67 F. Bake the following morning as directed.

By signing up, you agree to receive emails from The Clever Carrot. Unsubscribe at any time.

Soft & Gooey Sourdough Cinnamon Rolls
- Prep Time: 15 hours
- Cook Time: 30 minutes
- Total Time: 15 hours 30 minutes
- Yield: 8 rolls 1x
- Category: Sourdough Bread Recipes
- Method: Oven-Baked
- Cuisine: American
- Diet: Vegetarian
Description
These soft, overnight sourdough cinnamon rolls are perfect for breakfast, brunch, or holiday treat! Made with a luscious sweet dough and a not-too-sweet cinnamon filing, they are guaranteed to be a huge hit.
Ingredients
Sweet Dough
- 160 g (2/3 cup) milk, whole or 2%
- 28 g (2 tbsp) unsalted butter, melted (see notes below for variation)
- 1 large egg
- 100 g (1/2 cup) bubbly, active sourdough starter
- 24 g (2 tbsp) granulated sugar
- 300 g (2½ cups) King Arthur all-purpose flour
- 5 g (1 tsp) fine sea salt
- cooking spray or oil, for coating
Cinnamon-Sugar Filling
- 28 g (2 tbsp) unsalted butter (see notes below for variation)
- 100 g (1/2 cup) granulated sugar
- 3 tsp. ground cinnamon
- 1 level tbsp. flour
Glaze
- 2 tbsp unsalted butter, softened
- ⅓ cup whipped cream cheese, room temperature
- ¼– 1/2 cup powdered sugar, sifted (add more if you like it sweet!)
- 1–2 tbsp milk
Notes, Tips & Variations
- For a richer dough, increase the butter to 115 (8 tbsp) and use 360 g (3 cups) flour total. The texture is incredible.
- Make sure the melted butter and milk mixture has cooled slightly before making the dough. If it’s too hot, the dough will become incredibly sticky like cake batter (I’ve experienced this many times). If this happens to you, don’t worry- wait for the dough to cool down before adding more flour, if needed.
- Recent recipe update: to prevent the cinnamon sugar filling from leaking while the rolls bake, instead of using 28g (2 tbsp) of melted butter, combine 84 g (6 tbsp) softened butter with the rest of the cinnamon-sugar filling ingredients listed above.
Instructions
Baker’s Schedule
Overnight Option: Make the dough in the evening and let rise overnight. The following morning, roll, cut and shape the dough. Rest for 1-2 hours (second rise) before baking.
As an alternative, after resting for 1 hour, cover the dough and chill until ready to use. Rest at room temperature before baking. The dough should be plump and puffy before baking.
Make-Ahead Option (Freeze): Place the cut & shaped cinnamon rolls into a parchment lined 9-inch springform pan. Cover with two layers of plastic wrap. Freeze until ready to use. The night before baking, remove the old plastic wrap and replace with fresh wrap (this prevents any condensation from dripping onto the rolls). Defrost overnight, about 10-12 hrs. at room temperature, approximately 67 F. Bake the following morning as directed.
Make the Dough
In the evening: Combine the melted butter and milk in a small bowl. Cool slightly before using.
Add the egg, sourdough starter, and sugar to the bowl of a stand mixer fitted with the paddle attachment. Mix to combine. With the machine running, slowly pour in the milk mixture. Add the flour and salt. Continue mixing until a rough, sticky dough forms, about 1 minute. Scrape down the sides of the bowl. Cover with a damp towel and let rest for 30 minutes.
After the dough has rested, switch to the dough hook. Knead on medium-low speed for 6-8 minutes (I use #2 or #3 on my stand mixer). The dough should feel soft, supple and pull away from the sides of the bowl when ready. If it’s too sticky add a small bit of flour.
Bulk Rise
Transfer the dough to a medium-size bowl coated in butter. Cover with plastic wrap. Let rise overnight until double in size, about 8-12 + hrs. @ 67-68 F, depending on temperature.
Stretch and Fold the Dough (optional step): about 30 minutes- 1 hr. into the bulk rise stretch and fold the dough: grab a portion of the dough and stretch it upward. Fold it over toward the center of the bowl. Give the bowl a 1/4 turn; stretch and fold the dough again. Continue this technique until you’ve come full circle around the bowl (4 folds total). For video guidance, click here. This optional step will increase the overall volume of the rolls and aerate the dough.
Roll the Dough
In the morning: Line a 9-inch springform pan with parchment paper. I like to scrunch the paper into a ball first, open it up, and then line the inside with enough excess to hang over the sides for easy removal. It tends to fit better this way.
Lightly oil and flour your countertop to prevent sticking. Coax the dough out of the bowl. Gently pat into a rough rectangle. Let rest for 10 minutes for easier rolling.
Dust the dough (and your rolling pin) with flour. Roll the dough into a 16 x 12-ish rectangle using a tape measure for accuracy. If the dough resists, let rest for 5-10 minutes and try again.
Make the Cinnamon-Sugar Filling
If using the softened butter variation (listed in the notes above): add 84 g (6 tbsp) softened butter to a small bowl. Mix with the sugar, cinnamon and flour. With an offset spatula, spread onto the dough, leaving a 1/2-inch border around the edges.
If using the melted butter version: brush the entire surface of the dough, including the top, bottom and sides with 28 g (2 tbsp) melted butter. Use all of it. Combine the sugar, cinnamon and flour in a bowl. Sprinkle the mixture onto the dough leaving a 1/2-inch border around the edges. Smooth it out with your hands until it looks wet and sandy.
Shape & Cut the Dough
Starting on the long side of the dough (16-inch), roll it into a log pressing down gently as you go. Take your time with this step. The log needs to be tight so the swirls stay in tact. You should end up seam side down. TIP: if the dough starts to get sticky from the heat of your hands, lightly oil or flour your fingertips, take a deep breath and try again.
Cut the dough into 2-inch sections using a oiled knife or bench scraper. I lightly “mark” the dough first to make sure each piece is roughly the same size.
Second Rise
Place the rolls into the lined pan and let rest for 1- 2 hours, or until the dough puffs up. Alternatively, if you’d like to chill or freeze the rolls, please refer to the “Make-Ahead” option in the Baker’s Schedule at the top of this recipe.
Bake the Cinnamon Rolls
Preheat oven to 350 F. Bake the dough onto the center rack and bake for 35-40 minutes (check at the 30 minute mark). The tops should turn light golden brown when ready.
Remove from the oven and cool in the pan for 15 minutes. This helps the butter to absorb back into the dough. Then lift up the rolls, while still on the parchment paper, and transfer to a wire rack.
Make the Glaze
While the rolls are baking or cooling make the glaze. Add softened butter, whipped cream cheese and sifted powdered sugar to the bowl of a stand mixer. Beat until smooth, thinning out the consistency with a little milk as needed. The ingredients must be soft and at room temperature for best results.
To serve, top the rolls with some of the glaze or lightly dust with powdered sugar. These rolls are best enjoyed slightly warm on the same day they are baked.

Comments
Kaitlyn says
I’m disappointed my dough is not turning out as I would have expected. While I am new to the sourdough game, I have had several successful loaves. I just can’t get it to the expected consistency that is conducive to folds. It’s much tense/tougher than I think it should be.🙁
I am going to let rest overnight to see if it settles into anything/is able to be rolled out. Any thoughts on where I might have gone wrong? Otherwise, it sounds delicious.
Mikki says
Perhaps you just needed to add a little more liquid. Our house is very low humidity right now, and I also needed a little more milk than the recipe said to get the dough smooth and supple. Dough is always affected by external factors such as humidity, temperature, even altitude, so it’s always possible you might need to adjust a recipe a little to get the right result. Did the rolls turn out okay?
Mackenzie zilenas says
Loved it!! Want to try with all purpose flour instead of bread flour that I had. But super yummy & in love with the icing. Not super sweet icing, but the perfect sweetness!
Wendy says
1. Thanks for sharing your knowledge! I give you all credit for any success I have with anything sourdough. Love your book too.
2. My husband and I really enjoy your cinnamon roll recipe.
3. I poured a half cup of heavy cream over the rolls right before putting them to bake and oh my heavens they were even more amazing.
Thanks again!
Emilie Raffa says
This is such lovely feedback, Wendy, thank you! You’re the second person today to mention adding cream to the rolls; I’m going to adjust the recipe notes here to include it. 🥰
Maureen says
I love this recipe. I pour a couple of tablespoons or cream on top of each roll before baking. Makes the rolls moist and tender.
Emilie Raffa says
Maureen, this sounds absolutely divine! Thank you for sharing! 🥰
Johnna D says
Hi,
Could I cut these smaller and make more?
Thanks!
Tara says
I did and it worked beautifully. I made 12.
Alyssa says
Hi Tara! What size pan did you use to bake this recipe as 12 rolls?
Bernadette Dickson says
First off this recipe is excellent, so delicious. It was a bit complex and timely but so worth it. I would suggest reading the whole page, recipe and Notes before making because I did adjust according to the updates. Thank you so much for sharing. I will be making this again.
Haley says
Omg, perfect!! If I’m honest, I was a bit overwhelmed by the instructions before I started. But it was soo easy to follow along!
They turned out absolutely delicious!
Chelsea says
Could I use half and half if I dont have milk?
Cate Bellafiore says
This is my fifth time making them, they are unbelievable every time! This time I used all the butter in the alternative suggestions, used brown sugar in place of white, and added a little lemon zest to the glaze. I added chopped walnuts and a little extra filling to the top of a few of them, and they are better than those at my husband’s favorite bakery. All the tips and tricks are so helpful. I live in Hawai’i, and my kitchen is more like 78 degrees in the winter, and it only takes 7 to 8 hours for the bulk rise if my starter is nice and bubbly to begin with.
Alicja Ciastoch says
So amazing taste amazing thank you!
Rebecca Ferguson says
Finally! I can successfully make cinnamon rolls! After numerous recipes and attempts, this is easily the best recipe yet! I do find it easier to cut the dough into strips and roll each up individually than wrestle with the whole log. I also do the extra butter and flour with the softened butter filling. Thank you for sharing this recipe! ❤️
Madeline says
I was really struggling to start baking sourdough until I tried your wheat flour recipe! When I gave this recipe a shot, my dough turned out so sticky and gooey after the overnight ride that I could roll them into the correct shape. I did follow the recipe exactly, so is this an issue with my starter?
Chipmunk says
I have baked goods for 40 years and have recently mastered my first amazing sourdough loaf. These cinnamon rolls are heavenly! Pillowy and dreamy is the only way to put it. Followed recipe exactly but split up rolls between 2 pans. Yum!!!!!
Sherry says
Can you substitute whole milk with skim milk or almond milk? If so are there any adjustments to the measurements for this substitution?
Kenedie says
Can you triple this recipe?
Allison says
We love this recipe so much. I use a simple, lighter glaze (powdered sugar, milk) and it’s just perfect!
Debora Morris says
I was craving cinnamon rolls and I’ve done the overnight method for bulking. Absolutely delicious. This time I decided to put them in my oven on the proof setting. I waited until they doubled, then took them out and I’ve rolled them out and I’m currently waiting for them to come out out of the oven. They look amazing!
K says
How long do you think these will take with a bread proofing box set at 80°?
Luke B says
I have made these several times now. They are a favorite in our family, and I have had a few people request them in the last year (hence why I am here again and baked a double batch today). The recipe is very flexible, and even if I don’t follow the directions exactly, it always comes out perfect. True with most sourdough recipes, if I am busy, I throw the dough in the fridge and pull it out the next day when I am ready to work on it some more, and it is always very forgiving of this. This is the only recipe for cinnamon rolls I will use.
Johanna Baumeister says
Delicious and easy recipe. I was looking for something that could be left out overnight as I had some active starter and wanted to use it. These turned out so delicious, and they’re not huge to where you’re unlocking your jaw to just take a bite.
Angelica pfitzinger says
Delicious and super easy to follow recipe!
Gie says
My husband and I just finished our cinnamon rolls, still warm, topped with glaze. Pure heaven. These are arguably the best cinnamon rolls I’ve ever had. The recipe was easy to follow and the dough behaved beautifully. I have been baking from Artisan Sourdough Made Simple since it came out; I love how easy these recipes are compared to others. This recipe is a wonderful addition to my sourdough “recipe box.” It’ll be a holiday favorite for years to come.
Charlene says
WOW! I made these for the first time today. It will definitely not be the last time! They were decadently scrumptious.
I used the richer dough variation with 8 Tbsp butter & 360 g flour and the 2 Tbsp melted butter with the filling.
Thank you!!!
Selina Ramsden says
I make these for Christmas morning every year. My family loves them.
Halley says
Can I make these in a 9×9 nonstick pan? Don’t have a springform pan :( thanks!
Tammy Forbes says
I always use a glass Pyrex dish and they come out perfectly
MEG says
My starter isn’t strong enough to use yes, ( so sad about it!) how can I make with without the sourdough starter?
Kylinn Cobb says
Made these as a festive breakfast and they did not disappoint! I used a splash of whole milk while baking and they were so moist and delicious. I had to bake about 47 minutes.
Tara says
Absolute best cinnamon rolls I’ve ever made and ever eaten. No joke. And I’m a total cinnamon roll snob. I made these for our family Christmas celebration and everybody raved about them and wanted the recipe. They’re so soft and not too sweet. I made these a few days early and put them in the freezer after I cut the roll. I set them on the counter overnight and baked them in the morning. I brushed some cream on them before baking. Absolutely delicious!
Betsy says
Hi! Love the clever carrot’s recipes so giving this one a whirl! Has anyone ever made these into mini cinni rolls to make twice as much out of this recipe? :)
Mary says
Thank you for this wonderful recipe; it was a real Christmas treat for our family. Thank you for sharing your gift with the rest of the world. Have a Merry Christmas.
Nate says
We’re mostly dairy free here so I substituted the milk for pumpkin puree (my wife loves pumpkin everything) and WOW. Also made buttercream icing since I did not have cream cheese. These are the best cinnamon rolls I’ve ever had. Thanks for this recipe, it’s a killer recipe and easy to make small tweaks and create your own fantastic variations.
Alicia Kachanoski says
Also dairy free. Used vegan butter and oat milk and they are still amazing
Laura says
Hello! I tested this for freezing so I can bake for Christmas morning. They were very sour, I’m sure that it has to do with my starter I keep a pretty thick one. Do you have any recommendations on how I could make the sour flavor more subtle? Thanks so much :)
Brittany says
I make the dough in the AM and bulk ferment for 6-8 hours instead of overnight option for less tang! I roll out my dough and make the rolls, do the rest for 1 hour option, and pop them in the fridge to bake the next morning. Works perfectly and just the right amount of sourdough flavor.
JL says
I just finished baking these this morning. I thought I was doing them wrong the whole way through. My dough was super tacky, I was t sure if I let it rise enough, I thought I rolled it too thin, the filling was too thick and I had a hard time spreading it, I let too much condensation gather in the pan after the 2nd rise. But they turned out perfect! The dough was so airy and fluffy. I will be making these again for Christmas morning! Absolutely delish and worth the anxiety now that I know I can do it :)
Sammi says
How do I use this recipe to make JUMBO cinnamon rolls?
Has anyone tried and if so, could you let me know?
Lauren says
First time making this recipe – it’s absolutely delicious and fluffy! This will be a family favorite that we’ll come back to repeatedly! I used a cast iron pan (but I accidentally had it hot while letting the rolls go through the second rise, but it still turned out great!) The bottoms of the rolls became caramelized when the inside filling melted to the bottom of the pan – not sure if it’s because I heated the cast iron while resting the rolls or if this happens with a cold cast iron pan too. I loved the flavor and texture so I’ll probably repeat that happy mistake :)
Sue Morgan says
Delicious! I made double the recipe, cooked one and froze the other dough ready for when my family come to stay.
These are calorie free….right?! 😃
Jessica says
Looks amazing – I want to make and freeze to gift for teachers. Can I give in a container and they cook in whatever dish they have? Or does it need to be a spring foam pan?
Christie says
Beautiful dough. I’ve got mine on final rise with several inches of snow on ground this morning. Will be a lovely treat. Thank you for recipe.
Jim says
Is it safe to dough with egg in it overnight? Can it bulk ferment in the fridge?
Karen says
Hello, could I use Monkfruit or Alloulose to replace the sugar?
Carrie says
I’ve made these several times now, I do make them dairy free with creamy oat milk with high fat %, and dairy free butter. I use a basic glaze on top without cream cheese. They’re always great on day 1, but no matter how I store them day 2 the rolls themselves are very dry. Any tips for helping that?
Aimee Hampton says
Add a tbsp of cream or milk to each roll before baking. We’re dairy free so I add coconut cream or dairy-free milk before baking.
Emily says
The only flour I have is gold medal all purpose or king arthur bread flour. If I use the gold medal do I have to higher the water due to protein percentage in flour? Or should I use bread flour?
Emilie Raffa says
Hi Emily! No, you don’t have to do that. You can use Gold Medal flour as is, without making additional changes to the recipe.
Trish says
Easy easy! I have tried many and finally found a fav. A terrific SD dessert when bread gets tired. Thanks, my addition was tiny chunks of apple! A second batch is rising :)
Emilie Raffa says
Trish, apples sounds delicious! Thanks for sharing! Glad you enjoyed it.🥰
Emily Morris says
Hey there! Troubleshooting! I let my dough rise over night, and it was beautiful when I coaxed it out of the bowl. But after I rolled and cut them, they are limp and not fluffy anymore. And they don’t seem to be “fluffing up” to room temp. What did I do wrong??? The dough is so soft and fun to work with! Maybe I fussed with it too much in the rolling phase??
Thanks!
Emily from Texas
Denise says
Well for some reason the most recent comments that appear below are from March 2019. I cannot see my previous comment from a week ago and even though I received notification that Emilie had replied to my question, I see her answer! How disappointing, and I have no idea why I can’t see newer posts. Is her website locked for some reason? Are comments closed to new views after a certain amount of posts? Wish there was a way I could just get the reply via email message.
Emilie Raffa says
Hi Denise! How frustrating! I don’t know why that’s happening- the website is not locked. Comments are not closed. I would refresh your browser and/or clear your cache. Let me know if that helps. Tech can be so fickle sometimes!
Brenda M Brown says
Has anyone tried baking these rolls in a bundt pan? I find that my middle roll never properly cooks!
Emilie Raffa says
Hi there! I’ve never tested it, so I’m unable to advise with specifics. But do let us know if you experiment.
Danielle says
I really want to try these but I want them to be bake ready when I wake up so I don’t have to shape them and let them sit for 2 hours in the morning. Thoughts on if I could roll them out and let them rise overnight already rolled and ready to pop in the oven when I wake up? They look delicious!
Theresa says
Has anyone subbed almond milk and how did it turn out
karina says
yes i’ve subbed almond milk and vegan butter no problem
Emilie Raffa says
Hi Theresa! You can definitely sub with almond milk. The texture will change slightly, but it’s so subtle, and still very delicious.
Theresa says
Thank you Emilie!
Taylor says
Can you add inclusions to this? I was thinking pumpkin puree.
Emilie Raffa says
Yum! A pumpkin version of this sounds delicious. I haven’t tested it. But off the top of my head, I’d reduce the milk to compensate for the addition of pumpkin puree (which also counts as a liquid/moisture). Let us know if you experiment!
Kevin says
If I make these christmas eve morning are they fine in the fridge for close to 24 hours prior to baking christmas morning?
Aliyah Thao says
Can this dough be made the day of and use the day of instead of overnight ?
Emilie Raffa says
Absolutely. You can adjust your baking schedule for a same-day bake.
Genesis Garcia says
After shaping the rolls, how long can they stay in the fridge before baking?
Thanks!
Emilie Raffa says
Hi Genesis! I like to let the rolls rest at room temperature for 1 hour first, before chilling in the fridge. After that, they can rest overnight. (keep in mind, the flavor might deepen on the overnight). When ready to continue with the recipe, give them more time to plump up at room temperature, if needed.
Lisa says
I made these for Christmas morning and they are amazing. Thank you for this recipe. It’s a keeper.
C says
Just have to share that I have been making these for a while now and my whole family is obsessed. I get so many requests to make these and bring them to brunches. I’ve even made them a few times in a muffin pan and frozen the baked rolls so my kids can take them out and have some whenever they want. I quickly found out that means they eat them nonstop so I had to stop that 😄 There has even been a time or two when my starter was acting funny and the dough didn’t quite rise like it should, but I trusted the process and baked them up and they turn out amazing 100% at the time!
Emilie Raffa says
Music to my ears! Thank you for sharing! I love that you’ve baked these rolls in a muffin pan too- I have to try that. And ps: sourdough is 100% trust the process. You get it. 🥰
Joanna says
Can you swap out the refined sugar for coconut sugar or maple syrup?
Emilie Raffa says
Hi Joanna! I’ve never tried coconut sugar before- I imagine the taste would change a little bit. I do not recommend using maple syrup.
Kathryn says
I always make these with coconut sugar and they are amazing!