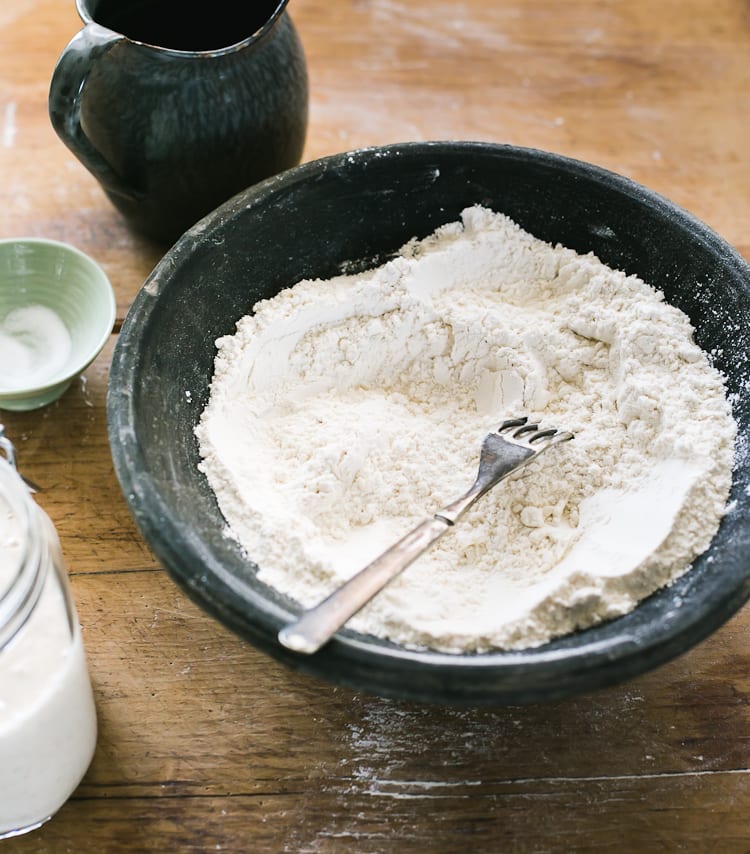
Imagine this: you’ve got a beautiful bubbly starter, you’re ready to make the dough, and everything is set for an overnight rise. You’ve followed the sourdough bread recipe to a T! Nothing could go wrong, right?
Except, when you wake up the following morning the dough has barely risen at all. Maybe only a few inches. The dough is cold, dense, and sort of lifeless (just like your mood). What gives?
First, what you’re experiencing is totally normal.
We’ve all been there no matter how easy the recipe might be. Ask any baker. In my experience however, temperature is usually the main culprit and luckily there are ways to control it.
But first, you’ll need to consider (and rule out) additional culprits that like to throw a wrench in your rise time game.
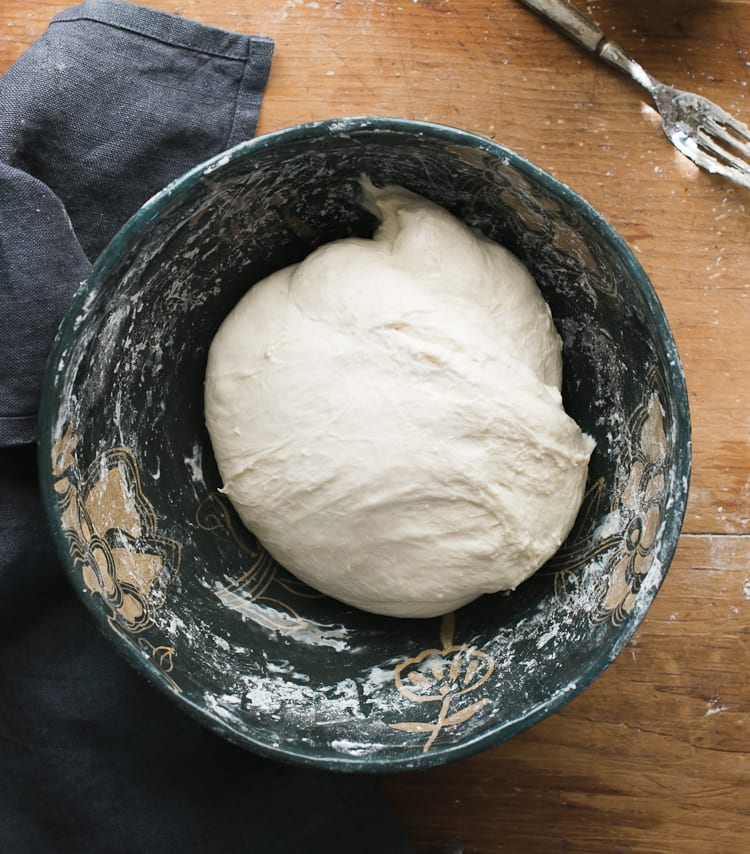
What most people don’t know, is that sourdough is like a web; each step is connected to the next.
That means when troubleshooting, it’s never just ‘one thing’ that causes your bread to flop. You have to consider how each step works together and what happens to the bigger picture when something goes wrong.
Sourdough Rise Trouble Shooting Steps:
Test Your Starter
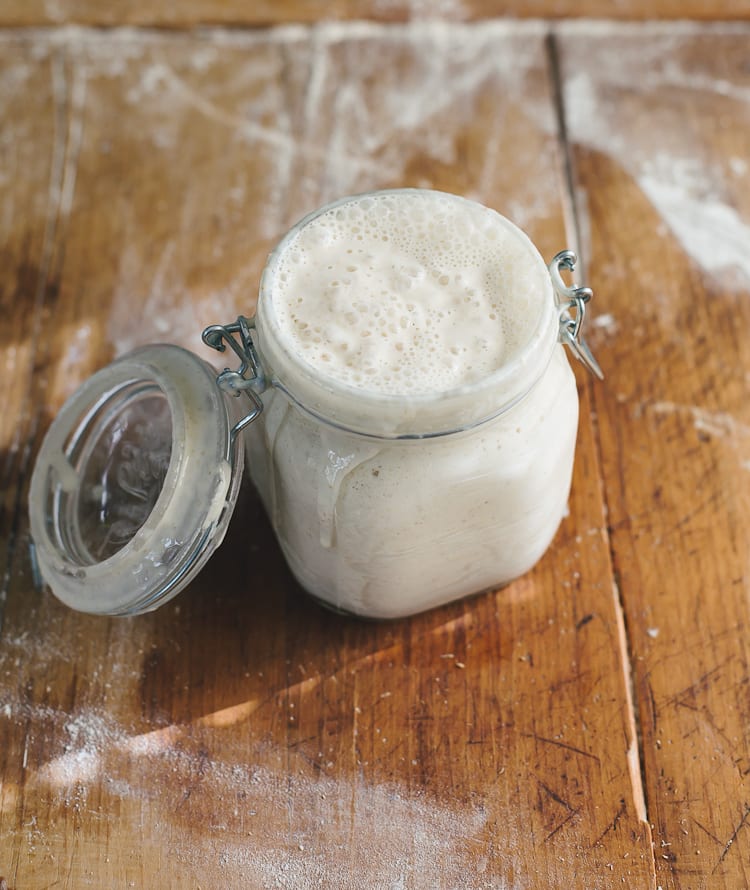
First, let’s talk about your sourdough starter. If it lacks power and vibrancy, your bread won’t rise. So, how can you test to be sure it’s okay? After giving it a good feed, it’s ready to use when it shows all of the following signs:
- doubled in bulk size (use a rubber band to track its growth as it begins to rise and fall).
- bubbles on the surface and throughout the culture.
- spongy texture similar to roasted marshmallows.
You can find more info regarding sourdough starters, ongoing care, FAQ in my book (p 16-23).
Once your starter shows all of the signs, make sure it passes the float test. To do the test, drop 1 tsp. of the starter into a glass of water; if it floats to the top it’s strong and ready to use.
The more you get to know your starter the more it will ‘speak’ to you, and eventually you’ll bypass this test altogether.
Check The Temperature
Assuming your starter is ready to use, the next step is to address the temperature. As mentioned above, temperature is usually the culprit when your dough is taking forever to rise.
Why? Because temperature controls time.
Simply put: if the weather is cold, your dough will take longer to rise. If the weather is warm, your dough will rise faster. This concept applies to ALL bread recipes, so get used to it and be flexible.
As a guideline however, bakers will often provide a specific temperature with an approximate rise time to help you out.
Here’s an example:
Let’s use my Everyday Sourdough from Artisan Sourdough Made Simple. The approximate rise time is 8-10 + hours at room temperature, defined at 70 F.
What does this rise time and temperature mean exactly?
Let’s say it’s winter in New York, and the temperature is about -20 F outside. Your thermostat is set to 70 F inside. You’ve made the dough, let it rise overnight on the kitchen counter at 70 F, and in the morning it has barely risen. What happened?
Here’s the deal: regardless of what your thermostat says, if it’s – 20 F outside, I can guarantee the temperature inside is not 70 F.
It’s most likely colder than you think! I learned this the hard way. Drafts, poor insulation, doors opening and closing etc. will not only change your current room temperature, but it changes the temperature of the dough too. My kitchen is the coldest room in the house, so I know this all too well.
Plus, if your body is cold and you’re wrapped up in 100 cable-knit sweaters, think about how the dough feels… To remedy this, you’ll need to deviate from the recipe to suit your personal environment.
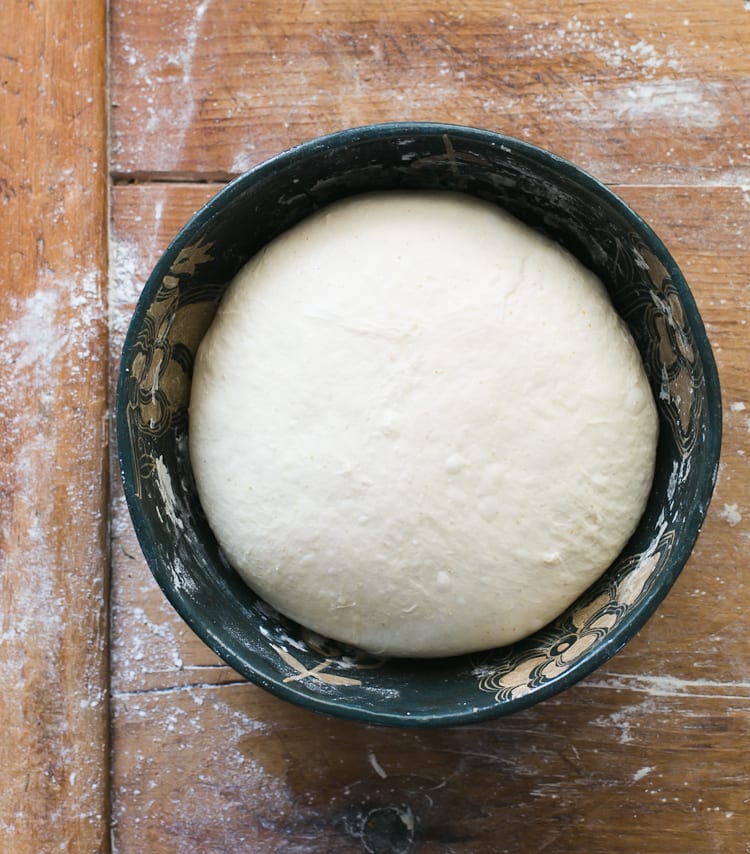
In other words, in this example, your dough needs more time to rise beyond the 8-10+ hour timeframe- it’s just too cold. And this is okay.
Remember, the dough is ready when it has doubled in size. This is your visual marker. Don’t even bother baking it if it still looks dense after 10 hours. Watch the dough and not the clock. Conversely, if you live on an island and it’s 90 F, the dough might be ready in only 4-5 hours.
Look On The Bright Side
While colder temperatures and extended rise times might initially frustrate you, the experience will always hand you a gift.
It develops your intuition and leads you away from second guessing yourself. Intuition is a baker’s secret weapon. With practice and repetition, you’ll learn how to marry the variables (time, temperature, specific instructions etc.) with intuition (adjusting rise times, rising locations, and just doing your own thing ) without thinking twice.
Trust the process, okay?
Now, let’s move on to see how we can control the temperature…
Use Warm Water To Control The Temperature
If the weather is cold and your dough won’t budge, please use warm water during the initial mixing phase. It will help to jumpstart the rising process.
I actually use warm water 90% of the time when making dough (I tend to use cooler water in the summer). The exact water temperature doesn’t really matter in my opinion. Between 80-90 F is good. It just shouldn’t be too hot. Use your judgement.
Also: do you store your flour in the fridge? Some people do this to prevent bugs from nesting in the bag. If you fall into this camp, remember, cold ingredients = cold dough.
Use A Proofing Box To Control The Temperature
The only way to really keep your dough at a constant temperature free of drafts and fluctuations is to use a proofing box.
If you’re unfamiliar, proofing boxes are basically like mini green houses for your dough. You can set the box to your desired temperature and go about your day (or night) worry free. Except, they’re really not so mini come to think of it.
These boxes are about the size of a microwave, they take up prime counter space, and worst of all- they are not cheap! I have a proofing box that collapses flat for easy storage, which I love but it cost over $150. The brand name is Brod & Taylor.
If a proofing box is not an option for you, there’s an easy a way to create a bootleg version at home.
To do so, adjust your oven to the lowest setting (mine is 200 F). Once it’s ready, shut it off. Stick an oven thermometer inside and wait for the temperature to drop to about 75-80F. Then place your dough inside (the bowl must be oven-proof, and a damp cloth should rest over the top to prevent a skin from forming on the dough). Allow to the dough rise in this warm, somewhat controlled environment until it has doubled in size. You can also use this tip for the dough’s second rise too.
Note: Please make sure your oven does not go above 8o F. If the temperature is too hot, many things can happen that might wreck your dough. For example, extreme heat + cold dough creates excessive condensation, which leads to a wet and sticky texture. Wet and sticky dough is difficult to work with and shape. In fact, you might have to shape the dough more than once if it’s spreading too much.
Extreme temperature can also lead to over-proofed dough, if the bowl is left inside of the oven for too long. And finally, too much heat might kill your starter power, resulting in flat and dense loaves.
I’ve experienced all of the above factors and it’s really frustrating. My best advice? Please monitor your dough when it’s inside of the oven so you have an idea of what’s going on- all ovens are different, all doughs are different. Eventually, you’ll get a sense of how long the dough will take to rise and you’ll be able to make better adjustments as you continue to observe.

Conclusion
So, let’s re-imagine this scenario once more: you’ve got a beautiful bubbly starter, you’re ready to make the dough, and everything is all set for an overnight rise on the kitchen counter.
This time, you know it’s freezing cold outside and you have a hunch the dough might not be ready in the morning. Low and behold, you are correct.
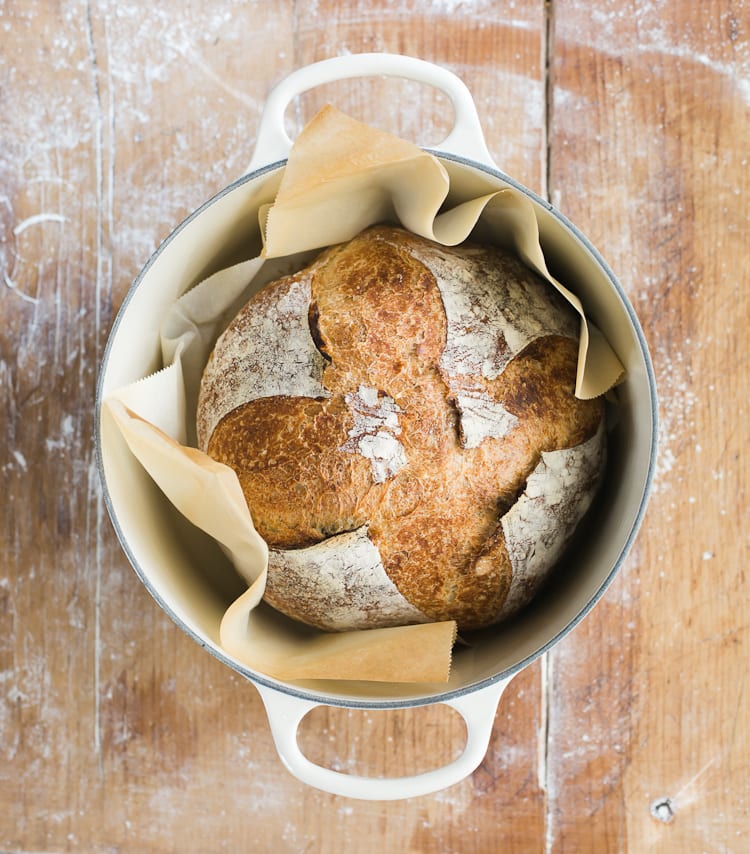
Quick to think, the following morning you create a proofing box using the oven trick mentioned above. In just a few hours the dough is soft, supple, and double in size. Success!
Once the dough is baked, you slice a piece of warm, crusty bread at just the right moment and inhale the aroma that has come from your creation. Slather on some salted butter and revel in your newfound accomplishment! You deserve it!
• • • • • • • •
If you have questions regarding the rise of your sourdough starter, please click here.

Comments
Wendy says
It’s a lovely warm morning, my starter is thick and bubbly so I decided to make a loaf.I done everything in your recipe,and in five hours nothing has happened please help.Also the mixture is fence and heavy
DENISE EVANS says
Hi
if using the oven to help double the dough do you have to then knock it back or bake straight away after it has doubled in size?? 7 hours on and still little movement !!!!! many thanks Denise Worcestersure U.K.
Kim says
Hello I am glad I found your recipe. Very straight forward. I think I screwed it up. I lit my oven to warm it at 180 but I forgot to shut it off when I put my dough in for at least an hour. I worked with it stretching every hour then left it on counter overnight. I saw no rise, so now it’s in the warmed oven agin but this time I shut the heat off haha. When should I’d I just give up and start over? I feel like I over proofed it. I’m a complete newbie to this but very committed to making Sourdough for my honey’s …
Kevin Allen says
My recipe suggested I leave my bread in the proofing basket in the refrigerator overnight and then bake it the next day I didn’t have the rise I expected and I’m curious should I have left it on the counter overnight? Or taking it out of the fridge in the morning and let it rest on the counter for a few hours? Thank you so much for your help.
frauka says
ohhh wow , thank you kindly my new friend- I am new at this and was ready to give up, but will and have followed your advice and recipe and will do so tomorrow if my bowl is not doubled by morning and btw, I am leaving both bowls in the oven overnight, I did actually warm the oven earlier but it had cooled down already and I figured there won’t be a draft hopefully for my dough to rest and grow while I will too-( sleep only for me ;))…. now i just need to find the oven temp and time to bake. also I just bought a Dutch oven but was told I did not need to do so, I could use use my bread pan or a flat cookie tray ?! your thoughts ? you are so amazing wanting to help newbies like me from not giving up -I am full of gratitude and will pay forward, blessings and I pray my 1st bread -any many more to follow-will turn out delicious. BTW-did you ever consider doing a class on this? hands-on ? for those of us that are kinetic learners?
Barb Meahan says
Im at my wits end! My starter is fine it floats so that’s not it. But my dough will not rise here lately! I’m not doing anything any different that I know of. My house at night is set at 68° so I have set it in oven with light on for 10 hours or so and did not rise. Felt like play dough next morning. But when I took it out and folded it it got a bit sticky. But didn’t rise 2nd time hardly at all.
I did another one and it was so sticky and like it melted when I dumped onto counter.
I have always done this and now it isn’t working so I have no clue. I’ll keep reading your ideas and do them to see if anything helps…
Hazel Laughlan says
Hi I always use 1 teaspoon of instant yeast and mix it in with dough. Helps every time.
Judy says
I like your recipes and directions and the simplest , greatest way to make it. So I made a first sourdough starter and am sitting a first loaf of sourdough bread for the 12 hrs. I decided to buy your recipe book , too. You do good work .
Lynne says
How soon after you feed your starter should you begin making bread with it, assuming it’s an active starter?
Amy brochu says
I have followed your starter recipe and it’s day 8 and it has not doubled in size. It actually rose about 1 inch and fell. Do I keep discarding and adding water and flour til it doubles in size before I can bake with it?
Emilie Raffa says
Hi there! Yes. It sounds like your starter is not active yet. Continue feeding it with fresh flour and water until in doubles in size. Additional helpful reading below:
– Beginner Sourdough Starter Recipe
– Feeding Sourdough Starter (my best tips & tricks)
– Troubleshooting Sourdough Starter (for established starters)
Kay says
I follow your sourdough recipes to a T. I live in a sub-tropical area of Australia and learned to make sourdough during our winter/spring, during which time my sourdough loaves rose well during the baking process. Now it’s summer, and hot and humid I’ve noticed they don’t rise as well as they bake. I suspect the first prove (overnight for around 8-10 hours) is resulting in an over proved dough because of the warmer temperatures. Do you have any tips for those of us who live in these climates? Or is it just a case of trying to reduce proving time? PS I don’t keep my flour in the fridge and I think my starter is pretty good.
PATRICIA A MCINTOSH says
This was a most helpful post on why my sourdough is not rising . I will try the oven proof method.
Sherri Conwell says
How do I freeze my loaves for later?
Lisa L says
Hello! Can I alter the sourdough bread recipe by adding more starter (1 cup vs. 1/2) and reduce the amount of water (less 1/4 – 1/2 cup) and flour (less 1/2 – 1 cup)? Or will this mess up the recipe somehow? Just looking for ways to use more of my starter instead of making more bread or other recipes.
Thanks!
Bay LeBlanc Quiney says
Hi, I’ve followed your recipe twice. Once I left it too long during the bulk rise. This second time, I was careful, but when I tip my dough out, it’s a sticky, spreading mess again, just like the first time. Not like a bread dough at all. I’ve left it on the counter, and it’s now flat like a pizza. What am I missing or doing wrong? I hate wasting all these ingredients again and again…
Sharon says
I overproofed my multigrain sourdough during bulk rise. Will it rise for 2nd proof? Should I give it extra time
Emilie Raffa says
If the dough over proofed during the bulk rise, I’d definitely shorten the second rise to compensate. It’s tough to say what it will do (rive vs. no rise); it’s one of those things you have to watch real time and make adjustments from there. If the dough is really, really over proofed you can always make focaccia instead.
Clare says
I”m struggling! I failed at sourdough in the past, so I decided to buy your book. I am attempting the everyday sourdough. When I woke up this morning my dough had more than doubled after the bulk rise and there were nice big bubbles on top. When I went to take it out of the bowl, it was a sticky mess! It stuck to my fingers and the parchement paper I was attempting to shape it on. What should I do differently next time? More flour before the bulk rise, or less time rising?
Marilyn says
Is it ok to use mt mixer to mix the dough after letting the dough rest for 30 minutes.
Emilie Raffa says
Yes! Absolutely.
Marilyn says
Please help this is my 3rd time trying to make sourdough bread followed your directions when it comes to covering the dough with a damp cloth and in the morning my dough is cold and has not risen. Sometimes I
It’s over 12 hours. What is happening that it won’t rise. Please help.
Emilie Raffa says
Hi there! Have you tried any of the tips in this post? If your starter is strong and active, temperature is the issue for you. Allow the dough to rise in a warmer spot, ideally 72-75 F. Additionally, cover the dough with plastic wrap instead of a damp cloth- it will keep all of the moisture and warmth in.
Marilyn says
I have tried the tips in the book. My started smelled really good I will try your recommendation and let you know. Thank you
Emmy says
Hi, I am making cinnamon rolls with my discard. My discard was a beautiful, bubbly, and rose double in size. I let my dough rise overnight and rose great, but there are no bubbles and there’s no gluten structure. Should I continue to bake as there seems to be no gluten to do the gluten-pane test.
ANN MIERS says
Hi, I mixed up two batches of high hydration left them out to rise over night, one did and the other did not. Sooooo what do do with the one that did not? So weird. We do live in N NV so it’s cold in my kitchen, but so weird that the other one did not really rise. It has air bubbles though.
I have been been baking through your book. Super fun! It’s kind of my thing. I get a book and bake cover to cover 😉
Thanks so much!
Carole says
So I prep my dough refrigerate overnight -12 hours. Take it out and let it come to room temp.?
Lynn says
Thanks for the interesting, and helpful articles.
I look forward to more recipes, including discards.
I did make pancakes, but found them to be quite dense and heavy.
Is the normal effect?
Greatly appreciated.
Lynn
Emilie Raffa says
Hi Lynn! Thanks for the feedback. The pancakes shouldn’t be dense or heavy at all. There was probably too much flour in your batter. Next time, add additional liquid to correct the consistency.
Lynn says
Thank-you
Lynn says
I have another question. If after feeding your starter, and it doesn’t rise, or pass the float test, what would I do?
Emilie Raffa says
Wait. Don’t use it yet. It needs more time to become active (otherwise your bread dough won’t rise). You’ll need to troubleshoot your starter. Possible issues include not enough time and/or cold ambient temperature. Have a look at the link below for more details:
https://www.theclevercarrot.com/2018/03/troubleshooting-your-sourdough-starter/
Theresa Healy says
Do a small amount of batter drop test in the pan to ensure they don’t come out dense. Use a higher heat and olive oil in the pan. Not to high that they burn. Also, I’ve successfully used a small amount of active dry yeast and honey to jump start the sourdough pancake dough when dense.
Bill Orrick says
I tend to watch the clock, based on rule-of-thumb advice from others. So, having stuck my thumb in my eye many times, I will be more relaxed, and take Emilie’s advice to watch the dough, watch the temperature, not the clock.
Brooke says
Hi, there!! I own your book and have been searching to see if you have an answer for this. Something happened with my starter about a month or so ago where the taste is VERY sour. I think I stirred too much hooch in and the flavor has never been the same. I’ve tried discarding it repeatedly and feeding it like crazy in hopes that the taste would change, but it hasn’t. Do you have any thoughts? I’m so frustrated! My bread is also not rising the same which does seem to be more of a winter temperature issue…but I haven’t seen you mention taste. Thanks so much!
Shawn Graham says
Does the bulk fermentation target rise not depend on the temp? I understood that if it was room temp ~70 you should aim for 75% rise? approx 12 hours.
Emilie Raffa says
The bulk rise definitely depends on temperature. However, additional factors include the amount/type of sourdough starter used and its overall strength. For example, dough made with 50 g of starter will rise differently than dough made with 200 g of starter. Therefore, rise times are typically given as a range.
Shawn Graham says
Thank you so much for the response.
I really struggle with all the info. I have followed and tried various instructions and still cannot get the rise and ear.
I baked a loaf yesterday and let it rise to about 30% at 78F. Dough had gluten strength, could do windowpane test. Was jiggly but only top part, not whole dough. Put in fridge overnight. Heated oven, stove and dutch oven base to 446F. Scored, spritzed with water, put in for 30min with base of dutch oven over top of dough and stone. Dough rose, but did not explode with ear as i am hoping for. The inside consistincy seems good, taste very good. Just not the rise and ear.
Could it be i’m not getting the dough tight enough during shaping?
Lori says
This article had great information, but didn’t address my particular problem. My bulk rise overnight went great, but then the second rise wouldn’t happen. After waiting 3 hours, I baked the bread and got a short, dense loaf. For both rises, I put a space heater in my bathroom and closed the door to heat up the room, which worked great for the first rise, but not for the second. Any ideas?
Catherine says
After the autolyse what do I do? Do I need to touch the dough again or just leave in bowl to rise. Thank You
Love your recipes
Dina Marks says
Hi,
Can I leave my dough in fridge overnight if I am done with the overnight proofing I did during day? Also should I do the second rise (30 -60 minute one)in the am or pm? How long do I need to let it get to room temp in the am before baking ?
Thank you so much
Dina
Marcy says
I don’t know what to do. My starter was great! It rose really high and was super bubbly. I let my dough ferment for 8 hours on the counter. It’s warm in my house, so I know that’s not the problem. I then put the dough in my banneton and in the fridge for a few hours. I baked it in my dutch oven for the recommended time, and it was flat and completely gummy inside, almost like it wasn’t barely cooked. I even cooked it longer than it said. I checked the internal temperature and it was 215. The outside was very brown. I used a brand new bag of bread flour, and bottled water. I took one bite and dumped it in the trash. It was my worst loaf yet. I’m about ready to give up.
Cris says
That’s what a happening to me too! Very frustrating.
Mark says
Greeting’s Just bought your book, Artisan sourdough, been wanting to learn how to bake for a long time. just retired so thought I’d give it a shot. So just getting the starter going day 4 doesn’t appear to rise at all? Do I need to discard half of starter each day of 4,5 &6 and refeed? Mark
Stephanie Kiick says
I finally had success when I understood the discard and ratios. I disgard half, then I weigh the disgard. I feed a 1/1/1
Ratio, in other words equal parts, starter, flour and water. I also use warm water.
William T. Smith says
Thanks for providing the info on making the bread. I made my first loaf, it came out like a brick. My starter was very active.
The problem came in second rise, it didn’t. My first rise appeared that it had doubled. The dough worked okay. After I made my ball, nothing.
Getting ready to try again.
Emilie Raffa says
Hi William! You’ve got the right idea. For the second rise, don’t expect it to actually rise that much. You’re not looking for the dough to double in size, per the bulk rise. The dough should just puff up and no longer look dense. The exact amount of time this will take depends on the specific recipe you’re following (different methods require different steps) and temperature. Ideally look for a warm spot, about 75 F+.
William T. Smith says
Emilie,
I was following your basic recipe. Everything was looking good until we made a ball. It is cold but will warm up next week and I will try it again. I think that was part of my problem.
I will follow your recipe once again.
Til Valhalla
Willy
Aakanksha says
Hi,
I use your book and have tried the everyday and high hydration sourdough. While bulk rise goes well, somehow, my trouble every time is, that the bread doesn’t really rise fully in the oven?
I am sure you have ideas what am I doing wrong and how can I maybe try to fix this?
Thanks! :)
Peter says
You have a lovely way of writing. Thank you for your help too. :))
Robin says
Hi Emilie, Took your bagel class online a few weeks ago. Great class! Have made bagels and the delicious bialys as well since! Making the basic sourdough loaf but the second rise reall seems very wet. How don I adjust for this during the last rise?
Emilie Raffa says
Thank you Robin! Glad you lied the class! To clarify, is the dough sticky after shaping (in preparation for the second rise)? I want to make sure I understand correctly :)
Ruth Abbott says
Okay, got the proofer, check,
Still not rising, check.
What can I make with this dense bagel dough?
Got your book too, check.
Emilie Raffa says
Hi Ruth! Have you tried testing the strength of your starter? Do the float test: when your starter is active and double in size drop a tsp. in a glass of water. If it floats to the top, it’s ready to use. Then, with fully active starter, you are ready to make the dough. A strong, active starter + a warm environment will help the dough rise. It takes time :)
David Skinner says
Can the proof setting on my stove be used for the long proofing period in the recipe?
Emilie Raffa says
Hi David! Do you know what temperature the proof setting is? Generally speaking: most proof settings will work, however you’ll need to adjust your rise time based on the specific temperature. For example, at 75- 80 F the dough will rise faster when compared to a recipe that follows an 8-10 hr bulk rise at 68-70 F.
Susan says
I love your book it’s how I learned to make sourdough ❤️ I see in some of your recipes you are using a lot more starter than in your book. Can I up my starter with recipes from your book keeping everything else the same
Amanda says
I’ve really enjoyed browsing your website and your recipes are spot on and so easy to follow, thank you. I absolutely love the discard recipes. I am having a little trouble with my starter not doubling in size once fed so I’m going to try giving it a few feeds to perk it up. I have just invested in a Brod & Taylor proofing box and wondered if you could tell me what temperature you use for rising your starter and proofing your dough? Thank you x
Emilie Raffa says
Hi Amanda! For proofer temperatures, I usually set it to about 75-78 F for my starter. This range is excellent for fermentation. For the dough, anywhere from 70- 78F depending on the specific recipe I’m following, the quantity of starter it calls for, and my baking schedule. Hope this helps :)
Amanda says
Yes thank you so much, I really appreciate your quick response
Kathy says
EXCELLENT information. Your tutorial was a very informative, answered all my questions before I even knew to ask. My first loaf was a success! Can’t wait to get to the point where I can read my bread! Thank you.
Dianne says
Hello!! I tried making English muffin. However, it didn’t rise like it did last time I made it. It seems kinda dense. I’m thinking it might be too cold in my house. How do I remedy it? Do I just wait for it to rise? It’s been 9hrs. Also, what happens if it doesn’t rise, is it still ok to use to cook?
Emilie Raffa says
Hi there! Yes: you have to wait until the dough doubles in size before moving on to the next step. Otherwise, your bread will be dense. If your house is cold, it will take longer (possibly more than 9 hrs.). If it’s warm, the dough will rise faster. Keep this in mind no matter what recipe you’re following, whether it’s English muffins or another sourdough bread!
Johnny Rauzi says
I began making a start from white flour one week ago. Can I divide it in half and begin feeding it with wheat flour and turn it into a wheat starter after a period of time or should I start from scratch?
Thank you,
Johnny
Emilie Raffa says
You sure can!
Steve Ryan says
I recently learned to make sourdough bread using theclevercarrot.com. Thanks for the great information. I especially appreciate the more compact recipe format which is give after the picture-filled one.
To control proofing temperature without the expense and space of a commercial proofing box, I grabbed a 16W reptile heating pad and a thermostatic controller for $35 total online. Add any cooler and you have a proofing box, or just use the oven, being very careful not to turn it on.
Emilie Raffa says
Fantastic tips. Thank you Steve!
Michael Enzweiler says
Great information – thanks! My starter, Loretta, came from dark rye flour and largely turns her nose up and won’t do much of anything if I try to switch her to straight unbleached white flour during feedings. I can get away with feedings of 50/50 dark rye and unbleached white, though. Getting enough rise out of dough made with Loretta has proven difficult, maybe partly because, like her feedings, she only really perks up in dough if it has at least some dark rye in it – I use 20/80 dark rye/unbleached white which seems to work best. I’m still struggling to get more rise, however, and worry that the use of the dark rye is partly to blame as rye and whole wheat are notoriously less robust risers. Don’t get me wrong, the bread I get is delicious if a little denser than it probably should be. Loretta seems to like it warm – 80-85 degrees Fahrenheit before she perks up, so I prep her first by feeding her and placing her in the oven with a small pan of boiling water kept well away from her jar. This seems to create the warmer temperature she loves and she’s usually double or tripled in volume within a few hours. I also use the pan of hot water in the oven for both the bulk and final proofs to speed up and encourage rise. I get a decent oven spring that adds maybe 15% more volume to the final loaf. Do you have any thoughts on whether or not I’ve captured a yeast variety that simply only eats rye flour? Does rye flour have a higher sugar content and maybe Loretta’s got a sweet tooth? Maybe I just captured a variety that’s problematic and I should start over with making a starter?
Peroja says
We are Gluten-fre, hence I have made my sourdough starter with Sorghum. It does not double in size rapidly. Also the bread does not proof fast. Could you give your expert tips. Thank you.
Suz says
Hello,
My rye starter is super strong and triples within 2-3 hours after a feed.
I get to the fourth stretch and fold (1.5 hours after autolyse finished) and the dough has already doubled by this point. I have a 25°c kitchen and put the dough in the oven with the light on to keep it at a steady temp.
Should I change things up to get the bulk rise to lengthen out or does it not matter?
Emilie Raffa says
Hi there! Congrats! It sounds like you have a fantastic, super strong starter.
To answer your question: it really doesn’t matter unless you want it to. A long slow rise isn’t necessarily better. It’s just different. Sometimes the flavor will be stronger and sometimes it won’t. It all depends on the recipe you’re following, the surrounding temperature, the dough temperature, type of flour etc.
If you’d like to play around to include a longer rise, try using cooler water in your mix and rising the dough in a cooler spot. Start with that and see how you go. Hope this helps!
Krista Gray says
Hi there,
I store my starter (Rosie!) in the fridge, and activate her when I want to bake (2 feedings a day, for 2-3 days). She doubles in size, has holes throughout and gets spongy. When she reaches this stage I bake with her – my bread rises well, but when its time to shape and proof, the dough loses shape and doesn’t rise in the oven. My loafs come out of the oven looking like large pancakes! Am I not catching my starter at the right peak to use? What could be happening here?
Emilie Raffa says
Hi there! Thanks for all the detailed info- it really helps. Ok, so here are my thoughts: if the dough definitely doubled in size during the bulk rise stage, then we know the gluten has properly formed (so the dough is not under proofed). However, because it spread out like a pancake and cannot hold its shape, to me, it sounds like the dough has become over proofed during the second rise. Do you know how long you’re letting the second rise go for?
Kim says
I’m trying your Country Farmhouse White. My starter works well and it got nice and big overnight (I started the bulk proof at 10 pm). My issue is that once I put it in the 9×5 pan, it still hasn’t crested 1″ over the edge, even at 2.5 hours. I live in Florida, and have never had issues with other breads not meeting that mark before 2 hours. Is it still bakeable? Do I let it go longer?
Emilie Raffa says
Hi there! With sandwich bread, the timing for the second rise takes a bit of practice to get right. And with sourdough, it will always take longer when compared to other doughs made with commercial yeast; it just doesn’t rise as fast. Here’s what you can do: find a warmer spot to let it rise. A microwave with the light on can serve as a makeshift proofing box or try preheating your oven to 75 F and then shut it off immediately; place the dough inside. Finally, you could also increase the total amount of starter (while decreasing the liquid slightly) to speed things up. Hope this helps a bit!
Laury T Morrison says
I’ve made your beginner Sourdough bread three times now. Each one comes out differently. I find the dough to be very dense to stretch and fold during bulk fermentation. I practically have to take the entire dough out of the bowl. I let it rise overnight and do the preshaping in the morning and let it rise for another hour or two depending on how it looks. Everything seems great and then I score the dough and follow all the baking directions. I use a cast iron covered pan. My bread practically looks like it’s exploded with lots of air bubbles. The cut i made looks like a crater by the time it’s all done cooking. I do all of my measurements with a scale. I use high quality white flour from a mill. The bread tastes great but not very tall. My starter is very bubbly too.
Bridget says
I’m at this point in my bill ferment where it has been almost 12 hours in 76+ degrees and I’m not getting any of the signs that it’s done. I also had a lot of trouble turn and folding where the whole piece of dough came out. Unsure if I should just keep letting it go or if the oil in the dough has something to do with it.
Marissa says
My sourdough starter is usually nice and healthy and doubles in size and it bulk rises for at least 10 hrs and is also nice and has doubled in size but when I shape the loaves it hardly rises and I have flat loaves…What am I doing wrong???? Help!!
Emilie Raffa says
Hi Marissa! It’s possible you’re letting the second rise go for too long, so the dough is over proofed and doesn’t rise in the oven. Usually after a 10 hr. bulk, the second rise should be about 30-minutes- 1 hr. Hope this helps!
Robyn says
My sour dough is very soft and won’t hold shape in the final shaping. Tends to stick to the board so that it is almost impossible to get a tension on the surface. Then sinks into a flat round shape and when baked the loaf is very dense
Emilie Raffa says
Hi there! It sounds like your dough is over proofed and/or the gluten is underdeveloped. In order to troubleshoot properly, I would have to know the exact recipe you’re following, brand/type of flour, temperature, bake time etc. Thanks!
josh says
I used Alex (from youtube)‘s non-baker guide to sourdough, and mine came out like that too. Could it have gotten too hot in my oven and caused it not to rise in the fridge overnight?
Emilie Raffa says
Hi Josh! It’s very possible! But I’d have to know the exact recipe, method, temperature and more specifics to really pinpoint the issue.