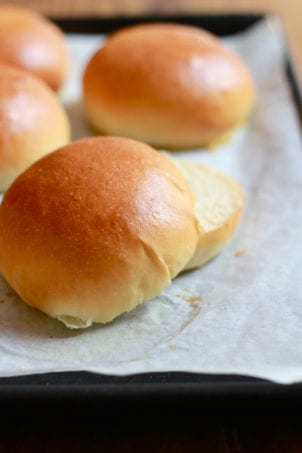
This recipe for light brioche hamburger buns proves that you can make seriously good hamburger buns at home. With a dough that’s simple to make and easy to handle, you’ll never buy brioche burger buns from the store again!

We like our burgers on soft, buttery brioche-style rolls and this NY Times recipe looked like a great starting point to experiment.
What’s interesting, is that this brioche burger bun is lighter than most traditional brioche recipes (hence the title). It’s still soft and fluffy, but not quite as eggy and rich. Even the color is a bit lighter. Incredible!
In my opinion, nothing beats all natural bread. Whether it’s a thick slice of sourdough bread or sandwich bread, good-quality hamburger buns from scratch are absolutely life changing. The taste, quality, and healthiness can’t be beat. These buns are the perfect vessel for sandwiches too! Let me show you how to make them.


How to Make Light Brioche Hamburger Buns {Step-By-Step Recipe}
Step 1: Make the Dough & Let it Rise
- Whisk the warm water, milk, yeast and sugar in a small bowl; set aside. Beat the egg in a separate bowl.
- To a stand mixer fitted with the paddle attachment: add the bread flour, all purpose flour, salt and butter. Mix the ingredients until the butter is the size of pebbles.
- Add the yeast mixture and the beaten egg. Run the mixer on medium-low speed (I used #3 on my Kitchen Aid) until a dough forms, about 5-8 minutes.
- Scrape down the sides of the bowl and shape the dough into a ball. It will be sticky.
- Cover bowl with plastic wrap and let the dough rise until it has doubled is size. Depending on how warm your kitchen is, this will take about 1-3 hours (mine took 1 1/2 hrs @ 70 degrees F.)
Tip: Giving the dough enough time to rise is crucial in bread baking. In the past, I have rushed this step which caused my bread to be very dense. Rise times will vary, so be patient. Remember to watch your dough and not the clock!

Step 2: Cut The Dough
- Once your dough has risen, dump it out onto a lightly floured work surface.
- Then, gently flatten the dough to get rid of any air bubbles. Using a bench scraper (or a chef’s knife) cut the dough into 8 equal portions.
- If you have a digital kitchen scale weigh each portion so that they’re all the same size. Do this by weighing the entire ball of dough first, and then divide by the number of rolls you want to make.

Step 3: Shape The Dough Into Balls
- To shape, gently flatten each piece of dough like a pancake.
- Pull up each side pinching it together in the center. Repeat until the ball is sealed. Flip the ball over (seam side down) and move to an un-floured part of your board. It will be easier to roll this way.
- To finish, place your palm over the top and gently roll into a smooth ball.
- Transfer each ball onto a parchment lined baking sheet.


Step 4: Second Rise
- The dough will need to rise again, this time for a shorter period than the initial rise.
- The balls should look puffy and slightly risen, about 1- 1/2 hrs. When they’re ready, gently brush each one with egg wash. See how puffy they are?
Tip: At this point, you could add sesame seeds to the top of your rolls if you’d like.

Step 5: Bake The Dough
- Preheat your oven to 400 F and place a shallow metal baking pan on the oven floor.
- Before the dough goes in, add about 1/2 cup of water to the pan to create steam. This will help keep the bread nice and moist.
- Bake for about 15-20 minutes or until golden brown. Transfer to a wire rack to cool completely.

More Delicious Brioche & Bread Recipes to Try!
Once you’ve mastered this recipe, branch out and try my soft brioche rolls and this incredible, sliceable brioche loaf – we love it toasted with strawberry jam!
By signing up, you agree to receive emails from The Clever Carrot. Unsubscribe at any time.
Light Brioche Hamburger Buns
- Prep Time: 15 minutes
- Rise Time: ~4 hours @ 70 F:
- Cook Time: 20 minutes
- Total Time: 4 hours and 35 minutes
- Yield: 8 buns 1x
- Category: Yeast Bread
- Method: Oven-Baked
- Cuisine: American
- Diet: Vegetarian
Description
Adapted from the NY Times, this recipe for light brioche hamburger buns is perfect for BBQ fare, sandwiches (try bacon, egg & cheese!) and so much more. You’ll never buy from the store again!
Ingredients
Dough
- 1 cup warm water, about 75–85 F
- 3 tablespoons warm milk (I prefer whole milk)
- 2 teaspoons active dry yeast
- 2 1/2 tablespoons granulated sugar
- 1 large egg
- 3 cups bread flour
- 1/3 cup all-purpose flour
- 1 1/2 teaspoons fine sea salt
- 2 1/2 tablespoons unsalted butter, softened
Egg wash
- 1 large egg
- splash of water
Toppings
- sesame seeds (optional)
Instructions
- Whisk together the warm water, milk, yeast and sugar; set aside. Beat the egg in a separate bowl.
- Add the flours, salt, and butter to the bowl of a stand mixer. Using the paddle attachment, mix the ingredients until the butter is the size of pebbles.
- Add the yeast mixture and the beaten egg. Run the mixer on medium-low speed (I used #3 on my Kitchen Aid) until a dough forms, about 5-8 minutes.
- Scrape down the sides of the bowl if necessary, and shape the dough into a ball. It will be sticky. Cover bowl with plastic wrap or a very damp kitchen towel, and let the dough rise until it has doubled is size, about 1- 3 hours @ 70 F. *See notes below.
- Line a baking sheet with parchment paper. Using a floured dough scraper (or chef’s knife), divide the dough into 8 equal pieces. If you have a scale, weigh each piece to guarantee that they’re all the same size.
- To shape the dough into balls, gently flatten each piece like a pancake. Gather the ends and pinch the dough to seal in the center. Flip the dough over, cup the surface with your palm, and roll into a ball. Transfer to your baking sheet, placing them a few inches inches apart. Cover and rest for 1-2 hours, or until puffy and slightly risen.
- To make the egg wash, beat the egg with a splash of water. When the buns are finished with the 2nd rise, gently brush each one with egg wash. At this point, you could add sesame seeds to the top of your rolls.
- Preheat your oven to 400 F. and place a skillet or metal baking dish on the oven floor. Before the dough goes in, add about 1/2 cup of water to the pan to create steam. This will help keep the bread nice and moist. Bake for about 15-20 minutes or until golden brown. Transfer to a wire rack to cool completely.
Notes
Giving your dough enough time to rise is crucial in bread baking. Rise times will vary depending on temperature, so be patient. Remember to watch your dough and not the clock!

Comments
barbara price says
Loved this recipe. I had no idea how easy this could be. I added 1/3 cup of light rye instead of AP, and I weighed the flours. My one mistake was after shaping the buns and covering, I set the timer for 90 and walked away. I completely missed the direction to let rise “slightly” so I got very large buns.
I no longer subscribe to NYT recipes so I’m glad to have your version.
Jackie Messinger says
I have tried making buns before, but they were always dense and heavy. This is a perfect bun!! I am in love! Thank you!
dana says
Can I use sourdough starter instead of active dry yeast? If so, how much would you recommend?
Lois says
I don’t usually comment on recipes I find online but I just had to for this recipe. I’ve made these buns multiple times now and they have worked out perfectly each time. Burger night is no longer complete without them! Much better than ANY you can buy, and super easy to make.
Anoma Hettige says
Does the yeast need time to “bloom” before adding to flour mixture? Thanks.
Anon says
This is not an original recipe its just a copy of NYT recipe for brioche bun.
Jackie Messinger says
So? It’s absolutely delicious! No complaints here!
Emilie Raffa says
Hi there! Recipe attribution, with any adaptations or changes are always included in my posts :)
Laura says
Can I make these successfully without a stand mixer?…
Clar says
This is a great recipe and everything worked out perfectly until I put the buns in the oven. They had an amazing oven spring but they looked like mushrooms. The bottoms kind of stuck to the baking sheet and the top lifted off and ‘broke off’ the base. Has that ever happened to you?
MARY JONES says
I have not yet made these buns. I was looking for a recipe for English Teacakes which my Mother made ,when I was a child. They were very light and fluffy like Brioche and had fruit in them. I have tried using a traditional fruit bun recipe without any success as the result is too dense. At what stage of this Brioche recipe would I add the dried fruit ? I would be very appreciative to receive your advice and will definitely let you know how they turn out.
Kind regards from Australia
Mary Jones
Chiria says
Hi,
Allow me to provide a response to your question. The English Teacakes are similar to Kugelhopf, it is basically a brioche with peeled/preserved fruits in it, i.e., raisins, cranberries, orange peel or even dried plums. There’s a lot of Kugelhupf recipe in the internet, most of them share the similar techniques and ingredients.
Hope it helps.
Cheers!
Karen Seiverson says
i really enjoy your recipes. I now Google Clever Carrot before my searches!
Thanks,
Karen
Emilie Raffa says
Karen, thank you! So sweet! xx
Nirmala says
My brioche buns didn’t become uniformly brown on top inspite of the egg wash. But the texture / taste etc is par excellence.
Annie R Maguatt says
I made these buns today, they came out really good. I will make these again , I put some in the freezer . Thanks for the recipe.
claire says
Hi – what does c. stand for – cup? Want to make these but obviously I want to get the measurements right!
Emilie Raffa says
Hi Claire! It stands for “cup.”
elizabeth nkuo says
Any idea if you can freeze these after they have been baked?
Shannon says
They freeze very well. I let they thaw on counter the cut and toast in a skillet for burgers.
Tara Firman says
Ok just baked & WOW these bins are amazing huge & very light I can’t wait to taste them tomorrow a definite in my recipe box tysvm & really easy to make I used sour cream instead of milk as a substitute b/c I didn’t have milk on hand,I don’t drink milk,I drink Almond milk & wasn’t sure if it would be good or not I imagine it would.
Tara Firman says
I just started to make these WOW really easy. I know their going to turn out,letting them rise. I cant wait to bake these thank you so much for the recipe.A must have in a recipe box or in your email box I save my recipes there.
Rosalie says
Thanks for the great recipe! I just finished making a batch and the house smells wonderful! I had baked 6 of the rolls in a convection oven which meant the buns were ready in 13.5 min – I will try lowering the temperature from 204oC to 190oC for the next bake. As a side experiment, I cooked two of the buns in my air fryer – 200oC for 8 min – this created a darker surface and a higher rise but a smaller diameter. Both types of cooking has produced lovely rolls. This is the first time I’ve made yeast bread since converting to sourdough bread 18 months ago using your recipe.
Helene Morse says
Amazing recipe! So simple, and for a regular baker, but bread newbie I was so delighted with how light and fluffy they turned out!! I also find that many bread recipes really can’t be done in a stand mixer under 6 quarts due to the engine power, but this was the perfect amount of dough for my little artisan mixer, so that was also a huge plus!! I even used just ap flour and found the consistency was still just what I would expect from a brioche bun. I left them in the oven on the longer side and the crisp they got was almost reminiscent of a pretzel bun. Win all around! Thank you!
Emilie Raffa says
Fantastic, Helene! Thanks so much for your feedback :)
Gabby says
I can’t wait to do this recipe in a few hours however I had a question, I do not have experience with baking bread. I wanted to know does the water that is placed underneath the baking tray that hold the bread should the water be cold or hot before going inside the oven. As well is the container with the water remain inside the oven while baking or should it be removed? I want to thank you in advance for response and thank you again for your recipe 😊.
Emilie Raffa says
Hi Gabby! Cold water straight from the tap is fine. Because the pan is preheated before the water goes in, the cold water will instantly create steam. The baking pan remains inside the oven for the full duration of the bake. Hope this helps!
MARCIN KAZMIERCZAK says
I’M VERY GREATFUL FOR THIS RECIPE! AFTER FIRST TRY MY BUNS ARE PERFECT….I TRY SO MANY RECIPES AND I WAS DOING ALL WRONG….THANK YOU VERY MUCH!!!!!!!!!
Emilie Raffa says
Incredible! I’m so happy for you! :)
Gia says
Do you switch the paddle attachment to the dough hook after you add the yeast mixture and egg?
Emilie Raffa says
No: I use the paddle attachment the whole time. You are more than welcome to switch to the dough hook, if you prefer :)
Terra says
Love this recipe! I have doubled it many times now and it comes out great
Jo says
These turned out really well! So fluffy
Gina says
Love this recipe! I will use this recipe forever! Thank you!
Emilie Raffa says
Thank you! :)
Fern says
Oh my! These are the easiest buns to make! The only thing, I would do as someone said above and make a dozen buns as compared to eight. They were huge but so delicious! My buns were 4 1/2″ round. I served them with pork BBQ . I will definitely be making these again, only smaller.
Don Richards says
By far the best hamburger buns I have made. I also use the same recipe to make dinner rolls (about 70 g makes a nice sized roll). Rave reviews from the whole family!
Emilie Raffa says
Thanks Don! Thrilled you and your family enjoyed them :)
Faith says
Can I refrigerate the dough if I don’t want to make the Buns right away
Emilie Raffa says
You should be able to do this for a few hrs., without any issues. You could also refrigerate the bulk dough to buy more time, if necessary.
Preston Smith says
You have 2 tsp of dry active yeast? Should that be 1 pk which would be 2 1/4 tsp of yeast other wise the recipe would be for 2 actual packets? Please clarify
Emilie Raffa says
Hi Preston! The recipe calls for 2 tsp. of yeast. This means you would need to purchase 1 packet (which contains 2 1/4 tsp). You’ll have 1/4 tsp leftover.
kathleen allen says
Thank you for this fantastic roll recipe. I have now made them many times and will not buy store rolls again. I bake our artisan bread too. I haven’t tried your sourdough baked goods. We love sourdough bread and have a bakery that has perfected it. The only problem is we haven’t been to any food stores since last March because of the pandemic. So maybe I’ll get brave and give your sourdough a try. I really enjoy your recipes. Thanks again!
Kathy
Emilie Raffa says
Thank you, Kathy! Glad you enjoyed it. And I do give sourdough a try! It’s definitely different than yeasted bread, but still incredibly rewarding :)
Deanna says
Can I use regular flour.
Emilie Raffa says
Hi there! For the whole recipe (instead of the ap flour/bread flour combo)? If so, the answer is yes, but the dough will be more sticky. You’ll have to add more flour to adjust the texture.
Madi says
Do you know approximately how much flour we would use if only using ap flour?
Emilie Raffa says
Madi, the total amount of flour would remain the same. I would reduce the water by 30 g to start.
Kelly says
Have now made this recipe two weekends in a row as it’s so some. I live in a warm climate so the rise happens quick.
I use lactose free milk and that’s fine and this second batch I used wholemeal flour rather than white and they were even better…I also forgot the sugar and they were all good too!
When I first made them the second rise they were HUGE so I refilled them into balls, definitely didn’t do that this time which was good. When adding the egg wash they do fall a bit so I was a bit worried as that wasn’t noted anywhere, but they taste great!
A Garcea says
I’ve used this recipe multiple times, and these buns are great even after freezing to use later! I cut them before freezing for ease of use one thawed. Made two batches baked out in smaller roll size (dozen per batch) for thanksgiving rolls this year as well. Just can’t get enough of the fresh baked bread taste this recipe produces!
Oona says
These burger buns came out so delicious!!! I liked how they stayed moist on the inside, unlike the store bought type which are dry. I used dairy free milk instead of the normal milk, and it worked. I’m getting a stand mixer but it hasn’t come yet, so I did it by hand, I just got it into a ball, and kneaded the dough for about 7-8 mins.
Mira says
Wonderful recipe! just works and tasted delicious!
Kyleigh says
I made these and they were the best buns I ever ate!!
Could I make slider buns with this recipe? Should I use the same cook time?
Thank you❤️
Emilie Raffa says
Hi Kyleigh! You can definitely make slider buns. Try 16 buns instead of 8, and for the bake time, perhaps 7-12 minutes? Enjoy!
Adriaan says
Hi, will I be able to double the recipe, is it going to affect anything?
Emilie Raffa says
Hi there! To be on the safe side, I would just make two separate batches of dough (in 2 bowls).
Nguyễn Rain says
Loại bột mì nào là tốt nhất để có được một chiếc bánh burger hoàn hảo?
Adriaan says
Tôi sẽ đề nghị sử dụng bột bánh mì trắng, nhưng bất kỳ loại bột nào cũng có thể nướng bánh. Đó là tất cả về kết cấu ;)
Laura says
Awesome recipe! My buns are baking up much darker than in the photo. Are there any adjustments or things I should be checking before baking again?
Emilie Raffa says
Hi there! Check your oven temp with a thermometer to make sure it’s correct. You can also try baking on a lower rack :)
Amy Lim says
May I know how many gram for butter and flour. Thanks, all the way from Kuala Lumpur, Malaysia
Emilie Raffa says
Hi Amy! For the flour, 1 US cup equals about 125- 130g. For the butter, 1 tablespoon is about 14g.
viola e brooks says
The only problem is the recipe..I think faster than I should I am sure..Says two eggs I put two eggs then realized one was for the egg wash…I’ve done this twice..I am sure I won’t do that again..lol Had to add more flour but both times buns turned out so good..
BreadPerson says
Seriously?
So, I tell my students, the first step in every recipe is to read it through. Will save you lots of grief.
Chloe says
Can I make the day before & cook the next day?
Emilie Raffa says
I would perhaps let the dough rise overnight in the fridge, and then shape and bake in the morning. This will give you the best texture.
Eli says
Hello!
may I replace the dry yeast for sourdough starter?
Emilie Raffa says
Yes, this recipe can be adapted to sourdough if preferred.
Eli says
Thanks! but how much starter should I use?
Emilie Raffa says
Hi! Without having to make additional changes to the recipe, try 50g of starter and a long overnight rise. If the dough is really, really sticky after adding the starter (all starter consistencies are different) add a sprinkle of flour to even out the texture.
Ama says
Hi,
I’m thinking of making this soon! Can I substitute whole milk for unsweetened almond milk?
Emilie Raffa says
Absolutely!
Andrea says
Best buns I’ve made so far, they went perfectly with my homemade vegetarian sloppy joe slop, I have added this recipe to my binder of go to meal ideas.
Emilie Raffa says
Fantastic! So glad you liked them :)
Carlee says
Excited to try these! We have a BBQ coming up and I wanted to make these ahead of time. How do you recommend storing them and how long will the last at room temp? Thanks!
Emilie Raffa says
Hi Carlee! Bread is always best on the same day it’s baked. I would make them in the morning if time permits. Alternatively, bake the day before serving, and wrap in plastic once completely cool. Enjoy!
Vanessa says
I only have instant yeast. How can I substitute the active dry yeast?
Emilie Raffa says
Hi there! Add the yeast to the liquid mixture to “bloom” first. You can give it a light stir if you want. Then add to the rest of the ingredients.
Ethan says
I was taught clearly how to make a hamburger, from grilled meat, adding tomatoes slides, lettuce, cheese inside. But I don’t know how to make buns. Before when I prepare everything for my hamburger, I have to buy ready buns. Now I can make a complete hamburger by myself. Thank you so much!
Patrick says
Hi,
When kneading this dough in the mixer, do you knead the dough until a windowpane forms or sometime before that occurs? What is the signal that you have kneaded the correct amount of time? Thanks!
Emilie Raffa says
Hi there! I typically do not use the window pane test (or another signal) for this recipe; the suggested kneading time paired with a sufficient bulk rise is usually good enough. However, you are more than welcome to try the window pane test for reference. Doesn’t hurt!
Iva says
Thank you so much for this recipe!!!! Mine turned out delicious and most important soft and light!!! My previous ones from a different recipe were so dense and heavy. So I am really happy that I found your recipe.
I veganized it by using 2 tablespoons of vinegar mixed with 2 teaspoons of baking soda instead of the eggs and with vegan butter and milk.
Diana says
These buns are one of the best I’ve made. They’re great for any type of sandwich and hold up so well.
Sue says
These are the most wonderful buns, I’ve been making them right through lockdown and will never buy them again. I freeze them so they are lovely and fresh when I want some. I have a steam oven which makes it very easy.
Just one question my son wondered if you could use part granary or whole meal flour to make them healthier?
Thanks again for this super recipe
Emilie Raffa says
Hi there! You most certainly can! But since whole grain flour absorbs more water than regular white flour you’ll need to add more water to the dough to achieve a similar texture. You might want to try my recipe here.