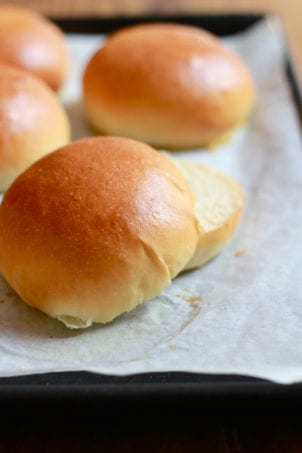
This recipe for light brioche hamburger buns proves that you can make seriously good hamburger buns at home. With a dough that’s simple to make and easy to handle, you’ll never buy brioche burger buns from the store again!

We like our burgers on soft, buttery brioche-style rolls and this NY Times recipe looked like a great starting point to experiment.
What’s interesting, is that this brioche burger bun is lighter than most traditional brioche recipes (hence the title). It’s still soft and fluffy, but not quite as eggy and rich. Even the color is a bit lighter. Incredible!
In my opinion, nothing beats all natural bread. Whether it’s a thick slice of sourdough bread or sandwich bread, good-quality hamburger buns from scratch are absolutely life changing. The taste, quality, and healthiness can’t be beat. These buns are the perfect vessel for sandwiches too! Let me show you how to make them.


How to Make Light Brioche Hamburger Buns {Step-By-Step Recipe}
Step 1: Make the Dough & Let it Rise
- Whisk the warm water, milk, yeast and sugar in a small bowl; set aside. Beat the egg in a separate bowl.
- To a stand mixer fitted with the paddle attachment: add the bread flour, all purpose flour, salt and butter. Mix the ingredients until the butter is the size of pebbles.
- Add the yeast mixture and the beaten egg. Run the mixer on medium-low speed (I used #3 on my Kitchen Aid) until a dough forms, about 5-8 minutes.
- Scrape down the sides of the bowl and shape the dough into a ball. It will be sticky.
- Cover bowl with plastic wrap and let the dough rise until it has doubled is size. Depending on how warm your kitchen is, this will take about 1-3 hours (mine took 1 1/2 hrs @ 70 degrees F.)
Tip: Giving the dough enough time to rise is crucial in bread baking. In the past, I have rushed this step which caused my bread to be very dense. Rise times will vary, so be patient. Remember to watch your dough and not the clock!

Step 2: Cut The Dough
- Once your dough has risen, dump it out onto a lightly floured work surface.
- Then, gently flatten the dough to get rid of any air bubbles. Using a bench scraper (or a chef’s knife) cut the dough into 8 equal portions.
- If you have a digital kitchen scale weigh each portion so that they’re all the same size. Do this by weighing the entire ball of dough first, and then divide by the number of rolls you want to make.

Step 3: Shape The Dough Into Balls
- To shape, gently flatten each piece of dough like a pancake.
- Pull up each side pinching it together in the center. Repeat until the ball is sealed. Flip the ball over (seam side down) and move to an un-floured part of your board. It will be easier to roll this way.
- To finish, place your palm over the top and gently roll into a smooth ball.
- Transfer each ball onto a parchment lined baking sheet.


Step 4: Second Rise
- The dough will need to rise again, this time for a shorter period than the initial rise.
- The balls should look puffy and slightly risen, about 1- 1/2 hrs. When they’re ready, gently brush each one with egg wash. See how puffy they are?
Tip: At this point, you could add sesame seeds to the top of your rolls if you’d like.

Step 5: Bake The Dough
- Preheat your oven to 400 F and place a shallow metal baking pan on the oven floor.
- Before the dough goes in, add about 1/2 cup of water to the pan to create steam. This will help keep the bread nice and moist.
- Bake for about 15-20 minutes or until golden brown. Transfer to a wire rack to cool completely.

More Delicious Brioche & Bread Recipes to Try!
Once you’ve mastered this recipe, branch out and try my soft brioche rolls and this incredible, sliceable brioche loaf – we love it toasted with strawberry jam!
By signing up, you agree to receive emails from The Clever Carrot. Unsubscribe at any time.
Light Brioche Hamburger Buns
- Prep Time: 15 minutes
- Rise Time: ~4 hours @ 70 F:
- Cook Time: 20 minutes
- Total Time: 4 hours and 35 minutes
- Yield: 8 buns 1x
- Category: Yeast Bread
- Method: Oven-Baked
- Cuisine: American
- Diet: Vegetarian
Description
Adapted from the NY Times, this recipe for light brioche hamburger buns is perfect for BBQ fare, sandwiches (try bacon, egg & cheese!) and so much more. You’ll never buy from the store again!
Ingredients
Dough
- 1 cup warm water, about 75–85 F
- 3 tablespoons warm milk (I prefer whole milk)
- 2 teaspoons active dry yeast
- 2 1/2 tablespoons granulated sugar
- 1 large egg
- 3 cups bread flour
- 1/3 cup all-purpose flour
- 1 1/2 teaspoons fine sea salt
- 2 1/2 tablespoons unsalted butter, softened
Egg wash
- 1 large egg
- splash of water
Toppings
- sesame seeds (optional)
Instructions
- Whisk together the warm water, milk, yeast and sugar; set aside. Beat the egg in a separate bowl.
- Add the flours, salt, and butter to the bowl of a stand mixer. Using the paddle attachment, mix the ingredients until the butter is the size of pebbles.
- Add the yeast mixture and the beaten egg. Run the mixer on medium-low speed (I used #3 on my Kitchen Aid) until a dough forms, about 5-8 minutes.
- Scrape down the sides of the bowl if necessary, and shape the dough into a ball. It will be sticky. Cover bowl with plastic wrap or a very damp kitchen towel, and let the dough rise until it has doubled is size, about 1- 3 hours @ 70 F. *See notes below.
- Line a baking sheet with parchment paper. Using a floured dough scraper (or chef’s knife), divide the dough into 8 equal pieces. If you have a scale, weigh each piece to guarantee that they’re all the same size.
- To shape the dough into balls, gently flatten each piece like a pancake. Gather the ends and pinch the dough to seal in the center. Flip the dough over, cup the surface with your palm, and roll into a ball. Transfer to your baking sheet, placing them a few inches inches apart. Cover and rest for 1-2 hours, or until puffy and slightly risen.
- To make the egg wash, beat the egg with a splash of water. When the buns are finished with the 2nd rise, gently brush each one with egg wash. At this point, you could add sesame seeds to the top of your rolls.
- Preheat your oven to 400 F. and place a skillet or metal baking dish on the oven floor. Before the dough goes in, add about 1/2 cup of water to the pan to create steam. This will help keep the bread nice and moist. Bake for about 15-20 minutes or until golden brown. Transfer to a wire rack to cool completely.
Notes
Giving your dough enough time to rise is crucial in bread baking. Rise times will vary depending on temperature, so be patient. Remember to watch your dough and not the clock!

Comments
K Anderson says
I’ve started making these every weekend but they’re so tasty I have to hide them from my husband or he’ll eat them all before Monday morning rolls around!
Kira says
Great light bun recipe. I did hake out a bit of yeast and add sourdough starter to add a bit of a different flavour. I made these for lobster rolls.
Val says
Easy recipe! I proofed the yeast with the sugar, water, milk for 10 min, then added it to my kitchen aid mixer. Added egg, butter, salt and one cup of AP flour and used the dough hook for several min on low. Then added the rest of flour (AP) and kneeded for 10 min on level 2 (I believe this is the recommended setting for bread dough). It’s been hot and humid here, so I did need to add a couple more tablespoons of flour to make it less sticky. Still – it was very soft and gooey. I could tell they were going to be lovely!
Doubled in an hour (it is hot as I said), shaped the buns easily. Let them rise again. Did the egg wash and put the water in the oven as suggested. The results? 8 amazing light and slightly crusty buns for tonight’s pulled turkey.
Thank you so much for the recipe!
Val says
Ok, I had to update. I’ve made 3 batches in 4 days, all wonderful! We had turkey burgers with the last ones. My family also says (as many have) not to buy store-bought again. I am planning to use this wonderful dough to try making cinnamon buns next. But I may wait a week or so. We’ll all weight 50 more lbs by the end of the year if we keep this up! ; )
Kellie says
These buns are amazing. I made them for my two sons 16 and 18 and my husband for supper tonight and they all said they do not want any other buns ever.
Crystal says
The taste is amazing! However, mine have turned out kinda flat twice now. Am I overproving? If so how do I not do that?
Emilie Raffa says
Most likely. To avoid over proofed dough, shorten the the bulk and/or the second rise time. This will help!
Iris says
Amazing im 12 and they were perfect and easy thank you
Emilie Raffa says
Amazing! Love this!
Sam says
For me this dough is way too wet and sticky as written. Like, completely unmanageable dough if the recipe is followed to a tee. I’ve made it 3 or 4 times now and each time I end up adding probably 3 or 4 more tablespoons of flour than what’s called for. With that adjustment these are lovely buns.
Shauna Kutzko says
I think it’s hard to give an exact ratio flour ratio as different temps and humidty affect the dough , i live in summer winter climate and my go to dough rations change with the seasons..
I also found unmanageable sticky dough with the measurements so i just kneaded in flour until it was okay to knead ..its rising now i am hoping it doesn’t affect the bake
Katrina says
Thank you for the receive what the reason why the buns tops split ? Do I need to flatten out dough balls more more ?
Emilie Raffa says
Maybe too much flour in the dough, shaping issue (try flattening them more) and/or your oven was not humid enough. Steam is key for soft rolls!
Renita says
This is an amazing recipe! I use my bread machine to do all the heavy work. If you go that route you have to re-order how you put in the ingredients: water, milk, egg, butter, salt, sugar, flour, and then yeast (bread machine/instant). It’s important the yeast only comes into contact with the flour. Then hit the dough cycle and wait. After that I divvy the dough up into my eight-bun hamburger mold (which I highly recommend), cover, and let rise again. My husband says these look and taste like they came out of a fancy restaurant.
Liz says
This recipe is terrific! It’s well-written and pretty much fool proof from what I can tell. I’ve made the buns several times and they are wonderful! (I top mine with “Everything but the Bagel” from TJ’s.) Thanks for inspiring the wannabe breadmaker in me!
Katherine A says
These were great! Easy to make and with a nice chewy crust to stand up to all my sandwich fillings. I had to pick up a grocery order in the middle of my second rise time so I just put them in the fridge while I was gone and pulled them out when I got back and it worked fine.
Cherry says
Lovely buns. Rose nicely and produced firm yet fluffy bread bun. I used it for pull pork buns. Recipe took some time to proof but is a keeper!
Janice Acheson says
There is nothing this recipe can’t do! I use it for hamburger, hot dog buns, loaf bread and even sweet rolls. It freezes beautifully with my food saver. I freeze it after I bake it, and it thaws quickly just as fresh as newly baked. This is my go to recipe that my whole family enjoys! I make it as listed with the only exception being raising. I set my Instant Pot to yogurt while I prep the dough in my kitchen aid. Once the dough is ready, I turn off the instant pot and place a silicone basket in the bottom of the pot, tuck a silicone mat in it and place the dough inside. I throw a towel over the whole thing and wait an hour. I didn’t change the dough at all for the sweet rolls, I simply rolled out the dough after the first rise, spread orange marmalade on it and rolled and cut. Let it rise again and baked at 375* for 20 min.
Emilie Raffa says
FANTASTIC!!!! Thanks, Janice! xx
Lauren says
Hello, I’ve made this recipe twice now and both times the buns turned out amazing! Quick question though, when you mix everything together for 5-8 minutes did you use a dough hook or the paddle? Thanks!
Emilie Raffa says
Great to hear, Lauren! I use the paddle attachment the whole time. However, you can absolutely switch to the dough hook if you’d like. I’ve done it both ways. :)
Sandy McDonald says
I just made this recipe for the first time and I followed it to the tee. I do have a question. Why aren’t the bottoms brown? They look and smell amazing but the bottoms are very pale. Not sure if this is suppose to be this way or not.
Emilie Raffa says
Hi there! The bottoms should be golden brown… perhaps it’s the oven temp and/or bake on a the lower rack next time, or at least for part the of the bake to make sure they’re golden.
Brian says
Do you have an electric oven with the heating element on the top? I’ve made this recipe with a nice golden brown bottoms in my gas oven with the heating element on the bottom, but I just made them in an electric oven with the heating element on the top and the bottom of my buns were pale like you said. I flipped them over at the end and let them brown which only took a minute or two.
Annie says
Hello! Love this recipe. I made it precisely as directed a few weeks ago and it came out perfect. I am now making a batch for someone who is a bit more sugar sensitive. Would reducing the sugar in half alter the texture of the bread dramatically? (I am fine if it is a bit less sweet).
Emilie Raffa says
You can absolutely reduce the sugar by half. It should cause a drastic change in texture :)
Jean Kealey says
It would be great if you could give quantities in grams, or even ounces. You refer to having and using kitchen scales so why not?
Baking is a science as well as a lot of fun and I find the cups method too inconsistent, for example is the flour settled or aerated? Is the tablespoon of butter a level or a heaped spoon?
My dough is currently in the first prove. I hope it will be good.
Andre says
I’ve made this recipe 3-4 times so far and they’ve turned out perfect every time!
Thank you so much for this recipe,
Andre
Katya says
I wonder what would the timings for sliders on this recipe? Many thanks
Lisa says
I just made smaller buns and it cooked on the earlier side of the suggested time – turned out perfect!
Phoebe says
Thanks for the recipe. The buns look so perfect! Just a silly question, why do we need to place half cup of water into the oven before baking? Are we keeping it during the whole baking process?
Emilie Raffa says
Not silly at all! The water adds steam to the oven which helps the rolls rise. It’s added to the pan before baking and evaporates over time.
Jules says
Thank you for sharing this recipe! If I plan to stock up on buns and want to freeze the dough, do I freeze them after the first proof? I am a home baker who loves to bake for a family of 6 so I really do need to stock up to save time.
Emilie Raffa says
Hi Jules! To be honest, I do not freeze the dough. I freeze the baked buns. However, if you want to experiment try doing this: after you shape the dough into balls place onto a lined sheet pan and freeze until solid. Transfer to a ziptop bag. When ready to bake, let them defrost on your baking sheet; they will nee to puff up (second rise). Then proceed with the final steps.
Dara says
Beautiful! I had tried a different recipe before but these are much better! They tasted of restaurant quality and are so much better than store bought buns. I subbed in unsweetened almond milk and Smart Balance to keep the hamburgers kosher and it worked just fine! I also made the egg wash with melted butter and it was wonderful! This is definitely a recipe I will return to
Karina says
Followed directions to the letter…came out fabulous! I was using the King Arthur recipe for burger buns, but this is now my go to. However, definitely a really light brioche so don’t think this will give you that golden bread-look. Thank you!
Nico says
Thank you for this quick and easy recipe! Also great to make brioche buns that don’t use a lot of butter and are less messy to make. Thanks so much for this :)
Sarah says
Can you make these with out bread flour?
Emilie Raffa says
Yes, but the buns will be slightly different as pictured. You’ll also need to decrease the liquid because all purpose flour absorbs less water than bread flour (otherwise the dough might be too sticky).
DS Citroen says
This is the recipe I have been looking for. It has a very good crust so it doesn’t fall apart when meat juices and condiments saturate it, with a satisfying fluffy chew inside.
I looked at some of the reviews and I feel that people need to understand that baking is as much art as science. You start with an amount of water, and you add flour until you get the consistency you are looking for. The recipe is just a guide to that ideal. Temperature is crucial for both rising, and for baking, so we need to be paying attention.
I knew that I wanted a slightly larger recipe so I used 1/2 cup more water. I had no milk so I used non-fat yogurt. I wanted a little more richness so I used two eggs, as the eggs were more medium than large. I used Bob’s Red Mill unbleached white pastry flour, and Bob’s whole wheat pastry flour, about 3/4 to 1/4, sifted, which is essential, and added to the water in the stand mixer as I let it run with the hook until it got to the texture I wanted; ever so slightly sticky but to where I didn’t need to flour any surface afterward. It doubled in the warm oven in 3 hours. I live 10 minutes from Bob’s world headquarters in Milwaukie, OR, and I can honestly say that their flour is the best I have ever used and one of the best reasons to live here. Try it instead of your all purpose and your results will improve, without a doubt.
After having lived with a professional baker for years, I have learned that a scale to be essential. I use a cheap postal scale. You can get one at Harbor Freight for almost nothing. I divided the dough into 3 ounce buns for hamburgers (you might want 4oz if you like big burgers, or 2oz for the awfully named sliders) and shaped those into balls that I then flattened.. I don’t use the same technique as the recipe, but I’m sure their method works and I don’t know quite how to verbalize mine. I made hot dog buns at 3 1/2 oz, rolled out by hand to length and shaped accordingly. They rose for another 1 1/2 hours on the parchment papered pans. I did the egg wash with sesame seeds. My recipe yielded 8 hamburger buns and 5 hot dog buns.
The real key to these in my opinion is the steam, so don’t omit that. That is what ultimately produces the nice firm crust. I baked for about 18 minutes at 400. I tap the bottom and I like to hear a nice hollow sound. 20 would probably have been good, too, but 15 not enough.
The result was truly beautiful, and I will continue to use and play around with this recipe from now on. There is no need to search for another, nor to ever buy buns again.
Just so people know, I have no fancy equipment. I have a basic Kitchen Aid stand mixer that I bought refurbished because I have arthritis now but I used to knead by hand. My oven is a 30 year old Kenmore electric. Most of baking, and cooking in general, is about careful attention and not equipment.
Thank you for posting this recipe. I am grateful.
Revekah Echols says
these were perfect!! really light but substantial enough to hold a hamburger patty as well as the cheese and keep its structure. pillowy soft, my whole family enjoyed!! will be my go-to bun recipe, may try to convert into hotdog buns!
Maxim Lagrilliere says
Hello, I was a little dubious with the mere 1 cup of water but they came out delicious. A little big for me so next time I will make 10 or 12 buns but another brilliant recipe! Thank you very much.
Emily says
I’ve made these twice, and both times they turned out beautifully! This is a pretty forgiving recipe-I forgot the egg in the dough the first time (so they turned out small) and didn’t have milk the second time so I substituted cashew milk. I’ll never buy burger buns again.
SHA says
Perfection, I’ve made these twice, and they were delicious. Could I use this recipe to make a loaf of bread? Thanks for a super recipe!
Halinka Burke says
I had to use a lot of flour on the board to divide the pieces because it was so sticky. Because of that I could not get enough traction to create a smooth ball. Will see how they fair after the second rise and bake.
Judy F says
These are amazing. I have made for five batches, and shared the recipe with several friends. It is a favourite for all of us. I find that having a little flour on my hands helps with shaping the buns. Also, the size The buns when I made of 8 was too big for us so I am making 10 instead.
They are also excellent with pulled pork. We will never buy hamburger buns again.
Mary Jo says
I will never buy buns in the grocery store again. These are amazing and will really improve this weekends Fathers Day BBQ! Thank you.
Julia says
After utterly failing to make this four times, I think I need some help! 🤣 I am normally quite a good baker, but I followed this recipe to the letter multiple times and I get a good rise the first time, then i shape my dough and instead of rising, the buns flatten into sad squished pancakes and there are absolutely un-salvageable. Proving them in a stable environment, stable temp, giving them enough time and all. Any suggestions on what I’m doing wrong?
Halinka Burke says
Mine was a sticky mess coming out of the first rise. Had to use quite a bit of flour but then that created a problem trying to roll them in to a ball as not enough traction to get a smooth top.
Revekah Echols says
i wonder if your first proof might be too long? i’m asking because they’re flattening the second rise which is usually a sign of over-proofing? also, are you forming a surface tension when you shape? one thing that i was surprised about is that my dough in stand mixer came together almost instantly, it formed a ball within about a minute, where the recipe says 5-8. anyway, i’m sorry they didn’t turn out for you!! they’re really delicious.
Leslie Renaud says
The recipe is short flour. If I use the quantities called for, it’s like cake batter. I generally need another 1/2 cup of flour. I bake by weight, which all serious bakers do. 450 grams of flour is about right, in my experience.
Emilie Raffa says
Hi there! Yes: the batter is indeed wet, like cake batter. Depending on the temperature and the brand you’re using, sometimes you’ll need to add more flour to achieve your desired consistency. Hope this helps!
Angie P. says
Hey, I have made these buns before and they were delicious. However, this time I am out of milk. Do you think this would work without adding the milk? I’m a little hesitant to try without milk but also hesitant to have to go out and buy milk… any advice is appreciated. :)
nico says
hello, i m french, very hard for me to translate the recipe,but i try it thanks
Sue L says
I’m making now for my second time. I didn’t have bread flour so used all purpose. They came out great we thought. Loved them. Wondering what difference there might be with bread flour? So easy. Almost seem fool proof.
Anita Bowes says
Hi Emilie,
I want to make these Light Brioche Hamburger Buns, but first I have a question. Do you first let the traditional yeast sit for 5 minutes to get foamy,
before adding the eggs and dry ingredients??
ShaunaTea says
Thats is called a sponge, it basically lets you know your yeast isnt dead
It wouldn’t hurt, leave the yeast with the sugar water and milk, until foamy before adding the egg. but its not really necessary if you know your yeast is okay
Leslie Renaud says
I find the recipe to be low in flour, but without using weights vs. measures, the results vary quite a bit. I generally need to use an additional 1/3-1/2 flour. Once the dough is right, it’s a wonderful recipe, producing the lightest of brioche buns. I make hot dog buns with it, too. It’s my go to.
Michelle Pinheiro says
Hi Emilie, I’m looking to try these buns and I was wondering what do you cover the buns with for the second rise?? After you have shaped them I’m afraid to cover with plastic wrap as it might stick to the tops and yours look so nice and smooth….so just wondering when you say “Cover and rest for 1-2 hours, or until puffy and slightly risen.” what did you cover the tray with?
Emilie Raffa says
Michelle, use lightly oiled plastic wrap. They won’t stick!
Sarah says
Can one make these with sourdough starter rather then dry active yeast? If so, how much starter should one use?
Christine Hernandez says
I have the same question.
Amanda Segal says
My kids keep on requesting these lovely light rolls. I am making using a bread machine and this has made them incredibly easy – just put all the ingredients in, run the pizza dough programme (45mins), divide and shape the rolls, allow to rise for 20-30mins and bake. Pretty quick and easy!
Darcy Huartson says
This was my second attempt at brioche hamburger buns this weekend. I tried a different recipe that didn’t turn out. I made there ones and they were amazing! Will definitely make them again!
Leya says
This recipe worked so wonderfully. I was even in a rush and they all still came out nice and light. I highly recommend this.
John says
I have made these buns several times and they always come out perfectly. I do find the dough a little sticky so I have been adding 1-2 tbs of flower during the mixing . Just bear in mind that you need less liquid in really hot weather. I also use yogurt instead of butter to brush the buns before baking.
I have also made whole wheat buns by replacing half of the bread flour with whole wheat flower. The dough turned out perfectly and was not sticky and easier to work with. The buns came great but not as light.
John says
I guess I’m the only one that can’t bake because I found the dough to be so sticky it was impossible to work with. I wound up with a lot of wasted dough, poorly shaped buns, and a giant mess to clean up. It’s much easier to just pay $4 for some artisan bread.
Pat says
Honestly, not saying this to insult anyone, but it not possible to screw up this recipe if you follow exactly. I identify with the person who said the dough comes together almost immediately. I put on the dough attachment and held the mixer down! I don’t remember that the first time but I cannot bring myself to buy store bought for my burgers tonight after having made these these. On its first rise and I can’t wait to have these again I promised my neighbor a sample, but the recipe only makes eight. They keep beautifully on the counter and freeze well. Not sure I want to share these! Would be happy to help anyone. These are so worth it!
Aisha says
Great recipe Emilie! Based on some of the confusion in the comments I thought it might be worth noting that “1 cup” of both ap and bread flours have an approx weight of 120 grams. (A cup isn’t a standard measurement outside the U.S.)
Caitlyn says
This recipe was absolutely amazing! They turned out perfect the first time. I’m going to be making them again with fresh herbs inside. Hope they turn out good again!
Corinne says
These were by far the easiest and best buns I have made, and I can confidently say I won’t be buying store-bought ones again. Friends were so impressed with the photos alone that I have shared the recipe with three others already.
Kelly Prine Alexander says
This has been a family/neighborhood favorite since I found it! It’s so good! Easy to make with all purpose or bread flour.
Valerie Barry says
Great recipe – I accidentally added both eggs to the dough and they still turned out perfect! Was thinking of making bread from this recipe. Do you have overnight in the fridge proofing instructions?
Kirtida Lalloo says
Excellent recipe