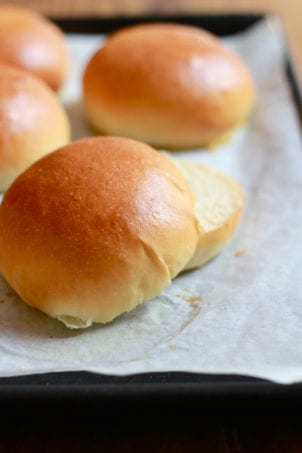
This recipe for light brioche hamburger buns proves that you can make seriously good hamburger buns at home. With a dough that’s simple to make and easy to handle, you’ll never buy brioche burger buns from the store again!

We like our burgers on soft, buttery brioche-style rolls and this NY Times recipe looked like a great starting point to experiment.
What’s interesting, is that this brioche burger bun is lighter than most traditional brioche recipes (hence the title). It’s still soft and fluffy, but not quite as eggy and rich. Even the color is a bit lighter. Incredible!
In my opinion, nothing beats all natural bread. Whether it’s a thick slice of sourdough bread or sandwich bread, good-quality hamburger buns from scratch are absolutely life changing. The taste, quality, and healthiness can’t be beat. These buns are the perfect vessel for sandwiches too! Let me show you how to make them.


How to Make Light Brioche Hamburger Buns {Step-By-Step Recipe}
Step 1: Make the Dough & Let it Rise
- Whisk the warm water, milk, yeast and sugar in a small bowl; set aside. Beat the egg in a separate bowl.
- To a stand mixer fitted with the paddle attachment: add the bread flour, all purpose flour, salt and butter. Mix the ingredients until the butter is the size of pebbles.
- Add the yeast mixture and the beaten egg. Run the mixer on medium-low speed (I used #3 on my Kitchen Aid) until a dough forms, about 5-8 minutes.
- Scrape down the sides of the bowl and shape the dough into a ball. It will be sticky.
- Cover bowl with plastic wrap and let the dough rise until it has doubled is size. Depending on how warm your kitchen is, this will take about 1-3 hours (mine took 1 1/2 hrs @ 70 degrees F.)
Tip: Giving the dough enough time to rise is crucial in bread baking. In the past, I have rushed this step which caused my bread to be very dense. Rise times will vary, so be patient. Remember to watch your dough and not the clock!

Step 2: Cut The Dough
- Once your dough has risen, dump it out onto a lightly floured work surface.
- Then, gently flatten the dough to get rid of any air bubbles. Using a bench scraper (or a chef’s knife) cut the dough into 8 equal portions.
- If you have a digital kitchen scale weigh each portion so that they’re all the same size. Do this by weighing the entire ball of dough first, and then divide by the number of rolls you want to make.

Step 3: Shape The Dough Into Balls
- To shape, gently flatten each piece of dough like a pancake.
- Pull up each side pinching it together in the center. Repeat until the ball is sealed. Flip the ball over (seam side down) and move to an un-floured part of your board. It will be easier to roll this way.
- To finish, place your palm over the top and gently roll into a smooth ball.
- Transfer each ball onto a parchment lined baking sheet.


Step 4: Second Rise
- The dough will need to rise again, this time for a shorter period than the initial rise.
- The balls should look puffy and slightly risen, about 1- 1/2 hrs. When they’re ready, gently brush each one with egg wash. See how puffy they are?
Tip: At this point, you could add sesame seeds to the top of your rolls if you’d like.

Step 5: Bake The Dough
- Preheat your oven to 400 F and place a shallow metal baking pan on the oven floor.
- Before the dough goes in, add about 1/2 cup of water to the pan to create steam. This will help keep the bread nice and moist.
- Bake for about 15-20 minutes or until golden brown. Transfer to a wire rack to cool completely.

More Delicious Brioche & Bread Recipes to Try!
Once you’ve mastered this recipe, branch out and try my soft brioche rolls and this incredible, sliceable brioche loaf – we love it toasted with strawberry jam!
By signing up, you agree to receive emails from The Clever Carrot. Unsubscribe at any time.
Light Brioche Hamburger Buns
- Prep Time: 15 minutes
- Rise Time: ~4 hours @ 70 F:
- Cook Time: 20 minutes
- Total Time: 4 hours and 35 minutes
- Yield: 8 buns 1x
- Category: Yeast Bread
- Method: Oven-Baked
- Cuisine: American
- Diet: Vegetarian
Description
Adapted from the NY Times, this recipe for light brioche hamburger buns is perfect for BBQ fare, sandwiches (try bacon, egg & cheese!) and so much more. You’ll never buy from the store again!
Ingredients
Dough
- 1 cup warm water, about 75–85 F
- 3 tablespoons warm milk (I prefer whole milk)
- 2 teaspoons active dry yeast
- 2 1/2 tablespoons granulated sugar
- 1 large egg
- 3 cups bread flour
- 1/3 cup all-purpose flour
- 1 1/2 teaspoons fine sea salt
- 2 1/2 tablespoons unsalted butter, softened
Egg wash
- 1 large egg
- splash of water
Toppings
- sesame seeds (optional)
Instructions
- Whisk together the warm water, milk, yeast and sugar; set aside. Beat the egg in a separate bowl.
- Add the flours, salt, and butter to the bowl of a stand mixer. Using the paddle attachment, mix the ingredients until the butter is the size of pebbles.
- Add the yeast mixture and the beaten egg. Run the mixer on medium-low speed (I used #3 on my Kitchen Aid) until a dough forms, about 5-8 minutes.
- Scrape down the sides of the bowl if necessary, and shape the dough into a ball. It will be sticky. Cover bowl with plastic wrap or a very damp kitchen towel, and let the dough rise until it has doubled is size, about 1- 3 hours @ 70 F. *See notes below.
- Line a baking sheet with parchment paper. Using a floured dough scraper (or chef’s knife), divide the dough into 8 equal pieces. If you have a scale, weigh each piece to guarantee that they’re all the same size.
- To shape the dough into balls, gently flatten each piece like a pancake. Gather the ends and pinch the dough to seal in the center. Flip the dough over, cup the surface with your palm, and roll into a ball. Transfer to your baking sheet, placing them a few inches inches apart. Cover and rest for 1-2 hours, or until puffy and slightly risen.
- To make the egg wash, beat the egg with a splash of water. When the buns are finished with the 2nd rise, gently brush each one with egg wash. At this point, you could add sesame seeds to the top of your rolls.
- Preheat your oven to 400 F. and place a skillet or metal baking dish on the oven floor. Before the dough goes in, add about 1/2 cup of water to the pan to create steam. This will help keep the bread nice and moist. Bake for about 15-20 minutes or until golden brown. Transfer to a wire rack to cool completely.
Notes
Giving your dough enough time to rise is crucial in bread baking. Rise times will vary depending on temperature, so be patient. Remember to watch your dough and not the clock!

Comments
Stella says
My dough was t sticky at all. Did I do something wrong?
Emilie Raffa says
Hi Stella! Sticky? Or not sticky? Not sure what you mean ;)
Stella says
Wasn’t sticky
Laura says
hello, I am going to try this recipe tonight but I don’t have butter without salt. Is this still ok? or should I reduce salt a little. Also, can you substitute regular salt for the sea salt?
Anu says
I made these burger buns last night and it’s really easy to make and the instructions are so clear ! It came out soft and tasted great ! The next day , it did feel a bit denser .
Courtney Bassetti says
I’m about to make these hamburger buns! I was wondering if I could do the bill ferment overnight in the refrigerator?? If so do you have a time that you’d recommend? Thank you!
Rachel Gage says
Looking for dairy-free subs so my husband can eat this: would oat milk work for the milk? And vegan (olive oil) butter work?
Emilie Raffa says
Hi Rachel! Yes, oat milk will work. Vegan butter should work too, but watch the salt. Some brands are saltier than others. In fact, you might want to decrease/omit the salt in the actual dough, depending on what brand of butter you’re using. Hope this helps!
Claire says
These sound delicious but I only have all purpose flour. Will it work to sub 1:1?
Megan H. says
Making these as we speak with only a.p.f., I’m sure they’ll turn out great. Keep you posted!
Heather. M. says
These are by far the most delicious and well-balanced bun recipe around. Thank you so much the recipe, it made our dinner as success!
Emilie Raffa says
Fabulous! Thanks so much Heather :)
Amanda G says
I’ve made these several times and are delicious every time! Thanks for another great recipe with clear instructions!
Jess says
This is my go to recipe for buns, I’ve made it countless times. These buns always impress guests. They’re light and fluffy and delicious! Thank you!
Emilie Raffa says
You’re very welcome, Jess! Thanks for the feedback :)
Darron says
I think I must has miscounted something. My dough was not wet like the recipe and many other people say. Hopefully they turn out ok.
Olya says
Same here!! The dough is hard as rock! Didn’t miscalculate, followed the instructions!
Violetta says
I have tried quite a few brioche recipes and this is one is aimh the best!
Maria says
The buns were delicious! I made 4 hamburger and attempted 4 hotdog, which came out only slightly oblong. Next time I will shape them longer and skinnier. This recipe is a keeper! So glad I subscribe to your blog, thank you! 💙
Glenda says
I love these buns. Big hit with my family.
I do have one question; what do you recommend covering the buns on the second rise with. I have tried plastic wrap and parchment paper and both stick to the buns.
Jesse says
Glenda – I use a lightweight kitchen towel. Usually the same damp one that covered the bowl on the first rise. Hope this helps :)
Timothy Woods says
I’m an expert cook. I’ve made these brioche hamburger buns and I can say with all honesty that these are the best brioche burger buns recipe and they taste even better than the ones in restaurants! You will not regret trying this recipe.
Doris Brady says
These are easy and delicious! I made 40 the very first time for a gathering. Everyone loved them. Definately a keeper! Thank you Emilie!
Emilie Raffa says
OMG! 40? Wow! Incredible! You are very welcome Doris :)
Julia says
I think you need to change the “total time” to be something like 3 hours, not 15-20 minutes!
Emilie Raffa says
Hi Julia! Yes, agreed! The proper fields weren’t filled in correctly on my end. Fixed now. Thanks for brining this to my attention :)
Patricia says
• If the dough is instead split into 16 mini buns, do instructions change for rising time?
• Less baking time?
ThankYou!
Jackie says
Easy, no kneading, beautiful buns!! Way better than you can get even at a bakery!
Amanda says
When it comes to making a good hamburger…. The bun is the key ingredient 😂.
This recipe did not disappoint! It’s our favorite bun recipe.
Cam says
Great! 16 mins was plenty in my oven. Just watch them and you’ll be right.
Emilie Raffa says
Excellent! Glad you enjoyed them!
cc says
I’ve got to admit that I had my doubts (as an avid bread baker) that this recipe would turn out when I saw how wet the ingredients were in the stand mixer… but I had faith and trusted and this recipe did NOT disappoint. Perfect first rise in about 1.5 hours. A little flour on my hands to help shape the rolls and second rise in just under an hour. I actually used my last egg IN them and wasn’t able to do the egg wash – but I know it would have made them even better – I just used a light brushing of butter when they came out of the oven. These rolls were absolutely delicious and perfect. I’m honestly still blown away by how well the recipe worked as written and how amazing the final product was. Never. Buying. Hamburger. Buns. Again! ❤ Thank you so much for sharing this recipe!!
Helen Krahn says
What is the nutritional information?
Emilie Raffa says
Hi Helen! Apologies- I typically do not include nutritional info in my posts.
Helen says
Ok. Just trying to watch my carb intake. Thanks for the reply.
Jesse says
I NEVER leave recipe reviews but these were absolutely amazing!!! 5 star all the way!! I did not have bread flour so I used AP and did a scant 1 cup of water. Also we didn’t have any sesame seeds in the house but we had an “Everything But the Bagel” blend that we added to the top which was incredible! I would say hands down the best bread-bun recipe ever! Thanks Emilie!!
Emilie Raffa says
You’re very welcome, Jesse! The everything seasoning (which I have too!) sounds amazing. Yum!
Ashley says
I was looking through the comments to see if anyone tried this with just AP flour. I’m glad yours turned out good. Did you do 3 and 1/3 cup AP?
Thanks!
Nora says
I just use AP flour and they always come out great.
Hal says
I made these for Memorial Day, came out perfect first time. I mixed by hand, I’m a little old school….
We bar-b-que’d venison burgers. Awesome
Thanks for the recipe
V. Abed says
I used them for muffaletta sandwiches. I made them a bit bigger and everyone loved it.
very easy recipe to follow with great instructions
Olivia says
I’m hopeless at baking bread. However, this recipe is fool proof as even I can make them! The resultant buns were absolutely delicious. Thank you!
Thanya Pathirana says
My very first attempt at baking buns – and it was a hit! :) Thanks for the recipe!
Sarah says
Thank you so much for sharing this recipe! These buns are easy to make and this recipe has become my go-to for any kind of bun – I probably make these 3 times per month. They always turn out fantastic and we can never resist sampling one while they are still hot from the oven. I do one thing a little differently to make the dough a bit less sticky: I add the yeast, sugar and milk to a measuring cup, then fill it the rest of the way with water, instead of measuring them all separately – it has worked perfectly for me every time!
Jocelyn says
Wow! My favorite recipe. Modifies easily as well. Today I made garlic parm buns using this recipe (sun the 1/3 cup flour for 1/3 cup grated parm. Add 1 clove of crushed garlic, 1/2 tsp garlic powder 1/2 tsp italian seasoning) made 20 small buns. Delicious!!
Elizabeth says
Hello!! Thank you!! Sooooo good!! xx Sourdough soft brioche buns! First time. Thank you. I only eat artisan sourdough. xx
Emilie Raffa says
Thank you Elizabeth!!! xx
Marcela says
Thank you so much for this recipe. They turned out perfect. The second time around I added a little bit more flour to make the bread more manageable so I could shape it into a braid… Everyone loved it. Thanks!
Kerry Sly says
One of the better bread/bun recipes that I have seen on the net. I have followed this recipe by point and have used it as a reference. I decided to make buns today and pulled up stored recipes and noted that this is one I preferred in the past. It would be hard to mess up if you follow the directions. I am an experienced bread maker and this a good recipe to keep on hand.
Emilie Raffa says
Thanks so much Kerry! Glad you liked it :)
Christi says
Yes the dough is wet. Aside from working with sticky dough, the recipe is rock solid! Super easy and made for some delicious burgers. I’ve made brioche buns before and they came out too dense. Not this recipe. These came out light and fluffy as promised. Saving this for next time.
Moriarty says
Can you give me the metric measurements? Thanks
Eirik says
Tried this recipe today, tasted and looked fantastic! I didn’t have bread flour at hand, so I used 415g type 405 flour – as it is a Sunday and couldn’t go to the shop. Added the liquid amount you specified here, but it turned out much too wet, so I had to work in around 100-150g more flour after the first rise until the dough was still slightly sticky, but mostly held its shape. Just mentioning it for people in the same situation as me. I think I also live in a relatively humid area, so next time I’ll be using a bit less liquid, might try going down 10%, to 58% liquid/flour ratio, and see where that takes me.
Bryana says
Made these for the first time yesterday! They were DELICIOUS! Everyone at dinner raved about how soft they were. A new family fav! Thank you!
Elinore says
Hi there, can I prove this dough overnight?
Brian says
thank you for this recipe. we’ve been using it for many years as our hamburger/hot bun. One of the best parts about it is it can be tweaked in so many ways and still turn out delicious. yesterday we made some starter with whole wheat, bread flour, yeast and water. Let it sit for 5(?) hours, adjusted the rest of the ingredients, removed the salt which was sprinkled on the top and baked w/o the egg wash. Was De- Licious. They also freeze well. Just a suggestion for anyone who decides to make these, Flatten them well and make the bun bigger than the burger and contents. It will hold all that meaty, veggie, dairy deliciousness much better that way and tend to keep it all from slipping out. Thanks Emilie
Mark Conroy says
Second time I’ve made these and easily the best recipe. Guess what? I Do Not knead the dough AT ALL! I make it by hand and it’s too sticky to deal with so I simply mix it and let it rise. Comes out perfect!!
Brenda Summers says
I’ve tried this recipe twice and they are delicious! The second time I made 12 instead of 8 buns and that was a better size for us. I love using them to make sandwiches or hamburgers. This recipe is a keeper!!!
Emilie Raffa says
Fantastic Brenda! Sounds perfect. We’ve made them smaller too- works just as well!
Helene Morse says
Made these once with cup measurements and they were incredible!!! Made them again with my kitchen scale, and the dough was way to sticky and wet. Wondering if there is an error with the gram measurements? Not sure what went wrong the second time
Emilie Raffa says
Hi Helene! All measurements are correct. The reason is because the volume to weight conversion (measuring cups to grams) is not equivalent; it’s only approximate. Here’s why: when you measure a cup of flour it can weigh anywhere between 120g -150g depending on how the flour was packed into a cup. Some bakers lightly fluff, spoon and level the flour into their measuring cup. Others pack it down tight. Big difference, especially in bread baking. To streamline these discrepancies, bakers typically use standard conversion charts to get us all on the same page. For example, 1 cup of flour is usually 120g- 130g. So, in your case, you most likely had more flour in your original dough due to how it was measured. To remedy this next time, either stick to volume measurements for this particular recipe. Or, when going by weight, cut back on the liquid, adding more as needed, to reach your desired consistency.
Megan says
Loved these soft and perfect consistency for burgers!
Emilie Raffa says
Thanks Megan! Glad you liked them :)
Burned bottoms says
Hi there. I’ve tried this recipe twice (the first time at the suggested temperature (400*), the second time I tried at 350*) and they burned on the bottom both times (the first time after only 10 minutes, the second time I took them out after 15 minutes (the bottoms weren’t quit as dark the second time). And both times they had zero color on top. My oven works well with other bread recipes, so I’m wondering if you have any suggestions to get them to golden on top without burning the bottom?
Emilie Raffa says
Hi there! There are two things you can do. First, use an oven thermometer to make sure the baking temperature is correct. This is important. Second, make sure to bake on the center rack, and place another baking sheet on the rack below (not directly underneath it). This will help shield the heat from the bottom up to prevent burning. With these recommendations, and use of the egg wash, the tops should turn out golden brown too! Hopefully this will help :)
Rebecca says
I have made these several times with fabulous results. Today the dough was way too sticky to work with. I added more flour but it didn’t seem to help. The only difference I can think of is that it is much more humid today. Any suggestions for modifications to make on very humid days? They are on their second rise now and look a hot mess but I am sure they will taste fine.
Kevin says
Happened to me too. I’ve made this a bunch of time with great results. Today, I think I left the first rise in too long; it had tripled in size, and was overflowing the bowl. I have an oven with a proof setting, and didn’t see it until too late.
When the dough came out after proofing, it was too stick to shape into buns. I tried kneading it with a tiny bit of flour, but that didn’t seem to help. Flour my hands, oil my hands – no difference. Couldn’t handle the dough. Could this all be due to overproofing?
Emilie Raffa says
Hi Kevin! Two things. Over proofed dough can be very, very sticky to work with. From what you’ve described, I think this was the case for you. Plus, dough held in an oven proofer (assuming 80 F) can be too warm sometimes. This also makes the dough sticky. So, you had two simultaneous variables working against you! Next time, shorten the rise time & use cooler liquid in the dough (if still using the oven proof setting) to control temperature and rise time. This should help.
Kevin Bertsch says
Our Miele oven has two proof settings: light and dense batter. I choose the light batter, and the oven says “110 degrees”. As I noted, I’ve had great results using this before, but I usually got the dough out before it tripled in size! It normally only takes about 45-1 hour to proof in the oven, which is why I use it.
Emilie Raffa says
Ah yes! Makes perfect sense :) And very cool that you have two proof settings.
Emilie Raffa says
Hi Rebecca! Yes, absolutely. That’s it. Temperature and humidity will always effect the texture and rise time of your dough. It’s totally normal to make adjustments as the seasons change. In your case, when it’s humid again, cut back on the liquid in the recipe. Start by 50 g (you can always add more). Also, make sure to stick with the same brand of flour; each brand absorbs water differently which will changes the texture of the dough.
Jessica S. says
I am going to try to make buns for a family gathering this weekend. I was planning to do a sourdough bun but these look amazing! Have you ever done a conversion and made with sourdough start instead of yeast? If so how many grams would you suggest?
Sandra B. says
I’ve made this recipe at least 5 times over the last couple of years and it amazes me every time! It’s absolutely awesome and very easy! We were invited for BBQ hamburger dinner (respecting social distancing) and I told the host that I’d bring the buns. I was worried that I’d mess up this time but it is a foolproof recipe if followed exactly as written. They didn’t believe me when I showed up with these beautiful buns because they looked like I picked them up fresh from the local bakery…good thing I took pictures at each stage of my process! THANK YOU Emile for a wonderful recipe. The buns are not only beautiful but sooo tasty too!
Yuna says
I have tried a lot of bun recipe but ended up failed. But this recipe turns out big success for me. My whole family really love my chicken-sesame-sauce burger! They even asked me to open a burger shop lol. I will never buy any store bought burger bun anymore. Thank you for this amazing recipe! :)
Scarlett says
I love this recipe, and have used it many times!
Annette says
Thanks to you I will never buy hamburger buns again! I live at 6700 feet so wasn’t sure this would work at altitude but they’re beautiful!
Madeline says
If you don’t have a stand up mixer how else can you prepare the dough
Breanne says
I used a fork and then my hands they turned out fine lol
Tracy Mcdonald says
My first attempt was a complete fail due to my faulty blender so need to try without one second time around. As the dough was so sticky I wasn’t sure how to mix it by hand. Any advice please.
Emilie Raffa says
Hi there! You can mix by hand with a wooden spoon or rubber spatula in the beginning to form a cohesive dough. Then knead by hand adding more flour as needed if it’s too sticky to work with. I would not recommend using a blender for this recipe. Hope this helps. Enjoy!
Jackie Messinger says
I made this recipe last week and everyone loved the hamburgers we made with them! I wish I had a picture of how beautiful these buns were. Today I’m making them with some whole wheat flour, replacing 1 cup of ww with 2 cups all purpose. I’m confident that they will be just as delicious and beautiful as the 1st batch. Thank you for this awesome recipe!
Jackie Messinger says
Jackie here, again! Um note to self to proof-read before submitting! What I meant was that I add 1 cup of whole wheat flour and decreased the white to 2 cups.
Jenn says
I made these today. They are easy, and came out amazingly. They are perfct for a burger.
I do need to put on two baking sheets next time as they did bump into one another during baking. I love them! Thank you for sharing!!!