My easy sourdough bagel recipe uses active sourdough starter (no yeast) to make soft, chewy, NY-style bagels at home with just 10 minutes of prep and an overnight option to fit your schedule. Customize with everything bagel spice, cinnamon raisin and more. Adapted from my bestselling book: Artisan Sourdough Made Simple.
Reader review
“I have made these twice this week. OH MY GOODNESS… they are perfect! They are literally so close to Brueggers!!! I’ve played with plain, sesame, Everything and cinnamon raisin. ALL were amazing! I want to make them into rolls or bialys as well. Thank you for your work on this. Just wonderful!”
—Rosemarie
Sourdough bagels are nothing like yeasted bagels. They’re more flavorful, less dense, and intensely chewy. You can eat two without time taking nap! The crust is thin and crisp, and the inside is soft (not doughy). I like mine warm, slathered in salted butter.
This recipe is from my bestselling book Artisan Sourdough Made Simple and like all of my sourdough bread recipes: it’s practical and straightforward. You’ll find clear step-by-step instructions for mixing, shaping, boiling and baking, plus a sample baking schedule to make it work for you.
Homemade sourdough bagels sound hard, but they’re doable and a fun next step after making sourdough bread. Just read the comment section! You’ll get the best tips from real life bakers who’ve made this recipe hundreds of times.
How To Make Homemade Sourdough Bagels {Step-By-Step Recipe}
Step 1: Mix The Dough
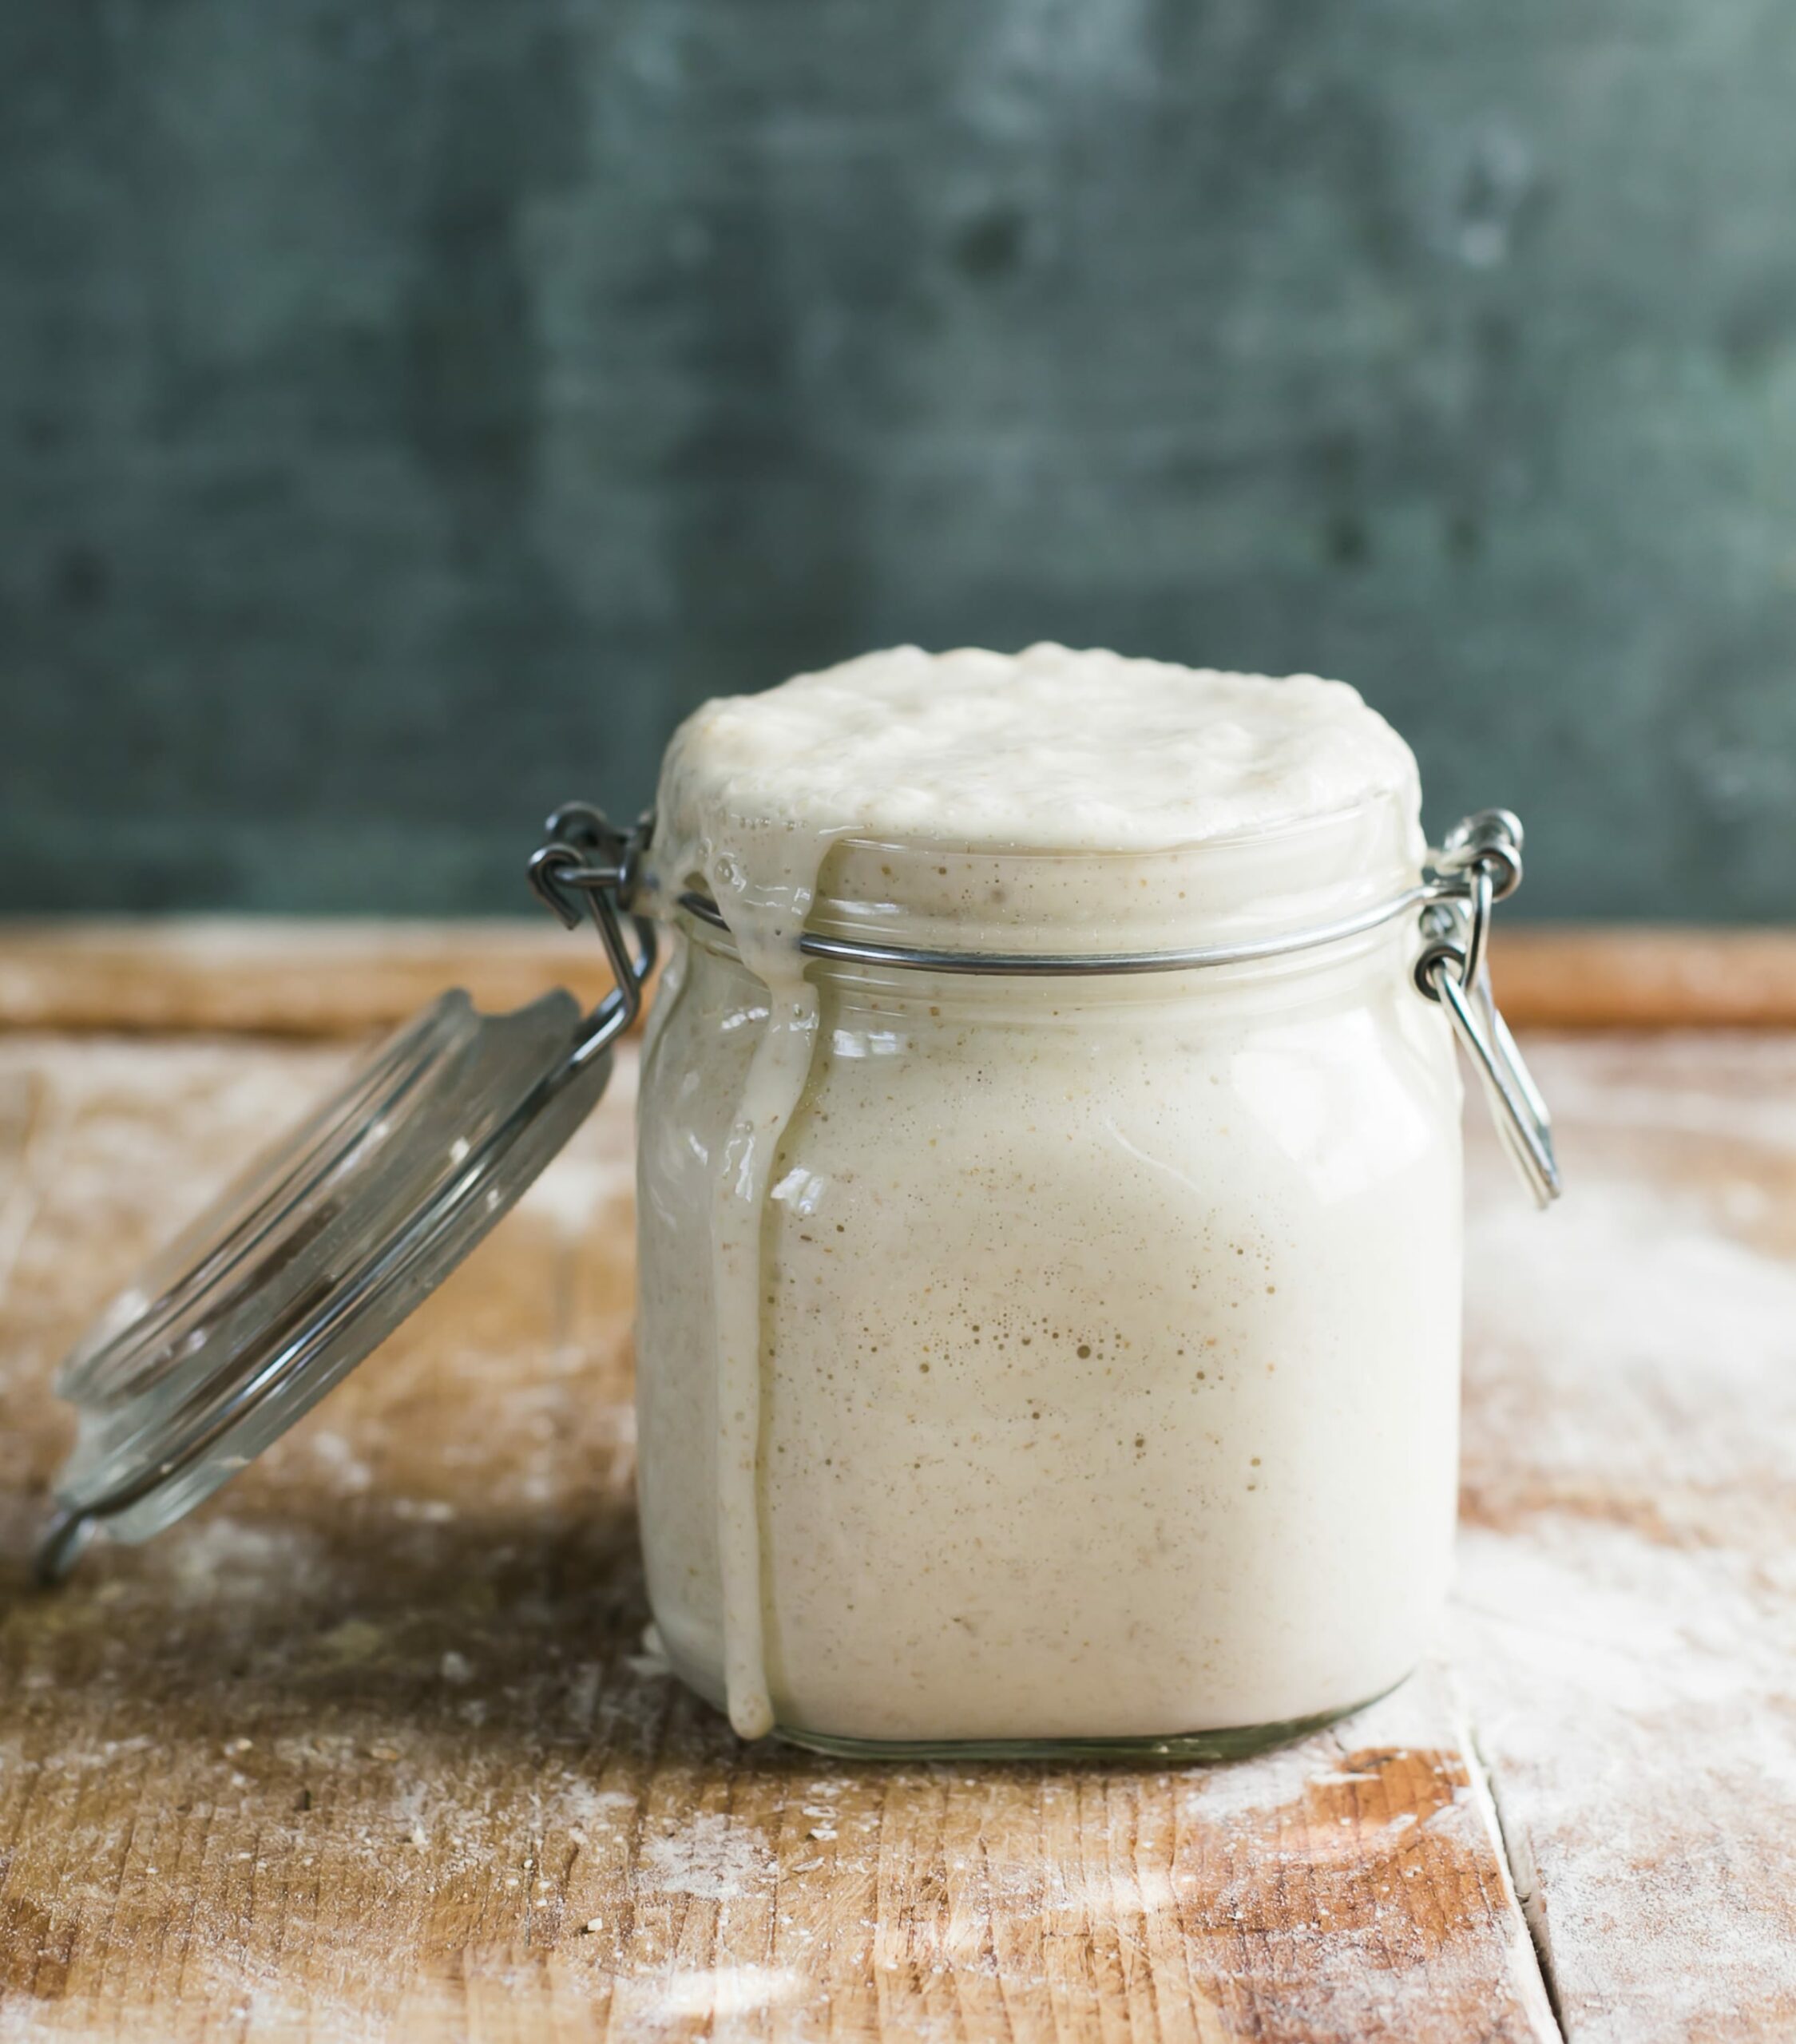
To start: Whisk the water, sourdough starter and sugar together in a large bowl (the sugar is for balanced flavor – the bagels are not sweet). Then add the bread flour and salt, and mix to form a rough dough. It will feel very stiff since it’s a low hydration dough. This is normal. Cover and rest to relax the gluten for 1 hour.
Step 2: Bulk Rise
Cover the dough or transfer to a high sided dough tub. Let rise overnight at room temperature until airy, puffy, and double in size.
How long should bagel dough rise? At 68 F, plan on 10-12 hrs; at 70 F, about 8-10 hrs. The dough will look lighter, domed, and spring back slowly when pressed lightly with your fingertip. Pay close attention to your specific room temperature. Treat it like an ingredient, and you’ll nail the rise time every time.
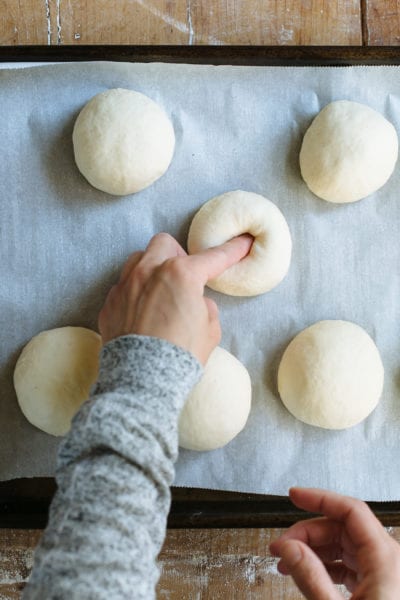
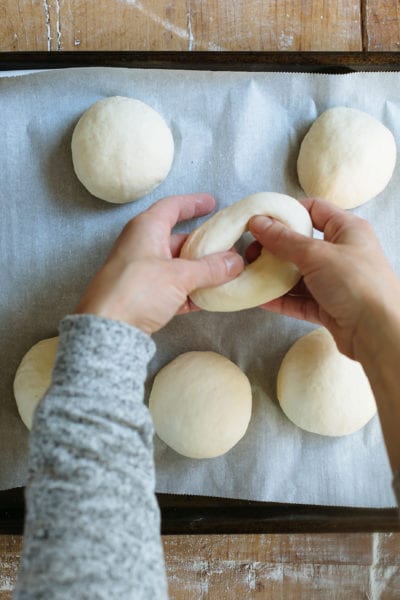
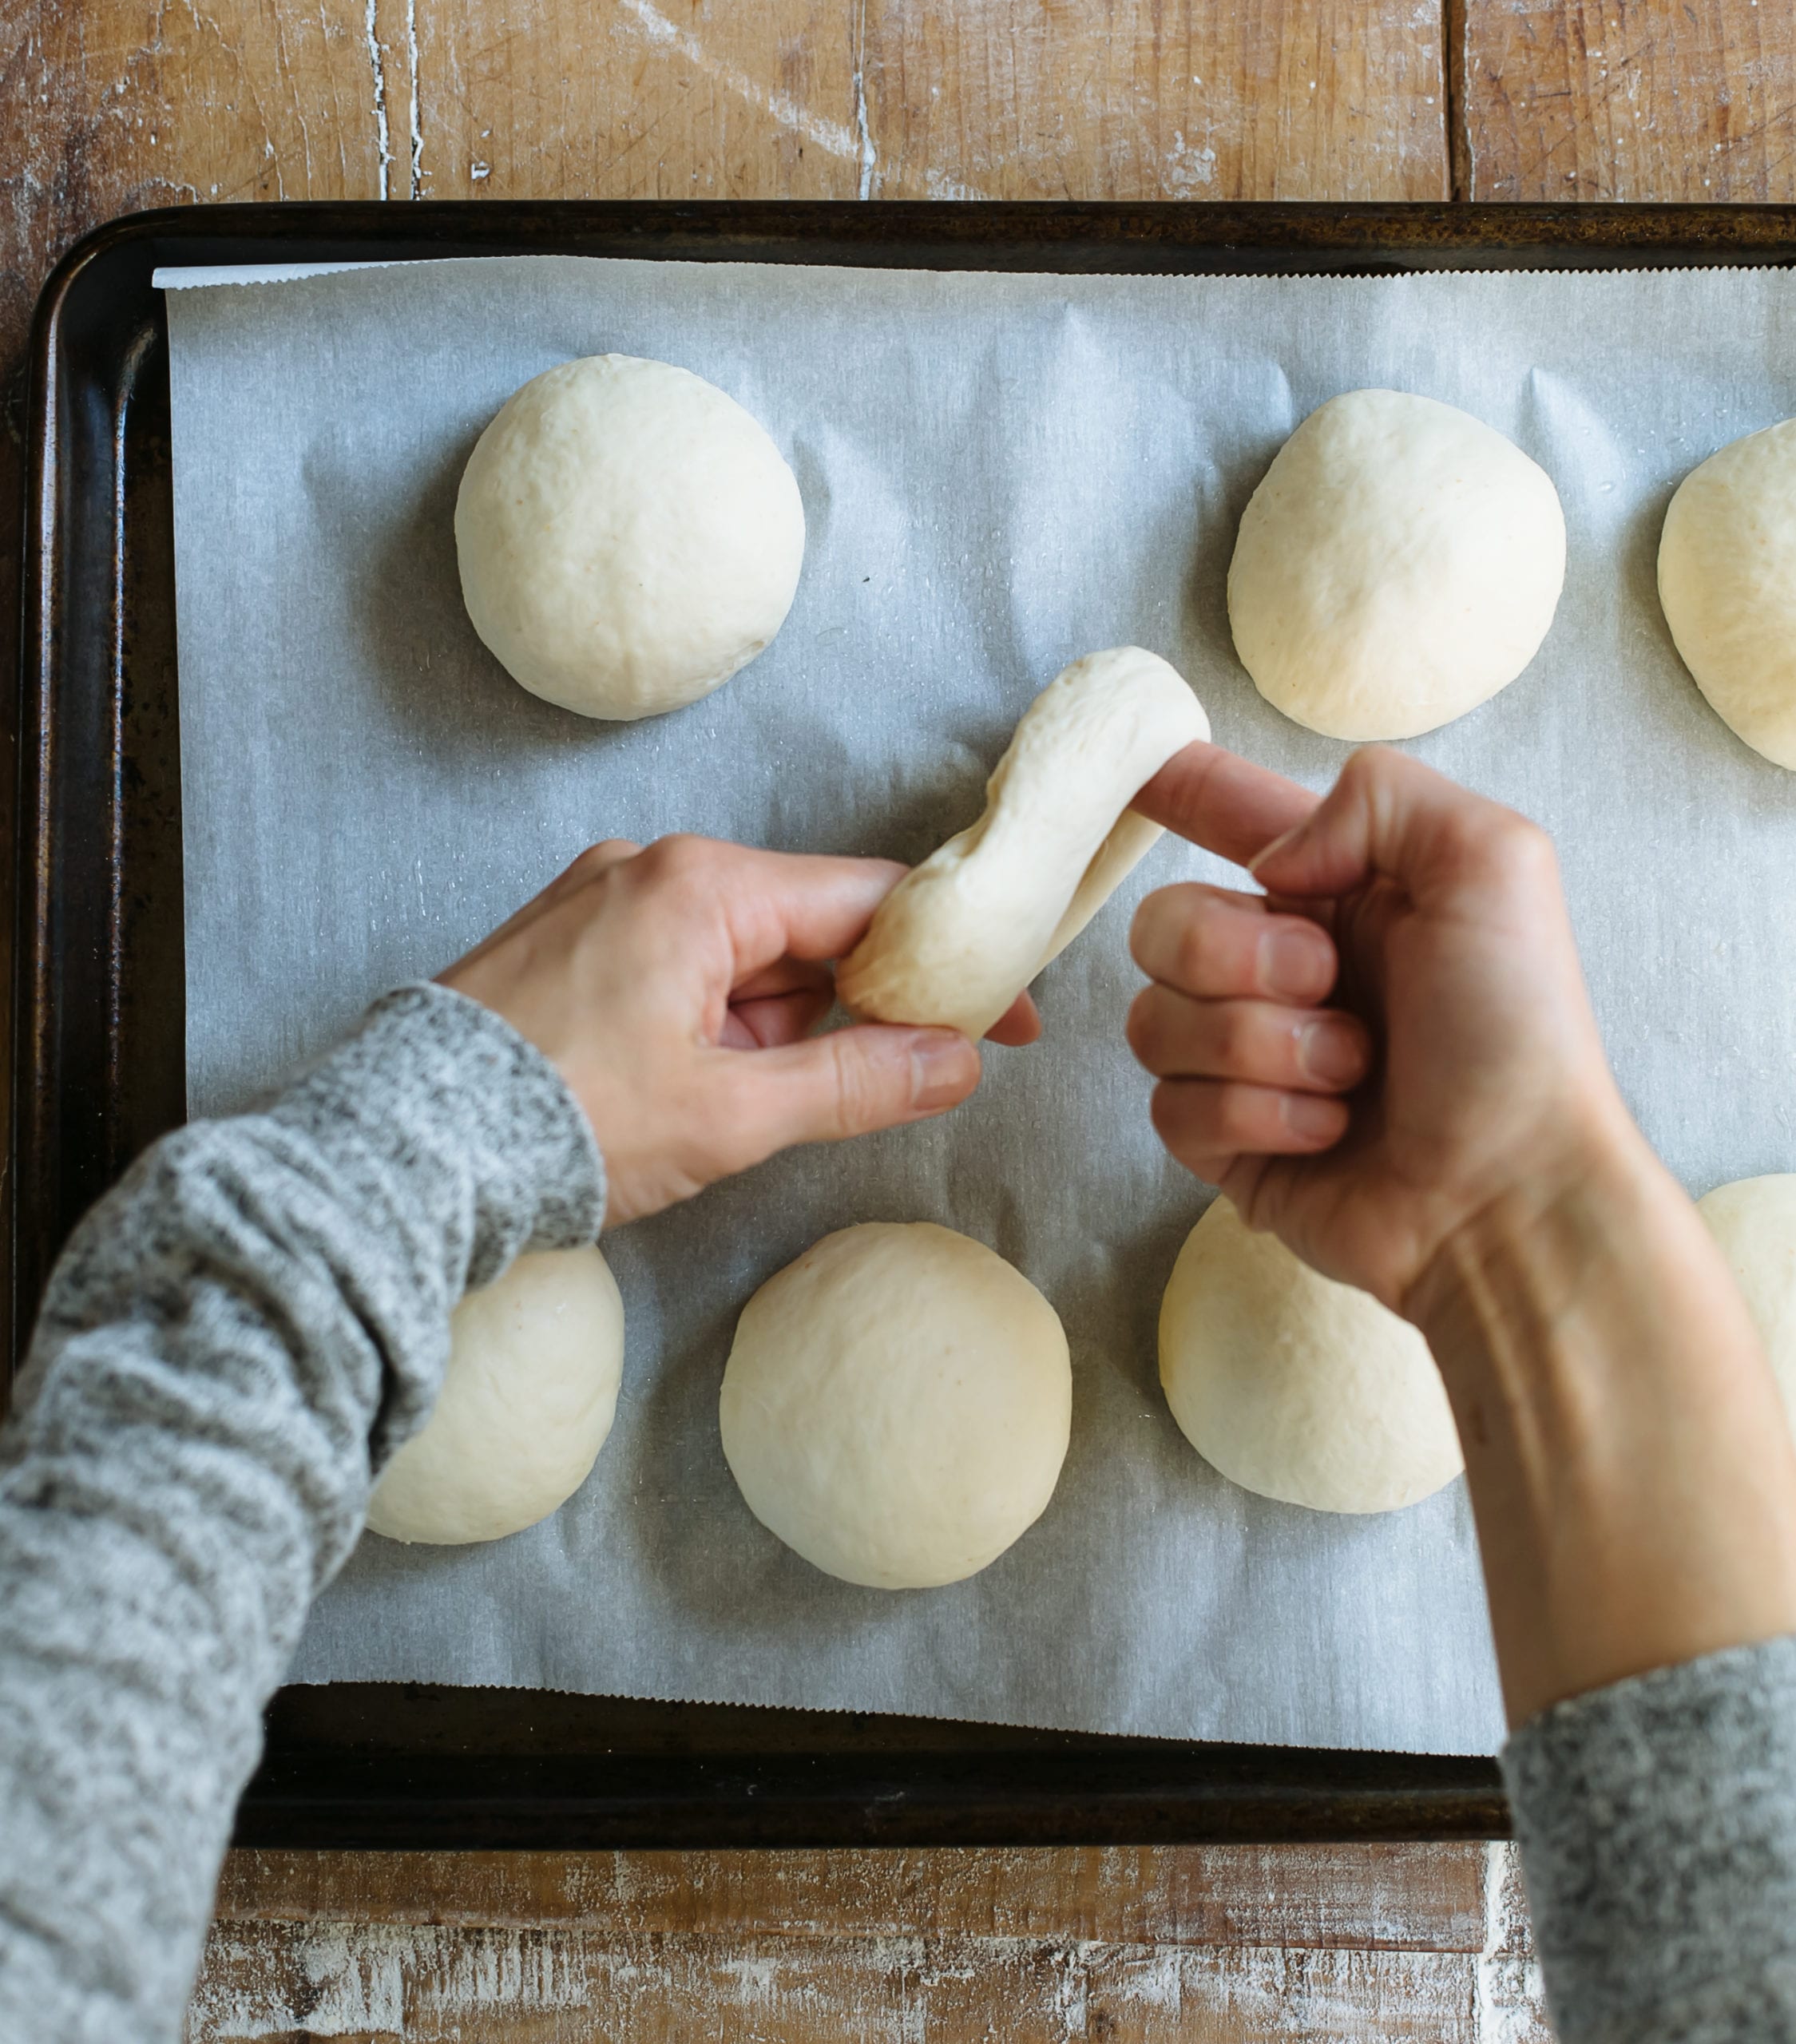
Step 3: How To Shape Sourdough Bagels
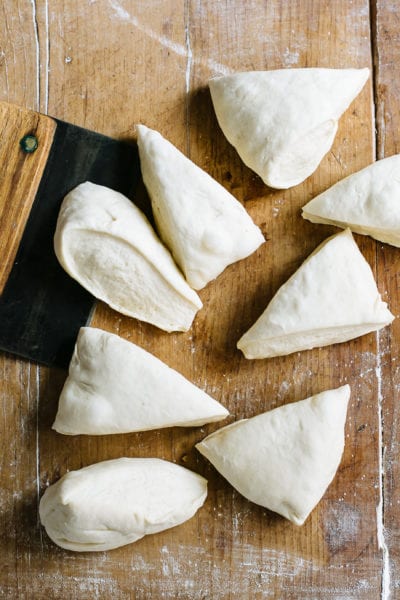
First, divide the dough into 8 equal pieces, about 115 g each.
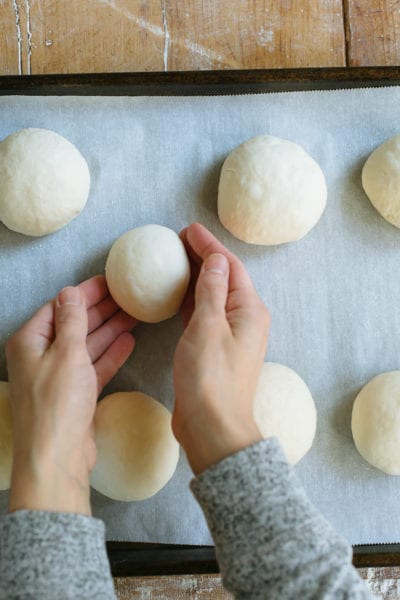
Then roll into balls, and rest for 10-15 minutes on a parchment-lined sheet pan coated with cooking spray. If you forget to spray your pan, your bagels will stick.
To shape the bagels, poke a hole into the center, then gently stretch and spin to form a ring. Don’t be afraid to make the hole larger than you think (it will shrink back during proofing and baking).
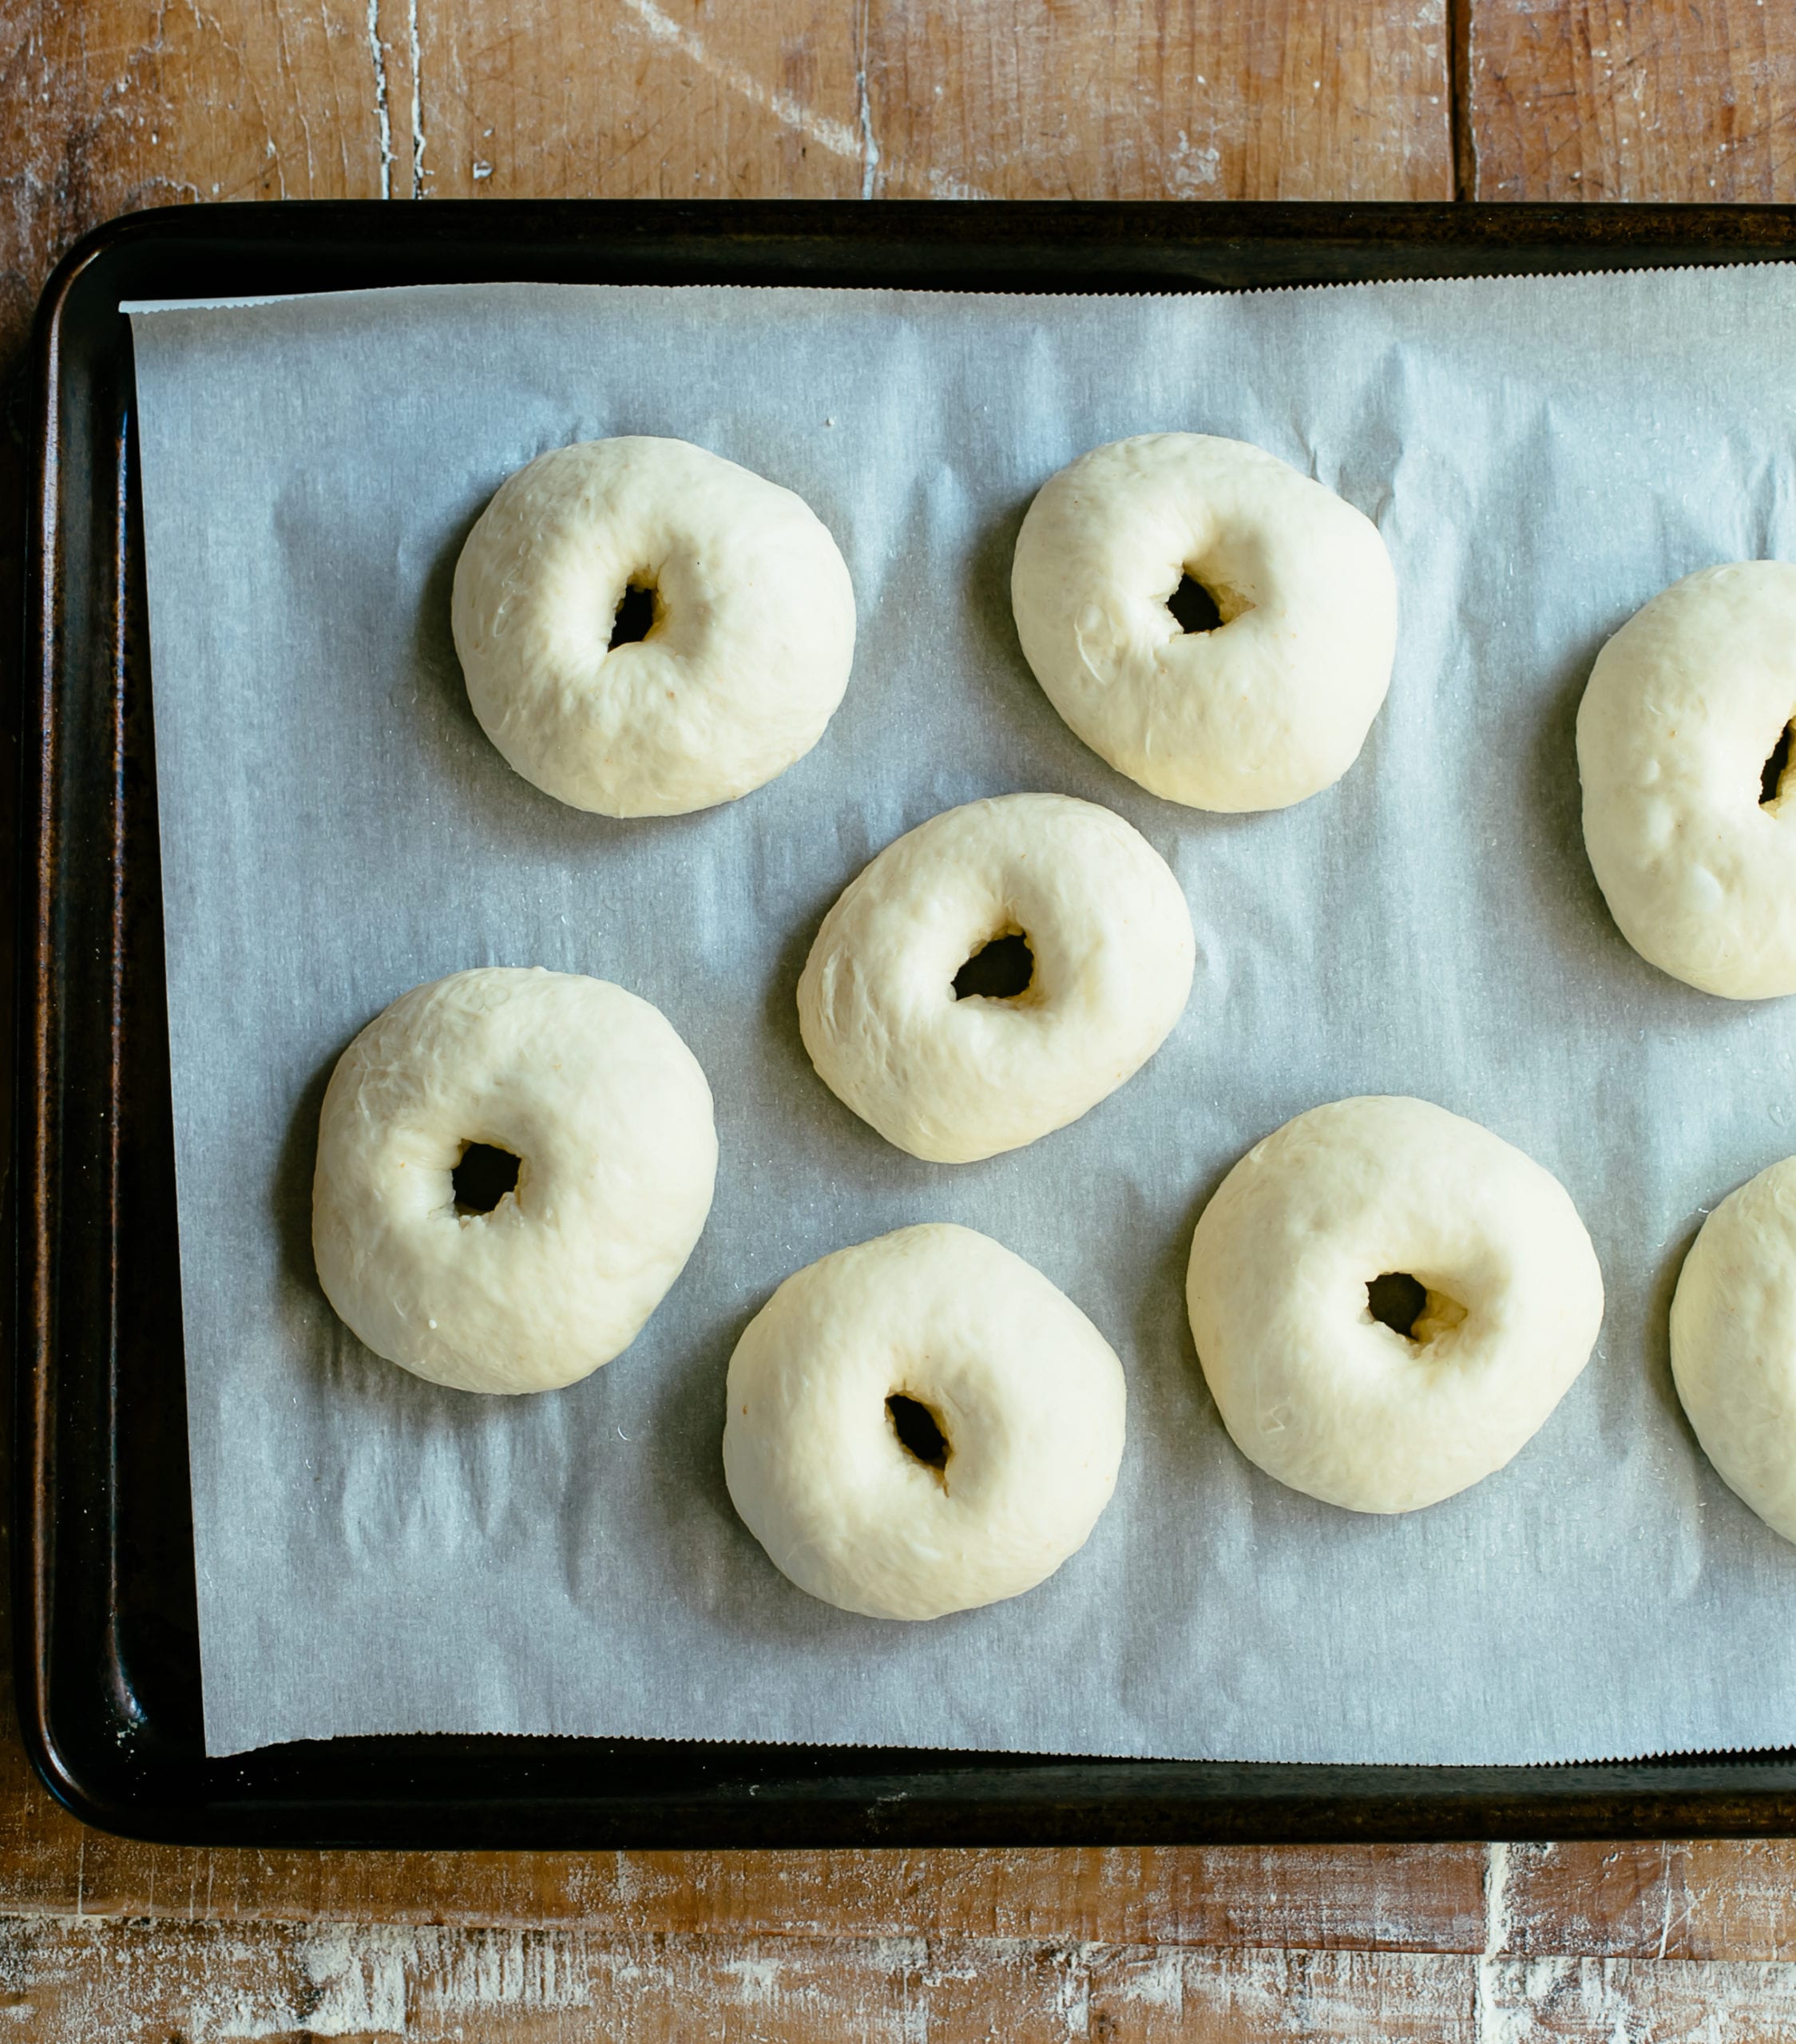
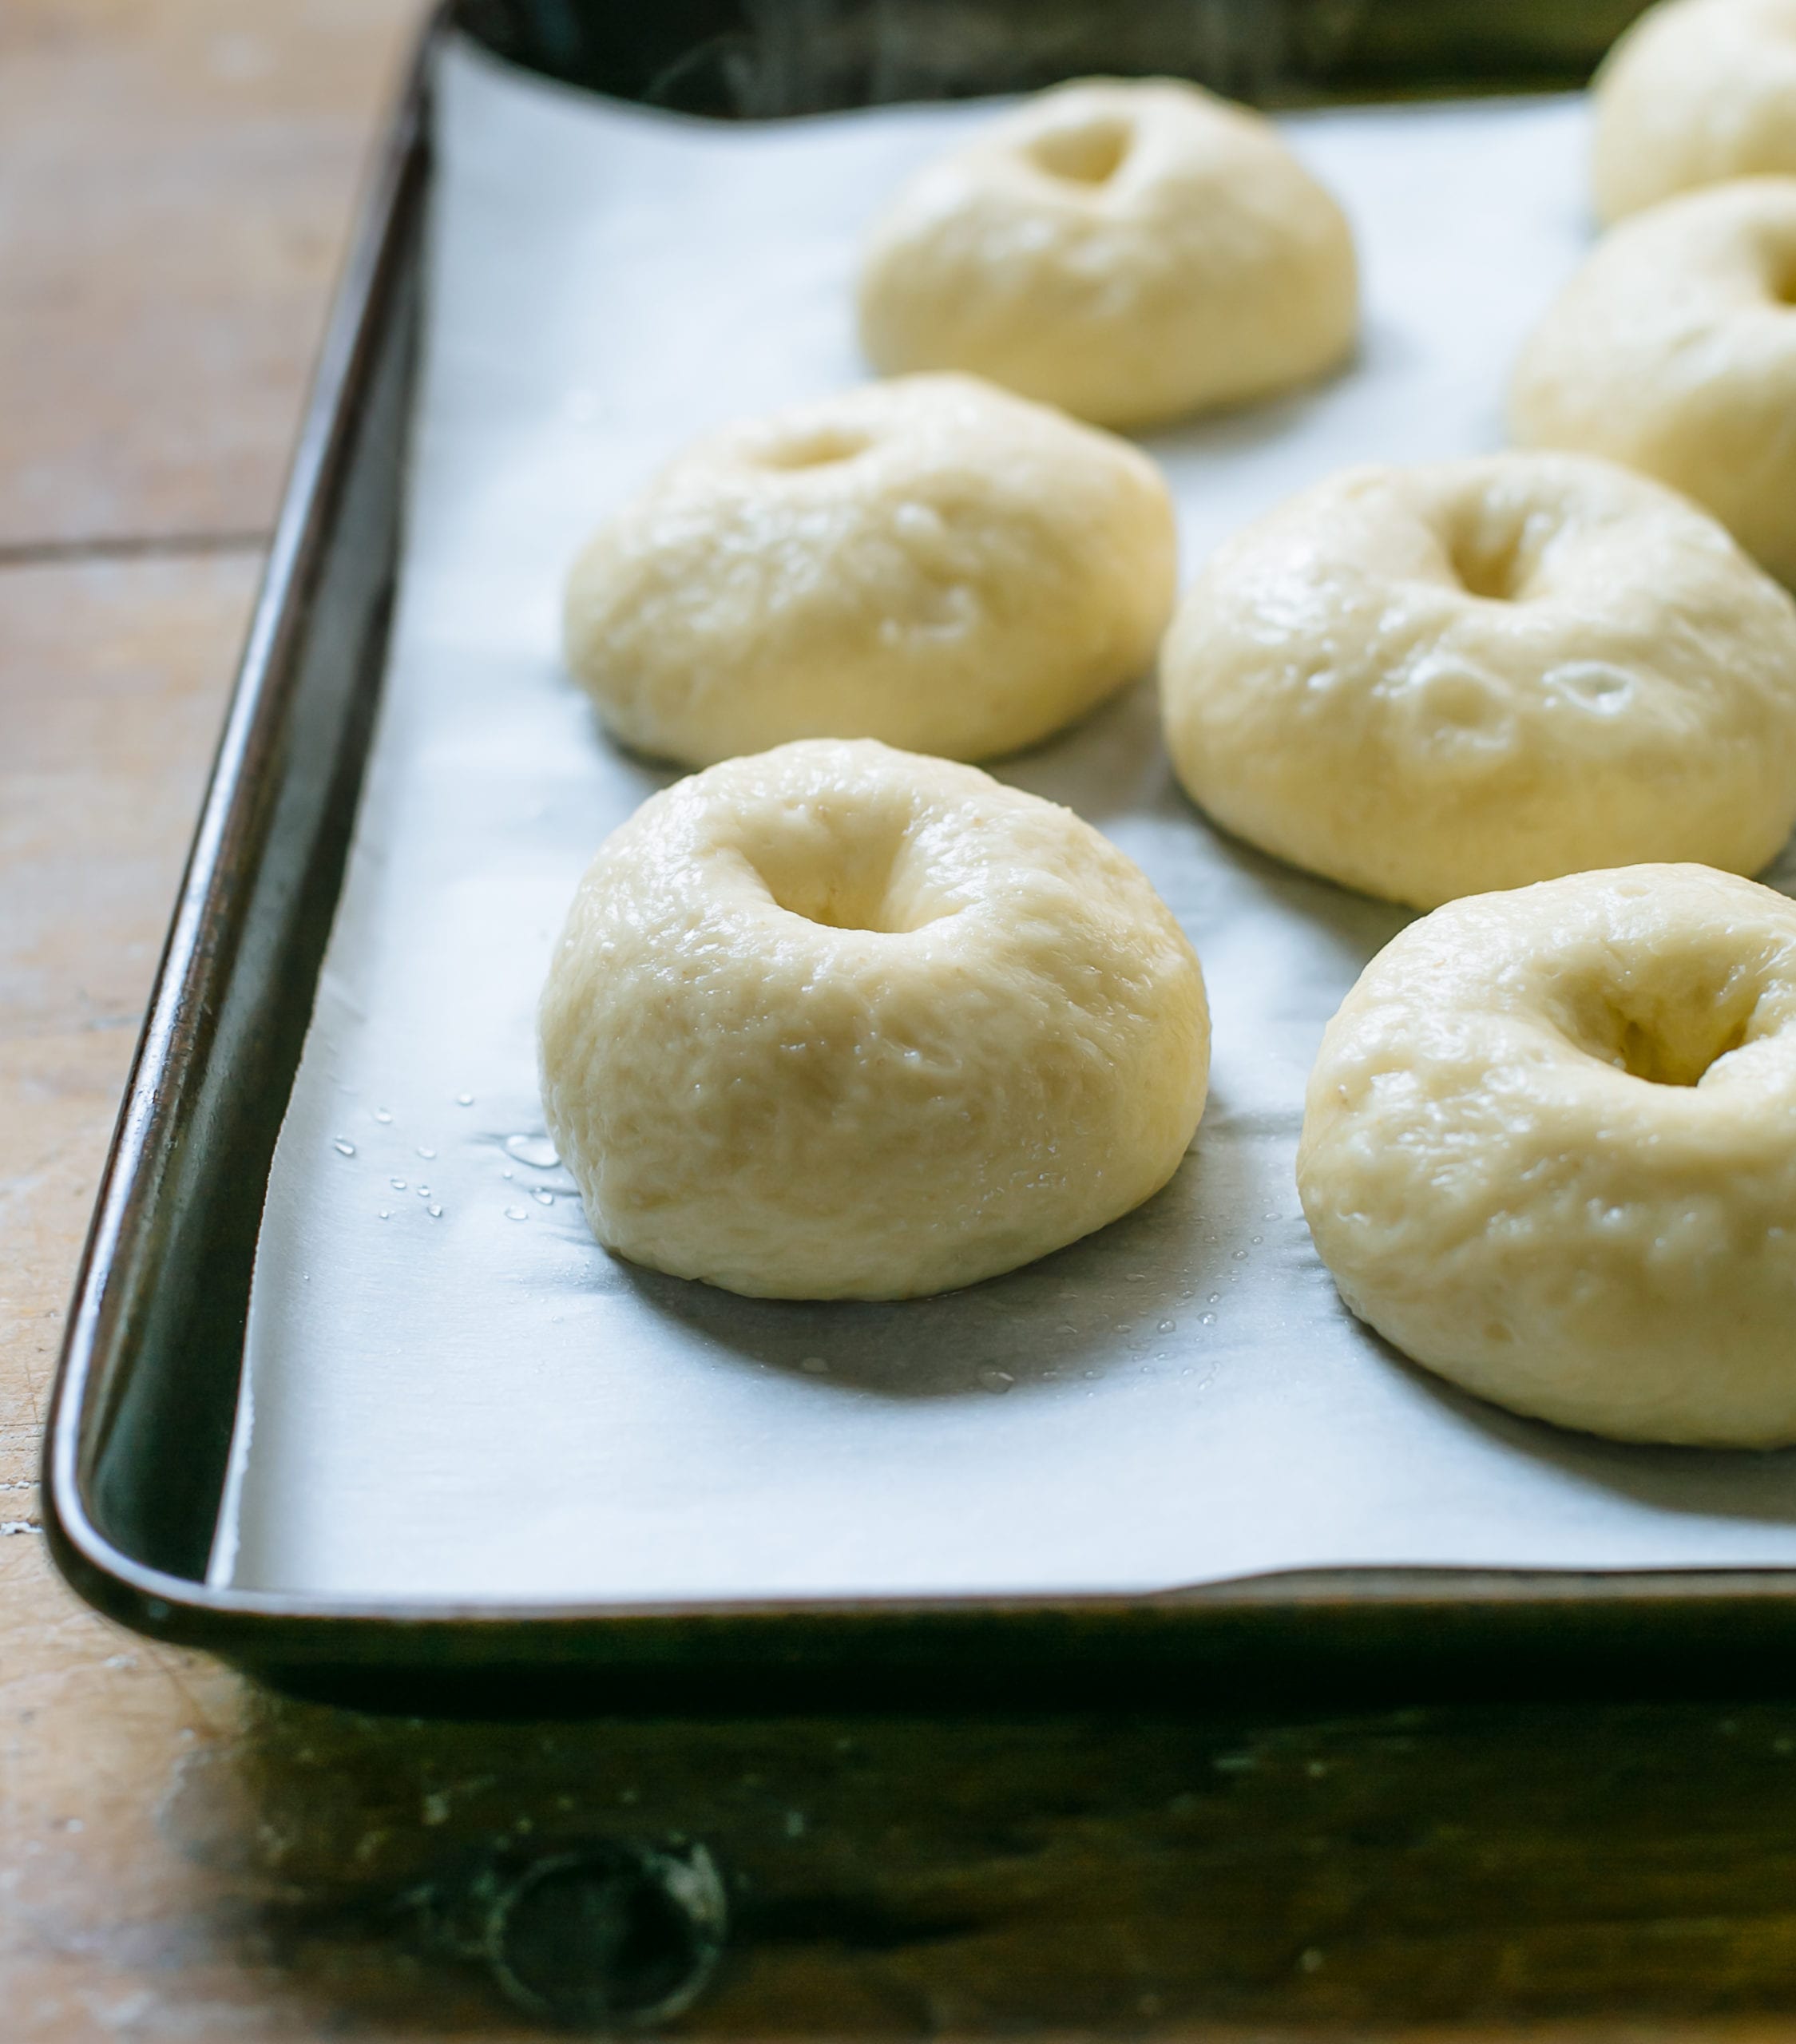
Step 4: Second Rise
The bagel dough needs to rise again, but only briefly. So you’ll cover and rest until puffy, about 20-30+ minutes (I use this sheet pan set w/lid. No more fussing with plastic wrap and kitchen towels!).
Meanwhile, bring a large pot of water to a boil. Add a spoonful of honey or barley malt syrup, which adds golden color and flavor to the crust. Preheat your oven. Prep your topping station with all of your favorites: sesame seeds, Everything bagel spice, poppy seeds, sharp cheddar cheese. Get creative!
Step 5: Boil The Bagels
Gently lower 2-3 bagels into the pot of boiling water. The idea of boiling dough used to make me so nervous, but it’s not that bad. If you can boil pasta or ravioli, you can boil bagels. Once they float, simmer for 30 seconds on each side for a thin crust (my preference), or up to 1 minute per side for a thicker, chewier crust.
Remove and place onto the sheet pan. They will look lumpy and slightly wet. All normal.
Why boil bagels before baking? It sets the crust early, so the dough doesn’t rise too high like bread. You can’t skip this step. It gives the crust its glossy sheen, chewy texture, and helps the toppings stick too.
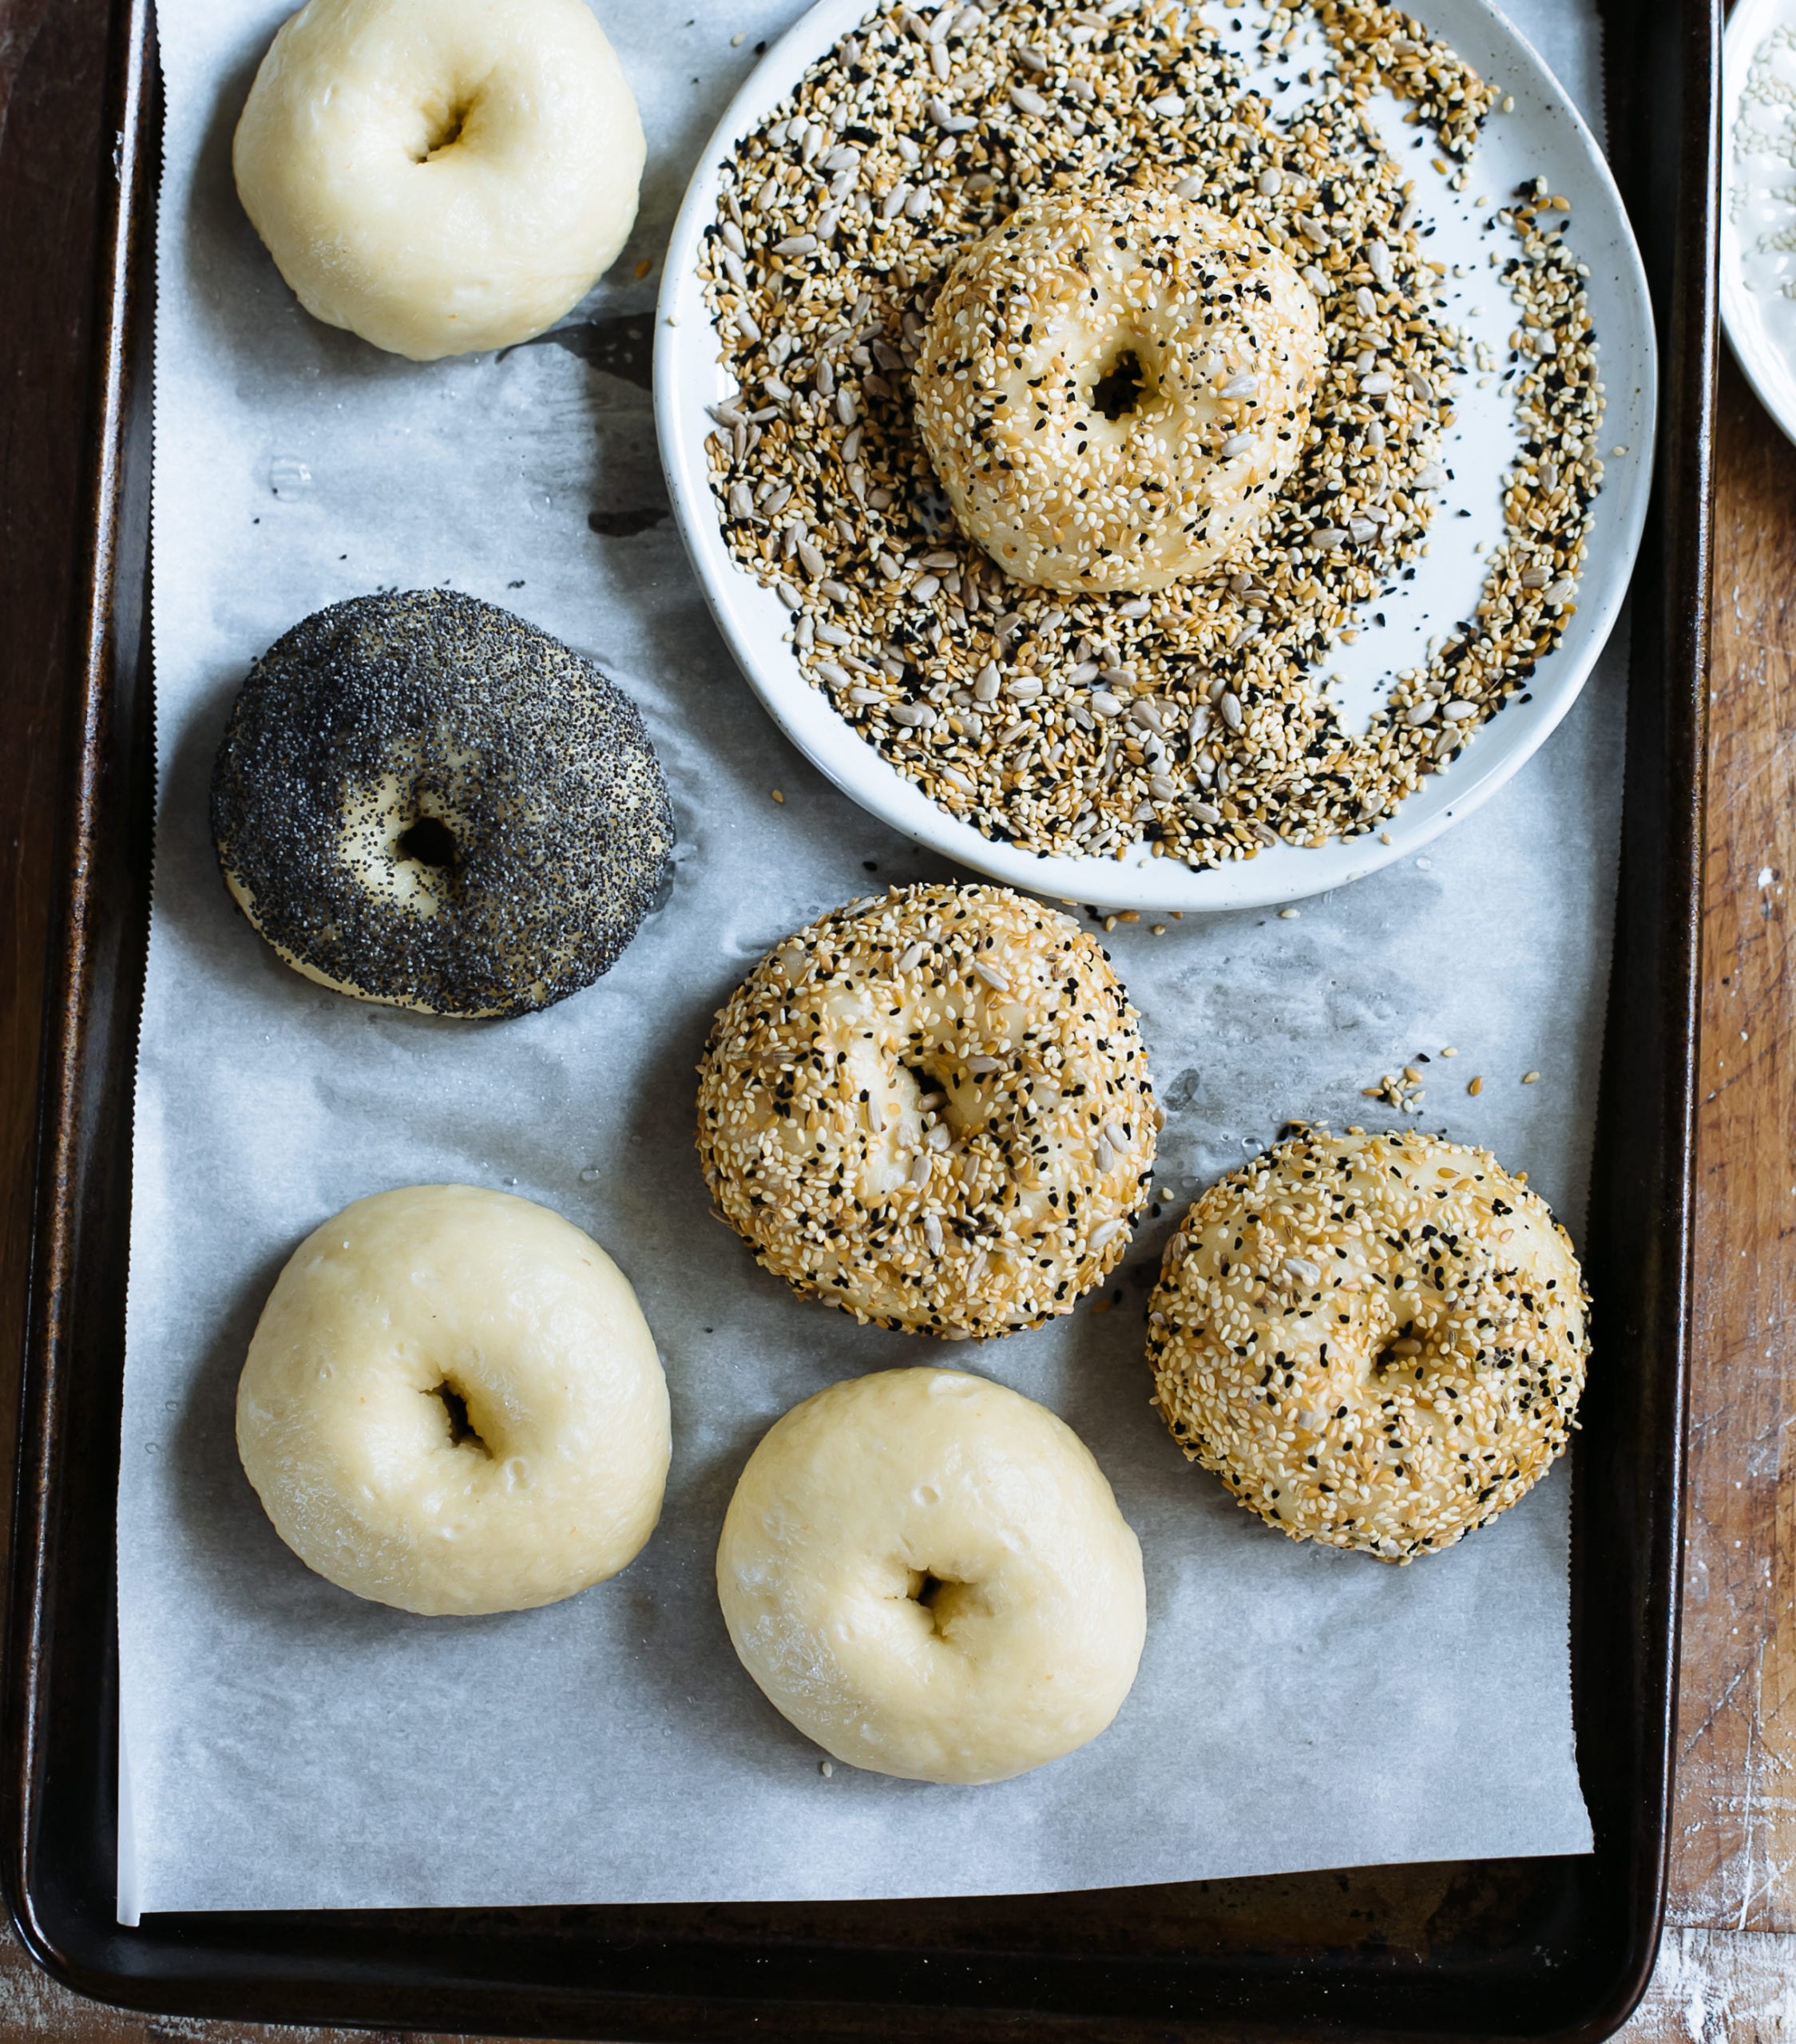
Step 6: Add Toppings
While the bagels are still warm from boiling and slightly wet, dip the rounded side into your toppings. Leave a few plain (the crust is amazing). If you wait too long and your bagels dry out, the toppings won’t stick.

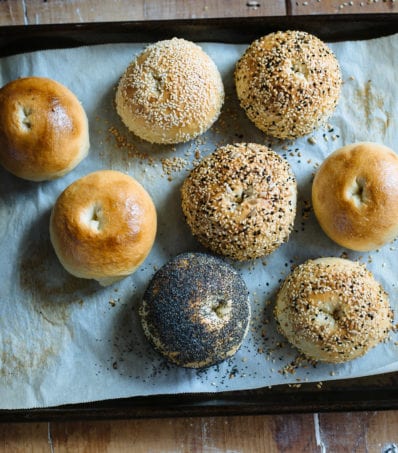
Step 7: Bake The Bagels
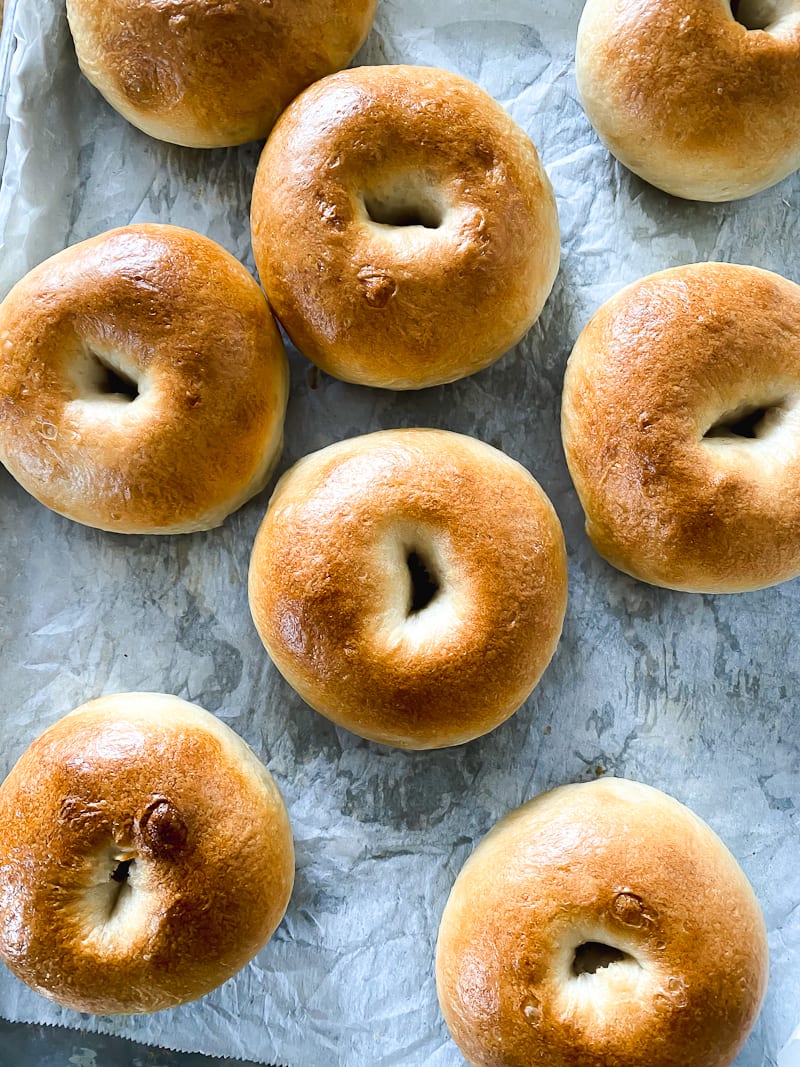
Bake your sourdough bagels for 20-25 minutes at 425 F. They should be light, slightly firm to the touch, and deep golden brown when ready. Do yourself a favor and enjoy one straight from the oven!
To serve, top with salted butter, veggie cream cheese, smoked salmon etc. Or just eat plain.
Sourdough Bagle Recipe: Sample Baking Schedule
First: You need a game plan. Sourdough bagels follow several steps, which can be broken down into manageable chunks. I recommend splitting the process over 2 days to utilize the overnight option.
Second: Feed (and activate) your sourdough starter prior to making the bagel dough. This can take anywhere from 2-12 hrs. Plan ahead! If you need assistance, read my companion articles, Feeding Sourdough Starer: My Best Tips & Tricks and Troubleshooting Sourdough Starter.
- Saturday night (8:00 PM)
- Mix the dough
- Let rise overnight at 68F
- Note: Hot weather? The dough will rise faster. Skip the overnight rise: do it during the day instead, then chill the bowl overnight once almost doubled. Cold dough is easier to shape.
- Sunday Morning (8:00 AM)
- Shape
- Boil bagels
- Add toppings
- Bake & enjoy warm
What To Make Next:
Once you’ve mastered my sourdough bagel recipe, try my no-knead pumpkin spice sourdough bagels for a seasonal twist, or these super soft sourdough english muffins for breakfast. My easy to slice sourdough sandwich bread is very popular too.
By signing up, you agree to receive emails from The Clever Carrot. Unsubscribe at any time.
Best Sourdough Bagels (Soft, Chewy, Easy!)
- Prep Time: 15 hours
- Cook Time: 20-25 minutes
- Total Time: 0 hours
- Yield: 8 bagels 1x
- Category: Sourdough Bread
- Method: Oven-Baked
- Cuisine: American
- Diet: Vegetarian
Description
My easy sourdough bagel recipe uses active sourdough starter (no yeast) to make soft, chewy, NY-style bagels at home with just 10 minutes of prep and an overnight option to fit your schedule. Customize with everything bagel spice, cinnamon raisin and more. Adapted from my bestselling book: Artisan Sourdough Made Simple.
Ingredients
For the Dough
- 150 g (3⁄4 cup) bubbly, active sourdough starter
- 250 g (1 cup plus 2 tsp) warm water (See Notes below for temperature range)
- 24 g (2 tbsp) granulated sugar
- 500 g (4 cups plus 2 tbsp) King Arthur bread flour
- 9 g (1 1⁄2 tsp) fine sea salt
- Cooking spray or oil, (for coating the plastic wrap)
For the water bath
- 20 g (1 tbsp) honey
Toppings
- Mixed seeds, such as poppy, sesame, fennel, flax and sun flower seeds or Everything Bagel Spice.
Notes, Tips & Variations
- Bread flour is best. It’s high protein content creates that classic chewy bite. In a pinch, I’ve had success with King Arthur all purpose flour instead (11.7%).
- Use a kitchen scale to weigh your bagels. They’ll be uniform in size.
- Toppings won’t stick? Try an egg wash for super sticking power.
- Water temperature: In winter, I use 85-95 F water (29-35 C) to give the rise a boost. In summer, I use cooler water, about 55- 60 F (13-16 C) to slow down and control the rise.
- Cinnamon raisin variation: add 6 g (2 tsp) of ground cinnamon to the dry ingredients (or try 50/50 ground cinnamon and pumpkin spice). Then make the dough. While the dough is resting in Step #2, soak 80 g (1/2 cup) raisins in warm water to soften. Drain in a fine mesh strainer and pat dry using a paper towel before adding them to the dough.
Instructions
- Make the Dough: In a large bowl, whisk the starter, water, and sugar together with a fork. Add the flour and salt. Combine to form a rough dough, then finish mixing by hand until no lumps of our remain. The dough will be very stiff and dry. Note: it’s important to use a large mixing bowl- this dough is strong and rises quite high. As a mixing alternative, use a stand mixer fitted with the dough hook; run on low speed for 5 to 6 minutes to combine and knead.
- Cover the dough with a very damp towel and let rest for 45 minutes to 1 hour. After the dough has rested, work the mass into a semi-smooth ball, about 15 to 20 seconds.
- Bulk Rise: Cover the bowl with plastic wrap that has been lightly coated in oil to prevent sticking. Let rise until double in size, about 10-12 hrs when the temperature is 68 F (20 C); 8 to 10 hours @ 70°F (21°C). Note: in the summer, rise the dough during the day. Once the dough is almost double in size, cover and chill the whole bowl overnight (it will continue to rise slightly in the fridge). Proceed using the cold dough the following day.
- Shape: Line a sheet pan with a nonstick silicone mat or parchment paper. If using parchment, lightly coat with cooking spray or oil to prevent sticking.
- Remove the dough onto a non- floured work surface. Flatten the dough into a rectangle and divide into 8 equal pieces, about 115 g (4 oz) each. Gather the ends, flip the dough over, and roll each piece into a ball. Let the dough rest on your lined sheet pan for 10 to 15 minutes to relax the gluten.
- Working with one ball of dough at a time, poke a hole straight through the center. Move your finger around in a circular motion to gently stretch the dough until the hole is about the size of a walnut. You can also lift up the dough, insert both index fingers through the center hole, and barrel roll to gently stretch the opening. When finished, place the dough back onto the sheet pan. It’s okay if the hole shrinks slightly. Repeat shaping the remaining dough.
- Second Rise: Cover the dough with a damp towel and let rest at room temperature for 15 to 20 minutes. The dough will puff up only slightly at this stage.
- Meanwhile, bring a medium pot of water to a boil. Add the honey and whisk well to dissolve. Preheat your oven to 425°F (220°C). Add the seeds to a rimmed tray or shallow bowl.
- Boil the bagels: Add 2 to 3 bagels into the pot and simmer for 30 seconds on each side for a thin crust. Note: if using cold dough from the fridge, the bagels might not float to the surface right away. Give them a nudge after 30 seconds or so and be patient. Using a slotted spoon, transfer the bagels back to the sheet pan you used earlier, placing them rounded side up.
- Once slightly cool but still wet, dip the rounded side of the bagels into the seeds to coat. Place back onto the sheet pan and finish boiling the rest of the bagels.
- Bake: Place your sheet pan on the center rack. Bake the bagels for about 20 to 25 minutes. Flip them over to briefly cook the bottom side, about 1 to 2 minutes or less. When ready, your bagels will be puffed up, light golden brown, and feel light to the touch. Transfer to a wire rack to cool, but indulge yourself and eat one (or two) warm.
The chewy texture of bagels is best enjoyed when made fresh. Store in a plastic bag at room temperature for up to 2 days. Bagels also freeze well; freeze them whole or sliced, covered in plastic wrap and a layer of foil, for up to 3 months.


Comments
Nicole says
Made several times and they turned out great. This time I tried adding Everything But the Bagel seasoning on top and it totally burnt. I added just as the recipe said. Is there a trick to baking with toppings so they don’t burn?
Andrea DeFelice says
I’m confused. During the bulk rise instructions, you say to let it rise until it is double in size, which can take about 10-12 hours and THEN put in the fridge but then you say to put in the fridge to chill overnight and rise, so you need 20 hours or rise time?
Jenna says
I tried a few other bagel recipes and when I tired this one, I stopped searching! I’ve made a few tweaks along the way. I like to boil mine longer, I’ve done two minutes per side but I think I like one minute per side better. One thing I did pick up up from another recipe is to use an egg wash before baking. I have found the bagels have a better color and using an egg wash, there isn’t a rush to stick the toppings on. I can boil all of them, egg wash and then the toppings. Doing it this way I heavily sprinkle the toppings on. I’ve also taken to tossing some semolina flour on the tray for an extra texture. I make everything bagels but my favorite by far is za’atar seasoning. Regardless of what you use for a topping, these bagels are amazing!
Kris says
Fantastic recipe! These are so soft, perfectly chewy with a thin crisp outer crust. Thank you!
Shelley says
Is there a place where one can “pause” the process? Example, after the overnight proof and shaping, can I put the shaped bagels in the fridge for a few hours or overnight before boiling and baking?
Betty says
You can put the whole bowl in the fridge to pause after the bulk fermentation, that’s what I just did. I put in there for about 5-6 hours until I was ready to shape them. I also read in the notes that you can shape them and put them in the fridge at that point and then Leo the second rise when you take them out and continue with the boiling and baking
Lynn says
Can this bagel recipe be completed the same day? It is 11:30, am , so if I mix it now, can I make them same day, or is refrigeration necessary ?
Thanks
Emilie Raffa says
Hi Lynn! You can absolutely make them on the same day, assuming the temperature is warm enough for the bulk rise to complete. In this case, you can skip the refrigeration step.
Lynn says
Thank-you,
Can I put the dough in the oven on proof, to speed up the rise, or will this alter the taste, and dough quality?
Thank-you very much.
Emilie Raffa says
You can do that. Two things come to mind: what is the temperature of your oven’s proof setting? My old oven was auto-fixed to 80F. This is warm. And because of that, my dough rose fast and it was on the sticky side. This is 100% fine, and to be expected of a warm bulk rise, just a heads up for you! Temperature will always effect the taste. I can’t say for sure how it will come into play here, because you need to take into account the quality of your starter and additional steps. I would say just go for it!
Lynn says
Thank-you.
I will try it for sure.
I love every one of your recipes, I’ve tried so far.
Sharon says
I made cinnamon raisin bagels and was pleased with how easy the recipe was. Delicious too! I trued making bagels once before with a different recipe and wasnt pleased with the result so I was anxious about trying again but I am glad I did! Thanks for the recipe!
Nicole says
This is my favorite bagel recipe by far! I automatically make a double batch because I love gifting a few to friends. It does take planning, but it’s worth being patient. I’ve got a schedule figured out that works for me. I mix the batch during my lunch hour, bulk ferment while I finish my work day, place in my car to continue BF while driving up to our cabin, cold proof overnight in the refrigerator and then bagel making Saturday morning. This recipe has never failed me. Plus, I love enjoying a normal-sized bagel without the guilt of a jumbo one. I’ve shared this recipe with all of my sourdough friends. Thank you for a consistent and delicious recipe!
Leslie says
I just made these yesterday and they are AMAZING! Your instructions are thorough and easy to understand. Obviously I’m making more since the 8 are almost gone. Can’t wait to try adding some different flavours.
Thank you!
Jalena says
Easy and delicious recipe!!!
Annie Cronin says
I have been on a gluten free diet for so many years I couldn’t really recall what a bagel tastes like. My daughter challenged me to try the bagels she made with this recipe and oh my goodness!!! They are delicious and as I remember.. and… my stomach loves them. The sour dough factor is a real thing! I have successfully tried the recipe once and have starter bubbling for bagels in the morning! Thank you!
Katie says
If I want to make a few chocolate chip bagels, would it work to mix the chocolate chips into the dough as I’m shaping into a ball? Or is there a better way?
Andrea Russell says
Can you make cinnamon bagels without raisins???
Iliana Farinha says
I enjoyed the experience of making this bagel recipe, especially because I had never made a sourdough recipe with such low hydration that doubled in volume so quickly and noticeably at 22 degrees. It was definitely an experience in itself to work with such a dry mixture. The result was not entirely to my liking; I found them too dry and hard. Although bagels have a dense consistency, I think this recipe, at least with my flour with 13% protein, needed a bit more hydration, which I suspected from the beginning but wanted to trust the process. Additionally, when taking the dough out of the fridge, flattening it, and trying to make the dough spheres, it was almost impossible to shape them nicely on the bottom because the dough was too hard.
Andrea says
The most amazing bagels I’ve ever tasted. I need to take up running for the amount of bagels I will be eating!!
Michaela Frie says
I love making bagels from this recipie. Do you have the nutrition information? Also I sub honey for the sugar. And I add honey to my boiling water. Do you have an estimate the exact volume of what is in a bagel?
Laura Underkofler says
I am new to sourdough bread baking. I made this bagel recipe this weekend and it was pretty easy and straight forward. They were really good…nice and crispy on the outside, and soft and chewy (not doughy) on the inside. My family loved them and I cannot wait to make them again. I made sesame and everything…next I will try the cinnamon raisin. I ordered your cookbook too and can’t wait for it to show up on Tuesday.
Amanda Teevan says
This really is the best bagel recipe! They are even better than the ones from the local bagel shops, which is saying a lot since we are in the NY area. And they’re sourdough! I’ve made this recipe many times, and even when I’ve gotten careless and made a couple mistakes the bagels still come out great. Thank you!
Lacey says
Perfection on my first try! Thank you so much!
M.H. says
Can’t wait to try! New to sourdough bagels, and was just curious when you would add inclusions, like if doing a cheddar jalepeno bagel for instance? Or blueberry? Thanks!
Lauren Lundy says
Yes I would like to know this too. Wanted to make both cheddar jalapeño and blueberry.
Tamara says
Just made this recipe and it turns out absolutely delicious! My family loved it… it’s a keeper, thanks Emilie for sharing your recipe !
Clara says
Like many commenting here, I was quite nervous trying these for the first time. I’m glad I did though! Although they didn’t come out quite good looking, I will definitely try them again. For starters, I forgot to add the salt (duh!), so I could definitely taste the lack of it at the end. So that’s an easy fix (just don’t forget it next time :D). But what do I do about the stickiness (they were sticky after the bulk rising and all the way through boiling. I cheated and used a bit of flour to get them off my hands. The appearance of the dough is also not smooth. They are wrinkled like an old man’s face :D. I followed the steps closely (obviously without the salt – could that be the culprit for the wrinkly appearance?). They were delicious though and next time I will use an egg wash to give them a glow and stick some more sesame seeds on top.
Sonya says
Hm, sounds like a hydration issue. Did you weigh out ingredients exactly. A kitchen scale is essential! Also, make sure you are using Bread Flour not AP.
Oobi Childs says
Love this recipe! Simple and prefect every time. Reminds me of a classic, chewy, NY style bagel.
I just made some (by request) for my daughter to take back to college and pop in the freezer.
Jerry says
I have made these multiple times and today I made the cinnamon raisin.
They didn’t rise as much as the original ones, is there a reason?
Lauran says
From what I’ve read, cinnamon and other spices can slow down the fermentation process.
Ben says
These by far are THE best bagels I have ever made and eaten. I have had bagels from NYC and think about them all the time, now I can make them in my own home 😍
Thank you for such an amazing recipe Emilie 🤍
Lizzy says
Making these again at my family’s request.
Janet Gordon says
These bagels came out absolutely perfect! I will never use another recipe again – this recipe is amazingly easy, and the results are bakery quality.
Carly says
Best bagels ever and so easy!!
Michele says
Hello,
I have made this bagel recipe several times and would like to try the cinnamon raisin version…I am a little confused on when to add the raisins. It appears that they are soaking after the dough has been mixed and is resting. How do I then incorporate the raisins if not in the mixer? Do I knead them in when I am making it into a smooth ball?
Pretty new at all of this.
Thanks for your patience,
Michele
Ashlyn says
Hi! Can you explain a bit more what you mean during the booking process? Do you keep the water at a boil the whole time? What do you mean by simmer each side?
Ashlyn says
Hi! Why sugar? Could I make these without the sugar? Thanks!
Emilie Raffa says
Hi there! The bagels are not sweet; the sugar adds subtle depth of flavor. Omit if you’d like!
Chrissy says
these honestly turned out fantastic. Super easy. I will be making this on repeat.
Karina says
Can the honey water be saved to be used at a later time? It was my first time ever making bagels and the turned out great. Delicious
KR says
This recipe comes out perfect every single time! Thank you, my kids love these so much.
D says
Couple of questions: Can you do the bulk (cold) overnight ferment in a cambro? Also, you say to bring the water to a boil and then simmer the bagels. Do you leave it at a boil or reduce the heat?
Laura says
Can I use maple syrup in place of sugar?
Emily says
Everyone says bagels are hard to make, but this was easy and delicious!
Nicole says
Made these bagels for the first time today and not only were they easy to make but they were absolutely delicious!! Instructions were detailed and easy to follow. Will be making more for family to try!!
Lucy says
As a teen baker who’s just starting out sourdough, these were so easy and so delicious!!! I added chocolate chips and put honey cinnamon butter on top 😍
Josie Scruggs says
Emilie!!! Your recipes and guidance have officially turned me into a full-on sourdough-baking fool — in the best way! 😂 Thank you for making it all feel so doable and fun. My family thanks you too! Can’t wait to dive into more of your recipes.
George Wright says
The bagel recipe is awesome! They look like I bought them from a shoppe. The recipe is easy to follow. I will definitely be saving this recipe!
Tom DeSantis says
Thank you so much for sharing your well written, easy recipe for making bagels! Our kids gave us a recipe to follow but we had questions and couldn’t get a hold of them. I googled easy sourdough bagels and your recipe popped up. Both recipes starter was 150grams so we knew yours would work. Your very thorough details were perfect for us(we are not bakers). Although we need practice at cutting and forming the bagels, they came out fantastic!! We will be following you for other wonderful recipes.
Weronika Jama says
Oh my goodness, I have just baked my bagels this morning. All I can say is WOW! I will not be able to go back to store bought bagels… let alone yeast dough bagels. This is the most incredible bake that I have ever done. I used a 1:1:1 ratio for my starter, it worked perfectly. I highly recommend this recipe! I wish I could attach a photo of these on here.
Tanya says
I just tried these and they were delicious but the dough was too wet and sticky so they were kind of flat. I added the correct amount of water, does the starter need to be a certain hydration level for desired puffiness? Thank you!!
Emilie Raffa says
Hi Tanya! I use a 100% hydration starter for my sourdough bread recipes. It’s fed with bread flour, so the texture is slightly thicker compared to one made with all purpose flour. This is a low hydration dough. It shouldn’t be sticky. However, when a low hydration dough becomes sticky (and the flour to water ratio is correct), it’s usually over proofed (rose for too long). So double check your starter first, and then shorten the rise time too, if this resonates.
Karen Wirner says
Hi Emilie,
I have your book and have been feeding my starter with AP flour as suggested. Do I feed my starter with bread flour prior to making the bagels? Also, can fresh blueberries be added? If so, when would I do that? Thank you so much!
Karen
Emilie Raffa says
Hi Karen! No, you don’t need to feed your starter with bread flour to make bagels. AP flour is fine, especially if your starter is happy with it. I typically add dried blueberries. But many bakers here have used fresh blueberries with great results. You would add them after the dough has rested for 45 minutes to 1 hour rest (step 2). The dough will be much softer and easier to work with.
KAREN WIRNER says
Thank you for such a quick reply and all your great recipes!!
christine jimenez says
Fantastic! You’ll look no further.
V. Seabury says
This is really the best bagel recipe. Everything a bagel should be. Ease, Taste, Chew. It’s all there! Thank You!
Alicia says
This recipe is delicious! I do have a question though. After they have bulk fermented for the 10-12 hours on the counter, do I then place the dough in the fridge until the next day?
Summer says
I’ve been using this recipe since the first time I tried to make sourdough bagels and it’s been foolproof the whole time! Super yummy and perfectly chewy every bake.
I want to try making blueberry bagels by adding masked blueberries to the dough, wondering if I should cut back on the amount of water added?
Rhea says
I made blueberry bagels once with this recipe and learned if you roast the blueberries a bit before, it pulls out a lot of the moisture and concentrates the flavor. Next time I’ll integrate them into the dough differently, so they distribute more evenly, but the flavor was yummy. I did have the feedback of adding slightly more sugar to the dough to make it overall a bit of a sweeter bagel, but that’s preference.
Joann says
Try dried blueberries. I have used them in sourdough scones, and they work beautifully.
Danielle says
Absolutely love this easy recipe! We have fresh bagels pretty much daily now. Thank you!!!
Chris says
Great bagels!
Iris says
I’ve never made bagels before but somehow my first try with this recipe I made the best bagels I’ve EVER had?? Granted I live on the west coast and have never had NY bagels but these by far beat any bagel I’ve had in my life by a wide mile. The entire process was easier than I thought. I can see myself making these weekly. On some bagels I did everything seasoning, and on the rest I did a sesame/zaatar seasoning and they were SO good. I can’t wait to eat another one.
Ashley says
Love this recipe! I made them plain the first time, really wanting to make it with blueberries and sweeten it up for that a little. Any suggestions?