This easy sourdough bagel recipe uses active sourdough starter (no yeast) to make soft, chewy, NY-style bagels at home with just 10 minutes of prep and an overnight option to fit your schedule. Customize with everything bagel spice, cinnamon raisin and more. Adapted from my bestselling book: Artisan Sourdough Made Simple.
Reader review
“I have made these twice this week. OH MY GOODNESS… they are perfect! They are literally so close to Brueggers!!! I’ve played with plain, sesame, Everything and cinnamon raisin. ALL were amazing! I want to make them into rolls or bialys as well. Thank you for your work on this. Just wonderful!”
—Rosemarie
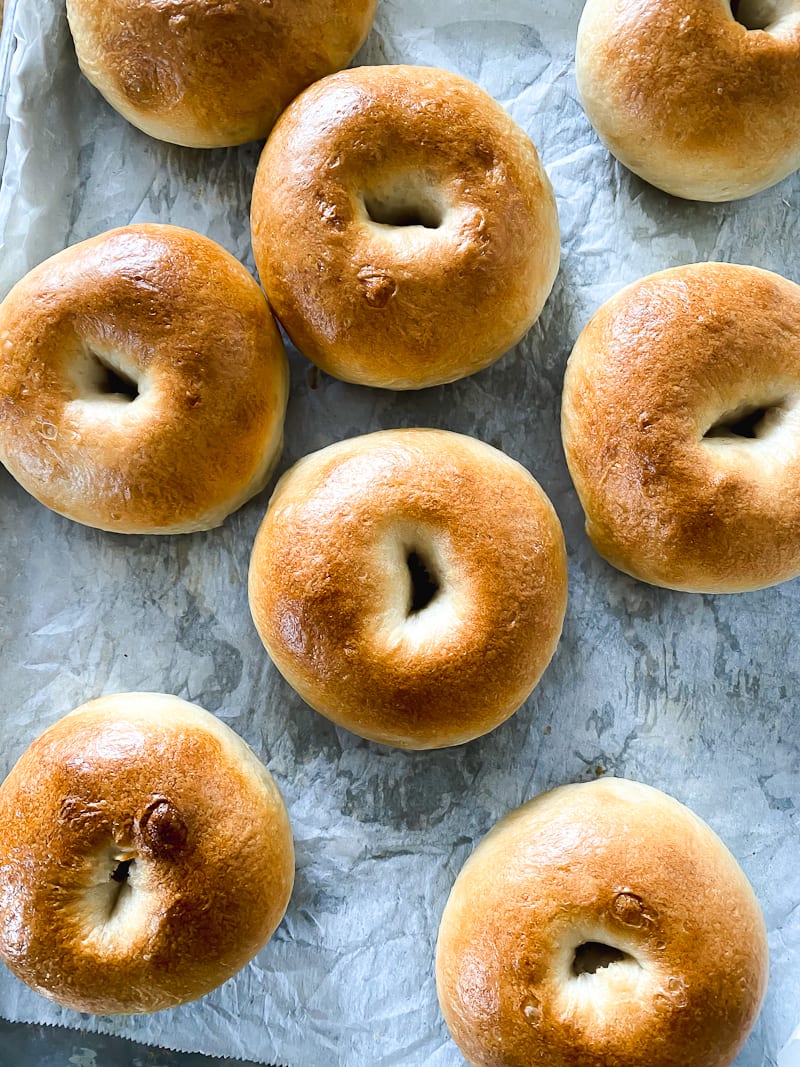
Sourdough bagels are nothing like yeasted bagels. They’re more flavorful. Less dense. Intensely chewy. You can eat two without time taking nap! The crust is thin and crisp, and the inside is soft (not doughy). I like mine straight from the oven, slathered in salted butter.
This recipe is from my bestselling book Artisan Sourdough Made Simple and like all of my sourdough bread recipes: it’s practical and straightforward. You’ll find clear step-by-step instructions for mixing, shaping, boiling and baking, plus a flexible timeline to make it work for your schedule.
Homemade sourdough bagels sound hard, but they’re doable with intention and a fun next step after baking sourdough bread. Just read the comment section! You’ll get the best tips from real life bakers who’ve made this recipe hundreds of times.
How To Make Homemade Sourdough Bagels {Step-By-Step Recipe}
Sample Baking Schedule
First: You need a game plan. Sourdough bagels follow several steps, which can be broken down into manageable chunks. I recommend splitting the process over 2 days to utilize the overnight option.
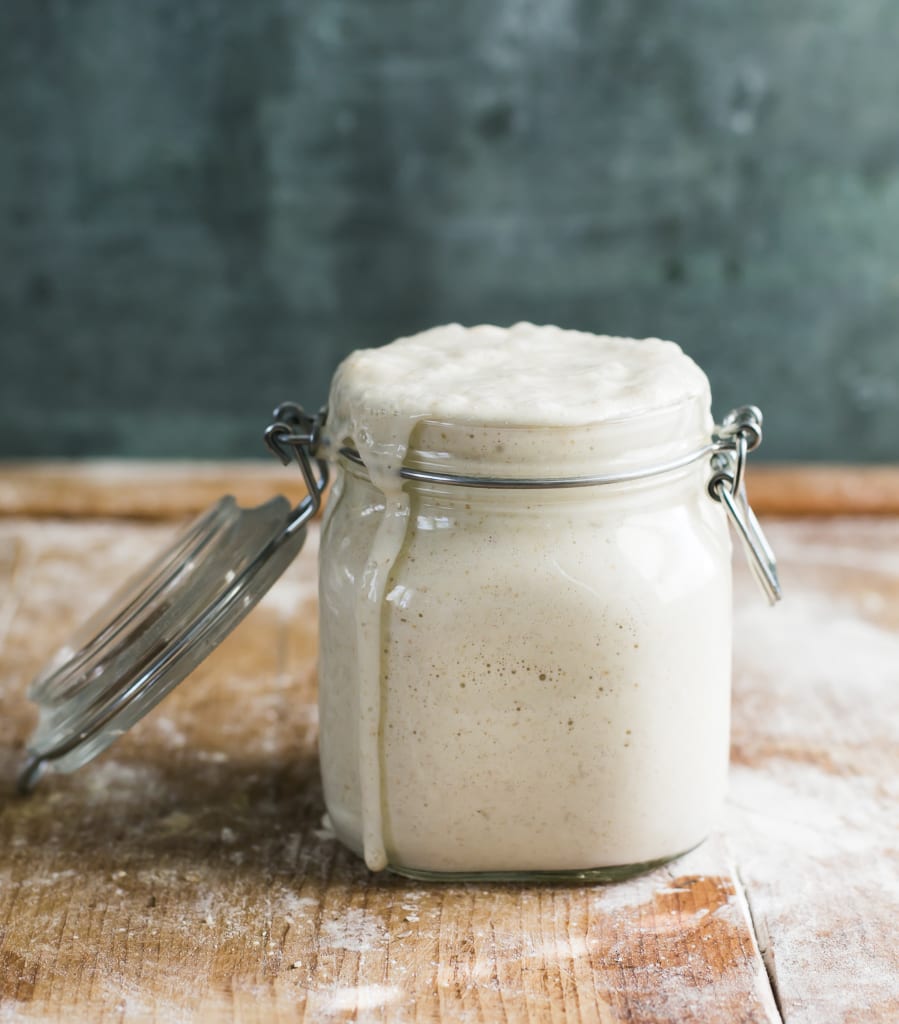
Second: Feed (and activate) your sourdough starter prior to making the bagel dough. This can take anywhere from 2-12 hrs. Plan ahead! If you need assistance, read my companion articles, Feeding Sourdough Starer: My Best Tips & Tricks and Troubleshooting Sourdough Starter.
- Saturday night (8:00 PM)
- Mix the dough
- Let rise overnight at 68F
- Note: Hot weather? The dough will rise faster. Skip the overnight rise: do it during the day instead, then chill the bowl overnight once almost doubled. Cold dough is easier to shape.
- Sunday Morning (8:00 AM)
- Shape
- Boil bagels
- Add toppings
- Bake & enjoy warm
Quick Tips
- Bread flour is best. It’s high protein content creates that classic chewy bite. In a pinch, I’ve had success with King Arthur all purpose flour instead (11.7%).
- Use a kitchen scale to weigh your bagels. They’ll be uniform in size.
- Toppings won’t stick? Try an egg wash for super sticking power.
- Use honey instead of malt syrup. It’s easier to find and not a single use item.
Step 1: Mix The Dough
To start: Whisk the water, sourdough starter and sugar together in a large bowl (the sugar is for balanced flavor- the bagels are not sweet). Then add the flour and salt, and mix to form a rough dough. It will be very stiff. Cover and rest to relax the gluten for 1 hour.
Why is the dough so stiff? Sourdough bagel dough is meant to be stiff (this is intentional). The lower hydration makes them chewier and easier to shape. If you find the dough too dry with floury bits, add a touch more water until it comes together.
Step 2: Bulk Rise
Cover the dough, or transfer to a high sided dough tub. Let rise overnight at room temperature until airy, puffy, and double in size.
How long should bagel dough rise? At 68 F, plan on 10-12 hrs; at 70 F, about 8-10 hrs. The dough will look lighter, domed, and spring back slowly when pressed lightly with your fingertip. Pay close attention to your specific room temperature. Treat it like an ingredient, and you’ll nail the rise time every time.
Step 3: How To Shape Sourdough Bagels
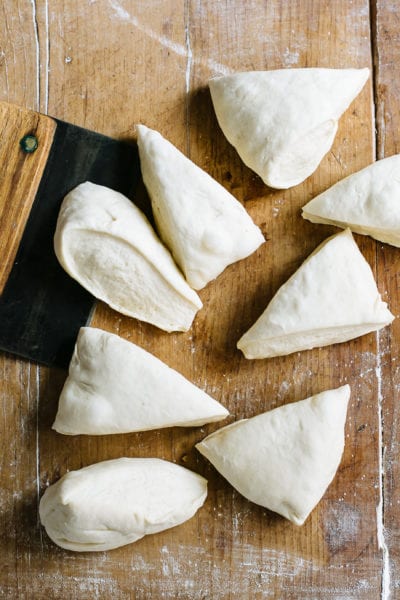
First, divide the dough into 8 equal pieces, about 115 g each.
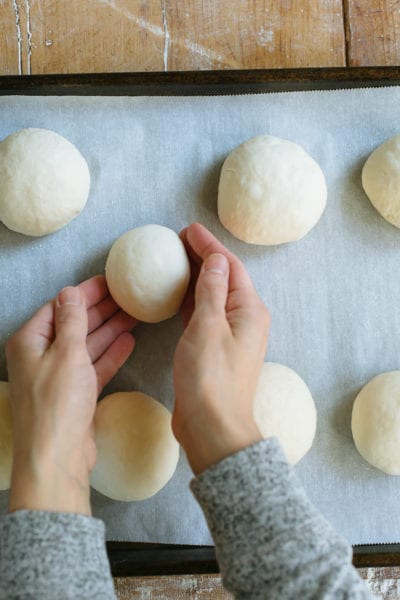
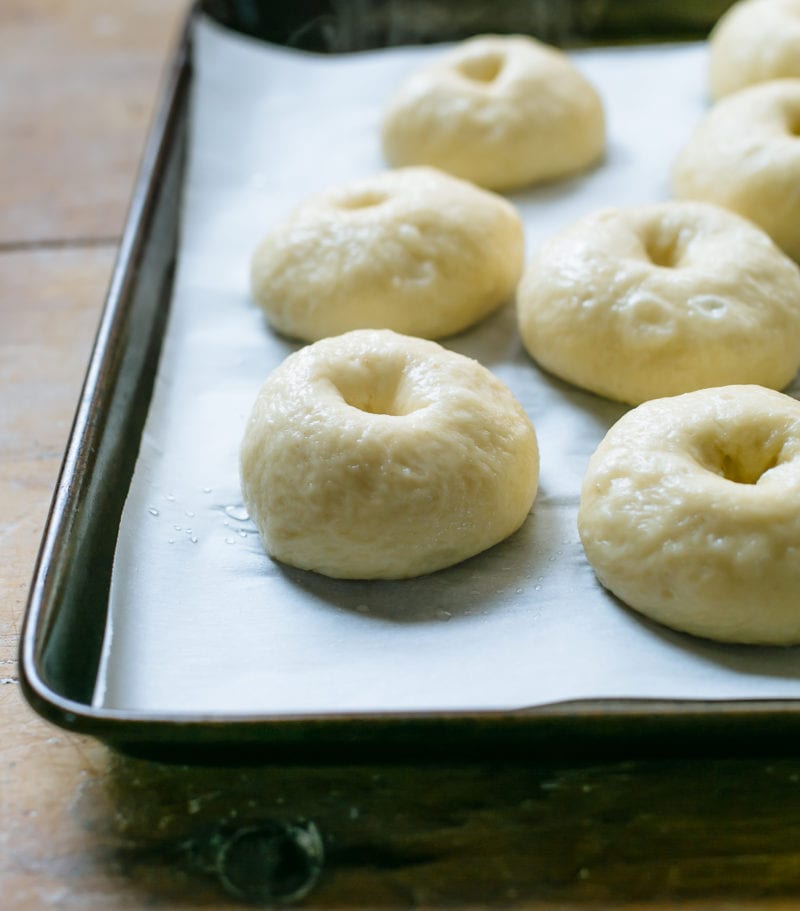
Then roll into balls, and rest for 10-15 minutes on a parchment-lined sheet pan coated with cooking spray. If you forget to spray your pan, your bagels will stick.
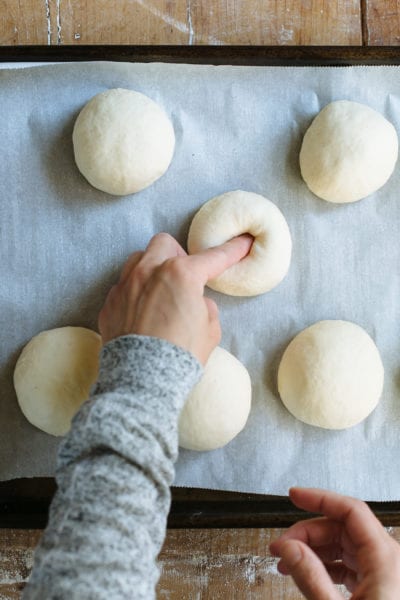
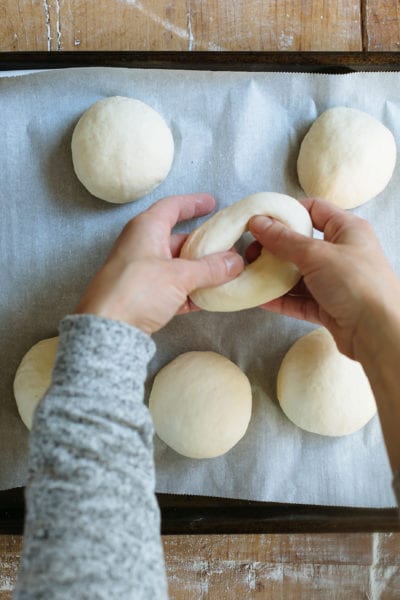
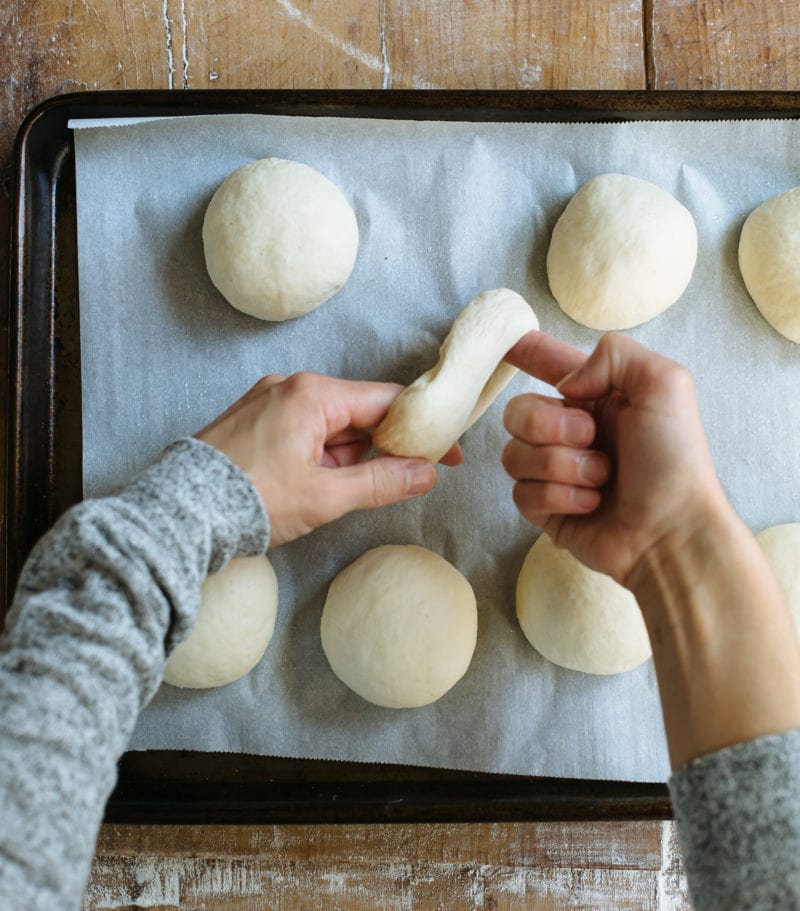
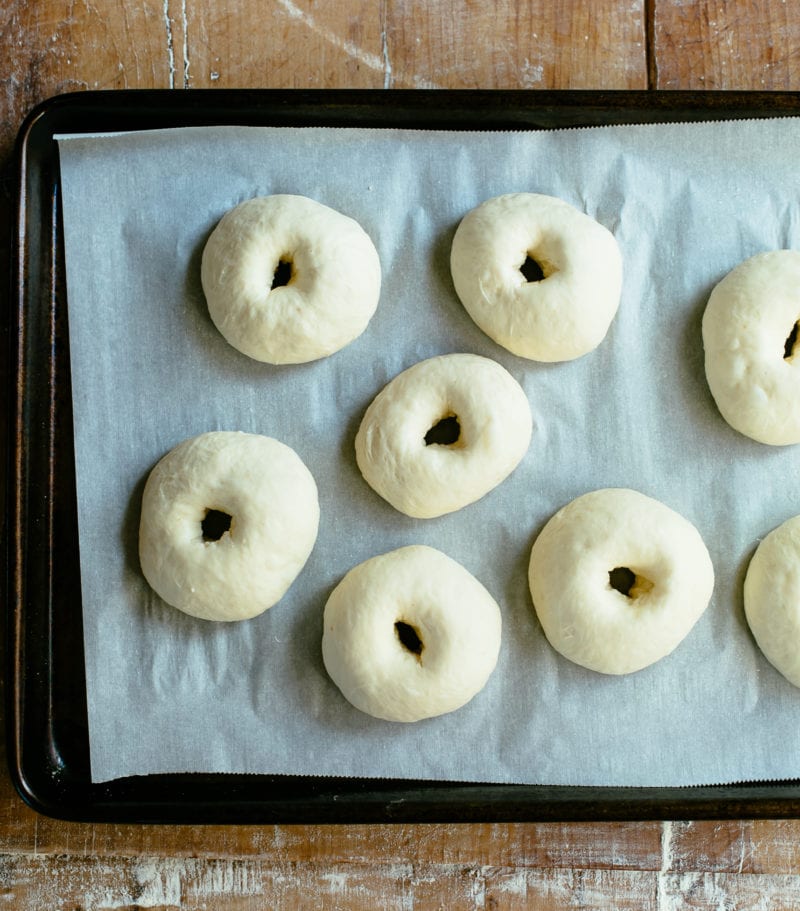
To shape the bagels, poke a hole into the center, then gently stretch and spin to form a ring. This is the fun part! Don’t be afraid to make the hole larger than you think (it will shrink back during proofing and baking).
Step 4: Second Rise
The bagel dough needs to rise again, but only briefly. So you’ll cover and rest until puffy, about 20-30+ minutes (I use this sheet pan set w/lid which is a game changer. No more fussing with plastic wrap and kitchen towels!).
Meanwhile, bring a large pot of water to a boil. Add a spoonful of honey or barley malt syrup, which adds golden color and flavor to the crust.
Preheat your oven. Prep your topping station.
Step 5: Boil The Bagels
Gently lower 2-3 bagels into the pot. This used to make me so nervous! But I’ve learned that if you can boil pasta or ravioli, you can boil bagels. Once they float, simmer for 30 seconds on each side for a thin crust (my preference), or up to 1 minute per side for a thicker, chewier crust.
Remove and place onto the sheet pan. They will look lumpy and slightly wet. All normal.
Why boil bagels before baking? It sets the crust early, so the dough doesn’t rise too high like bread. You can’t skip this step. It gives the crust its glossy sheen, chewy texture, and helps the toppings stick too.
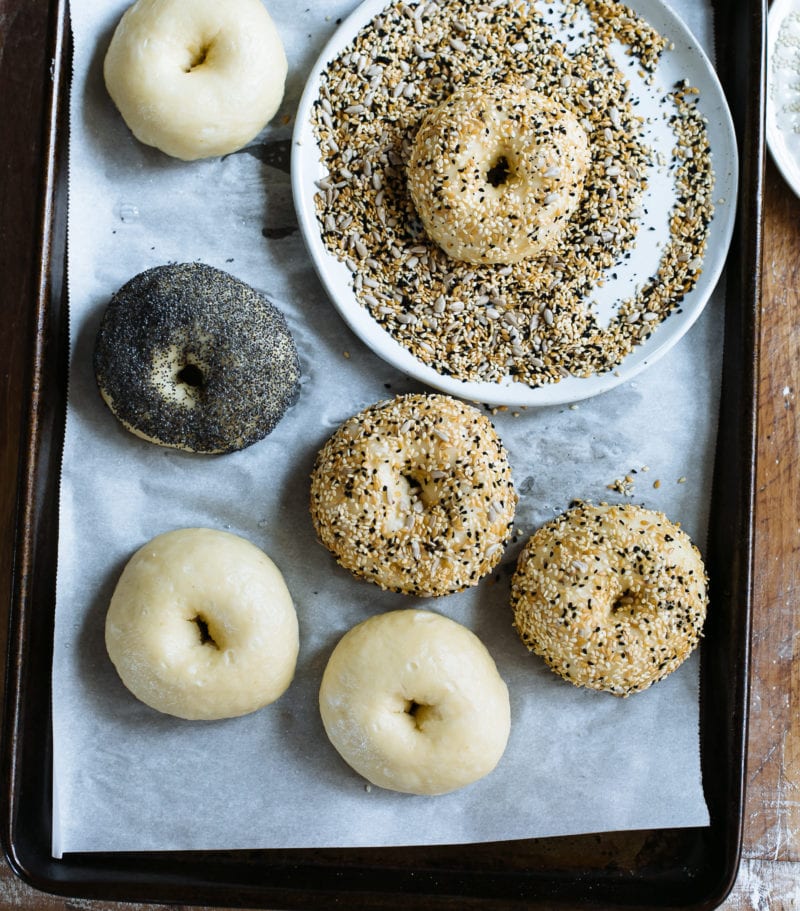
Step 6: Add Toppings
While the bagels are still warm from boiling and slightly wet, dip the rounded side into your toppings. Leave a few plain (the crust is amazing). If you wait too long and your bagels dry out, the toppings won’t stick.

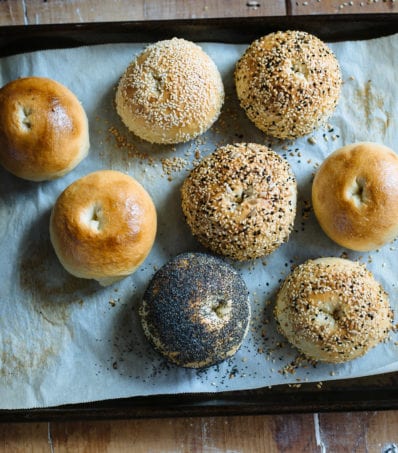
Step 7: Bake The Bagels
Bake your sourdough bagels for 20-25 minutes at 425 F. They should be light, slightly firm to the touch, and deep golden brown when ready. Do yourself a favor and enjoy one warm.
To serve, top with salted butter, veggie cream cheese, smoked salmon etc. Or just eat plain.
How To Keep Sourdough Bagels Fresh
Your first batch of sourdough bagels will be gone in a day- trust me. Store any leftovers in a plastic bag at room temperature for up to 2 days. Keep in mind, bagels are best when fresh (eventually they’re get rubbery). You can also freeze them whole or sliced.
What To Make Next
Once you’ve mastered these sourdough bagels, try my no-knead pumpkin spice sourdough bagels for a seasonal twist, or these super soft sourdough english muffins for breakfast. My easy to slice sourdough sandwich bread is very popular too.
By signing up, you agree to receive emails from The Clever Carrot. Unsubscribe at any time.
Best Sourdough Bagels (Soft, Chewy, Easy!)
- Prep Time: 15 hours
- Cook Time: 20-25 minutes
- Total Time: 0 hours
- Yield: 8 bagels 1x
- Category: Sourdough Bread
- Method: Oven-Baked
- Cuisine: American
- Diet: Vegetarian
Description
With just 10 minutes of prep, this easy overnight sourdough bagel recipe uses active sourdough starter to create the ultimate soft, chewy, NY-style bagel at home. Customize with zesty everything bagel spice, sesame seeds, cinnamon raisin, and more! Recipe adapted from my bestselling book: Artisan Sourdough Made Simple.
Ingredients
For the Dough
- 150 g (3⁄4 cup) bubbly, active sourdough starter
- 250 g (1 cup plus 2 tsp) warm water (See Notes below for temperature range)
- 24 g (2 tbsp) granulated sugar
- 500 g (4 cups plus 2 tbsp) King Arthur bread flour
- 9 g (1 1⁄2 tsp) fine sea salt
- Cooking spray or oil, (for coating the plastic wrap)
For the water bath
- 20 g (1 tbsp) honey
Toppings
- Mixed seeds, such as poppy, sesame, fennel, flax and sun flower seeds or Everything Bagel Spice.
Notes & Variations
- Water temperature: In winter, I use 85-95 F water (29-35 C) to give the rise a boost. In summer, I use cooler water, about 55- 60 F (13-16 C) to slow down and control the rise.
- Cinnamon raisin variation: add 6 g (2 tsp) of ground cinnamon to the dry ingredients (or try 50/50 ground cinnamon and pumpkin spice). Then make the dough. While the dough is resting in Step #2, soak 80 g (1/2 cup) raisins in warm water to soften. Drain in a fine mesh strainer and pat dry using a paper towel before adding them to the dough.
Instructions
- Make the Dough: In a large bowl, whisk the starter, water, and sugar together with a fork. Add the flour and salt. Combine to form a rough dough, then finish mixing by hand until no lumps of our remain. The dough will be very stiff and dry. Note: it’s important to use a large mixing bowl- this dough is strong and rises quite high. As a mixing alternative, use a stand mixer fitted with the dough hook; run on low speed for 5 to 6 minutes to combine and knead.
- Cover the dough with a very damp towel and let rest for 45 minutes to 1 hour. After the dough has rested, work the mass into a semi-smooth ball, about 15 to 20 seconds.
- Bulk Rise: Cover the bowl with plastic wrap that has been lightly coated in oil to prevent sticking. Let rise until double in size, about 10-12 hrs when the temperature is 68 F (20 C); 8 to 10 hours @ 70°F (21°C). Note: in the summer, rise the dough during the day. Once the dough is almost double in size, cover and chill the whole bowl overnight (it will continue to rise slightly in the fridge). Proceed using the cold dough the following day.
- Shape: Line a sheet pan with a nonstick silicone mat or parchment paper. If using parchment, lightly coat with cooking spray or oil to prevent sticking.
- Remove the dough onto a non- floured work surface. Flatten the dough into a rectangle and divide into 8 equal pieces, about 115 g (4 oz) each. Gather the ends, flip the dough over, and roll each piece into a ball. Let the dough rest on your lined sheet pan for 10 to 15 minutes to relax the gluten.
- Working with one ball of dough at a time, poke a hole straight through the center. Move your finger around in a circular motion to gently stretch the dough until the hole is about the size of a walnut. You can also lift up the dough, insert both index fingers through the center hole, and barrel roll to gently stretch the opening. When finished, place the dough back onto the sheet pan. It’s okay if the hole shrinks slightly. Repeat shaping the remaining dough.
- Second Rise: Cover the dough with a damp towel and let rest at room temperature for 15 to 20 minutes. The dough will puff up only slightly at this stage.
- Meanwhile, bring a medium pot of water to a boil. Add the honey and whisk well to dissolve. Preheat your oven to 425°F (220°C). Add the seeds to a rimmed tray or shallow bowl.
- Boil the bagels: Add 2 to 3 bagels into the pot and simmer for 30 seconds on each side for a thin crust. Note: if using cold dough from the fridge, the bagels might not float to the surface right away. Give them a nudge after 30 seconds or so and be patient. Using a slotted spoon, transfer the bagels back the sheet pan you used earlier, placing them rounded side up.
- Once slightly cool but still wet, dip the rounded side of the bagels into the seeds to coat. Place back onto the sheet pan and finish boiling the rest of the bagels.
- Bake: Place your sheet pan on the center rack. Bake the bagels for about 20 to 25 minutes. Flip them over to briefly cook the bottom side, about 1 to 2 minutes or less. When ready, your bagels will be puffed up, light golden brown, and feel light to the touch. Transfer to a wire rack to cool, but indulge yourself and eat one (or two) warm.
The chewy texture of bagels is best enjoyed when made fresh. Store in a plastic bag at room temperature for up to 2 days. Bagels also freeze well; freeze them whole or sliced, covered in plastic wrap and a layer of foil, for up to 3 months.


Comments
Susan says
If you like NY bagels, you are going to LOVE this recipe. I have made these a gazillion times and have given them to the harshest of food critics and they have all raved about them! The chew is fantastic and the crust is perfect. Here in Northern VA, we cannot purchase good bagels reminiscent of the ones we get in NY, so being able to make them fresh and replicate them at home is the best! SUPER easy to throw together and make. I’ve made the bagels both out of the fridge (resting overnight) and immediately after the bulk rise (fresh). Both turn out fantastic!!
Emilie Raffa says
Being from NY, this is the best compliment ever. Thank you Susan! I’m thrilled you enjoyed my sourdough bagel recipe. I appreciate your feedback. 🥰
Susan says
I have used this recipe so often but just today realized you pinned my comment at the top!! I am so touched!! 😂 Best fool-proof recipe for bagels, Emilie! ❤️
George Wright says
The bagel recipe is awesome! They look like I bought them from a shoppe. The recipe is easy to follow. I will definitely be saving this recipe!
Tom DeSantis says
Thank you so much for sharing your well written, easy recipe for making bagels! Our kids gave us a recipe to follow but we had questions and couldn’t get a hold of them. I googled easy sourdough bagels and your recipe popped up. Both recipes starter was 150grams so we knew yours would work. Your very thorough details were perfect for us(we are not bakers). Although we need practice at cutting and forming the bagels, they came out fantastic!! We will be following you for other wonderful recipes.
Weronika Jama says
Oh my goodness, I have just baked my bagels this morning. All I can say is WOW! I will not be able to go back to store bought bagels… let alone yeast dough bagels. This is the most incredible bake that I have ever done. I used a 1:1:1 ratio for my starter, it worked perfectly. I highly recommend this recipe! I wish I could attach a photo of these on here.
Tanya says
I just tried these and they were delicious but the dough was too wet and sticky so they were kind of flat. I added the correct amount of water, does the starter need to be a certain hydration level for desired puffiness? Thank you!!
Emilie Raffa says
Hi Tanya! I use a 100% hydration starter for my sourdough bread recipes. It’s fed with bread flour, so the texture is slightly thicker compared to one made with all purpose flour. This is a low hydration dough. It shouldn’t be sticky. However, when a low hydration dough becomes sticky (and the flour to water ratio is correct), it’s usually over proofed (rose for too long). So double check your starter first, and then shorten the rise time too, if this resonates.
christine jimenez says
Fantastic! You’ll look no further.
V. Seabury says
This is really the best bagel recipe. Everything a bagel should be. Ease, Taste, Chew. It’s all there! Thank You!
Alicia says
This recipe is delicious! I do have a question though. After they have bulk fermented for the 10-12 hours on the counter, do I then place the dough in the fridge until the next day?
Summer says
I’ve been using this recipe since the first time I tried to make sourdough bagels and it’s been foolproof the whole time! Super yummy and perfectly chewy every bake.
I want to try making blueberry bagels by adding masked blueberries to the dough, wondering if I should cut back on the amount of water added?
Rhea says
I made blueberry bagels once with this recipe and learned if you roast the blueberries a bit before, it pulls out a lot of the moisture and concentrates the flavor. Next time I’ll integrate them into the dough differently, so they distribute more evenly, but the flavor was yummy. I did have the feedback of adding slightly more sugar to the dough to make it overall a bit of a sweeter bagel, but that’s preference.
Joann says
Try dried blueberries. I have used them in sourdough scones, and they work beautifully.
Danielle says
Absolutely love this easy recipe! We have fresh bagels pretty much daily now. Thank you!!!
Chris says
Great bagels!
Iris says
I’ve never made bagels before but somehow my first try with this recipe I made the best bagels I’ve EVER had?? Granted I live on the west coast and have never had NY bagels but these by far beat any bagel I’ve had in my life by a wide mile. The entire process was easier than I thought. I can see myself making these weekly. On some bagels I did everything seasoning, and on the rest I did a sesame/zaatar seasoning and they were SO good. I can’t wait to eat another one.
Ashley says
Love this recipe! I made them plain the first time, really wanting to make it with blueberries and sweeten it up for that a little. Any suggestions?
MB says
Thank you for sharing this recipe. The bagels turned out AMAZING! They were crispy, chewy and soft just like the recipes states. Reminds me of the fresh bagels from a bakery in Brooklyn, NY. Thanks again for sharing a great recipe. :)
Debra says
I don’t know why I’ve been so afraid to make sourdough bagels all these years, but reading your recipe and seeing your pictures, convinced me “I’ve got to try this”. I mixed everything up yesterday evening and put it on the counter around 7:30 last night. The temperature in the house was about 67 and by six this morning. It had risen beautifully and I proceeded with the recipe just as written they came out wonderful. I did three types of toppings, white sesame; black and white sesame, poppyseed, and flaxseed combination; and everything version. I don’t think we’ll be buying bagels anymore. We stopped buying bread along time ago when I started doing sourdough. Thank you for your wonderful recipe and inspiration.!!
Rachel says
These are the best bagels I’ve ever eaten. I did half dipped in grated Parmesan and half regular. I only tried the regular and they are amazing. I never thought I could successfully keep up a sourdough starter and make sourdough products but your blog has been so helpful. Thank you!
Amanda Caponigro says
These are amazing bagels!! This is the only bagel recipe you need!! I will be baking these weekly. Thank you!
Seth says
Just made these this morning and they are perfect. I used 50g of whole wheat flour and 450 of KA bread flour so added a touch more water. Proofed overnight in the fridge after the bulk fermentation was done and baked first thing in the morning. Perfect NY style crust and chewy inside.
Elizabeth says
This bagel recipe is amazing! I’m new to sourdough but this was such an easy recipe to follow. I would say the only thing I would do different is make the holes a bit bigger but that’s just a look preference. I made plain and everything bagels and loved the everything bagels. I will definitely experiment with other flavors and toppings!
Sanya Paul says
This is delicious and super easy. Made it before bed and added the cinnamon and raisins soooo yummy! Make sure to use parchment paper when baking. I didn’t for some of them and ruined the bottoms.
Rae says
These are absolutely amazing!! I’ve made these bagels following the recipe 4 times in a row and they have never failed me! Thank you so much for this recipe!
Question for freezer storing…
After I wrap each one individually and place them in an airtight container, then freezer, when I take them out of the freezer for eating do I thaw them leaving all the wrapping on? Or do I take them out and place on a wire rack… What would you suggest?
Thanks so much!!!!
Vanessa Cox says
I love this recipe! I have made sourdough bagels before but these are better. I actually make them with wholewheat bread flour and we have enjoyed them so much. Thank you!
Anabel says
I’ve made them multiple times and they taste amazing!! But once they cool they are rock hard. Any idea how to fix this??
Maria says
I live in a very hot, humid area 83 degrees f. My bagels end tasty but not puffed and “full” like they should be. Not sure if over proofed or underproofed. Will try to bulk ferment in fridge next time.
Sam D says
As a sourdough beginner with a relatively young starter (about two months old), I always worry mine will never taste good or look like the real thing. These were DELICIOUS! Perfectly soft, with that textbook shiny bagel outside. Great chew, amazing flavor. I will never buy bagels again!
Beth says
Amazing. Just made for the first time. I live at 5500 ft and followed the recipe. Turned out amazing.
Shelby says
My college aged daughter wasn’t really into my sourdough bread before finding this recipe. She now gets a quadrupole batch made for her to take back to school with her anytime she is home. She won’t eat any other bagel.
JET says
These have the best flavor, but the light and fluffy didn’t happen for me. Gonna try again!
JoAnna says
I found your page last October and love that you’re sharing your recipes. I love these bagels and they have become part of my weekly baking routine. Thank you ~ JoAnna
Diane Ward says
Is there a recipe using apples to make a Cinnamon Apple Bagel. I don’t want a topping on it, just apples in the dough. Needing to see if they need to be cooked or dried and how much. I follow your basic bagel recipe and it works perfectly. Thank you.
Diane Ward
Sierra says
I refuse to do any other recipe than this one! But dying to do pumpkin bagels for the holidays. Any tips?
Emilie Raffa says
Hi Sierra! Thank you 🙏🏻 Actually, I have a recipe for sourdough pumpkin bagels here. Enjoy!
Tammy L says
AMAZING! And so easy. Thank you so much. I decided to try these after having so much success with your Light Wheat Sourdough Bread (I made it so many times I make it by heart now) and I may never buy a bagel again. I would proudly serve these to anyone.
It should be noted that I dropped the entire beautifully baked, still hot batch on the floor when I went to transfer them to my wood table to get a gorgeous photo and we STILL ate them and can’t get enough of them.
Margaret says
Hi! Can this be made with inactive starter/discard if I supplement with yeast? I’d like to made them today but don’t have time to allow my starter to wake up. I would love to have the sourdough tang though.
Emilie Raffa says
Hi Margaret! The answer is yes, but I haven’t tested it. Off the top of my head: don’t go by the rise times listed here. Doughs made with instant yeast rises way faster than sourdough, especially in warm weather. You’ll need to plan accordingly. Other than that, when it’s doubled in size you can go ahead and proceed with the rest of the steps, again, keeping an eye on how fast the dough puffs up at the shaping stage. Hope this helps 🥰
Jill says
Made these numerous times and turned out great each time! We store in fridge and pull out, pop in toaster for a quick morning breakfast. Wondering if I can make it with whole wheat?
Lisa says
I love these bagels. I have made them several times. Can the recipe be doubled?
Emilie Raffa says
Thanks Lisa!🙌🏻 Yes: you can absolutely double this recipe. Enjoy!
Gita says
Hi Emily, the dough rose overnight, but I don’t have time to make them this morning. Can I put it in the fridge and make it tomorrow morning?
Gita
Emilie Raffa says
Hi Gita! Yes, you can hold the dough in the fridge. How long it will last depends on what it looks like now (if it’s fully risen, it might over proof by tomorrow morning). Alternatively, if you have a little time now: shape the dough into balls, cover, and chill overnight. Tomorrow morning, poke holes into them, boil and bake.
Lively D says
YUM! i’m 9 years old, and when my mom makes
these they always turn out soft and fluffy, and of course delicious!
(I love to spread my cream cheese thickly on them)!
Emilie Raffa says
Amazing! Love to hear this. Thanks for sharing Lively! 🥰
Andrea says
What dose NY stand for?
Emilie Raffa says
Hi there! It stands for New York, with reference to “NY” style bagels.
Justina Molloy says
My bagels keep coming out flat and not puffy :(
Am I letting them rise too long and they’re over fermenting?
I did an overnight rise10-12 hours and I think the temp inside was between 70-74F.
Katie Anne Barnett says
Is the dough rising well in the first rise? I use almost the exact same recipe (I came looking for an answer to something and wound up here). If at all possible I’d suggest using a scale for measurements. It seems annoying, but I actually much prefer cooking with a scale. I use a pinch of dry active yeast and this allows me to use my starter straight from the fridge as well. Dissolve the pinch of yeast in your warm water before mixing with the starter. By adding the yeast I’m able to make my bagels in a matter of a few hours, which is great. The ones I made today were proofed in the fridge overnight, and that worked great too. Make sure you’re getting a good first rise and if you are doing over night, you can let it rise on the counter for a bit, but move to the fridge before bed. It can absolutely over proof if kept for too long. Mine continued to rise even in the fridge last night, if it had been in the counter they would have over proofed for sure. Hope the options help a little.
Carol Doherty says
1st time trying this and OMG they are incredibly impossibly sticky to handle. I used King James flour – All Purpose. Could it be because I didn’t use bread flour? I had to keep dipping my fingers in water to be able to shape them. Getting ready to boil – wish me luck! But anyone please – any tips on handling the dough?
VS says
King James Flour? Haven’t heard that one yet! OK, we know you meant King Arthur Flour.
Irene says
These bagels were amazing! I tweaked it so I could make my husband’s favorite bagel — cherry vanilla. (I used dried cherries instead of raisins.) They were nice and soft just like all reviews.
Denise says
Cherry vanilla?? That sounds amazing!!! I need to give that a try! Thanks for sharing 😁
Irene says
Denise,
Just a note from lesson’s learned. I used dried cherries from Aldi’s and cut them in half and did not soak them (it didn’t work out so well on my first attempt). The moisture from the dough reconstituted the cherries just fine.
Josh says
How much vanilla did you add?
Irene says
@ Josh,
I added 1 tablespoon.
Tonya says
Looking forward to making this recipe this weekend! I prefer to do my rise overnight on the counter but it’s very hot here… our house is kept at 73 through air conditioning. Is that still too hot for an overnight counter rise?
Tonya says
I ended up doing an 8 hour overnight rise – right before bed. House was at 73 and I skipped covering with plastic wrap and did a little oil on my hands to cover the top of the ball, and then put a lid on my container. It is also humid here so maybe that helps?
I also cut them into (12) 75g bagels instead of the 8. They were all eaten by 4 adults and a toddler. They turned out perfect & chewy!
Sam says
Tried making for the first time and my husband almost cried tears of joy. He’s from ny and is always underwhelmed by what we get here in Asia
Emilie would you pls also share an egg bagel recipe? Thank you!!
Vicki P says
Excellent recipe! I have been using one of your sourdough recipes for years, and while searching for variations the other day I stumbled across your sourdough bagels. I had to give them a try, and didn’t even realize it was one of your recipes until I downloaded it into my Paprika app.
I started the dough last night at 8 pm exactly with a very active starter and followed the recipe to the letter. Since my house stays on the colder side (63 degrees), I proofed the dough overnight in my microwave (above the stove) and programmed the stovetop light to switch on at 3 a.m. for four hours to heat up the microwave slightly. By the time I woke up, the dough was absolutely beautiful and ready to go.
This recipe was straightforward, easy to handle, and a breeze to shape. Two quick notes for next time: I’ll make the center holes a bit larger so they bake up like bagels instead of rolls, and I’ll adjust the baking (lower temp, shorter time, or foil for the first 10 minutes) since they browned a little too quickly. I pulled them at 19 minutes when the outside was darker than golden, but the bottoms were already crisp and I didn’t want to risk burning them further. Thankfully, the insides were perfectly baked.
Once cooled enough to handle, I scraped off the burnt onions, cut two bagels in half, and slathered them with cream cheese while still warm. The crumb inside was gorgeous – soft, fluffy, and fragrant. My husband and I devoured one each on the spot. They had everything you want in a bagel: a crisp exterior, chewy interior, and that subtle sour tang that makes sourdough so special.
I cannot wait to enjoy one tomorrow, and the rest will be going straight into the freezer. I’ve tried yeast bagels before and they were a disappointment, but this sourdough recipe has completely changed the game. These are amazing, and I will absolutely be making them at least once a month vs buying them from our local Ann Arbor bakery. These were even better.
Thank you for another winner!
andrea Hofer says
Can those bagels be proofed overnight? After shaping
Husna says
Looovee this recipe😍 thanks emilia this is my keeper for sourdough bagels, never failed
lots love from indonesia💖💖💖
Susan says
Best bagels ever, chewy and delicious, followed recipe.
Emily says
Hey! Love this recipe. When you make them with toppings (specifically everything but the bagel seasoning), do you still tip them over and bake the bottom side? Won’t that shed all the toppings? Thank you!
Margaret says
I am totally addicted to these. My daughter suggested at adding jalapeño peppers to some… So I added jalapeño peppers, bacon, and cheese. Grandkids love them!
So easy to make!
Shannon says
These bagels are incredible. Super easy, never any problems making them, and I’ve had glowing reviews, two people saying “that is the best bagel I’ve ever had in my life”. I’ve done plain, sesame, poppy, and rosemary sea salt. I’ll never stop making these!
Wendy says
Wow! All I can day. Easy to follow recipe. The taste is incredible.
Exactly how I remember it from when I worked at a Bakery 40 yrs ago.
This will be a frequently used recipe in our home!