This post will teach you how to make a beginner sourdough starter at home, step-by-step. All you need is flour, water and a little bit of patience. Before you know it, you’ll have your very own bubbly, active sourdough starter to make my best sourdough bread recipe, sourdough focaccia and more! Grab your personal sourdough starter feeding chart.

Looking to bake sourdough bread? First: you’ll need a sourdough starter. Without it, your bread won’t rise. It’s the absolute heart and soul of sourdough baking. Creating a sourdough starter from scratch is not hard to do. However, the process is intimidating, especially for beginners. Let’s change that.
Adapted from my bestselling book Artisan Sourdough Made Simple, I will demystify and simplify the process with step-by-step recipe instructions. In approximately 7+ days (yes, it takes that long- there are no shortcuts) you’ll get approximately 1 cup of bubbly, active sourdough starter which is more than enough to make bread, including my best sourdough bread recipe with olive oil (most popular recipe on my blog!). More sourdough bread recipes here.
Sourdough is more than just a recipe; it’s an understanding. So before we dive in, let’s define.
What Is Sourdough Starter?
A sourdough starter is a live, fermented culture of flour and water filled with wild yeast and bacteria from our environment. A small portion is added to sourdough bread dough to make it rise. Commercial yeast IS NOT required.
Sounds a bit weird, right? Of course it does. Know this: natural “wild” yeast is all around us. It can be found in a bag of flour, in the air, on your hands etc. Just because you can’t see it, doesn’t mean it’s not there and doing its thing. It’s like magic.
How Long Will It Take?
To create a sourdough starter from scratch, the overall process will take 7 days (or more) from start to finish. It’s not instant. First, you’ll create the starter with whole wheat flour to jumpstart fermentation. Then, you’ll continue to feed it with regular all purpose flour or bread flour to cultivate the wild yeasts and friendly bacteria. Once it’s created, you’ll keep it alive with ongoing feedings and care, which you can read about here.
When Will It Be Ready To Use?
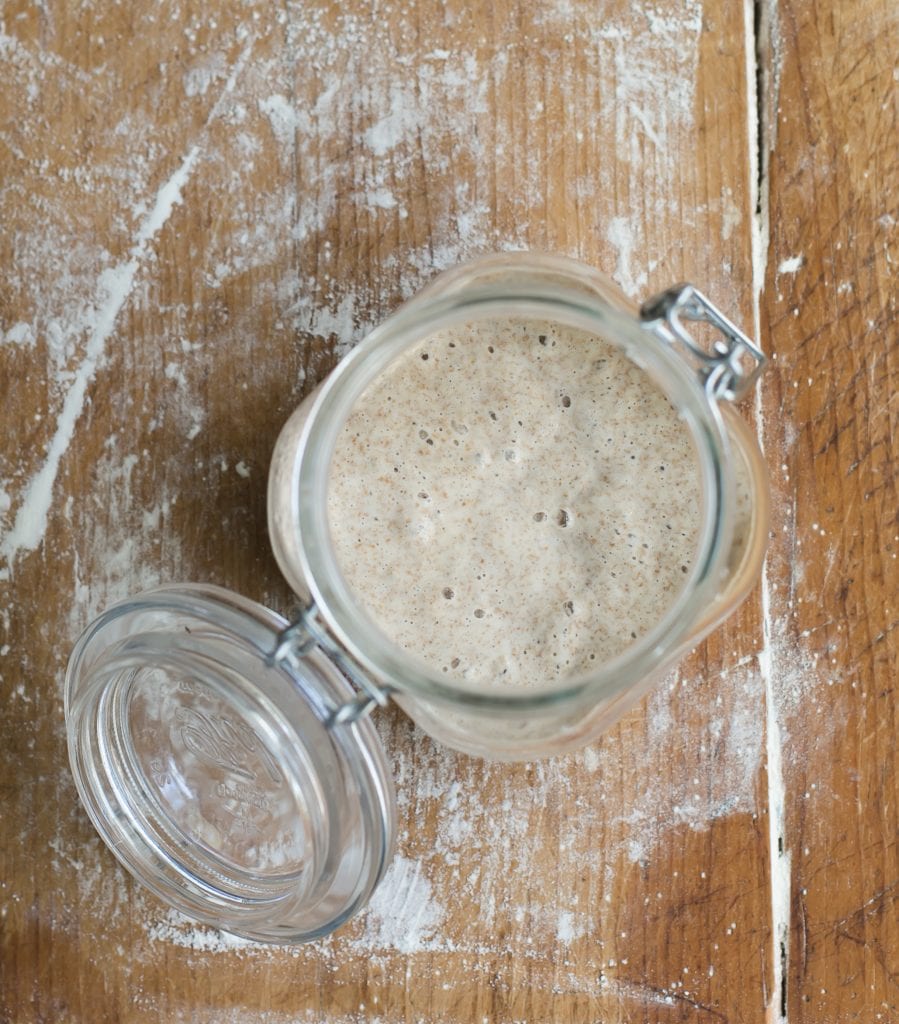
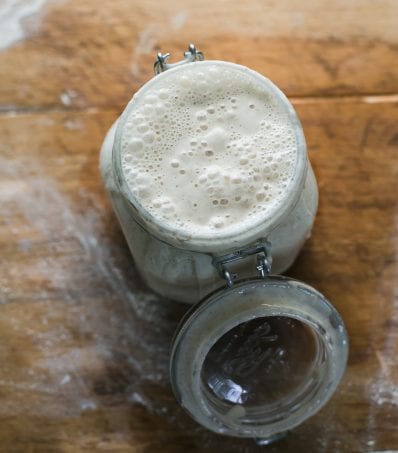
Your starter is ready to use when it has doubled in size, with plenty of bubbles on the surface and throughout the culture.
NOTE: It’s not uncommon for it to take up to two weeks or more for the starter to become active. It all depends. I know this timeframe sounds a bit vague, but growing yeast in a jar (that’s basically what you’re doing) can be unpredictable at times. Please be patient if the process takes time for you- it’s normal.
Is It Difficult To Do?
Absolutely not! In short: you’re basically adding flour and water to a jar, feeding it with more flour and water and waiting for it to become bubbly, active and double in size. That’s it. Most of your time involvement is hands-off. Can I ask you a favor though? Don’t overthink it. There’s a ton of sourdough information out there, and you will fall down a major rabbit hole if you start poking around. Just stick to this tutorial for now, follow the steps as written and just go for it.
Beginner Sourdough Starter Recipe {Step-By-Step}
You Will Need:
Supplies
- 3/4 L jar (I use this one)
- Digital scale
- Small rubber spatula
Ingredients
To create the sourdough starter on Day 1:
- 60 g (1/2 cup) whole wheat flour
- 60 g (1/4 cup) water
To feed the sourdough starter each day (Days 3-7):
- 60 g (1/2 cup) unbleached all purpose flour or bread flour
- 60 g (1/4 cup) water
NOTE: Use regular, unbleached all purpose flour or bread flour for best results. I use flour from KAF, Trader Joe’s or Whole Foods. As for organic flour, I first learned that it wasn’t always successful when first creating a sourdough starter (sourdough can be finicky). However, due to the widespread use of glyphosate, I’ve been inspired to re-test with organic flour. The results were good. Please experiment with what resonates. For the water, filtered or tap water is fine. Use the latter if you know it’s mostly chemical/chlorine free.
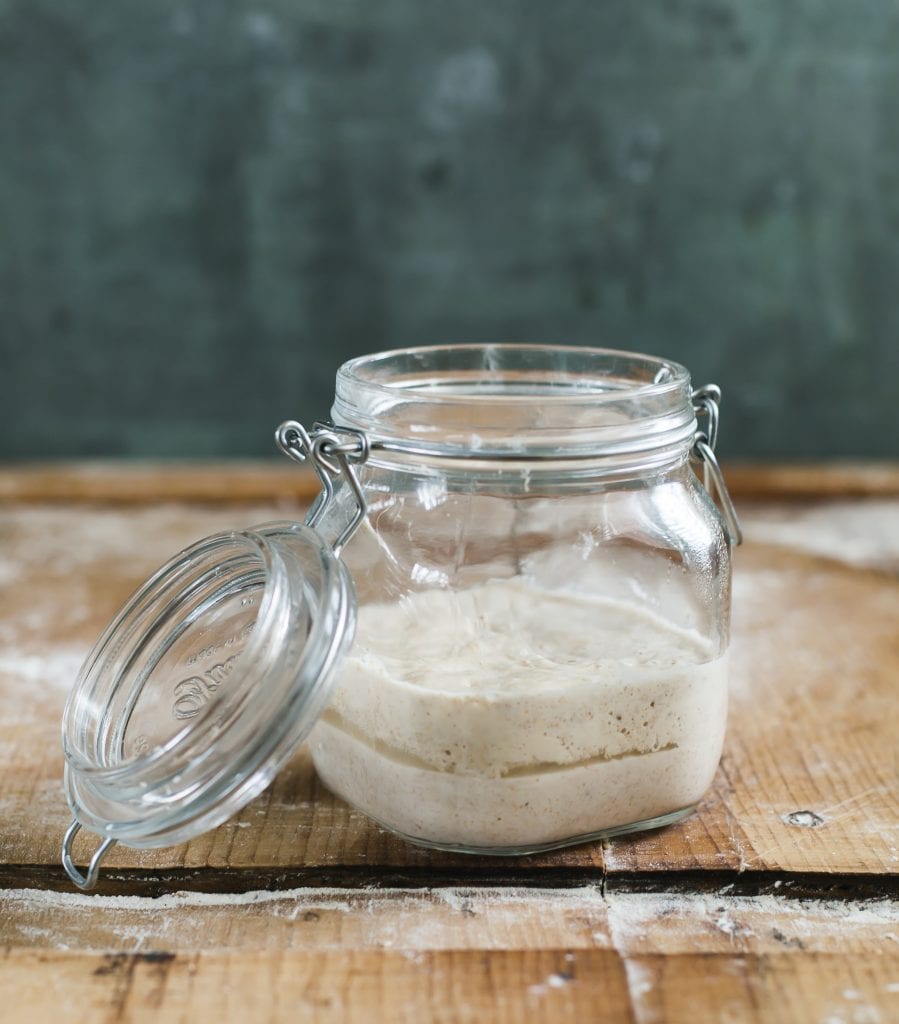
Day 1: Make The Sourdough Starter
- First, download and print out this chart. It’s your daily “at a glance” feeding schedule to keep you on track.
- Add 60 g (1⁄2 cup) of whole wheat flour and 60 g (1⁄4 cup) of water to your sourdough starter jar. Total yield: 120 g sourdough starter.
- Mix with a fork until smooth; the consistency will be thick and pasty.
- Cover with plastic wrap or a lid, and let rest in a warm spot, about 75 F for 24 hours.
Temperature Tips: Temperature is very important. If it’s too cold, your starter won’t rise and the process will take longer. Consider the following tips if you’re looking for a warm, 75 F spot. Place your starter on a cookie sheet inside the oven (turned off) with the light on for a only few hours to give it a boost (please don’t leave it there overnight- the environment will become too warm). Monitor the temperature with an oven thermometer. You can also use a proofing box set to your desired temperature, or a microwave with the door ajar and the light on.
Day 2: Got Bubbles?
- Today, you’re going to check if any small bubbles have appeared on the surface.
- Bubbles indicate fermentation, which is what you want. However, it’s okay if you don’t see anything right away; the bubbles might have appeared and dissolved overnight while you were sleeping. This happens quite often.
- You do not have to do anything else on Day 2. Just let it rest in your warm spot for another 24 hours. Feel free to stir once or twice to oxygenate the mixture.
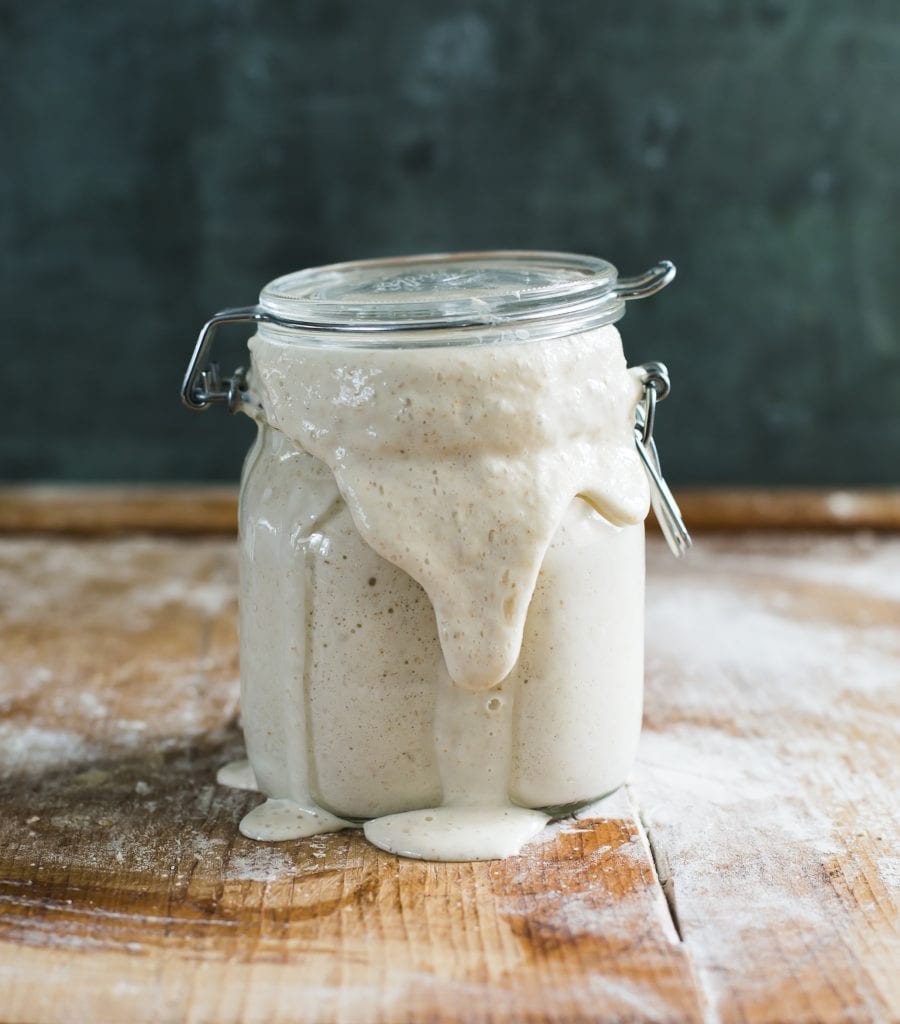
Tip: What’s That Brown Liquid? During the creation process, and even after your starter has been established, a dark liquid might appear on the surface (the image below shows the liquid in the middle of the starter). This liquid is called “hooch” and is an indication that your starter is hungry. It also has a very distinct smell, similar to rubbing alcohol or gym socks. This is normal. Don’t freak out. Any time you see this liquid, it’s best to pour it off before feeding it with fresh flour and water.
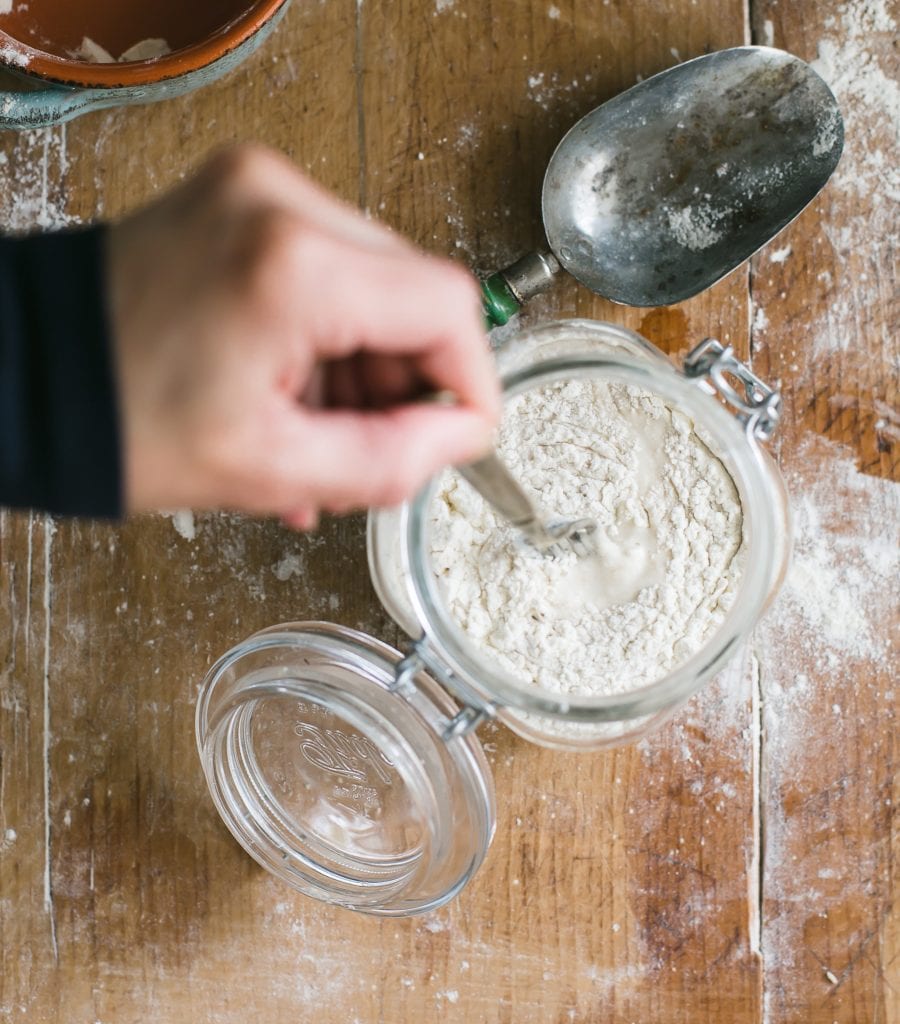
Days 3-7: Feed Your Sourdough Starter
Whether bubbles are visible or not, it’s time to start the ongoing feeding process. As the natural yeasts begin to develop, your starter will rise. Bubbles will form on the surface. Eventually, your starter will fall back down or “collapse” indicating that it’s time to feed it again. The goal: is to increase the total quantity to about 236 g (1 cup) following the specific feeding ratio outlined below on each day.
Before you begin, a few tips for success:
- Establish a feeding schedule. Feed your starter at the same time each day. This will train your starter to rise and fall predictably, which is what you want. Consider feeding your starter in the morning when you wake up. Again, this is where my feeding chart comes in handy.
- Track the growth. Place a rubber band or piece of masking tape around the jar to measure the starter as it rises. When it falls, you’ll see streaks of starter on the sides of the jar.
- Keep your jar clean: Use a small rubber spatula to scrape down the sides of the jar to prevent mold growing up the sides.
- Be patient. This is a slow, gradual process. Remember: temperature (75 F) and consistency (daily feedings @ approximately the same time each day) is key.
Day 3:
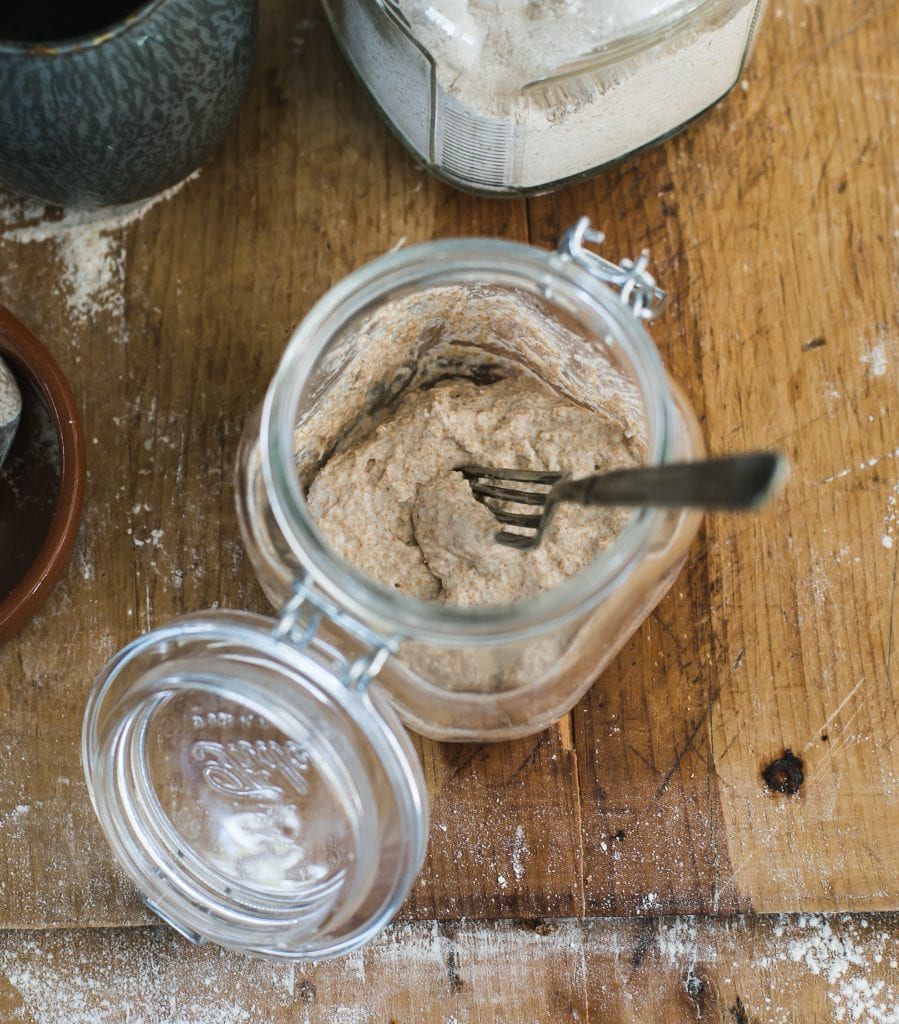
- Remove and discard half (60g) of your sourdough starter from the jar. To do so: use a spoon to scoop it out, or pour the starter directly into a bowl to weigh (you can also just eyeball it- the amount doesn’t have to be exact). The texture will be very stretchy.
- To the jar: Add 60 g (1⁄2 cup) of all-purpose flour + 60 g (1/4 cup) of water. Mix with a fork until smooth. Scrape down the sides with a small rubber spatular. The texture should resemble thick pancake batter or plain yogurt at this point.
- Cover and let rest in a warm spot, 70-75 F for 24 hours.
- Total yield: 180 g starter.
Day 4:
- Remove and discard half (90 g) of the sourdough starter.
- To the jar: Add 60 g (1⁄2 cup) of all-purpose flour + 60 g (1/4 cup) of water to the jar. Mix well and scrape down the sides.
- Cover and let rest in a warm spot for 24 hours.
- Total yield: 210 g starter.
- Note: The growth of your starter might appear to slow down on Days 3-4, after switching to all purpose or bread flour for the ongoing feedings. This is normal. Your starter needs more time to adjust. Be patient.
Day 5:
- Remove and discard half (105 g) of the sourdough starter.
- To the jar: Add 60 g (1⁄2 cup) of all-purpose flour + 60 g (1/4 cup) of water. Mix well.
- Cover and let rest in a warm spot for 24 hours.
- Total yield: 225 g starter
Day 6:
- Remove and discard half (112 g) of the starter.
- To the jar: Add 60 g (1⁄2 cup) of all-purpose flour + 60 g (1/4 cup) of water. Mix well and scrape down the sides.
- Cover and let rest in a warm spot for 24 hours.
- Total yield: 232.5 g starter
Day 7:
- Remove and discard half (116.25) of the sourdough starter.
- To the jar: Add 60 g (1⁄2 cup) of all-purpose flour + 60 g (1/4 cup) of water. Mix well, and scrape down the sides.
- Cover and let rest in a warm spot for 24 hours.
- Total yield: 236 g starter
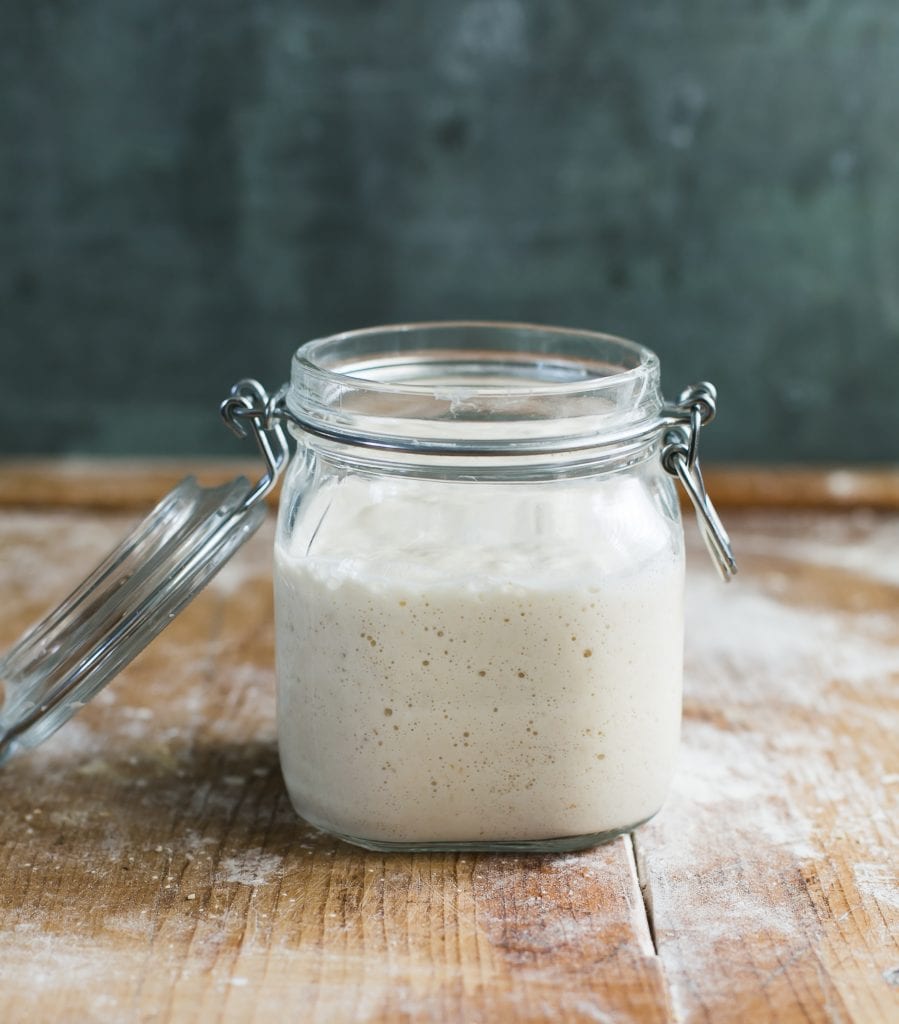
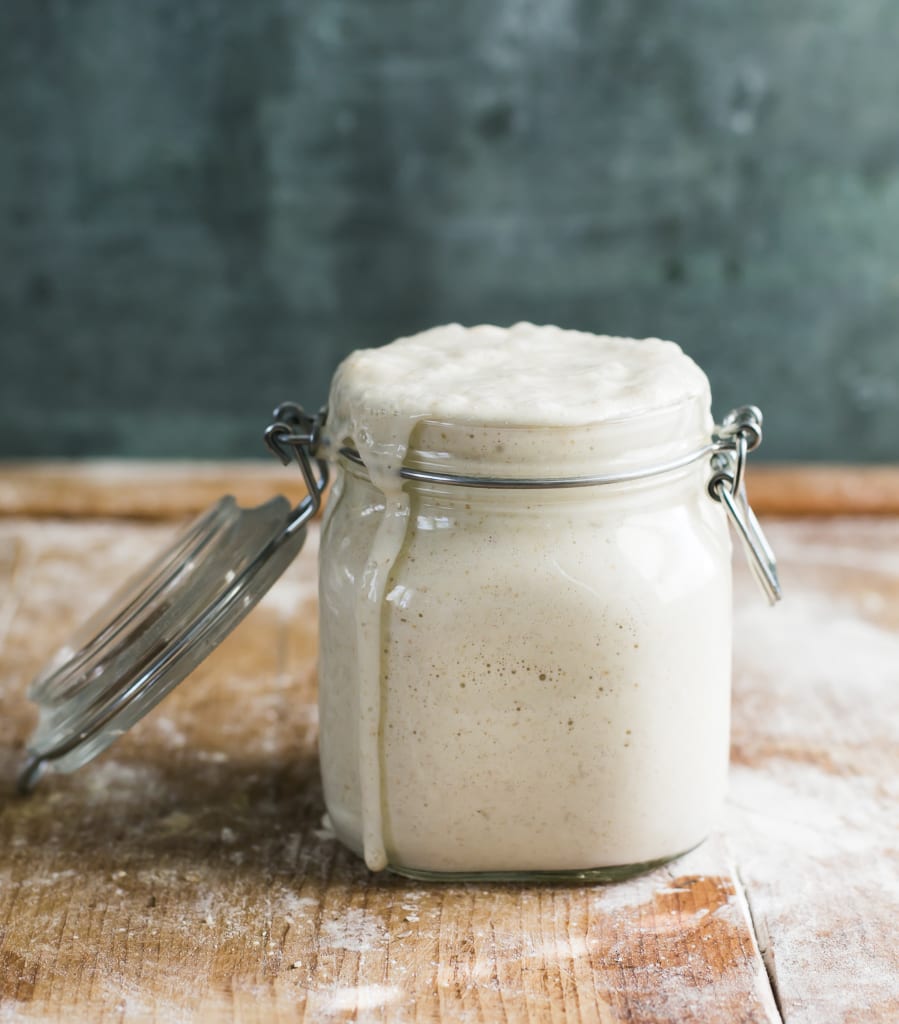
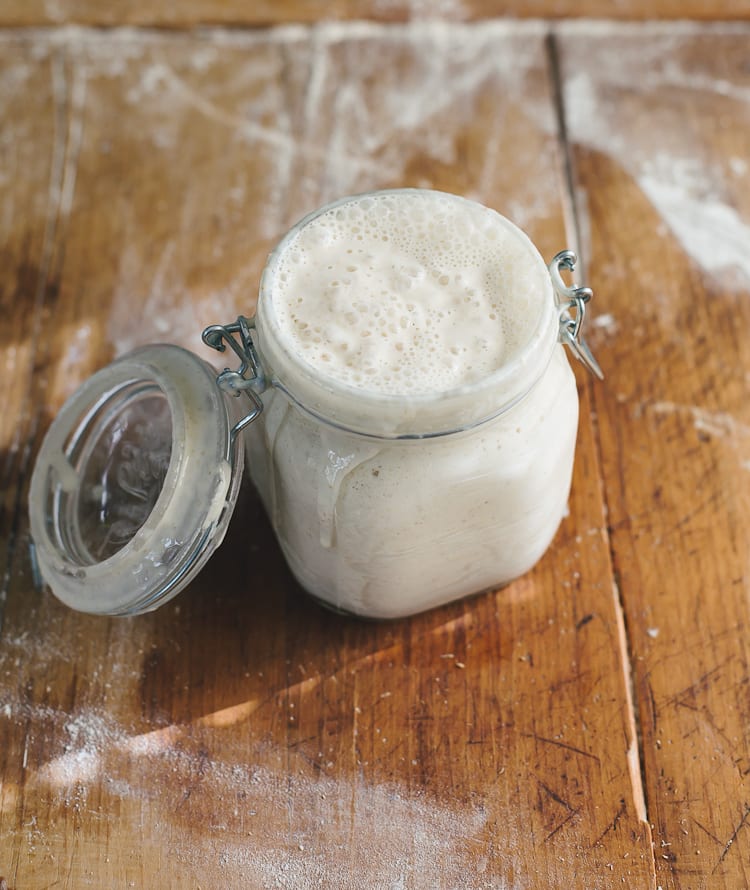
Day 7-8: A Sourdough Starter Is Born!
- By now, your sourdough starter should have doubled in size. You should see plenty of bubbles, both large and small. The texture will now be spongy, fluffy, and similar to roasted marshmallows (think: s’mores). It should also smell pleasant and not like stinky gym socks. If these conditions are met, your starter is now active.
- The very last step is to transfer your sourdough starter to a nice, clean jar. Do this only if your current jar needs a good scrub. Otherwise, leave it as is.
- In keeping with tradition, you can also name your sourdough starter (and please do). My starter is called Dillon after my oldest boy. It’s bright and bubbly, just like him ;)
- Now you’re ready to bake. Start with my beginner sourdough bread recipe- you’re going to love it!
Feeding & Maintaining Sourdough Starter For Ongoing Care
So you’ve created a sourdough starter! Now what? Just like any living creature, your starter must be kept alive with regular feedings, proper storage, and ongoing care to keep to maintain its strength. If your starter is not strong, your bread will not rise. Once you’re starter is established, read my companion article to learn exactly how I do it- Feeding Sourdough Starter: My Best Tips & Tricks. Have more questions? Read troubleshooting your sourdough starter.
Note: You will need to feed your starter every time prior to making bread dough and to maintain it (keep it alive).
How To Store Sourdough Starter
At Room Temperature: If you bake often, let’s say a few times a week, store your starter at room temperature. This will speed up fermentation, making the starter bubbly, active, and ready to use faster. Room temperature starters should be fed one to two times a day, depending on how quickly they rise and fall.
In the Fridge: If you don’t bake that often, store your starter in the fridge covered with a lid. You’ll only need to feed it about once a week or so to maintain its strength when not in use (you can just feed it cold and then pop it back in the fridge right afterwards; no need to warm it up first). When you are ready to make dough, feed your starter at room temperature as needed, to wake it back up.
Frequently Asked Questions & Helpful Info:
1.) What If my starter is not ready after 7+ days?
Feed every 8-12 hours (not 24) and continue the same formula: Discard half starter. Feed (Add): 60g flour & 60g water and store at 70-75°F / 21-24°C. Too runny? Add an additional 1-2 tbs of flour. Note: the most common reason for your starter not starting is cold temperature.
2.) Can this sourdough starter be made with all purpose flour only?
Yes. The process might take a little longer.
3.) Can sourdough starter be made with bread flour only?
Yes. Because it’s more “thirsty” than AP flour, add more water if the texture is too thick.
4.) Can this sourdough starter be made with whole wheat, spelt flour or rye flour only?
Yes. Like bread flour, whole grain flour absorbs more water than all purpose flour, so adjust the texture with additional water your starter is too thick.
5.) Can sourdough starter be made with bleached flour?
Yes. But it’s not recommended. The chemicals can throw off the fermentation process. Some readers have reported success, however. Your choice!
6.) Why do you use whole wheat flour in the beginning of the recipe? And then switch to all purpose flour for the ongoing feedings?
Whole wheat flour is used to jumpstart the fermentation process. All purpose flour or bread flour is used for the ongoing feedings because it’s inexpensive, practical and suitable for everyday baking.
7.) On Days 3 & 4, my starter is not as bubbly compared to Days 1 & 2. Growth is slowing down. Why?
As mentioned in question #5, whole wheat flour is used in the beginning to jumpstart fermentation. This is why you saw bubbles right away. When you switch to all purpose or bread flour for the ongoing feedings, growth will inevitably slow down on Days 3-4, as your starter needs time to adjust to the new flour. This is normal. Growth is still happening.
8.) For the daily feedings, you mention to feed your starter “equal parts” flour and water by weight. For example: 60 g (1⁄2 cup) flour + 60 g (1⁄4 cup). But the volume conversions (measuring cups) are not equal. Is this a typo?
No. It’s not a typo. “Equal parts” refers to feeding by weight only. Not measuring cups. Here’s why: different ingredients weigh different amounts based on density. For example 1 cup of flour can weigh anywhere from 125-150 g depending on how it was packed into the measuring cup. 1 cup of water can weigh anywhere between 236-250 g. Because weights are constant, it streamlines the process for accuracy. It is the preferred measuring unit in bread baking. The volume approximates are listed for convenience because not everyone has a scale.
9.) Can I use the sourdough discard from Day 1-7 for something else?
In the beginning, I typically don’t recommend using the discard (it’s usually really smelly and discolored). I recommend using the discard after the starter has been established. However, everyone will have a different experience with this. If it looks good- use it! And yes, you can save it to create a new, separate sourdough starter if you’d like. For more info please read Sourdough Discard 101: Recipes & Faqs Answered.
By signing up, you agree to receive emails from The Clever Carrot. Unsubscribe at any time.
Beginner Sourdough Starter Recipe
- Yield: appx. 236 g (1 cup)
- Category: Sourdough Starter
- Method: 1-Bowl
- Cuisine: American
- Diet: Vegan
Description
Looking for an easy, sourdough starter recipe for beginners? Adapted from my bestselling book Artisan Sourdough Made Simple, follow my no-nonsense, step-by-step guide for practical tips, tricks, and ongoing care- anyone can do it. Use it to make my famous golden, crusty sourdough bread recipe.
Please read my notes below before you begin.
Notes, Tips & Expectations:
- Download & print personal sourdough starter feeding chart {here}.
- The overall process takes ~7+ days, if the temperature is warm enough, ideally 70-75 F. However, it can take up to 2+ weeks or more for a strong starter to become established. Do not ignore the importance of temperature.
- Growth will seem to slow down on Days 3-4. This delay is commonly called a “false” start. It’s also normal- the yeast needs time to cultivate. Please be patient!
- You will need one large 3/4 L jar, or something of similar size (I use this one). Place a rubber band or piece of masking tape around the jar to measure the starter’s growth as it rises.
- To clarify feeding your starter: “equal parts” refers to equal weights only, not measuring cups. Example: 60 g (1/2 cup) flour + 60 g (1/4 cup) water. Same weight. Different volume. Not a typo. Why? Flour is light, fluffy and full of air pockets, so it takes up more space in a measuring cup (but weighs less than water). Water is more dense and compact; it takes up less space but weighs more than flour. That’s why their cup measurements don’t match, even when their weights are identical. Many bakers get confused by this. I’ve included volume measurements for convenience since not everyone owns a scale. But, do choose one measurement system and stick with it for feeding!
Ingredients
Note: Once your starter is established, make your first loaf using my sourdough bread recipe.
- 1x (5lb) bag all purpose flour or bread flour (I use either KAF, Trader Joe’s, or Whole Foods)
- 1/2 cup (60g) whole wheat flour (I use KAF whole wheat)
- Water, preferably warm around 85 F
Instructions
Before you begin: Establish a feeding schedule. Meaning, feed your starter at the same time each day. This will establish consistency, which sourdough starters love. Consider feeding your starter in the morning when you wake up.
Day 1:
- Combine 60 g (1⁄2 cup) of whole wheat flour + 60 g (1⁄4 cup) of warm water in a large jar. Mix with a fork until smooth; the consistency will be thick and pasty.
- Cover with plastic wrap, reusable wax wrap, or a lid and let rest in a warm spot, about 70-75 F for 24 hours. Temperature is important.
- Total approximate yield: 120 g starter
TIP: Looking for a warm, 75 F spot? Place your starter on a cookie sheet inside the oven (turned off) with the light on for only 1-2 hours (it can get hot in there, so keep you eye on it!). Center rack is best. You can also use a proofing box set to your desired temperature, or a microwave with the door ajar and light on.
Day 2:
Check to see if any bubbles have appeared on the surface. If you don’t see anything, it’s okay. The bubbles might have appeared and dissolved overnight while you were sleeping. Feel free to stir once or twice to oxygenate the mixture. Otherwise, you don’t have to do anything else now. Rest the starter for another 24 hours.
TIP: During the creation process, and even after your starter has been established, a dark liquid might appear on the surface and throughout the culture. It has a very stinky smell, similar to rubbing alcohol or gym socks. This liquid is called “hooch” and is an indication that your starter needs to be fed. It’s normal. Any time you see this liquid, it’s best to remove it along with any discolored starter present.
Day 3:
- Remove and discard half (60g) of your sourdough starter from the jar. To do so: use a spoon to scoop it out, or pour it directly into a bowl to weigh (you can also just eyeball the amount- it doesn’t have to be exact). The texture will be very stretchy.
- To the jar: Add 60 g (1⁄2 cup) of all-purpose flour + 60 g (1/4 cup) of water. Mix with a fork until smooth. Scrape down the sides with a small rubber spatular. The texture should resemble thick pancake batter or plain yogurt at this point.
- Cover and let rest in a warm spot, 70-75 F for 24 hours.
- Total yield: 180 g starter
Day 4:
- Remove and discard half (90 g) of the sourdough starter.
- To the jar: Add 60 g (1⁄2 cup) of all-purpose flour + 60 g (1/4 cup) of water to the jar. Mix well. Scrape down the sides.
- Cover and let rest in a warm spot, 70-75 F for 24 hours.
- Total yield: 210 g starter
Note: The growth of your starter might appear to slow down on Days 3-4, after switching to all purpose or bread flour for the ongoing feedings. This is normal. Your starter needs more time to adjust. Be patient.
Day 5:
- Remove and discard half (105 g) of the sourdough starter.
- To the jar: Add 60 g (1⁄2 cup) of all-purpose flour + 60 g (1/4 cup) of water. Mix well. Scrape down the sides.
- Cover and let rest in a warm spot, 70-75 F for 24 hours.
- Total yield: 225 g starter
Day 6:
- Remove and discard half (112 g) of the sourdough starter.
- To the jar: Add 60 g (1⁄2 cup) of all-purpose flour + 60 g (1/4 cup) of water. Mix well. Scrape down the sides.
- Cover and let rest in a warm spot, 70-75 F for 24 hours.
- Total yield: 232.5 g starter
Day 7:
- Remove and discard half (116.25) of the sourdough starter.
- To the jar: Add 60 g (1⁄2 cup) of all-purpose flour + 60 g (1/4 cup) of water. Mix well. Scrape down the sides.
- Cover and let rest in a warm spot, 70-75 F for 24 hours.
- Total yield: 236 g starter
Day 8:
When your starter is fully active, do the float test. Feed your starter, wait for it to double in size, and then drop a teaspoon of bubbly starter into a jar of water; if it floats to the top it’s ready to use.
Storage Options
If you bake often, store your starter at room temperature (feed it 1x-2x a day to keep it active). If you plan to bake only once in a while, store it in the fridge to preserve its strength (feed it 1x a week). When storing your starter in the fridge, there’s no need to bring it to room temperature first before feeding it. Just give it some flour and water and pop it back in the fridge.

Comments
Greg says
After the 7th day if u want to keep feeding the starter how much do you discard on each subsequent day.
Jenn H says
Hi Emilie! Loving your Artisan Sourdough: Made simple book!! I should have purchased it before starting my starter, I jumped right it and the realized I am way over my head. My main question is do you not use a clean jar after every fed? My starter was doing great false rise and all and then all of a sudden it has not risen but there has been small bubbles. I use clean jars every time I discard and fed my starter. It’s been a lot of work but I figured it was necessary to keep a mold free environment..? Is that not right? I’m contemplating throwing away my 7 day starter and using your whole wheat starter (which I used bread flour).
Emilie Raffa says
Hi Jenn! Thank you so much! 🥰 I do not use a new jar for every feeding. Some bakers do, which is 100% fine. I don’t because of the clean up! To clarify, a clean jar can help prevent mold, but that doesn’t mean it needs to be a new jar every time (does that make sense?). To prevent mold without switching jars, it’s best to scrape down the sides after every feeding AND after every time you mix it to aerate it. Use a mini rubber spatula.
On the topic of mold, sometimes it’s completely unavoidable regardless of how well you clean the jar. It’s a learning curve. So just keep that in mind. I also don’t think you need to throw away your current starter. Creating one from scratch takes time and the false rise around day 3-4 happens to almost everyone, regardless of flour type. In fact, bread flour is great to use as long as it’s good quality & unbleached. The bottom line is, it’s really hard to have patience in the beginning. But it’s definitely part of the process. Sourdough is slow bread.
Ashley says
I’m on Day 4 and my starter kept developing liquid at the top. I poured off and re-fed as you mentioned doing in your book, but I’m worried I over fed it since it was only 5 hours after the regular feed. Should I have done this? Or do I need to start over? There are bubbles now on the top, but I keep seeing liquid and it isn’t rising at all. Thank you so much!
Maddir says
Hi!
I’m currently on day 6 of my sourdough starter. It doesn’t seem like it will be ready by day 8. My question is for discarding – should I weigh my sourdough starter on the scale to continue to determine what amount is “half” to discard?
Emilie Raffa says
When discarding, I’ve given you the exact amount in grams for each day. Just spoon the discard into a bowl and weigh it until you reach the indicated amount. That would be the easiest. Alternatively, if you’d rather weigh your starter, you’ll need to know the weight of the empty jar first. Once you have that weight, write it down somewhere or tape it to the bottom of the jar for quick reference. You’ll then subtract that amount, the empty jar weight, to determine the amount of sourdough starter you have in the jar.
Melinda Hier-Goetz says
Also, using the “tare” function on a digital scale sets the bowl and contents to zero – then you can add and subtract ingredients according to the recipe. That is the method I have been using. :) Make sense?
Emilie Raffa says
Absolutely! I do the same as well 🥰
Hannah says
It was my first try with starter and this worked great!
Emilie Raffa says
This is so great to hear Hannah. Thank you for sharing your feedback!
Ally says
When you “discard” half of the starter, do you throw it out or keep in a different jar?
Emilie Raffa says
When creating a sourdough starter for the first time, per this recipe, I throw it out. I do this because the condition of the discard is typically not good enough to save. It can be discolored, smelly, and the bacteria within the culture can be off. It doesn’t makes sense. What does make sense, is saving the discard once your starter is up and running. You can use the discard for other recipes, save it in another jar to create a new starter, keep an ongoing batch in the fridge etc.
Colette Dillman says
Hi Emilie: I was just wondering about storing the starter in the fridge. It says to feed once a week, is that the 1/2 cup flour and 1/4 cup water (does this water need to be warmed?). Do I need to remove anything before I feed the starter?
Emilie Raffa says
When feeding a starter in the fridge: First, discard a small portion to remove any liquid or discoloration on the surface (it doesn’t need to be half or any other specific amount, just use common sense based on what it looks like). Then, feed your starter with equal parts flour and water by weight. The amount by weight is up to you, depending on the feeding ratio you’re following (there are several feeding rations to choose from). For example, a lot of bakers follow the 1:1:1 formula (starter: flour: water). It’s the most common. However, for fridge starters in specific, some bakers prefer to only feed their starter with the amount they initially discarded. So for example, if you initially discarded 50 g, feed what’s left in the jar with 25 g flour + 25 g water. You have options to experiment with! I tend to use warm water in my feedings.
Nore says
Great recipe! the instructions are really clear. I have a question:
The instructions for day 3-7 are to discard half of the starter and add 60g of flour and water.
if I discard 105g on day 5 then I would be adding 60g flour and 60g water to 105g of starter. shouldn’t there be more flour and water than starter or is that only for after the starter is established.
most recipes I have seen use at least a 1:1:1 ratio or sometimes only about 2TBSP of starter during the initial week.
also, after day 8 if I need to keep feeding for a bit do I continue discarding half and then adding 60g flour to 60g water to feed? or should I do a different ratio?
Emilie Raffa says
Hi there! Thank you. 🥰
To clarify: In this post, you are creating a sourdough starter for the first time, from scratch. It’s intentionally designed to follow a completely different feeding ratio (not 1:1:1), because the goal is to build up your starter, incrementally, to approximately 1 cup total. Other recipes might do it differently, which is totally fine. But that’s the main goal here. You follow this formula only once.
Then, once your starter is established, you switch from creation mode to “maintenance” mode following a feeding ratio of your choosing. The 1:1:1 is the most common feeding ratio; however you can do 1:2:2, 1:5:5 and so on. This is where you are encouraged to experiment!
And finally, if your starter is not ready by day 8 during the creation process, you can continue to discard half and feed it with 60 g flour + 60 g water. My recommendation at this point, is to really pay attention to the texture, especially if it’s runny (you’ll need to add more flour regardless of the ratio) and make sure to keep it in a warm spot, ideally 75 F to boost fermentation.
Nore says
That makes sense, thank you. Just to clarify, when you discard half for days 3-7 there are different amounts being discarded. So on day 5 when I discard 105g I should have 105g left over and add 60g of flour and 60g of water to that?
Emilie Raffa says
Correct. You are discarding a different amount for each day.
For Day 5, yes: after discarding 105 g, you’ll be left with 105 g in the jar which you will then feed with 60 g flour + 60 g water to = approximately 225 g total yield.
Nore says
Thank you ❤️
Violette says
Hi! I am on day 5 and my starter has some bubbles but smells awful… I removed the hooch but it’s like the entire mixture has molded or something… should I keep going or start over???
Emilie Raffa says
Hi Violette! If your starter has mold on it, I would start over. Next time, be sure to scrape down the sides of the jar with a small rubber spatula to keep it clean and stir it several times, when you can remember to aerate it.
Diana says
Hi!! If you see hootch on day 2, don’t proceed to feeding it? Or just discard the hootch and continue to let it rest until day 3?
Thanks!
Emilie Raffa says
Correct. You only start feeding your starter on Day 3. You are more than welcome to pour off the hooch right now if you want, and give the starter a stir to incorporate some air.
Allison says
Hello! I’m in the same boat. I followed your response (discarding the hooch on day 2 and stirring) and when I went to discard half and feed on day 3, I only started with 55g starter. I discarded 27g and fed with 60g water and 60g bread flour. Was this the correct way to do this? Thanks in advance!
Ashley D says
Question: once the starter is completed. If I store it in the fridge (I likely only have time to bake on the weekends), if I feed the starter and then put right back in the fridge to keep it going… do I still dicard half of it like when I created the starter, or just feed with the flour and water without discard?
Emilie Raffa says
It depends on what it looks like. If enough time has passed and there’s a good amount of liquid on top, discard a small portion of your starter first, feed it, and wait for it to become bubbly and active at room temperature. However, if only a few days have passed in the fridge after feeding it, and it looks bubbly, do the float test to see how active it is. You might be able to use it right away.
Maddie says
Hello-
The measurements you posted on the sourdough starter are not accurate. You said to add 60g of whole wheat flour (1/2 cup) and 60g of water (1/4 cup) on Day 1. However, 60g equals 1/2 cup so it should be equate parts whole wheat flour and water. Please fix this error because by looking through the comments it seems to be throwing a lot of people off.
Emilie Raffa says
Hi there! The measurements are correct. Please see the FAQ section at the bottom of this post, question #7.
To summarize: “equal parts” refers to feeding by weight only, not measuring cups. Here’s why: the same volume amount of a particular ingredient (i.e. flour or water) will weigh a different amount based on its density.
For example, 1 cup of flour can weigh anywhere between 120- 150g depending on how it was packed into the cup. 1 cup of water, although equivalent in volume, can weigh anywhere between 236-250 g depending on the size of the measuring cups and/or what system you’re using.This is why bakers go by weight. Weights are constant. 60 g is 60 g. There’s no guess work, and it streamlines the process for accuracy. I’ve only included the approximate volume conversions in measuring cups for convenience- not everyone has a scale.
Maddie Simms says
Ahh. I’m sorry. Makes sense!! I was so confused at first.
Emilie Raffa says
No worries at all! ☺️
Rose says
PLEASE respond. Is it necessary to use UNBLEACHED all purpose flour when feeding the starter on day3-7 ?
Emilie Raffa says
Rose, for best results used unbleached flour all purpose flour. If you only have bleached flour, it’s possible to use but the results might vary.
Caitlyn says
I’m not sure what I did wrong!! I followed it exactly and on day 4 I noticed it was a bit runny but still bubbling and doing its thing , but day 5 I noticed it’s all mouldy so had to throw it all out and restart!! I’m not sure what I did wrong??
Emilie Raffa says
Hi there! To correct a runny starter, simply add more flour to achieve a thick, batter-like texture. Your starter will look different on different days depending on the temperature and the specific brand of flour used. As for the mold, very frustrating, I know. My best advice is to scrape down the sides of the jar after every feeding to ensure the inside is very clean. Also, make sure to feed it at the same time each day to promote balanced acidity. Additionally, stir it a few times a day when you can remember to redistribute the air flow.
Addison Williams says
Hi! Are you saying we should stir it throughout the day even when it’s not feeding time?
Larz says
Excellent teacher for the starter I’ve made breads and pizza with the starter with no problems
Emilie Raffa says
Thank you! 🥰
Susanna says
Nice read good info , what size jar do I need ?
Emilie Raffa says
My jar is 3/4 L. You can use something similar (or smaller). This recipe makes about 1 cup. The idea is to have a jar large enough to accommodate your starter’s growth in size, which is typically double or triple in volume.
Robert E says
Absolute rookie on sourdough. Did the 1/2 cup whole wheat, 1/4 cup water. Mine looked quite different than your pic above the step 1 heading. Had to take it out of the mason jar to mash it with a fork. Took quite a while to incorporate all of the flour. Felt like it needed more water but resisted that mod this early in the journey. Now at 24 hrs., very slightly less dry looking (I might be imagining that though). Used the light in the microwave to provide minimal heat
Should I have weighed rather than using cups? Could it be the flour being drier or absorbing more? Am I just catastophizing?
Last question – why is catastrophizing coming up as a misspelling here and not on the web?
Rob
Hamza says
If you don’t have a weighing scale, I’d go by looking for the texture of the starter as opposed to using the measuring cup. If you packed down your flour, then you would have much more than you would have needed. The consistency should be thick and gooey, but not so that you can’t mix it with ease. I would add a little bit more water, and then continue the feeding schedule as normal.
Hope this helped.
Emilie Raffa says
Thank you for chiming in- my thoughts exactly!
Emilie Raffa says
In any recipe: you will always get different results when using measuring cups over a scale (and vice versa). Weights are exact. Measuring cups will yield a slightly different result with regards to texture, depending on how the flour was packed into the cup. So in your case, you might’ve had too much flour to start. This is not the end of the world, I promise you. The texture can easily be corrected by adding more/less flour or water as needed! Re: the spelling, I have no idea! 😂
Margot says
How can you tell if you killed your starter? Mine hasn’t risen since day three (where it almost doubled) and it’s now day seven. It does have some small air bubbles but it’s very runny and not cohesive when I go to discard and feed. Should I start over?
Emilie Raffa says
So ironically, it’s very difficult to kill a starter. They are quite resilient given adequate time, temperature and care. In your case, it’s not dead because you still have some bubbles. Bubbles = activity. It just needs a boost, especially since it’s runny. Feed it again, add more flour next time to achieve a thick, batter-like texture, feed it at the same time each day, and make sure to let it rest it in a warm spot to speed up fermentation. You do not need to start over.
Addison Williams says
When you say to add more flour next time. Do you mean more flour and water or just a it more flour and about how much?
David Smith says
Hello, I am attempting to answer my own question just using math.
Here is a No Discard method that gets you 250 grams of starter from 250 grams of ingredients.
It uses a geometric series
Day 1 2g of flour + 2 grams of water
Day 3 add 4 + 4
Day 4 add 8 + 8
Day 5 add 16 + 16
Day 6 add 32 + 32
Day 7 add 64 + 64.
The daily ratios of new flour & water to accumulating starter mix follows the same sequence as your method. However I have no idea what the biological significance is of the decreasing ratios.
2:1, 1.33:1, 1.14:1, 1.1:1, 1.03:1
So add all that together = 252 g (no, not 8 bit (256) computer geeks because we are adding)
Compare this with the discard method: you toss 484 g leaving 236 grams. So the efficiency is 236/720 = 33% efficient.
A more practical & easier (100% efficient) method would be to start with 20 g + 20 g then keep adding 20 + 20 five times to get 240 grams. (6 X 40 = 240). I don’t think the microbes would be too concerned if they were being fed via a geomtric versus a linear function. Just “feed me”!
Melanie Nyland says
Thank you!!! My husband has been trying starters for a couple of years….decided I would jump in and start one to see if I could master it for him….it is destiny as we have “your” jar already….fingers crossed…now if I can keep him away from it so he doesn’t over love it
Emilie Raffa says
Haha! I love this! 🥰
David Smith says
Have you ever tried initiating the starter with much less flour and water so that you don’t have to discard anything? So every day is a simple addition. I have a hard time with waste. Thanks
Mary says
From other bakers I know, they use the discard to bake other things, such as cookies, rolls, etc., so there’s no waste.
Emilie Raffa says
David, this is a great question. When first creating a sourdough starter, it’s best to have a bit more in quantity to encourage proper (and friendly) bacteria and microbial activity. Plus, as you go through the process, intuitively, you’ll want to discard some it- it will look discolored, it might smell etc. Starting with less doesn’t mean you’ll avoid those things. However, once your starter is established, then it’s recommended to save some of the discard to use for something else.
Amanda says
Question, once I’m at day 8 and ready to use the starter, how much do I use to make a loaf of bread? And, do I keep discarding when I feed it each day? Or do you just keep adding half a cup of flour and a quarter cup of water, looking for the same smooth consistency each time, leaving it for 24 hours before each use?
Emilie Raffa says
It depends on the recipe you’re following. The range is anywhere from 50 -150 g. I use 150 g in my beginner loaf, linked here: https://www.theclevercarrot.com/2014/01/sourdough-bread-a-beginners-guide/
And yes: always discard before feeding your starter to keep the acidity levels fresh and balanced. If you do not discard, it will keep growing and growing. So to recap, to feed your established starter: discard a small portion first, feed it with flour and water, leave it in a warm spot to rise & activate, which should take about 2-6 hrs depending on how warm it is and the strength of your starter.
Elizabeth says
I decided to try making my own starter, I followed the first 3 days instructions. Jen I. Misremembered and started taking only 60 g of the starter (for two or three days) rather than splitting it in half and feeding it. 60 g flour and 60 g water. Have I ruined it or should I just divide it in half tomorrow and continue on?
Emilie Raffa says
It’s not ruined. You can continue with what you have. Weigh the amount of starter you currently have (without the jar) and take it from there.
Lydia says
Hi! Thank you for this guide! I’ve been working on a starter from scratch, and I’m on day 6. I’ve been exclusively using organic Brown Rice flour, because I want it to be gluten free (for my husband who is gluten intolerant and sister in law who is celiac).
I’ve heard almost exclusively that starter shouldn’t be used until it’s at least two weeks old. But is that actually true? Is it more a precaution because of the risk of bad bacteria still floating around? I’ve never had an unpleasant smell from my starter, and it’s had good bubbles since day 2. I’ve been following a different recipe because I just now saw yours – I’ve been feeding it twice a day and am just about to go down to once a day.
Emilie Raffa says
Lydia, this is a great question. You’ll hear different things from different bakers, which is fascinating and frustrating at the same time. Generally speaking: an established, well-fed, 2 week old starter that rises and falls predictably is usually stronger compared to one that’s first born with little behavioral data for comparison. But this isn’t always true. Everyone will have a different experience. The main goal is to take care of your starter properly and it will serve you well. As for the bacteria, off putting bacteria can occur at any stage depending, again, on how you care for it.
Michelle says
Need some help with this starter. Been on this for about 11 days now, feeding it regularly and also weighing everything but i don’t get the bubbles the picture shows and i haven’t seen it rise after day 3. i have stored the starter in front of a fire place that isn’t on, in the oven with the light for a few hours, used warm water after the discard and i must be doing something wrong. the bubbles are tiny and i must be missing something. still get some of the houch of brown water and need some help.
Emilie Raffa says
What type & brand of flour are you using? And what time(s) are you feeding it each day?
Sharna says
I forgot to feed my starter- on day 3. It also has a bad smell. Do I need to start over?
Shawn says
The starter you have to split in half can they be used too to make starter?
Emilie Raffa says
Technically yes, but I don’t recommend it when first creating a starter. It depends on the condition of the discard. If it’s smelly or discolored, I don’t use it. Once your starter is up and running, and it’s well fed and cared for, the discard is optimal for creating a new starter from scratch.
Jared says
Hi! I bought a 1L jar from Target similar to the one you show. Should I remove the gasket so it’s not 100% airtight? I don’t see the gasket in your photos..
Emilie Raffa says
Sure. I don’t use the gasket and it works perfectly fine! I think I actually lost it 😂
Greg says
I am building a proofing box using a seeding heat mat. The mat came yesterday and i put my 3 day old starter on it set at 75 degrees. I checked the starter this morning and it is starting to bubble. My house is on the cool side so that is why I am building the proofing box. The box will be large enough to put a sheet pan in it since I want to make bagels and other things that need to rise on it. I can’t wait until my starter is ready to use. So far so good.
Joan says
I have time to make a starter, so can I use a starter I got from King Arthur flour. I want to make your wonderful sourdough discard biscuits, but honestly, I’m scared to death to do your starter guide. I’m 86 years old now and I often have problems with baking that I never had when I was younger ha ha. So I just wanna order a starter and then use it in your recipes. Any chance of that working BTW, love your blog.
Emilie Raffa says
Joan, absolutely. You can 100% use store-bought starter. Once active, you can bake straight away. Keep in mind, once you activate the starter you will have to keep it alive with additional feedings and care. This is the case for all starters, homemade, store-bought etc. Good luck! And thank you!
Manu says
Hi! Starting on my sourdough starter journey and I’m a bit confused…
If we’re following the 1:1:1 ratio, why are we only adding 60g of flour and 60g of water each day?
From what I understand, for day 5 for example we have 210g of starter so far. I discard half, so I’m left with 105g of starter. Shouldn’t I be adding 105g of flour and 105g of water if we’re doing 1:1:1?
Emilie Raffa says
Hi there! No. What you are referring to are two separate things. In this recipe, the one you are following to a create a sourdough starter from scratch for the very first time, you are following a specific formula to incrementally build up your total quantity to approximately 1 cup. When that’s finished, you can switch to the 1:1:1 feeding ratio for maintenance mode. It gets confusing because people comment here at different points in their process (i.e. making a starter from scratch, vs. maintenance mode, vs. troubleshooting etc). In your case, follow the recipe as written to start!
Monica says
Hi there, I live in a colder climate. While making my starter there was a couple days where I went 48 hours in instead of 24 hours between removing half and feeding it. I’m just wondering if this is a big deal and if I need to restart? When I go to feed it right now I just removed 105 g and the consistency was kind of like pancake batter. It smells okay, it doesn’t smell rancid.
Julia says
Is there ever a point when I should be feeding my sourdough starter twice a day?
Thank you!
Dot says
Hi, is it ok to use a larger jar? I don’t want an overflowing mess as pictured (if that’s what happens with the recommended jar size) :D Thanks ever so much!
Manny says
Hello, thank you very much for sharing your recipe…after I have the final starter created, how do I keep some for FUTURE baking? How much do I take out?
So I can continue using the same starter.
Thank you,
Manny
Emilie Raffa says
This recipe yields about 236 g/ 1 cup of sourdough starter, which is more than enough for a sourdough bread recipe. For reference, a sourdough bread recipe can call for anywhere between 50-200 g starter. The amount you take out will depend on the recipe you’re following. To keep some for future baking, always feed your starter again after taking out the quantity you need for your recipe. This will keep the process going so that you always have starter to bake with.
Jomar Perez says
Hey! I think my starter is ready, but I have some questions. When you say to feed your starter once every week to keep it active, do you mean to remove and discard half, and add 60g of flour, and 60 ml. of water? Other than that, mine smells very good and has some small bubbles (not a lot). The consistency looks very good to me.
Thanks for the recipe!!
Courtney Kappes says
Hi, what if I want to have more of the starter. I’m planning on making multiple loads as Christmas presents so, I’ll need more starter. Do I just weigh the starter and add equal parts flour and water? I.E. I dont throw any discard away.
Emilie Raffa says
If you already have an established starter, you can increase the quantity by feeding it equal parts flour and water (by weight) and not discarding.
Christine says
I followed your steps, but added a bit more water, as it was so thick that held its form and didn’t look anything like your picture. I have beautiful starter inside a week! Thanks for the great recipe! I am doing my first batch of bread tomorrow!
Emilie Raffa says
Excellent! This is great feedback Christine, thank you. Yes: sometimes your starter won’t look exactly like mine, or anyone else’s, because we all work with different variables (i.e. flour brand/type, water temp. ambient temp. type of jar etc.) which will effect the final outcome.
Lauren says
Hello, I followed your instructions for the sourdough starter and now my starter is about two months old and fairly strong. I’ve made bagels, pizza dough, pumpkin muffins, pancakes, and cinnamon rolls with it so far! I’m building my YouTube channel and created a video of making my batch using your sourdough instructions (I’ve referenced you in the description of course). I’m pleased and excited to try out more sourdough recipes.
Emilie Raffa says
Oh my goodness, thank you Lauren! I’m honored to be part of your journey 🥰
Linda says
I began my starter 3 days ago. It is thick like dough. Should I add extra water? I hesitate in doing that.
Emilie Raffa says
Hi Linda! It’s normal for your starter to be very thick in the beginning. The texture will change as you continue to feed it. However, if you still find it too thick, thin out the texture with water if you prefer.
Aaron says
When storing your starter in the fridge, upon feeding 1 time per week as instructed, do you discard 1/2 prior to feeding?
Emilie Raffa says
Hi Aaron! Yes. Always discard prior to feeding. It doesn’t always have to be half at this point; your starter might just need 1 tablespoon scooped off the top. It depends on wha it looks like (i.e. discolored, watery etc.) Doing so will keep the acidity levels balanced and fresh.
Laurel says
Hello, I’m on day 4 and mine is very liquidy . I have weighed out both of flour and the water and it seems to bubble up. I have been reading some of the other comments and I’m thinking I’ve done something wrong. Do you have any advice or any idea what’s going on?
Charles E Didrickson says
Laurel,
I am replying because I am in a similar situation after day 7. At 4 it was much more bubbly and then I missed an evening feed. I did it the next morning then got back on track. Day 7 it seems more runny and less bubbly than I thought it would be. It smells like bread though!
I’m patient but reaching out to others to see if feed schedule (remove half and add 60/60 grams flour and water is still the process going forward?
Maybe we can both get help.
Charlie (first timer)
Gordon & Kathy says
I tried about 8 or 9 different sourdough starter recipes, but none of them worked. I got very discouraged and stopped trying for a few months. I decided to try one more time and found your recipe. It was a bit different in the amount of discard each time. On day eight, there was no problem, and it’s working great. We finally have a sourdough starter. This was my last chance before I quit for good. Thank You very much for your recipe.
Mel says
Figured my problem: too warm & too moist ! I left it under my counter lights and likely got too warm in those few hours. I alsobadded extra water looking for “pancake mix” consistency. Y’all! Do not add extra water! I would say consistency should be chunky, dry playdough. As it progresses and ferments it’ll be stretchy but will most likely resemble super dry playdough or barely wet soil …. I’ve never EVER cooked a pancake with mix that looked this dry 🤣🤣
Loretta Morandin says
I just added extra water as it looked so dry compared to the photos in the recipe
Kayla says
When splitting/discarding on day seven, could I put the discarded half in a another jar and feed both jars following day seven instructions?
Thank you in advance.
Linz says
Hello! Will the starter grow larger and larger after feeding it more flour and water over time? Or will it always fit in the same container? I know this is a silly question but I’m very new to baking!
Mark says
Thanks for putting this together. Today is day 4. My starter did not rise since I fed it at 8am. It has a vomit like smell. From what I gather, this is fairly normal. It’s been kept between 70-75 degrees. I actually used the discard from the first feeding to start a second jaw and am feeding that one twice a day as an experiment. I can’t really tell a difference. Would you recommend changing anything or stick to the schedule you’ve outlined?
Francesca says
Following this comment! I have the exact same problem! I think I messed up by mixing the starter a bit before discarding. Whatever liquid sitting on top got mixed in and I think I might have “poisoned” my starter :(
Mark Rockwell says
Just an fyi, I stayed the course. Starter is doing phenomenal but took 2-3 weeks not 8 days to become reliable. Slower process than described for me but it worked.
Stephanie Payton says
Sourdough newbie here! Thanks for the recipe it was super easy to follow. I am trying to be patient and trust the process, but I’m worried about my starter. It is day 9 of my starter which I made with King Arthur’s AP, and then switched to King Arthur’s bread flour for feedings. I have been discarding half, using 1/4 filtered water, and 1/2 cup flour every 24 hours, but since day 4 it has not risen/bubbled/produced hooch. I have it stored in my cabinet with a breathable towel over the top. It smells slightly sweet/sour like bread, but doesn’t seem to be doing anything. Any advice?
Karin Taylor says
Hi
My question is on day three when I discard half of the starter-is it 60 grams? I am discarding? I only used 60 grams of wheat flour to start it ( with the 60 grams of H2O)
Seems like it would be the whole amount if I discarded 60 grams??
Thank you
Karin
Betty says
It should be doubling in size from the fermentation and bubbles. Unless it rises and falls before you check it.
Matthew says
Just wanted to reply to this in case you didn’t get the answer yet, but by adding 60 grams of flour and 60 grams of water together, you’d have a total weight of 120 grams, so you’d be getting rid of half of that weight, which would be 60 grams, when you discard. You’ll still be left with 60 grams of the starter after your first discard.
Jamie says
Many thanks for this, I’m on Day 8 and it’s doubled in size, bubbly and smells great! I won’t be baking with it super regularly, once a week, twice at most so I’ll be storing mine in the fridge. I read I can feed it once a week, but how much should I be giving it? And should I be discarding a portion when feeding it also? Sorry if that’s a daft question, I’m very new to this!
Alicia Murphy says
Following! Same question here!
AYLA PARIYAR says
Hi,
I’m on about day 10 of my starter. It’s been doubling in size since yesterday and looks fantastic. I fed it today and it doubled within 2-3 hours and now has deflated after 6 hours. It’s 10pm here so would I need to feed it again or can I wait until tomorrow. I feel like tomorrow will be the day I can use it for a bake.