Let’s bake my easy sourdough focaccia recipe, step-by-step. No kneading, no shaping, no Dutch oven. Just golden crisp edges, a light airy crumb, and a simple overnight rise naturally leavened with active starter. Adapted from my bestselling book Artisan Sourdough Made Simple.
If you’re new to sourdough bread and want an easy, no-knead recipe to expand your repertoire, my sourdough focaccia is you next move. Crisp edges, soft center and perfect, tangy flavor.
Adapted from my book Artisan Sourdough Made Simple, I often recommend this recipe to beginners- there’s no kneading, no scoring, no Dutch oven. Just a handful of ingredients, a bread pan (or not) and some hands off time to let the dough rise. You can start right now.
At home, I make sourdough focaccia at least once a week to serve alongside cozy soups and sourdough pasta dishes. Leftovers become golden homemade croutons, fluffy breadcrumbs or sourdough pizza crust (more sourdough bread recipes here). That aside, poking soft, squishy focaccia dough is wildly therapeutic! Let’s make it together, step-by-step.
How To Get A Sourdough Starter For this Recipe
A sourdough bread recipe of any kind cannot be made without a sourdough starter.
You have two options: make one from scratch (see my beginner sourdough starter recipe), buy one online or get some from a fellow baker. Even bakeries sell starters. If you already have one, and need assistance for ongoing care, read my companion articles, Feeding Sourdough: My Best Tips & Tricks and Troubleshooting Sourdough Starter.
My Sourdough Focaccia Tips
Tip #1: Plan ahead. Feed your starter a few days in advance prior to making the focaccia dough. This will ensure a vibrant starter that’s strong enough to make the dough rise.
Tip #2: Use regular olive oil (no extra virgin). It has a higher smoke point and is less likely to burn the top and bottom of your focaccia.
Tip #3: Pick the right pan. Sourdough focaccia can be baked on a regular rimmed sheet pan or a rectangular metal pan (e.g. brownie pan). If using the latter option, I suggest this non-stick pan by Lloyds which I’ve been using for years. It’s truly non-stick and makes the crispiest crust!
How to Make Sourdough Focaccia {Step-By-Step Recipe}
Step 1: Make The Dough
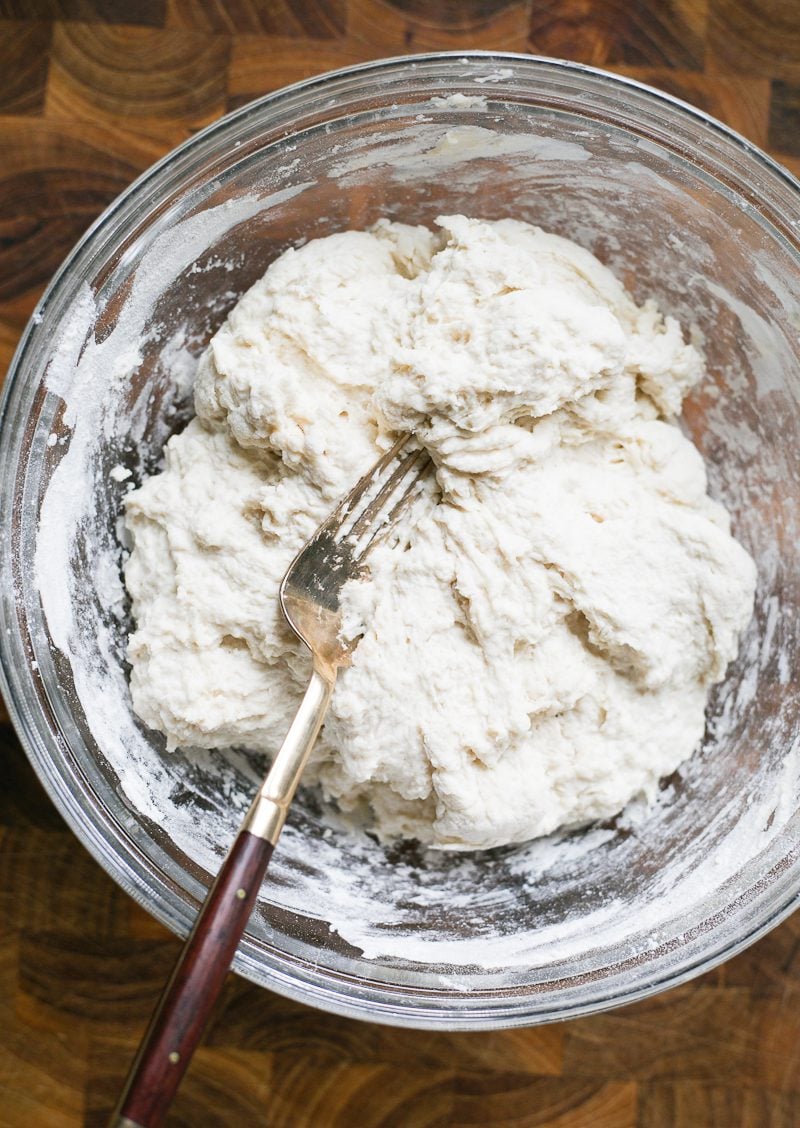
In the evening: whisk the sourdough starter, water and honey together in a large bowl (I use a fork for mixing). Add the flour and salt. Mix to combine and then finish by hand to form a rough dough. It will be wet and sticky.
Cover and let rest for 30 minutes to 1 hour. Timing is flexible here. Then work the dough into a ball. Again, it will be sticky!
When finished, transfer the dough to a lightly oiled dough container or just keep it in the same mixing bowl. It’s up to you. The next step is to let the dough rise.
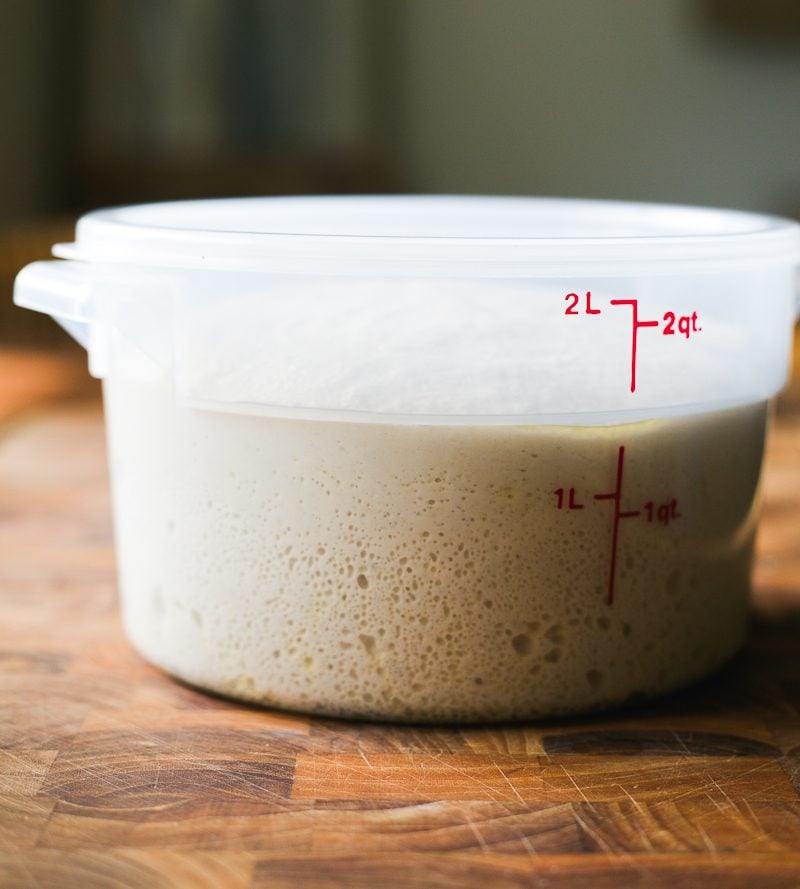
Step 2: Bulk Rise (Overnight)
Rest the dough at room temperature and let rise overnight on your countertop. For focaccia, the dough should double or triple in size. This will take approximately 12+ hrs @ 68 F (20C).
Note: the warmer the temperature, the faster the dough will rise. So for example, if your current room temperature is 80 F (27 C), the 12+ rise time mentioned above would not apply to your specific environment. Not even close. The rise time would be shorter, say 3-4 hrs. Watch the dough, not the clock!
Diving Deeper: Why Won’t My Sourdough Bread Rise?
Step 3: Second Rise (In The Pan)
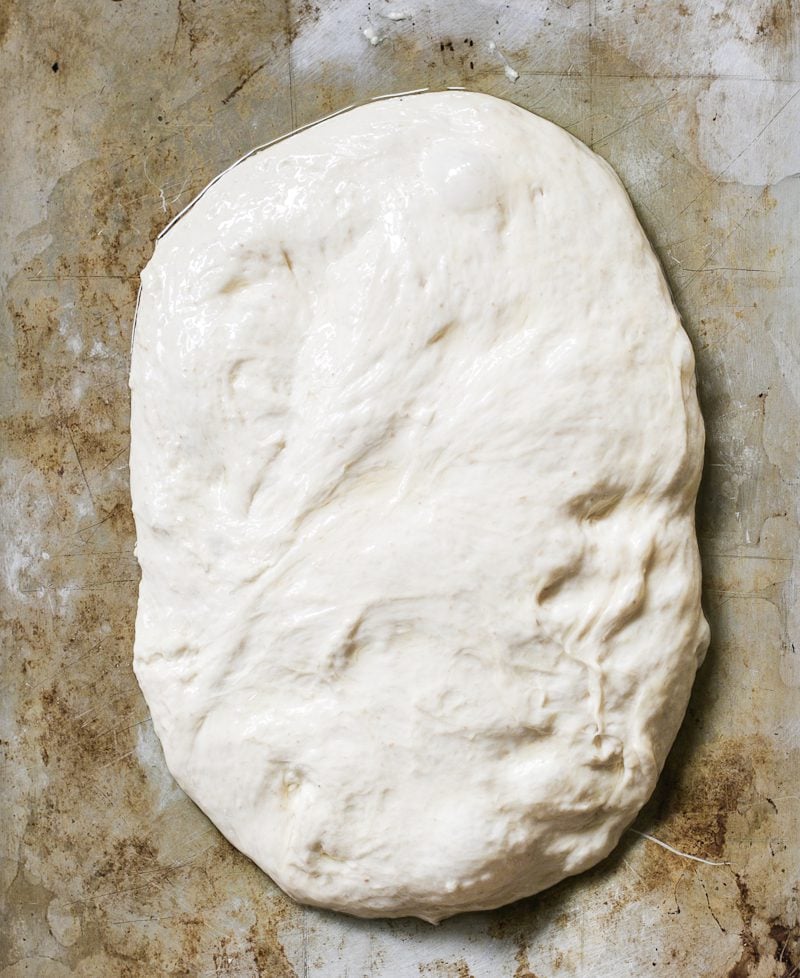
In the morning: oil a rimmed sheet pan. I use my hands to evenly coat the bottom and sides. Then place the dough onto the pan and flip it over to coat both sides. You do not need to pull or stretch the dough to fit the pan. The dough needs to relax first, which happens naturally in the next step.
Cover the dough (I use an inverted sheet pan instead of wrap. It doesn’t touch the dough). Let rest for 1 1/2 to 2 hours or until puffy. Preheat your oven to 425 F (220 C).
Note: I like to rest my dough in a warm spot, usually on top of the oven while it preheats. The dough becomes more soft and bubbly.
Tip: Instead of a sheet pan, you can bake sourdough focaccia in a non-stick rectangular pan instead (9 x 13- inch or 10 x 14-inch).
Step 4: Assemble The Focaccia
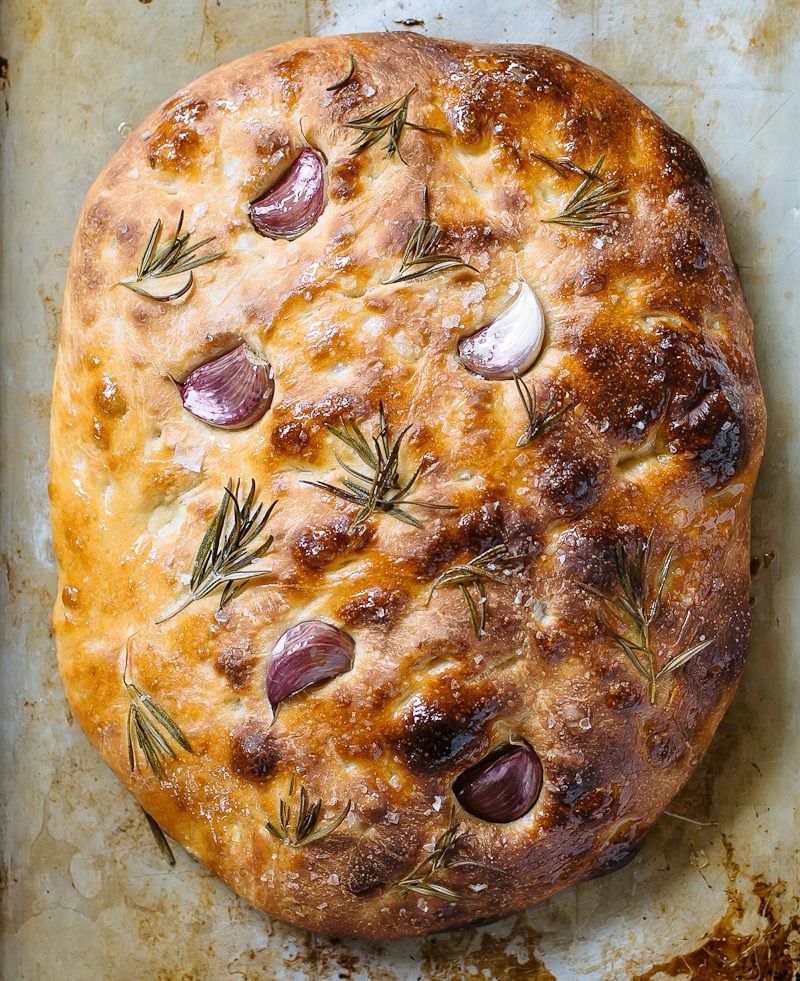
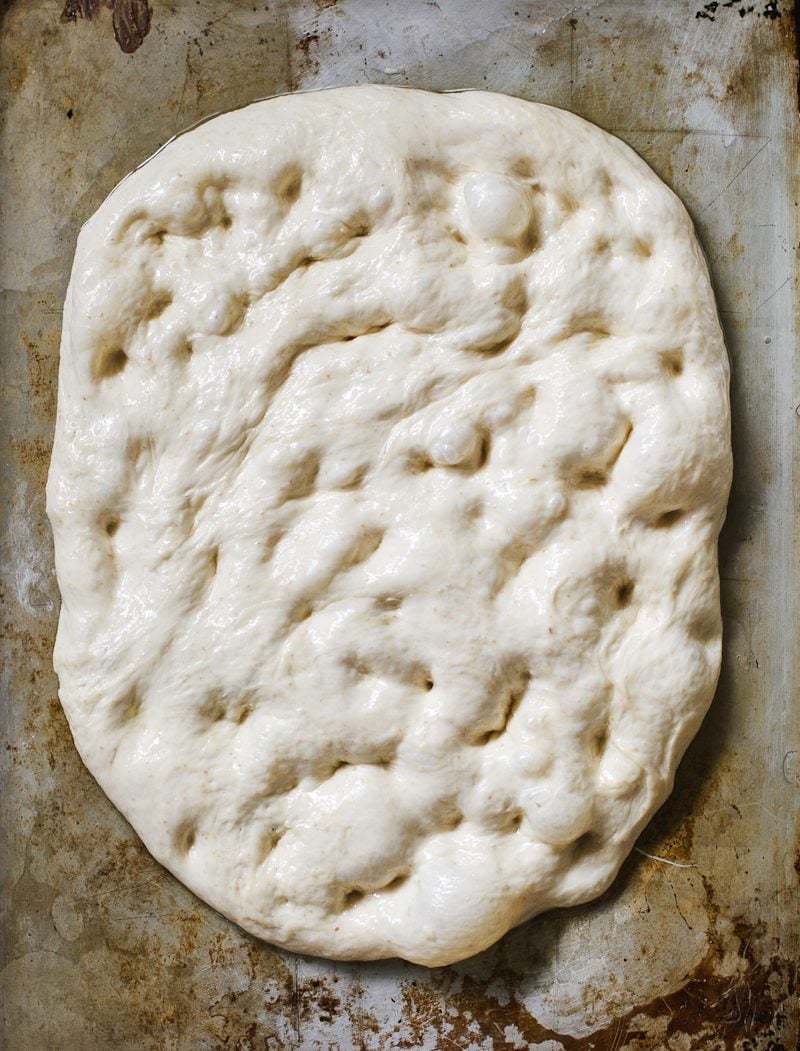
Right before baking, gently dimple the dough with oiled fingertips. As you dimple, the dough will naturally begin to stretch outward. Continue (gently!) until you’ve created a rustic rectangular or oval shape. The dough won’t go all the way to the corners and sides of the sheet pan, which is fine.
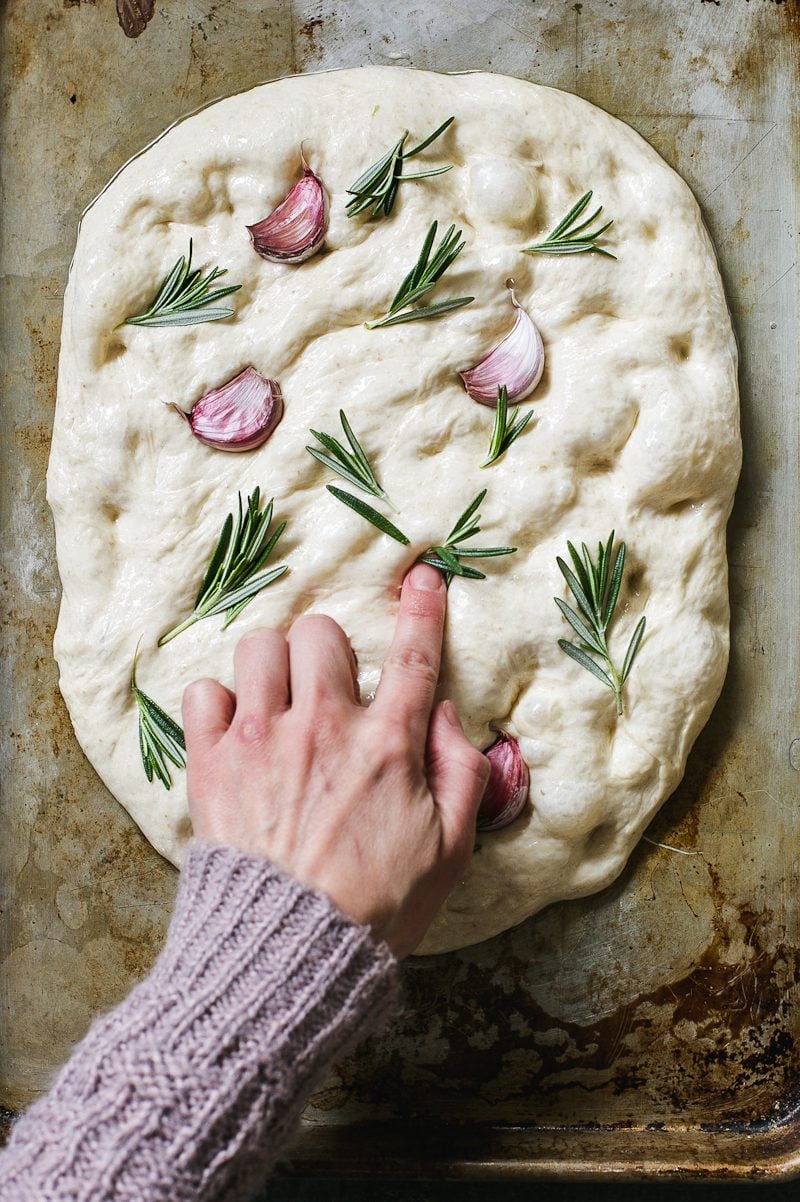
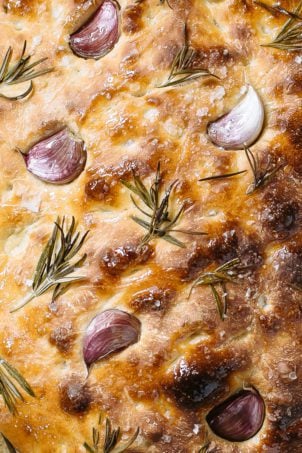
If using toppings, press them into the dough. As the dough rises it will puff up, so the toppings need to be well anchored. Press down deeper than you’d think. Otherwise they will pop out!
Step 5: Bake The Focaccia
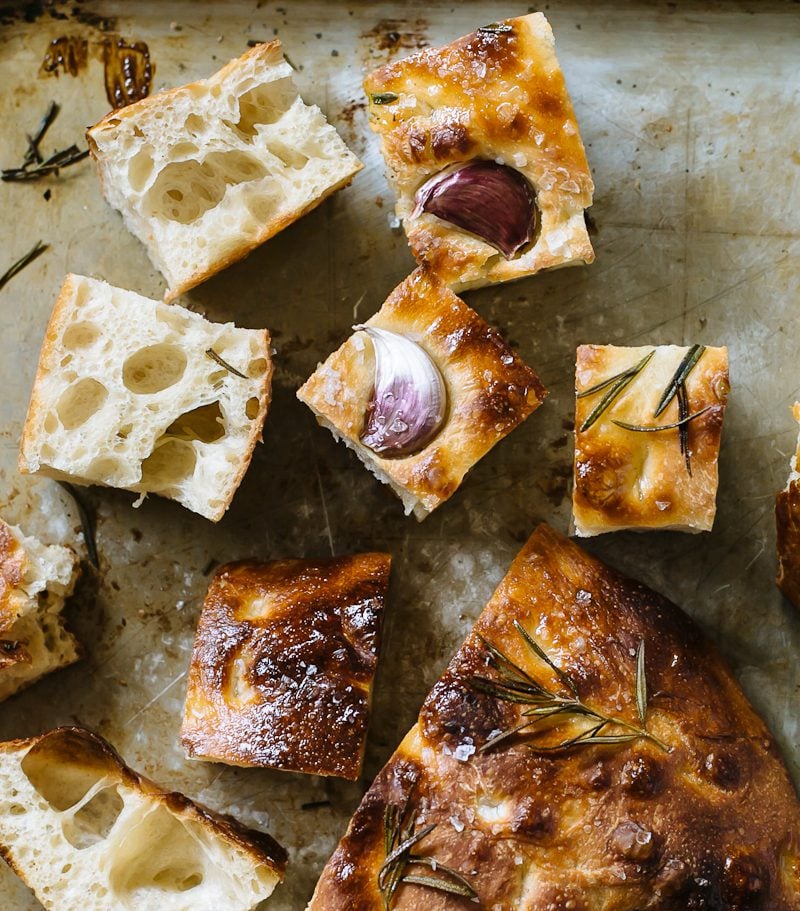
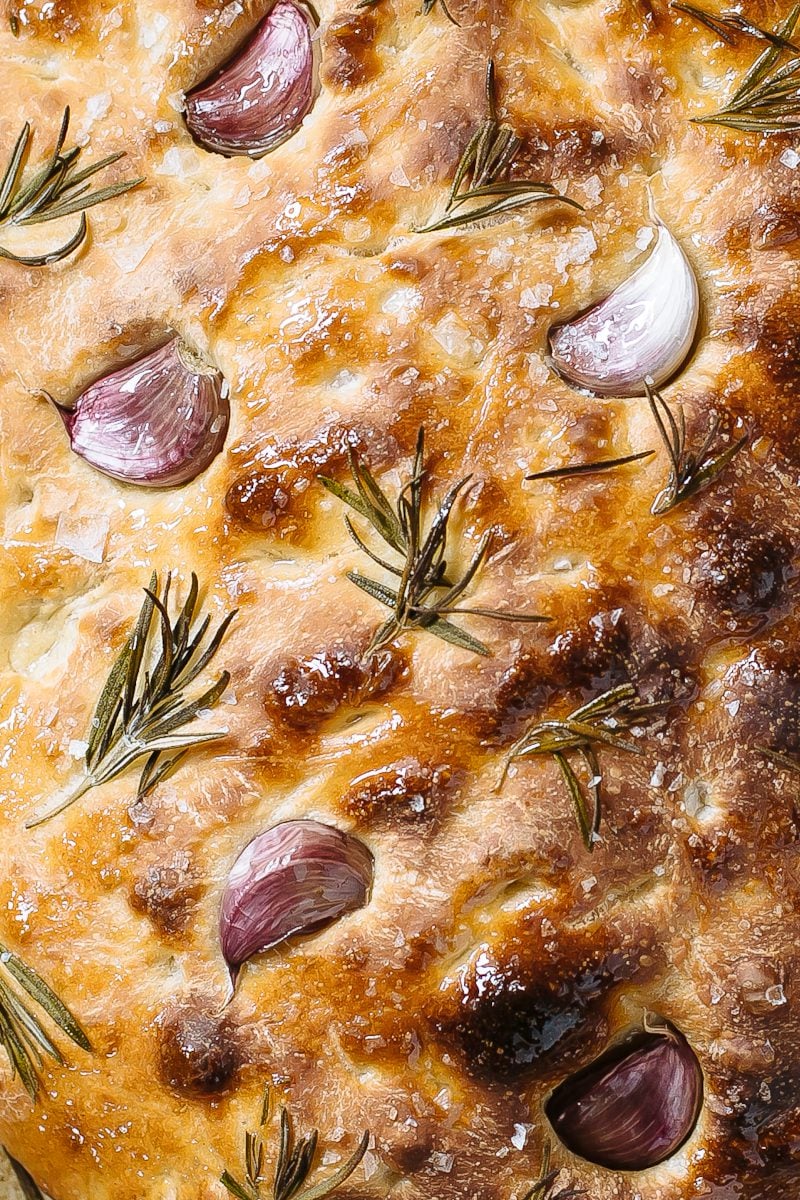
In the oven, set the dough on the center rack. Bake the focaccia for 25-30 minutes or until golden brown. Remove and cool on a wire rack so the underside does not steam for at least 30 minutes. Cut into wedges or squares, and serve warm with dipping oil, if preferred. Delicious!
How to Par-Bake Sourdough Focaccia
Want to prep ahead and bake later? Par-baking is a game changer for serving fresh, warm bread at dinnertime. And it’s perfect for stress free entertaining. Here’s how:
- Bake for 15-18 minutes at 425 F (220 C). The crust should be set but pale, with a golden bottom.
- Cool completely on a wire rack to prevent the underside from steaming.
- Wrap and store at room temperature for up to 6 hours.
- Finish baking in the pan for 12-15 minutes, until golden and crisp.
Sample Sourdough Baking Schedules
The key to sourdough is timing. Here are 2 sample baking schedules to follow and adapt according to season. In my experience, the overnight method is best in cooler temperatures (the dough can survive a long rise without becoming over proofed in the morning). The daytime method is best in warmer temperatures when the dough rises faster. As a rule of thumb, temperature controls time and ultimately: your baking schedule.
Fall/Winter (overnight method)
- 4-6:00 PM: Feed starter
- 8:00 PM: Make the dough
- 8:30 PM: Let rise overnight (bulk rise)
- 8:30 AM (the next day): Inspect the dough. Does it need more time to rise? If so, give it more time, otherwise continue on.
- 9:00-11 AM: Second Rise
- 11:30 AM: Par-bake or Bake.
Spring/Summer (daytime method)
- 8 AM: Feed starter
- 10 AM: Make the dough
- 10:30 AM: Let rise during the day (bulk rise)
- 3:00 PM (onwards): Second rise
- 5:00 PM: Par-bake or Bake
What To Bake Next?
If you haven’t tried it yet, have a go at my beginner sourdough bread recipe for a golden, crackly loaf with a plush interior crumb, my glossy, NY-style sourdough bagels and the highly popular: soft and gooey sourdough cinnamon rolls that you’ll need a hundred napkins for.
By signing up, you agree to receive emails from The Clever Carrot. Unsubscribe at any time.
Beginner’s Guide To Sourdough Focaccia Bread
- Prep Time: 15 hours
- Cook Time: 30 minutes
- Total Time: 15 hours 30 minutes
- Yield: 1 large focaccia 1x
- Category: Sourdough Bread Recipes
- Method: Oven-Baked
- Cuisine: American
- Diet: Vegetarian
Description
Master the best easy sourdough focaccia bread—soft, fluffy, and naturally leavened with bubbly, active sourdough starter. This step-by-step recipe includes an overnight rise, no kneading, and simple tips for par-baking the dough. Adapted from my bestselling book Artisan Sourdough Made Simple.
Ingredients
- 50–75 g bubbly, active sourdough starter
- 375 g water (see Notes below)
- 20 g honey (optional)
- 500 g bread flour or all purpose flour (see Notes below)
- 9 g fine sea salt
- 2–3 tbsp olive oil, for coating the pan
- Assorted Toppings (optional): rosemary, garlic cloves, flaky seat salt, tomatoes, olives etc.
Notes:
- Thoughts on Flour: You can use bread flour or all purpose flour to make sourdough focaccia. Comparatively speaking, bread flour yields a slightly chewier focaccia with a higher rise. All purpose flour creates a more tender focaccia. The choice is up to you. If you prefer to use all purpose flour, I do recommend King Arthur brand. Coming in at over 11.7% protein, this flour is stronger than most all purpose flours, which means it can handle a higher quantity of water without the dough becoming a gloppy mess. It’s actually stronger than most bread flours! If you cannot access this flour, make the following changes to ensure success: decrease the water to 325-350 g (start small and work your way up) OR use King Arthur bread flour with 375 g water instead.
- Thoughts on Sourdough Starter (quantity): When the weather is cold, I’ll use a higher amount of starter to give the dough a boost when doing a long, overnight rise. I’ve given you a range so you can decide what suits you best.
- For Baking: You will need a rimmed sheet pan or non-stick rectangular pan (9×13-inch or 10×14-inch)
Instructions
Before you begin: decide when you want to make the dough. The instructions (below) outline a long, overnight rise @ 68-70 F (20-21 C) Alternatively, you can rise the dough during the day. Please refer to the sample schedules in the post above and choose what suits your needs.
- Make the Dough: In the evening: whisk the sourdough starter, water and honey together in a large bowl (I use a fork for mixing). Add the flour and salt. Mix to combine and then finish by hand to form a rough dough. It will be wet and sticky. Cover and let rest for 30 minutes to an hour. Timing is flexible here. Then return to the bowl and work the dough into a ball.
- Bulk Rise: Cover the bowl of dough with lightly oiled plastic wrap (or transfer the dough to a lightly oiled dough container). Let the dough rise overnight at room temperature, approximately 68-70 F (20-21 C) for about 12+ hours. The dough will double in size (or more) when ready. Note: if the weather is warmer than 68- 70 F (20-21 C) the dough will rise faster than 12+ hrs. Please adjust your timeframes accordingly.
- Second Rise: In the morning, pour 2 tbsp. of olive oil onto a rimmed sheet pan (or 1 tbsp. olive oil if using a non-stick rectangular pan). Use your hands to evenly coat the bottom and sides. With your oiled hands, remove the dough onto the pan, and then flip it to coat both sides. Cover and let rest for 1 1/2- 2 hours or until very puffy (I use an inverted sheet pan to cover the dough). Preheat your oven to 425 F (220 C). Note: I like to rest my dough in a warm spot, usually on top of the oven while it preheats. The dough becomes soft and bubbly.
- Assemble the Focaccia: Right before baking, gently dimple the dough with oiled fingertips. I start at the bottom of the pan and work my way to the top. As you dimple, the dough will naturally begin to stretch outwards. You should end up with a rustic rectangular or oval shape, about 14 x 9-inches (36 x 23 cm) or larger. The dough won’t go all the way to the corners and sides of the sheet pan- this is OK. Note: If using a rectangular pan, the dough will naturally fill the shape of the pan.
- Add Focaccia Toppings (optional): Press your preferred toppings into the dough. As the focaccia rises, the dough will puff up. The toppings will pop out if not properly anchored. If using garlic, I keep the cloves wrapped in their papery peels to prevent burning. Remove and discard the peels before eating.
- Bake the Focaccia: Place the dough onto the center rack. Bake for 25-30 minutes or until crisp and golden brown. Remove from the oven and cool on a wire rack before cutting. TIP: To par-bake focaccia dough: Bake for approximately 15-18 minutes @ 425 F (220 C). The crust will be set, very pale in color and golden underneath. Remove the focaccia from the pan and cool on a wire rack. Once completely cool, wrap in plastic wrap and store at room temperature for up to 6 hrs. To finish, return to the pan and bake for 12-15 minutes.
- To serve, cut the focaccia into wedges or squares and enjoy warm!


Comments
Amber says
Another question, I seen the comment about par baking then freezing, defrosting, baking.
Would you recommend the 15-18 par bake. Then to finish off the baking, defrost at room temp and finish at 425 for the remaining 10-15 minutes? Do you recommend checking bread for a certain temp? Thanks so much!
Amber says
I baked at least 30 of these, I sell them locally and they’re a HIT! One question as I learn, I’ve had several people ask about freezing them. Unfortunately I read the par bake/freeze comment after I baked completely. How would you recommend reheating after being frozen? TIA
Jeff Bellamy says
you could try the same technique as for a loaf. Run under the tap and then bake. I do 30 minutes for a loaf so maybe 18-20?
Ally says
This is forcaccia is amazing! Turns out perfect every time I make it. I’ve started taking it to family gatherings and everyone always devours it. Thanks for a great recipe!
Emilie Raffa says
This is so great to hear. Thanks Ally!
Paige says
Thank you so much! I just made this for today’s lunch and the kitchen smelled amazing while baking. It was so easy here in Florida thanks to your timing suggestions. Definitely a recipe to be kept on repeat.
Diane Sulllivan says
I have made this 5-6 times since February.. So good and easy. I love the sourdough recipes but this is the one! I use rosemary & maldon sea salt.. In the summer I will add tomatoes.
Kryyysta says
This is the only recipe I e ever followed to make this kind of bread, and wow, it’s seriously amazing. I don’t even have to follow it exactly, like, I let it rest way longer than stated and all good. Amazing!!!
Michelle says
Just made this and turned out great! It has the same crust, etc. as the pizza we had in Rome years ago. Will definitely make it again!
Angela says
I love this recipe so much! I’ve made it several times now, and I’ve always used unbleached all purpose. I’m all out of unbleached at the moment and was wondering if this can still be made with regular bleach flour. Worried that it won’t rise so I thought I’d ask if you’ve ever tried it!
Emilie Raffa says
Great question. Believe it or not, I’ve never made this with bleached flour! I typically stay away from bleached flour, only because you never know how it might interfere with sourdough, which is a living culture. With that said, I always encourage people to experiment. If you do so, please let me know how it comes out :)
Arlene says
Made this and loved it! Thank you for the recipe and the easy to follow instructions. This recipe is definitely a keeper.
Emilie Raffa says
You’re very welcome Arlene. Thanks so much for the feedback :)
Cyndi L Olsen says
Do you have this recipe with North American measurements?
Terri says
At what point could I put it in the fridge if I’m not ready to bake it yet? After the 12 hour fermentation? If so, how long should I leave it out on the counter once I take it out of the fridge? And how should I continue?
Emilie Raffa says
Hi Terri! You can do two things: 1.) Chill the bulk dough when *almost* doubled in size. When ready to bake, let it rest at room temperature if it needs more time to rise, and then continue with the next steps. 2.) Do the full bulk fermentation followed by the second rise in the fridge (shape the dough into a ball, place onto your oiled pan, cover with oiled plastic wrap, and chill until ready to bake). The dough will spread out and relax slightly in the fridge. When ready to continue, let it rest for an hour or so (it depends on how warm it is), dimple and bake.
Marcie says
I just made this into a pizza. Used a 17×12 pan. Baked it 12 minutes , topped it and baked for 17 more minutes. Crust was so flavorful! It did stick to the pan a little. We loosened it by sticking a turner underneath all the way around. I’ve made focaccia before but this was so flavorful. I used half King Arthur all purpose and half store brand unbleached all purpose. Thanks so much for the recipe and instructions.
Emilie Raffa says
Marcie, this is fabulous. Thanks for sharing your feedback!
Jen M. says
This is a great recipe. Thank you. I decorated mine with lots of thinly sliced veggies, a garden scene. So much fun!
Jen in Virginia
Emilie Raffa says
SO fun. I bet it looked amazing too ;)
Cassie Walker says
I’ve come back to this recipe time and time again because it’s so great! This next time I plan to make a focaccia pizza for my husbands birthday. Any tips on how long I should bake the focaccia before adding toppings and putting it back in the oven?
Emilie Raffa says
Hi Cassie! Great question. I actually have a separate recipe for sourdough (pan) pizza with a par-bake step if you want to check that out first (click here). But generally speaking: bake dough on bottom rack @ 450 F for 15-18 minutes, or more until the surface is set and the bottom crust is golden brown. Hope this helps!
Grace says
This was delicious!!!! So easy to follow and a flexible recipe. I rose the dough overnight and then wanted to bake it later so I put it in the fridge for a few hours and then just took it out and let it come to room temp, then put it on the sheet pan and continued. Worked great!
Emilie Raffa says
Hi Grace! Yay! Excellent tips. Thrilled you liked it ;)
Libby says
This was amazing! Made for the first time yesterday with fresh rosemary and a sprinkle of sea salt
Emilie Raffa says
I absolutely love rosemary on focaccia. I don’t think I could make it without some!
Tram says
I made this in a glass 9×13 pan and it stuck so much I had a bottomless focaccia, despite more than enough oil on the pan. The taste and texture were fabulous though, so I would like to try again. Any tips on how to prevent sticking if not using a nonstick?
Emilie Raffa says
Hi there! Yes: focaccia (or any bread dough) will definitely stick to the bottom of a glass pan. In my experience, buttering the glass pan first, followed by a layer of oil helps, but it can still be a little risky! It’s worth a shot though, if you do not have a non-stick option. Alternatively, line the pan with parchment paper to prevent sticking altogether. Hope this helps!
Daneen Avendano says
Hi there! I always generously butter my metal pan and the top with a few tablespoons of olive oil. The butter adds so much nutty flavor and prevents sticking.
Emilie Raffa says
Hi Daneen! Yes: this is an excellent suggestion. The butter adds great flavor too (sometimes I use salted!) Thank you :)
Torrie says
Fantastic and easy! The instructions really left no room for error. I did the overnight method and added kalamata olives, dried rosemary and garlic cloves. It was my first attempt at focaccia and will not be my last, thank you!
Emilie Raffa says
Excellent, Torrie! Thanks so much for the feedback. I’m glad you enjoyed the focaccia :)
Joe S says
Thank for for this fantastic bread! What a great recipe. My neighbors are excited when they see me coming with a bread bag! They think I know what I’m doing, lol.
Anyway, can you just half this recipe? If so, any tips?
Thanks
A Fan
Emilie Raffa says
Hi Joe! Haha.. better than Santa! ;) To answer your question, you can definitely cut this recipe in half. A few tips: If using a 9×13-inch pan for baking, and you spread the dough all the way out to the corners and sides of the pan, the crust will be thinner due to the adjusted dough size (this is what I do for my sourdough pizza, linked here. In fact, check out the recipe at the bottom of the pizza post for a similar/smaller adjusted dough quantity). Then, just watch your bake time. Additionally, you can try baking in a 9-inch springform pan for a round focaccia.
Amy says
I’ve tried this and it’s amazing! I am wanting to make it again today but I’m out of honey. What would be a good substitute?
Emilie Raffa says
Hi Amy! Thank you! I’m thrilled to hear this :) A pinch of sugar would be a good substitute. Or just omit altogether.
Ashlee says
Maple syrup!!
Jacqui says
I’m a novice and have been following your recipes- they are wonderful!!! Thank you!
I’m curious if you could freeze the par baked bread then finish cooking when you go to use it? I wanted to give it as a gift :)
Thank you!!
Emilie Raffa says
Hi Jacqui! Yes, you can freeze the par-baked crust. I do this all the time. Wrap tightly in plastic wrap and then a layer of foil. Defrost at room temp. and then continue baking when ready.
Kathleen Gundry says
I made this and it was fantastic (added kalamata olives and fresh rosemary sprigs). I would like to make smaller ones (for gifts, to travel). Can I just divide the dough into two pieces and shape two smaller oval foccacias before baking?
Emilie Raffa says
Absolutely. Just keep your eye on the bake time. The two smaller focaccias will be slightly thinner compared to one large one.
Brandt says
This is the first focaccia recipe I’ve seen where there’s no oil in the dough itself.
Emilie Raffa says
You are correct! Since the pan is generously coated in oil, I opt to exclude it from the actual dough. However, if you’d like to add some, olive oil will “tenderize” the finished product making the interior crumb more plush. About 1 tbsp. is sufficient.
Sarah says
Amazing focaccia. Followed recipe without variation. Used a 10x15x1 sheet pan and baked for 27 minutes. The crust is lightly browned and the texture is soft and chewy. I used slivers of garlic, slices of cherry tomatoes, sprigs of rosemary, mozzarella pearls and balsamic reduction. Please come to my house and take it away so I can’t keep eating it.
Emilie Raffa says
FABULOUS! Thrilled you enjoyed it, Sarah. Thanks for the feedback :) And yes, happy to join you! Balsamic reduction sounds so good.
Christine S says
Love your sourdough loaf recipe and so excited to make this one now! I’ve mixed everything together before the bulk rise. Is there any chance I could pop this in the fridge halfway through the bulk rise (or at the beginning of the second rise) to have it be ready for 2 or 3 days from now?
Emilie Raffa says
Hi Christine! For focaccia in 2-3 days from now, I’d refrigerate the dough mid-bulk rise for best results. It’s less likely to overproof. When you’re ready to continue with the recipe, give the dough more time to rise at room temperature if needed- it won’t rise much in the fridge. Enjoy!
Glynda says
My first time making Focaccia Bread. Even though I only used 2 cups of all purpose flour instead of 4 cups by mistake (I had a slight problem with gram conversion) it turned out great! Of course, I couldn’t make it into a ball but managed to get it in the baking pan. I added tomato sauce, olives, garlic, sun roasted tomatoes, Italian Seasons, purple onion, feta and mozzarella cheese as toppings. I am proof that it would be hard to screw this wonderful recipe up. Already I’m working on the next batch using the correct conversion!
Cyn says
For overnight bulk fermentation, does that happen in the refrigerator or counter top.
Emilie Raffa says
Hi there! The bulk rise happens at room temperature (counter top). Not in the fridge. Enjoy!
Maria says
This was so easy and absolutely delicious!
Stefanie says
This was wonderful!
Emilie Raffa says
Excellent to hear! So glad you liked it Stefanie. Thanks for the feedback :)
Mary says
Forgot the 5stars!!! I’d give it 10!
Mary says
This recipe is perfect!!! I have made it as written and I have made it as pizza crust. I proofed overnight and in the morning put the whole thing in the fridge. About 2:30 I took it out of the fridge and put it on the oiled black cookie sheet as usual but stretched it a little more into a rectangle as I was doing that. I let it rest for two hours then used my fingers to stretch it gently to the sides, added toppings and baked as usual. The result was incredible if you like a thicker crust. So airy and soft with crispy bottom. Just wanted to share!
Laura W says
Just made it. This is THE BEST sourdough focaccia recipe out there. I even bought the pan you recommended and the bottom crust came out perfectly golden and crisp. Bookmarking this one. Thank you Emilie!
Emilie Raffa says
Isn’t that pan amazing? I still get excited just thinking about it ;)
Julie Huddleson says
After purchasing your amazing sourdough book and baking the chocolate sourdough and cinnamon raison swirl sourdough bread, I am most anxious to try the focaccia recipe! One question I would have is why the outer skins of the garlic cloves are left on…..I’m wondering if it is to keep them from burning?
Thank you for the amazing book and I look forward to baking and learning from it!!
Julie Huddleson (@flippingvintagetexas)
Emilie Raffa says
Hi Julie! Wonderful! Yes, so the garlic skins are kept on during baking to prevent the cloves from burning. Happy baking :)
Carol Flowers says
Emilie Thanks for the fast response on the focaccia bread, I will try that. I have made quite a few of the recipes in your book but this one is one of our favorites. Well, the cinnamon raisin swirl is hard to beat. I have to keep that one in the freezer for the husband. Have a great weekend.
thomas says
Why is there no stretch and fold for the focaccia recipe.
Emilie Raffa says
Hi Thomas! It’s an optional technique that can be applied, if you prefer. Do so during the bulk rise. More info here: How to Stretch & Fold Sourdough.
Carol says
I made the focaccia recipe. Everything went great. The top browned beautifully but having trouble getting the bottom to brown. I used a cast iron jelly roll pan.
Emilie Raffa says
Hi Carol! So glad to hear! Try baking on a lower rack first (closer to the heat source), and then move the pan up later on, if you want. This will give the bottom crust a head start. Make sure the pan is oiled. Also: double check your oven temp with a thermometer for accuracy.
Linus says
Peels on the garlic? My whole family and I are upset!
Emilie Raffa says
Hi there! Not sure I understand your comment? The peels prevent the garlic cloves from burning while the focaccia bakes. Just remove them before eating (this is mentioned in the recipe). Thanks :)
Tara says
I’m loving this recipe, but finding it takes longer than the recommended time to brown. I’ve been using a pan with high sides on it, and wondering if thats the problem. Hmm..
Emilie Raffa says
Hi Tara! The cause could be a few things. See thoughts below!
1.) Check your oven temp with a thermometer to make sure it’s hot enough. This is key.
2.) Drizzle a bit of olive oil on the surface of the dough to encourage browning.
3.) Is your dough under proofed (didn’t rise for long enough)? Oftentimes, this creates lighter colored bread.
4.) As for the pan, a standard 9×13-inch pan shouldn’t give you any issues. If you’re using a different pan with notably higher sides, consider using something else. A sheet pan is a great alternative.
Hope this helps!
Loretta says
Good recipe, I have found others too oily but this one worked out well. Olives and tomato and basil for me, delicious.
Emilie Raffa says
Sounds delicious, Loretta. I literally plucked all of our basil out of the garden last night. Going to make pesto, focaccia and pasta salad! Glad the recipe worked out for you. Thanks for the feedback :)
Megan says
I am new to this and am a little confused lol! Could you please clarify if I feed the starter a few days before making the dough or do I feed the starter the morning of making the dough? Thank you!
Emilie Raffa says
Hi Megan! You’ll need to feed your starter a fews days prior to making the bread dough. It doesn’t activate on demand (like instant yeast). However, once your starter is really strong, it might only need a few hours to activate. This means, for example, you could feed your starter in the morning or afternoon, and make the dough at night. Does that make sense? Once you get the hang of it, there are a few possibilities to experiment with! Also, this article is very helpful, Feeding Sourdough Starter: My Best Tips & Tricks.
Megan says
Thank you so much!
Megan
Mel says
I am a total novice sourdough baker. I finally got my starter to a healthy active state and decided to make this focaccia. I only had extra virgin olive oil and it worked out perfectly. It is incredible. I’m very proud of my first attempt. Thank you for an amazing recipe.
Emilie Raffa says
Mel, this is so great! I’m glad to hear this. Thanks for your feedback :)
Susan says
Can I mix this in the morning or afternoon and bulk rise in the fridge for 24 hours? Thanks!
Emilie Raffa says
Hi Susan! You can, but the dough won’t rise much in the fridge, as opposed to a dough made with instant yeast. In comparison, sourdough takes longer to rise and it needs a warm spot to jump start process. I’d recommend bulking the dough at room temp. for a few hours if you can, and then transferring it to the fridge. You can continue to let the dough rise when you remove it. Alternatively, let the dough rise overnight. Once doubled in the morning, chill in the fridge until ready to use. Hope this helps.
Susan says
Thanks for the different options. I’ll give it a try!
Terri says
What should you do after removing dough from fridge?
Patricia says
RE: oil…..what smoke point do you recommend? (I only have EVOO, ghee, & safflower oil).
Emilie Raffa says
Hi Patricia! Generally speaking: 410 F or higher is ideal. The smoke point of evoo is usually lower, which is why it has a tendency to burn when baked at high temperatures. This is not always the case for every evoo (it really depends on quality and specific olive variety) but a good fyi. As a recommendation, try experimenting with your current evoo for a benchmark or use the safflower oil. I’ve never made focaccia with ghee. Let me know if you try it!
Victoria says
Love this recipe!
Emilie Raffa says
Thank you Victoria! xx