Let’s bake this easy sourdough focaccia recipe, step-by-step. No kneading, no shaping, no Dutch oven. Just golden crisp edges, a light airy crumb, and a simple overnight rise naturally leavened with active starter. Adapted from my bestselling book Artisan Sourdough Made Simple.
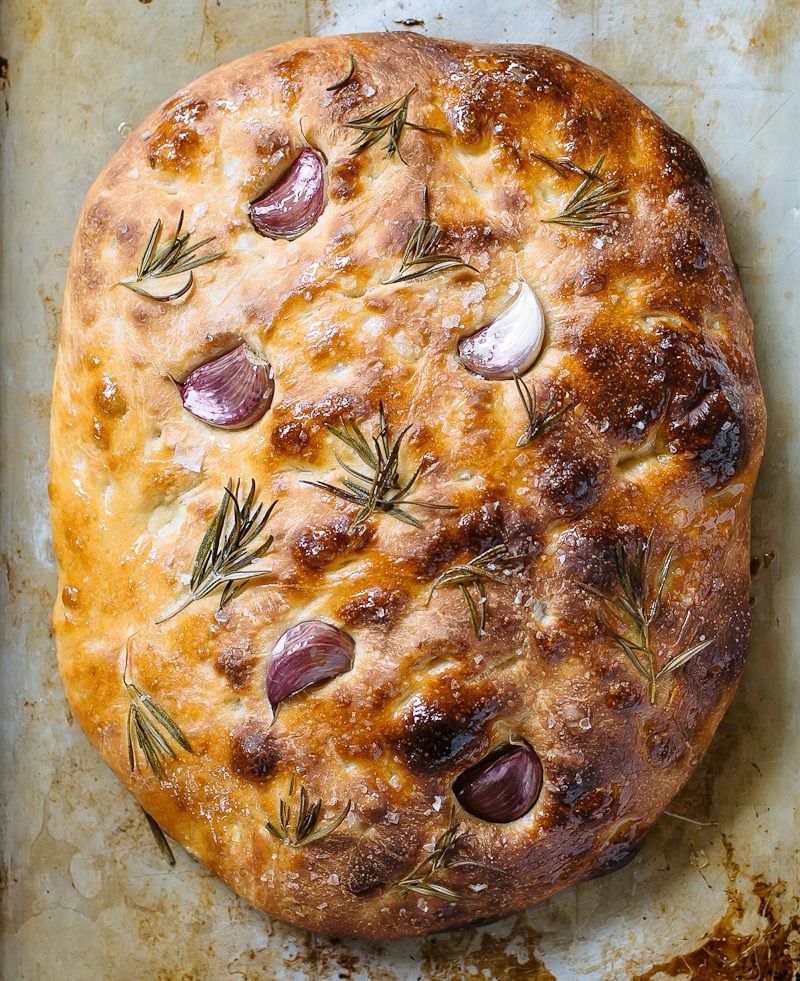
If you’re new to sourdough bread and want an easy, no-knead recipe to expand your repertoire, my sourdough focaccia is you next move. Crisp edges. Soft center. Perfect, tangy flavor.
Adapted from my book Artisan Sourdough Made Simple, I often recommend this recipe to beginners- there’s no kneading, no scoring, no Dutch oven. Just a handful of ingredients, a bread pan (or not) and some hands off time to let the dough rise. You can start right now.
At home, I make sourdough focaccia at least once a week to serve alongside cozy soups and sourdough pasta dishes. Leftovers become golden homemade croutons, fluffy breadcrumbs or sourdough pizza crust (more sourdough bread recipes here). That aside, poking soft, squishy focaccia dough is wildly therapeutic! Let’s make it together, step-by-step.
How To Get A Sourdough Starter For this Recipe
A sourdough bread recipe of any kind cannot be made without a sourdough starter.
You have two options: make one from scratch (see my beginner sourdough starter recipe), buy one online or get some from a fellow baker. Even bakeries sell starters. If you already have one, and need assistance for ongoing care, read my companion articles, Feeding Sourdough: My Best Tips & Tricks and Troubleshooting Sourdough Starter.
My Sourdough Focaccia Tips
Tip #1: Plan ahead. Feet your starter a few days in advance prior to making the focaccia dough. This will ensure a vibrant starter that’s strong enough to make the dough rise.
Tip #2: Use regular olive oil (no extra virgin). It has a higher smoke point and is less likely to burn the top and bottom of your focaccia.
Tip #3: Pick the right pan. Sourdough focaccia can be baked on a regular rimmed sheet pan or a rectangular metal pan (e.g. brownie pan). If using the latter option, I suggest this non-stick pan by Lloyds which I’ve been using for years. It’s truly non-stick and makes the crispiest crust!
How to Make Sourdough Focaccia {Step-By-Step Recipe}
Step 1: Make The Dough
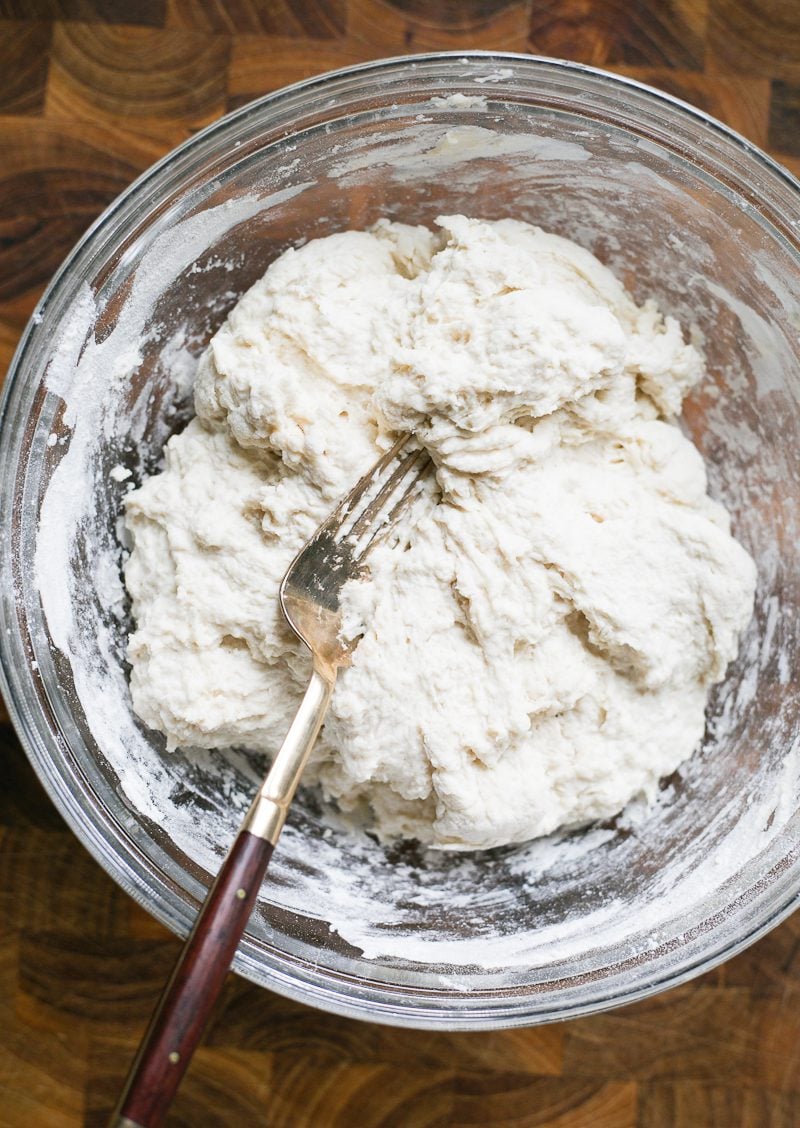
In the evening: whisk the sourdough starter, water and honey together in a large bowl (I use a fork for mixing). Add the flour and salt. Mix to combine and then finish by hand to form a rough dough. It will be wet and sticky.
Cover and let rest for 30 minutes to 1 hour. Timing is flexible here. Then work the dough into a ball. Again, it will be sticky!
When finished, transfer the dough to a lightly oiled dough container or just keep it in the same mixing bowl. It’s up to you. The next step is to let the dough rise.
Step 2: Bulk Rise (Overnight)
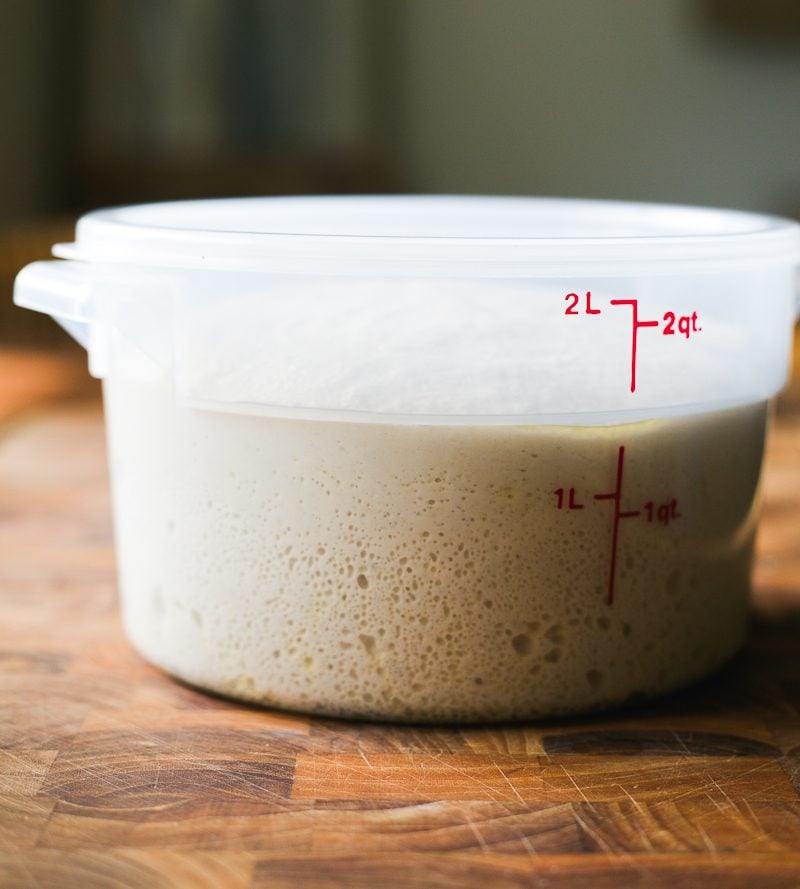
Rest the dough at room temperature and let rise overnight on your countertop. For focaccia, the dough should double or triple in size. This will take approximately 12+ hrs @ 68 F (20C).
Note: the warmer the temperature, the faster the dough will rise. So for example, if your current room temperature is 80 F (27 C), the 12+ rise time mentioned above would not apply to your specific environment. Not even close. The rise time would be shorter, say 3-4 hrs. Watch the dough, not the clock!
Diving Deeper: Why Won’t My Sourdough Bread Rise?
Step 3: Second Rise (In The Pan)
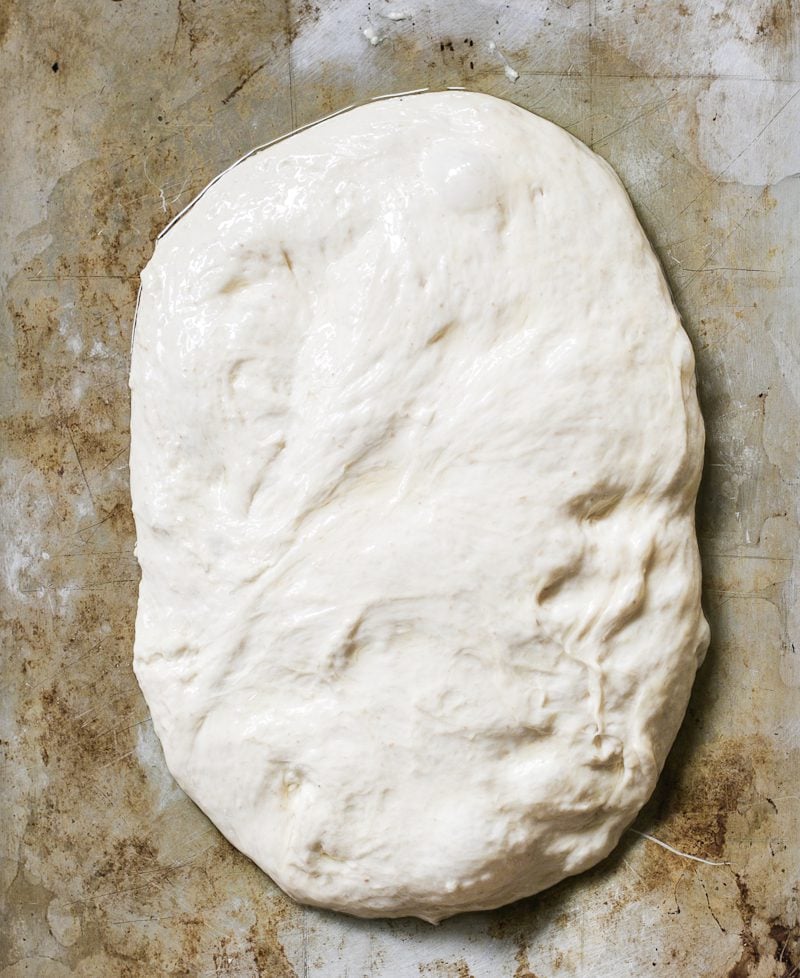
In the morning: oil a rimmed sheet pan. I use my hands to evenly coat the bottom and sides. Then place the dough onto the pan and flip it over to coat both sides. You do not need to pull or stretch the dough to fit the pan. The dough needs to relax first, which happens naturally in the next step.
Cover the dough (I use an inverted sheet pan instead of wrap. It doesn’t touch the dough). Let rest for 1 1/2 to 2 hours or until puffy. Preheat your oven to 425 F (220 C).
Note: I like to rest my dough in a warm spot, usually on top of the oven while it preheats. The dough becomes more soft and bubbly.
Tip: Instead of a sheet pan, you can bake sourdough focaccia in a non-stick rectangular pan instead (9 x 13- inch or 10 x 14-inch).
Step 4: Assemble The Focaccia
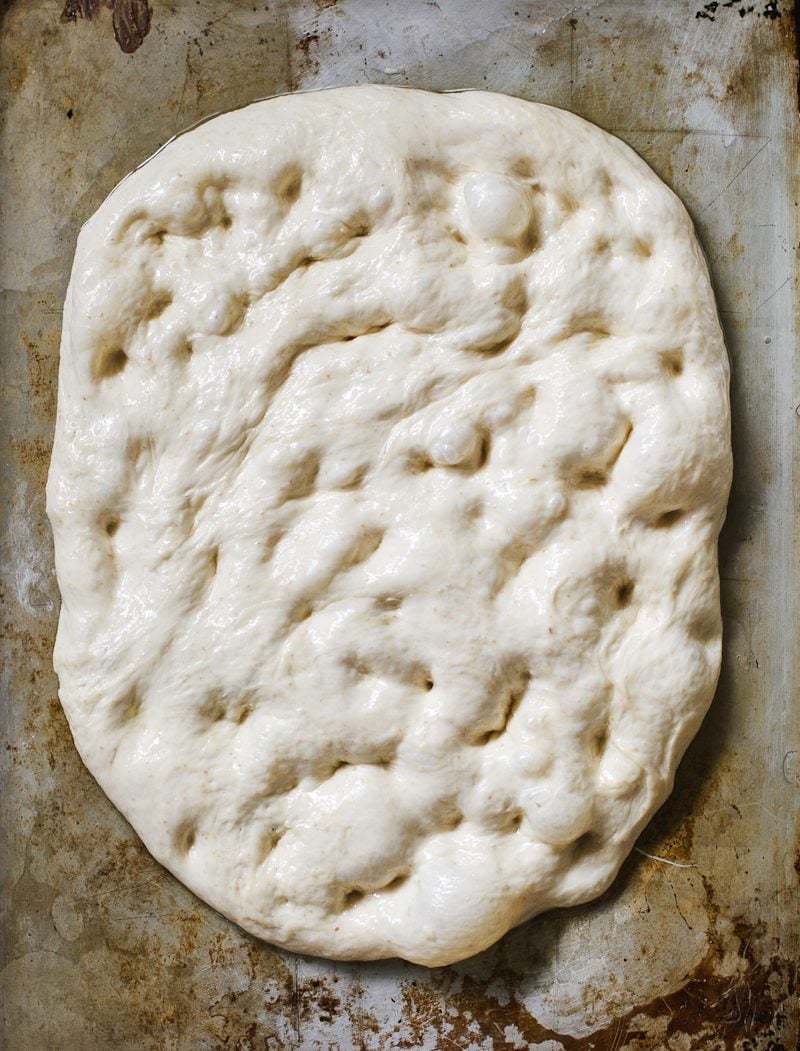
Right before baking, gently dimple the dough with oiled fingertips. As you dimple, the dough will naturally begin to stretch outward. Continue (gently!) until you’ve created a rustic rectangular or oval shape. The dough won’t go all the way to the corners and sides of the sheet pan, which is fine.
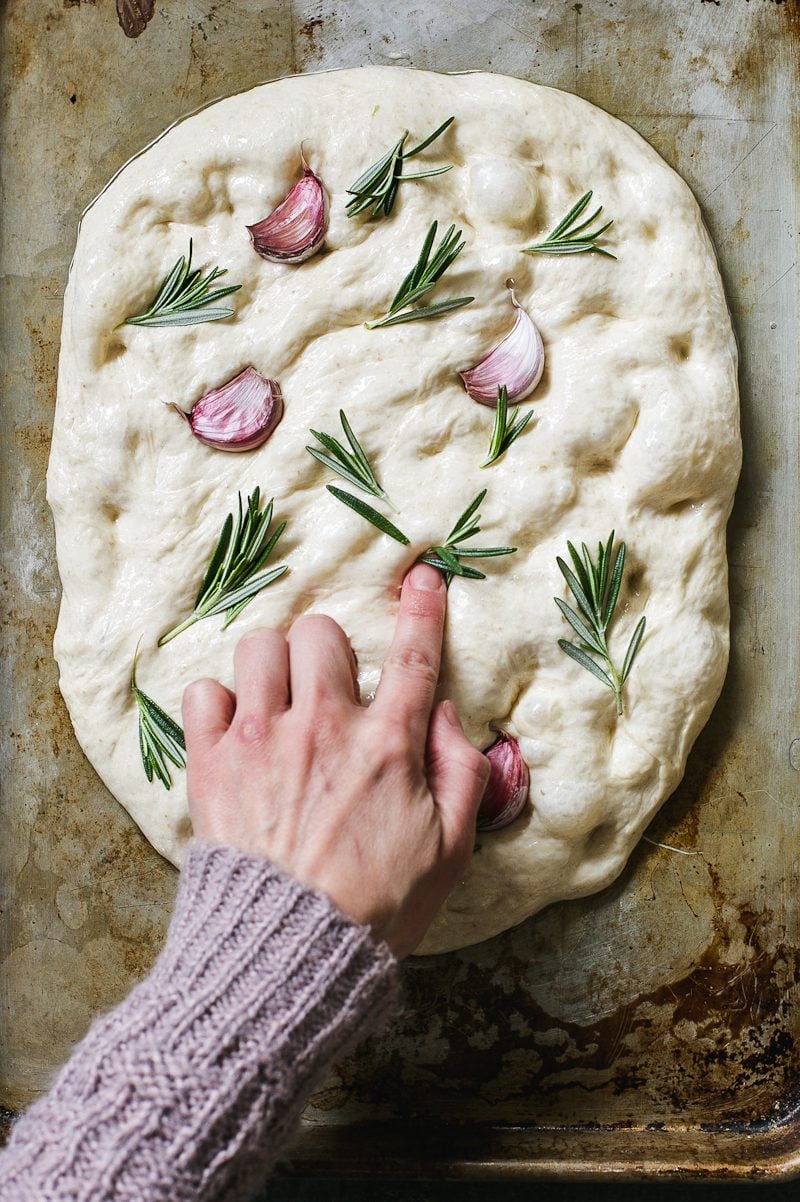
If using toppings, press them into the dough. As the dough rises it will puff up, so the toppings need to be well anchored. Press down deeper than you’d think. Otherwise they will pop out!
Step 5: Bake The Focaccia
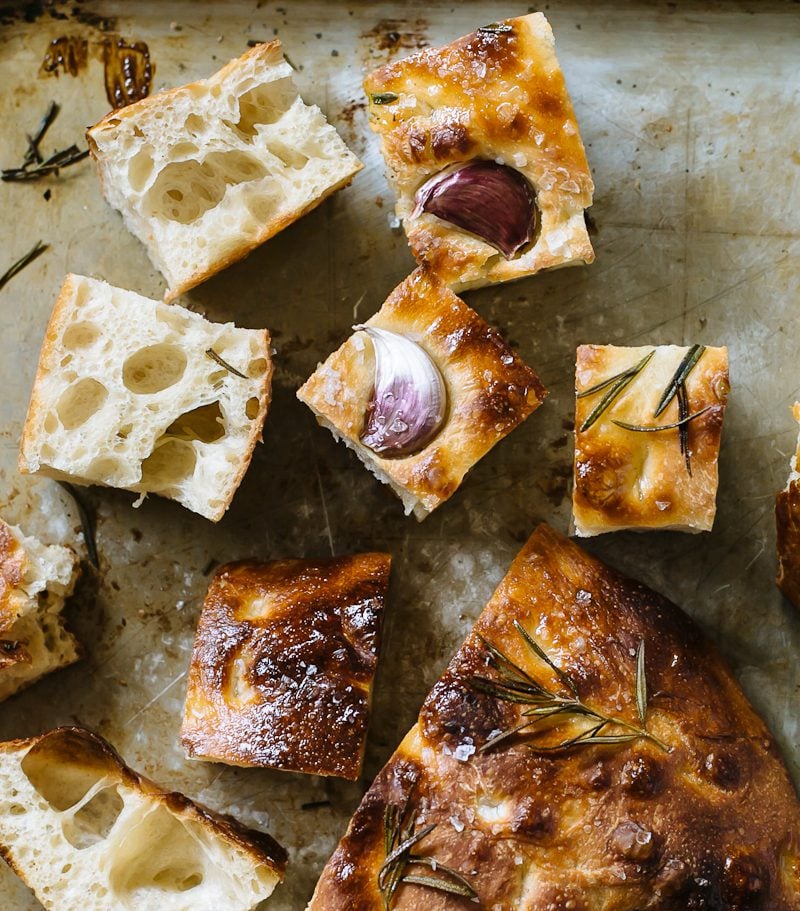
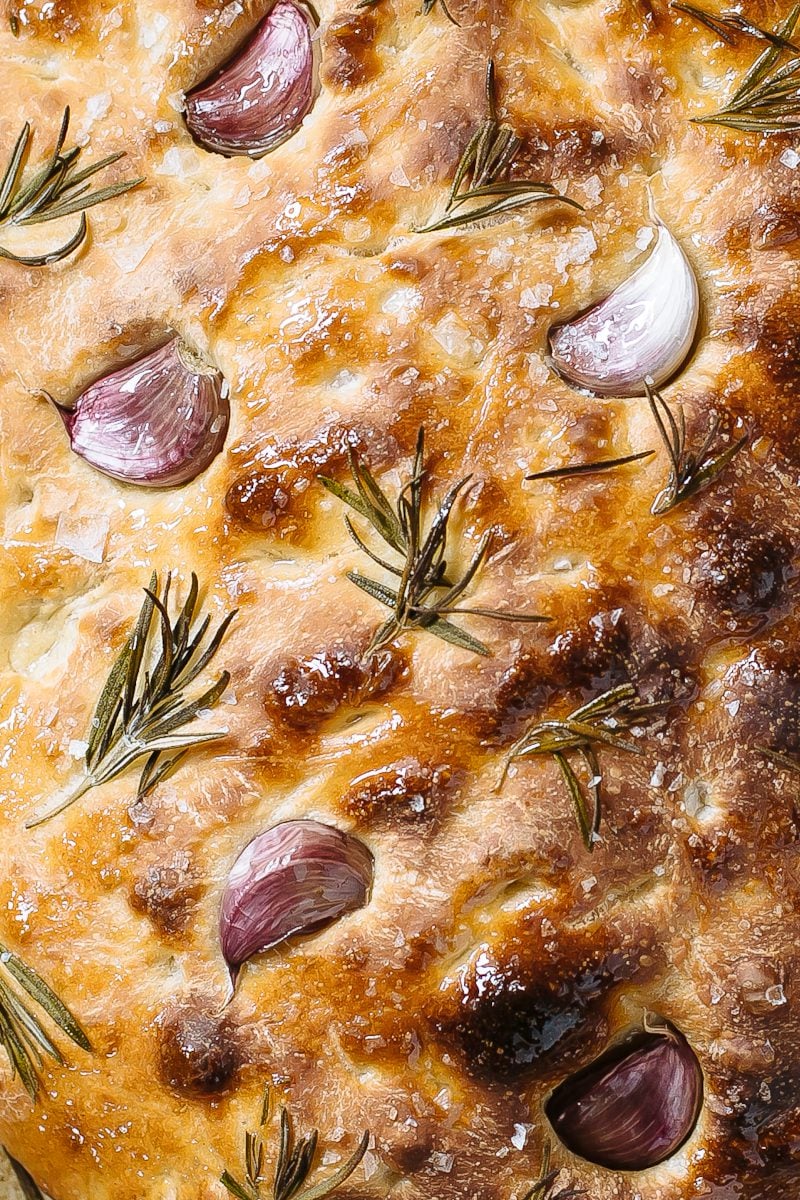
In the oven, set the dough on the center rack. Bake the focaccia for 25-30 minutes or until golden brown. Remove and cool on a wire rack so the underside does not steam for at least 30 minutes. Cut into wedges or squares, and serve warm with dipping oil, if preferred. Delicious!
How to Par-Bake Sourdough Focaccia
Want to prep ahead and bake later? Par-baking is a game changer for serving fresh, warm bread at dinnertime. And it’s perfect for stress free entertaining. Here’s how:
- Bake for 15-18 minutes at 425 F (220 C). The crust should be set but pale, with a golden bottom.
- Cool completely on a wire rack to prevent the underside from steaming.
- Wrap and store at room temperature for up to 6 hours.
- Finish baking in the pan for 12-15 minutes, until golden and crisp.
Sample Sourdough Baking Schedules
The key to sourdough is timing. Here are 2 sample baking schedules to follow and adapt according to season. In my experience, the overnight method is best in cooler temperatures (the dough can survive a long rise without becoming over proofed in the morning). The daytime method is best in warmer temperatures when the dough rises faster. As a rule of thumb, temperature controls time and ultimately: your baking schedule.
Fall/Winter (overnight method)
- 4-6:00 PM: Feed starter
- 8:00 PM: Make the dough
- 8:30 PM: Let rise overnight (bulk rise)
- 8:30 AM (the next day): Inspect the dough. Does it need more time to rise? If so, give it more time, otherwise continue on.
- 9:00-11 AM: Second Rise
- 11:30 AM: Par-bake or Bake.
Spring/Summer (daytime method)
- 8 AM: Feed starter
- 10 AM: Make the dough
- 10:30 AM: Let rise during the day (bulk rise)
- 3:00 PM (onwards): Second rise
- 5:00 PM: Par-bake or Bake
What To Bake Next?
If you haven’t tried it yet, have a go at my beginner sourdough bread recipe for a golden, crackly loaf with a plush interior crumb, my glossy, NY-style sourdough bagels and the highly popular: soft and gooey sourdough cinnamon rolls that you’ll need a hundred napkins for.
By signing up, you agree to receive emails from The Clever Carrot. Unsubscribe at any time.
Beginner’s Guide To Sourdough Focaccia Bread
- Prep Time: 15 hours
- Cook Time: 30 minutes
- Total Time: 15 hours 30 minutes
- Yield: 1 large focaccia 1x
- Category: Sourdough Bread Recipes
- Method: Oven-Baked
- Cuisine: American
- Diet: Vegetarian
Description
Master the best easy sourdough focaccia bread—soft, fluffy, and naturally leavened with bubbly, active sourdough starter. This step-by-step recipe includes an overnight rise, no kneading, and simple tips for par-baking the dough. Adapted from my bestselling book Artisan Sourdough Made Simple.
Ingredients
- 50–75 g bubbly, active sourdough starter
- 375 g water (see Notes below)
- 20 g honey (optional)
- 500 g bread flour or all purpose flour (see Notes below)
- 9 g fine sea salt
- 2–3 tbsp olive oil, for coating the pan
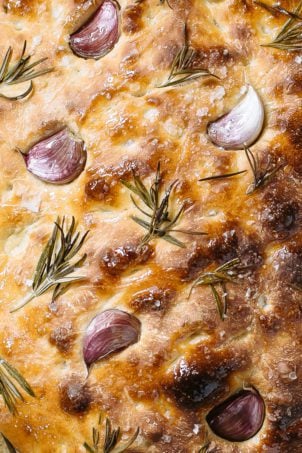
- Assorted Toppings (optional): rosemary, garlic cloves, flaky seat salt, tomatoes, olives etc.
Notes:
- Thoughts on Flour: You can use bread flour or all purpose flour to make sourdough focaccia. Comparatively speaking, bread flour yields a slightly chewier focaccia with a higher rise. All purpose flour creates a more tender focaccia. The choice is up to you. If you prefer to use all purpose flour, I do recommend King Arthur brand. Coming in at over 11.7% protein, this flour is stronger than most all purpose flours, which means it can handle a higher quantity of water without the dough becoming a gloppy mess. It’s actually stronger than most bread flours! If you cannot access this flour, make the following changes to ensure success: decrease the water to 325-350 g (start small and work your way up) OR use King Arthur bread flour with 375 g water instead.
- Thoughts on Sourdough Starter (quantity): When the weather is cold, I’ll use a higher amount of starter to give the dough a boost when doing a long, overnight rise. I’ve given you a range so you can decide what suits you best.
- For Baking: You will need a rimmed sheet pan or non-stick rectangular pan (9×13-inch or 10×14-inch)
Instructions
Before you begin: decide when you want to make the dough. The instructions (below) outline a long, overnight rise @ 68-70 F (20-21 C) Alternatively, you can rise the dough during the day. Please refer to the sample schedules in the post above and choose what suits your needs.
- Make the Dough: In the evening: whisk the sourdough starter, water and honey together in a large bowl (I use a fork for mixing). Add the flour and salt. Mix to combine and then finish by hand to form a rough dough. It will be wet and sticky. Cover and let rest for 30 minutes to an hour. Timing is flexible here. Then return to the bowl and work the dough into a ball.
- Bulk Rise: Cover the bowl of dough with lightly oiled plastic wrap (or transfer the dough to a lightly oiled dough container). Let the dough rise overnight at room temperature, approximately 68-70 F (20-21 C) for about 12+ hours. The dough will double in size (or more) when ready. Note: if the weather is warmer than 68- 70 F (20-21 C) the dough will rise faster than 12+ hrs. Please adjust your timeframes accordingly.
- Second Rise: In the morning, pour 2 tbsp. of olive oil onto a rimmed sheet pan (or 1 tbsp. olive oil if using a non-stick rectangular pan). Use your hands to evenly coat the bottom and sides. With your oiled hands, remove the dough onto the pan, and then flip it to coat both sides. Cover and let rest for 1 1/2- 2 hours or until very puffy (I use an inverted sheet pan to cover the dough). Preheat your oven to 425 F (220 C). Note: I like to rest my dough in a warm spot, usually on top of the oven while it preheats. The dough becomes soft and bubbly.
- Assemble the Focaccia: Right before baking, gently dimple the dough with oiled fingertips. I start at the bottom of the pan and work my way to the top. As you dimple, the dough will naturally begin to stretch outwards. You should end up with a rustic rectangular or oval shape, about 14 x 9-inches (36 x 23 cm) or larger. The dough won’t go all the way to the corners and sides of the sheet pan- this is OK. Note: If using a rectangular pan, the dough will naturally fill the shape of the pan.
- Add Focaccia Toppings (optional): Press your preferred toppings into the dough. As the focaccia rises, the dough will puff up. The toppings will pop out if not properly anchored. If using garlic, I keep the cloves wrapped in their papery peels to prevent burning. Remove and discard the peels before eating.
- Bake the Focaccia: Place the dough onto the center rack. Bake for 25-30 minutes or until crisp and golden brown. Remove from the oven and cool on a wire rack before cutting. TIP: To par-bake focaccia dough: Bake for approximately 15-18 minutes @ 425 F (220 C). The crust will be set, very pale in color and golden underneath. Remove the focaccia from the pan and cool on a wire rack. Once completely cool, wrap in plastic wrap and store at room temperature for up to 6 hrs. To finish, return to the pan and bake for 12-15 minutes.
- To serve, cut the focaccia into wedges or squares and enjoy warm!


Comments
Kevin says
I can now ignore my other recipies for focaccia. This turned out great with added olive bits and cherry tomatoes. Your tutorials are spot on.
Emilie Raffa says
Excellent! Thank you so much, Kevin. I really appreciate the helpful feedback.
Robin Payne says
This recipes sounds amazing! How do I translate grams to cups and tsp./Tbsp.? Thanks in advance.
Dana Misner says
If you get a small digital baking scale you can use that to measure ingredients in grams. They’re inexpensive and it will help make sure measurements are spot on!
Megan says
Loved this recipe as it was so easy to follow, so thank you! The only question I have is why has it come out so chewy? Is it meant to be chewy? I left mine to proof overnight, I think it ended up being 16+ hours. The flour I used was strong white bread flour, was this maybe the issue?
Emilie Raffa says
Hi Megan! You’re very welcome! You are correct: it’s the flour. Generally speaking, the stronger the flour the chewier the texture will be. Results will vary from brand to brand. Next time, use a lower protein flour and/or experiment with a 50/50 blend of your current bread flour and AP flour. See what you like best 🥰
Megan says
Thank you so much! I will definitely try again using different flour and see how that comes out!
Meena says
This is my fave recipe now. I missed the point about dimpling right through earlier and read it in the comments.made it again yesterday and it dimpled and was nice and puffy before baking. Thanks so much, am a sourdough bread addict thanks to you. And love the cheese and olive stuffed bread.
Elisha says
Thank you for this fantastic recipe! I got my first starter going last week and decided to use this recipe for my first sourdough creation. We loved it so much I made it two days in a row. It makes the best focaccia sandwiches. I was wondering if I added an apple cinnamon brown sugar butter topping to it before the final proofing would it prevent it from rising?
Elisha says
Thank you for this recipe! I got my first starter going last week and decided this would be my first creation. It turned out so good I made it the next day too! I was wondering if I could make a sweet version with apples? Would mixing in a cinnamon apple butter brown sugar topping before the final proofing cause it not to rise? Either way, this will be a go to for us weekly. It makes the best focaccia sandwiches!
Wendy Frankland says
Great recipe!!!
Why did it stick to my ceramic baking dish?
Emilie Raffa says
Thank you! It’s possible the dough absorbed a good amount of oil while it was resting in the ceramic pan, causing the dough to stick. This has happened to me before (the pan I use now is technically not non-stick but it releases very easily). Next time, use parchment paper to line the pan just in case!
Annette says
HELP! I followed the process and left it overnight until the afternoon. Went to put it in to baking tin and it smells a bit eggy. Should I throw it away?
Emilie Raffa says
Hi Antette! Eggy? I’m not sure what you mean. The dough won’t go bad per se, it might be over-proofed at this point based on the length of time it’s been sitting out. You could try baking it to see what happens and/or toss it out you are unhappy with the results.
Anthony says
Can I halve the recipe and cook in an 8×8 round cake pan?
Emilie Raffa says
Yes! I believe this will work, watching your bake time. Make sure to coat the pan so it doesn’t stick- you could so a fair amount of oil, a layer of softened butter (then oil), or line with parchment paper.
Mary says
This is easy & delicious! I’m having one issue though & hopefully I can get some help.
The dough doesn’t hold the dimples when I do them before baking. Per instructions, I leave the dough out overnight covered. In the morning, it’s risen beautifully. I leave it in the pan for 2 hours before baking. Any suggestions or ideas as to what I’m doing wrong? Other than that, it’s great. Nice & fluffy on the inside. Thank you!
Emilie Raffa says
Hi Mary! Typically, if the dough doesn’t hold dimples before baking it’s not relaxed enough. It needs more time to rest in the pan, regardless of how long you left it out for. Did you notice the dough snapping back like a rubber band when working with it? Additionally, next time, try wetting your fingertips before dimpling pressing all the way down to the bottom of the pan- gently!
Mary says
Thank you so much! This morning I left in the pans longer & eyeballed for puffy/jiggly. This did the trick & they came out perfect!
Emilie Raffa says
You know the old saying… “watch the dough and not the clock!” Well done! 🥰
Tosha says
Made this today. It was buttery, chewy, and delicious. I was worried it wasn’t going to turn out because the dough was so wet and really difficult to work with. I also never made a bread that didn’t need to be kneaded. This was incredibly easy and delicious. I topped my bread with roasted garlic, parmesan cheese and basil before I dimpled the bread. I will certainly make this focaccia again.
Emilie Raffa says
Thank you for sharing your experience Tosha! This sounds so good by the way…
Kayla Hill says
Looks great but what’s the temperature for a non par bake?
Linnae says
Taken from above …
To do this, bake the focaccia for approximately 15-18 minutes @ 425 F (220 C).
Hanna says
I love all of your recipes! We bake something from your book once and week and have been for over two years!
This recipe doesn’t disappoint. It’s chewy and delicious.
Jenna says
Can you freeze after the par bake? I would love to make this a couple days in advance.
Emilie Raffa says
Yes. Absolutely. Once completely cool, wrap tightly in plastic wrap, then foil, and freeze until ready to use. Defrost at room temperature and proceed with the rest of the recipe.
Colleen says
375 g water (see Notes below)
20 g honey (optional)
500 g bread flour or all purpose flour (see Notes below)
9 g fine sea salt
Jay says
There is no recipe for the dough? How much starter? How much flour? How much salt?
Teresa says
Scroll through again. It’s there.
Emilie Raffa says
Please scroll to the bottom of the post! All ingredients & instructions are listed in the printable recipe card.
Bianca says
I made this as 2 loaves in a loaf pan and our family inhaled it. I’m new to sourdough, would a bread blend or sprouted whole wheat flour be as successful?
Tiffany says
Ok, I never write reviews but this recipe is the best thing I have ever made and I need to shout it from the rooftops!!! So easy and so delicious!! Only thing is mine completely baked in the 15 min span that I was intending on par baking for, but not even upset bc there’s currently fireworks going off in my mouth from this!! I used avacado oil instead, and just topped with Italian seasoning, garlic powder and a bit of flaky sea salt- incredible!!! Can’t wait to make again and experiment with different toppings! Thank you thank you thank you for sharing!! :)
Emilie Raffa says
Omg you are too funny 🤣 Yay! I’m so glad you liked it. Sounds SO good with those seasonings and flaky salt. Thanks for sharing your feedback Tiffany!
Mary says
Oh my god… I’ve been baking sourdough since November 2023 and I am mad I didn’t try this recipe sooner! I put roasted garlic and rosemary on top and I’m pretty confident this is about to be my husbands new favorite
Sheetu says
I started baking bread in August. Since then, I have made this 3 times. This is a family favorite! Followed directions to the T. So glad I stumbled across your recipe!
Raina says
Oh wow! Fabulous! Used King Arthur AP flour bc I like it softer but I will make with bread flour sometime just to see the difference. I topped with bbq chicken, bacon, green onion, yellow peppers and cheddar, and served bbq sauce on the side.
Christy says
Hi! Quick question. If I am par baking… do I put my toppings on before or after the par bake?
Emilie Raffa says
Hi there! It depends on what they are, but if you want them to stick to the dough it’s better to put them on when par baking.
Christy says
Doing cherry tomatoes and rosemary
Kayla says
I peeled my garlics and put them in olive oil cooked on low on stove for 20 mins. Left them sitting overnight and I pushed them onto my dough and they did not burn the whole 30 mins.
Leslye says
I have the dumbest question. I want to use garlic like this but I don’t like the idea of leaving the papery skins on. Obviously you remove them before eating but does that mean you pick them out and remove the skins and replace them before serving to people? Or you’re just reminding people to remove their garlic skin before enjoying? haha seems so tacky.
Tasnim says
Today was the the third time that I made the focaccia recipe. Really amazing flavour. I put a few slices of tomato and jakepeno slices on top which added a nice flavour as well.
Sam Readman says
I’ve made this three times now, topped with a combination of garlic, rosemary and black pepper mixed together in olive oil and drizzled on top before baking. It’s my go-to for my daily bread with eggs, and it’s a showstopper at gatherings. Great recipe. I baked it today at double the quantities of ingredients and it turned out perfect. Thanks so much for this. I’ve been using your website for sourdough baking for years now! ♥️
Ellen says
Hi! What difference will including the honey vs. omitting it create in the focaccia?
Diana Fraser says
Can’t wait to try this…i am going to a holiday party and will dress it with homemade cranberry sauce, goat cheese, brie, pecans and rosemary! Yum!!
Hamish Hornsby says
after the bulk rise there was a thin skin on top is that ok will it affect the outcome
of the bread
Emilie Raffa says
Hi there! It depends on what it looks and feels like. If it’s dry, yes. You don’t want to work that into the dough. Can you peel it off? Or parts of it at least? The reason this happened was because the surface of your dough was exposed to too much air during the rising process. This can happen. Next time, cover the bowl of dough with lightly oiled plastic wrap (or a reusable wrap of your choice). Alternatively, use a high sided dough tub with lid. Both options will keep the dough airtight.
Shannon says
I absolutely adore this recipe. It always produces the bubbliest and yummiest focaccia. I’ll usually top mine with marinara, cheese, and pepperoni-effectively making the most amazing tasting pizza I’ve ever had. My family requests it once a week and honestly, I love it because it hardly takes any work for something so impressive, haha! 10/10 recipe, thank you!
Helen says
oh please share the amounts of add ons and when you put them on. This sounds delish!
Shannon says
Absolutely! I more or less measure with my heart, haha! I wait until it’s done rising and ready to go in the oven and I spoon on some marinara and sometimes I’ll add some spots of pesto and ricotta. Then I dimple the dough, getting all that sauce and cheese deep down into the crust. Then I’ll top it with mozzarella until I barely see the sauce and then throw some pepperoni on top of that. I usually keep it in the oven a little longer than the recipe suggests to make sure everything is melty and perfect. My best advice is to pull it out when the cheese starts turning golden. I hope you enjoy it as much as we all do!
Leslie says
Success!! Love the thorough directions and recipe. I wanted a more tender crumb, so took your advice to make with all purpose flour; water at 350 g, and 75 g starter.
I added katamala and green olives; they looked beautiful but were too much of a distraction to the great sourdough flavor of the bread. Fresh rosemary was nice. My husband suggested cheddar and jalapeño focaccia next time.
Amy Karabinas says
Hi! Great recipe, my second time making it. Just a suggestion, in the last instruction where you put the focaccia in the oven, you say to put the “dough” on the middle risk. I think you meant to put the pan containing the dough there. I did it with the pan both times, because I didn’t see how the recipe would work otherwise. But, since this is a beginner’s guide, you might want to fix that.
kristen says
Girl. I don’t think anyone is that much of a beginner
Eve says
😂😂😂😂😂 Great recipe. I just used carmelized onions, rosemary, and sea salt. Delicious.
Sparky says
Used this recipe. Came out amazing. My new favorite kind of sourdough. Thanks!
tamara says
lovely and simple to make
Emilie Raffa says
Thank you Tamara! 🥰
Tresa says
I have a question! I’ve made this before and loved it! I’ve mostly switched to extra virgin olive oil which has a much lower smoke point than regular olive oil. Would it be okay to cook at 356 for longer?
Karen Powell says
I use avocado oil. Sourdough really needs to be baked at high temp
Tresa Malone says
Thank you! I do too at this point and just have olive oil and vinegar out for dipping if in using it that way!
Erin says
This turned out the best focaccia. I’ve ever made. Beautiful, delicious crust with a beautiful, airy crumb. Too good!! I’ve never left a review on anything before, but I did for this post because it’s that good. The world needs this bread!
Emilie Raffa says
Ahhh, love this Erin! Thank you so much!
Daniil says
I got into sourdough baking this year, and this is definitely my favourite recipe. I’ve made it so many times, it never fails, and you can put anything on it. I recently made an apple-cinnamon focaccia. Also everyone who has tried this has always been really happy and told me that it tastes amazing!
Emilie Raffa says
OMG apple cinnamon sounds amazing. I need to try that! Thanks for sharing, Daniil. I’m glad you’ve found your recipe ;)
Michela says
Hi! If I dont have a baking sheet or brownie pan as the ones mentioned here, can I use a rectangular glass Pyrex´?
Thanks!
Michela says
Please help! I want to bake it this weekend but don’t know if I will ruin it by using a glass baking dish. Thanks!
Emilie Raffa says
Hi there! Yes, you can (the texture will be slightly different). I would butter and oil the bottom and sides of the pan, and line the bottom with parchment paper to prevent sticking. And of course, make sure your particular pan can heat up to high baking temperatures. Enjoy!
Shelbie says
I’ve used this recipe countless times. I started out making focaccia but I frequently make pizza with it now and it is ALWAYS requested by those that have had it. Including my super picky niece and stepson!
Patrick says
Has anyone tried to par bake and then freeze before doing a final bake? I’ve done it with the pizza recipe and turned out ok, curious if anyone has experience with this method with the focaccia.
Katie says
This was sooooooooo good! I doubled the recipe and topped mine with melted garlic butter, basil, and Parmesan. Great recipe.
Mary says
Made this focaccia today. Delicious! I used halved cherry tomatoes and rosemary. Turned out great
Kylinn says
She never misses and this recipe is no exception!! So easy and straight forward. Extremely forgiving recipe/dough type so you don’t have to worry about mucking it up if you’re newer to sourdough. Texture is fabulous and chewy and crispy on the bottom. I always have to bake this recipe slightly longer than suggested or broil for a few minutes to get it browned on top but otherwise perfect recipe! She won’t steer you wrong.
Vange Langford says
Absolutely delicious my only negative was dough stuck to sheet pan despite plenty of oil. I will use baking paper next time & maybe put on lowest rack to guarantee bottom remains crisp – maybe …
Emilie Raffa says
Hi there! Thanks for your feedback. Yes: this happens sometimes. In my experience, it has to do with how long the dough sits on the pan for before baking- it soaks up the oil causing the dough to stick. Parchment paper will solve this problem instantly. And perhaps, now that I’m thinking about it, remove the paper towards the end of baking allowing the bottom to crisp up further. The lowest rack will help too.
Estella Ringger says
just to confirm, are there no stretch and folds in this recipe?
Kylinn says
No stretch and folds. Don’t want to form much protein structure for focaccia.
Nicole Schneider says
I always do three sets of stretch and folds and it turns out perfect every time. I also use king a bread flour. The honey makes the bread last longer but it isn’t necesssry if you have a strong starter.
Monica says
Clear and easy . I have made this four times already, for company. I live in Italy, so it’s a tough crowd, and they all loved it! Thank you!
Sarah says
Delicious and simple. I love how fluffy and light the dough became. I used green olives stuffed with jalepenos and garlic and garlic cloves and the focaccia turned out amazing. My husband told me I could skip sourdough and just make this. 🤣
Rosie says
Hi Emilie,
New to sourdough, and found the idea of baking one of these recipes very intimidating, to where I fed my starter for weeks before doing anything with it. Finally tried this recipe and although the taste is awesome, the texture’s all wrong 🙈—it’s dense and chewy. Any insights as to where I may have gone wrong?
Thank you!
Rosie
dylan jones says
great recipe!
Emilie Raffa says
Thank you!
J says
Hello! Any idea how long the par baked would last in the fridge or the freezer? I make lots of your sourdough recipes, thank you!
Angela says
First time making it & it was delicious. Do you know what the serving size/nutritional facts are for this recipe?
Pearl says
Soo good! My first focaccia attempt. I took it to a potluck and it was devoured. I love all the detailed instructions. So very helpful. I used King Arthur bread flour and it was a lovely more chewy texture. I did the one day version, and had to shorten the bulk rise a bit since I miscalculated my timing, and that didn’t make a difference. I put garlic, rosemary, basil, and oregano on as toppings. I can’t wait to do it again with all purpose flour and the correct bulk rise time! Thank you so much!!
Araceli says
Great recipe, super easy to follow!
I followed step by step and my dough proofed beautifully, with great rise and lots of bubbles. When I went to move into the pan, my dough was runny. I tried to allow it to complete the second rise to no avail. I waited for some rise before baking.
Maria says
I’ve made this clever carrot focaccia several times (and pizza dough and sourdough loaf). A slightly different result each time but never fails! Today I’m baking onboard our yacht, fingers crossed for yummy focaccia for dinner.
Emilie Raffa says
Ooo how exciting! Sounds like so much fun. Fingers crossed for you :)
Amie says
I botched the timing for the bulk rise and have to go to bed. It’s already doubled in size, but could I leave it in the fridge overnight and get to it in the morning? By then it’ll have been 17 hrs from the start of the bulk rise. Ah is it hopeless?
Geoff says
I am working through this scenario. I chilled my dough in the fridge overnight, and am now letting it warm and rise for about an hour.
How did your focaccia turn out?
Traci says
I’m sure you know by now, but this will work perfectly well. I wanted to answer so that it might help others with the same question.