This easy, step-by-step whole wheat sourdough bread recipe (and video) is light and flavorful, not heavy and dense. Made with 20% whole wheat flour. Naturally leavened with active sourdough starter. Ideal for sandwiches, toast and soup.
Whole grain flours are prized for their toasty, earthy flavors. Packed with plenty of fiber and nutrients, their natural complexity is a perfect match for any slow-fermented sourdough bread recipe. However, in bread baking there are rules…
You can’t just swap white flour for whole wheat flour and expect the same results (unless you like dry and dense bread). Adjustments need to be made.
In this post, you’ll learn how to make exceptional whole wheat sourdough bread that’s not only light, crisp and airy, but is good for you too. {Browse my full collection of sourdough bread recipes here}
How To Make Whole Wheat Sourdough Bread {Step-By-Step Recipe}
Step 1: Mix The Dough
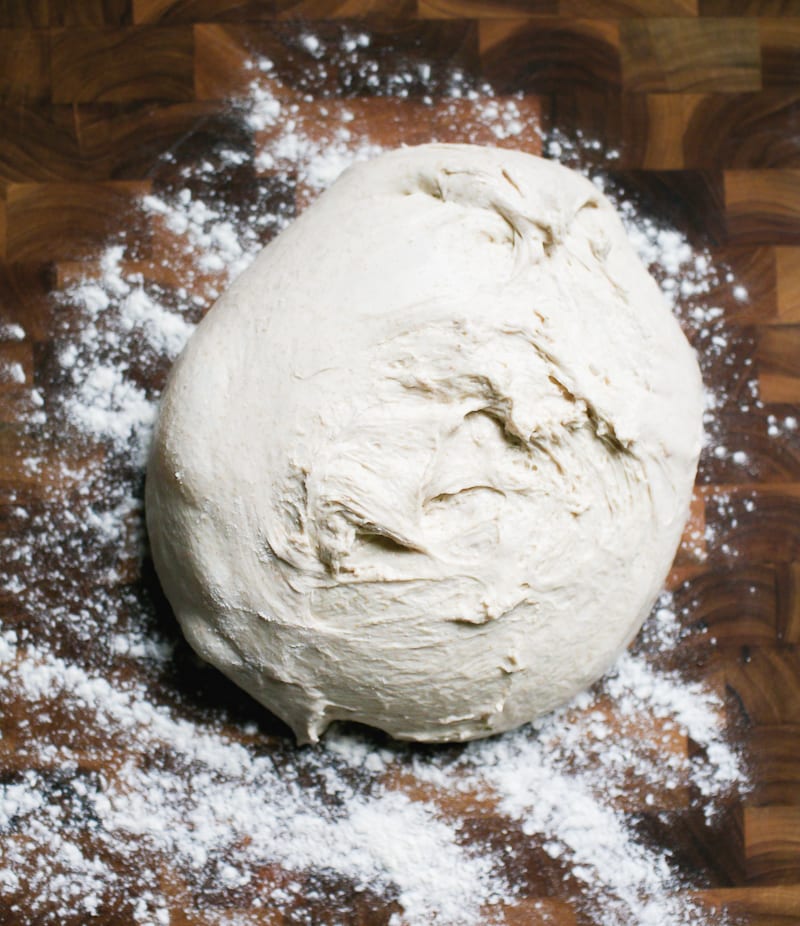
To Start: Weigh your ingredients using a scale. Mix the sourdough starter and water together in a large bowl. Add the flour and salt. Stir to combine, and then squish by hand to form a rough dough. This dough is very sticky, around 75% hydration. It’s like playing with wet mud. Very satisfying! Cover the bowl and rest for 1 hour- this is your first rest.
Tip: Whole wheat flour is thirsty. Because it absorbs more water than regular all purpose flour, extending the “autolyse” or first resting period gives the dough ample time to hydrate. The texture of the dough will be noticeably different after the full hour: it will be softer, and more extensible to stretch and fold later on.
Step 2: Bulk Rise With Stretch & Folds
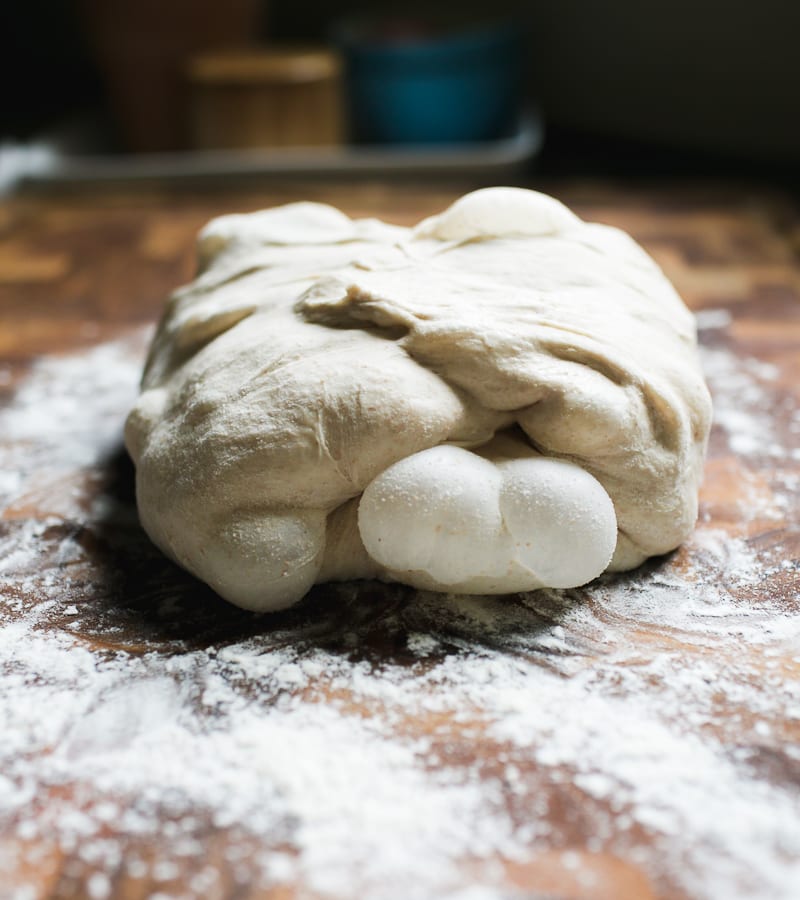
Now the dough needs to rise. During this stage, you’ll stretch and fold the dough to strengthen the gluten and boost the height of the bread. I like to do 4 sets spaced 30 minutes apart. The dough will become soft, pillowy, and a bit stiffer by the 4th set which is what you want.
When finished with the folds…
Cover the bowl with lightly oiled plastic wrap, and continue to bulk rise, untouched at 75-78 F for about 2-3 hours. The dough is ready when it’s puffy, airy, and almost doubled in size. Chill overnight.
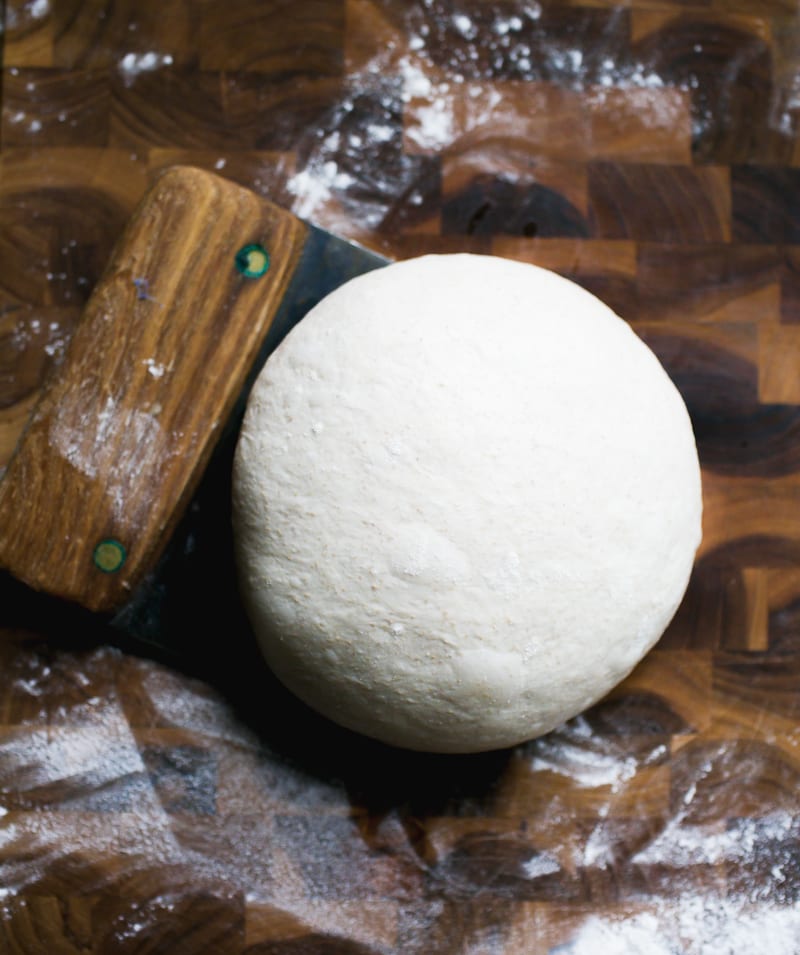
Step 3: Shape The Dough
In the morning, you’re going to shape the dough twice to build extra strength. The first shaping is called “pre-shape” and the second one is the “final shape.”
Pre-shape
Remove the cold dough onto a floured surface. Rest for 10-15 minutes to take the chill off. Shape the dough into a loose ball. Cover and rest for 20-30 minutes.
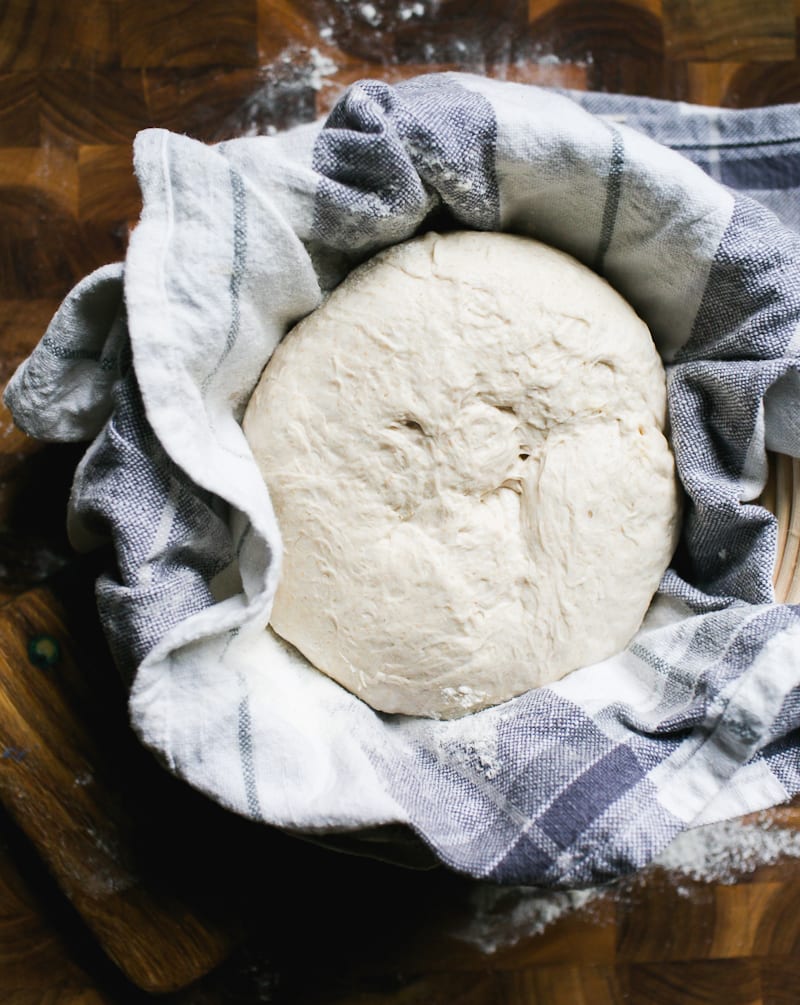
Final Shape
Using a bench knife for guidance, flip the dough over and shape it again (a little bit tighter this time). Place into a lined bowl of proofing basket seam side up. Cover the dough with the vloth overhang.
Tip: Pre-shaping Bread Dough: not every sourdough recipe needs it. High hydration doughs (like this one) benefit from the extra support to hold its shape. Otherwise, it might spread when baking.
Step 4: Second Rise
The dough needs to rise again, but only briefly. Rest the dough in the warm spot you used earlier for about 30 minutes to 1 hour. The dough is ready when it’s puffy and looks plump. It should not be super cold or dense-looking prior to baking. Preheat your oven.
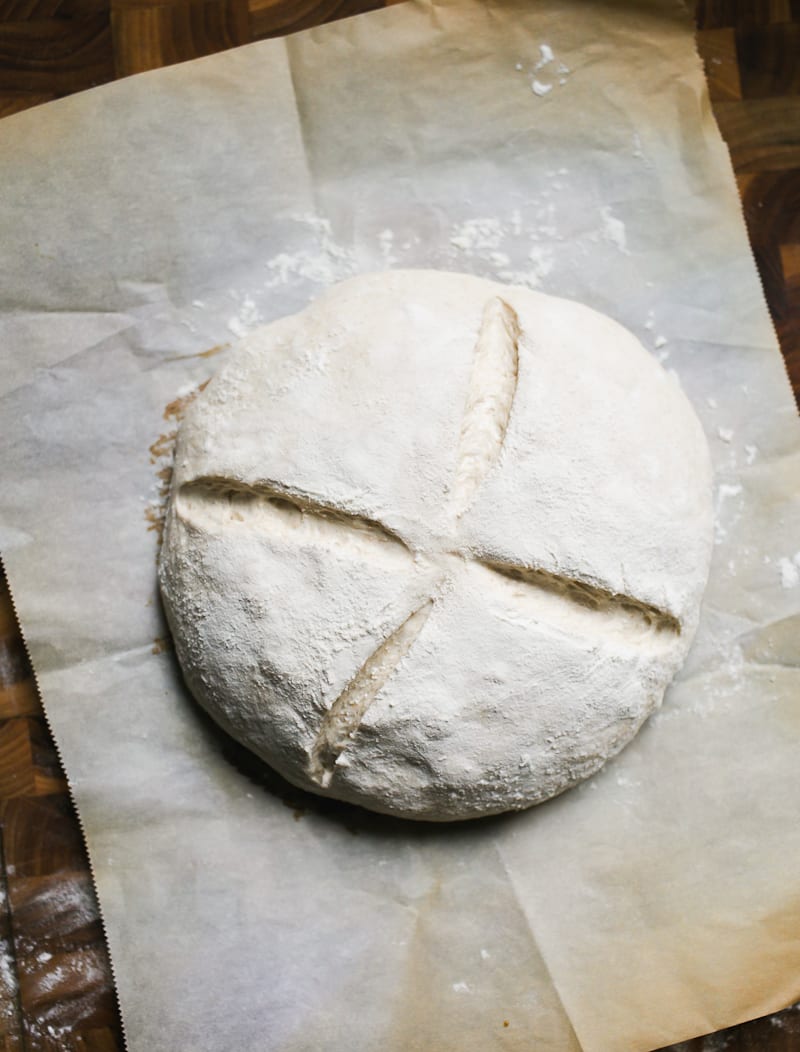
Step 5: Score The Dough
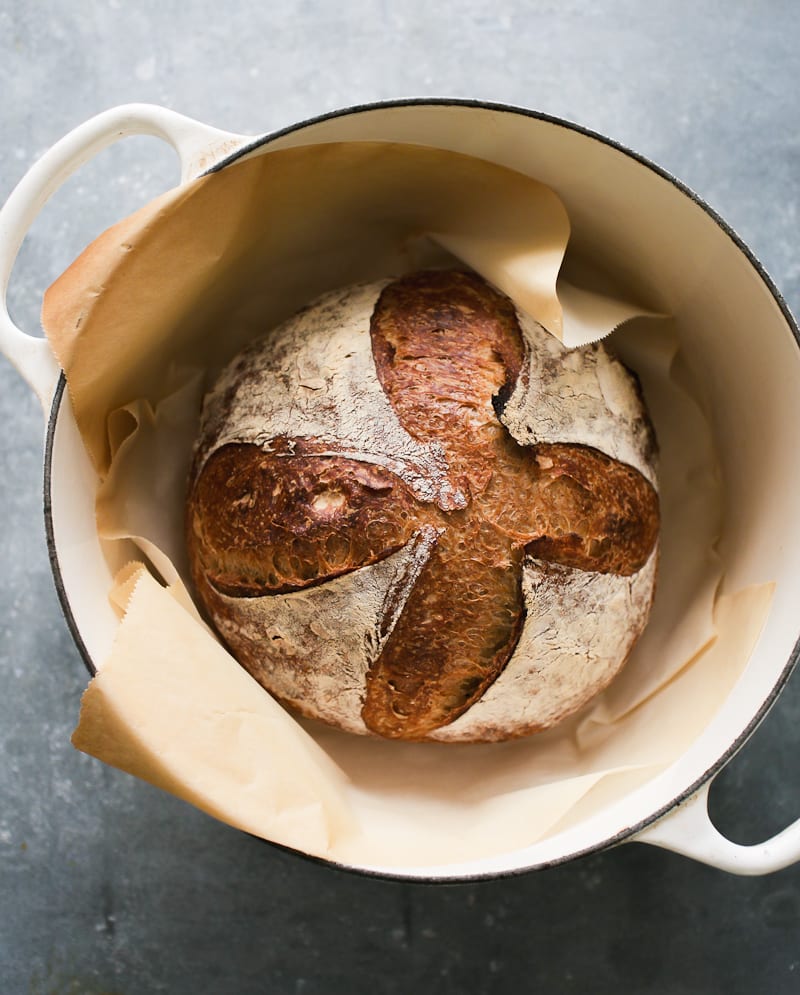
Invert the dough onto a sheet of parchment paper. Flour the surface. Using a bread lame or small serrated knife, score the dough at 12, 3, 6 and 9 o’clock, turning the parchment paper as you go. Alternatively, make one long slash down the center- do whatever you feel comfortable with. Scoring takes practice.
Step 6: Bake The Dough
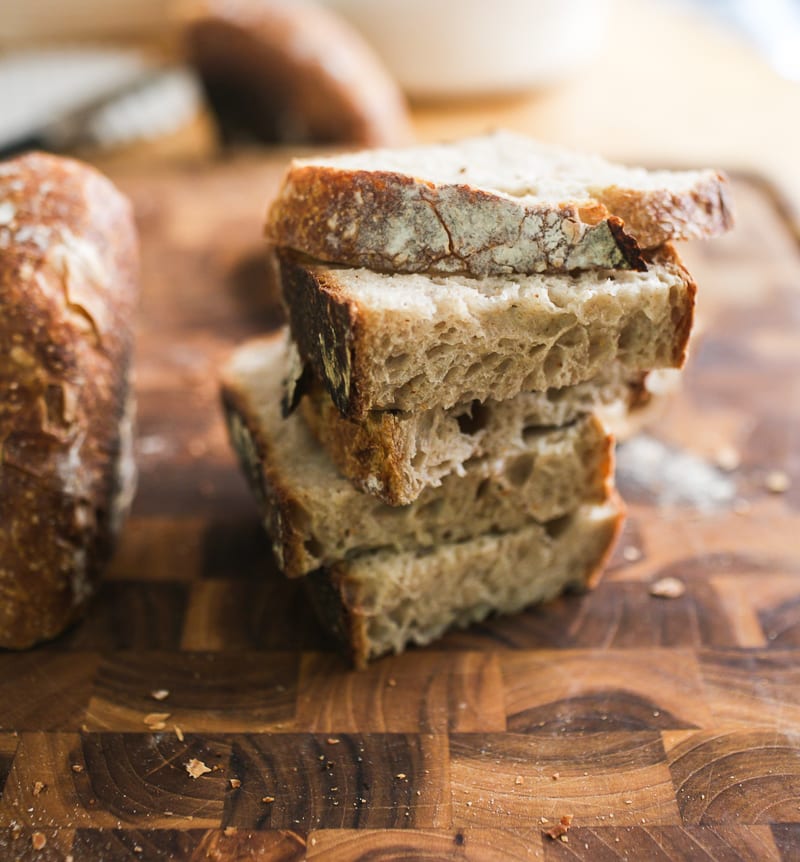
Place the dough in a Dutch oven or another oven safe pot with lid. You don’t have to preheat it first. Pop the lid on top, and bake @ 450 F for 20 minutes. Remove the lid and bake for an additional 40 minutes or until golden brown. Remove the bread from the pot. Cool on a wire rack for 1 hour before slicing, otherwise the interior crumb might taste gummy. How good does this look?!
Let’s Talk About Taste.
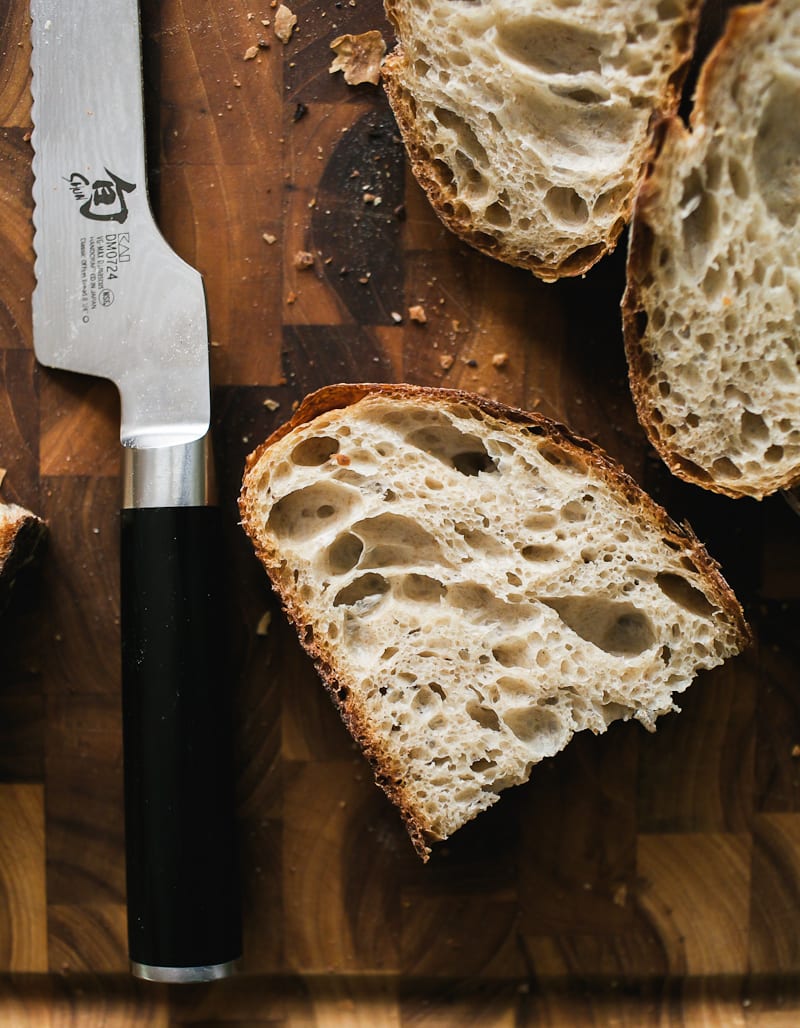
Because this dough is made with only 20% whole wheat flour, the taste is mild and nutty, with a light texture.
For a heartier loaf, you can increase the whole wheat flour up to 30% with additional water (see recipe card below). However, the biggest mistake I see with bakers is attempting these higher %’s without understanding that it can cause extremely dense and heavy bread. Start small, practice, and work your way up.
Then once you’ve mastered this recipe, have a look at my classic sourdough bread recipe, this easy sourdough sandwich bread and my light and airy sourdough focaccia!
Sample Baking Schedule
Whole wheat doughs tend to rise faster than all-white doughs, especially in warm weather. To avoid over proofed dough, I like to make this recipe in the afternoon (usually between 2-3 PM), when i know I’ll be home to do the stretch and folds. The dough is shaped and baked the following morning.
Late Afternoon
- 2:00 PM: Mix the dough/rest for 1 hour
- 3:00 PM: 1st Stretch & Fold
- 3:30 PM: 2nd Stretch & Fold
- 4:00 PM: 3rd Stretch & Fold
- 4:30 PM: 4th Stretch & Fold
- 5:00 PM: Bulk Rise for 2-3 hrs @ 75-78 F
- 7:00 or 8:00 PM: Chill overnight
- 6:00-8:00 AM (the next day): Shape and bake the dough.
By signing up, you agree to receive emails from The Clever Carrot. Unsubscribe at any time.

Light Whole Wheat Sourdough Bread
- Yield: 1 loaf 1x
- Category: Sourdough Bread Recipes
- Method: Oven-Baked
- Cuisine: American
- Diet: Vegan
Description
An easy recipe for whole wheat sourdough bread that’s light and flavorful (not heavy and dense). Made with 20% whole wheat flour. The dough can be made in advance and baked the following day. Ideal for sandwiches, crostini, and morning toast with jam.
Ingredients
- 50g bubbly, active sourdough starter (100% hydration)
- 350g – 375g warm water (80–85 F)* See note below
- 400g bread flour
- 100g whole wheat flour
- 9g fine sea salt
Notes & Substitutions
* Flour is like a sponge. Depending on the brand you’re using, it might not absorb all of the water. Start with 350g of water if you’re using a low protein bread flour, less than 12.7%.
For best results, use a scale to weigh your ingredients. If using measuring cups, please aerate the flour first, lightly spoon it into the cup, and then level off the excess with the back of a knife.
Instructions
Baking Schedule
Whole whether doughs tend to rise faster than white doughs, especially in warm weather. To avoid over proofed dough, I like to start mixing in the afternoon (usually between 2-3 PM) when I know I’ll be home to stretch and fold the dough. Please adjust your rise times based on temperature.
Make the Dough
Combine the sourdough starter and water in a large bowl. Add the flour and salt. Mix with a fork and then finish by hand to fully incorporate the flour. It will feel very wet and sticky. Cover with a damp towel or wrap and let rest for 1 hour on your countertop, returning to the bowl after the first 30 minutes to work the dough into a rough ball.
Bulk Rise with Stretch and Folds
After the dough has rested for 1 hour, do your first fold.
Gather a portion of the dough, stretch it upward, and fold it over toward the center of the bowl. Give the bowl a 1/4 turn and repeat 3 more times, stretch and folding the dough to come full circle around the bowl (4 folds = 1 set). If the dough still feels slack after the 1st set, do an additional 4 folds around the bowl to tighten the dough.
For best results, do 4 sets total spaced 30 minutes apart resting the covered dough in a warm spot in between each set (see tip below). Notice how the dough will tighten after the 4th set. See video for technique.
When finished with the folds, cover the bowl and continue the bulk rise (untouched) at 75-78 F for about for 2-3 hours. The dough is ready when it has almost doubled in size. Wrap and chill the whole bowl overnight; the dough will continue to rise only slightly in the fridge when the dough is warm.
How to Create Warm Spot for Bread Dough: Preheat your home oven to the lowest setting for 30- 45 seconds and then shut it off. Place the covered bowl of dough inside to bulk up. The temperature should be 75-78 F and no higher than 80 F. Use an oven thermometer (and common sense) to keep track of the temperature. Dough that is too warm will become wet, sticky, and a tricky to work with. Alternatively, I highly recommend using a proofing box.
Shape the Dough
The following morning, make sure the dough has doubled in size. If not, give it more time to bulk up, if needed. This is important to build strength.
Line a small bowl (or proofing basket) with a cotton or linen cloth. Sprinkle with flour. You’re going to shape the dough twice to build extra strength.
Preshape
Remove the cold dough onto a floured surface. Let rest for 10-15 minutes to take some of the chill off. Shape the dough into a loose ball using the envelope technique. Starting at the top of the dough, stretch and fold it over toward the center. Then stretch and fold the bottom of the dough toward the center. Repeat on the left side…and then the right side. Using a bench scraper, scoop up the dough and flip it over so the smooth side is facing up. Cover and rest for 20-30 minutes.
Final Shape
After the dough has rested, flip it over again (the smooth side should be facing down now). Shape it again following the steps above. Flip it back over. With floured hands, gently cup the dough and pull it toward you in a circular motion to tighten its shape. Place the dough into the lined bowl or proofing basket seam side up. Cover with the cloth overhang.
Second Rise
Rest in the warm spot you used earlier for 30 minutes to 1 hour. The dough is ready when it looks puffy and has risen slightly, but has not yet doubled in size. The dough should not be very cold prior to baking.
Preheat your oven to 450 F towards the tail end of the second rise.
Cut a sheet of non-stick parchment paper to fit the size of your baking pot, leaving enough excess around the sides to remove the bread.
Score the Dough
Place the parchment over the dough and invert the bowl to release. Sprinkle the dough with flour and gently rub the surface with your hands. Using the tip of a bread lame, small, serrated knife or a razor blade, make four shallow 4-inch long cuts at 3, 6, 9, and 12 o’clock around the dough. Use the parchment paper to transfer the dough to a Dutch oven (or another oven safe pot with lid).
Bake the Dough
Bake the dough on the center rack for 20 minutes, covered. Remove the lid, and continue to bake for 40 minutes and golden brown.
When finished, transfer to a wire rack. Cool for 1 hour before slicing, for best texture.


Comments
sophie says
WOW!!! this bread was so good! my family loved it. it was my first sourdough bread ever! and my starter is only 10 days old! it was just a bit dense, and there weren’t many bubbles/air holes inside. it also didn’t have a very sour taste, but it’s ok! try and try again!
thank you!!
-sophie:)
Crystal says
So delicious! Family favorite! One thing I’m wondering, though, is what would be the bake time for 2 smaller loaves instead of one large loaf? Specifically time with the lid on then with lid off? Thank you so much for making this newbie feel like a pro!
Emilie Raffa says
Hi there! For 2 smaller loaves, I typically bake them for about 50 minutes or so (20 minutes lid on/30 minutes lid off). I would just keep an eye on them.
xiang says
Hi Emilie,
My sourdough hasn’t risen a lot and smells very tangy and sour. Is there something wrong?
Emilie Raffa says
Are you referring to your starter or the actual dough? Thanks!
Chelsea says
Hi Emilie,
I’m sorry if this has already been answered, but I’m curious if it’s okay to make a wheat sourdough with a starter that contains unbleached all purpose white flour?
Thank you.
Emilie Raffa says
Yes! It’s totally fine :)
Becci Blood says
I have made the beginner sourdough and now this one and I love how easy the instructions are and how easygoing you are! My only problem is that I can never score the bread easily, it’s like the dough it too elastic to get a sharp knife through to make a score, the dough comes with the knife if that makes sense. What am I doing wrong?
Emilie Raffa says
You’re not doing anything wrong :) Scoring dough takes a bit of practice and trial and error. Not to mention, some doughs are harder to score than others based on their texture; dry doughs will always be easier to score than wet ones. What kind of knife are you using? Shape and size? Thanks!
Becci Blood says
Oh ok I think it’s because the doughs are so wet then. I’ve tried all kinds of sharp knives and serrated ones. Last time I used a small Stanley knife but it still dragged the dough with it?
Emilie Raffa says
You know what else helps? Try using the tip of the knife or blade! This will help a lot. Again, it just takes a bit of practice.
Becci Blood says
Thank you so much I’ll try that x
Brenda Steele says
I have made your recipe twice now. My thing with the sour dough is that my loaf never stays puffy and round, it always relaxes out (a lot). Am I doing something wrong?
Emilie Raffa says
Hi there! At what stage? After the second rise before its scored and baked? Thanks!
Brenda says
2nd rise. It just seems to want to flatten out when I try to score it. I am baking today actually so we will see.
Emilie Raffa says
Brenda, the dough is most likely over proofed or the gluten was underdeveloped. Next time, during the bulk rise make sure the dough doubles in size before going on to the next step. This will ensure the gluten is developed which in turn will holds its shape. For the second rise, don’t let it go for too long otherwise the dough will spread out and flatten. Hope this helps!
Brenda says
Thank you so much. I will pay close attention to this.
Naseema Laher says
Hi there , if I only use brown bread wheat flour, without the whole-wheat would that be fine ?
Emilie Raffa says
Hi there! May I ask what brand you’re referring to? Thanks!
Charles McBee says
Greetings, I am getting started learning about sourdough bread making and I tend to follow instructions very well…at least at the beginning and then experiment later.
My question comes after reading the schedule you posted.
2:00 PM: Mix the dough/Rest for 1 hour
3:00 PM: 1st Stretch and Fold
3:30 PM: 2nd Stretch and Fold
4:00 PM: 3rd Stretch and Fold
4:30 PM: 4th Stretch and Fold
5:00 PM: Bulk rise for 2-3 hrs @ 75- 78 F
7:00 or 8:00 PM: Cover and chill the bowl overnight
6:00-8:00 AM (the following morning): Shape & Bake the dough
So after the bulk rise for 2-3 hours cover the bowl…don’t do anything to the rise…put it in the frig over night.
Here is my question. you pull it out of the firg, How long after you take the dough out of the frig do you start shaping, dusting of flour, scoring, putting it in the dutch oven? Do you give it time to reach room temp?
Emilie Raffa says
When you take the dough out of the fridge the next day, make sure it has doubled. If not and it needs more time, rest at room temperature until ready. Alternatively, if it is in fact ready in the morning, you can continue right away: dump it out on your floured surface, shape, and do the second rise. During this time, the dough will naturally warm up to room temp before baking.
Josh says
Would using organic stoneground flour (for both the bread and whole wheat) make a difference? I recall hearing the stoneground impacts how the gluten works.
Thanks!
Emilie Raffa says
You can use stoneground flours, but you’ll get a different style and texture sourdough. The coarser texture tends to “cut through” the gluten strands which impacts the rise.
lauren says
Emilie,
Like a lot of folks here, I am a brand new quarantine baker and have always been intimidated by baking, the timing and precision. I just pulled my 3rd loaf out of the oven and man! It is so so good. Better than the others! Your recipe is thorough, easy to follow, and the video is so helpful. I have a question. Three actually. First, I skipped the fridge for the 2nd rise and left it out overnight in the bowl with plastic wrap over it. Is that alright? Also, I am having a hard time getting my oven temp right for the 2-3 hour bulk rise. It’s either too cold or maybe too hot and eventually, it just sits in (I think) a cold oven for that time. Any other tips for finding a warm spot? Finally, what’s the best way to store the bread over the next few days?
Thank you again!
-lauren
Emilie Raffa says
Welcome Lauren! Happy to hear the posts and videos are helpful. Thanks for the feedback :)
1.) Totally fine! The fridge is used to slow down the rise at a certain stage because whole wheat doughs tend to over proof if left out for too long. But everything is adjustable based on temperature. I’ve done an overnight rise with ww dough, starting later in the evening if the weather was very warm.
2.) Sure! If you have a microwave, pop the dough inside leaving the door ajar so the light stays on. It’s like a bootleg proofing box for your dough. Alternatively, purchase an actual proofing and set the temperature to your desired setting.
3.) For storage, wrap the baked loaf (plastic wrap or reusable wax wrap) and keep at room temperature. I’ve used cloth bread bags but they’re not my favorite.
Hope this helps!
Carlos at Spoonabilities says
Hi, This is the best step by step video that I have seen so far. The video will help me a lot to bake my first sourdough bread this week. Thank you!
Emilie Raffa says
Excellent! I’m glad you’ve found it helpful. Bread is so visual!
Robyn Smale says
I been having inconsistent results with my sourdough for a few weeks and moved to your receipt this week – changed my white flour to organic bread flour and then used our local, fresh, stone ground whole wheat flour. The first loaf was fabulous – I stuck to 360g water and wasVERY worried at my dry, dead looking dog when it came out of the fridge in the morning. I put it in a warm spot for an hour before reshape and generally took my time, allowed a longer 2nd rise in the proofing basket and live returned. It came out beautifully when baked!
Today I increased the water to 375g, (hoping for bigger holes in the crumb) used 100g of local sifted whole wheat and 100g of the other stone ground whole wheat (cutting down on the additives of the bread flour, which dont always work for my tummy) and it came out beautifully. I will continue to bleed in more local wheat and see what the limits are.
Thank you!! I am excited to have a reliable recipe and feel more confident at reading the dough through the process.
Emilie Raffa says
This is fantastic, Robyn. Thanks so much for the feedback. I’m glad you are enjoying the process!
Chenge James says
Not much of a commentor BUT I had to let you know that after several attempts with sourdough starter using different recipes, yours is the only one that worked at the 1st attempt and was easy to bring back to life again after being in the fridge. Additionally, I like the small refeed quantities so that little discard is wasted, although I never waste it as I make your pancakes as well. The bread has turned out very well both times I made it and it seems to be getting better with each bake. Thank you so much!
Reshu says
May I please ask which bread flour did you use. Thanks so much!
Emilie Raffa says
King Arthur Bread Flour :)
leslie says
what if you can’t find bread flour?
Emilie Raffa says
FANTASTIC! Thank you for taking the time to comment!
Alla says
I have just discovered sourdough baking during quarantine, and have been trying many recipes. The entire family agreed this was my best loaf yet thanks to your recipe! The bread had just the right amount of “sour” taste to it, a nice rise, and crust. I also appreciated the simplicity of the recipe, especially no need for building a levain. Thanks so much! I can’t wait to try the raisin bread recipe next. And lastly, if I was to start the recipe in the morning, and bake the same day, how long should the bulk rise take (if I’m skipping the fridge part)? or what characteristics of the dough should I look for? Thanks !
Brandy says
Hi Emilie,
Why doesn’t this recipe include olive oil?
Thanks,
Brandy
Emilie Raffa says
Hi there! It’s just a different style recipe. You are more than welcome to add some if you’d like, or keep as is :)
Esther Rodgers says
I love your recipes, and your book is one of my favorites! I’m looking forward to trying this out! What do you think is the difference between letting the show come to room temperature and baking it cold out of the fridge? I’ve always thought that baking cold dough give the better oven spring? Is there a reason that you prefer to let this dough warm up a bit before baking?
Also if you have a stiff starter, that’s more two parts flour to one part water and one part starter, do you use it the same way you would a 100% hydration that slightly more liquidy?
Thanks again! I appreciate all of your hard work to create your recipes.
Eve says
Hi Emilie! I can’t wait to try this one!! I am novice baker and baked my very first sourdough bread last week following your beginner sourdough bread recipe as well as your starter recipe. The bread came out really good! I think it’s the most beautiful thing I have ever made in my whole life. :-) My husband was soooo happy.
I have a question… With your beginner sourdough bread recipe, the bulk rise is done at room temperature for up to 12 hours. With this one, you do a 2 to 3-hour rise first and then chill the dough in the fridge. What is the difference between the two? Thank you so much!!!
Karen says
Superb. I followed the directions almost exactly except started earlier in the day. (What other option is there beside refrigeration?) The bread is beautiful and delicious! Thank you.
Emilie Raffa says
Fantastic. I’m so glad you liked it! The other option would be a same day bake (start early in the morning and bake in the afternoon/early evening).
Kelly says
Hi there! I am wondering if you could do the second rise in the fridge overnight and bake in the morning? And if so, would you let it warm up at room temperature or just go straight to the pre- heated oven? Thanks as always for your insight.
Emilie Raffa says
Yes you can. Just keep an eye on it; whole wheat doughs have a tendency to over proof. The following day, let the dough sit at room temperature while the oven heats up. Then pop it in the oven.
Anne says
I dont understand why kelly asks this when the second rise is already overnight? Was the post changed or am I missing something?
Emilie Raffa says
Anne, the post was not changed. This recipe does not follow an overnight second rise. It’s done the following morning.
However, some bakers prefer an overnight second rise (instead of chilling the bulk dough, per the recipe). This is what Kelly is referring to.
ANNE says
Ah ok I do understand now. Is there any added benefit to the chilling overnight? Or could you just as well skip this step?
My husband is going to buy your book for my birthday. So excited!
Emilie Raffa says
Great! Chilling overnight does a few things: it adds additional flavor to the bread, slows down the rise, and helps with scheduling. If you’d rather skip this step, just start the mixing process earlier and bake later in the day/evening. It’s flexible. Hope you enjoy the book- it’s finally back in stock. Happy birthday!
Brandy says
I doubled mine and am wondering if I should split in half before I stretch the dough?
Emilie Raffa says
It’s up to you. If you’re comfortable with doing the folds in one large container, go for it. If not, split the dough beforehand.
Anne says
Hi there! Im busy baking this bread and have two questions:
You mention that the dough will only rise a little bit in the fridge but you do say you must wait until it has doubled. Should it have been doubled when removing from fridge? Or during the rise in the banneton in the morning?
Also, i noticed during my fourth set of folding that when I pulled (stretched) the entire ball came along (let go from the bowl). So enentually I tried keeping the one side down with my one hand while stretching with my other hand. It was not fragile (tearing) but seemed resistant to stretching?
Thanks alot! Can your book be bought in South Africa?
Emilie Raffa says
The dough should almost double during the bulk rise @ 75-78 F, before going into the fridge. The following morning, if it still has not doubled, give it more time directly in the bowl (before shaping and transferring to the banneton).
Regarding folds, what you experienced is normal. After the 4th set, the dough should be tight; that’s how you know the gluten has properly formed.
You can purchase the book from The Book Depository (free worldwide shipping).
Anne says
Thank you, the bread came out delicious!!
Emilie Raffa says
FANTASTIC!
Gemma says
Hello Emilie, I tried making sourdough a number of years ago without much success. During lockdown I have been unable to get dried yeast so I thought I would try sourdough once more. I discovered your blog a few weeks back and made the cinnamon buns. They were absolutely amazing and I immediately went online to order your book. There was a hold up with the order (I’m in the UK) and I got very impatient and ordered the kindle version. I made the olive, lemon and thyme loaf today and it was the best bread I have ever tasted, yet alone made! Thank you so much for making sourdough approachable and achievable – I am completely addicted to baking it now. My family have asked for the decadent chocolate chip to be made this evening :)
Emilie Raffa says
Gemma, thank you so much. What a lovely comment. Enjoy sourdough- it’s one of the most rewarding things you can do (and eat!).
Esley Albert says
Hello
Love this loaf of bread! I can’t see the conversion for the 30% whole wheat loaf.
Patricia says
Hello Emilie,
I’m also interested in the recipe for 30% whole wheat….what are the ingredient proportions? I’m excited to make this week! LOVE your videos, they are very, very helpful and mesmerizing! :)
~ Patricia
Chere says
Emilie,
Can you explain what the (100% hydration) means for the starter? Maybe I missed something along the way but I’m not sure what that means. I usually use the starter when it has doubled in size after feeding. I’ve been making the everyday sourdough from your book. It is so good that I haven’t branched out to any of the other recipes until now when I’m going to try this whole wheat recipe!
Emilie Raffa says
Hi there! There are different types of starters. Oftentimes, people ask what I bake with so I list it in the ingredient section.To clarify: a 100% hydration starter is fed equal parts flour and water by weight. This is the most common type of starter used in baking. It’s the same one I use in the book, so you are good to go :)
Eileen says
Can I shape this loaf in the evening and let it rise in the banneton overnight to be baked in the morning?
Emilie Raffa says
You most certainly can. Just keep your eye on it; sometimes doughs that follow an overnight second rise can over proof by the following day.
Rachel says
I tried this recipe and it came out great! The taste was unbelievable! Was that because of a longer autolyse? I also like that it was not dense!
Emilie Raffa says
Itcould be! A longer autolyse can deepen the flavor depending on the recipe, temperature etc. Glad you liked it!
Jessica Harris says
I followed this recipe to a tee. But I feel like I must have missed something along the way. My bread turned out very dense, kind of wet, and the crust softened as it cooled. Any tips for next time? The flavor is great!
Emilie Raffa says
Hi Jessica! Dense bread usually means the gluten was not fully developed or the dough was over proofed (rose for too long). If it was wet on the inside, it was undercooked. A softened crust occurs when the steam escapes through the outside of the bread (and because your loaf was wet, it made the crust more soft).
Next time, make sure the dough doubles in size before baking, don’t skip the pre shape, use an oven thermometer to make sure the oven temp is accurate, and after baking allow the loaf to cool directly on the wire rack inside the oven (turned off) with the door ajar.
Sarah Penny says
I’m curious also as to why in the white one we use 150g starter and this one 50g, what effect does this gave on the loaf? Thank you :)
Emilie Raffa says
Hi Sarah! They are just different recipes. For more detailed info, please visit the FAQ section in this post (scroll to the bottom).
Xiang says
Hi again,
Can you make another version of this recipe but smaller?
Emilie Raffa says
I would divide the dough in half and bake two smaller loaves. Freeze what you’re not using.
Xiang says
Do you mean freeze the bread? Or the dough?
Emilie Raffa says
The bread!
Sarah says
I loved your white sourdough recipe and it works every time; this one however was really wet didn’t seem to hold its shape at all, as soon as it came out the bowl with the floured tea towel it just collapsed. Not sure where I went wrong.
Emilie Raffa says
It could be a few things:
If it was too wet, there might have been too much water in the dough (please weigh your ingredients!).
Regarding the texture, it sounds like the gluten needed more time to develop OR the dough was over proofed (rose for too long). Make sure the bulk rise is long enough; the dough should double in size when ready. For the second rise, do not let it go for too long because the dough will over proof and lose its shape. If the weather is warm, these variables can speed up quickly.
In comparison to the white sourdough, whole wheat doughs handle differently so it’s just something to keep in mind as you continue to bake :)
Emma says
Thanks for the video! It was useful but my dough seemed softer than yours during the folds and then the next day it did not hold it’s shape to become taught. I ended up handling it more and it looks like it did not rise in the oven. When I put it in the fridge it was quite wet when I poked it and sticky though it did rise a bit more overnight. I used a half rye and half AP flour starter and my place is not very warm… Not sure where it went wrong!
Emilie Raffa says
Hi there! It’s possible your dough needed a few more folds to tighten up. At any point in the process, you can add more folds around the bowl during each set. This will help.
Additionally, make sure the dough doubles before baking; in your case it was either over or under proofed.
Finally, I’m sure you’re already doing this, but make sure to weigh all ingredients for accuracy. This will ensure the exact amount of water is added to the dough every time. Hope this helps!
Parviz says
I am baking this bread tomorrow. Love your recipes. They work! Just a question… can I bake it in the Challenger bread baker and does it have to be pre heated first?
Emilie Raffa says
Absolutely! We love the Challenger Bread Pan. You can preheat it (or not); the choice it up to you. In most cases, the preheated option will give the dough instant expansion upon contact.
huong says
Hi. do i have to preheat the baking pot ?
Emilie Raffa says
Hi there! I do not preheat my pots, but you can if you want. Up to you!
Paula says
This recipe like all your others is easier than most and always tastes great……The crust was awesome and the crumb was beautiful. Thank you for all you excellent tutorials .
I have been using my microwave oven for A proofing box and it works perfectly. I live in Colorado so nights and mornings can be chilly.
Emilie Raffa says
Fantastic. Thanks Paula!
Gaby says
I don’t have a dutch oven/baking pot. Is there anything else I can use to bake the bread?
Emilie Raffa says
Any oven safe pot with lid that can heat up to 450 F (including the handles etc.) will work just fine.
Mary says
I have made 3 successful loaves of white sourdough bread. Instructions are very helpful. I use my oven light to create a warm space for rising… and with the white, I can start to finish the same day… I will try the whole wheat the same way, just might bake it later in the eve… so it will be delicious for breakfast… waiting an hour to cut is soooo hard!
Emilie Raffa says
Isn’t the oven light trick great! I bet you can do a same day wheat loaf starting earlier in the day. Enjoy!
Kelly says
I am trying this one today and its in the second rise of the morning now. I am curious, do you bake this loaf at 450 the entire time? I notice you don’t mention reducing the tempt to 425 or 400 after putting in the preheated oven. Thanks!
Emilie Raffa says
Hi there! Yes: 450 F the whole time.
Kelly says
Thank you! It looks beautiful, although I didn’t get nearly the rise I thought I would. Not sure what I did that caused that, but I’ll keep trying. Thanks for making this new hobby of mine fun and approachable!
tobie says
I am learning so much by making these recipes. I am also learning patience. The breads have all been great and the cinnamon rolls were fantastic and all the adult kids consumed them.
Emilie Raffa says
Fantastic! Glad you liked the rolls And yes: patience is the secret ingredient ;)
Jordi says
Hi.
Great recipe and video. It looks tasty
I have a couple of questions:
– In the summary your wrote that the baking was at 6:00AM. Did you made the second rise in the fridge? I can’t see that in the full instructions
– Currently I don’t have any iron cast to do that so I’m wondering if this would work in a Pyrex mold
Thanks for sharing
Emilie Raffa says
Hi Jordi! The second rise is done in the morning. I’ve updated the baking schedule to include the timeframe for for this step. Detailed instructions are in the recipe below. For baking, any deep pot with lid that can heat up to 450 F will work. Double check with the manufacturer.
Zoe says
Hi there, could I used wholewheat bread flour and all purpose flour? If so what would the measurements be?
Thank you
Emilie Raffa says
Zoe, I’m sure it can be done. But since I haven’t tested it myself, I’m unsure of the adjustments. If you experiment, please let us know!
Mamta sood says
Can we only with whole wheat flour as bread flour nt available
Emilie Raffa says
Unfortunately, it won’t work with all whole wheat flour. The loaf will be too dense.
Annie says
I will try this version! I already bake the Whole Wheat Sourdough from your book 🙏🏻 It’s the family favorite for everyday bread😊. Tonight we are making Ficacvia Di Recco – can’t wait!
Annie from Denver
Emilie Raffa says
Fantastic! And yay! Glad your family likes the one from the book :)
Paula says
Can you use a whole wheat starter?
Emilie Raffa says
Yes, you most certainly can.
Donna T. says
Emilie,
Thanks, I’m excited to try your new recipe. As always, I picked up several small differences in techniques on the video from what I’ve been using that will help me become a better SD baker. Thanks for both the recipe and instructive video, much appreciated.
Emilie Raffa says
You’re very welcome. Isn’t it amazing how a simple video can change your technique? It’s the little things!
jude says
what a great video, emilie.
i loved the silence and just the sounds of you working.
no distractions.
can’t wait to bake this tomorrow.
will be back to rate it then.
thank you for another fabulous recipe.
jude
Emilie Raffa says
Ah, thanks Jude. I was worried about the birds in the background, lol :) Enjoy!
jude says
a gorgeous loaf just came out of the oven.
all that’s left is to patiently wait to dive in.
thanks again and stay safe,
jude