Description
An easy recipe for whole wheat sourdough bread that’s light and flavorful (not heavy and dense). Made with 20% whole wheat flour. The dough can be made in advance and baked the following day. Ideal for sandwiches, crostini, and morning toast with jam.
Ingredients
- 50g bubbly, active sourdough starter (100% hydration)
- 350g – 375g warm water (80-85 F)* See note below
- 400g bread flour
- 100g whole wheat flour
- 9g fine sea salt
Notes & Substitutions
* Flour is like a sponge. Depending on the brand you’re using, it might not absorb all of the water. Start with 350g of water if you’re using a low protein bread flour, less than 12.7%.
For best results, use a scale to weigh your ingredients. If using measuring cups, please aerate the flour first, lightly spoon it into the cup, and then level off the excess with the back of a knife.
Instructions
Baking Schedule
Whole whether doughs tend to rise faster than white doughs, especially in warm weather. To avoid over proofed dough, I like to start mixing in the afternoon (usually between 2-3 PM) when I know I’ll be home to stretch and fold the dough. Please adjust your rise times based on temperature.
Make the Dough
Combine the sourdough starter and water in a large bowl. Add the flour and salt. Mix with a fork and then finish by hand to fully incorporate the flour. It will feel very wet and sticky. Cover with a damp towel or wrap and let rest for 1 hour on your countertop, returning to the bowl after the first 30 minutes to work the dough into a rough ball.
Bulk Rise with Stretch and Folds
After the dough has rested for 1 hour, do your first fold.
Gather a portion of the dough, stretch it upward, and fold it over toward the center of the bowl. Give the bowl a 1/4 turn and repeat 3 more times, stretch and folding the dough to come full circle around the bowl (4 folds = 1 set). If the dough still feels slack after the 1st set, do an additional 4 folds around the bowl to tighten the dough.
For best results, do 4 sets total spaced 30 minutes apart resting the covered dough in a warm spot in between each set (see tip below). Notice how the dough will tighten after the 4th set. See video for technique.
When finished with the folds, cover the bowl and continue the bulk rise (untouched) at 75-78 F for about for 2-3 hours. The dough is ready when it has almost doubled in size. Wrap and chill the whole bowl overnight; the dough will continue to rise only slightly in the fridge when the dough is warm.
How to Create Warm Spot for Bread Dough: Preheat your home oven to the lowest setting for 30- 45 seconds and then shut it off. Place the covered bowl of dough inside to bulk up. The temperature should be 75-78 F and no higher than 80 F. Use an oven thermometer (and common sense) to keep track of the temperature. Dough that is too warm will become wet, sticky, and a tricky to work with. Alternatively, I highly recommend using a proofing box.
Shape the Dough
The following morning, make sure the dough has doubled in size. If not, give it more time to bulk up, if needed. This is important to build strength.
Line a small bowl (or proofing basket) with a cotton or linen cloth. Sprinkle with flour. You’re going to shape the dough twice to build extra strength.
Preshape
Remove the cold dough onto a floured surface. Let rest for 10-15 minutes to take some of the chill off. Shape the dough into a loose ball using the envelope technique. Starting at the top of the dough, stretch and fold it over toward the center. Then stretch and fold the bottom of the dough toward the center. Repeat on the left side…and then the right side. Using a bench scraper, scoop up the dough and flip it over so the smooth side is facing up. Cover and rest for 20-30 minutes.
Final Shape
After the dough has rested, flip it over again (the smooth side should be facing down now). Shape it again following the steps above. Flip it back over. With floured hands, gently cup the dough and pull it toward you in a circular motion to tighten its shape. Place the dough into the lined bowl or proofing basket seam side up. Cover with the cloth overhang.
Second Rise
Rest in the warm spot you used earlier for 30 minutes to 1 hour. The dough is ready when it looks puffy and has risen slightly, but has not yet doubled in size. The dough should not be very cold prior to baking.
Preheat your oven to 450 F towards the tail end of the second rise.
Cut a sheet of non-stick parchment paper to fit the size of your baking pot, leaving enough excess around the sides to remove the bread.
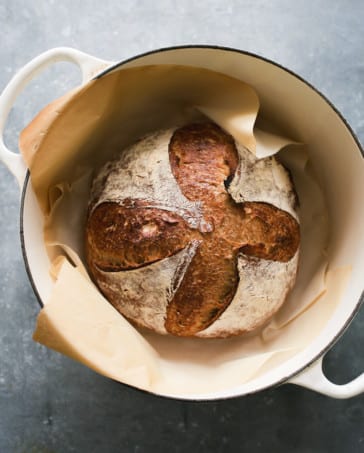
Score the Dough
Place the parchment over the dough and invert the bowl to release. Sprinkle the dough with flour and gently rub the surface with your hands. Using the tip of a bread lame, small, serrated knife or a razor blade, make four shallow 4-inch long cuts at 3, 6, 9, and 12 o’clock around the dough. Use the parchment paper to transfer the dough to a Dutch oven (or another oven safe pot with lid).
Bake the Dough
Bake the dough on the center rack for 20 minutes, covered. Remove the lid, and continue to bake for 40 minutes and golden brown.
When finished, transfer to a wire rack. Cool for 1 hour before slicing, for best texture.