This easy, step-by-step whole wheat sourdough bread recipe (and video) is light and flavorful, not heavy and dense. Made with 20% whole wheat flour. Naturally leavened with active sourdough starter. Ideal for sandwiches, toast and soup.
Whole grain flours are prized for their toasty, earthy flavors. Packed with plenty of fiber and nutrients, their natural complexity is a perfect match for any slow-fermented sourdough bread recipe. However, in bread baking there are rules…
You can’t just swap white flour for whole wheat flour and expect the same results (unless you like dry and dense bread). Adjustments need to be made.
In this post, you’ll learn how to make exceptional whole wheat sourdough bread that’s not only light, crisp and airy, but is good for you too. {Browse my full collection of sourdough bread recipes here}
How To Make Whole Wheat Sourdough Bread {Step-By-Step Recipe}
Step 1: Mix The Dough
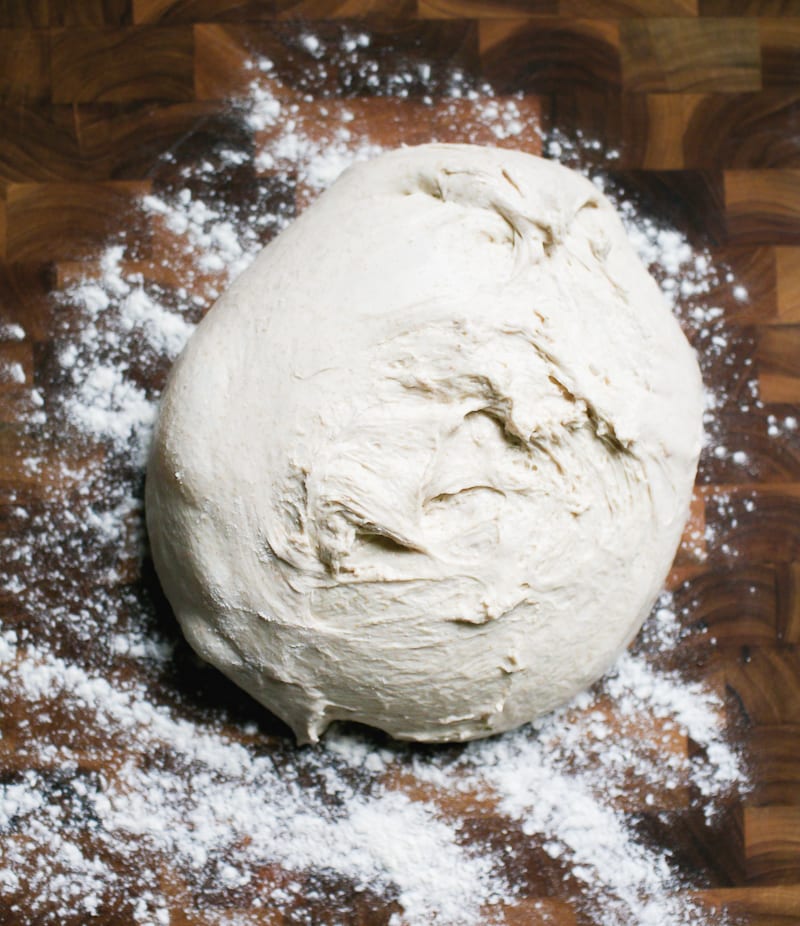
To Start: Weigh your ingredients using a scale. Mix the sourdough starter and water together in a large bowl. Add the flour and salt. Stir to combine, and then squish by hand to form a rough dough. This dough is very sticky, around 75% hydration. It’s like playing with wet mud. Very satisfying! Cover the bowl and rest for 1 hour- this is your first rest.
Tip: Whole wheat flour is thirsty. Because it absorbs more water than regular all purpose flour, extending the “autolyse” or first resting period gives the dough ample time to hydrate. The texture of the dough will be noticeably different after the full hour: it will be softer, and more extensible to stretch and fold later on.
Step 2: Bulk Rise With Stretch & Folds
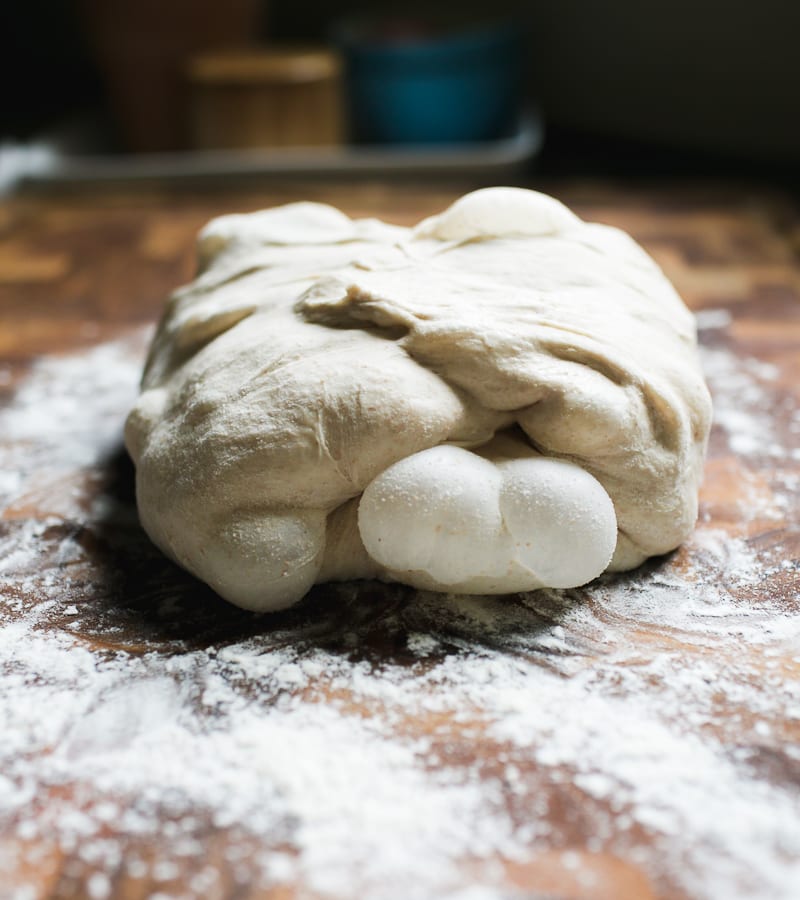
Now the dough needs to rise. During this stage, you’ll stretch and fold the dough to strengthen the gluten and boost the height of the bread. I like to do 4 sets spaced 30 minutes apart. The dough will become soft, pillowy, and a bit stiffer by the 4th set which is what you want.
When finished with the folds…
Cover the bowl with lightly oiled plastic wrap, and continue to bulk rise, untouched at 75-78 F for about 2-3 hours. The dough is ready when it’s puffy, airy, and almost doubled in size. Chill overnight.
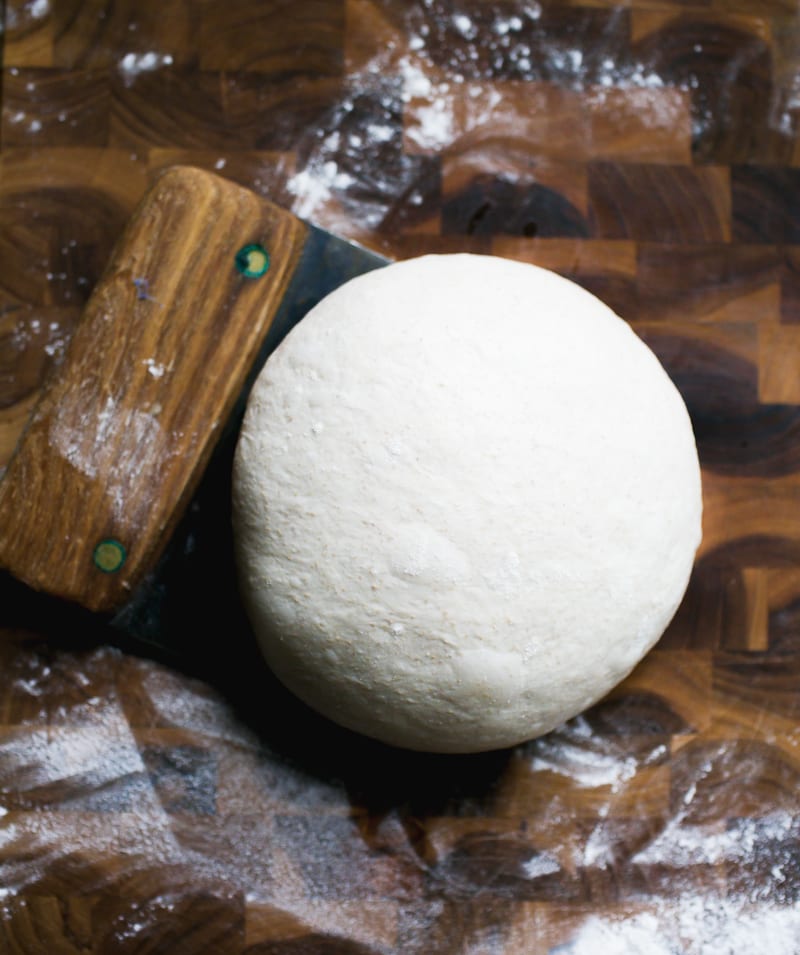
Step 3: Shape The Dough
In the morning, you’re going to shape the dough twice to build extra strength. The first shaping is called “pre-shape” and the second one is the “final shape.”
Pre-shape
Remove the cold dough onto a floured surface. Rest for 10-15 minutes to take the chill off. Shape the dough into a loose ball. Cover and rest for 20-30 minutes.
Final Shape
Using a bench knife for guidance, flip the dough over and shape it again (a little bit tighter this time). Place into a lined bowl of proofing basket seam side up. Cover the dough with the vloth overhang.
Tip: Pre-shaping Bread Dough: not every sourdough recipe needs it. High hydration doughs (like this one) benefit from the extra support to hold its shape. Otherwise, it might spread when baking.
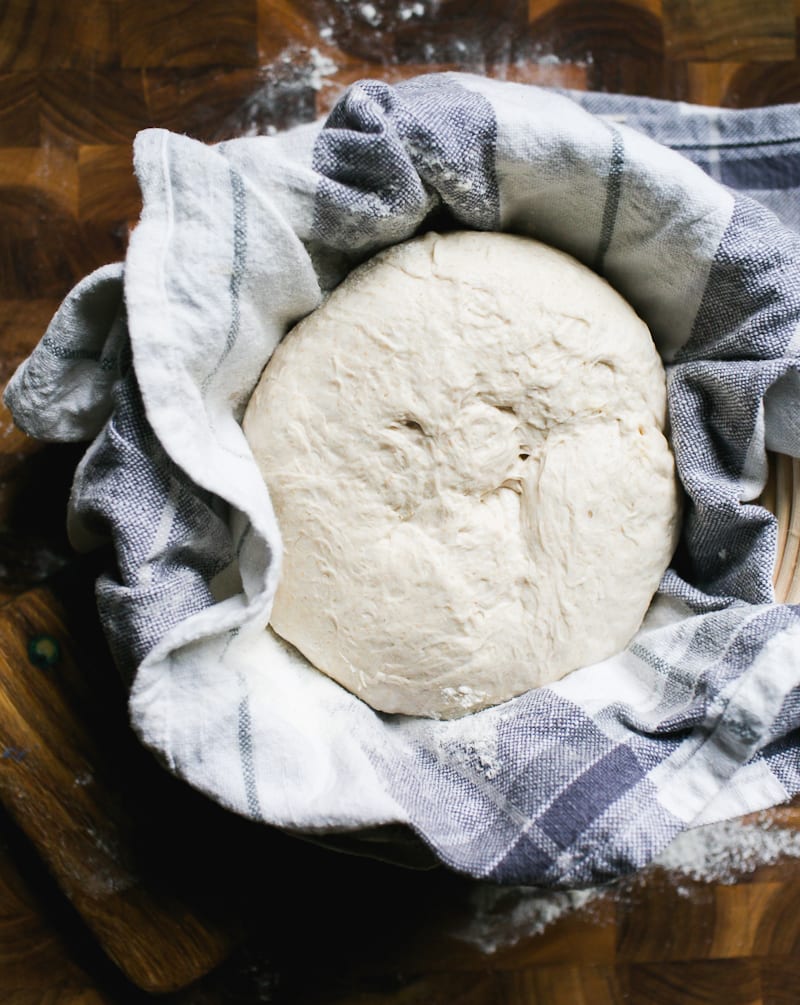
Step 4: Second Rise
The dough needs to rise again, but only briefly. Rest the dough in the warm spot you used earlier for about 30 minutes to 1 hour. The dough is ready when it’s puffy and looks plump. It should not be super cold or dense-looking prior to baking. Preheat your oven.
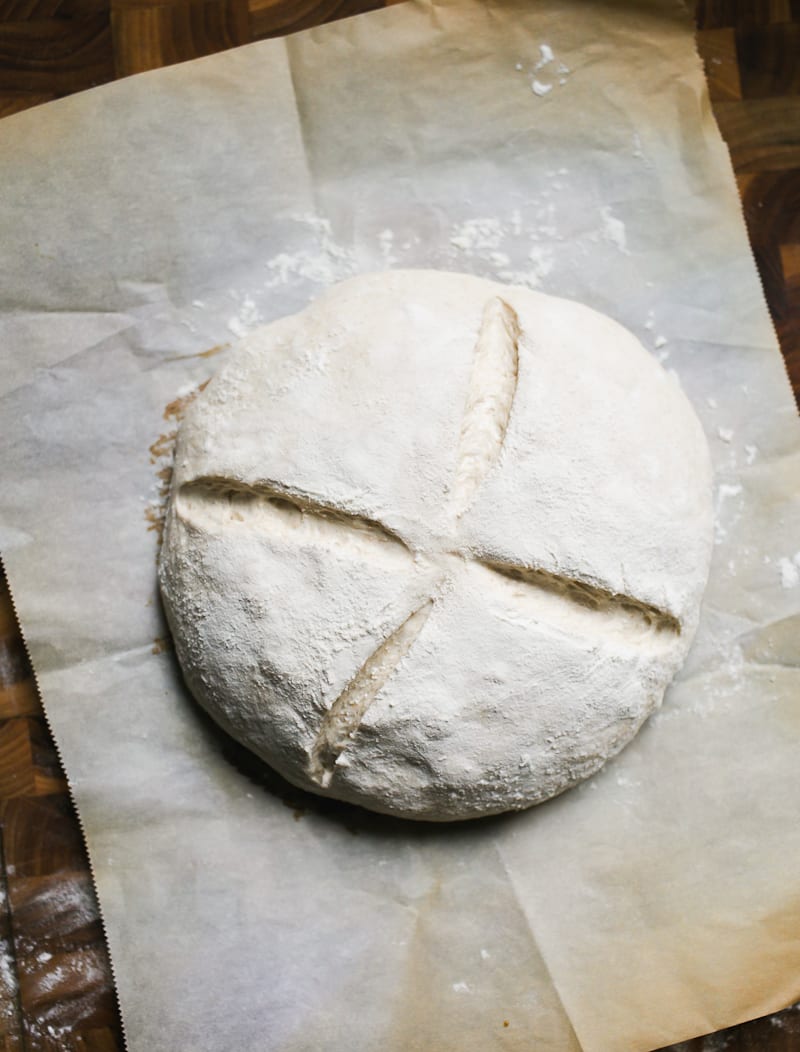
Step 5: Score The Dough
Invert the dough onto a sheet of parchment paper. Flour the surface. Using a bread lame or small serrated knife, score the dough at 12, 3, 6 and 9 o’clock, turning the parchment paper as you go. Alternatively, make one long slash down the center- do whatever you feel comfortable with. Scoring takes practice.
Step 6: Bake The Dough
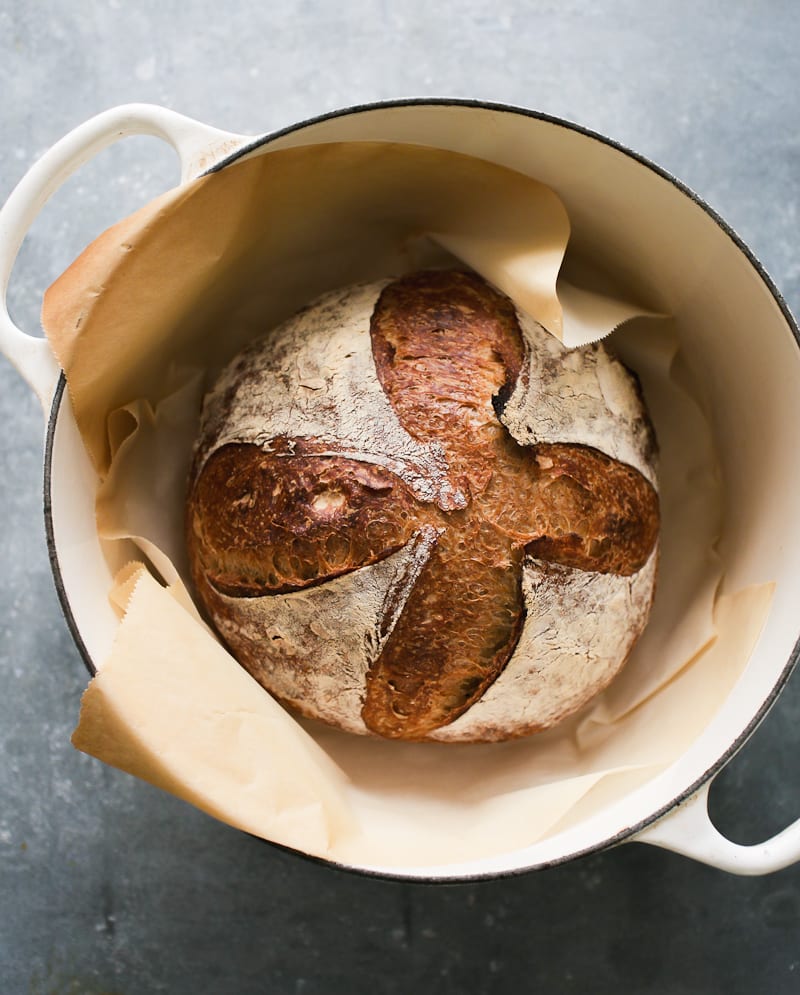
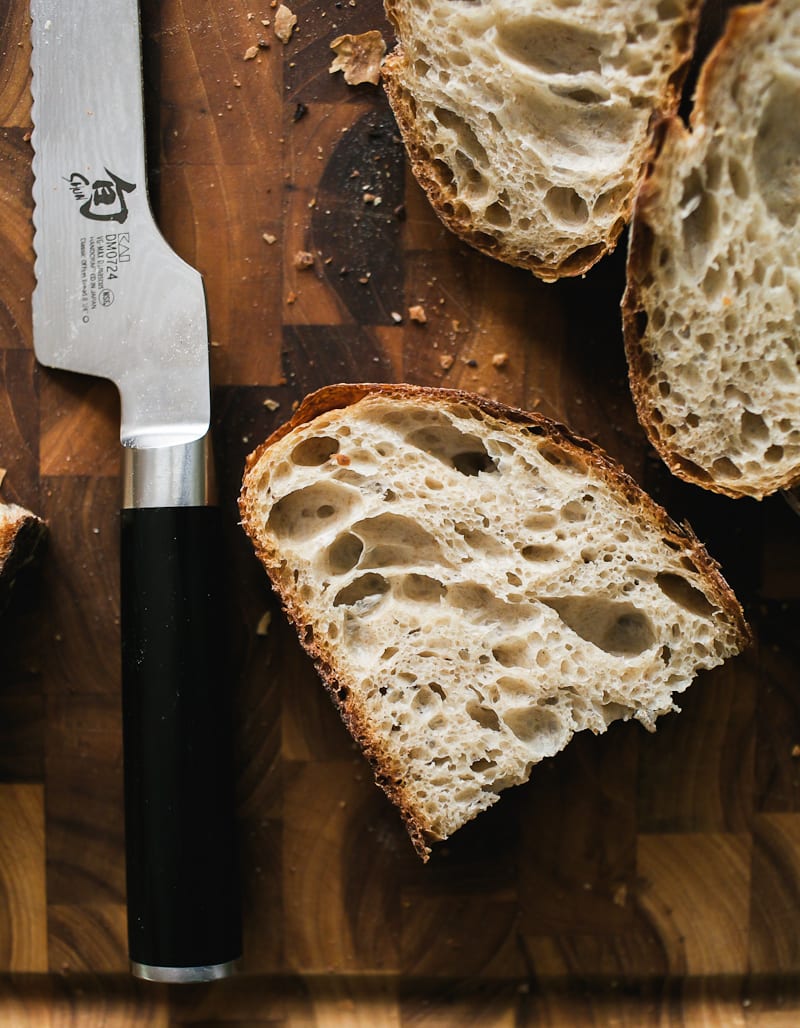
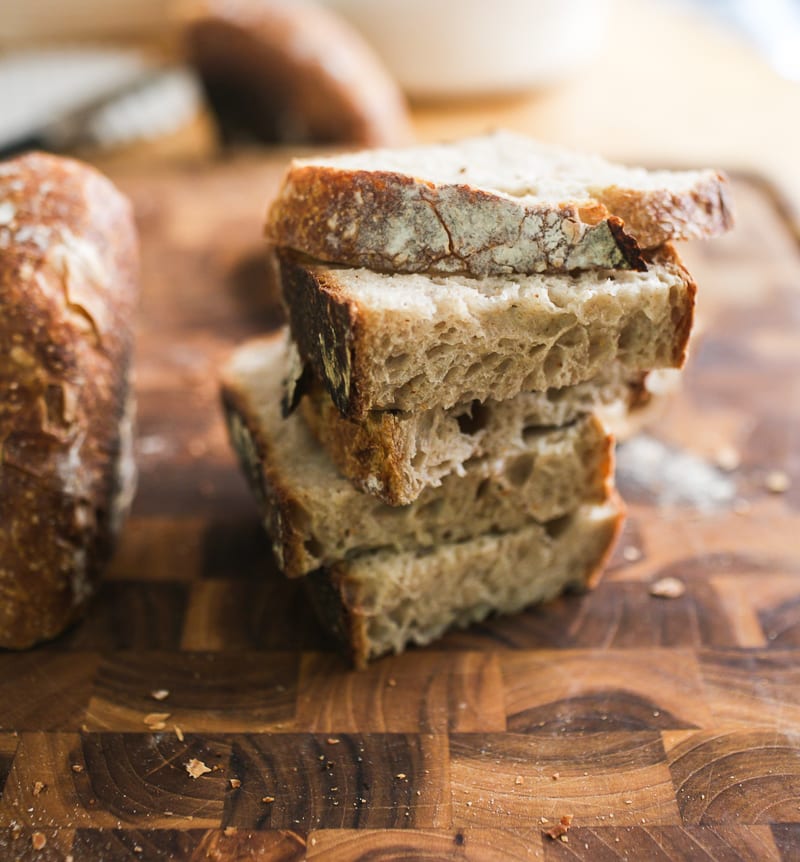
Place the dough in a Dutch oven or another oven safe pot with lid. You don’t have to preheat it first. Pop the lid on top, and bake @ 450 F for 20 minutes. Remove the lid and bake for an additional 40 minutes or until golden brown. Remove the bread from the pot. Cool on a wire rack for 1 hour before slicing, otherwise the interior crumb might taste gummy. How good does this look?!
Let’s Talk About Taste.
Because this dough is made with only 20% whole wheat flour, the taste is mild and nutty, with a light texture.
For a heartier loaf, you can increase the whole wheat flour up to 30% with additional water (see recipe card below). However, the biggest mistake I see with bakers is attempting these higher %’s without understanding that it can cause extremely dense and heavy bread. Start small, practice, and work your way up.
Then once you’ve mastered this recipe, have a look at my classic sourdough bread recipe, this easy sourdough sandwich bread and my light and airy sourdough focaccia!
Sample Baking Schedule
Whole wheat doughs tend to rise faster than all-white doughs, especially in warm weather. To avoid over proofed dough, I like to make this recipe in the afternoon (usually between 2-3 PM), when i know I’ll be home to do the stretch and folds. The dough is shaped and baked the following morning.
Late Afternoon
- 2:00 PM: Mix the dough/rest for 1 hour
- 3:00 PM: 1st Stretch & Fold
- 3:30 PM: 2nd Stretch & Fold
- 4:00 PM: 3rd Stretch & Fold
- 4:30 PM: 4th Stretch & Fold
- 5:00 PM: Bulk Rise for 2-3 hrs @ 75-78 F
- 7:00 or 8:00 PM: Chill overnight
- 6:00-8:00 AM (the next day): Shape and bake the dough.
By signing up, you agree to receive emails from The Clever Carrot. Unsubscribe at any time.

Light Whole Wheat Sourdough Bread
- Yield: 1 loaf 1x
- Category: Sourdough Bread Recipes
- Method: Oven-Baked
- Cuisine: American
- Diet: Vegan
Description
An easy recipe for whole wheat sourdough bread that’s light and flavorful (not heavy and dense). Made with 20% whole wheat flour. The dough can be made in advance and baked the following day. Ideal for sandwiches, crostini, and morning toast with jam.
Ingredients
- 50g bubbly, active sourdough starter (100% hydration)
- 350g – 375g warm water (80–85 F)* See note below
- 400g bread flour
- 100g whole wheat flour
- 9g fine sea salt
Notes & Substitutions
* Flour is like a sponge. Depending on the brand you’re using, it might not absorb all of the water. Start with 350g of water if you’re using a low protein bread flour, less than 12.7%.
For best results, use a scale to weigh your ingredients. If using measuring cups, please aerate the flour first, lightly spoon it into the cup, and then level off the excess with the back of a knife.
Instructions
Baking Schedule
Whole whether doughs tend to rise faster than white doughs, especially in warm weather. To avoid over proofed dough, I like to start mixing in the afternoon (usually between 2-3 PM) when I know I’ll be home to stretch and fold the dough. Please adjust your rise times based on temperature.
Make the Dough
Combine the sourdough starter and water in a large bowl. Add the flour and salt. Mix with a fork and then finish by hand to fully incorporate the flour. It will feel very wet and sticky. Cover with a damp towel or wrap and let rest for 1 hour on your countertop, returning to the bowl after the first 30 minutes to work the dough into a rough ball.
Bulk Rise with Stretch and Folds
After the dough has rested for 1 hour, do your first fold.
Gather a portion of the dough, stretch it upward, and fold it over toward the center of the bowl. Give the bowl a 1/4 turn and repeat 3 more times, stretch and folding the dough to come full circle around the bowl (4 folds = 1 set). If the dough still feels slack after the 1st set, do an additional 4 folds around the bowl to tighten the dough.
For best results, do 4 sets total spaced 30 minutes apart resting the covered dough in a warm spot in between each set (see tip below). Notice how the dough will tighten after the 4th set. See video for technique.
When finished with the folds, cover the bowl and continue the bulk rise (untouched) at 75-78 F for about for 2-3 hours. The dough is ready when it has almost doubled in size. Wrap and chill the whole bowl overnight; the dough will continue to rise only slightly in the fridge when the dough is warm.
How to Create Warm Spot for Bread Dough: Preheat your home oven to the lowest setting for 30- 45 seconds and then shut it off. Place the covered bowl of dough inside to bulk up. The temperature should be 75-78 F and no higher than 80 F. Use an oven thermometer (and common sense) to keep track of the temperature. Dough that is too warm will become wet, sticky, and a tricky to work with. Alternatively, I highly recommend using a proofing box.
Shape the Dough
The following morning, make sure the dough has doubled in size. If not, give it more time to bulk up, if needed. This is important to build strength.
Line a small bowl (or proofing basket) with a cotton or linen cloth. Sprinkle with flour. You’re going to shape the dough twice to build extra strength.
Preshape
Remove the cold dough onto a floured surface. Let rest for 10-15 minutes to take some of the chill off. Shape the dough into a loose ball using the envelope technique. Starting at the top of the dough, stretch and fold it over toward the center. Then stretch and fold the bottom of the dough toward the center. Repeat on the left side…and then the right side. Using a bench scraper, scoop up the dough and flip it over so the smooth side is facing up. Cover and rest for 20-30 minutes.
Final Shape
After the dough has rested, flip it over again (the smooth side should be facing down now). Shape it again following the steps above. Flip it back over. With floured hands, gently cup the dough and pull it toward you in a circular motion to tighten its shape. Place the dough into the lined bowl or proofing basket seam side up. Cover with the cloth overhang.
Second Rise
Rest in the warm spot you used earlier for 30 minutes to 1 hour. The dough is ready when it looks puffy and has risen slightly, but has not yet doubled in size. The dough should not be very cold prior to baking.
Preheat your oven to 450 F towards the tail end of the second rise.
Cut a sheet of non-stick parchment paper to fit the size of your baking pot, leaving enough excess around the sides to remove the bread.
Score the Dough
Place the parchment over the dough and invert the bowl to release. Sprinkle the dough with flour and gently rub the surface with your hands. Using the tip of a bread lame, small, serrated knife or a razor blade, make four shallow 4-inch long cuts at 3, 6, 9, and 12 o’clock around the dough. Use the parchment paper to transfer the dough to a Dutch oven (or another oven safe pot with lid).
Bake the Dough
Bake the dough on the center rack for 20 minutes, covered. Remove the lid, and continue to bake for 40 minutes and golden brown.
When finished, transfer to a wire rack. Cool for 1 hour before slicing, for best texture.


Comments
Yancy says
Excellent! First time trying this recipe. My starter deflated by the time I was ready to start but I went ahead and used it and boy am I happy that I proceeded! Thank you for being detailed with your instructions! Am now gonna try your raisin and cinnamon swirl bread! Excited!
tamina says
i used this recipe for my 4th attempt at sourdough bread (and 1st attempt at working with wheat flour) and i’m so impressed!! fantastic texture, great crust and the taste is phenomenal as well, i’m very proud and happy about my loaf. thank you for this wonderful recipe :-)
Bea says
Hi, love your recipes! Everything just comes out amazing. Thank you. Wondered if you can help though? I’m not at home during the day due to work. So I wondered if I could leave the prove overnight until the next evening. Do you think it’s possible with this recipe to adapt it to making it in the evening and then cooking it the next evening?
Thank you
Nicole says
Hello! Hoping for your input. These loaves come out a little small, so I tried 1.5x the ingredients to yield a bigger loaf. They still come out delicious but a teeny bit more dense, versus the light airy vibes of your rustic loaf. Do you have any recommendations if one is wanting to make a bigger loaf? At the moment I’m using 75g starter, 550g water, 600g bread flour, 150g whole wheat flour, 13g salt. Should I be using more starter than that? Thanks for taking a look!!
Sofie says
Hi Nicole, I am still fairly new to sourdough bread, but had the same experience as you. For me, it came down to two things! My sourdough starter was not at it’s actual peak when I started making my bread. It doubles, but my starter peaks at triple its original height. But the main difference, way more than I expected, was visible when I switched out my flour. I was using a general bread flour, but now I am using the Italian 00 flour with 12 grams of protein per 100 grams of flour. I just read all the labels on the flour at my local supermarket and took the one with the higher percentage of protein. I hope this helps you!! Happy baking
Per Kristian Goksøyr says
I’ve been into artisan bread baking with souerdough for nearly ten years. I bake using a challenger pan. From april – october I may also use a woodfired brick oven in the garden to bake my loaves. This recipy make a delicious bread. Following the description, it is easy to secceed.
I have long searched for a recipy for Campaillou, without success. Anyone?
Christopher Lemay says
Finally a whole wheat sourdough recipe that works. A must try.
Sofia says
Hello, can I add everything bagel spice of herbs? If yes, at which stage should I do it? Thank you! 😊
James Holt says
I wrote v a long comment but must have touched wrong key while trying to edit Bk in name field. Maybe it v survived, I’ll try again another day.
Karen Amstutz says
Hi, How big (in quarts) should the enameled pan be for this loaf? Thank you!
Emilie Raffa says
Hi there! a 5 qt Dutch oven is best. Slightly smaller will work too.
Marleen says
Can this dough be put in the fridge after the 4th stretch and fold to bake the next day ?
Emilie Raffa says
Yes, you can do that. Just give it more time to rise at room temperature the next day (if needed).
Gisele says
Great recipe thanks, wanted to post a photo, but it did not work
Emilie Raffa says
Hi Gisele! Thank you! Unfortunately, readers are unable to upload photos at this time. You can always tag me on social @theclevercarrot so I can see.
John says
Is the overnight refrigerator step necessary?
Could the double in size rise be done at room temp and all steps completed in same day (start in morning)?
Emilie Raffa says
Hi John! Yes, absolutely. This recipe can be a same-day bake, if you prefer.
Brooks says
I noticed this recipe calls for 50g starter whereas your basic sourdough recipe calls for 150g, with the same 500g flour.
What is the reason for that?
Thanks!
Emilie Raffa says
Hi Brooks! They’re just two different recipes, that follow two different formulas for variety.
Kristy says
I’ve been making 1-3 loafs a week for about 6 months now. I decided to stray from my normal recipe just to see what happens. Color me shocked yall. This loaf was AWESOME. I live at 8000ft and only adjustment I made was a shorter bulk fermentation time because my dough look ready for the slow ferment.
She came out nice and tall, with a perfect ear and great crumb. Will definitely make this again.
Sam says
Can you add seeds or grains to this recipe?
Catriona says
Hi,
I am wondering if I should increase the starter to 70 grams as I live in a colder climate and for the white sour dough you suggest using 100 grams of starter and that works great for the white one I make.
Cheers
Lena Damon says
Hello, Do you think I can cold prof for 24 hours? I need to leave the house to watch my grandsons and will not be back in time as your suggested schedule. Do you have any recommendations? Thanks so much. I love this recipe as written, and have had great results with it. Do you think it will taste much different if I let cold prof for a longer time? Lena
Claudine says
Hello Emily,
You are not heating up your dutch oven? Does it make a difference? I thought i had to do it in order to have a good result….
Claudine
Emilie Raffa says
Hi Claudine! I do not preheat my Dutch oven for this recipe. I used to in the past, but I kept burning myself. Then I realized, that while doing so has the potential to increase oven spring, it’s not always guaranteed. Properly developing the gluten + adequate shaping is needed for best results.
Dominique says
If I want to double the recipe to make two loaves, should I double the amount of starter I use or keep it at 50 g? I usually make the Tartine recipe that makes two loaves (200 g starter + 750 g water + 900 g bread flour + 100 g WW flour + salt/water slurry), but wanted to try a new recipe. I love your cinnamon rolls and sourdough waffles and have made them countless times. Thank you!
Emilie Raffa says
Hi there! Thank you so much 🙌🏻. When I scale this recipe, I double all of the ingredients as written. Comes out great!
Tammy L says
A fave and my go to sourdough recipe.
Emilie Raffa says
Thank you Tammy! 🥰
Albert Dell says
I’ll give it a good try very helpful advice thanks
Emilie Raffa says
Glad you’ve found it helpful, Albert. Thank you!
andrea Hofer says
Would i be able to use a stiff starter ratio for this recipe? What ratio would suggest?
SJ Clayton says
Hi! What size dutch oven do you use? Thanks!
Deborah Hunt says
Can this whole wheat sourdough be made with less salt? I have chronic kidney disease and so must watch the salt.
Emilie Raffa says
Of course. What’s listed here is typically the standard amount based on 500 g of flour. However, you can reduce the salt to your desired amount.
Jennifer N. says
Your recipe, instructions and video have lead to the success for me! I am so elated that I can finally “get” the sourdough conception from beginning to end, based on your guidance. Thank You! I grew up on “brown bread”as we never had white bread in the house. So to this day, I don’t like “white bread”. I love sourdough though, as it has more structure and flavour. I have played with the ratios of different flours and have had many fails, and a few successes. Still learning! I have a question though…if I were to add flax, sesame, and maybe sunflower seeds, at what point do I add them? Do they come into play with the measurements in the recipe? Or do I add them during one of the folds? When??? Maybe I should just buy your book and I’d find out! Thanks again, you are amazing! Cheers, Jennifer N.
Suzanne says
My 10 yr old usually doesn’t like wheat breads but today I baked your recipe and she loved it! Hurray! It’s delicious!
Marc says
Hi there! I really appreciate your website, it’s beautifully designed and incredibly informative. Thank you for sharing your recipes and all the effort you put into them.
I’ve tried this sourdough recipe a few times and noticed that the interior of my loaf turns out a bit softer and denser than what I’m used to from my local bakery. Their sourdough tends to be lighter, airier, and more chewy. I’m wondering, is that the expected result for this recipe, or might I be doing something wrong?
Thanks again!
Steven Timbrook says
This is a great recipe. I use 360 g of water and have made many boules and batards. I wanted to see if I could use the same dough to make sandwich bread. I used a USA Pan Bakeware Seamless Nonstick Standard Bread Loaf Pan, 8 x 4.5 x 2.75 and placed it in an oval graniteware roasting pan with a lid. I baked covered at 450 F for 20 minutes, removed the lid and baked for another 40 minutes. It made a great loaf. I’d include a photo if I that were possible.
Michelle says
My starter is about a week old , I have had an amazing result today using this recipe. I used 20 percent whole grain spelt flour.
I left my dough out for nearly 5 hours yesterday evening for the bulk ferment as I have a cooler kitchen, I wasn’t confident about the fermentation actually working for me.
My loaf is perfect, lovely and brown with a wonderful crisp crust. I’m amazed I have produced this for my first ever sourdough attempt while caring for 2 boisterous children. I can’t wait to bake another but i definitely need a sharper bread knife!
Thankyou for such simple steps and a great video to refer to:)
Chella says
Thanks so much for this recipe, Emily, and for all of your helpful tips! This was my very first try at making sourdough bread, using a starter that I made myself a few weeks ago. Huge success, delicious! It came out perfect. One change – I lowered the oven temperature to 400 degrees after putting in the bread, as you had instructed in the basic Sourdough Bread recipe. I thought that baking this at 450 degrees throughout would be too hot.
Janice Kenny says
Love the whole wheat breads! Have used Spelt, Emmer, Einkorn, Dark Rye any my favourite Red Fife flour. This is my go to recipe, it just works all the time.
andrea Hofer says
Would you have more hits what this dough should look like when done fermenting?
Evgeni says
How about oil? The recipe with just bread flour uses 25gr olive oil and this doesn’t have oil at all.
I just started it and added olive oil anyway, let see what happens. If everything goes well tomorrow morning we’ll see the results 😁.
Beginning Baking Momma says
This is literally why I’m reading the comments. I’m so confused. Probably going to ad a tab of butter or oil myself. Though also want to trust the process. So torn!!
Darlene says
Excellent directions for beginning sourdough bakers. Thank you for holding my hand as I introduce sourdough baking for the first time.
Joe says
Do you reduce tempt to 400 after taking lid off?
Tabitha says
Decided to try my hand at making a sourdough starter and after looking around for recipes came across Emilie’s because all the instructions were well laid out with a video, especially essential for a first-time bread maker.
Thanks to you my bread came out perfect! I also tried out your recipe for apple cake with my sourdough discard as I always feel terrible chucking it in the bin. Will be trying out more of your recipes in the future.
Thanks again!
andrea Hofer says
So what would the hydration of this bread be?
Heather Boonzaaier says
This is probably the nicest bread I’ve ever eaten!!!
Crust is so crispy, and the interior a beautiful texture and flavour.
Thank you for your amazing recipe.
I rate it 11 out of 10 😋
Lisa says
Thank you for your instructions! You’ve turned me into a sourdough baker! But, I have questions: 1) if I start my light wheat sourdough in the morning, is it possible to rise enough to bake it in the same evening? 2) why does the light wheat sourdough recipe only call for 1/3 of sourdough starter than the regular sourdough recipe?
Shell Smith says
I’ve had so many failures with bread in general and sourdough but this was a huge success! I will try 150 gr whole wheat to 350 gram white next (375 gr water?) and also wondering about using Spelt whole wheat flour, any suggestions? Such a great recipe, thanks.
andrea Hofer says
The bread is bit sour for my liking, why would it be.
Faye says
Was amazing. Have to say it’s the best I’ve made .
Natalie says
Hello! Thank you for all
your wonderful recipes! I’ve very new to sourdough, but have tried your waffles, AP flour beginner loaf recipe, and this recipe for light whole wheat. Three great recipes! I was just wondering why this loaf goes into the fridge and the AP flour loaf could sit on the counter all night. Would it be ok to let this sit on the counter all night? I should also mention, I’m making this with AP flout as I don’t have bread flour just yet. Thanks so much!
Priyanka Chadha says
Hi, I was wondering if I could use spelt flower instead of whole wheat flour, and all-purpose flower instead of bread flower? Thank you!
Hugh Whitmore says
Thank you for the thorough instructions. This was my first time baking sourdough from my own starter. The loaf was attractive and delicious! My only suggestion is to make your instructions clearer when you say to bake the bread covered for 20 minutes and then bake for 40 minutes, because it’s hard to tell if you mean 40 minutes total or 60 minutes total.
David Ledlie says
Tried your light whole wheat sour dough recipe — had great success. Process was much easier than the levain method I’d been using for over 40 years. I purchased your book and will try the whole grain recipe listed therein. I have one question: Can I refrigerate the dough after the bulk rise overnight, then bake the following day?
Best,
Dave Ledlie
Emilie Raffa says
Hi there! To clarify: do you mean chill the unshaped bulk dough (after the overnight rise) OR after the overnight bulk, shape and chill the dough to bake later in the day? Thanks!
Michelle says
Hi. Can I use whole wheat and regular all purpose flour? I do not have bread flour. Thank you
Emily Strange says
Hi Michelle!
I’m not the original author, but I too bake bread almost exclusively with All-Purpose flour. This recipe: https://www.theclevercarrot.com/2020/04/artisan-sourdough-with-all-purpose-flour/
had a really nice explanation about the unique challenges of baking bread with all-purpose.
What I do to adapt this recipe to AP is lower the amount of AP flour by 1/4 cup and up the amount of whole wheat by 1/4 cup (WW has a higher protein content than AP) and then start off with just a little less water than this recipe says, and work my way up by feel. I have no idea if that’s the best way to do this or if it would work in all oven, altitude scenarios, but it worked for me! Created a delicious bread.
LJT says
Hi! Can’t tell you how much I love this recipe. It is my go to bread!!! Thanks you.
Sometimes timing can be challenging when making sourdough in general… do you think shaping at the end of the bulk rise and then leaving it in the proofing basket and then straight to bake will work?
Emilie Raffa says
Thank you so much! Yes- you can absolutely do that. Just keep your eye on it during the second rise at room temperature. And take notes! Timing is everything is sourdough.
Catriona says
Hi,
I live in a colder climate and higher altitude. I am just wondering if I can use more starter (70 g) as the bread doesn’t seem to rise so well?
Chuck says
I can not find recipe if you want 30% whole wheat. Would you use 150g whole wheat, 350g white flour, how many g of water ?
Erica says
Hi :) Started this recipe this morning and have another hour before I’m done with my folds and start the bulk rise. For the fridge, would you say there’s a minimum amount of time it needs to ferment in the cold? Wondering if it will be ok to be in the fridge from 3pm until the next morning, or if I could bake it late tonight? I love all you recipes!
Sam says
I have made this a couple of times, and have and have not preheated the Dutch oven …I haven’t been able to get my loaf as brown and crusty as yours appears to be and I thought preheating might help?
Amy Jean says
Hi Erica! Yes its perfectly fine after your S & F to place the large mass of doh in frig from 3pm till am, this will slowly ferment. In the am just let it sit out for a bit & remember the warthog of your hands will help to pre-shape & final shape. Hope that helps!