Made with all purpose flour and just a touch of butter, learn how to make soft, tender sourdough sandwich bread with bubbly, active sourdough starter. Recipe adapted from my bestselling book:
Artisan Sourdough Made Simple.
Out of all the sourdough bread recipes I make on repeat (my beginner sourdough bread recipe,
sourdough focaccia and sourdough pancakes to name a few!), this easy sourdough sandwich bread gets the most requests. Why? It’s soft. It’s buttery. It makes the kitchen smell like magic.
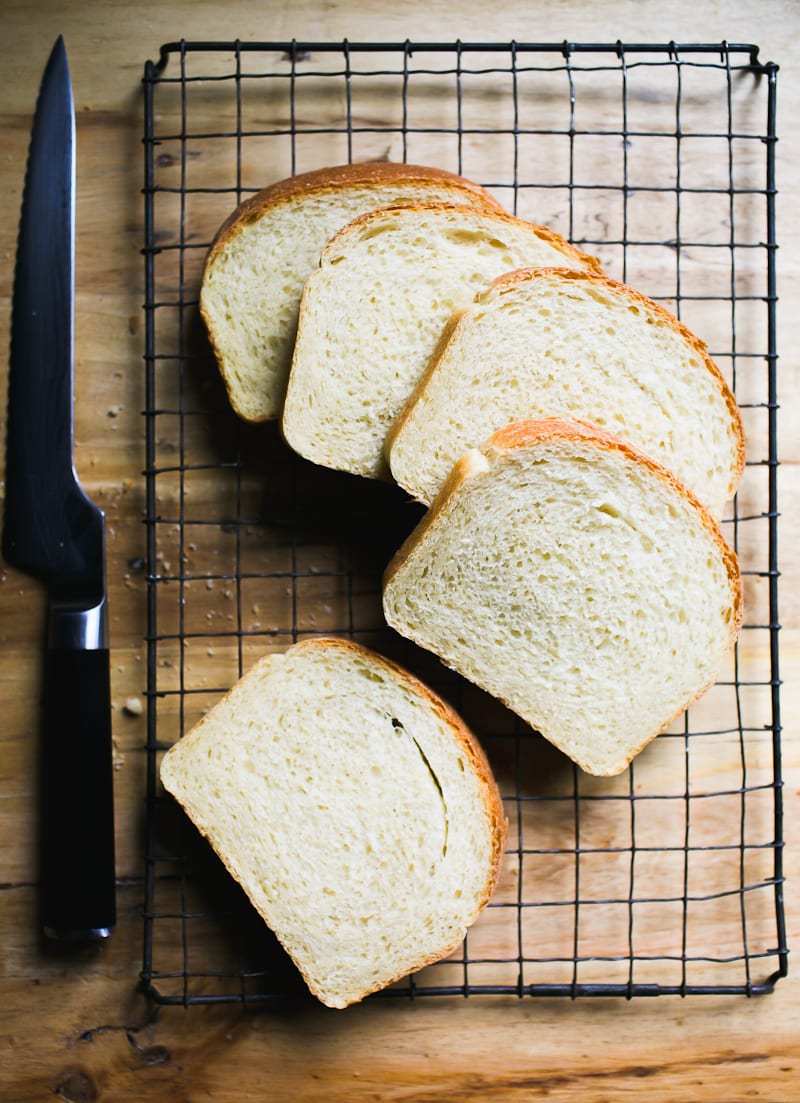
And the best part: you made it yourself. No junk or preservatives. Just simple sourdough with a soft crust, subtle tang and fluffy crumb that holds up to slicing, toasting and sandwiches (anything really).
Below, you’ll find my step-by-step walkthrough and baking schedule. You’ll also get three solid
variations (cinnamon raisin, whole wheat and bread flour) plus more sandwich loaf recipes in my book for inspiration.

Good To Know:
- What most bakers get wrong: the second rise goes for too long. This creates over proofed dough that bakes up flat. Follow my recommended timing and tips to master this step.
- Pan size matters. Want a taller loaf? Use an 8.5×4 inch pan instead of the standard 9×5 inch pan. Both work, but the smaller size will give the dough a nice upward boost.
- Use softened butter. If it’s cold, it won’t blend into the dough.
- Make it vegan. Swap in your favorite plant-based butter. Just check the label. Some brands are very salty.
- Temperature controls time. Warm kitchen? The dough will rise fast. Cold kitchen? Give it more time. Watch the dough and not the clock.
How To Make Sourdough Sandwich Bread {Step-By-Step Recipe}
Step 1: Mix the Dough
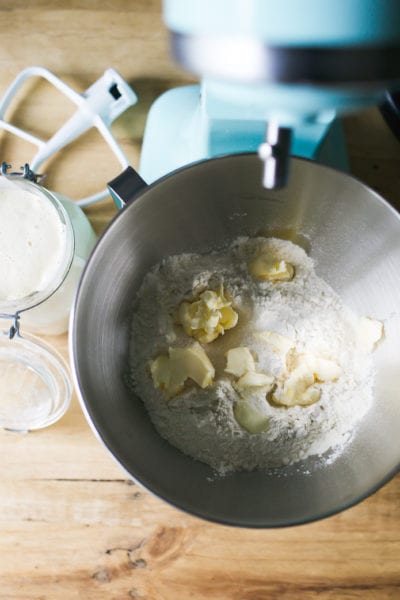
To Start: Add the flour, softened butter, sugar and salt to a bowl. I like using a stand mixer for this recipe. The dough is naturally a bit sticky; the machine makes it easier to handle. Mix with the paddle attachment until the butter looks like crumbs.
Mix in your bubbly, active sourdough starter and water until everything comes together. Cover and rest for 30 minutes to relax the dough before kneading.
Note: If you need assistance with your sourdough starter, read my companion articles Feeding Sourdough Starter: My Best Tips & Tricks and Troubleshooting Sourdough Starter.
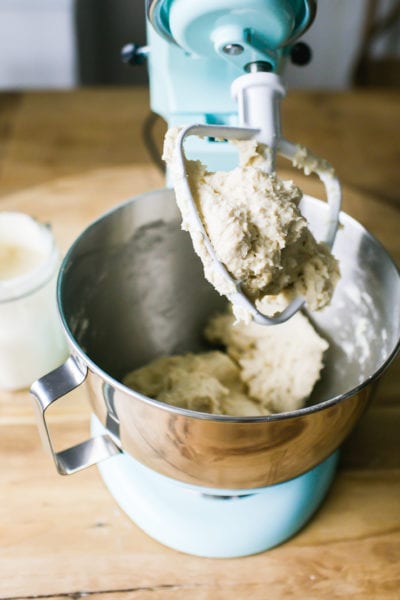
After 30 minutes of resting…
Remove the paddle attachment and switch to the dough hook. Knead until soft and supple, about 6-8 minutes. Note: on this particular day, my dough was stickier than usual so I added a sprinkle of flour to even it out. You can do that too.
No Stand Mixer? Knead the dough by hand on a lightly floured surface until it feels smooth, soft and elastic, about 8-10 minutes. Don’t worry about under/over kneading. If it’s springy (not sticky) you’re good to go.
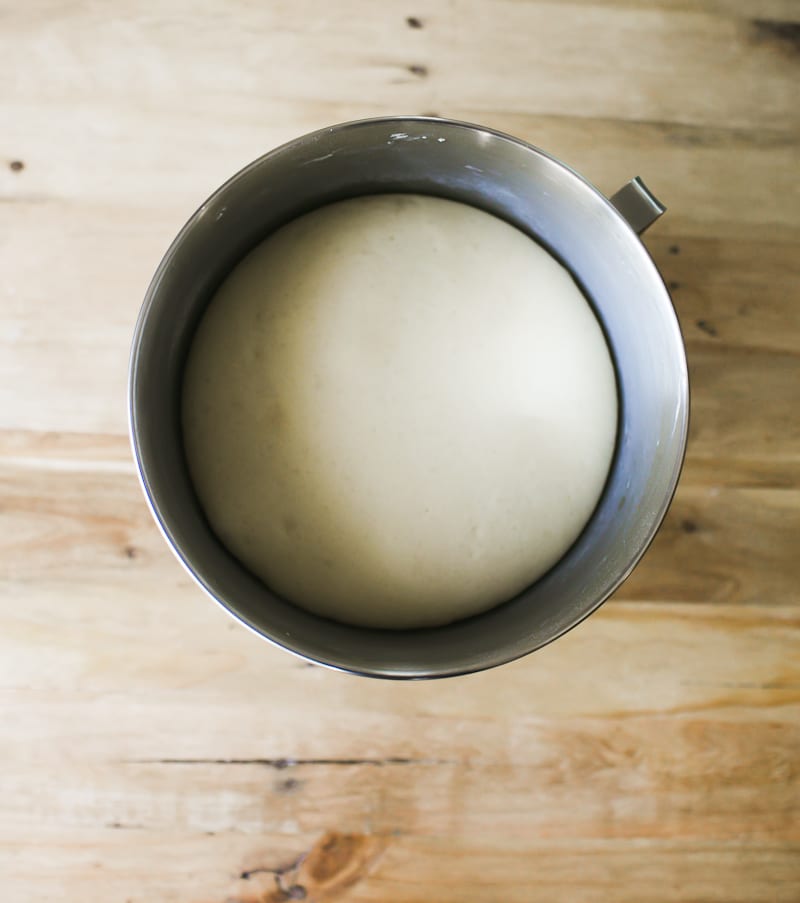
Step 2: Bulk Rise (Overnight)
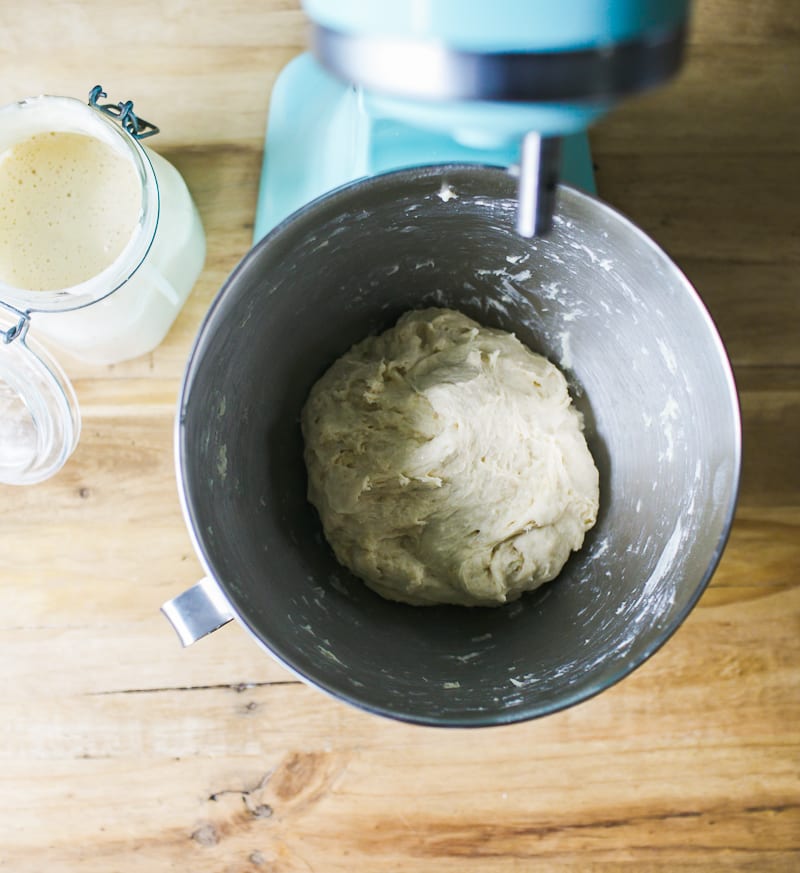
Cover the bowl with plastic wrap and let the dough rise overnight at room temperature (68 F), about 10-12 hrs. The dough is ready when it’s puffy, airy and has doubled in size.
Tip: This is an overnight sandwich dough. However, you can do a same-day bake instead (see my Sample Baking Schedule).

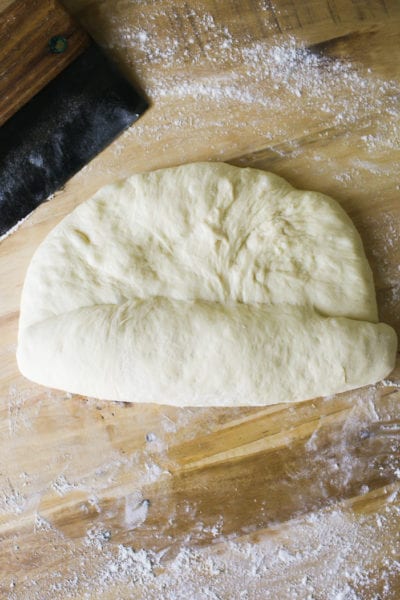
Step 3: Shape the Dough
Remove the dough onto a lightly floured surface. Gently flatten to release the air bubbles (you don’t want big holes like ciabatta!).
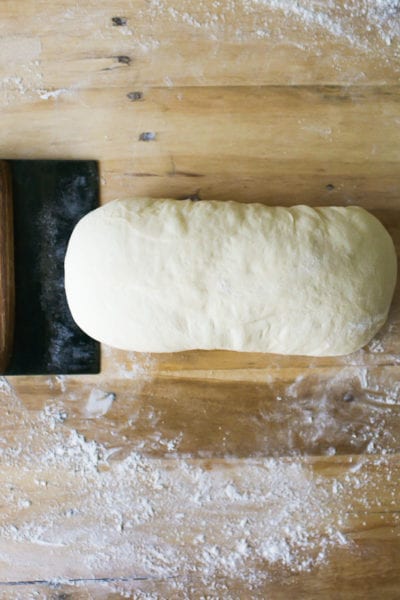
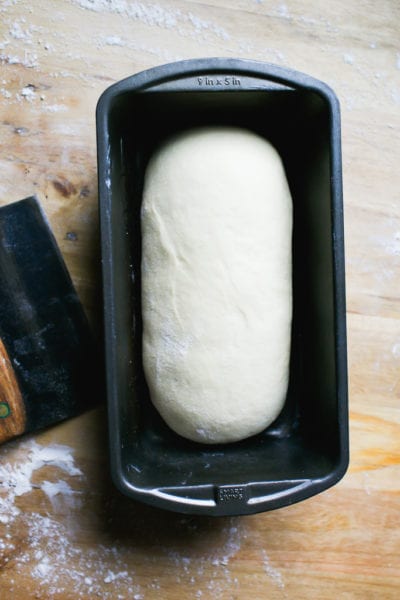
Roll the dough into a log, tucking the ends underneath. Then, with floured hands pull the dough towards you creating surface tension to tighten its shape. Place the dough into a buttered loaf pan, but make sure it’s seam side down.
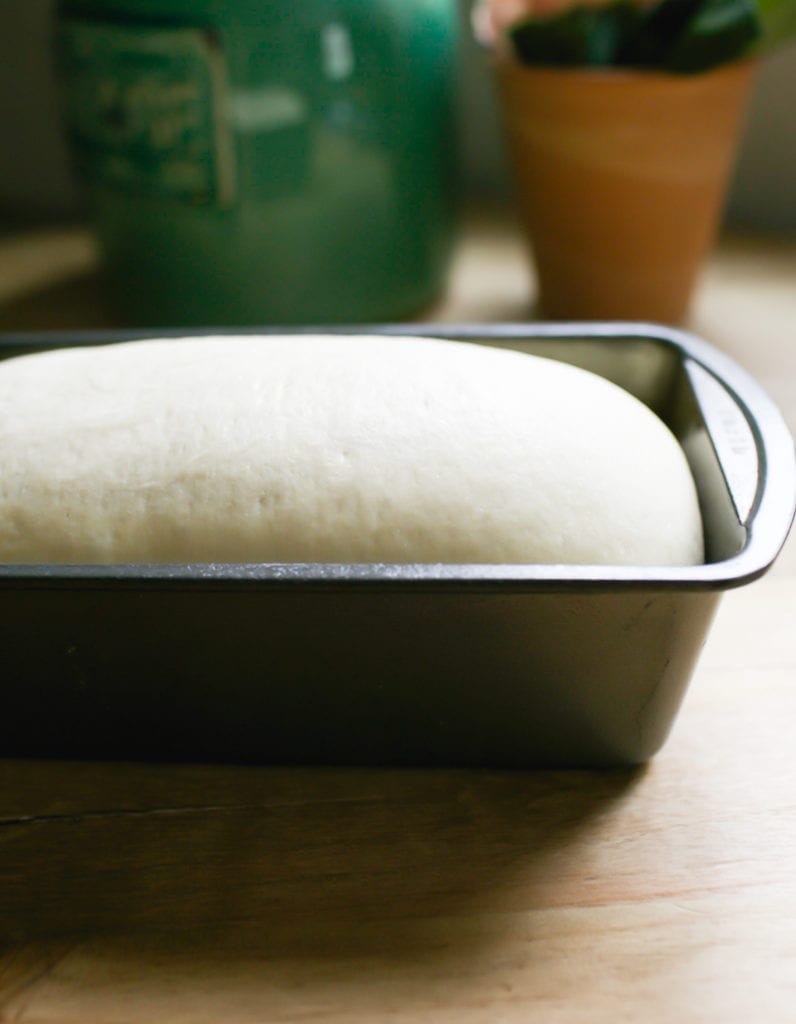
Step 4: Second Rise
This step is crucial. When done correctly, your loaf will build back additional strength needed for good oven spring. Cover the pan with lightly oiled plastic wrap so the dough doesn’t stick to the top. Let rise until the center domes about 1 inch above the rim of the pan. You’e not going for double in size or sky scraper height; just notably puffy and less dense.
Tip: Cold Kitchen? Your second rise might take longer than expected @ 68 F. Be patient with this step. Plan on 1 1/2 -2+ hours depending on your specific room temperature and starter strength. If you’re short on time, use a proofing box or my DIY warm oven trick to speed things up (see “Helpful Tips” in the recipe card below).

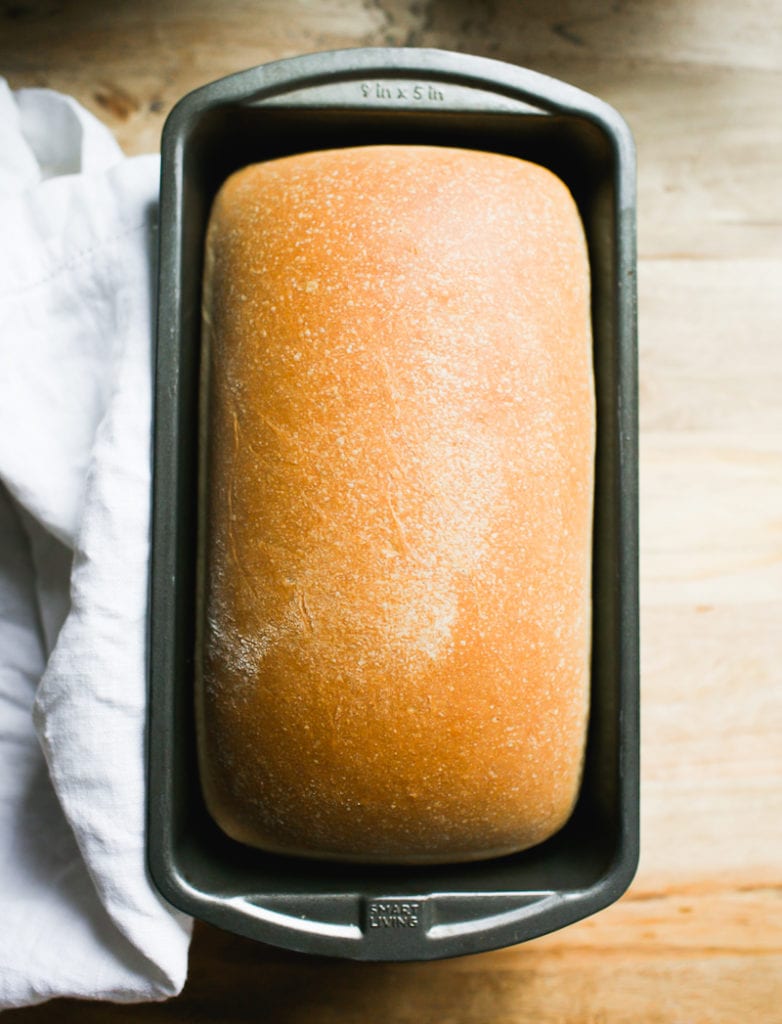
Step 5: Bake The Bread
Preheat your oven to 375 F. For better oven spring, preheat to 500 F instead, then lower the temperature to 375 F when the dough goes into the oven. Bake on the center rack for 45-50 minutes or until golden brown.
Cool in the pan, then transfer to a wire rack. Wait an hour before slicing (skipping this step can turn the inside gummy).
Tip: Have an extra loaf pan? Some bakers create a makeshift “lid” by placing a separate, upside loaf pan on top of their pan before baking. This traps steam inside, creating a humid environment for the dough to rise avoiding potential blow-outs or tears, and keeps the crust soft. It’s similar to using a Dutch oven for my sourdough bread recipe.
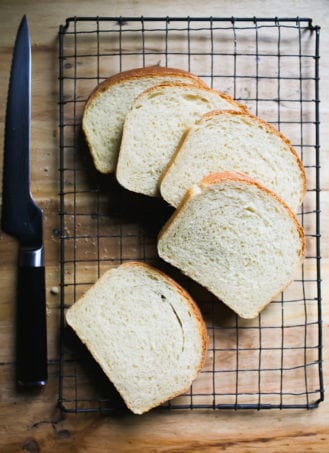
Slice & Store
You’ll need a good serrated knife (I use this one). For a moderately priced option, try this knife instead. If your bread slices are really uneven, consider this collapsable bread slicer with 3 different thicknesses: thin, medium and thick to guide you along.
What I do at home: If you have a large family, or just eat a lot of bread, I highly suggest doubling this recipe. Bake (2) loaves side by side and freeze whatever you don’t eat. This loaf can be frozen whole, covered tightly in plastic wrap or as individual slices.
Sourdough Sandwich Bread Variations
- Whole Wheat: Replace 20% of all purpose flour with whole wheat or white whole wheat flour. If the dough seems dry (whole grain flours absorb more liquid), add more water as needed to achieve a workable consistency. Do this 1 teaspoon at a time.
- Bread Flour: Do an even swap, adding more liquid if the dough is dry. For example, King Arthur Bread flour is very thirsty so more liquid might be needed. If using Gold Medal bread flour which is not as absorbent, additional adjustments might not be necessary.
- Sourdough Cinnamon Raisin Bread: You’ll find my step-by-step post here. The vanilla-soaked raisins make it a community favorite!
What To Bake Next
In addition to the above variations, a natural next step for sandwiches and breakfast fare would be my easy, NY-style sourdough bagels (they are so incredibly chewy and addictive) and these super soft sourdough english muffins. I’m excited to see what you make next.
Sample Overnight Baking Schedule (68 F)
Feel free to adjust the start times below as needed. It’s flexible. For a same-day bake, start early in the morning and bulk rise at a warmer temperature.
Day 1 (Evening)
- 4:30 PM: Feed sourdough starter (to activate)
- 8:00 PM: Mix dough
- 8:30 PM: Rat 30 minutes, then knead.
- 9:00 PM: Cover and bulk ferment, room temp @ 68 F overnight (10-12 hrs).
Day 2 (Morning)
- 7:00-8:00 AM: Check the dough (should be doubled)
- 8:15 AM: Shape dough
- 8:30 AM: Second rise (1 1/2 – 2+ hours)
- 10:30 AM: Preheat oven
- 10:45 AM: Bake
- 11:30 AM: Cool
By signing up, you agree to receive emails from The Clever Carrot. Unsubscribe at any time.
Easy Sourdough Sandwich Bread
- Prep Time: 12 hours
- Cook Time: 50 minutes
- Total Time: 12 hours 50 minutes
- Yield: 1 loaf 1x
- Category: Sourdough Bread
- Method: Oven-Baked
- Cuisine: American
- Diet: Vegetarian
Description
A simple and easy recipe for homemade sourdough sandwich bread. Made with all purpose flour and just a touch of butter. I like to make the dough at night so we can have fresh bread in the morning. This loaf freezes well (whole or sliced). I recommend this loaf pan.
Helpful Tips:
- For best results, weigh your ingredients with a scale instead of using measuring cups. Weight and volume measurements are not equal, only approximate! For example: If your starter is very bubbly, 1/4 cup might only weigh 30 g which is too little for this recipe (you need 50 g). The dough will take forever to rise. Same goes for the flour: 4 cups might weigh over 500 g depending on how tight the flour was packed into the cup. More flour = dry dough.
- This recipe works with Whole Foods 365 Everyday, King Arthur and Trader Joe’s all purpose flour. If using another brand with a lower protein content (i.e. Gold Medal, Pillsbury, Heckers) consider reducing the total water amount by 15 g.
- For a variation of this recipe with more sourdough starter, please choose one of the following adjustments below, keeping the rest of the ingredient quantities the same:
- 100 g starter + 255 g water
- 150 g starter + 250 g water
Additionally, because temperature controls time: you can also increase your surrounding temperature for the bulk or second rise, as needed. Place the dough in a proofing box set to 75-80 F. Or, preheat your home oven to 75-80 F and then shut it off immediately (use an oven thermometer to make sure it’s set to exactly 80 F and not higher!). Place the covered dough inside until it bulks up. Do no use this option overnight- it will be too warm.
Ingredients
- 500 g (4 cups) all purpose flour
- 60 g (4 tbsp.) unsalted butter, softened, cut into cubes
- 12 g (1 tbsp.) sugar
- 9 g fine sea salt
- 50 g (1/4 cup) bubbly, active sourdough starter (100% hydration)**
- 270 g (1 cup + 2 tbsp) warm water
Instructions
Baking Schedule: this is an overnight dough which takes approximately 10-12 hrs to rise @ 68 F. Start the night before, in the evening, and plan to bake the following day. If it’s warmer than 68 F the dough will take less time to rise. Alternatively, start in the morning and bake in the afternoon or evening.
Mix the Dough
In a stand mixer fitted with the paddle attachment, add the flour, butter, sugar and salt. Mix on low speed until combined; the butter should look like crumbs.
Add the starter and warm water. Mix until the flour is fully absorbed (get in there with your hands to finish mixing). The dough will feel slightly sticky and elastic at this stage. Cover with plastic wrap or a damp towel and let rest for 30 minutes. Meanwhile, replenish you starter with fresh flour and water.
After the dough has rested, switch to the dough hook and run the machine on medium-low (#3 on a KitchenAid) for 6-8 minutes. The dough will feel soft and supple and not stick to your hands. If it does, add a dusting of flour.
Note: If you do not have a stand mixer, the dough can be made by hand. After mixing and resting for 30 minutes, knead the dough on a lightly floured surface for 8-10 minutes, or until smooth, soft and elastic. Do not worry about under/over kneading. Relax into the process and focus on the texture, not the time.
Bulk Rise
Cover the bowl with plastic wrap and let rise overnight at room temperature (68 F) until double in size, about 10-12 hrs. Please refer to the Baking Schedule above for additional rise time options.
Shape the Dough
In the morning, coat an 8.5×4 inch loaf pan with butter.
Remove the dough onto a lightly floured work surface. Gently flatten the surface to release any large air bubbles.
Roll the dough into a log tucking the ends underneath. Rest for 5-10 minutes. With floured hands, gently cup the dough and pull it toward you to tighten its shape. Using a bench knife, place the dough into the loaf pan seam side down.
Second Rise
Cover the dough with lightly oiled or buttered plastic wrap. Let rest at room temperature until it has risen to about 1-inch above the rim of the pan (check the height by looking at the domed center portion of the dough). You are not looking for it to double in size. For timing, this can take anywhere from 1 1/2-2 hours (or more!) depending on temperature and the amount of sourdough starter used. Remember, the warmer it is, the faster the dough will rise. Refer to the “helpful tips” at the top of this post.
Preheat your oven to 375 F. Note: For higher oven spring, preheat to 500 F instead. Reduce to 375 F once the dough goes into the oven and bake as directed.
Bake the Dough
Bake the dough on the center rack for about 45-50 minutes, or until golden brown. Cool in the pan for at least 10 minutes, and then transfer to a rack to cool completely. This sandwich loaf will stay fresh for up to 3 days, stored in a plastic bag at room temperature.


Comments
Anna says
I baked the bread and it was beautiful! Unfortunately it cracked in the oven. Have I made it too tight? Or should I have scored it?
Emilie Raffa says
Usually, when sandwich bread has a crack, it just means the oven is too dry. Adding steam will fix this. You can spritz the inside walls and surface of your loaf with water in a spray bottle. Or, place a metal (not glass) pan on the bottom rack while the oven heats up; add a few ice cubes when the dough goes in. :)
Amy Dietz says
Hi! I love this recipe. The first two times I made it, came out beautifully. I changed to arrowhead organic all purpose flour and the bread is not rising and dense. Do you have any idea what I’m doing wrong?
Emilie Raffa says
If your starter is strong and bubbly, temperature is most likely the issue- I would make sure the dough is rising in a really warm spot.
As for the flour, while switching brands might effect your sourdough starter feedings, it shouldn’t cause the bread not to rise.
Hope this helps!
Emily says
I use this recipe at least 3 times a week for my family, alternating with the light whole wheat sourdough recipe from your site. I’ve tried too many mediocre sandwich bread recipes…this is the ONLY one I’ve ever found that is perfect for every type of filling. Thank you, Emilie!
Question: The last two times I’ve made it, I’ve substituted 100 grams whole wheat flour for part of the bread flour, keeping all other ingredients the same as the original. It turned out well, but the texture was just a bit off. How would you make this a partial-whole-grains loaf?
Emilie Raffa says
Thank you so much Emily! Glad you like it. Sandwich bread is literally one of my favorite breads to make :)
Ok, so regarding the whole wheat flour- sometimes even swaps don’t work. Why? All flours are different. Whole wheat flour absorbs more water than ap flour, which means the dough will be drier. That’s why the texture was off. The dough needed more water. You can try the Honey Whole Wheat Sandwich Bread in my book or perhaps increase the water here by 15-30 g (go a little at a time). Enjoy!
Karla Zavaleta says
Is there any possibility to substitute the starter with discard? I have so much discard and would like to make this loaf. Let me know. It sounds delicious.
Emilie Raffa says
Hi there! Typically, sourdough discard is not active, so your bread might not rise. I’d use bubbly, active starter for this recipe. Alternatively, there are many recipes on my blog that utilize sourdough discard. You can get started here: Sourdough Discard 101: Recipes & Faqs Answered.
Jean Good says
Can you use levain instead of the starter ?
Emilie Raffa says
A levain is an offshoot of your mother starter, so yes. It will work.
Lay Ean Teoh says
Made today. The bread taste sourish and a bit of cake texture ? Can I know why ? I let the dough overnight proofing on the tabletop (currently is summer at Melbourne), and next morning shaped and proofing 5 hours.
Emilie Raffa says
Hi there! Not quite sure. It’s possible the dough was over proofed (5 hrs is a long second rise in warm, summer weather). Next time, I’d shorten the second rise and see how that goes.
Sharon says
Greetings from Malaysia! Thanks to the corona virus I’ve ventured into more challenging recipes for baking. I made your sourdough raisin cinnamon loaf a week ago and it was sooo good I’ve had to make another 3 since! It was my first attempt at making sourdough bread (grew my starter 6 days prior to baking) and I’m so glad I found your blog! Today I decided to try your recipe for sandwich bread. I like a bit of texture in my bread so I substituted 100g AP flour with whole-wheat flour and it turned out amazing. So soft and fluffy! Love love love your recipes!!
Caitlyn says
Hi there! I don’t have a kitchen scale (I know, I know) and google is telling me different things. About how much is 9g of salt in teaspoons? Can’t wait to make this recipe!
Elizabeth says
This bread is SO good. I mixed by hand and let it rise on the kitchen counter from about 5 p.m. to 10 p.m., then put it in the fridge overnight. I let it rise in the oven with the light on the next morning for several hours until it was above the loaf pan. A great alternative schedule for those who are unable to leave their dough out overnight due to temperature!
Emilie Raffa says
I love when bakers report back with their personal methods and tips. Adapting and making changes is what it’s all about. Thanks, Elizabeth!
Josh says
Love this recipe, I add 2 TBSP everything bagel seasoning for a little extra twist and it comes out perfect. One question- why does this recipe not require stretching the dough at all after kneading?
Emilie Raffa says
Ooo, sounds delicious Josh! Yum! To answer your question: not all doughs require it. And it gets confusing because every baker has their own method. However, you can certainly add a few stretch and folds if you like, as an optional step.
Caroline Sorestad says
Love this recipe. Plan to use it weekly!
Suzanne B. says
I have made the basic sourdough twice and am now making the sandwich bread. My family loves the bread! Quick question – have you ever mailed loaves of bread? I am thinking of making loaves and sending for holiday gifts. Any shipping tips would be great! Thanks so much! I am putting your cookbook on my Christmas list! :)
Emilie Raffa says
Hi Suzanne! Sandwich bread is one of the better breads to mail. In my experience, it stays fresher for longer than artisan-style bread. I’d wrap it several times in plastic wrap and put it in a box with some cushioning around it so it doesn’t get smushed. Additionally, choose the fastest mailing option. Fresh bread is best!
Suzanne says
Great! Thank you!!!!
Courtney says
Wondering what type of loaf pan you use?? So far I’ve been using glass because that’s all I have but need to get second one because of all the bread I’m making! I’m not really crazy about using nonstick products. Does it matter which kind you use as far as metal vs glass? And we LOVE this bread!!!!!
Emilie Raffa says
Hi Courtney! So great to hear!
This is my favorite pan. It seems like it’s out of stock on Amazon right now, but you can purchase from the company directly. Note: it’s not the same pan pictured in the images above (I have many loaf pans, lol).
Regarding the material, it’s totally up to you. I will say this though, anything baked in glass tends to cook faster/darken quicker so make adjustments as needed to your recipe bake times.
Christina says
Absolutely love this recipe! It is fantastic! Making it twice per week. Thanks for so much detail and sharing your talent.
Quick question…each time I’ve made this, there is a large gap on the inside mid loaf to the top…suggestion? Do I need to knead it longer or possibly proof less time? Other than this, it’s excellent!
gwengoepel says
Can not find recipe ingredient amounts!
Emilie Raffa says
Hi there! The recipe (with amounts/instructions etc) is listed at the bottom of this post. If you’ve landed at the comment section, you scrolled too far. Thanks!
prita says
Hai, Emily …
Can I overnight the dough in the fridge? If my room temperature is about 28-30 Celcius, how long it would be the bulk rise? I live in Indonesia. :) Sometimes it’s hot. But a few days has been raining so the temperature is not as hot as usual.
thank you
Emilie Raffa says
Hi there! You can, but the dough won’t rise much. I’d start the bulk rise at room temperature first, and then chill overnight. You can always give it more time to rise the following day.
Kim says
My scale is in ounces and I’m trying to convert the recipe from grams or even cups to ounces, it is way too much flour, etc. I must not be converting the amounts correctly. Could you tell me the best conversion amounts in ounces for this recipe?
Emilie Raffa says
Kim, is your scale digital? If so, there should be a button that toggles back and forth between grams and ounces.
Leah says
Iw as wondering if this recipe can be adapted to make with active yeast? I’ve tried a few active yeast recipes but we’ve preferred this sourdough recipe overall, but it does have a mild sourdough taste – trying to satisfy a picky child ;)
Emilie Raffa says
Sure thing! Omit the starter, increase the liquid to 280g, and use 1 tsp. of yeast.
Keep in mind, the dough will rise a lot faster since you are not using sourdough (the rise times as indicated here will not apply). Consider making the dough in the morning to bake in the afternoon.
Enjoy!
Leah says
Thank you! I needed a tad more water but it worked just fine.
Greg says
Hi Emilie
Greetings from Australia,
I am a long time home sourdough bread maker. Usually I make the round “boule” following the Chad Robertson method. During winters in Melbourne temperatures are quite low and our Kitchen gets down to 15°C (60°F) by the morning. Because the ideal temp for sourdough activity is around 26°C (79°F), on cold days I place the bowl containing the dough into a sink of warm water. If its a ceramic bowl I set the water temperature to around 29°C (84°F) however if its a metal bowl like the kitchenaid stainless steel bowl, I usually set the temperature to 26°C because of the better heat conductivity of steel.
I work from home whereas my wife works on site at the local council. I make her a sandwich each day but the shape of the Boule slices are not great for lunch boxes. So I am currently experimenting with your recipe. Will let you know how it turns out.
Regards
Greg
Michelle says
This is a great recipe! It was moist and delicious. Thanks for all the modifications and notes, I made a double batch and used the 100g of starter modification. I’m excited to play around with it and thrilled it went so well my first attempt. Appreciate it!
Emilie Raffa says
Fantastic! Thanks for the feedback, Michelle! xx
Adam says
One question i have about sandwhich bread, why do we need sugar? I’m new to all this. But i have been making sourdough for a few months. I’m going to test this recipe out, but i often wonder about how much sugar and why?
Emilie Raffa says
Hi there! Sandwich bread is completely different than regular artisan-style sourdough. My dough for sandwich bread is enriched with butter and a hint of sugar for sweetness. You can leave the sugar out if you’d like. However, the butter differentiates the dough from a lean dough, which is your typical artisan-style bread.
Amanda says
This is my first time making this recipe, the bulk rise was beautiful, and doubled in about 10 hrs. The second rise hasn’t happened at all. It’s been 2 hrs and no rise at all. (I did the 100g starter and 255g water.)
Any ideas what I did wrong? The dough was in the same spot for both rises and I’m sure it’s warm enough
Emilie Raffa says
Sounds like it just needed more time :) Next time, try the oven tip (mentioned in the recipe) for rising the dough in a warmer spot. It really helps!
kate says
I’m genuinely shocked that this recipe worked for me! I don’t have much kitchen equipment (hello, early 20s), so I used the cup/tbsp measurements and mixed by hand. Keep in mind, this was my first ever attempt at sourdough. It tastes and looks perfect. I don’t even know if I want to try another recipe after this!
Emilie Raffa says
Yay! Amazing, Kate! Love when this sort of thing happens… ;)
Michelle says
That’s great! I don’t have a mixer & was wondering if I could mix by hand as well. Thank you!
Emilie Raffa says
Yes! See note in recipe above (in the dough mixing section).
Dryw says
Hi Emilie,
I love your sourdough recipes and am trying this one for the first time. My condo retains heat like crazy and never gets cooler than about 72-73 degrees. (Even in the depths of winter, even with the heat off.) I know that’s too warm for any kind of overnight rise, but the fridge is too cold. I should have asked this question before a started the bread, but what I’m trying is using 100 g of starter and leaving the dough on my balcony overnight. If’s going to get down into the 50s overnight but will probably be a little warmer on the balcony by the house. I’m also hoping that even if it doesn’t fully double overnight, I can give it a little time inside in the morning to finish up. What do you think? I guess in the summer, this just isn’t an overnight recipe any more, right? Thanks so much for any advice and for all of the delicious recipes!
Dryw says
Wow, this bread is amazing! I didn’t get quite the rise I’d hoped for before baking, but I got a solid oven spring, and the texture and flavor of the finished loaf are perfect. This is a new go-to recipe for me!
Chris G says
Looks like a great recipe that I will be trying this weekend. I will be trying to increase the ingredients to get a final dough weight of 1000g so I can use a pullman loaf pan. So far I have only used established recipes and have never increased specific weights (with the exception to double or triple recipes) to meet a final weight total. Any suggestions for a final proof with a pullman loaf pan since I don’t want to have the rise over the top?
Emilie Raffa says
This is a great question, Chris. I actually don’t know the answer off the top of my head (I haven’t tested it), but I do know that for Pullman pans, the dough should rise to about 1/2- 1 inch below the top rim of the pan.
As for the exact amount of dough you’ll need with quantities, if you search “bread dough calculator” online you’ll come across a way to convert a specific dough amount to a specific size pan. Pullmans come in different sizes.
I hope this info is helpful for you- please let us know how it turns out. I’d like to give this a go myself :)
Chris G says
Thank you for the feedback. I used breadcalc.com to adjust the recipe up to 1000g. I noticed during the second rise that I probably should have adjusted it up to 1100g. After 3 1/2 hours in the second rise, it was still about two inches below the top of the pullman loaf pan (13 x 4). I went ahead and baked it for about 50 minutes and took the top off after about 40 minutes. The bread didn’t reach to the top of the pan.
The bread came out light colored on the top, but the crumb turned out very good. The flavor had a bit more tang to it than my other go to sourdough sandwich bread, but this recipe had a longer initial bulk rise time. I really enjoyed it. I think that this will now be my go to recipe for sandwich bread.
Emilie Raffa says
Thanks for reporting back, Chris. Great details! Glad to hear it turned out ok :)
Katie says
I’ve made this bread several times now and it is consistently the BEST!! My favorite sourdough recipe by far. Soft, tender, flavorful and easy to slice thin. Most recently added “EVERYTHING” seasoning and that really adds a nice flavor. Thanks for sharing!!!
Emilie Raffa says
Yay! Everything seasoning sounds AMAZING!
Stephanie says
Hi! Is it possible to use oil instead of butter for this recipe, and would it be the same amount? Also, is there a reason you use AP flour and not bread flour? I’m excited to try a recipe with AP flour. Thank you!
Emilie Raffa says
Hi Stephanie! Yes, you can use oil instead of butter which will give it a slightly different texture. Try 2 tbsp. to start.
AP flour is used instead of bread flour for two reasons: 1.) For variety, I wanted this recipe to differ from the one in my book 2.) AP flour is (mostly) easier to find these days due to the ongoing flour shortages.
Hope this helps!
Chris says
My dough took longer for the bulk rise than I expected (weather here is finally cooling off) and now I don’t have time to bake tonight. Should I put the dough in the fridge in the same container, or should I shape and place in the bread pan before putting in the fridge overnight? I’ve been making this dough every week for months now and absolutely love it! Thanks for helping me to master at least one great sourdough recipe!
Emilie Raffa says
Hi Chris! It depends… if the dough doubled in size at the end of the bulk rise, then you could shape it and chill directly in the loaf pan to bake the following morning (assuming it rose enough on the overnight- sometimes it will need more time the next day). Alternatively, if your dough didn’t double and you’ve run out of time you could chill the whole bowl overnight. Does this make sense? Hope so! xx
Ana says
Wonderful recipe! The bread came out perfect! Thank you😁
Jac says
Easy recipe with clear instructions. However my bread crack at the side during baking. Why is this so?
Emilie Raffa says
Hi there! This happens from time to time with sandwich breads. It just means the crust hardened too quickly while the dough was still rising. To remedy this, you need to add steam to the oven. Place an oven-safe metal pan on the bottom rack while the oven preheats. When the dough goes in, add a few ice cubes to the hot pan to create steam. Hope this helps!
Paula says
I make this sandwich bread all the time its always amazing . Our weather in Colorado is cooling off at night so I went with the 100 grams of starter and 255 water . I Started baking at 8:00 pm About 65 degrees overnight on the counter and by 7:00 a.m. it was ready and looked beautiful! My dough seemed a little drier than usual but it shaped up and looked awesome.
Thank you so much your recipes are easiest and the best!
Emilie Raffa says
Ahh, this is wonderful Paula! I’m glad you adjusted the amount of starter based on your current temperature. That’s what it’s all about! Enjoy :)
Jennifer says
Did you have to make any other modifications altitude?
Layean Teoh says
Hi I’m making today, waiting for overnight proofing. To confirm, do I need to knead with dough hook till window pane ?
Teala says
Thanks for the recipe Emilie! I just made this side by side with the country farmhouse white recipe in your cookbook. I honestly thought I would prefer this recipe, because butter, but like everyone else this recipe didn’t rise very well. It still tastes delicious, but it’s definitely a bit more flat and dense in comparison to the other loaf. I think I’ll try it again in the future but with slightly more starter. Thanks!
Leeanne Millar says
Followed your starter recipe with success. Made this loaf for the first time using my now 1 month old starter (Sammy) and it too worked out perfect. Thanks so much for the easy to follow instructions and GREAT recipes, I may just conquer sourdough after all.
Flora says
Hello! I’ve made this bread many times now and love it. I was wondering if I can use whole wheat bread flour instead of AP? I bought the wrong flour so wanted to see if I can use it for this sandwich bread and if I needed to adjust the water amount? Thanks!
Nick Wolf says
I use 350g of whole-wheat flour and 150g of AP flour, add an additional 10g sugar, and it turns out wonderful!
It’s especially delicious when you use Sonora White whole wheat!
Healthy(ish)
Helen says
We have made this recipe a dozen times now and it is our go-to sandwich bread, thank goodness my coworker passed it along to me! I follow a Low FODMAP diet and the only gluten allowed is sourdough bread (I don’t remember why, honestly, Google it if you’re curious) but it must be wild fermented for a minimum 12 hours, 24 is better, 36 is the best. So this recipe works great as is if your guts are on the less reactive side, but adding a cold rise is a good way to get more fermentation time and sourness.
We also prefer a heartier loaf so we’ve been trading out a portion of the AP flour for whole wheat or white whole wheat. So far, we’ve only swapped out up to 1/3 the total (we’re trying 1/2 this weekend). However, the starter gets too excited with whole grains and an overnight rise where you aren’t able to keep an eye on it will definitely over-proof the dough in a warmer setting (we’re usually between 72-74 F). So, I mix the dough night before, give it 1-2 hours on the countertop to get going, then pop it in the fridge overnight. First thing in the morning, I take it out and let it come to room temp and rise throughout the day, checking in on it periodically to make sure it doesn’t go much beyond the double rise, usually 8-10 hours depending on whether I’m baking other stuff and the kitchen gets warmer than usual. Then follow as written for shaping and final rise.
So, this turns into more of a 24 hour affair than a 12 hour 1, but it’s no more labor intensive. I usually start Saturday morning with feeding starter, make dough in the evening, rise in the fridge overnight, warm up and rise on the counter all day Sunday, shape and rise in the evening, bake off that night. The only thing we haven’t figured out is why we keep getting a big bubble at the top of the loaf, but all things considered that’s pretty minor!
Helen says
I knew I forgot something…wheat flour is extra thirsty, so I tend to add 20-40g more water depending on how much I swap out
Leeanne Millar says
Thanks for the tips Helen. I gave the recipe a try using 1/3 wheat flour along with the tip of popping it into the fridge overnight and it worked out great.
Jeannette says
Thanks for this recipe. I have used it a couple of times now. I have also doubled it, but added more starter and water. Turns out very well.
Andrea says
Mine came out dense and gummy but tasty. Like a lot of others on here it didn’t rise much during the second rise so i wonder if it needs more starter or maybe a pinch of yeast. I weighed all of my ingredients and I’m not a novice baker. I’ll try again because it was fun to make and it did taste good.
Emilie Raffa says
Hi there!
Ok, so a few things: if the rise was sluggish and the bread was dense and gummy, the gluten was most likely under developed. Make sure the dough doubles in size during the bulk rise and is not over proofed after the second rise. This is important.
Additionally, I’ve made an update to the original recipe with options to include more sourdough starter for a faster rise. When used in conjunction with a warm surrounding environment (there are tips for this as well), the dough will have no problems rising at any stage.
PS: a gummy texture could also be from cutting into the loaf too soon!
Hope this helps. Thanks for the feedback, Andrea :)
Kelly says
Hi! I’ve tried this recipe twice and I cant get my dough to rise! My starter was ripe but I’m now 18 hours into bulk rise and it hasn’t changed a whole lot. Should I let it sit longer? Maybe a full 24 hours?
Emilie Raffa says
Kelly, something’s definitely off! It’s either the strength of your sourdough starter (did it pass the float test?) and/or your environment is very, very cold. The rise should not take that long even in winter. You can let the dough sit longer, but perhaps see if any of these points ring a bell first for next time!
Isabel says
This is one of my favorite sourdough recipes ever. I am trying to pass it on to a friend who doesn’t have a stand mixer-what would you recommend for adapting the recipe?
Andrea says
She could do it by hand! It will take longer, especially the kneading part (6-8 minutes in stand mixer). She will just knead it until it is smooth and elastic. She will get a workout for sure!
Rebekah says
I do it with a hand mixer that has dough hook attachments. Same mixing time and my loaves came out beautifully!
Josh says
I am going to leave this a review when I make it in a few days. I just want to stop by and say it looks and sounds amazing and thank you for making this in grams! It is so hard to find recipes I want to make in grams. I can do baker’s percentages but certain ingredients I am unfamiliar with I like to see and try examples first. What are your thoughts on using brown sugar instead of white sugar and adding milk to this recipe?
Emilie Raffa says
You’re welcome Josh! Personally, I’m sure brown sugar would work but it might change the color of the dough slightly. So it’s ok to leave it out. And for the liquid, you could definitely use milk or a combo of milk and water depending on the type of texture you’re trying to achieve.
Linda says
This is an excellent recipe. Thanks CC!!!
Emilie Raffa says
You’re welcome! Enjoy :)
Mark Jay Calles says
Looks so very fluffy and delicious😍💕
Lisa Taylor says
Hi Emilie – I absolutely love this bread and have made it several times. Earlier I had asked about scaling it up – and I have been able to do that successfully as well. I’m reading the comments again and see a recurring theme – an issue I have as well. I can not get the kind of rise you describe on my 2nd rise. I’m careful to watch it for proofing so end up baking it without the dough reaching the top. I get a good oven spring, but it’s still only a couple of inches above the pan. Internal texture is perfect. Flavor is great. But it’s just not a very tall loaf. So, I’m wondering about adding a little yeast to the recipe – what might be the effect, if any? And how much would I use?
Jennifer says
I, too have the same problem, watch bulk rise carefully, but no second rise. The bread is still good, if a bit dense, I used it for a batch of homemade garlic croutons, yummy! FYI, my starter is mature, and active. What I am doing now, is increasing the starter amount to approx 3/4 cup, or 150 g. At 100% hydration, I then reduced the flour and water by 50 g each, to account for the additional 100 g of starter. This should shorten the bulk rise, and make the second rise more robust. A mature starter should still have enough sourdough flavor for that to be fine. The tiny amount of starter in this recipe seems to be the problem. I have never seen a sourdough bread recipe that calls for less than at least a half cup of starter, that didn’t call for additional yeast or baking powder or soda, or both. I’ll let you know how it turns out. :)
Jennifer says
Follow up: The adjustments worked perfectly, with a bulk rise of about 5 hours, and a second rise of 2 hours, resulting in 2 inches over the rim of the pan. 40 minutes at 375 degrees gets an internal temp of 203, then a quick brush with butter over the beautifully browned top while cooling. This is our new favorite bread.
Emilie Raffa says
Thanks for the feedback, Jennifer! :)
Kath says
Your adjustments worked for me as well- thanks! Wonderful bread!
Loshanya says
Dear Emilie,
I was so elated by the outcome of this recipe considering a few failures with sourdough breads. It came out so well. Since I live in a humid place I started the dough around 10 in the morning post a couple of feedings to my starter. It took only 4 hours for the bulk fermentation. I tried the poke test to make sure that the dough is ready for shaping ( I was nervous because I didn’t want it to over proof or under proof). With crossed fingers I did the shaping and placed it inside the mould and let it rest for 2 hours and baked it in the evening. It came out perfectly EXCEPT the fact that it cracked a bit on the sides. Had a good oven spring as well. Would scoring on top will avoid the cracking? I have posted it on Instagram and tagged you. Please have a look and thank you so much for this recipe.
Loshanya says
Ps: the temperature was varying from 29C to 32C on the day I tried the recipe.
Emilie Raffa says
Hi there! Typically, cracking is due to the crust forming too quickly which hardens the top, causing it to burst on the sides or elsewhere. You’ll need to add steam to you oven. Place a heat proof metal pan (not glass) on the bottom rack while your oven heats up. Add a few ice cubes right before the dough does in. This will help create a more humid environment. Scoring the dough might help too. PS: Sorry, I wasn’t able to find you pic on IG!
Sunil says
I make this recipe a couple times a week and it turns out so great every time! Although to save time do you have suggestions on whether this can be made in a larger bread pan and what the proportions of ingredients should be when using a bigger bread pan?
Emilie Raffa says
What size larger pan? Alternatively, you can double the recipe and bake in two separate loaf pans (that’s what I do- I have 4 of them!).
Ron says
We have dairy allergy. Can we use extra virgin olive oil in place of butter and would the quantity be the same (60g)? Would it change the texture a lot? Thank you!
Emilie Raffa says
Oil is fine to use. However, I’ve never tried it with extra virgin olive oil. Because it’s a stronger oil, the flavor and color of the bread might change a bit. If you have something more neutral in flavor, like sunflower oil, you might want to experiment with that first. For the quantity, I would use 2 or 3 tbsp of oil instead of the butter.
Mark says
I do love this loaf although I find, despite my strong starter, the proof in the loaf pan (I proof at 78° – 80°) takes more like 6-7 hours than 1-2.
Still, a delicious loaf once done, and it’s possible the longer proof time improves the flavor.
John Weir says
When proving in the loaf pans, you suggest placing the loaves in an 80 degree oven. I find that when I do this, the loaves fall when I have to remove them to preheat the oven. Do you have a suggestion for me?
Emilie Raffa says
Hi there! A few things come to mind… First, it’s possible your oven is too hot. 75-80 F is ideal, however use an oven thermometer to double check. Leave the thermometer in there for up to 10 minutes after you shut it off because the temperature might continue to climb. Second, do not leave the dough to rise for too long in the pan. Dough that collapses is usually an indication that it’s over proofed.
Steve says
I’ve been baking bread (and sourdough) a long time. This bread is excellent – one of the best I’ve fund for sandwiches and toasting! Trying to bake a loaf a week if I can!
Leslie says
Can you post an approximate time schedule to make/bake in one day? I love in Los Angeles where my thermostat is set to 78 degrees… and I can place dough bowl in oven to keep out of air flow’s way?
Looks amazing.
Emilie Raffa says
Hi there! For same day bakes, start the dough in the morning to bake in the afternoon or in the evening. The earlier you start, the sooner the dough will be ready; it’s up to you. Based on your current temp. @ 78 F, it will definitely rise faster than the timeframe given in the recipe below, which is based on 68 F. Hope this helps!
Scott Robert Larson says
This worked perfectly. We had some today and oh, that sourdough flavor! I will definitely do this again.
Rhea says
Hi! What does the 100% hydration (next to the amount of starter) means?
Thank you.
Emilie Raffa says
A 100% hydration starter is fed with equal parts flour and water by weight.
leslie says
Does it matter that weight of the starter when you do that? I always feed equal water/flour but don’t know if I need to know the weight of the actual starter!
Emilie Raffa says
If you’re following the 1:1:1 feeding ratio, yes, the weight of the starter matters for best results. So for example, if you have 50 g of starter you would feed it with 50 g or water + 50 g of flour. Does that makes sense? :)