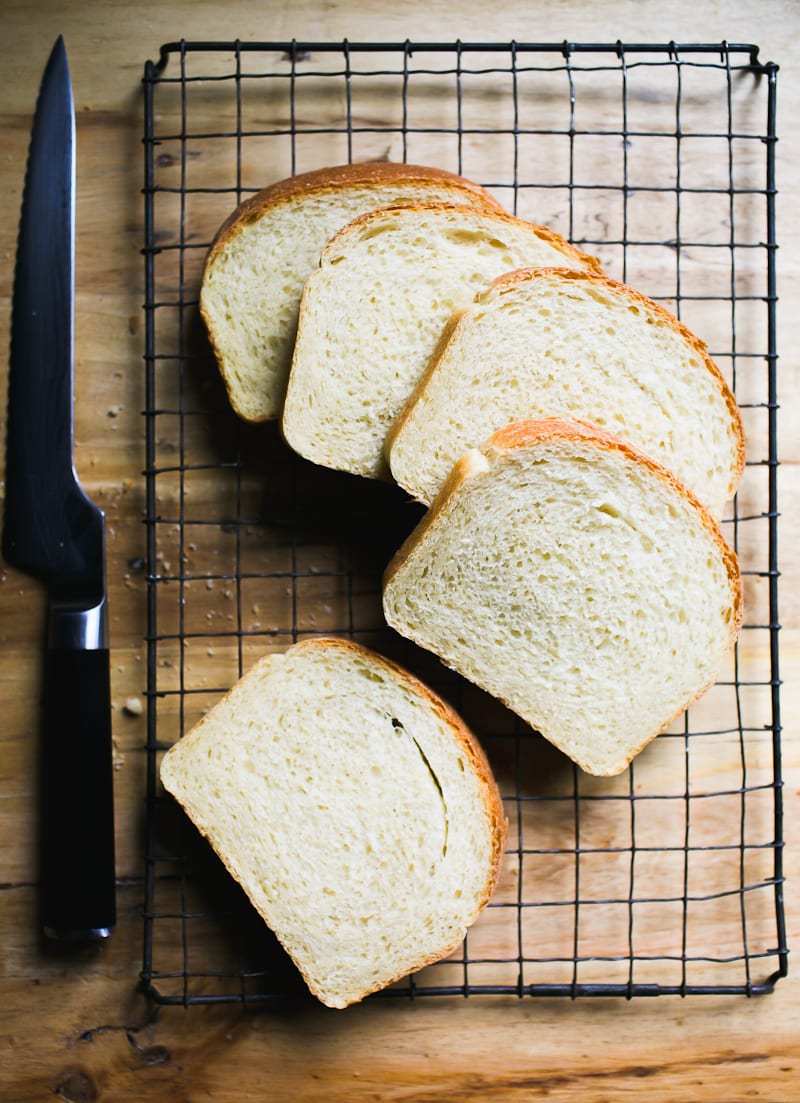
Made with all purpose flour and just a touch of butter, learn how to make soft, tender sourdough sandwich bread with bubbly, active sourdough starter. Recipe adapted from my bestselling book:
Artisan Sourdough Made Simple.
Out of all the sourdough bread recipes I make on repeat (my beginner sourdough bread recipe,
sourdough focaccia and sourdough pancakes to name a few!), this easy sourdough sandwich bread gets the most requests. Why? It’s soft. It’s buttery. It makes the kitchen smell like magic.
And the best part: you made it yourself. No junk or preservatives. Just simple sourdough with a soft crust, subtle tang and fluffy crumb that holds up to slicing, toasting and sandwiches (anything really).
Below, you’ll find my step-by-step walkthrough and baking schedule. You’ll also get three solid
variations (cinnamon raisin, whole wheat and bread flour) plus more sandwich loaf recipes in my book for inspiration.

Good To Know:
- What most bakers get wrong: the second rise goes for too long. This creates over proofed dough that bakes up flat. Follow my recommended timing and tips to master this step.
- Pan size matters. Want a taller loaf? Use an 8.5×4 inch pan instead of the standard 9×5 inch pan. Both work, but the smaller size will give the dough a nice upward boost.
- Use softened butter. If it’s cold, it won’t blend into the dough.
- Make it vegan. Swap in your favorite plant-based butter. Just check the label. Some brands are very salty.
- Temperature controls time. Warm kitchen? The dough will rise fast. Cold kitchen? Give it more time. Watch the dough and not the clock.
How To Make Sourdough Sandwich Bread {Step-By-Step Recipe}
Step 1: Mix the Dough
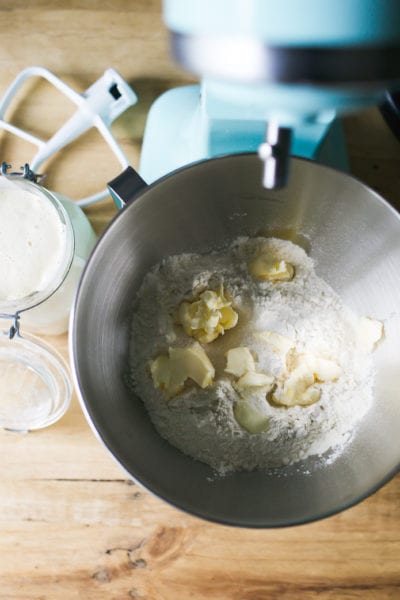
To Start: Add the flour, softened butter, sugar and salt to a bowl. I like using a stand mixer for this recipe. The dough is naturally a bit sticky; the machine makes it easier to handle. Mix with the paddle attachment until the butter looks like crumbs.
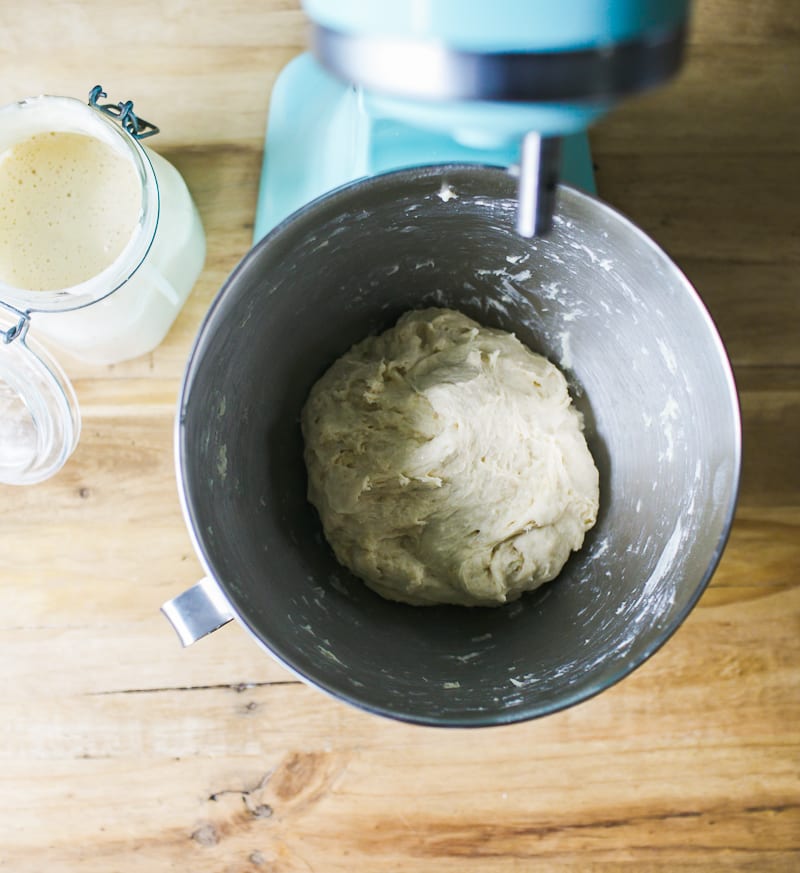
Mix in your bubbly, active sourdough starter and water until everything comes together. Cover and rest for 30 minutes to relax the dough before kneading.
Note: If you need assistance with your sourdough starter, read my companion articles Feeding Sourdough Starter: My Best Tips & Tricks and Troubleshooting Sourdough Starter.
After 30 minutes of resting…
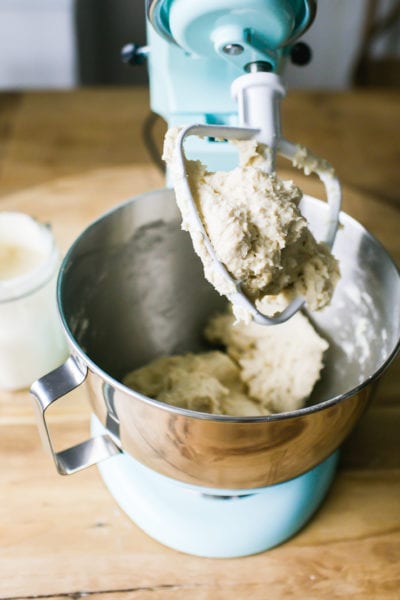
Remove the paddle attachment and switch to the dough hook. Knead until soft and supple, about 6-8 minutes. Note: on this particular day, my dough was stickier than usual so I added a sprinkle of flour to even it out. You can do that too.
No Stand Mixer? Knead the dough by hand on a lightly floured surface until it feels smooth, soft and elastic, about 8-10 minutes. Don’t worry about under/over kneading. If it’s springy (not sticky) you’re good to go.
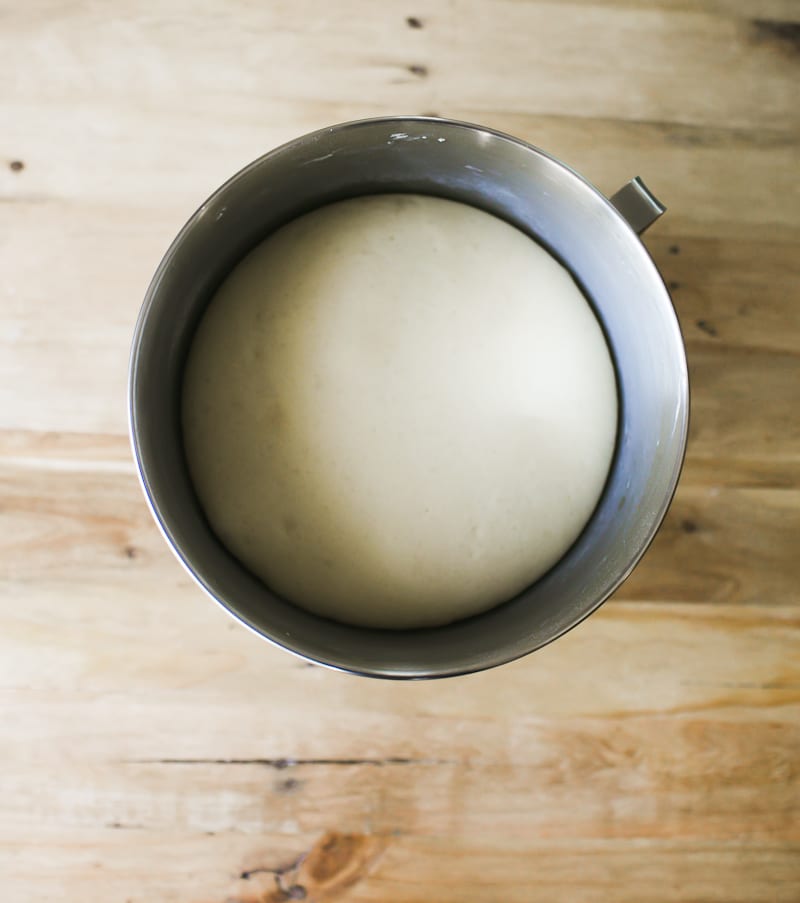
Step 2: Bulk Rise (Overnight)
Cover the bowl with plastic wrap and let the dough rise overnight at room temperature (68 F), about 10-12 hrs. The dough is ready when it’s puffy, airy and has doubled in size.
Tip: This is an overnight sandwich dough. However, you can do a same-day bake instead (see my Sample Baking Schedule).

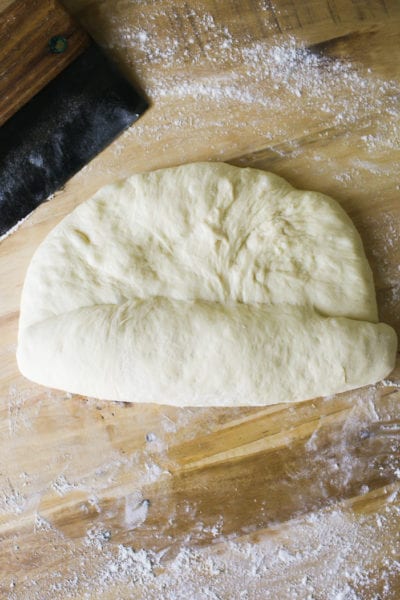
Step 3: Shape the Dough
Remove the dough onto a lightly floured surface. Gently flatten to release the air bubbles (you don’t want big holes like ciabatta!).
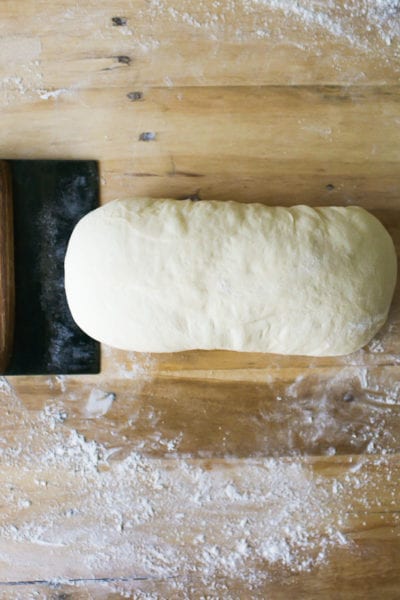
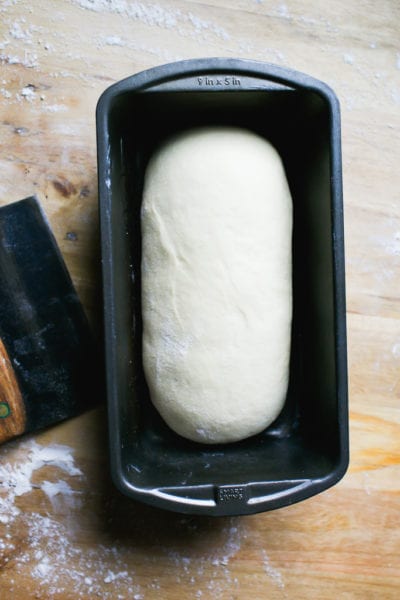
Roll the dough into a log, tucking the ends underneath. Then, with floured hands pull the dough towards you creating surface tension to tighten its shape. Place the dough into a buttered loaf pan, but make sure it’s seam side down.
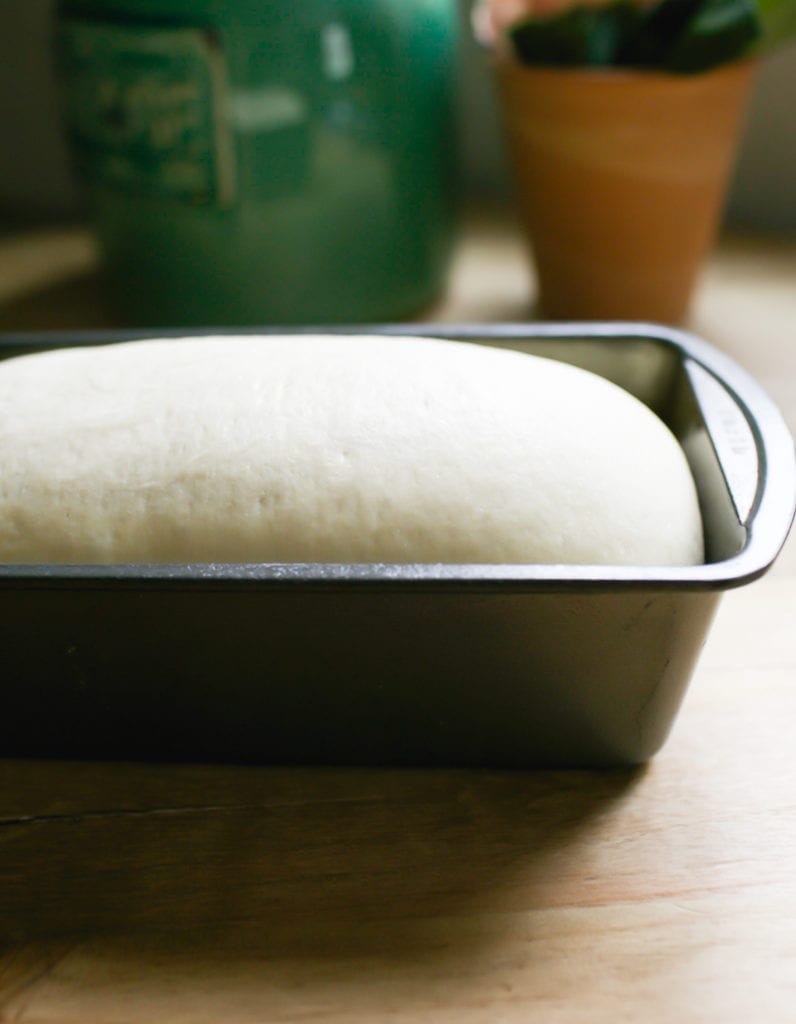
Step 4: Second Rise
This step is crucial. When done correctly, your loaf will build back additional strength needed for good oven spring. Cover the pan with lightly oiled plastic wrap so the dough doesn’t stick to the top. Let rise until the center domes about 1 inch above the rim of the pan. You’e not going for double in size or sky scraper height; just notably puffy and less dense.
Tip: Cold Kitchen? Your second rise might take longer than expected @ 68 F. Be patient with this step. Plan on 1 1/2 -2+ hours depending on your specific room temperature and starter strength. If you’re short on time, use a proofing box or my DIY warm oven trick to speed things up (see “Helpful Tips” in the recipe card below).

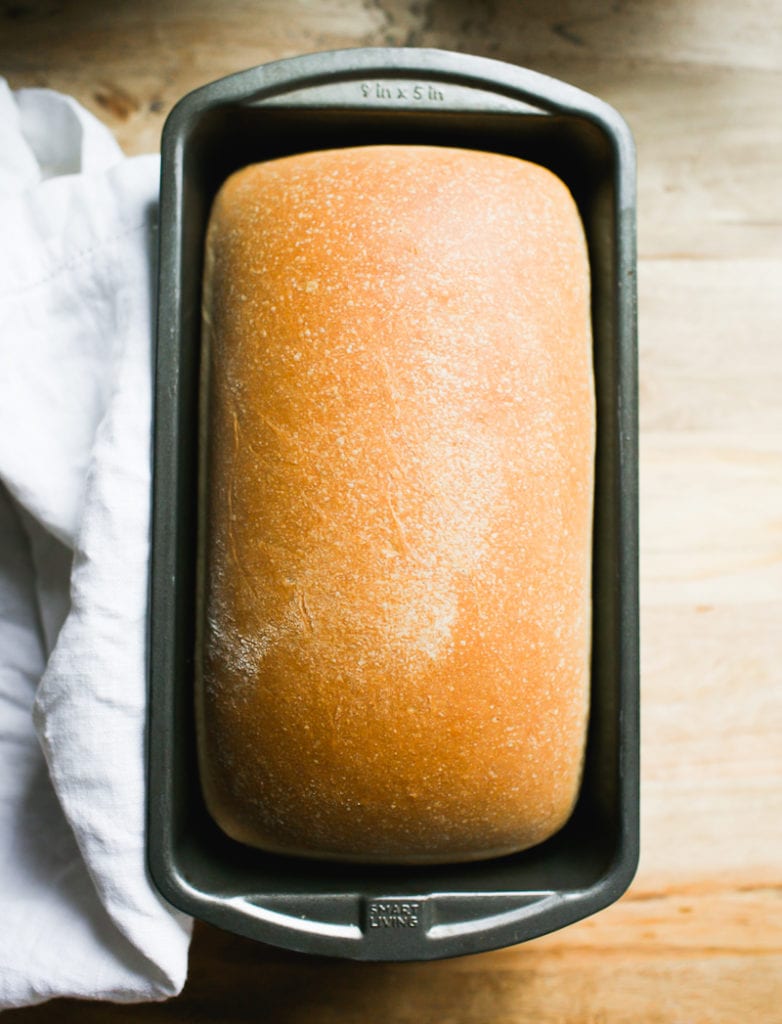
Step 5: Bake The Bread
Preheat your oven to 375 F. For better oven spring, preheat to 500 F instead, then lower the temperature to 375 F when the dough goes into the oven. Bake on the center rack for 45-50 minutes or until golden brown.
Cool in the pan, then transfer to a wire rack. Wait an hour before slicing (skipping this step can turn the inside gummy).
Tip: Have an extra loaf pan? Some bakers create a makeshift “lid” by placing a separate, upside loaf pan on top of their pan before baking. This traps steam inside, creating a humid environment for the dough to rise avoiding potential blow-outs or tears, and keeps the crust soft. It’s similar to using a Dutch oven for my sourdough bread recipe.
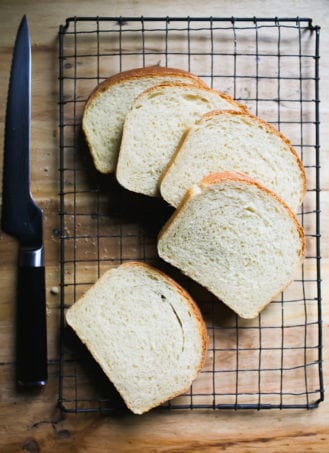
Slice & Store
You’ll need a good serrated knife (I use this one). For a moderately priced option, try this knife instead. If your bread slices are really uneven, consider this collapsable bread slicer with 3 different thicknesses: thin, medium and thick to guide you along.
What I do at home: If you have a large family, or just eat a lot of bread, I highly suggest doubling this recipe. Bake (2) loaves side by side and freeze whatever you don’t eat. This loaf can be frozen whole, covered tightly in plastic wrap or as individual slices.
Sourdough Sandwich Bread Variations
- Whole Wheat: Replace 20% of all purpose flour with whole wheat or white whole wheat flour. If the dough seems dry (whole grain flours absorb more liquid), add more water as needed to achieve a workable consistency. Do this 1 teaspoon at a time.
- Bread Flour: Do an even swap, adding more liquid if the dough is dry. For example, King Arthur Bread flour is very thirsty so more liquid might be needed. If using Gold Medal bread flour which is not as absorbent, additional adjustments might not be necessary.
- Sourdough Cinnamon Raisin Bread: You’ll find my step-by-step post here. The vanilla-soaked raisins make it a community favorite!
What To Bake Next
In addition to the above variations, a natural next step for sandwiches and breakfast fare would be my easy, NY-style sourdough bagels (they are so incredibly chewy and addictive) and these super soft sourdough english muffins. I’m excited to see what you make next.
Sample Overnight Baking Schedule (68 F)
Feel free to adjust the start times below as needed. It’s flexible. For a same-day bake, start early in the morning and bulk rise at a warmer temperature.
Day 1 (Evening)
- 4:30 PM: Feed sourdough starter (to activate)
- 8:00 PM: Mix dough
- 8:30 PM: Rat 30 minutes, then knead.
- 9:00 PM: Cover and bulk ferment, room temp @ 68 F overnight (10-12 hrs).
Day 2 (Morning)
- 7:00-8:00 AM: Check the dough (should be doubled)
- 8:15 AM: Shape dough
- 8:30 AM: Second rise (1 1/2 – 2+ hours)
- 10:30 AM: Preheat oven
- 10:45 AM: Bake
- 11:30 AM: Cool
By signing up, you agree to receive emails from The Clever Carrot. Unsubscribe at any time.
Easy Sourdough Sandwich Bread
- Prep Time: 12 hours
- Cook Time: 50 minutes
- Total Time: 12 hours 50 minutes
- Yield: 1 loaf 1x
- Category: Sourdough Bread
- Method: Oven-Baked
- Cuisine: American
- Diet: Vegetarian
Description
A simple and easy recipe for homemade sourdough sandwich bread. Made with all purpose flour and just a touch of butter. I like to make the dough at night so we can have fresh bread in the morning. This loaf freezes well (whole or sliced). I recommend this loaf pan.
Helpful Tips:
- For best results, weigh your ingredients with a scale instead of using measuring cups. Weight and volume measurements are not equal, only approximate! For example: If your starter is very bubbly, 1/4 cup might only weigh 30 g which is too little for this recipe (you need 50 g). The dough will take forever to rise. Same goes for the flour: 4 cups might weigh over 500 g depending on how tight the flour was packed into the cup. More flour = dry dough.
- This recipe works with Whole Foods 365 Everyday, King Arthur and Trader Joe’s all purpose flour. If using another brand with a lower protein content (i.e. Gold Medal, Pillsbury, Heckers) consider reducing the total water amount by 15 g.
- For a variation of this recipe with more sourdough starter, please choose one of the following adjustments below, keeping the rest of the ingredient quantities the same:
- 100 g starter + 255 g water
- 150 g starter + 250 g water
Additionally, because temperature controls time: you can also increase your surrounding temperature for the bulk or second rise, as needed. Place the dough in a proofing box set to 75-80 F. Or, preheat your home oven to 75-80 F and then shut it off immediately (use an oven thermometer to make sure it’s set to exactly 80 F and not higher!). Place the covered dough inside until it bulks up. Do no use this option overnight- it will be too warm.
Ingredients
- 500 g (4 cups) all purpose flour
- 60 g (4 tbsp.) unsalted butter, softened, cut into cubes
- 12 g (1 tbsp.) sugar
- 9 g fine sea salt
- 50 g (1/4 cup) bubbly, active sourdough starter (100% hydration)**
- 270 g (1 cup + 2 tbsp) warm water
Instructions
Baking Schedule: this is an overnight dough which takes approximately 10-12 hrs to rise @ 68 F. Start the night before, in the evening, and plan to bake the following day. If it’s warmer than 68 F the dough will take less time to rise. Alternatively, start in the morning and bake in the afternoon or evening.
Mix the Dough
In a stand mixer fitted with the paddle attachment, add the flour, butter, sugar and salt. Mix on low speed until combined; the butter should look like crumbs.
Add the starter and warm water. Mix until the flour is fully absorbed (get in there with your hands to finish mixing). The dough will feel slightly sticky and elastic at this stage. Cover with plastic wrap or a damp towel and let rest for 30 minutes. Meanwhile, replenish you starter with fresh flour and water.
After the dough has rested, switch to the dough hook and run the machine on medium-low (#3 on a KitchenAid) for 6-8 minutes. The dough will feel soft and supple and not stick to your hands. If it does, add a dusting of flour.
Note: If you do not have a stand mixer, the dough can be made by hand. After mixing and resting for 30 minutes, knead the dough on a lightly floured surface for 8-10 minutes, or until smooth, soft and elastic. Do not worry about under/over kneading. Relax into the process and focus on the texture, not the time.
Bulk Rise
Cover the bowl with plastic wrap and let rise overnight at room temperature (68 F) until double in size, about 10-12 hrs. Please refer to the Baking Schedule above for additional rise time options.
Shape the Dough
In the morning, coat an 8.5×4 inch loaf pan with butter.
Remove the dough onto a lightly floured work surface. Gently flatten the surface to release any large air bubbles.
Roll the dough into a log tucking the ends underneath. Rest for 5-10 minutes. With floured hands, gently cup the dough and pull it toward you to tighten its shape. Using a bench knife, place the dough into the loaf pan seam side down.
Second Rise
Cover the dough with lightly oiled or buttered plastic wrap. Let rest at room temperature until it has risen to about 1-inch above the rim of the pan (check the height by looking at the domed center portion of the dough). You are not looking for it to double in size. For timing, this can take anywhere from 1 1/2-2 hours (or more!) depending on temperature and the amount of sourdough starter used. Remember, the warmer it is, the faster the dough will rise. Refer to the “helpful tips” at the top of this post.
Preheat your oven to 375 F. Note: For higher oven spring, preheat to 500 F instead. Reduce to 375 F once the dough goes into the oven and bake as directed.
Bake the Dough
Bake the dough on the center rack for about 45-50 minutes, or until golden brown. Cool in the pan for at least 10 minutes, and then transfer to a rack to cool completely. This sandwich loaf will stay fresh for up to 3 days, stored in a plastic bag at room temperature.


Comments
Kristen says
We love this recipe as is, but I’m wondering if I can swap white whole wheat flour for the all-purpose flour and keep the measurements as is? Has anybody tried this?
Emilie Raffa says
Hi there! You can definitely give it a try. Use 15-20% whole wheat flour to start. If the dough feels too dry (whole wheat flour absorbs more liquid than regular flour) add more water.
Laura says
Can this be doubled to make 2 loaves at once or is it best to mix each loaf separately? We go through a lot of bread so making yow at a time is super helpful for me.
Michele says
I double it and haven’t had any issues 🙂
Laura says
Thank you! I did eventually see that in your notes. I missed it the first skim through but then couldn’t find my comment to delete it. Thanks for being patient and graciously answering questions you’ve already answered!
Teresa Webster McCreight says
Hi,
My loaf doesn’t get very brown. Any tips? It tastes great!
Hannah says
I’ve been making artisanal sourdough bread for a few months, but a few of my kids don’t like it… They missed the bread i used to make. I made this today and it was so good! They didn’t even realize it was sourdough.
In case anyone else runs into the same predicament….i ended up making the dough early yesterday morning with the intention to bake it that night. But time slipped away and i had to leave for an overnight shift before the second proof was finished. So I put it in the fridge overnight, pulled it out and put it in the counter for a few hours this morning, then baked it. It probably could have been on the counter another hour or two for the best ride, but it was still delicious and my kids loved it. I have a grain mill so I’m going to try adding some whole wheat or spelt next time. Thank you!
Barb says
Came out excellent! Thank you! Can I make this into hamburger buns?
Ruthlyn says
I made this today and it came out perfectly. I live in Trinidad and Tobago where it’s HOT but today of all days it rained so it was pretty cool thus things took longer as I started in the morning. So I had to heat the oven to help the rise 😏.
I used wheat germ, oat bran and wheat bran in one loaf and oat bran, wheat bran and chia seeds in the other. The house smells heavenly but I’ll have to wait until morning to dive in. I can hardly wait but it’s after 1a.m. 😁.
Thanks for the lovely recipe.
Sandy says
Hi Emilie,
Can you use honey instead of sugar in the recipe?
Holland Gaston says
Have you ever put seeds in this bread? Or do you not recommend?
Tara Walker says
Hi! I followed the directions perfectly and my first rise didn’t happen. It’s hot here in CA so I put the damp cloth on and put it in my coldest room that would be around 70 degrees over night. Any idea what I did wrong to try the next time?
Emilie Raffa says
Hi Tara! Sourdough needs three things in order to rise: active starter, warmth, and time. So, if your dough didn’t rise much at your current room temp., which is warm, I’d venture to say it’s either your starter and/or the dough just needed more time. Try the float test before using your starter. This will ensure it’s active and ready to use! Also: more info in these two posts: Why Won’t My Sourdough Rise? & Feeding Sourdough Tips & Tricks.
Emmalita says
Really good, easy to follow! Turned out great. My kids loved their sandwiches today!
Emilie Raffa says
So great to hear! Enjoy :)
Cecilia says
Best and simplest sourdough sandwich bread Ive ever made.
Emilie Raffa says
Thank you Cecilia! xx
Brenda says
This is the easiest & best tasting sandwich bread I ever made I passed the recipe on to friends & they agree. My go to sandwich bread from now on. Thank you so much & God Bless
Emilie Raffa says
Brenda, you are so kind. Thank you!
Marie says
Thank you for such detailed and well written recipe Emilie
I look forward to trying this bread. By any chance could I use olive oil instead of butter in this recipe?
Emilie Raffa says
Hi Marie! Yes, you can use olive oil instead. The texture and color will change slightly, but it will still be very good. Try 2-3 tbsp oil to start.
Julia Miyakawa says
I have been using this recipe to
make bread for two years, it is the best
Emilie Raffa says
Yay! This makes me so happy!!!
Ricki Soucy says
I’ve been baking bread for 50 years, since I was a kid. But sour dough starter has been new to me, only since I started following you. Just want to know if you can freeze starter. I don’t always have time to make bread/biscuits during the week and I can give only so much away. Thanks
Emilie Raffa says
Hi Ricki! Great question. Some bakers freeze their starter, I do not. Sourdough can be very fickle and can lose strength when frozen. I’d recommend storing your starter in the fridge following the feeding tips in this post (linked here).
Laura says
Are you able to use dairy free butter? I love the idea of making this but my sister cannot have dairy.
Emilie Raffa says
Absolutely. Dairy free butter will work.
Laura says
Thank you!
Emilie Raffa says
PS: I forgot to mention, just watch the salt! Some brand are saltier than others which might change the taste a little but. But nothing to really worry about- just a heads up :)
Emmalita says
I bet coconut oil would work well too!
Shannon says
Will this work as well with bread flour?
Emilie Raffa says
Hi Shannon! Yes, you can use bread flour. Depending on the brand, the dough might be a little drier (flour absorbs water at different rates). Add more water as needed to get the dough to a workable consistency.
Emilia says
This recipe was the jackpot for me. I’m somewhat new to sourdough. I was mostly baking with the discard and I’ve made a couple of sourdough loaves but they were Ok, until this! It was so easy and it came out perfectly. Thank you for a fantastic recipe and for boosting my confidence with sourdough baking <3. Can't wait to try more of your recipes!
Emilie Raffa says
Emilia, you are very welcome! What kind words. Thank you you so much! I’m glad the recipe worked out for you :) Happy baking!
Bren says
Hi! Can I use spelt in this recipe instead?
Emilie Raffa says
Hi Bren! I wouldn’t 100% spelt for this recipe; it will come out too dense without making additional changes to the formula. Try subbing about 20% spelt, adding more water as needed to get a workable dough consistency.
Kris says
This recipe is almost full proof. I followed the directions exactly. I struggled with shaping a bit and I was worried how the bread would come out, but it came out perfect. Thank you so very much
Emilie Raffa says
Oh good! I’m glad you stuck with it. Bread is all about practice and repetition…. the more you do it, the better it will come out :)
Krista says
Have made this many times and it always comes out performs delicious! And so easy to make. Thank you!
Emilie Raffa says
Excellent, thank you Krista! Glad you enjoyed the recipe.
brenda says
Started in the evening first rise started at 8:00 pm, 2nd rise 4:00 am, baked at 7:05 am beautiful bread.
Emilie Raffa says
Thrilled it turned out for you, Brenda. Early morning baker… I love it!
Nate says
This recipe is fantastic. I used 200g whole wheat and 300g white. I also used a Pullman 9×4 pan. It turned out well with a perfect, tender crumb and excellent flavor. Thanks for the recipe.
Emilie Raffa says
Thanks for the tips Nate! Many readers have asked about using a pullman pan for this recipe (I’ve yet to experiment with this). I love the perfect square shape the pull man produces. Do you have a favorite brand pan?
Jessica says
I’ve made this bread many times and I love it but gets very dry after one or 2 days. I’m keeping it in a ziploc and I’m the fridge. Is there a modification I need to do or am I storing wrong?
Hayley says
You shouldn’t put bread in the fridge, it actually makes it go stale faster! Leave at room temp, you can freeze the other half if you want eat it in time.
Emilie Raffa says
Hi Jessica! For best results, keep it out of the fridge. Just like Hayley mentioned, it’s best to store the sandwich bread at room temp. in an airtight bag. You’ll have better success with extending its freshness. Note: it is in fact possible to store bread in the fridge; however you’ll need to warm it up before using. I’ve written a post with more info here.
Amber says
Can you use whole wheat flour for this recipe in the same way?
Emilie Raffa says
Hi Amber! For best results, sub 20% whole wheat flour (not 100%, the bread will be too dense) adding more water as needed to hydrate the dough to workable consistency.
Lu says
I have made this recipe several times..and each time the bread comes out PERFECTLY! This is my regular bread recipe now…I measured the ingredients, as advised…Love it! Thank you!
Emilie Raffa says
Hi Lu! Excellent! Using a scale in bread baking makes all the difference in the world. Super helpful. I use my scale for all recipes now… cooking & baking.
Clydia says
After the first rise can I shape into the loaf pan and do the bulk rise in the fridge overnight? If so do I have to bring it to room temp before baking? Will it rise in the fridge or should I start bulk rise where I left off before baking?
Emilie Raffa says
Hi Clydia! After the bulk rise, you can shape the dough in the loaf pan and do the 2nd rise in the fridge (overnight). The dough won’t rise much in the fridge. So, the following day, give it more time at room temperature to puff up. Note: this will take longer than the times indicated in the recipe instructions because the dough is cold. You can always rest the dough in a warm spot to move things along.
Sarah L. says
Can’t wait to try this one…I love all your recipes! Do I need to perform any stretch and folds on this dough during the bulk rise?
Emilie Raffa says
Hi Sarah! You don’t have to do any stretch and folds (the machine does all the kneading). However, if you’re in the mood, you can definitely add a few sets.
Erin says
Thanks for this recipe!! I have made so many loaves over the past month. My family and neighbors love it!!
Emilie Raffa says
You’re very welcome Erin! So glad you like it! xx
Megan says
Hey Emilie, thanks so much for your website and recipes. I am a newbie with sourdough and my starter just recently became really active. It went all over the counter this morning out the jar. I had to transfer it to a half gallon wide mouth jar. The quart jar wasn’t cutting it. Anyways, I tried to make your sourdough cinnamon rolls and a vegan sourdough rolls recipe (another website) with discard awhile ago when my sourdough start was only 5 days old and they both turned out very dense. Now that my sourdough is so active I’m trying again this time with the sandwich loaf. I made the sandwich loaf dough last night and let it rise over night but it didn’t rise much i noticed this morning and so I put it in the sun this morning and it rose to double. I took it out and put it in a loaf pan that was buttered. I warmed up the oven to use it as a proof box and got distracted and before I noticed the oven got up to 335 of 350 with the loaf in there. It hadn’t of cooked at all as I checked the dough and I immediately pulled it out and put it in the freezer for a few minutes. It cooled off the pan and I’ve been letting it rise since. Did I kill the sourdough start for the second rise? Can you let sourdough rise for the second time in the 85-95F degree sunlight at an elevation of 5600ft. Or does it have to be inside? I hope when I bake it that I won’t be super dense but I’m trying to give it another hour to see if I can get any height or if I killed the sourdough yeast. It’s not yet above the loaf pan but has risen a little.
Thanks for your help,
Megan
Megan says
It’s me again. I tried a second loaf and the second rise is actually worse and I did everything I was supposed too. The bulk rise was perfect. I don’t know what is going wrong on the second.
Emilie Raffa says
Hi again! I’ve just replied to your first comment. With a bit more info, I can help :)
Emilie Raffa says
Hi Megan! The second rise @ 335F was way too hot- the temperature killed the yeast. It dies at 120-140 F. Next time let the dough rise @ 80F, if possible, until it puffs up and no longer looks dense (it will not double in size at this stage). Keep it inside. Be flexible with time.
Also: you mentioned high elevation. This changes things considerably. Are you making any specific changes to this recipe (besides the ones mentioned above) for high elevation baking? The more I know, the better ;)
Megan says
On the second loaf the only thing I did different for elevation was use the 100 g starter and 255g water rise in the recipe. Like I said the bulk rise worked perfectly. I did put it outside in the morning just to get it a bit puffier. The problem was 2 hours later into the second rise with the loaf being in the 9×5 pan being in the oven with it off at 73F the loaf did nothing and I put it outside in the 85F degree weather and it still didn’t do much…the top got somewhat puffy but the loaf never got above the top of the pan. At close to 3 hours the bread was still below the top of the pain and so I ended up just baking it. It did rise in the oven a little bit while cooking. Like 1/2” above the pan. The bread still tastes wonderful just is more dense. I live at 5600 ft above sea level and it gets down to the 50s still at night. The overnight rise doesn’t seem to be the problem. It seems the second rise is. I’m new to sourdough and I’ve always struggled a bit with yeast so I’d love to get this down.I love your recipes to with the simpler ingredients. Thanks for your help!
Juliana says
Can I use BLEACHED all purpose flour?
Emilie Raffa says
Hi Juliana! I typically don’t recommend it, as bleached flour can sometimes interfere with the rising power of your sourdough starter. However, that’s usually the case when it’s used to feed your starter and not necessarily to bake with. So, long story short: yes, you can use it. If you run into issues, switch to regular, unbleached flour.
clair says
How important is the sugar to this recipe? Will it matter if I leave it out?
Emilie Raffa says
It changes the texture and flavor slightly, although the overall taste is not sweet at all. Feel free to leave it out if you want.
Jessica Surak says
I just finished the first bulk rise. I am worried about leaving the second rise to long, can I put it in the fridge for a while for before the second rise?
Amanda says
My starter will only double if I put it in a warm oven, like 90°. My bread dough may have increased in size some but it definitely did not double. I had it in a warm oven most of the time like I do my starter. Any idea why it’s not rising? Should I just try more starter and less water next time?
Emilie Raffa says
Hi Amanda! You’re on the right track: starters need warmth in order to activate. Bread dough needs warmth too, if you want a boosted rise. To troubleshoot: when bread dough doesn’t rise, go back to your starter first. Is it active? Did it pass the float test? If so, you can rule it out. For the dough, most likely, it just needs more time at a warmer temperature. More helpful info in this post I’ve written: Why Won’t My Sourdough Bread Rise? Hope this helps!
Emilie Raffa says
Hi Jessica! Absolutely. The fridge is a great tool to slow down the rise of the dough at any point during the process. Cover with lightly oiled plastic wrap and chill overnight, or for a few hours as needed. The next day, rest the dough at room temperature to ensure it has puffed up (it won’t rise in the fridge much) and is not too cold.
EmilyS says
All your recipes are fabulous! Thank you for sharing. I love the detailed instructions.
Any ways I was wondering if you have a light wheat sandwich sourdough bread recipe? Or guidance on how to add wheat to recipes?
Paul says
Hello,
Have you had any luck on your long 2nd proofing times?
I’m about to try this recipe. I do have a proofer so maybe that will help. I do hope you found a solution.
Emilie Raffa says
Hi Emily! I have a recipe for whole wheat sourdough sandwich bread in my book. However, to modify this one: replace 20% of the all purpose flour with whole wheat flour, adding more water as needed to achieve a hydrated dough with a workable consistency.
Christine says
So I’ve had a problem with the last couple of times I’ve made this, but I’ve still had good bread in the end (it’s just taking a lot longer than I thought) Here is my process:
I feed my starter so that it’s equal parts starter, water & flour about 6 hours before I want to make the dough. As the 6 hour mark approaches, she is bubbly and active and ready to go! I follow your instructions for making the dough (the first time with just 50g of start, and this last time with 100g of starter with the adjusted water amount). I let it rest 30 minutes and then knead it with my mixer per your instructions. I then sit it out overnight, covered, and by the time I get around to her 10 – 12 hours later, she has doubled in size. I then shape her, place her in the greased pan, and this is where my problem begins. My house is never below 75 degrees. In fact, right now, it is 78 degrees F. It takes her all day to rise. Not 2 hours. All day. The progress is so slow that I can scarcely see it when I check on her. I don’t understand why, even with more starter she’s this slow on the second rise. I wonder if maybe she rose too much during the bulk rise? Perhaps 10 – 12 hours is too much time?
Lisa says
I had a similar problem. My first rise took about 6 hours. But the second took more than 6 hours; I finally baked it because it was midnight and I wanted to go to bed! My kitchen was about 79 degrees.
I really loved the finished product, but I think it could have risen a bit more before baking. I also really would like to get this dialed in because I don’t want to bake it at 1:00 in the morning.
I am wondering if I could do one of the rises in the fridge overnight.
Anna says
Just chiming in to say that I am having the exact same problem. The second rise takes ~6 hours. It turns out fine in the end but I’m a little confused, especially since others are seeing the same thing.
Emilie Raffa says
Hi there! If the second rise is taking longer than expected (and you know it’s not lack of sourdough starter strength), the issue is temperature: both ambient and dough temperature. Temperature controls time. The colder it is, the longer the dough will take to rise. Conditions will vary for every baker. Let the dough rise in a warmer spot, 75 – 80F to give it a boost.
Cheryl says
Would you have recommendations for ingredient adjustments for high altitude? I am at 5400 ft elevation.
Jane says
i’m making the sandwich bread. Can I refrigerate it after done kneading? Not going to have time to get to it tomorrow morning.
Thank you
Emilie Raffa says
Hi Jane! Yes: you can chill the dough after kneading. Keep in mind, it won’t rise much in the fridge. You’ll need to give it ample time to rise at room temperature when ready to continue with the recipe.
Elizabeth says
Any reason why this bread isn’t scored? Mine busted a little at the side. However I think I may have overproofed because it was a bit dense. It was still delicious snd I sort of like the heavy heartiness.
Emilie Raffa says
Hi Elizabeth! Typically, sandwich breads are not scored. However, if you are more than welcome to do so, if preferred.
If your loaf busted at the side, this means the crust formed/hardened too fast. Adding steam to your oven will remedy this. There are a few ways to add steam during baking. The most common technique is placing a few ice cubes in a heated metal baking pan while your sandwich bread bakes.
Susie says
I’ve tried this recipe 3 times and it keeps turning out dense and heavy. What am I doing wrong??
Emilie Raffa says
Hi Susie! Dense and heavy bread can mean a few things: underdeveloped gluten, over proofed dough (especially during the second rise), sluggish starter etc. Can you describe your exact method, timing and temperature conditions? It will be easier to troubleshoot with more info :)
Laura says
Never mind on my comment….if I had read completely I would have seen the answer! Oops!
Emilie Raffa says
No problem! Hope it worked out for you Laura!
Laura says
I know there are a lot of variables to this answer….but proofing at room temp for the second rise, what is the average rise time using 50 grams starter?
Emilie Raffa says
Hi Laura! It really depends on temperature. The warmer it is, the faster it will rise. Timing will be different for everyone based on your current environment. For 50g starter, assuming it’s not sluggish, give yourself at 2 hrs @ 70 F- ish degrees, with a dough temp in that same range or higher.
Libby says
Super simple and easy recipe. Wish I doubled the recipe because I went through the loaf so quickly.
Emilie Raffa says
Glad you liked it Libby! I usually double this recipe too. I cut my slices way too thick so the first loaf always goes too fast!
Rachel says
Great recipe! This came together so well! I measured the ingredients with a kitchen scale, and it turned out exactly as I wanted.
Emilie Raffa says
Perfect, Rachel! A kitchen scale is a must for bread baking. Makes a huge difference! Glad you had success with the recipe.
Alva says
Can you substitute olive oil for the butter?
Emilie Raffa says
Hi there! Yes, oil can be used instead. The taste and texture will change slightly. Try 3 tbsp. instead of 4, per the recipe.
Danielle says
Does this recipe double or triple well? Thanks!
Julie says
I always double it! But double barely fits in my Kitchenaid (artisan line, small!) so I’ve never ventured beyond that. It’s a major favorite around here.
Emilie Raffa says
Thanks Julie! xx
Emilie Raffa says
Hi Danielle! Sure thing! Just like Julie mentioned, you can easily double the recipe in your stand mixer. However, if you want to triple it, you might need to work in batches.
Also, for the bulk rise: you will need a high sided dough tub to accommodate the increased dough size. Or, alternatively, bulk the dough in 2-3 separate bowls, depending on how much you’re making.
Andrea says
Took me 5 tries but I figured it out! The taste was amazing each time, but other things were off, like it didn’t rise, or the texture was dense/heavy. But I kept trying because it tasted so good!! I used 100g starter to 255g water after feeding my starter twice a day for about 3 days. So so good!!
Emilie Raffa says
Perfect, Andrea! I’m so glad it finally worked for you!
Rkl says
I make this about once a week – our household loves it. Thank you! I’ve had to make a few modifications for elevation and exert loads more patience for our temperatures here as the rise times take a lot lot longer even using the higher amounts of starter – but its so good its worth the wait. :)
Emilie Raffa says
Oh yes! Elevation will do that to you! Do you have any tips you’d like to share? There are a few readers here with elevation questions, and it would be really helpful for those who’d like to make this recipe. No pressure, only if you have the time :)
Angelika says
The best sandwich bread of all times. And sooo easy. I must confess, lazy me always uses 100 g starter because it rises much faster this way. I also use my oven’s rise-program (sorry English isn’t my native language) – 30 C and steam, so the bread ist ready to bake in 6 hours. I wish I could post a photo.
Thank you ☺️
Emilie Raffa says
Angelika, that’s totally fine! Bread baking is all about making the method work for you, your schedule, and your specific environment. I use my oven all the time to speed-proof my dough, especially in winter :)
Christina says
Can I use bread flour instead? A friend was moving and gave me a LOT of Crown Best Baker’s Flour. Thank you!
Rkl says
I do all the time. Depending on where you live though, just keep an eye on it as the extra gluten in the bread flour will possibly impact rising
Christina says
Thank you!
Emilie Raffa says
Absolutely! Depending on the bread flour’s protein content, you might have to add a touch more liquid to the dough (only if it feels very dry), and like RKL mentioned below, watch the rise time: high protein + warm temperatures = fast rise time. Other than that, it’s all good. Enjoy!
Amanda Hubert says
Help! I accidentally forgot about two loaves of this recipe during the shaped ride before baking. They were overproofed when I found them before heading out the door so I put them in the fridge. Is there anything I can do to salvage them or repurpose the dough? It’s hard to throw away 1000 grams of flour and all that time! So mad at myself for forgetting about them!
PS I really appreciate your website and recipes! We love your artisan loaves as well as your cinnamon raisin bread and cinnamon rolls!
Emilie Raffa says
Hi Amanda! Have you tried making focaccia? It’s perfect for overproofed dough- don’t throw it out. Off the top of my head: I would dump the dough onto an oiled, parchment lined sheet pan, or 9×13 inch pan, dimple the surface to stretch it out a bit, cover and rest until it plumps up. Then dimple the surface once more with oiled fingertips and bake for 30 min or so on a 425 F oven.
Amanda Hubert says
I had wondered about focaccia! Thank you! I’ll give it a try!