This post will teach you how to make a beginner sourdough starter at home, step-by-step. All you need is flour, water and a little bit of patience. Before you know it, you’ll have your very own bubbly, active sourdough starter to make my best sourdough bread recipe, sourdough focaccia and more! Grab your personal sourdough starter feeding chart.

Looking to bake sourdough bread? First: you’ll need a sourdough starter. Without it, your bread won’t rise. It’s the absolute heart and soul of sourdough baking. Creating a sourdough starter from scratch is not hard to do. However, the process is intimidating, especially for beginners. Let’s change that.
Adapted from my bestselling book Artisan Sourdough Made Simple, I will demystify and simplify the process with step-by-step recipe instructions. In approximately 7+ days (yes, it takes that long- there are no shortcuts) you’ll get approximately 1 cup of bubbly, active sourdough starter which is more than enough to make bread, including my best sourdough bread recipe with olive oil (most popular recipe on my blog!). More sourdough bread recipes here.
Sourdough is more than just a recipe; it’s an understanding. So before we dive in, let’s define.
What Is Sourdough Starter?
A sourdough starter is a live, fermented culture of flour and water filled with wild yeast and bacteria from our environment. A small portion is added to sourdough bread dough to make it rise. Commercial yeast IS NOT required.
Sounds a bit weird, right? Of course it does. Know this: natural “wild” yeast is all around us. It can be found in a bag of flour, in the air, on your hands etc. Just because you can’t see it, doesn’t mean it’s not there and doing its thing. It’s like magic.
How Long Will It Take?
To create a sourdough starter from scratch, the overall process will take 7 days (or more) from start to finish. It’s not instant. First, you’ll create the starter with whole wheat flour to jumpstart fermentation. Then, you’ll continue to feed it with regular all purpose flour or bread flour to cultivate the wild yeasts and friendly bacteria. Once it’s created, you’ll keep it alive with ongoing feedings and care, which you can read about here.
When Will It Be Ready To Use?
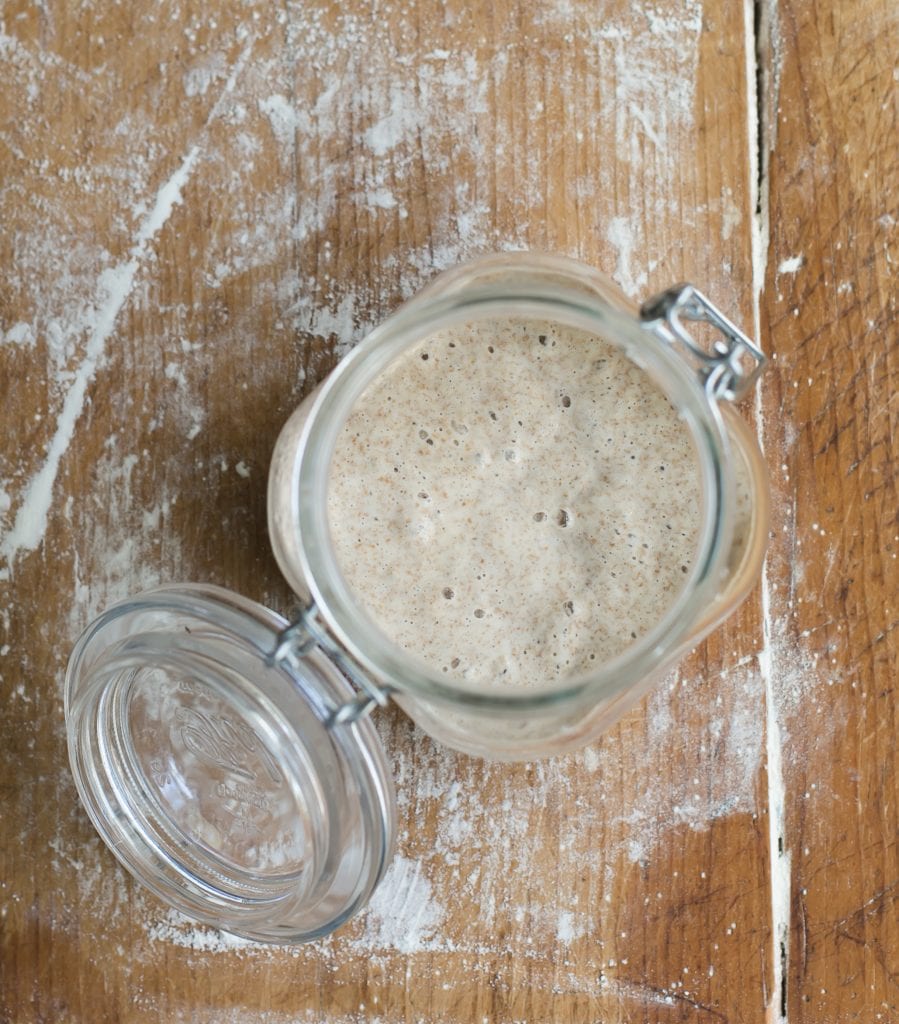
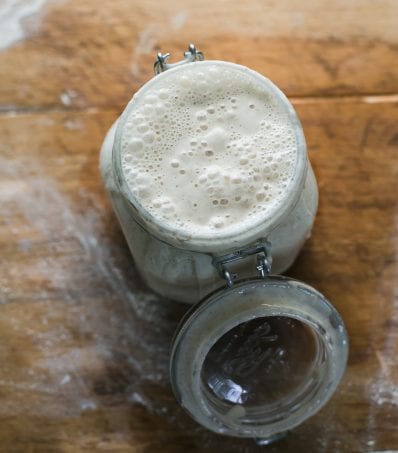
Your starter is ready to use when it has doubled in size, with plenty of bubbles on the surface and throughout the culture.
NOTE: It’s not uncommon for it to take up to two weeks or more for the starter to become active. It all depends. I know this timeframe sounds a bit vague, but growing yeast in a jar (that’s basically what you’re doing) can be unpredictable at times. Please be patient if the process takes time for you- it’s normal.
Is It Difficult To Do?
Absolutely not! In short: you’re basically adding flour and water to a jar, feeding it with more flour and water and waiting for it to become bubbly, active and double in size. That’s it. Most of your time involvement is hands-off. Can I ask you a favor though? Don’t overthink it. There’s a ton of sourdough information out there, and you will fall down a major rabbit hole if you start poking around. Just stick to this tutorial for now, follow the steps as written and just go for it.
Beginner Sourdough Starter Recipe {Step-By-Step}
You Will Need:
Supplies
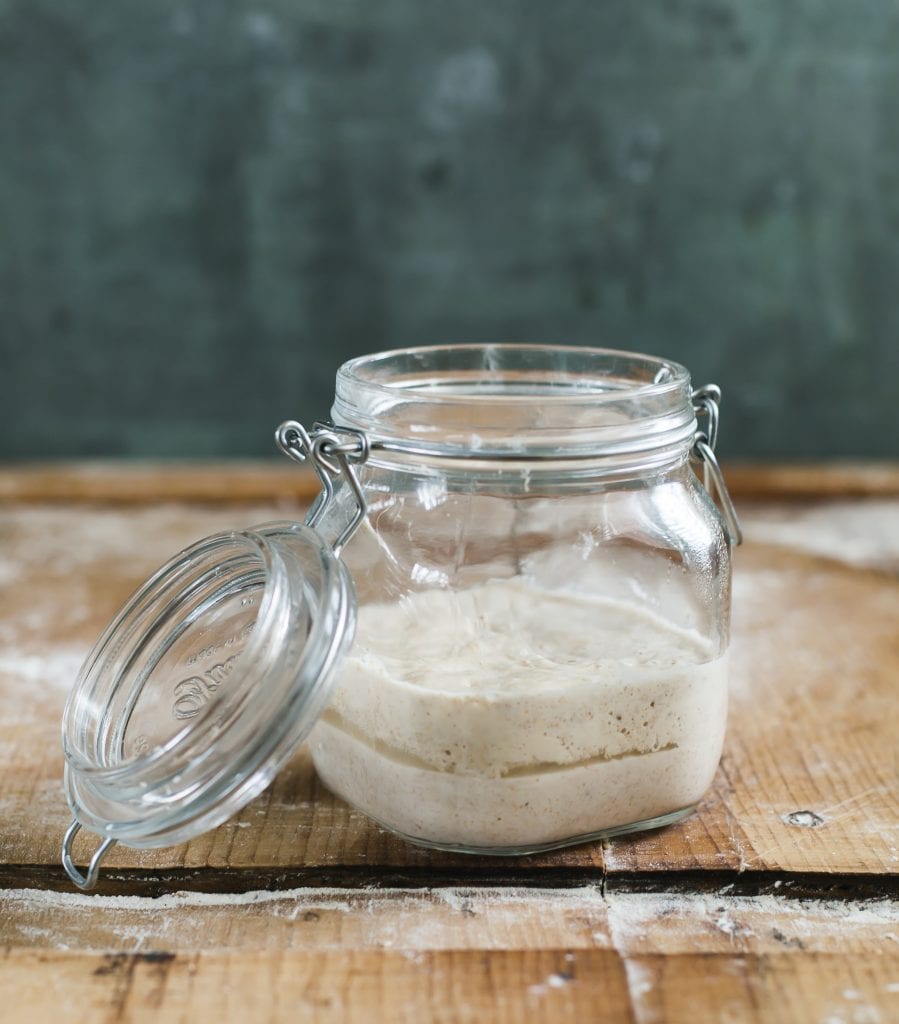
- 3/4 L jar (I use this one)
- Digital scale
- Small rubber spatula
Ingredients
To create the sourdough starter on Day 1:
- 60 g (1/2 cup) whole wheat flour
- 60 g (1/4 cup) water
To feed the sourdough starter each day (Days 3-7):
- 60 g (1/2 cup) unbleached all purpose flour or bread flour
- 60 g (1/4 cup) water
NOTE: Use regular, unbleached all purpose flour or bread flour for best results. I use flour from KAF, Trader Joe’s or Whole Foods. As for organic flour, I first learned that it wasn’t always successful when first creating a sourdough starter (sourdough can be finicky). However, due to the widespread use of glyphosate, I’ve been inspired to re-test with organic flour. The results were good. Please experiment with what resonates. For the water, filtered or tap water is fine. Use the latter if you know it’s mostly chemical/chlorine free.
Day 1: Make The Sourdough Starter
- First, download and print out this chart. It’s your daily “at a glance” feeding schedule to keep you on track.
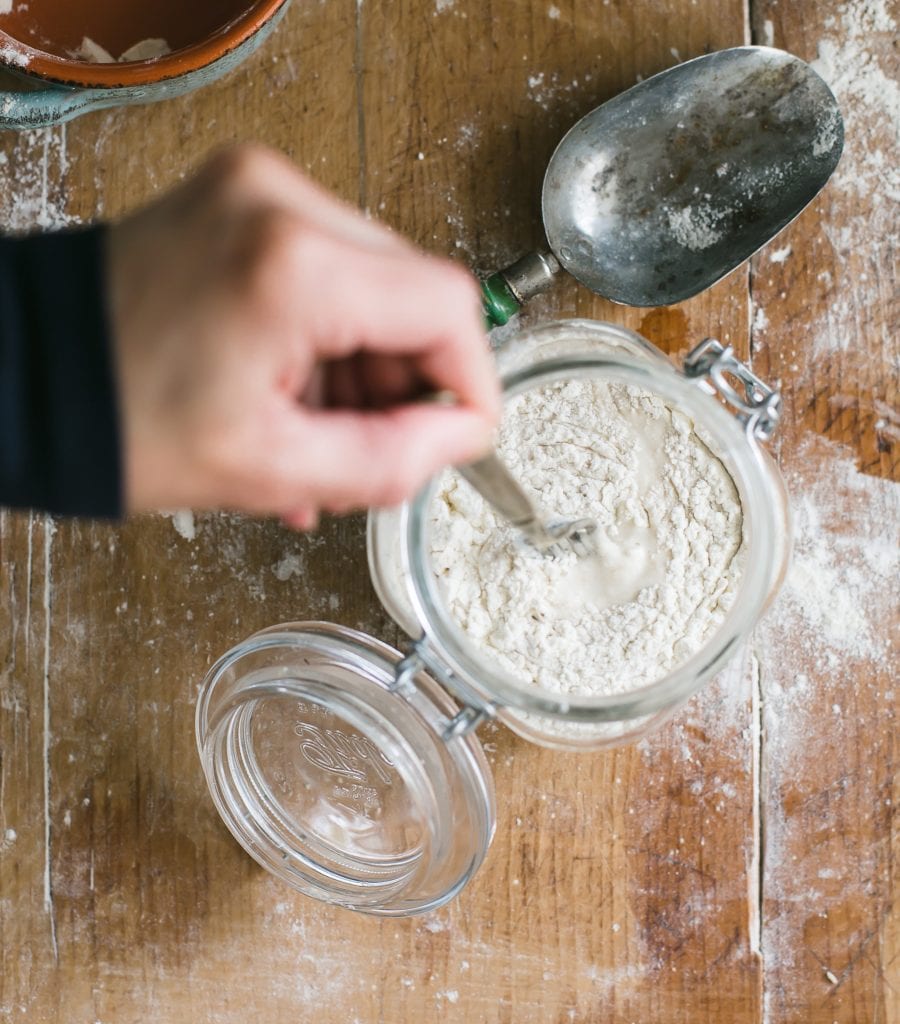
- Add 60 g (1⁄2 cup) of whole wheat flour and 60 g (1⁄4 cup) of water to your sourdough starter jar. Total yield: 120 g sourdough starter.
- Mix with a fork until smooth; the consistency will be thick and pasty.
- Cover with plastic wrap or a lid, and let rest in a warm spot, about 75 F for 24 hours.
Temperature Tips: Temperature is very important. If it’s too cold, your starter won’t rise and the process will take longer. Consider the following tips if you’re looking for a warm, 75 F spot. Place your starter on a cookie sheet inside the oven (turned off) with the light on for a only few hours to give it a boost (please don’t leave it there overnight- the environment will become too warm). Monitor the temperature with an oven thermometer. You can also use a proofing box set to your desired temperature, or a microwave with the door ajar and the light on.
Day 2: Got Bubbles?
- Today, you’re going to check if any small bubbles have appeared on the surface.
- Bubbles indicate fermentation, which is what you want. However, it’s okay if you don’t see anything right away; the bubbles might have appeared and dissolved overnight while you were sleeping. This happens quite often.
- You do not have to do anything else on Day 2. Just let it rest in your warm spot for another 24 hours. Feel free to stir once or twice to oxygenate the mixture.
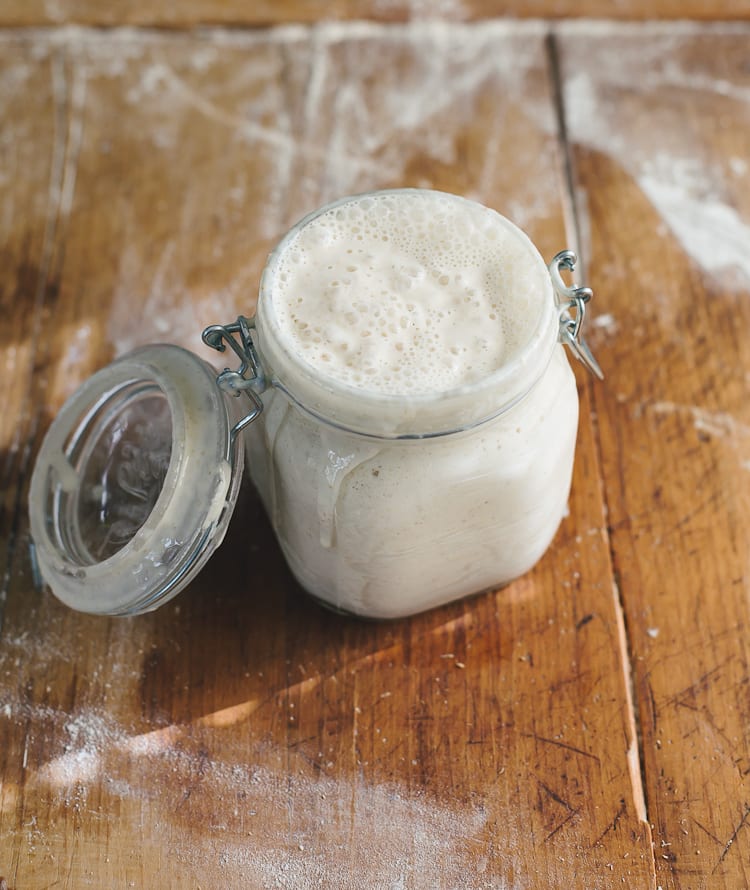
Tip: What’s That Brown Liquid? During the creation process, and even after your starter has been established, a dark liquid might appear on the surface (the image below shows the liquid in the middle of the starter). This liquid is called “hooch” and is an indication that your starter is hungry. It also has a very distinct smell, similar to rubbing alcohol or gym socks. This is normal. Don’t freak out. Any time you see this liquid, it’s best to pour it off before feeding it with fresh flour and water.
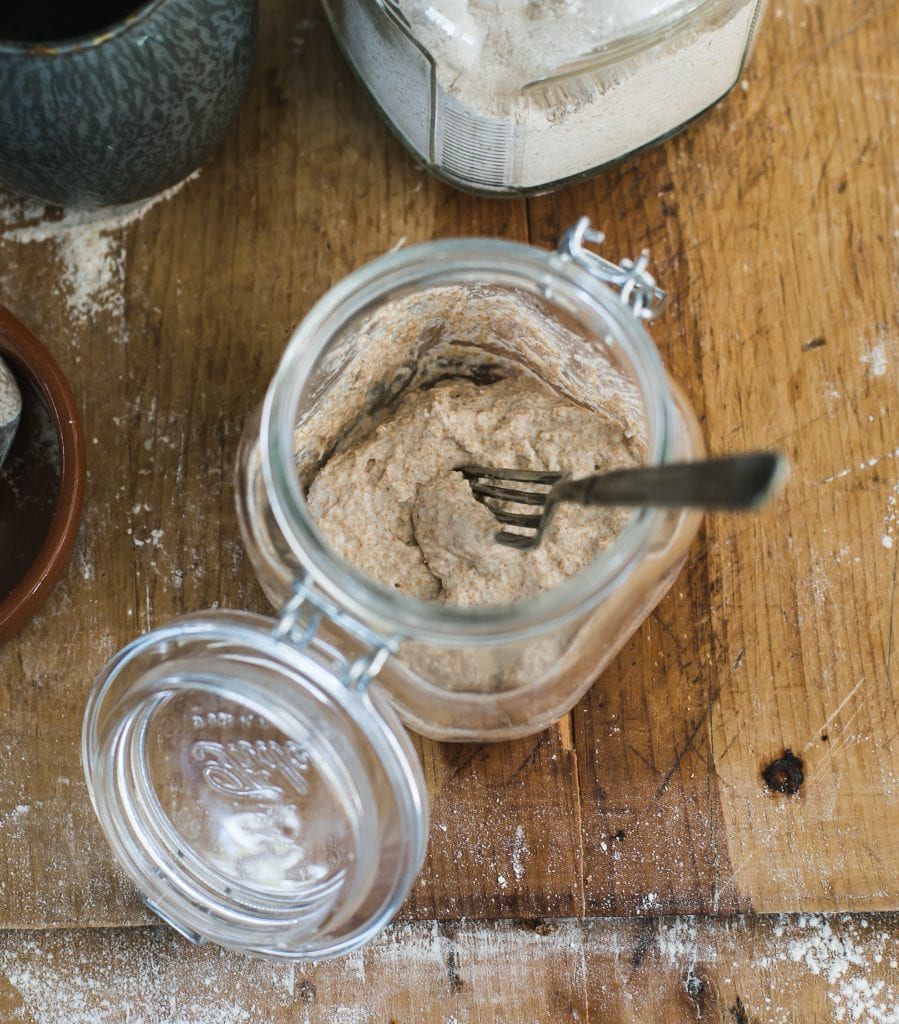
Days 3-7: Feed Your Sourdough Starter
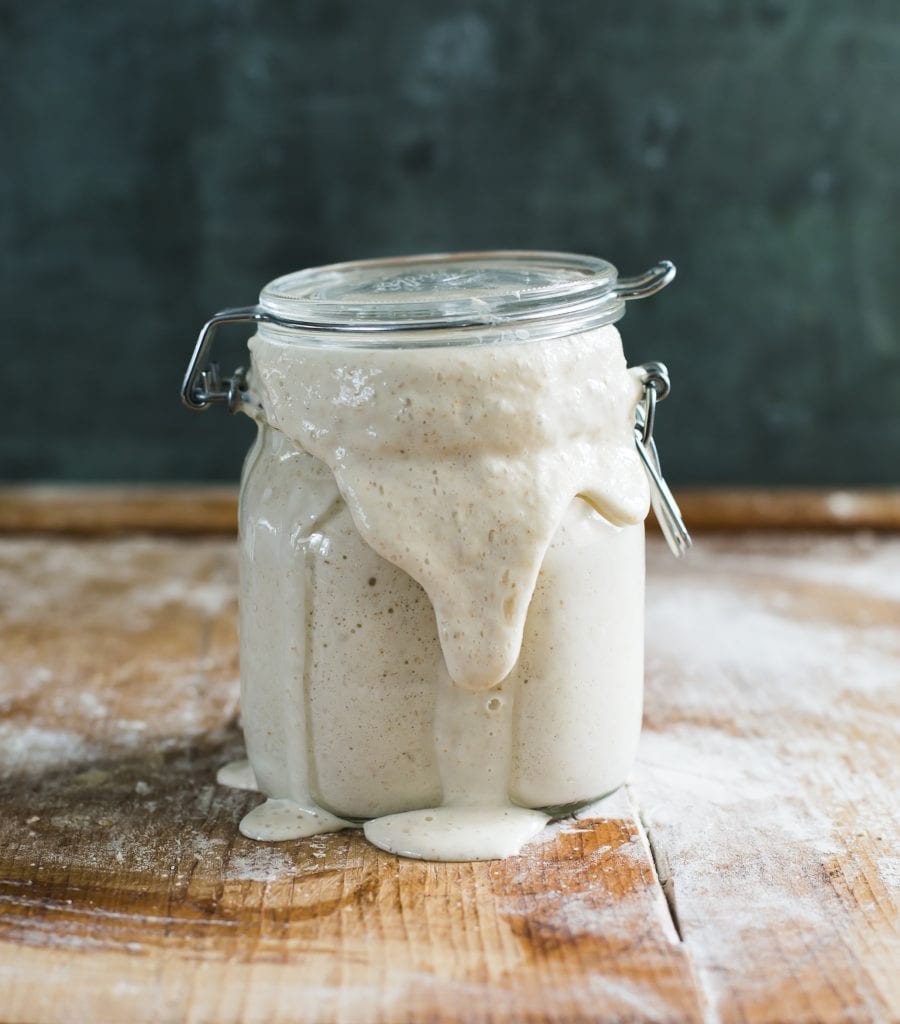
Whether bubbles are visible or not, it’s time to start the ongoing feeding process. As the natural yeasts begin to develop, your starter will rise. Bubbles will form on the surface. Eventually, your starter will fall back down or “collapse” indicating that it’s time to feed it again. The goal: is to increase the total quantity to about 236 g (1 cup) following the specific feeding ratio outlined below on each day.
Before you begin, a few tips for success:
- Establish a feeding schedule. Feed your starter at the same time each day. This will train your starter to rise and fall predictably, which is what you want. Consider feeding your starter in the morning when you wake up. Again, this is where my feeding chart comes in handy.
- Track the growth. Place a rubber band or piece of masking tape around the jar to measure the starter as it rises. When it falls, you’ll see streaks of starter on the sides of the jar.
- Keep your jar clean: Use a small rubber spatula to scrape down the sides of the jar to prevent mold growing up the sides.
- Be patient. This is a slow, gradual process. Remember: temperature (75 F) and consistency (daily feedings @ approximately the same time each day) is key.
Day 3:
- Remove and discard half (60g) of your sourdough starter from the jar. To do so: use a spoon to scoop it out, or pour the starter directly into a bowl to weigh (you can also just eyeball it- the amount doesn’t have to be exact). The texture will be very stretchy.
- To the jar: Add 60 g (1⁄2 cup) of all-purpose flour + 60 g (1/4 cup) of water. Mix with a fork until smooth. Scrape down the sides with a small rubber spatular. The texture should resemble thick pancake batter or plain yogurt at this point.
- Cover and let rest in a warm spot, 70-75 F for 24 hours.
- Total yield: 180 g starter.
Day 4:
- Remove and discard half (90 g) of the sourdough starter.
- To the jar: Add 60 g (1⁄2 cup) of all-purpose flour + 60 g (1/4 cup) of water to the jar. Mix well and scrape down the sides.
- Cover and let rest in a warm spot for 24 hours.
- Total yield: 210 g starter.
- Note: The growth of your starter might appear to slow down on Days 3-4, after switching to all purpose or bread flour for the ongoing feedings. This is normal. Your starter needs more time to adjust. Be patient.
Day 5:
- Remove and discard half (105 g) of the sourdough starter.
- To the jar: Add 60 g (1⁄2 cup) of all-purpose flour + 60 g (1/4 cup) of water. Mix well.
- Cover and let rest in a warm spot for 24 hours.
- Total yield: 225 g starter
Day 6:
- Remove and discard half (112 g) of the starter.
- To the jar: Add 60 g (1⁄2 cup) of all-purpose flour + 60 g (1/4 cup) of water. Mix well and scrape down the sides.
- Cover and let rest in a warm spot for 24 hours.
- Total yield: 232.5 g starter
Day 7:
- Remove and discard half (116.25) of the sourdough starter.
- To the jar: Add 60 g (1⁄2 cup) of all-purpose flour + 60 g (1/4 cup) of water. Mix well, and scrape down the sides.
- Cover and let rest in a warm spot for 24 hours.
- Total yield: 236 g starter
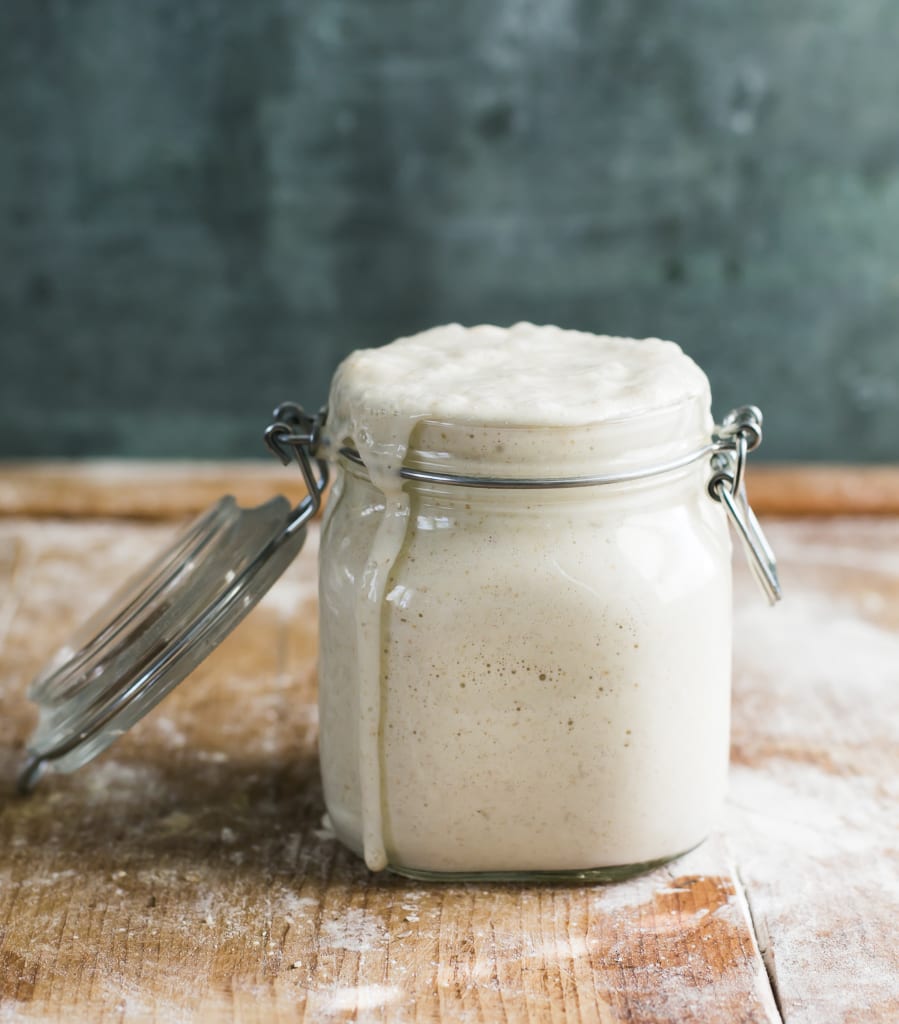
Day 7-8: A Sourdough Starter Is Born!
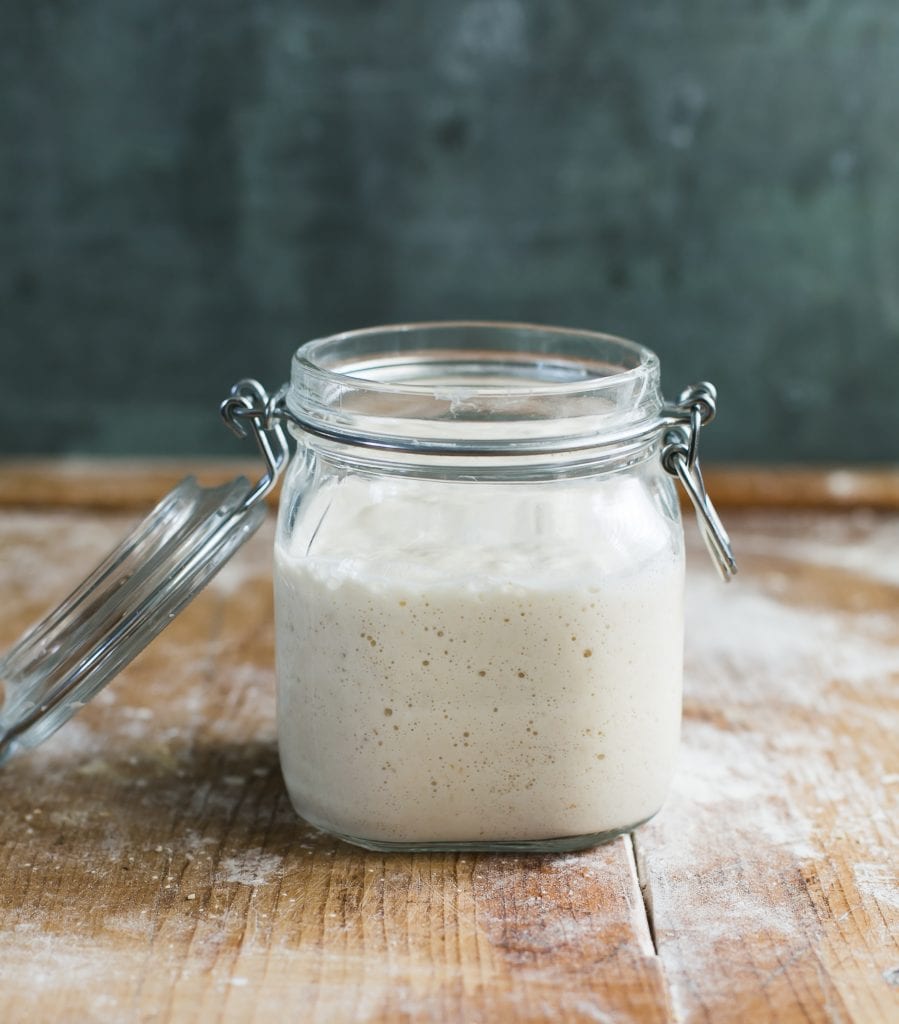
- By now, your sourdough starter should have doubled in size. You should see plenty of bubbles, both large and small. The texture will now be spongy, fluffy, and similar to roasted marshmallows (think: s’mores). It should also smell pleasant and not like stinky gym socks. If these conditions are met, your starter is now active.
- The very last step is to transfer your sourdough starter to a nice, clean jar. Do this only if your current jar needs a good scrub. Otherwise, leave it as is.
- In keeping with tradition, you can also name your sourdough starter (and please do). My starter is called Dillon after my oldest boy. It’s bright and bubbly, just like him ;)
- Now you’re ready to bake. Start with my beginner sourdough bread recipe- you’re going to love it!
Feeding & Maintaining Sourdough Starter For Ongoing Care
So you’ve created a sourdough starter! Now what? Just like any living creature, your starter must be kept alive with regular feedings, proper storage, and ongoing care to keep to maintain its strength. If your starter is not strong, your bread will not rise. Once you’re starter is established, read my companion article to learn exactly how I do it- Feeding Sourdough Starter: My Best Tips & Tricks. Have more questions? Read troubleshooting your sourdough starter.
Note: You will need to feed your starter every time prior to making bread dough and to maintain it (keep it alive).
How To Store Sourdough Starter
At Room Temperature: If you bake often, let’s say a few times a week, store your starter at room temperature. This will speed up fermentation, making the starter bubbly, active, and ready to use faster. Room temperature starters should be fed one to two times a day, depending on how quickly they rise and fall.
In the Fridge: If you don’t bake that often, store your starter in the fridge covered with a lid. You’ll only need to feed it about once a week or so to maintain its strength when not in use (you can just feed it cold and then pop it back in the fridge right afterwards; no need to warm it up first). When you are ready to make dough, feed your starter at room temperature as needed, to wake it back up.
Frequently Asked Questions & Helpful Info:
1.) What If my starter is not ready after 7+ days?
Feed every 8-12 hours (not 24) and continue the same formula: Discard half starter. Feed (Add): 60g flour & 60g water and store at 70-75°F / 21-24°C. Too runny? Add an additional 1-2 tbs of flour. Note: the most common reason for your starter not starting is cold temperature.
2.) Can this sourdough starter be made with all purpose flour only?
Yes. The process might take a little longer.
3.) Can sourdough starter be made with bread flour only?
Yes. Because it’s more “thirsty” than AP flour, add more water if the texture is too thick.
4.) Can this sourdough starter be made with whole wheat, spelt flour or rye flour only?
Yes. Like bread flour, whole grain flour absorbs more water than all purpose flour, so adjust the texture with additional water your starter is too thick.
5.) Can sourdough starter be made with bleached flour?
Yes. But it’s not recommended. The chemicals can throw off the fermentation process. Some readers have reported success, however. Your choice!
6.) Why do you use whole wheat flour in the beginning of the recipe? And then switch to all purpose flour for the ongoing feedings?
Whole wheat flour is used to jumpstart the fermentation process. All purpose flour or bread flour is used for the ongoing feedings because it’s inexpensive, practical and suitable for everyday baking.
7.) On Days 3 & 4, my starter is not as bubbly compared to Days 1 & 2. Growth is slowing down. Why?
As mentioned in question #5, whole wheat flour is used in the beginning to jumpstart fermentation. This is why you saw bubbles right away. When you switch to all purpose or bread flour for the ongoing feedings, growth will inevitably slow down on Days 3-4, as your starter needs time to adjust to the new flour. This is normal. Growth is still happening.
8.) For the daily feedings, you mention to feed your starter “equal parts” flour and water by weight. For example: 60 g (1⁄2 cup) flour + 60 g (1⁄4 cup). But the volume conversions (measuring cups) are not equal. Is this a typo?
No. It’s not a typo. “Equal parts” refers to feeding by weight only. Not measuring cups. Here’s why: different ingredients weigh different amounts based on density. For example 1 cup of flour can weigh anywhere from 125-150 g depending on how it was packed into the measuring cup. 1 cup of water can weigh anywhere between 236-250 g. Because weights are constant, it streamlines the process for accuracy. It is the preferred measuring unit in bread baking. The volume approximates are listed for convenience because not everyone has a scale.
9.) Can I use the sourdough discard from Day 1-7 for something else?
In the beginning, I typically don’t recommend using the discard (it’s usually really smelly and discolored). I recommend using the discard after the starter has been established. However, everyone will have a different experience with this. If it looks good- use it! And yes, you can save it to create a new, separate sourdough starter if you’d like. For more info please read Sourdough Discard 101: Recipes & Faqs Answered.
By signing up, you agree to receive emails from The Clever Carrot. Unsubscribe at any time.
Beginner Sourdough Starter Recipe
- Yield: appx. 236 g (1 cup)
- Category: Sourdough Starter
- Method: 1-Bowl
- Cuisine: American
- Diet: Vegan
Description
Looking for an easy, sourdough starter recipe for beginners? Adapted from my bestselling book Artisan Sourdough Made Simple, follow my no-nonsense, step-by-step guide for practical tips, tricks, and ongoing care- anyone can do it. Use it to make my famous golden, crusty sourdough bread recipe.
Please read my notes below before you begin.
Notes, Tips & Expectations:
- Download & print personal sourdough starter feeding chart {here}.
- The overall process takes ~7+ days, if the temperature is warm enough, ideally 70-75 F. However, it can take up to 2+ weeks or more for a strong starter to become established. Do not ignore the importance of temperature.
- Growth will seem to slow down on Days 3-4. This delay is commonly called a “false” start. It’s also normal- the yeast needs time to cultivate. Please be patient!
- You will need one large 3/4 L jar, or something of similar size (I use this one). Place a rubber band or piece of masking tape around the jar to measure the starter’s growth as it rises.
- To clarify feeding your starter: “equal parts” refers to equal weights only, not measuring cups. Example: 60 g (1/2 cup) flour + 60 g (1/4 cup) water. Same weight. Different volume. Not a typo. Why? Flour is light, fluffy and full of air pockets, so it takes up more space in a measuring cup (but weighs less than water). Water is more dense and compact; it takes up less space but weighs more than flour. That’s why their cup measurements don’t match, even when their weights are identical. Many bakers get confused by this. I’ve included volume measurements for convenience since not everyone owns a scale. But, do choose one measurement system and stick with it for feeding!
Ingredients
Note: Once your starter is established, make your first loaf using my sourdough bread recipe.
- 1x (5lb) bag all purpose flour or bread flour (I use either KAF, Trader Joe’s, or Whole Foods)
- 1/2 cup (60g) whole wheat flour (I use KAF whole wheat)
- Water, preferably warm around 85 F
Instructions
Before you begin: Establish a feeding schedule. Meaning, feed your starter at the same time each day. This will establish consistency, which sourdough starters love. Consider feeding your starter in the morning when you wake up.
Day 1:
- Combine 60 g (1⁄2 cup) of whole wheat flour + 60 g (1⁄4 cup) of warm water in a large jar. Mix with a fork until smooth; the consistency will be thick and pasty.
- Cover with plastic wrap, reusable wax wrap, or a lid and let rest in a warm spot, about 70-75 F for 24 hours. Temperature is important.
- Total approximate yield: 120 g starter
TIP: Looking for a warm, 75 F spot? Place your starter on a cookie sheet inside the oven (turned off) with the light on for only 1-2 hours (it can get hot in there, so keep you eye on it!). Center rack is best. You can also use a proofing box set to your desired temperature, or a microwave with the door ajar and light on.
Day 2:
Check to see if any bubbles have appeared on the surface. If you don’t see anything, it’s okay. The bubbles might have appeared and dissolved overnight while you were sleeping. Feel free to stir once or twice to oxygenate the mixture. Otherwise, you don’t have to do anything else now. Rest the starter for another 24 hours.
TIP: During the creation process, and even after your starter has been established, a dark liquid might appear on the surface and throughout the culture. It has a very stinky smell, similar to rubbing alcohol or gym socks. This liquid is called “hooch” and is an indication that your starter needs to be fed. It’s normal. Any time you see this liquid, it’s best to remove it along with any discolored starter present.
Day 3:
- Remove and discard half (60g) of your sourdough starter from the jar. To do so: use a spoon to scoop it out, or pour it directly into a bowl to weigh (you can also just eyeball the amount- it doesn’t have to be exact). The texture will be very stretchy.
- To the jar: Add 60 g (1⁄2 cup) of all-purpose flour + 60 g (1/4 cup) of water. Mix with a fork until smooth. Scrape down the sides with a small rubber spatular. The texture should resemble thick pancake batter or plain yogurt at this point.
- Cover and let rest in a warm spot, 70-75 F for 24 hours.
- Total yield: 180 g starter
Day 4:
- Remove and discard half (90 g) of the sourdough starter.
- To the jar: Add 60 g (1⁄2 cup) of all-purpose flour + 60 g (1/4 cup) of water to the jar. Mix well. Scrape down the sides.
- Cover and let rest in a warm spot, 70-75 F for 24 hours.
- Total yield: 210 g starter
Note: The growth of your starter might appear to slow down on Days 3-4, after switching to all purpose or bread flour for the ongoing feedings. This is normal. Your starter needs more time to adjust. Be patient.
Day 5:
- Remove and discard half (105 g) of the sourdough starter.
- To the jar: Add 60 g (1⁄2 cup) of all-purpose flour + 60 g (1/4 cup) of water. Mix well. Scrape down the sides.
- Cover and let rest in a warm spot, 70-75 F for 24 hours.
- Total yield: 225 g starter
Day 6:
- Remove and discard half (112 g) of the sourdough starter.
- To the jar: Add 60 g (1⁄2 cup) of all-purpose flour + 60 g (1/4 cup) of water. Mix well. Scrape down the sides.
- Cover and let rest in a warm spot, 70-75 F for 24 hours.
- Total yield: 232.5 g starter
Day 7:
- Remove and discard half (116.25) of the sourdough starter.
- To the jar: Add 60 g (1⁄2 cup) of all-purpose flour + 60 g (1/4 cup) of water. Mix well. Scrape down the sides.
- Cover and let rest in a warm spot, 70-75 F for 24 hours.
- Total yield: 236 g starter
Day 8:
When your starter is fully active, do the float test. Feed your starter, wait for it to double in size, and then drop a teaspoon of bubbly starter into a jar of water; if it floats to the top it’s ready to use.
Storage Options
If you bake often, store your starter at room temperature (feed it 1x-2x a day to keep it active). If you plan to bake only once in a while, store it in the fridge to preserve its strength (feed it 1x a week). When storing your starter in the fridge, there’s no need to bring it to room temperature first before feeding it. Just give it some flour and water and pop it back in the fridge.

Comments
Cathy says
Excellent directions and I am so delighted to have a beautiful active starter! I have tried a few recipes before but failed. Thank you so much for such excellent explanations. I weighed the discard and all feedings and I think that made a huge difference.
I have had success along the way with using discard for bread. Totally delighted with this too.
Brenda says
I did this on day 4, I read that you just take out more of the starter the next day so that it does not grow out of control and over flow the container its in. I will just put it in my discard jar.
Mari says
I forgot to discard on the 3rd day…..Should I start over?
Kim says
When storing in fridge and you need to feed, do you take half out first before feeding and follow the 60g of flour and 60g of water steps? Or do you just add the flour and water?
Secondly, when you are ready to use after being in the fridge, what are the steps at that point? Do you bring to room temperature or do you feed and restart the 7 day process?
Kim says
I had to throw out my completely established starter as it started looking like it was getting a bacteria on it. I’ve tried 3 times to restart and after 24 hours it has green or pink bacteria. I’m about to give up. Any ideas? I’ve tried 2 different flours, sterilized the jar, etc…..
Jenn Trull says
Did you use bottled water? I’ve heard that makes a huge difference not using tap water
Danielle says
Hello you marvelous sourdough queen,
I very excitedly gave my day 7 discard to two friends of mine, one local, another about an hour away, with links to your website and instructions on feeding. Both of them are telling me the starters did not rise after feeding. One of my friends said her house was about 60 degrees so chalked it up to being cold. The other one has a warm apartment. She sent me pics of the jar with a mark on it and yes, it looks like it had t risen at all. Is there a shock issue with being separated from the mother starter or was it too soon to share? What can they do to get it going again?
Thank you,
Danielle
Allysa Follini says
Hi I am currently on day 6 not seeing very many bubbles and it has only risen a little above the start line. Moving forward how should I keep feeding till fermentation?
Ellie says
I have a question! I am on day 5 of my sourdough starter, my starter has already doubled and passed the float test! Can I use it now or should I wait until day 8?
Kate says
I was gifted a starter and have had it a few days. I’ve been feeding it and thought it was going well. Made a Dutch baby with it today that came out horrible (recipe’s fault not starter, I think) any way I needed to clean out the bowl and wanted to divide my starter because there was a lot. It’s been 5 hours since transfer/ feeding on a relatively warm space but it hasn’t risen at all. Am I doing something wrong?
Grace says
Hi Emilie,
I need help please. Yesterday I opened my starter jar and it hissed and smelt like a chemical solution instead of a nice yeasty smell
What would cause that?
I’m only a newcomer to the world of sourdough and this was my first go at making a starter.
I was on about day 10 as my starter hadn’t risen so I kept going.
G.
Enjay says
Hi Emilie,
Really delighted to see your simple approach, I have been baking breads for 6 years with commercial yeast, every time I see starter recipe and leave it, your is so simple that I couldn’t resist and tried it. I am on 4th with approx 6 feedings as temperature at my place is 21-32 C, everytime I feed the started it goes back to same place immediately after feeding, I want to understand how this will reach to 236 grams on 7 th day , it is 225 grams today after feeding and after discarding half it will again go down drastically.
Q. Will the rise pick up significantly on 7-8th day
Q. For baking first loaf should I straightaway take 150 grams from this without discarding anything ?
Q. I’ll left with only 86 grams, should I add 60+60 and place it in the refrigerator or place only 86 grams in refrigerator, Thank You
Nicole says
Hello, if my starter is in the fridge, and i would like to make a bread, that feed the entire starter the chef and after that keep the portion necessary for the bread ? What the proportion to feed the chef 1 Time per week ? Thanks
Amanda says
Can I make my starter in a glass bowl?
Rose R says
I have a question???
After making Sourdough for a year. I stored my starter in the freezer.
Plan to start baking again and allow my starter to thaw.
I would your opinion on freezing and thawing starter.
Thank You
Chantall says
Hi! I have never made a sourdough but I do want to try your recipe for the starter. I know this may sound silly but I just had to be sure of what to do with it. When you say remove and discard half of the sourdough does that mean to throw it out?
Really excited to try this! Thank you!
Juliet says
Thanks for your recipe. I live in a warm climate. 21 degrees is a dream temperature. My temperature during the day gets to 32 degrees Celsius and in the night 29. Would I need 7 days for my starter? How do I adjust? This is my first time doing this.
Cyndie Bradley says
I’m confused about the 1:1:1 ratio. Is that just on day 1 of creating the starter and then the ratio changes? If, for example, on day 4 you start with 180g of starter, discard 1/2 leaving 90g of starter wouldn’t a 1:1:1 ratio be adding 90g water and 90g flour instead of 60?
Emilie Raffa says
Hi there! This recipe doesn’t follow a 1:1:1 ratio when creating a sourdough starter from scratch. It follows different ratio, building it up incrementally to reach approximately 1 cup. However, after your starter is established, then you can switch the 1:1:1 ratio for feeding and maintenance, or another ratio of your choice. Many bakers comment on this interchangeably here, which is why it gets confusing in some cases. Hope this helps!
Cyndie Bradley says
Yes! Thank you 😊
Rachelle Strong says
Hello,
Was just wondering if after starting with a different recipe that only called for Organic AP flour I can/should use WW flour with my initial feedings to help speed up the fermentation process. Yesterday was Day 1. Today (day 2 at 5:30) will be the 1st feeding.
Thanks!
Lavoia Summers says
This is my first time of taking care of sourdough starter and hoping I’m doing it right. Any way I’m going to try your recipe and directions, cause it sounds amazing and easy. And hope 🙏 for the best.
Lina says
I have one question,
On day 3 when I need to start to discard do I need throw away the discard or add to the new 60 gr flour and water?
Sybil says
It will be my first time doing this and am scared.
Can I use all purpose only.
Very good explanation..thank you.🙂
Abby Brown says
I’ve heard that All Purpose flour works too, but can take a little longer.
Reginald says
Good day,
I have made my starter according to the recipe but : I discard an amount, I then add the flour and water and thoroughly mix, I then place the jar in a warm spot, the starter then doubles in volume but falls back after a while. What must I do to achieve the desired end result?
Lauren says
Does the lid go on tight or loose or do I not cover it at all? I’ve currently just got some kitchen paper over the top with an elastic band keeping it round tight, is that okay?
Kailee says
Hello. I was given about 12oz of a starter in a mason jar, and was wondering if I’d be able to follow everything you’ve said here to feed it and be able to take care of it and whatnot? I’m hoping that I’ll basically just get to skip the whole starting it out thing, and just do feeding steps, correct?
Tiffany says
Yes! Except, lucky you, you get to begin at the last step since your starter is already established!
David Wilson says
Hello
I am using a Killiner type jar while feeding and resting should I seal the jar or leave it open ??
Thank you
Ben says
I have just got to the end of this journey I have been putting the clip on the jar but leaving it open and it’s been a good mix.
Carrie says
I’m on Day 5 with my starter and did not rise and seems a bit runnier than usual. Should I still continue with the feed today? I stirred it to hopefully make it rise more.
Van says
Mine was the same consistency, and i did some trouble shooting. I was using regular flour but a good quality one that came from a mill directly. Something about regular flour absorbing more or less liquid. So i did a 1:2:1 ratio. Equal parts water and starter but double the flour. So if you have 60g of starter, add 60g of water and 120 grams of flour. Mixing it will be tough but try to make sure all the flour gets incorporated (i cheated and added 1tsp more of water). Keep it in a warm place and that helped so much. Hope this helps!
Sarah says
When feeding the starter from the fridge how much (if any) do we remove?
Philip Cimino says
I mistakenly used Gold Metal All Purpose Bleached flour and it did produce numerous bubbles in less than 1 day with 80 degree heat. Maybe it was a fluke.
Question: There are obviously many different types of yeast, San Francisco being one of the
tastiest.
Question: So do you know what provides the inoculating yeast – the flour or the air.
Question: And do different flour brands and flour types support different yeast growth?
This is really a very interesting subject. It seems you have a head start in knowing a great deal.
Rishu says
If I forgot to feed my starter lets say 4th day then can i start the next day with 4th day rituals or need to start over from scratch?
I waited for 9 days after that a black mold came on top of starter then i needed to discard it why is that so?
Anne says
I’ve tried Preppy Kitchen sourdough starter four times with no luck. I’m determined to get the starter going so I’m going to try your method. Do you think it failed because it was only 68 degrees in our house? The starter never doubled. Once it grew a bit but not double. Did I have the wrong wheat flour? It was Bob’s Red Mill.
Julie says
Start by putting the starter in the fridge with the light open for 2 hours then shut the light off and leave until the next day. I kep mine in the oven overnight and had huge success with it.
Paula Lemire says
In the “fridge??”
Mel says
It is likely that your starter did not get warm enough. I put mine in the oven with the light on only and that seems to work well. When I can’t use my oven, I warm my dryer up by running it for a few minutes empty and then set my starter in there and close the door. Also works great! Good luck!
Cyndie says
I decided I wanted to try to make sourdough bread. A friend recommended your starter recipe and sent me a link to your blog. I’ve since purchased your book and a couple other recommended tools and have gotten started. I’m on day 6 and my starter, Marge, hasn’t seemed to be doubling in size. I used bread flour after the initial whole wheat (organic, that was all I could find in a small amount from the Sprout’s bins) Today, day 6, I added ap flour instead of bread flour and used tepid water instead of cold water from the fridge. I put Marge in the oven with the light on and door closed for 2 hours. Still no increase. I’ve had bubbles, I’ve had “hooch”. What do you suggest? A failure?, should I start over?
Thank you in advance for your help. I really want to do this!!
Vicki says
I’m on my second try — the first time I finished to day 8 and left it out to use again and had had a white mold. Not sure why. Any thoughts? I’m on Day 5 of version 2.0
AM says
If you’re going on holiday for 2 or 3 weeks, what should you do with the starter?
N says
Put it in the fridge and refresh it when you get back
Toni says
I’m on day 7 and have lots of bubbles
But it only rose on day 3, as fast as it rose, it fell even quicker lol
I’ve been doing this step by step, 60/60/60
It has doubled in size for sure, but it seems runny to me
So today on day 7, I decided to be brave and switch it up, and keep 100 grams of the starter and added 100 grams of water and 100 grams of flour… thinking maybe it needed more food, if that makes sense
I have lots of bubbles again but it hasn’t moved past the elastic band mark. What am I doing? Do I discard and feed again tomorrow on day 8? Or is this ready to use? She doesn’t have a foul odour at all..
ughhhhh… hellllpppp!
Kavita Lal says
Hi, I followed the 7 day feeding chart – discard half from day 3 and add 60g flour & 60g water, and my starter wasn’t very active. There would be a bubble here and there but for the most part, it developed a hooch and that’s it. On Day 8 or 9, i discarded half and then added the weight of the starter in flour and water, and now I’m seeing it rising. Its not rising to the point its reaching the jar, but its definitely rising – and not falling back down on itself – have I done something wrong? Should I start the starter again? I’m not too sure if I should move to 2 day feeds because the starter doesn’t fall back on itself
Ashley says
I’m on day 9 of my starter and am not seeing much activity. There is some bubbling but it hasn’t risen since day 4. I’m still discarding half then adding 60g of water and 60g of flour every 24 hours. Should I be doing something else since I haven’t seen any rise? When do I switch to 1:1:1 feed ratio?
Abby says
I’m 3 weeks in with this starter. I’ve been feeding my starter 2 times a day. It is nice and bubbly, and has been exactly doubling in about 10 hours. It’s cold here so I rigged up a “nest” for the jar and keep it around 80 degrees thanks to a seedling warming mat. I tried making bread and although it looked great on outside, it is gummy and dense inside. Any advice??
Mandy says
To maintain my starter do I still need to discard and re-feed, even if I’m storing it in the fridge because I don’t bake often?
Lisa says
On day 4 I misread and added only 60g of starter, and the additional 60g flour -60g water this I realize now would have probably been ok. But I reread, and noticed I made an error by not discarding 90g. I ended up adding 30g of the starter into the jar with the new fed starter. Did I ruin it? Note to self, best time for feeding is in the morning, not after a long day. I was definitely not thinking clearly!
Liz* says
I appreciate your timely and knowledgeable post. My stepdaughter is an artisan in her own right, and I’m ashamed I haven’t gotten on the sourdough explosion. She sent me her bread recipe, but wanted me to do my “homework” and make my starter alone. This post is my no excuse, kick in the pants, meet ya at the oven challenge! Wish me luck!
Grady Gattis says
I have followed directions as written and had not seen much happening with the starter. On day 11 I went back to whole wheat flour and it did grow but not that much. On day 12 I went back to bread flour and not much happening. I have tried lid on lid open covered with filter paper. Warmer water at 85 degrees. Any suggestions
Esther says
this is really useful for me thanks very much. I would like to ask if my container is large enough, do i really need to throw away the starter on day 3 to 7? Also, as the weather where i live is very warm room temp is approximately 30 to 34 degrees celsius (86F – 93F)so i have to keep the starter in the refrigerator. Can i just double the resting times?
Thanks for your time
Mel M says
I’ve always wanted to try making a sourdough starter and baking my own sourdough bread but it just seemed daunting. Thanks to your easy to follow directions and helpful hints, I was able to make a healthy sourdough starter and baked my very first sourdough bread, albeit with some additional adjustments needed.
I was initially discouraged with my sourdough starter as it didn’t double in size after day 7. At day 7, I started feeding it twice a day with KAF bread flour and bottled water. I also tried placing the jar in a warm water bath. I even tried placing the jar inside the oven as suggested, on subsequent days, with the oven off and light on but the starter didn’t double in size. I persisted, mainly due to the encouraging feedback I read from you on this site, and on day 14, the starter rose to twice its size after I placed the jar inside a warm air fryer I used to heat up some samosas. Voila! A float test confirmed my starter is active and I proceeded to make my first sourdough bread.
My first sourdough bread turned out well, EXCEPT the bottom of the bread stuck to the enameled Dutch oven. Perhaps I used the wrong flour (just AP flour) to sprinkle on the bottom of the Dutch oven or I didn’t use enough. On the second attempt, after I fed the starter and it double in size again using the air fryer technique, I used a parchment paper to line the bottom of the Dutch oven. The sourdough bread didn’t stick this time, BUT it looks like I underproofed the dough since the score marks closed up. Still tasted good though. For my third attempt, I am following your light wheat sourdough recipe. Hoping for the best!
Thanks again!
Nevaeh says
I like to put dry rice in the bottom of my DO!! There’s a Facebook group (not a promo, but it helped my tremendously) Called sourdough beginners!
Karn King says
I fed the starter and forgot to discard on Day 7. Can I just keep discarding (I will remember next time) and feeding the starter every 24 hours?
Tina says
Is it possible to use gluten free flour for sourdough starter?
Jessica Anderson says
So I came across your article. I have made sour dough before, but this time I used just plain rye flour as the starter.
I’m on day three, and just mixed in KA Sir Galahad. I love playing around, and you have some good information on your post. I have explained how to make. Sourdough multiple times to people and the science behind it.
I’m a pastry chef, and I love playing with breads. Many of the places I have worked we’ve made our own breads. I am going to share your website with anyone who asks as it’s very simple to understand. Great job, and I will have to show you a picture of the bread. I am going to add wheatberries , and whatnot to make a hearty sourdough.
Michelle says
If your starter is not ready on day 8, does it matter how much you remove each day? Can I remove 40g and add 40g of flour and water? I do not have much starter right now…maybe 90-100g. It has not done much this week. I think it may be too chilly. My house is at 67-68 F all the time
Aamil says
Hi, I started following the recipe but didn’t see any activity until day 7, so I switched to feeding with whole wheat flour instead of unbleached AP flour and adjusted the water accordingly. The problem is that now my starter doubles in size for the first 12 hours and then starts falling back. It’s back to the same volume by feeding time. I’m currently on day 13.
Emilie Raffa says
Hi there! The rise and fall of your starter is normal and to be expected. It will never stay at peak height or “double in size” forever. What goes up must come down. Example: you feed your starter, then it rises, it stays at peak height for a bit, and then eventually it consumes all of its food and falls back down. It’s an ongoing cycle.
In your case, your starter is now active. You are done with the creation process. You can switch over to maintenance mode, which simply outlines the next steps for feeding and ongoing care.
More info linked here: https://www.theclevercarrot.com/2021/01/feeding-sourdough-starter-my-best-tips-tricks/
Alicia Hufford says
Hi I used 1/2 a cup of flour and 1/4 a cup of water and it’s so thick I can barely mix it without there being a lot of leftover flour. Is this correct ?
Emilie Raffa says
Hi there! The texture is supposed to be thick and pasty on Day 1. However, if you find that it’s absolutely too thick to stir and the flour won’t absorb, add a splash of water to loosen it up.
Kelly says
If there is hooch on the top in the 24 hours do you discard the hooch and add a little more whole wheat flour and water or just discard?
Doreen Hartman says
Hi Emilie. Can I use organic white whole wheat flour for my starter?
Emilie Raffa says
Hi Doreen! Yes! You can do that- what brand?
Nikkie says
When starting do I mix the wheat flour and water together? When feeding do I mix the flour and water together? Can I use the discard for other recipes? I don’t want to waste it.
Emilie Raffa says
Hi there! Yes: on Day 1 you will mix the whole wheat flour and water together directly in the jar. The same technique applies for the ongoing feedings throughout the process. Don’t use the discard when first creating a starter from scratch- it’s not good quality, especially in the very beginning. Use discard from an already established sourdough starter for best results.
Melissa says
If starter is not active by day 8, do I discard more than 1/2? My jar will start to overflow if I continue the normal 1/2 discard pattern for another week!
Emilie Raffa says
Hi there! Believe it or not, your starter won’t grow that much more (exponentially) after day 8 on this formula. So, you can continue to discard half or discard more if that’s what you feel comfortable with.