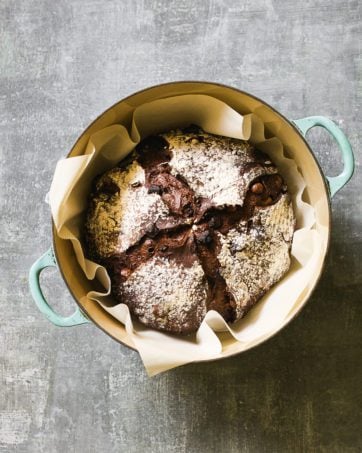
This chocolate sourdough bread recipe is soft, chewy and full of rich chocolate flavor. Made with real cocoa powder, vanilla-soaked raisins, and decadent chocolate chips, it uses active sourdough starter to naturally leaven the dough (which comes together by hand in under 10 minutes!).

Chocolate Sourdough Bread: could there be a better combination?!
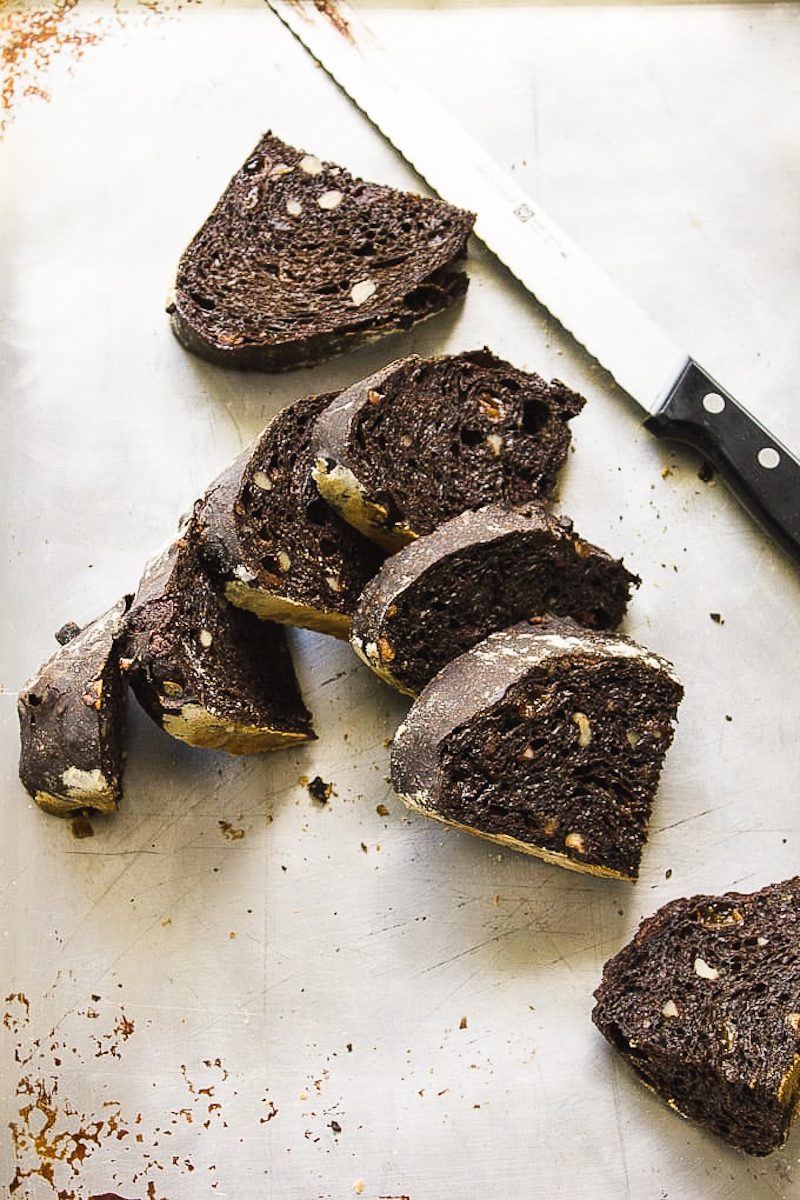
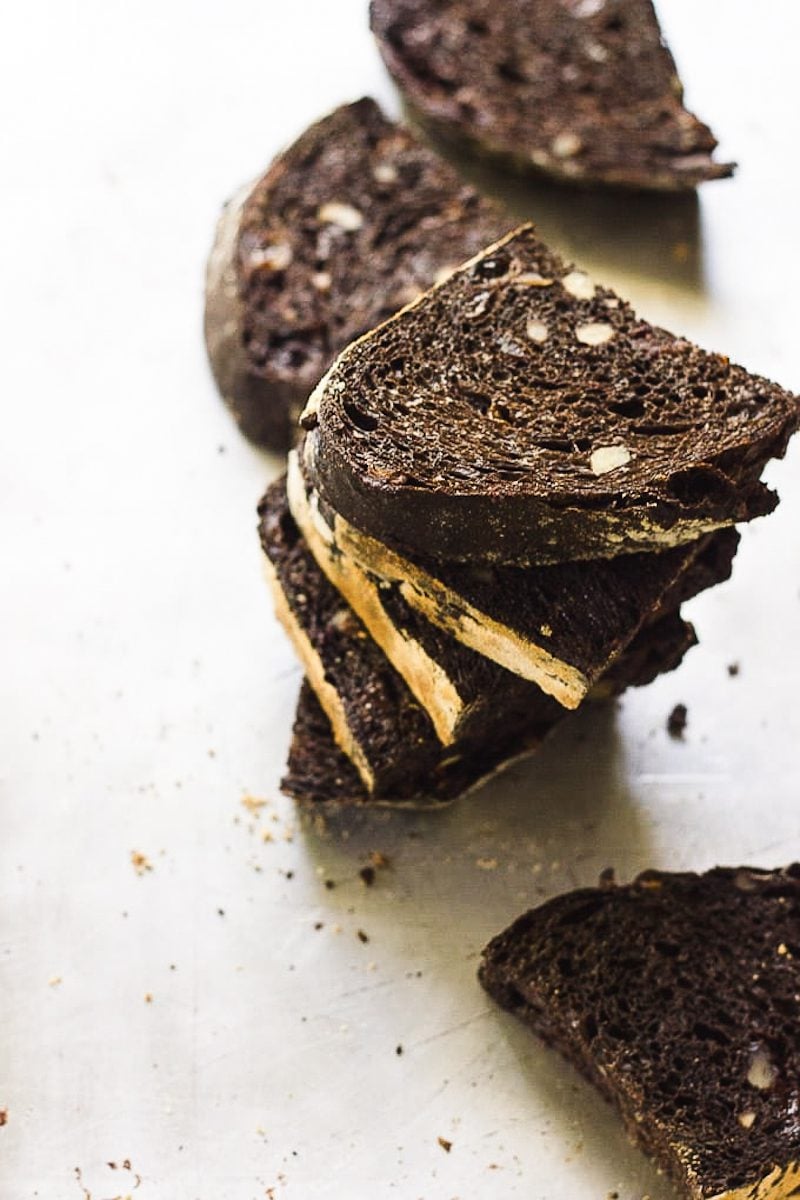
Adapted from my beginner sourdough bread recipe, this unique chocolate sourdough loaf is packed with rich chocolate chips, crunchy walnuts and vanilla-soaked raisins (soft and chewy too!). I wrote this recipe years ago, and to this day it’s still one of the most popular sourdough bread recipes on my blog!
For variety, I highly recommend you try the peanut butter almond version too, which you can find in my book Artisan Sourdough Made Simple. I love leftover slices, toasted, with pats of salted creamy butter.

It Took 3 Tries To Get This Recipe Right.
Round #1: Cocoa Powder
To make chocolate sourdough bread, I initially assumed adding cocoa powder to the dough would make it taste like chocolate cake. It didn’t. Although the texture was nice, the final product wasn’t chocolatey at all. It needed something…
Round #2: Chopped Chocolate Chunks
To elevate that chocolate flavor, I added chunks of good-quality bar chocolate to the dough. You know what happened? It melted into the dough. Unlike chocolate chips from the bag (think: Nestle semi-sweet morsels), most chocolate bars do not contain stabilizers to keep them from melting. It added too much fat to the dough. This round was a fail (but mental note for Round# 3).
Round #3: Chocolate Chips, Dried Fruit + Nuts
In this final version, my base dough included cocoa powder for color and richness. But the addition of chocolate chips meant chocolate in every bite while dried fruit and nuts made it texturally interesting (at least to me anyway). I used a combination of raisins which I soaked in vanilla and chopped walnuts. Dried cherries or hazelnuts would be fantastic, too.

How to Make Chocolate Sourdough Bread
Method at a glance:
- Mix dough by hand
- Let dough rest for 1 hour (autolyse)
- Salt and fillings added after autolyse
- Stretch and fold every 30 minutes for 2 hours during the bulk rise
- Bulk rise at room temperature (currently 65 F here) overnight, about 12-14 hours
- Second rise approximately 45 minutes- 1 hour
- Bake in Dutch oven at 400 F for 20 minutes (covered) + 40 minutes (uncovered)
A Few Tips:
- Weigh your ingredients. A digital scale for accuracy is a must in bread baking. Alternatively, if using measuring cups please lightly spoon and level your flour.
- Chocolate dough is stiff. The cocoa powder tightens up the texture of the dough- this is normal. Give it more time to rise, in a warm spot, as needed.
- Use a Dutch oven or Bread Pan. Steam is essential for a lofty high rise and artisan crust. The easiest and most reliable way to create steam is choosing a baking vessel with a lid.

By signing up, you agree to receive emails from The Clever Carrot. Unsubscribe at any time.
Chocolate Sourdough Noir
- Prep Time: 10
- Cook Time: 1 hour
- Total Time: 1 hour 10 minutes
- Yield: 1 Loaf 1x
- Category: Sourdough Bread Recipes
- Method: Oven-Baked
- Cuisine: American
- Diet: Vegetarian
Description
This chocolate sourdough bread recipe is soft, chewy and full of rich chocolate flavor. Made with real cocoa powder, vanilla-soaked raisins, and decadent chocolate chips, it uses active sourdough starter to naturally leaven the dough, which comes together by hand in under 10 minutes.
Ingredients
- 150g bubbly, active sourdough starter
- 350g water, preferably filtered
- 50g sugar (vanilla sugar is nice)
- 1 tsp. vanilla extract or 1 vanilla pod, seeds scraped
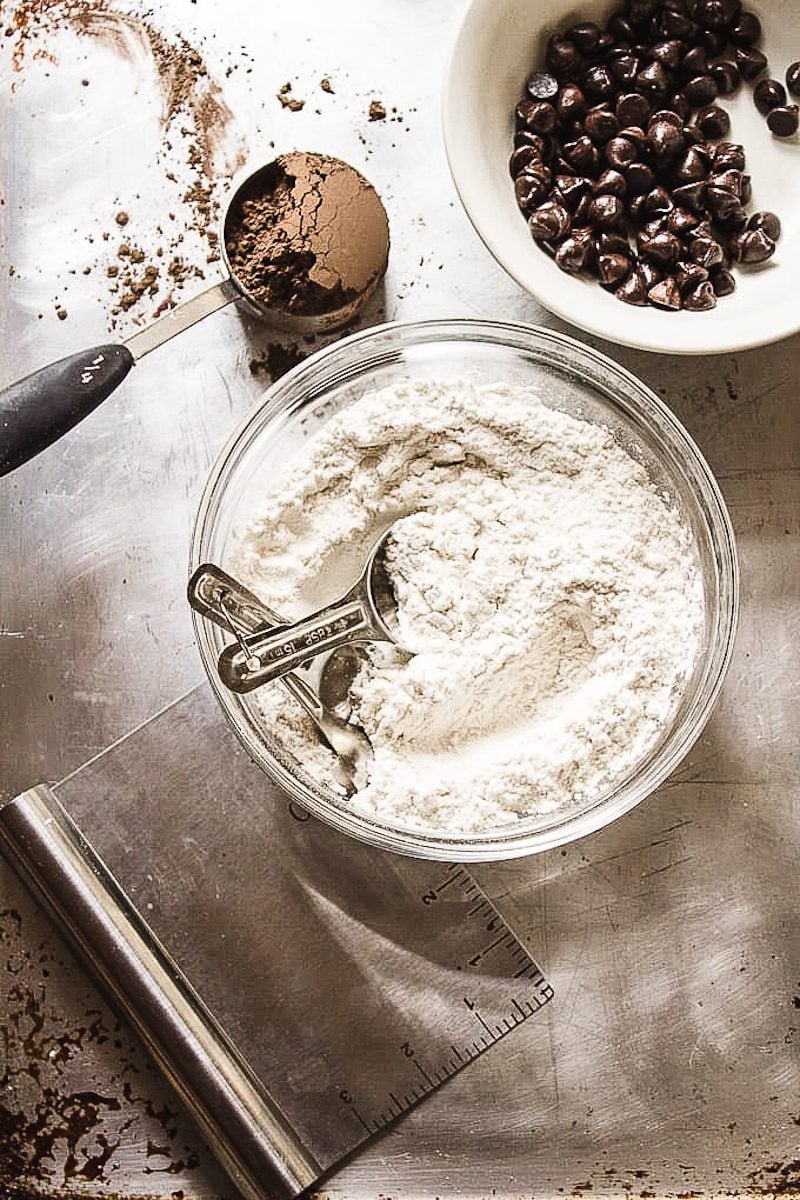
- 500g bread flour
- 50g cocoa powder*
- 9g fine sea salt
- 65g chopped walnuts
- 65g raisins
- 150g semi sweet chocolate chips
- powdered sugar for decoration
* I used Hershey’s Special Dark, a blend of natural and Dutch process cocoas
** You will need a 6 quart Dutch oven for baking
Instructions
Make the Dough
In a large bowl combine the starter, water, sugar and vanilla. Stir with a fork. Sift the bread flour and cocoa powder together and add to the bowl. Squish everything together with your hands until all of the flour is absorbed. Cover with plastic wrap and let it rest (autolyse) for 1 hour. Note: use this time to soak the raisins in a splash of vanilla extract for extra flavor (optional). Drain and pat dry before using.
To the dough: Add the salt, walnuts, raisins and chocolate chips. Lift and fold the dough over itself several times and squish with your hands to incorporate. The dough will tear slightly as you fold. Don’t worry- this is normal. Work the dough as best you can until it comes back together into a rough ball.
Bulk Rise
Cover the bowl with plastic wrap and a clean kitchen towel. Leave it in a warm spot to rise. Your dough is ready when it no longer looks dense and has increased in volume about 1½- 2x its original size. This can take anywhere from 10 hrs @ 68 F; 5-6 hrs @ 75 F; 3-4 hrs @ 80 F depending on the temperature of your ingredients, the potency of your starter and surrounding environment (**see notes below). Optional Step: about 30 minutes into the start of the bulk rise, you can stretch and fold the dough.
Stretch & fold: To strengthen your dough, do a series of stretch and folds every 30 minutes for the first 2 hours of bulk fermentation. Simply gather a portion of the dough, stretch it upwards and then fold it over itself. Rotate the bowl ¼ turn and repeat until you have come full circle. You will have completed 4 folds. Try to keep the fillings tucked into the dough and not on the outside. This will prevent burning when baked.
Shape the Dough
To cut and shape the dough, divide your work surface in half; lightly flour one side (for cutting) and leave the other half clean (for shaping). Remove the dough from the bowl and place onto the floured section. You do not need to ‘punch down’ the dough; it will gently deflate as you fold and shape it. Cut the dough in half to make 2 loaves, or leave it whole for a single loaf. To shape, use a bench scraper to move your dough to the non-floured section (if there is any flour present it will be difficult to shape- brush away any excess). Gather the dough, one side at a time, and fold it into the center. Flip the dough over and place it seam side down. Using your hands, gently cup the sides of the dough and rotate it using quarter turns in a circular motion. You can also pull it towards you to even out its shape. Repeat this process until you are happy with its appearance.
Second Rise
Place the dough into a cloth lined 8-inch bowl or floured/lined proofing basket. It will need to rise again, about 30 minutes to 1 hour. It is ready when the dough is slightly puffy, but not double in size.
Towards the end of the second rise preheat your oven to 400 F. Cut a sheet of non-stick parchment paper to fit the size of your baking pot, leaving enough excess around the sides to remove the bread.
Score the Dough
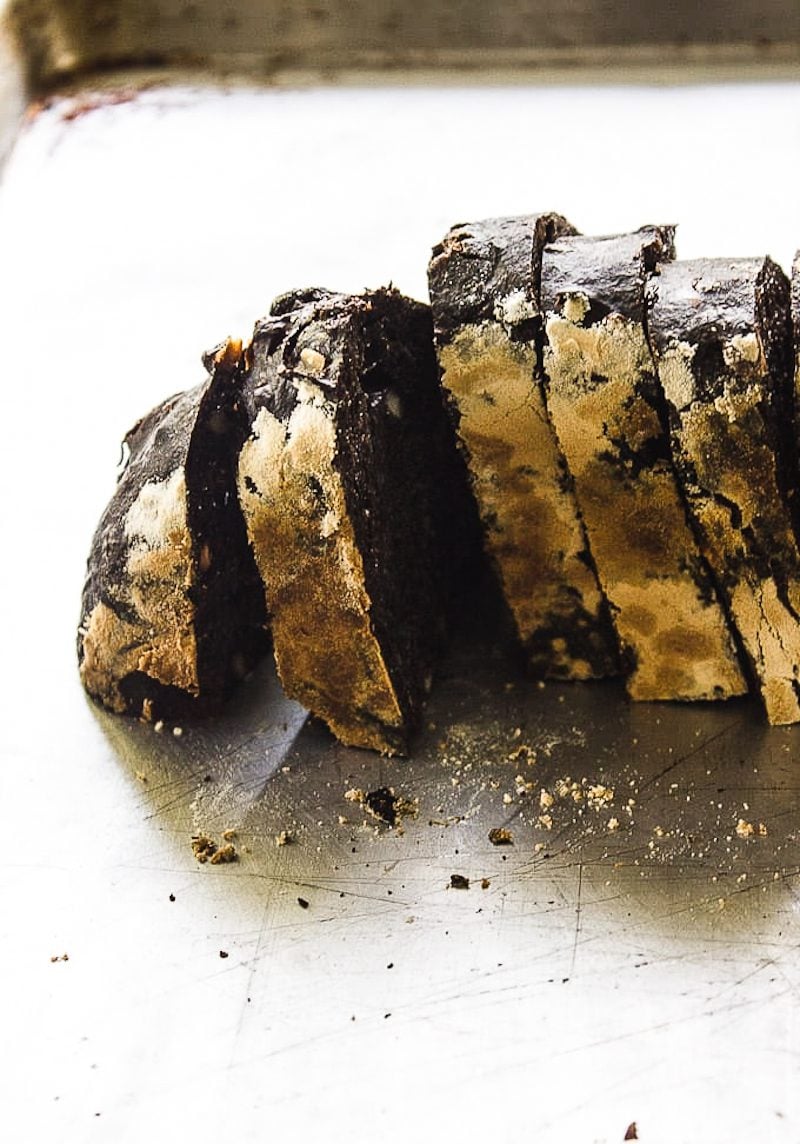
Place the parchment over the dough and invert the bowl to release. Using the tip of a bread lame, small, serrated knife or a razor blade, make four shallow 4-inch long cuts at 3, 6, 9, and 12 o’clock around the dough. Use the parchment paper to transfer the dough to the baking pot.
Bake the Dough
Place your bread into the oven (lid on) and bake for 20 minutes. Remove the lid, and continue to bake (uncovered) for an additional 40 minutes. During the last 10 minutes of baking, crack open the oven door. This allows the moisture to escape, leaving your bread with a crisp crust. You can also take the internal temperature of your bread to double check that it is done. For sourdough, it should read about 205 F.
Cool
Remove the bread from the oven, and cool on a wire rack for at least an hour before slicing. Dust with powdered sugar before serving.
Notes
Because sourdough does not contain commercial yeast, it takes considerably longer to rise. In the summer months, it can take anywhere between 3-4 hours @ 85 F whereas in the winter, about 8-12+ hours @ 65 F. In the winter, I make my dough in the afternoon and leave it to rise overnight at room temperature. In the warmer months, I bulk ferment in the fridge to slow down the rise time.

Comments
Tina says
OUTSTANDING!!! I made this today and was nervous since 15 min after I made the dough, I got called into work. I covered it and hoped for the best. This morning I took it out of the fridge and let it warm for 1 1/2 hrs and the restarted the whole process like I just made the dough. I used all cooled coffee for the water and used white chips and pecans. ABSOLUTELY DELICIOUS. Does make a very large loaf but that just means more good bread to eat!!
Emilie Raffa says
Hi Tina! This is such great (real life!) feedback. Thanks so much for sharing. I’m thrilled you liked the bread.
Jenifer Davis says
I have a question. I was about to make this bread when I realized my son had used my bread flour up making cookies (he didn’t check the label, saw a white flour and used it, lol). Now, I only have white whole wheat and all purpose flour left. I don’t have time to run to the store.. which flour would be the best sub? Or should I just wait? Help!
Kasey says
This bread is phenomenal! Wondering what the bake time would be if I split into two loaves and baked in loaf pans?
Harmony says
I’m trying this recipe now. Am a bit of a sourdough newbie. Thankfully this dough rose overnight. Having a hard time getting the mix-ins to stay in the dough following the bulk rise though.
Other recipes mention putting the Dutch oven in when the oven is preheating. This recipe doesn’t mention it so I am going to try without doing so. Let’s see how it goes *crossing fingers*. Looking forward to the result. Thank you for the easy instructions!
Angela says
So, so good! We omitted the walnuts and raisins and used 250g of chocolate. Family’s favorite!!
Nemesia Park says
Can I proof it in the fridge for more than 1 day? 48 hours? Or will it ruin the loaf?
Joan says
Thank you for the step by step recipe! I left it to bulk rise, shape, and cold proof in the fridge. Baked the next day and it is yummilicious 😋
Fiona says
I started making this last night and baked this afternoon. It’s the best looking loaf of sourdough I’ve made yet and it tastes amazing. I’ve realised I need to leave the dough to prove much longer than recipes say as my kitchen is so cold! I left out the nuts so that my children can take it to school for lunch. Thank you for such a great recipe and such a fab website.
Lisa says
Is it possible to leave out the sugar or replace with maple syrup or honey?
KT says
I used a chocolate starter instead, and probably a lot more chocolate chips. It was soft, fluffy, and super flavourful. My son had asked me to make it again – loaf’s not even gone yet…
Sandra Morales says
Hello! Can’t wait to try this recipe after reading all these rave reviews :) is it ok to make with AP flour?
Jenny says
Im making this sourdough noir as I write. At the first stretch and fold with choc chips and raisins, the dough is quite stiff…is this to be expected?
Simon says
Quick question- cos I love this recipe
Can you second ferment in a fridge?
Cheers
Simon
Jeanette T says
Hey Simon. Jeanette in AL here. I made the chocolate sourdough in her book, did the bulk fermentation on the counter, shaped & placed in my banneton then after a 20 minute warm proof on the counter placed it in the fridge at 5:30 pm to proof overnight. Baked the next morning. Came out great. Hope this helps.
Anna says
Replaced the raisins with dried blueberries (and they plumped up almost like fresh blueberries) and the walnuts with pecans and added a little bit (about a teaspoon) of instant coffee to the liquid mixture to enhance the chocolate flavor. Definitely a winner!
Janice says
I first had chocolate sourdough from a local bakery and glad I found this recipe. It is very yummy and the texture was great. I replaced the raisins and walnuts with all chocolate chips and it turned out delicious.
Janell Murri says
If you divide the dough in half and bake two loaves, what would be your suggested bake time?
Han says
I’m not sure what I did wrong, but the crust burned on the bottom before it could reach the correct internal temp, despite the parchment paper. Seemed like 400 was too hot.
Debra Paulson says
The bread rose beautifully. My husband who is a chocoholic loved it with a dour cherry jam and made into French toast which I topped with whipped cream, berries and bananas. I liked it with the cherry jam and butter. My son in law loved it too.
Cherryl L Moore says
This was super easy to follow the recipe. My family loved it. They can’t wait for me to make another loaf.
Maureen kelm says
Hi, my dough was rather stiff through out the stretch & folds. It didn’t loosen up like my sourdough does. Is it because of the cocoa powder?
Thanks, Maureen K
Sil says
Can’t wait to try this!! Just wanted to confirm, no cold proof with this recipe?
Jennifer Sund says
I made this recipe last night and added vanilla sugar I got from Germany, a whole vanilla bean, and salted caramel chips instead of chocolate. I completely forgot about it in the oven during the first rise and fell asleep. Shaped into 2 loaves this morning and tossed in the fridge. Baked as directed and now I’m struggling to wait for it to cool. The smell is divine.
Josie Vehrenkamp says
Just did my second stretch & fold and realized I forgot the salt and inclusions! Can I try to mix the salt in now and then the inclusions when I shape? Or what do you suggest? Also, my loaf seems stiffer than my normal sourdough. Normal?
KUNJI says
I had a huge hit of your Cinnamon Raisin Swirl from you book so I am trying to bake this one – Quick question – can I use cacao powder instead of cocoa powder? If yes, is any changes I should be making to this recipe?
Katie says
Thank you, Emilie, and great tip! I will try that.
Katie says
First, thank you for your delicious recipes and clear instructions! Your website is automatically included in my sourdough starter gifting to friends! As a newer sourdough-er, wondering if it would affect the dough if I used my stand mixer with dough hook to knead the dough when adding the choc chips, salt & raisins (or dried cherries)?
Emilie Raffa says
Thank you so much Katie! You are very welcome 🥰 You can absolutely use your stand mixer to knead the dough. The structure of the dough will only change slightly (not in a bad way), because you are using a machine to do so and not your hands. My recommendation is to use the stand mixer, take notes, and if you ever make the dough again by hand, compare the two versions and see what you like best.
Cecilia says
This is an absolutely FANTASTIC recipe!
I made 2 small loaves and cooked them together in a 9*12 Corning ware casserole dish with a glass lid. They baked up, barley touching each other and were absolutely PERFECT!
I am giving these as Christmas gifts to friends and neighbors…..the first time I only used chocolate chips, the next round I am going to add white chocolate as well!
Definitely give this recipe a try! You won’t be sorry!
Robin says
A newbie sourdough baker here. It came out fantastic, OMG! Your directions were spot on along with comments from others. I bulk proofed for 8 hours and then did an overnight in the refrigerator. Baked according to the directions with an extra 5 minutes to reach a temperature of 200*.
Thank you for this recipe! Now I need to purchase your book.
Dona Pyle says
Have you ever considered using chocolate milk in place of the water in this recipe
Natalie says
I have made this recipe 3 times so far and it has been an absolute hit every time. I substituted the raisins for dried cranberries and left out the walnuts. Friends are now requesting I bring a loaf whenever I come over for dinner.
Emilie Raffa says
Yum! Love the combination of cranberries and chocolate. You are a star!
tj says
luv it
Great bread and a light dessert
Cheryl Dayton says
Love this recipe. Had been wanting to try a chocolate sourdough and this did “tick all the boxes”. Making a second one today. I did use hot strong coffee in lieu of water and bloomed the cocoa in it and waited for it to cool to use in recipe.
Karen says
I bought your book several years ago. I had tried to get a starter going several times previously with no success. Your book was a game changer for me. I recommend it to everyone who asks how I make such wonderful SD bread. I also love ❤️ and steer folks to your blog. Thank you!
Emilie Raffa says
This is so great to hear. Thank you Karen! xx ❤️
MICHELLE ONEIL says
This recipe seems really easy and doable in one afternoon. Especially if you have a proofing box. Why do you not need to put it in the fridge overnight?
ANN MIERS says
Hi there, I have baked through your book and everything‘s been awesome. I’m just curious how to make my higher hydration have more holes in the crumb? Is that more folding?
Also, I throw everything in the refrigerator for a second rise. Could that be an issue? Including the peanut butter chocolate bread…….
Thanks so much!
Ann
Jenna Barnhill says
A new favorite! The flavor is incredible and not to sweet. I left out the raisins just because I don’t like them and I did not substitute with anything else. A slice of this would pair perfectly with a cup of coffee!
Personally, I feel like the dough took a little longer to bulk ferment with the inclusions. It took mine about 8 hours at 78-80 degrees (F) ambient temperature. The dough was around 79-80 degrees (F) every time I checked.
I split the dough in half after bulk ferment. I shaped, rested, and then baked one loaf while the other one was shaped and then put in the fridge to bake later.
I did NOT preheat my Dutch oven while preheating my oven and I put a baking sheet on the rack directly below the one I was baking on, I feel like doing these things helped the bottom not to burn or get too hard.
For the smaller loaves, I baked at 400F with the lid on for 20 minutes, then with the lid off for 30 minutes. I did not leave the oven cracked during the last 10 minutes as I did not want a super crisp crust. These baking times put my loaf right at 205 degrees (F).
10/10!
Kristen Boivin says
Amazing! Left out the raisins though.
Jin says
This recipe is incredible! I followed the ingredient list to the gram except for swapping out 100g of the water with brewed coffee. The dough was much drier than regular sourdough and harder to do the stretch and folds but not impossible. I found that the recipe made one huge boule so I divided the dough into two after bulk fermentation. I baked one boule right away and set another in the fridge for an overnight proof.
I don’t have a dutch oven so I baked my loaf in a 400F oven for the first 20 min with the loaf sprayed with water + a tray of boiling water below the baking sheet. Then I draped the loaf with some tin foil to stop it from burning, took the tray of water out and continued to bake for another 25 min. Perfection! The flavour and texture combination was just scrumptious. I’m looking forward to seeing how the cold proofed loaf turns out. Thank you for the recipe!
Anonymous says
Melissa M says
Question about this, what if you replace some of the water with cooled strong coffee or espresso? Would that change the texture too much? It would oomph the chocolate flavor up a whole bunch!
Emilie Raffa says
Yes! I’ve done this before with leftover morning coffee. It definitely boosts the chocolate flavor, but not too much. Try it!
Amy says
This turned out exactly like I wanted it to! Yum. I wanted to replicate a chocolate cherry bread we used to get at a bakery that no longer exists. This was perfect. I substituted dried cherries for both the raisins and the walnuts and it turned out exactly like I wanted it to. Thanks!
Nancy says
I have been looking at this recipe for some time. I was a bit nervous about trying it. I finally baked it this morning. WOW! Amazing flavor. I never tasted a chocolate bread before. It is so difficult not eating the entire loaf! I now understand comments from others that it is difficult not eating the entire loaf!
I made half a recipe. I omitted walnuts and changed raisins for dried cherries soaked in brandy and a touch of vanilla extract.
I am baking my sourdough bread in a Lodge combo cooker. That exposes the entire loaf when the top is removed. I baked my loaf until the internal temperature was 205 degrees. The exterior is crusty and the interior perfect. I did not crack open the door for the last few minutes of the bake.
Thank you for amazing recipes that come out wonderful. Each time I unwrap or uncover a loaf, as dough or finished bread, it is like opening a present. I am pleasantly surprised each time. I bring my Mom an Artesian loaf when I visit. She loves it.
Your recipes have made me a much better baker. Thank you!
I haven’t tried any from your book yet. I am going to select one for my next loaf!
𝙰𝚗𝚐𝚎𝚕 𝙺𝚘𝚕𝚋 says
I’m trying this tomorrow! I am adding blueberries to mine, with some chocolate chips❤️
Anne says
This is an incredible recipe! I added cinnamon, but no nuts, was absolutely perfect! Thank you for such an inspiring and delicious recipe! This is my new favorite!
Anne says
KatieBelle says
Yum! I have to admit I was a little skeptical of chocolate sourdough bread but I decided to try it anyway. I’m so glad I did! I’m not a fan of raisins and am allergic to walnuts so I omitted them. Also, I somehow messed up the measurement of water and when attempting to mix, it was so dry I ended up adding another 100g water. Pretty sure that was my own error, not an error in the recipe.
The bread turned out beautiful, soft/chewy with just the right amount of crust. My only complaint is that it burned a little on the top. I wonder if it would work to cover it lightly with foil the last 15-20 minutes to prevent the top crust from burning?
Anna mcgarvey says
I baked this this morning! Wow ,great recipe! I added a packet of instant espresso !
I’m terrible with timing and ended up kneading instead of stretch and folds, folded in chocolate chips after kneading and bulk ferment over night, this was my 8th sourdough boule!
Happy baking everyone!!!
Thanks for fab recipe!!
Gabrielle says
How would this turn out if I added more water? I don’t use the nuts and raisins, and it tastes great, but the dough is quite dense/dry. Thank you for any insight.
Casey says
Delicious! Beautiful on its own. I enjoyed a slice toasted with cottage cheese, cherries, and maple syrup!
Emilie Raffa says
Casey, this sounds so delicious. I love cottage cheese and never would’ve thought to include it here on toast. Yum. Thank you!
Amanda says
I made the recipe, but I found it online. I went to double check my artisan sourdough made simple book and I didn’t see it in there.
Emilie Raffa says
Hi there! This specific recipe is not in my book (however, there is a variation with peanut butter chips and an almond crust). Hope this helps!
Giovanna says
I made this and it was excellent. I followed the recipe exactly and it came out great. I wouldn’t make any alterations to the recipe. The vanilla soaked raisins were such a nice touch and just the right amount of sweetness. Even my family members that aren’t big chocolate fans loved it.