Learn how to feed, maintain, and care for a successful sourdough starter in 3 easy steps! Tips shared for choosing the best flour, the right jar, and how to keep it alive (without the stress).
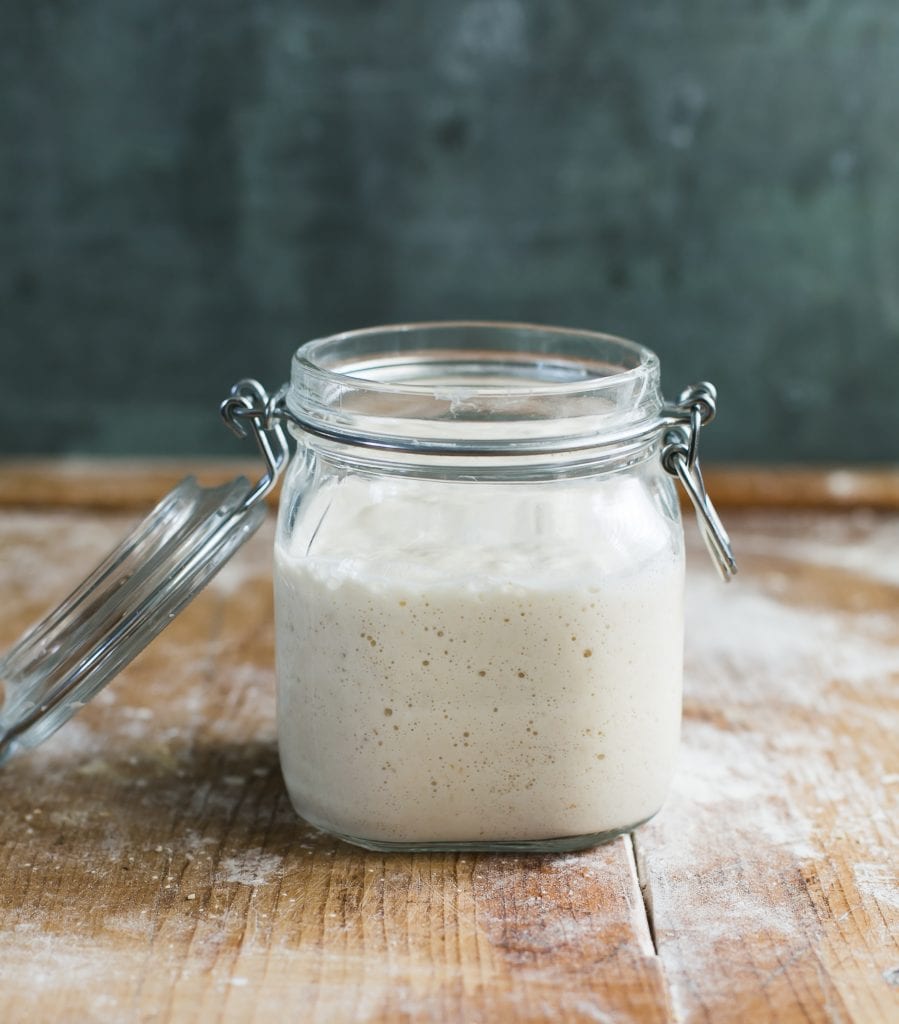
Without fail, the most intimidating aspect of sourdough bread recipes is understanding how to feed and maintain your sourdough starter. If your starter is not strong, you can’t make sourdough bread, sourdough focaccia or anything else with a lofty-high rise. I discuss this in detail in my bestselling book Artisan Sourdough Made Simple. However, I’ve written a quick guide below so you can tackle this now.
First, let’s qualify the following: this post assumes you already have an established starter, either made from scratch, purchased or gifted to you. And now, you need trusted instructions on how to feed and care for it for optimal use. Sound like you? Read on.
In this post, you’ll find sourdough starter feeding instructions (at a glance) and (in depth) depending on how much instruction you need. I’ve also included tips on how to store & maintain your sourdough starter with helpful FAQs at the end. There’s a lot to cover, each section is connected to the next, so let’s begin with the basics: a simple definition and why ongoing care is important.
What Is Sourdough Starter?
Simply put: a sourdough starter is a live fermented culture of flour and water. Once it’s fed with additional flour and water (and left in a warm spot to rise, ideally 75+ F), it becomes bubbly and active. A small portion of this active starter is used to make bread dough rise. Instant yeast is not required.
Why Feeding Matters
Most bakers, especially beginners, don’t realize that you can’t just create a sourdough starter and walk away. It’s alive now. You need to take care of it. Expect to feed your starter every time prior to making bread dough AND while not in use to keep it alive and strong. Just like watering a plant or feeding a pet, feeding your sourdough starter is an ongoing relationship. What you put into the process is what you’re going to get out. Do the work. Make it count. Below is your list to get started.
Feeding Sourdough Starter (You Will Need):
- Sourdough Starter
- Jar with lid (I use this one)
- Kitchen Scale
- Bread flour or all purpose flour
- Water, filtered or quality tap water (that doesn’t taste like chlorine).
Need a sourdough starter? Try my Beginner Sourdough Starter Recipe with step-by-step instructions.
What Is The Sourdough Starter Feeding Ratio?
Before we jump into the mechanical step-by-step process, it’s helpful to know a simple tip upfront: most bakers feed their sourdough starter by ratio. Not specific amounts. Why? Because all bakers work with different quantities of starter to begin with. I might have 250 g of starter; you might have only 50 g of starter. Feeding by ratio streamlines the process for everyone, allowing you to scale up or down to suit your preference.
Let’s dive a little bit deeper…
There are different types of feeding ratios in sourdough. The most common feeding ratio is 1:1:1 (sourdough starter: flour: water) also known as a 100% hydration starter. That’s what you’re going to learn here. It’s an excellent starting point for most recipes including my famous sourdough bread recipe.
Now let’s understand how the 1:1:1 feeding ratio works. Let’s say you have 40 g of sourdough starter in a jar. To feed it, you would add 40 g of flour + 40 g of water. This is referred to feeding with equal parts by weight. You need a scale for this, not measuring cups, which go by volume. As another example, if you have 20 g starter in a jar, your would feed it with 20 g flour + 20 g water. Make sense? Remember, you can scale the ratio up or down depending of the quantity you have.
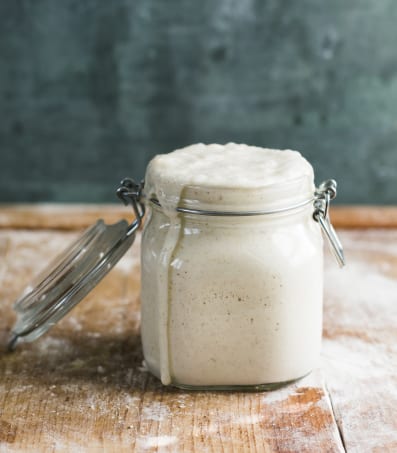
TIP: Texture is key. While following a feeding ratio is helpful, use it as a guide only. It doesn’t have to be exact. This is because your starter will look different on different days, due to the following variables: type/brand of flour used, temperature, flour absorption rate etc. So, if you’ve followed the feeding ratio and your starter is too thick, add more water to thin it out. If it’s too thin, add more flour. The texture is always adjustable. It should look like thick pancake batter.
Ok, so let’s quickly re-cap: we’ve defined sourdough starter, why feeding matters, gave you a supply list and touched on feeding ratios. Up next: how to feed your sourdough starter at a glance and in depth. This is what you came here for.
How To Feed Your Sourdough Starter (At A Glance)
- Remove and discard half of your sourdough starter.
- Feed what’s left in the jar with equal parts flour and water by weight (1:1:1 feeding ratio).
- Let rise at room temperature (loosely covered or airtight) ideally 75+ F, until bubbly, active and double in size (2-12 hrs).
*NOTE: Before you begin, establish a regular feeding time. Morning or evening; the time itself doesn’t matter. What does matter is consistency. Feeding your starter at roughly the same time each day will train it to rise and fall predictably. This way, you’ll know when it’s ready to use. For example, if you want to make dough at 7 PM (and your starter takes about 5 hrs to rise), feed it at 2 PM.
Feeding Sourdough Starter (In-Depth)
- Step #1: Remove and Discard. Before every feeding, the first step is to discard a portion of your sourdough starter to refresh the acidity levels, to keep it balanced, and to control it’s overall growth in size. This step is important. To do so, pour off or scoop out the discard with a spoon. Where does the discard go? Well, if it’s extremely smelly or discolored, it goes in the trash. If it’s in good condition, save it to make a sourdough discard recipe. Example: You have about 120 g of sourdough starter in a jar. The first step is to remove half, about 60 g. The sourdough discard is in good condition so you save it in a separate bowl to make my fluffy sourdough pancakes. Please don’t feel pressured to use the discard right away; the focus of this post is to teach you how to feed your starter, not 20+ Sourdough Discard Recipes. My intent is a simple introduction to possibility.
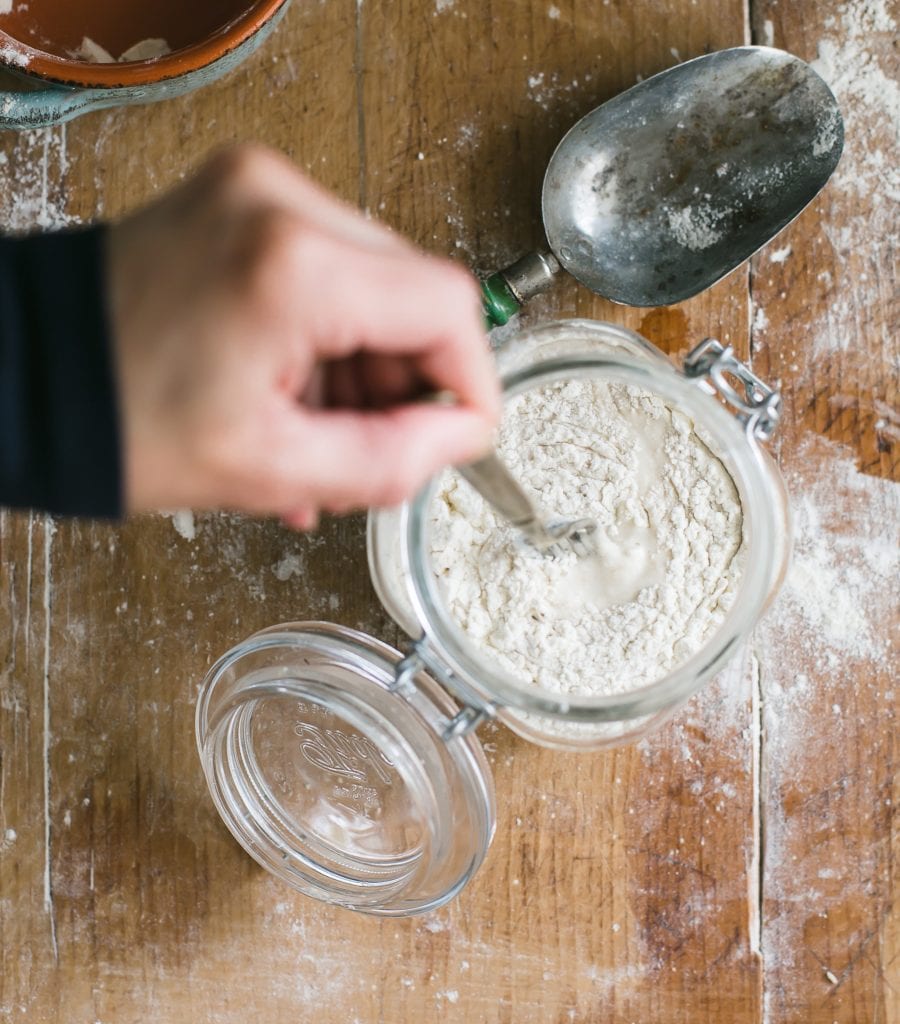
- Step #2: Feed The Starter. Back to the jar. The next step is to feed what’s left in the jar with equal parts flour & water by weight following the 1:1:1 feeding ratio (sourdough starter: flour: water). Continuing with our example: You have 120 g of starter and removed half, about 60 g. You now have 60 g of sourdough starter left in the jar. Feed what’s left in the jar with 60 g flour + 60 g of water. Mix well with a fork, scraping down the sides until the texture turns into a thick, lump-free batter. Place the lid on top, loosely covered or airtight.
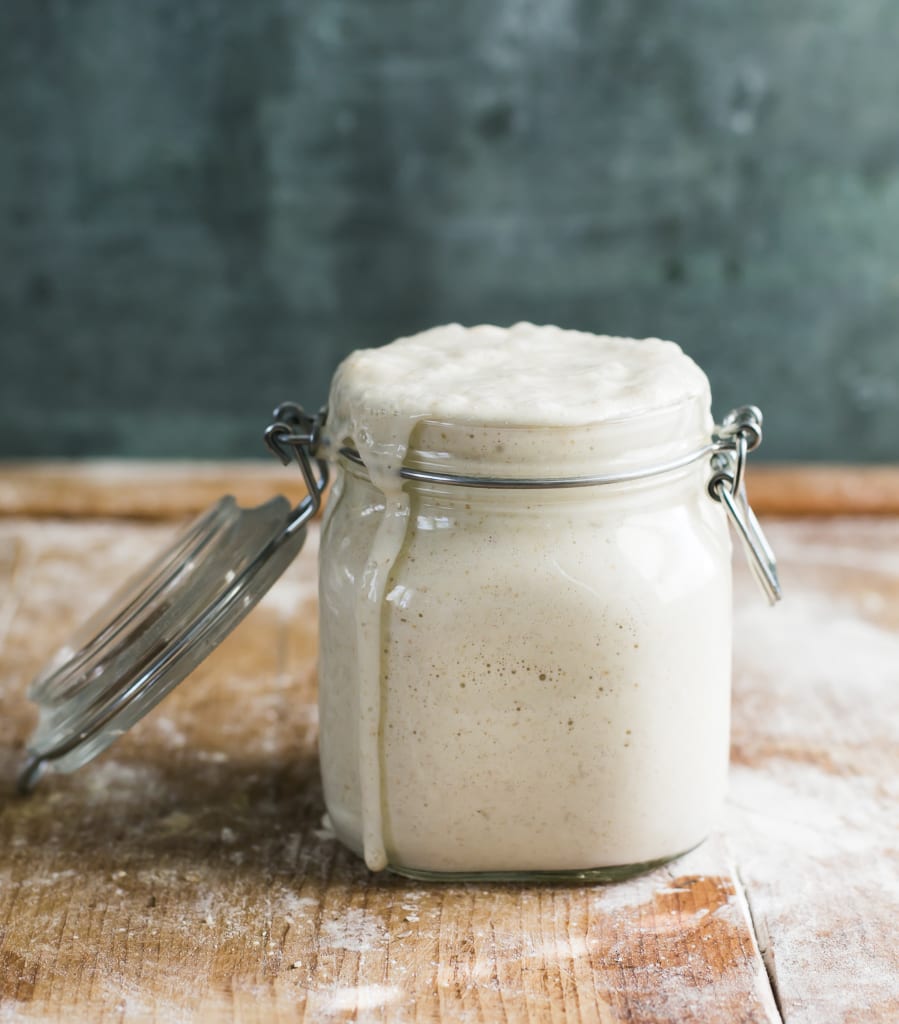
- Step #3: Wait For The Starter To Rise & Activate. The final step is to place your starter in a warm spot to activate, ideally 75-80 F. Temperature is really important. The warmer it is, the faster it will rise. Your starter is active when it shows the following signs: it doubles in size, small and large bubbles appear on the surface and throughout the culture, the texture is spongey or fluffy and it exhibits a pleasant aroma. This can take anywhere from 2-12hrs.
TIP: What goes up must come down. An active sourdough starter, one that has doubled in size, will eventually fall back down. This is normal. There’s nothing wrong with your starter when it falls; it’s just losing its strength as it goes down. It will only stay fully risen for 1-2 hours (this varies). Use it to make bread dough at peak height.
How To Store Sourdough Starter
Now that you’ve learned how to feed your sourdough starter, you’ll need to maintain it with regular feedings even when not in use for making bread dough- otherwise your bread won’t rise. Your feeding maintenance routine is directly related to where it’s stored and how often you plan to bake.
- Room Temperature: if you bake a few times a week, keep your starter at room temperature. You’ll need to feed it (1x) per day, even when not in use. Storing at room temperature, especially if it’s warm, will make it ready to use faster.
- In the Fridge: if you bake only once a week or once a month, store your starter in the fridge. Feed it (1x) per week to maintain it’s strength. You do not need to bring it to room temperature first before feeding it; just remove it from the fridge, feed it and put it back. When ready to use, feed the cold starter at room temperature until it perks back up. Use warm water. Find a warm spot. Remember, the warmer it is, the faster it will rise.
Feeding Sourdough Starter FAQs
Most of the questions below have been answered throughout the blog post. However, some questions are new. It’s important to read through the material several times for the information to sink in.
Q: Why do we remove and discard sourdough starter?
This is the #1 question asked about the feeding process. While it might feel wasteful, it’s done to refresh the acidity levels and to control the starter’s growth in size. I recommend removing half as a guideline, but the exact quantity is not set in stone. Some days you’ll remove more or less, depending on what the starter looks like. If you do not discard (and yes, some bakers choose to do this), your starter would grow exponentially making it difficult to maintain. But remember! You don’t have to throw the discard away.
Q: What should I do with sourdough discard?
Make sourdough discard recipes. Additionally, you can save discard in the fridge, freeze it, share it, or create a new starter.
- Best Sourdough Pancakes
- Crispy Sourdough Waffles
- Overnight Sourdough Apple Cake
- Moist Sourdough Blueberry Muffins
- Ultimate Sourdough Banana Bread
- Secret Ingredient Sourdough Cornbread
Q: What if I don’t have a scale? Can I use measuring cups to feed my starter?
Yes, absolutely. However, “equal parts by weight” does not translate into measuring cups. Why? Because 1/4 cup flour does not weigh the same as 1/4 water. You can certainly use “equal measurements” if you’d like, but you will most likely need to adjust the texture slightly. Add more/less flour and water to achieve a thick, batter-like consistency.
Q: Do I need to feed and activate my starter every time before using it?
Yes. You cannot bake with inactive starter. To activate your starter, feed it with fresh flour and water, and then wait for it to bubble and double in size. Feeding a starter is not a once off activation process (like a new cell phone).
Q: What if I forget to feed my starter?
Totally normal. We all forget at some point. It’s not dead (and you didn’t ruin it). Please keep feeding it until it becomes bubbly and active. For best results, find a warm spot and use warm water for a boost. Starters are more resilient than you’d think- they just need time and patience.
Q: What’s the best flour for feeding sourdough starter?
Starters like routine. In my experience, it’s best to feed your main jar of starter with the same flour it’s made of.
For white flour starters, use unbleached all purpose flour or bread flour. These flours are inexpensive, easy to find, and reliable for starter growth. For whole wheat starters, use whole wheat flour. For rye starters, use rye flour etc.
For variety, some bakers prefer to use a 50/50 blend of whole wheat and white flour for an enzyme boost (starters love enzymes). This is fine too. See what works best for your taste, your budget and your convenience level.
Just do me one favor: when choosing flour, always consider how the starter will be used.
For example, a 100 % whole wheat starter might not work for Soft Sourdough Cinnamon Rolls because the unsifted bran will make the dough more hearty, rather than light and airy. On the flip side, it might be more desirable for Light Whole Wheat Sourdough to really amplify the nutty, wholegrain taste.
Q: What’s the best jar or container for sourdough starter? Does it need to be airtight?
Currently, I use a 3/4 L glass jar with a latch top. I love it. I prefer glass over plastic, it’s easy to clean and it doesn’t absorb any weird smells or chemicals.
Oftentimes, I switch things up and use jam jars, glasses and/or whatever else is clean! My friend Jim recently sent me this sourdough starter jar to try- it’s really cool. Whatever you choose, make sure the jar is large enough to accommodate the starter’s growth when it doubles in size- this is key.
Regarding the lid: it can be airtight or loosely covered. It depends on the baker. For example, when I want my starter to bubble up fast, I keep it airtight. But if the jar is not large enough for the starter to grow, it might burst through the lid. Always keep an eye on it. Alternatively, rest the lid on top of the jar without securing it. This way, the jar is technically still covered but it won’t break as the starter rises.
Q: How long will it take for my starter to rise?
The activation process is not instant. Plan on 2-12 hrs. depending on temperature and the strength of your starter. The warmer it is, the faster it will rise.
Q: Can you recommend a warm spot for my starter to rise?
Potential warm spots include a proofing box, a microwave with the light on, or inside the oven (turned off) with the light on for 1-2 hours but not overnight- the environment will become too warm. You can also try a warm water bath, with frequent water changes to maintain temperature.
Q: What is hooch?
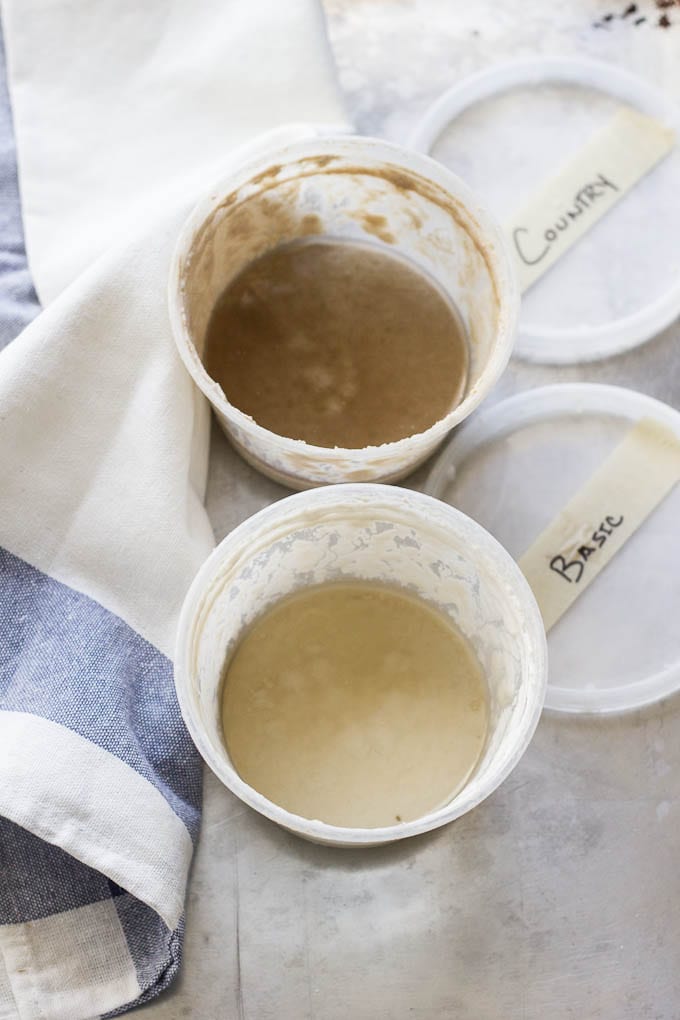
At some point, you’ll experience a dark, grayish liquid on the surface of your sourdough starter. Don’t stress. Hooch is just a sign that your starter needs to be fed. Simply pour it off, removing any discolored starter underneath and give it a fresh feeding. The image below features two different starters I keep in the fridge: Country Starter (fed with 50/50 white flour + whole wheat) and my Basic Starter (all white flour) both with a layer of hooch on the surface.
By signing up, you agree to receive emails from The Clever Carrot. Unsubscribe at any time.
Feeding Sourdough Starter: My Best Tips & Tricks
- Prep Time: 5 hours
- Total Time: 5 hours
- Yield: 1 cup 1x
- Category: Sourdough Starters
- Method: No-Cook
- Cuisine: American
- Diet: Vegetarian
Description
Learn how to feed and maintain a successful sourdough starter in 3 easy steps! Tips shared for choosing the best flour, the right jar, and how to keep it alive (without the stress).
Ingredients
- Sourdough Starter
- Jar with lid (I use this one)
- Digital Kitchen Scale
- Bread flour or all purpose
- Water, filtered or regular quality tap water
Instructions
*Note: Before you begin, establish a regular feeding time. Morning or evening; the time itself doesn’t matter. What does matter is consistency. Feeding your starter at roughly the same time each day will train it to rise and fall predictably. This way, you’ll know when it’s ready to use. For example, if you want to make dough at 7 PM (and your starter takes about 5 hrs to rise), feed it at 2 PM.
- Remove and discard half of your sourdough starter from the jar.
- Feed what’s left in the jar with equal parts flour and water by weight (1:1:1 feeding ratio). You need a digital kitchen scale for this. Because we all work with different quantities of starters, this 1:1:1 feeding ratio is best understood by example. So, if you have 60 g of starter in the jar, feed it with 60 g flour + 60 g water. If you have 30 g of starter, feed it with 30 g of flour and 30 g of water. Mix well with a fork, scraping down the sides as needed. Cover the jar with a lid. The lid can be airtight or loosely placed on top- your choice. Note: if the jar is airtight, the pressure will build up fast. Keep an eye on the jar so it doesn’t burst.
- Let your starter rise at room temperature, ideally 75+ F (the warmer it is, the faster it will rise), until bubbly, active and double in size (2-12 hrs). When your starter is at peak height, it’s ready to use. Eventually it will fall back down, and become inactive again. Then, you’ll need to repeat the feeding process.

Comments
Anne says
I finally made a beautiful looking and tasty sourdough loaf and am so very happy I persisted. Thankyou again Emilie for all your tips. For anyone out there looking for a recipe for beginners, please go no further than Emilie’s recipe for beginners. I have been so overwhelmed by all the tips etc on the internet that I was totally upsetting the sourdough process. Following Emilies recipe step by step, and it worked.
Regards
Anne
Tami says
Hi Emilie-
I started your starter for beginners. I am on day 7. It smells like nail polish remover, it has not rise any and it has bubbles only on top surface. What do I need to do to be on track? I followed your cheat sheet but this morning it smell like nail polish remover and it is runny. Please tell me how to discard and feed. I am going on the 7th day according to your cheat sheet. If I am following correctly, I’ll be feedback it at 8pm tonight, but it smells like nail polish. Is my starter ruined?
Please help,
Tami
Sharon Meade says
This post was very helpful and answered all the questions I have. Thank you. I will continue to refer to this post for reminders in case I forget something
I do have one question. I was given a starter using dark rye flour. Do I need to use rye flour to make the bread or can I use unbleached regular flour?
Filomena Alves Amado says
Thank you this was very helpful.
Kaila Forest says
Hi! New to this process and I’m so confused how we’re supposed to keep some in the fridge to keep growing/going, however we’re also supposed to use it and discard it and I can’t find anywhere that explains it and dumbs it down enough for me to understand. I don’t know what I’m doing wrong or right because it turns out differently every single time. This most recent time, the bread will not form. It just gooes out everywhere and is very sticky. I cooked it anyway and it ended up just barely over an inch -2 inches tall. I put everything bagel seasoning on top because it flattened the way it did, and it gave it good flavor. Still tastes good just not a sandwich loaf like I had intended. Love your blog and all the info it has!
Anne Lennox says
Thank you Emilie for your recipe. I have made it several times and although I haven’t had a great loaf yet, I can eat it and I will keep on trying. My daughter has mastered your recipe and passed it on to me,but I’m having trouble with the bulk rise as my kitchen is very cold. I have been a little overwhelmed with all the info on the internet, so have decided to focus on your recipe and see what happens. I have thought of giving up but I love the process. I think it is a little addictive
Regards
Anne Lennox
Cindy says
Help, I am on my second round of trying to get a starter going. Started this one on 4/12…the first three days everything was great, it grew like it was supposed to. Since then nothing. Can anything be done to save this one?
Julie says
Veey helpful instructions for beginners!! Sourdough made simple!
Darja says
I have a question, when I learned to do sourdough starter I was told to feed it 1:2:2 and only 1:1:1 the day of the baking whats the difference? Also I’ve been told it’s only ready to bake once it has dubbuled in size 4-6 hours, but you say it can take between 2-12 hours. How will I know my starter is strong enough to go in the fridge? I’ve been feeding it with first rye flour in the start, then day 4 I start to adding more white flour. Please help me understand what I’m doing wrong, I wanna have a strong sourdough starter.
Vic says
Let’s say I have a tub of “ mother starter” from a local bakery. I take out 15 grams to make an “active starter” that I will bake bread with when it’s ready.
It sounds like you are saying I should discard 1/2 of my mother starter, feed it, and the return it to the fridge if I only bake once or twice a month. So i have 1 cup / 8 ounces of mother starter in the fridge, use a scant 15 grams of it, but still discard 1/2 of the mother starter? Is ‘levain’another term for ‘active starter’?
I am a beginner.
David says
I was given an amish starter with milk instead of water. Do all the same rules apply to both?
Patti Price-Taylor says
I’m on day 5 of the starter. I don’t have a 5 1/2 quart dutch oven but have a 2 1/2 quart dutch oven. When I make the first bread recipe, can I cut the ingredient in half and use my smaller dutch oven?
Emilie Raffa says
Hi Patti! Yes, a 2 1/2 quart Dutch oven should work with half the recipe. Enjoy! 🥰
BeachMom65 says
AND 😣, I just saw where you DO stipulate when to feed… it’s AFTER discarding. I simply didn’t see it, but that didn’t stop me from looking for the answer anyway!
Loved your site!
I’ll be making my sourdough tomorrow☺️
Your steps look easy 🔆
BeachMom65 says
I have a question regarding feeding my starter, because whatever I’ve read, it doesn’t stipulate whether to first feed it, stir, and ~then~ discard, or to discard a portion first, ~then ~ feed? I would think the latter would yield a stronger flavor 🥰
Any advice would be greatly appreciated!
Eric says
Hello. I recently (4 days ago) started a fresh starter using your 100% rye flour on day 1 method. By day 3 it was already doubling and bubbling . On day 4 now and after a few hours at 24C it is growing rapidly and bubbling away.
I bake 1Kg flour once a week (on Tuesday) using 220 Gram of starter (up to now (Levain)
Can you suggest how I can best use this new starter most effectively
Thanks in advance – Eric
Katie says
Hi Emilie! Thank you so much for this concise and useful information. I’ve read well over a dozen sites on how to proceed with a starter untouched in the fridge for a week, to no avail. While your article didn’t specifically address this, your clear approach to explaining the process of managing starters provided insight on how to proceed. I’ll look at your site in more depth later, but had to comment and say thank you for this first step. Well done.
Emilie Raffa says
You’re very welcome, Katie! I appreciate you taking the time to leave such thoughtful feedback. Thank you. 🥰