Made with all purpose flour and just a touch of butter, learn how to make soft, tender sourdough sandwich bread with bubbly, active sourdough starter. Recipe adapted from my bestselling book:
Artisan Sourdough Made Simple.
Out of all the sourdough bread recipes I make on repeat (my beginner sourdough bread recipe,
sourdough focaccia and sourdough pancakes to name a few!), this easy sourdough sandwich bread gets the most requests. Why? It’s soft. It’s buttery. It makes the kitchen smell like magic.
And the best part: you made it yourself. No junk or preservatives. Just simple sourdough with a soft crust, subtle tang and fluffy crumb that holds up to slicing, toasting and sandwiches (anything really).
Below, you’ll find my step-by-step walkthrough and baking schedule. You’ll also get three solid
variations (cinnamon raisin, whole wheat and bread flour) plus more sandwich loaf recipes in my book for inspiration.

Good To Know:
- What most bakers get wrong: the second rise goes for too long. This creates over proofed dough that bakes up flat. Follow my recommended timing and tips to master this step.
- Pan size matters. Want a taller loaf? Use an 8.5×4 inch pan instead of the standard 9×5 inch pan. Both work, but the smaller size will give the dough a nice upward boost.
- Use softened butter. If it’s cold, it won’t blend into the dough.
- Make it vegan. Swap in your favorite plant-based butter. Just check the label. Some brands are very salty.
- Temperature controls time. Warm kitchen? The dough will rise fast. Cold kitchen? Give it more time. Watch the dough and not the clock.
How To Make Sourdough Sandwich Bread {Step-By-Step Recipe}
Step 1: Mix the Dough
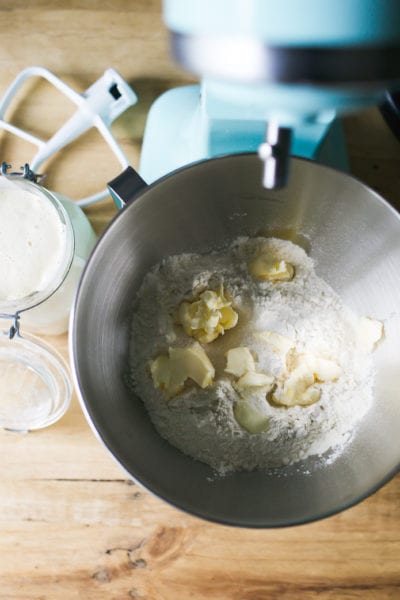
To Start: Add the flour, softened butter, sugar and salt to a bowl. I like using a stand mixer for this recipe. The dough is naturally a bit sticky; the machine makes it easier to handle. Mix with the paddle attachment until the butter looks like crumbs.
Mix in your bubbly, active sourdough starter and water until everything comes together. Cover and rest for 30 minutes to relax the dough before kneading.
Note: If you need assistance with your sourdough starter, read my companion articles Feeding Sourdough Starter: My Best Tips & Tricks and Troubleshooting Sourdough Starter.
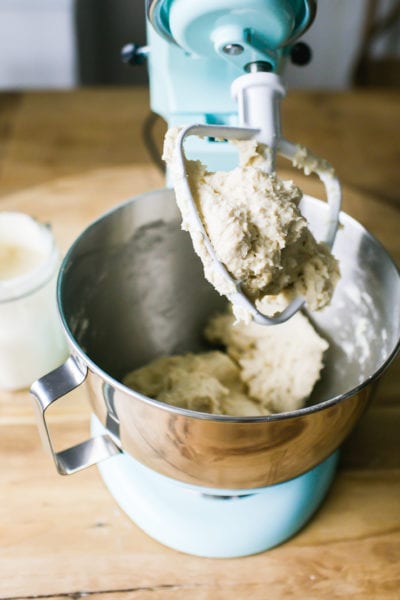
After 30 minutes of resting…
Remove the paddle attachment and switch to the dough hook. Knead until soft and supple, about 6-8 minutes. Note: on this particular day, my dough was stickier than usual so I added a sprinkle of flour to even it out. You can do that too.
No Stand Mixer? Knead the dough by hand on a lightly floured surface until it feels smooth, soft and elastic, about 8-10 minutes. Don’t worry about under/over kneading. If it’s springy (not sticky) you’re good to go.
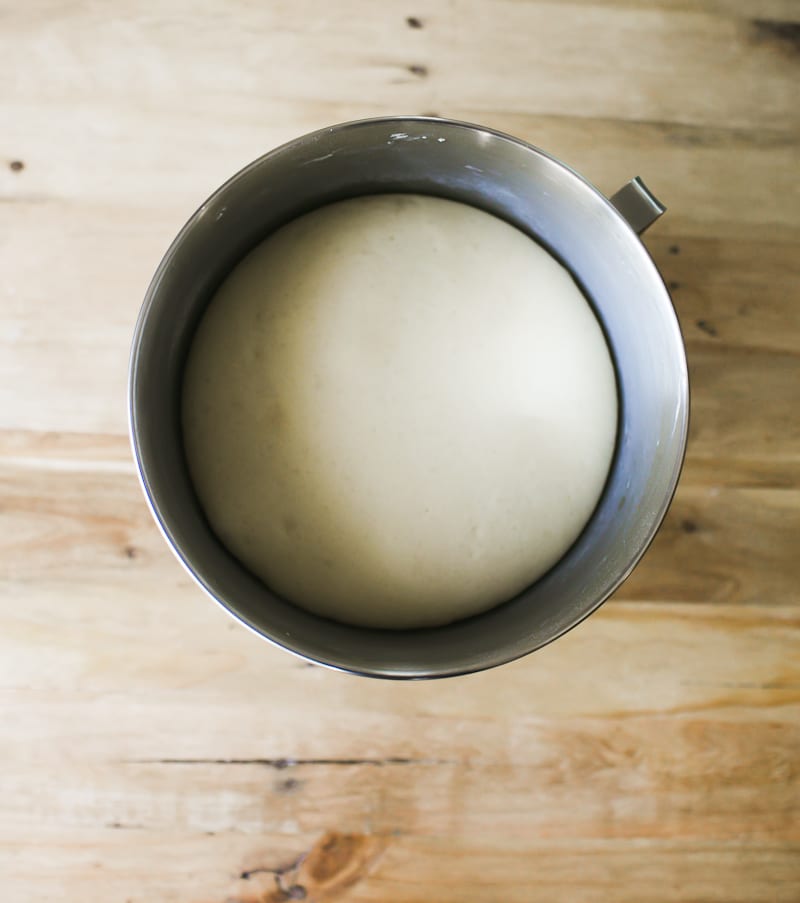
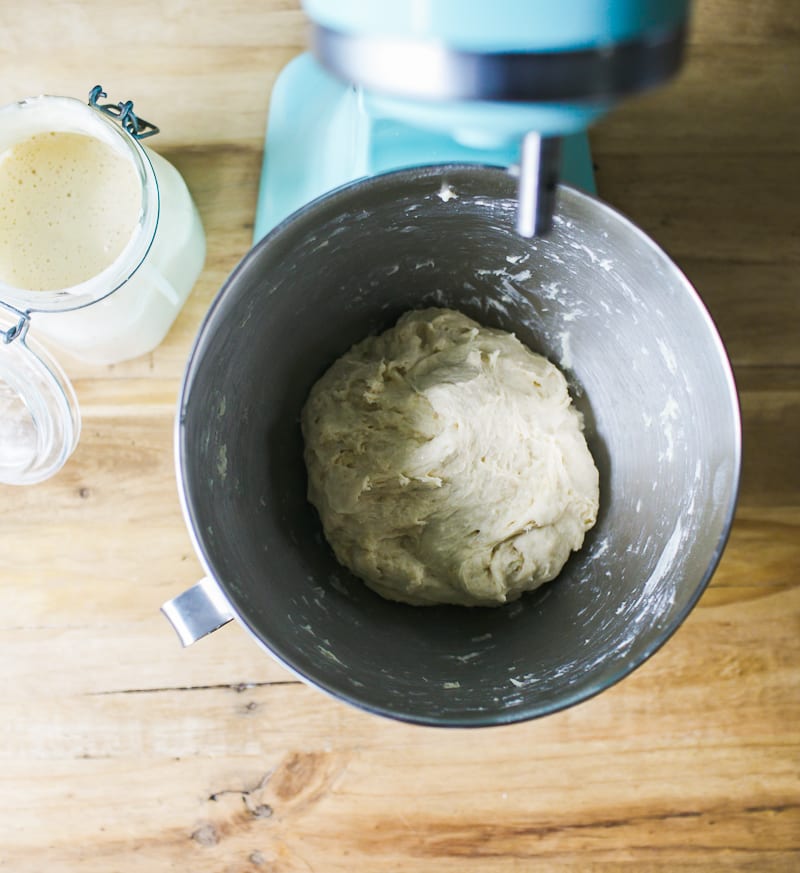
Step 2: Bulk Rise (Overnight)
Cover the bowl with plastic wrap and let the dough rise overnight at room temperature (68 F), about 10-12 hrs. The dough is ready when it’s puffy, airy and has doubled in size.
Tip: This is an overnight sandwich dough. However, you can do a same-day bake instead (see my Sample Baking Schedule).

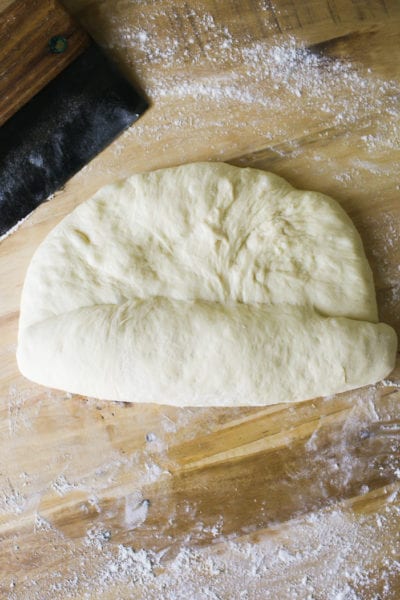
Step 3: Shape the Dough
Remove the dough onto a lightly floured surface. Gently flatten to release the air bubbles (you don’t want big holes like ciabatta!).
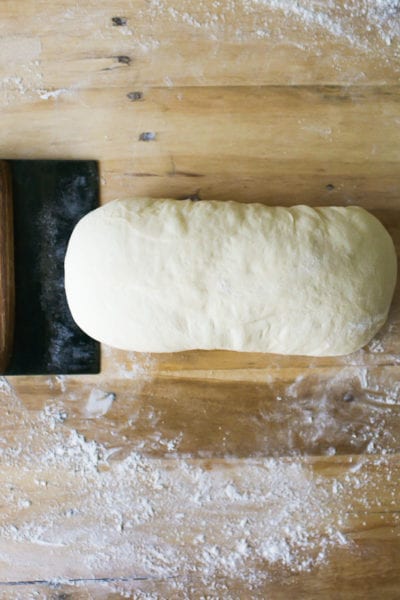
Roll the dough into a log, tucking the ends underneath. Then, with floured hands pull the dough towards you creating surface tension to tighten its shape. Place the dough into a buttered loaf pan, but make sure it’s seam side down.
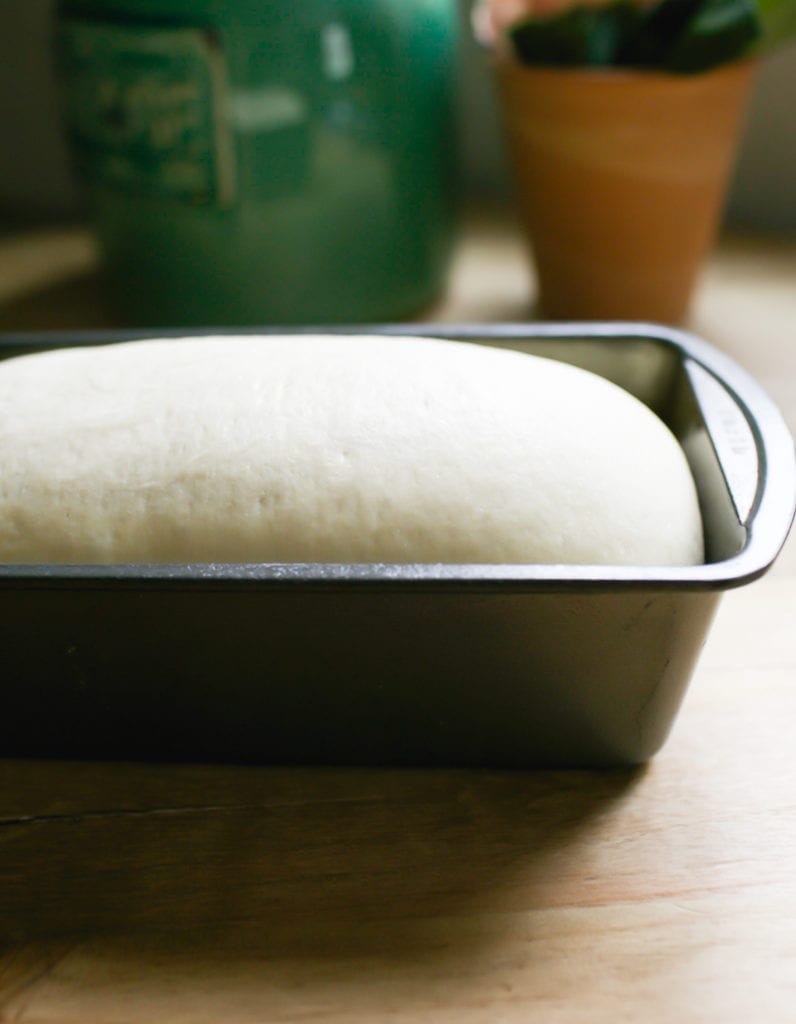
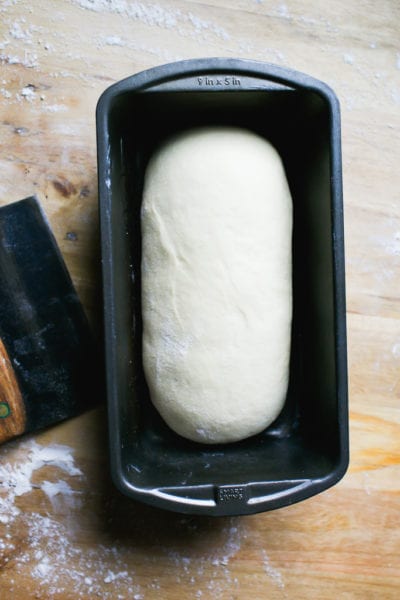
Step 4: Second Rise
This step is crucial. When done correctly, your loaf will build back additional strength needed for good oven spring. Cover the pan with lightly oiled plastic wrap so the dough doesn’t stick to the top. Let rise until the center domes about 1 inch above the rim of the pan. You’e not going for double in size or sky scraper height; just notably puffy and less dense.
Tip: Cold Kitchen? Your second rise might take longer than expected @ 68 F. Be patient with this step. Plan on 1 1/2 -2+ hours depending on your specific room temperature and starter strength. If you’re short on time, use a proofing box or my DIY warm oven trick to speed things up (see “Helpful Tips” in the recipe card below).

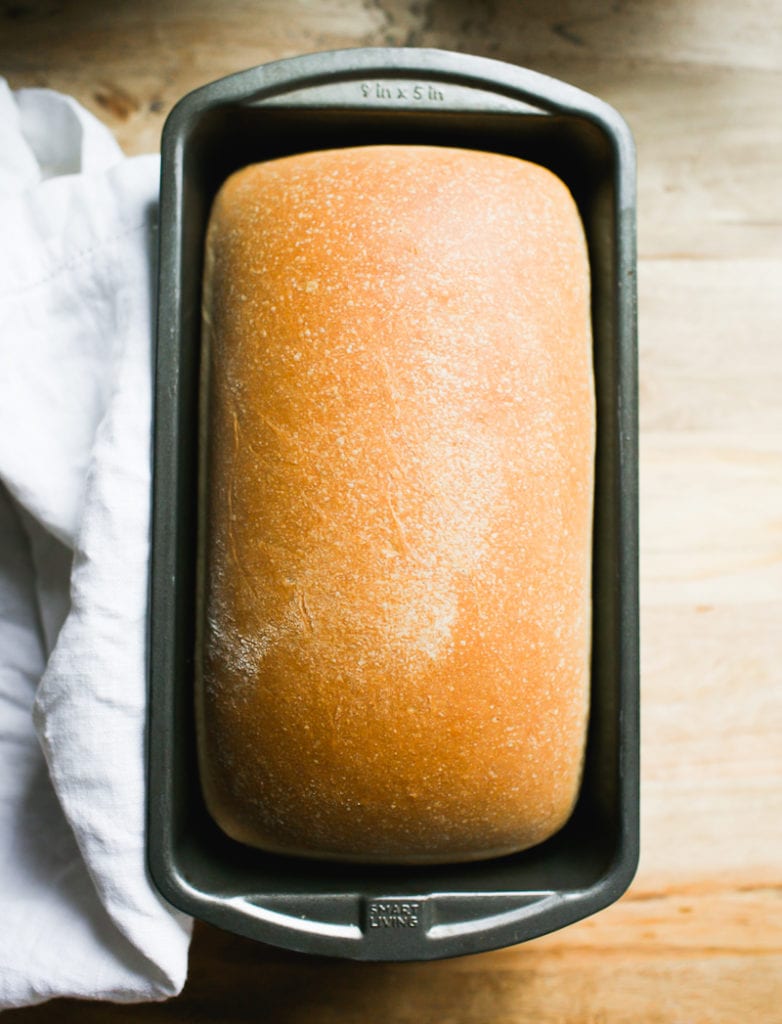
Step 5: Bake The Bread
Preheat your oven to 375 F. For better oven spring, preheat to 500 F instead, then lower the temperature to 375 F when the dough goes into the oven. Bake on the center rack for 45-50 minutes or until golden brown.
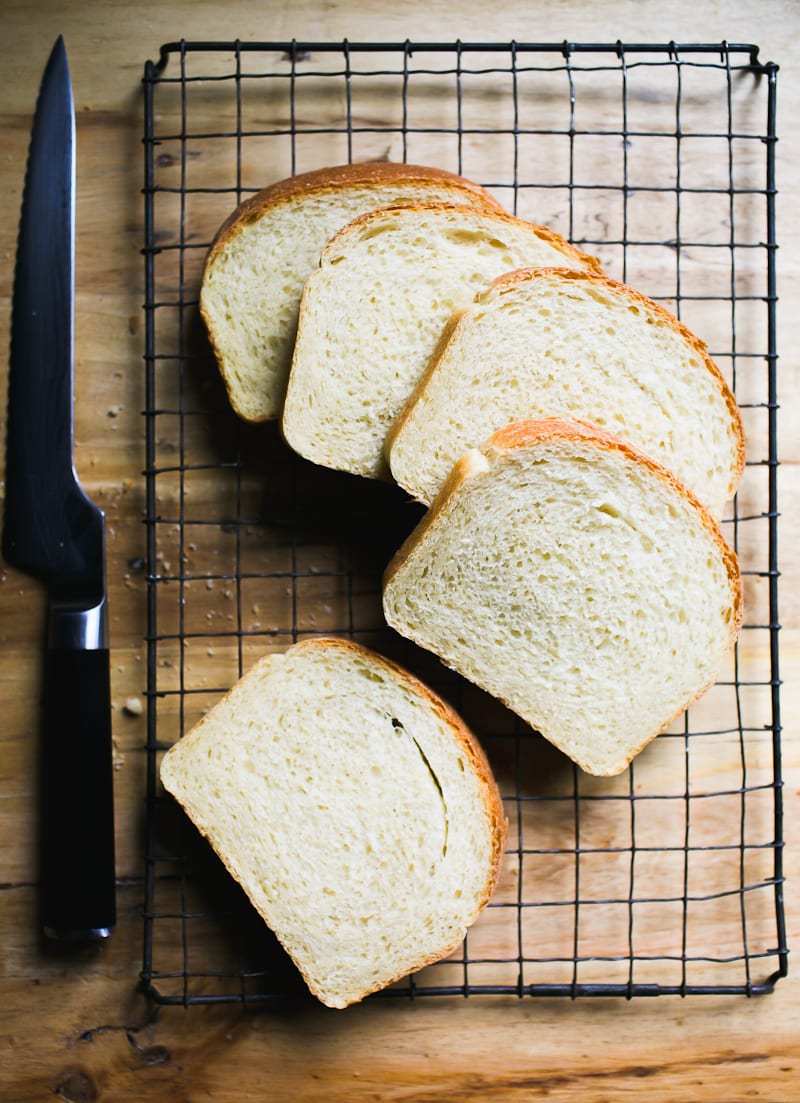
Cool in the pan, then transfer to a wire rack. Wait an hour before slicing (skipping this step can turn the inside gummy).
Tip: Have an extra loaf pan? Some bakers create a makeshift “lid” by placing a separate, upside loaf pan on top of their pan before baking. This traps steam inside, creating a humid environment for the dough to rise avoiding potential blow-outs or tears, and keeps the crust soft. It’s similar to using a Dutch oven for my sourdough bread recipe.
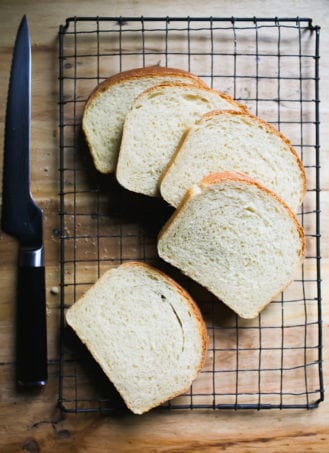
Slice & Store
You’ll need a good serrated knife (I use this one). For a moderately priced option, try this knife instead. If your bread slices are really uneven, consider this collapsable bread slicer with 3 different thicknesses: thin, medium and thick to guide you along.
What I do at home: If you have a large family, or just eat a lot of bread, I highly suggest doubling this recipe. Bake (2) loaves side by side and freeze whatever you don’t eat. This loaf can be frozen whole, covered tightly in plastic wrap or as individual slices.
Sourdough Sandwich Bread Variations
- Whole Wheat: Replace 20% of all purpose flour with whole wheat or white whole wheat flour. If the dough seems dry (whole grain flours absorb more liquid), add more water as needed to achieve a workable consistency. Do this 1 teaspoon at a time.
- Bread Flour: Do an even swap, adding more liquid if the dough is dry. For example, King Arthur Bread flour is very thirsty so more liquid might be needed. If using Gold Medal bread flour which is not as absorbent, additional adjustments might not be necessary.
- Sourdough Cinnamon Raisin Bread: You’ll find my step-by-step post here. The vanilla-soaked raisins make it a community favorite!
What To Bake Next
In addition to the above variations, a natural next step for sandwiches and breakfast fare would be my easy, NY-style sourdough bagels (they are so incredibly chewy and addictive) and these super soft sourdough english muffins. I’m excited to see what you make next.
Sample Overnight Baking Schedule (68 F)
Feel free to adjust the start times below as needed. It’s flexible. For a same-day bake, start early in the morning and bulk rise at a warmer temperature.
Day 1 (Evening)
- 4:30 PM: Feed sourdough starter (to activate)
- 8:00 PM: Mix dough
- 8:30 PM: Rat 30 minutes, then knead.
- 9:00 PM: Cover and bulk ferment, room temp @ 68 F overnight (10-12 hrs).
Day 2 (Morning)
- 7:00-8:00 AM: Check the dough (should be doubled)
- 8:15 AM: Shape dough
- 8:30 AM: Second rise (1 1/2 – 2+ hours)
- 10:30 AM: Preheat oven
- 10:45 AM: Bake
- 11:30 AM: Cool
By signing up, you agree to receive emails from The Clever Carrot. Unsubscribe at any time.
Easy Sourdough Sandwich Bread
- Prep Time: 12 hours
- Cook Time: 50 minutes
- Total Time: 12 hours 50 minutes
- Yield: 1 loaf 1x
- Category: Sourdough Bread
- Method: Oven-Baked
- Cuisine: American
- Diet: Vegetarian
Description
A simple and easy recipe for homemade sourdough sandwich bread. Made with all purpose flour and just a touch of butter. I like to make the dough at night so we can have fresh bread in the morning. This loaf freezes well (whole or sliced). I recommend this loaf pan.
Helpful Tips:
- For best results, weigh your ingredients with a scale instead of using measuring cups. Weight and volume measurements are not equal, only approximate! For example: If your starter is very bubbly, 1/4 cup might only weigh 30 g which is too little for this recipe (you need 50 g). The dough will take forever to rise. Same goes for the flour: 4 cups might weigh over 500 g depending on how tight the flour was packed into the cup. More flour = dry dough.
- This recipe works with Whole Foods 365 Everyday, King Arthur and Trader Joe’s all purpose flour. If using another brand with a lower protein content (i.e. Gold Medal, Pillsbury, Heckers) consider reducing the total water amount by 15 g.
- For a variation of this recipe with more sourdough starter, please choose one of the following adjustments below, keeping the rest of the ingredient quantities the same:
- 100 g starter + 255 g water
- 150 g starter + 250 g water
Additionally, because temperature controls time: you can also increase your surrounding temperature for the bulk or second rise, as needed. Place the dough in a proofing box set to 75-80 F. Or, preheat your home oven to 75-80 F and then shut it off immediately (use an oven thermometer to make sure it’s set to exactly 80 F and not higher!). Place the covered dough inside until it bulks up. Do no use this option overnight- it will be too warm.
Ingredients
- 500 g (4 cups) all purpose flour
- 60 g (4 tbsp.) unsalted butter, softened, cut into cubes
- 12 g (1 tbsp.) sugar
- 9 g fine sea salt
- 50 g (1/4 cup) bubbly, active sourdough starter (100% hydration)**
- 270 g (1 cup + 2 tbsp) warm water
Instructions
Baking Schedule: this is an overnight dough which takes approximately 10-12 hrs to rise @ 68 F. Start the night before, in the evening, and plan to bake the following day. If it’s warmer than 68 F the dough will take less time to rise. Alternatively, start in the morning and bake in the afternoon or evening.
Mix the Dough
In a stand mixer fitted with the paddle attachment, add the flour, butter, sugar and salt. Mix on low speed until combined; the butter should look like crumbs.
Add the starter and warm water. Mix until the flour is fully absorbed (get in there with your hands to finish mixing). The dough will feel slightly sticky and elastic at this stage. Cover with plastic wrap or a damp towel and let rest for 30 minutes. Meanwhile, replenish you starter with fresh flour and water.
After the dough has rested, switch to the dough hook and run the machine on medium-low (#3 on a KitchenAid) for 6-8 minutes. The dough will feel soft and supple and not stick to your hands. If it does, add a dusting of flour.
Note: If you do not have a stand mixer, the dough can be made by hand. After mixing and resting for 30 minutes, knead the dough on a lightly floured surface for 8-10 minutes, or until smooth, soft and elastic. Do not worry about under/over kneading. Relax into the process and focus on the texture, not the time.
Bulk Rise
Cover the bowl with plastic wrap and let rise overnight at room temperature (68 F) until double in size, about 10-12 hrs. Please refer to the Baking Schedule above for additional rise time options.
Shape the Dough
In the morning, coat an 8.5×4 inch loaf pan with butter.
Remove the dough onto a lightly floured work surface. Gently flatten the surface to release any large air bubbles.
Roll the dough into a log tucking the ends underneath. Rest for 5-10 minutes. With floured hands, gently cup the dough and pull it toward you to tighten its shape. Using a bench knife, place the dough into the loaf pan seam side down.
Second Rise
Cover the dough with lightly oiled or buttered plastic wrap. Let rest at room temperature until it has risen to about 1-inch above the rim of the pan (check the height by looking at the domed center portion of the dough). You are not looking for it to double in size. For timing, this can take anywhere from 1 1/2-2 hours (or more!) depending on temperature and the amount of sourdough starter used. Remember, the warmer it is, the faster the dough will rise. Refer to the “helpful tips” at the top of this post.
Preheat your oven to 375 F. Note: For higher oven spring, preheat to 500 F instead. Reduce to 375 F once the dough goes into the oven and bake as directed.
Bake the Dough
Bake the dough on the center rack for about 45-50 minutes, or until golden brown. Cool in the pan for at least 10 minutes, and then transfer to a rack to cool completely. This sandwich loaf will stay fresh for up to 3 days, stored in a plastic bag at room temperature.


Comments
Cici says
Perfect Bread! Made it yesterday.
Toma says
Made this today, started the dough last night. Everything seemed fine (novice bread maker, only 2nd recipe I have made), until the 2nd rise before baking. Stared this rise at approximately 9:30am this morning. At 3pm this afternoon still not rising to an inch above the edge of pan, but it did rise. So I decided to go ahead and bake. Why did it not rise?
Cheryl says
Just wanted to say I had the same experience. My house might be too cool or maybe my starter isn’t strong enough? I don’t know but I’m going to give it another try and do the 2nd rise in the microwave with the light on. My dough was a bit wet, I think, so I may add more flour.
Whitney says
A perfect sandwich loaf! Straightforward recipe. Will be on repeat. Thanks!
Karyne Lapensee says
Looooved this recipe ! Perfection. We made some epic gourmet grilled cheese with homemade roasted tomato soup! Delish!
Jackie says
Jackie commenting again . I get the feeling that no one believes my comment about the plastic bags ! Try storing in paper and test it out.
You certainly don’t want to ruin
this beautiful bread with plastic!
HEATHER J GRINSTEAD says
Yes !! Paper is the only way .
Cici says
Thank you for this tip.
Gill says
Makes beautiful sandwich loaf thanks.
Would I be able to make rolls using the same recipe? If so how long would I cook.
Thanks again in advance.
Patty Dameron says
I love this recipe! I opted to make a couple of adjustments. I use milk instead of water and no sugar. When the bread is ready to go into the oven, I score lengthwise and put in about 1-2 tablespoons melted butter. I even won a blue ribbon at the county fair.
AJ says
You put the butter on top? In the score mark? What’s the result?
Patty Dameron says
A nice buttery crust
Jackie says
I made this recipe with my 150 year old starter. It turned out really well. My husband will also agree. I will make this again and again. I have one thing to offer. Do not store this bread, or any other homemade bread in a plastic bag. I couldn’t figure out why my sourdough bread was not tasting as good the next day. We finally figured out that we needed to store it in non-plastic bags. I buy paper bread bags with a cellophane window from Amazon. Much better it actually lasts longer as well. Thanks for the recipe!
Lisa says
Question for Jackie
Does the bread not get dry and hard when stored in paper bags?
Jackie says
I store mine in bags I get from Amazon. They are paper with a cellophane window. If I’m keeping it longer, I sometimes wrap it also in a compostable bag – you know, those little green ones.
Erin says
Where I live it is typically very dry and if stored in paper it goes stale quickly. I even tried a cloth bread bag coated with beeswax on the inside and it still dried out. So I think relative humidity is a big factor here.
Cheryl Nicholson says
This was my first try at baking sourdough bread. It’s August in Manitoba, warm and humid weather. It took 8 hours on the second rise to bring it an inch above the edge of my loaf pan, even proofing it in the oven with the light on. I’d like slightly less density and a lighter flavor, but these are minor issues. It turned out so well for my first time. Very rewarding!
Dave Blazer says
This is the most well-written recipe I have ever used, and the bread came out beautifully. I used 100g of starter and 255g of water and otherwise followed it exactly, using hard red wheat bread flour.
Thanks, it made my first attempt at sourdough a success.
Mike says
What % rise are you looking for for the bull fermentation?
Diane Marie says
WOW!
So first time using this recipe and first time using my starter in sand which bread. My house smells amazing, because bread yum! The rise is completely epic, a nice crust, a little tang, soft yet firm, absolutely perfect and will be my go to, thank you so very much for sharing, I appreciate you!
Linda V says
This is my go-to sandwich bread recipe. I make it about every 10 days. So easy! & Delicious! There are only 2 of us, so I slice the loaf and place squares of parchment between them & freeze. The parchment gets reused forever & I can easily take out as many slices as I need. I shared the recipe with my daughter and she makes it all the time too. I love my boules and baguettes, but this recipe makes the perfect sandwich bread.
Sally says
Can I give this recipe 100 stars?!? Wow. This bread is remarkable! So soft and squishy. I have tried multiple sandwich bread recipes, searching for the perfect sourdough sandwich bread…my search is over!! Thank you for such a wonderful recipe! I really like how this recipe doesn’t have any oil, only butter. The oil seems to make bread dense instead of light and fluffy. Try this bread; you won’t be disappointed!
Jordan says
I put the dough in the fridge overnight because I wasn’t sure if I could pick it up the next day…will I be able to continue the process once I bring the dough back to room temp?
Nicole Owen says
I love this recipe! I just made this bread for the first time and it turned out great. It has a nice crust, soft inside, and has a delicious sourdough taste. The directions really helped me understand the process and its saved in my favorites!
Kacy says
My sourdough sandwich bread is always very dense (not this recipe). My problem is, my loaf is uniform as your looks and it always splits on one side. Making it very wonky. Please help.
Samantha says
Best bread ever. Any way to make a bunch of doughs and then freeze or refrigerate and use a week later? What are your thoughts.
KeenBaker says
Maybe you could try a longer second proof? That’s usually when bread splits, so might be worth a try.
Patty Dameron says
Score the top lengthwise just before baking. I throw some butter in the score. Since doing this, I have stopped having side blowouts.
Patty Dameron says
I would say if the side is blowing out, it hasn’t proved long enough or you have too much dough in the pan. When my dough was blowing out, I reduces the amount of dough per pan and then I started scoring the dough the length of the pan. No more blowouts.
Julie says
Omg this sourdough sandwich bread recipe is awesome. Thank you for sharing it. I made a loaf last week where I had to add quite a bit extra flour but today I did a double batch and dropped the warm water to 256g per loaf; likely more humid here. Excellent and highly recommend this recipe.
Michele says
Just love this recipe. I like a really tangy sourdough, so used 160 gm of starter. Also, I used 1/2 Dakota Maid bread flour -a high -protein ND flour I love -and half all-purpose. Dakota Maid is very thirsty flour, so I have settled on 160 gms of 100% hydration starter, 260 gm water with these flours. I have slashed the top with a lame, and made it without the slash -great either way.
Makes the BEST sandwiches and toast-perfect texture, great flavor.
Everyone asks when I’m baking it again!
Kenny says
In case this is of use to anyone stumbling on this, I wanted to bake this in my Breville countertop convection oven and wasn’t sure what temperature and for how long. I baked for 40 minutes @ 350 F. The color seemed right and I used an instant-read thermometer to check the temperature (208 F). I got a very good oven spring.
Jennie says
I need help! Every time I make your sandwich bread, the white or wheat from your cookbook, my bread splits on one side, instead of having a nice smooth dome. I’ve tried giving my dough more time to rise and less time to rise, but it still happens. Do I need to try a larger loaf pan or is there something else I’m doing wrong? I’m a huge fan of both your cookbook and online sourdough recipes for all my sourdough baking. Thank you!
Pvole says
If your bread splits on the side it is usually because of one of the following:
1. Underproofed (use the finger poke test)
2. Top of dough formed a tough skin during 2nd rise (cover with plastic wrap or damp towel during first and 2nd rise).
3. Oven is too dry or bread too close to top of oven so crust forms too early (try a water bath on rack under bread and set racks so top of bread is closer to center of oven).
4. Sometimes slashing bread helps. For sandwich bread I sometimes slash down middle. Right before you put in oven Sprinkle top of bread with a tiny amount of rice or wheat flour flour. Use a new razor blade or lame to make a 3/4 deep and even slash.
Good luck!
Mike says
Ok so made this recipe and did the 8×4.5 pan loaf. It exploded out the side because it had way too much dough in it. Should I have cut back on what I put in the pan if using that pan?
Ashley Eddingfield says
I did two loaves!
Aneta says
Hello, my dough doubled beautiful but did not hold its shape well, do I need to add more flour? Thank you
Sidney says
I followed all the instructions, mu loaf tastes great but didn’t rise enough. Any tips? I live at very very high altitude.
Adriana says
AMAZING!! This bread is so good. Can’t wait to make it again.
Kelly says
Does this freeze well? Turned out great!
LC says
I often freeze mine! I slice it into sandwich sized slices and then freeze. I toast up a few pieces as needed!
Maren says
I made this recipe using the dough setting on my bread machine first thing in the morning for the mixing and a warm place to rise. I took it out and put it in a bread pan for the second rise and then put it in the fridge overnight to develop a more sour flavor. Baked the next morning and it is delicious! So easy and minimal clean-up 👍
Susan says
Made this loaf today (well, started yesterday, baked today). I wanted a sourdough recipe to make sandwiches with and this one is exactly what I was looking for. Easy kneading and the end result is a light loaf with the perfect texture for sandwiches. Thank you!
Hannah says
It took quite a long time to rise but it turned out beautifully! Exactly what I was looking for – a more dense, elastic loaf of bread that doesn’t fall to pieces when you slice it. Perfect for toast, very tasty. I will definitely be using this recipe regularly, thank you so much!
Judy McNeely says
This is the best recipe I’ve ever used! I love it! The bread does not crumble when sliced and used as a sandwich!
Kaylee says
This came out tasting a bit flour-y for me. Maybe it’s because I did the recommended starter-water changes for a cooler temperature? Or maybe it has something to do with my kneading it by hand. Either way, it tastes ok, but not fantastic.
Patty says
My first try on sourdough bread was a round loaf which didn’t really make the grade. My second try was this easy sandwich loaf recipe by Emilie. It came out great! Really soft bread that held up perfectly as a sandwich and delicious as toast too. Highly recommend this recipe. I am doubling my next batch!
Patty Dameron says
I love your sourdough recipes. I am using the sandwich bread recipe but instead of adding sugar, I just use milk (no water). The bread is fantastic tasting. I have a cast iron bread pan and the bread comes out perfectly brown and done. I have also shaped the dough into hot dog or hamburger buns. I also use your other sourdough recipes.
Kaelii says
It took longer than expected for my dough to rise and it’s too late in the day for me to wait for a second rise after shaping. Would I be able to shape, place in my bread pan and refrigerate over night and bake in the morning? Maybe just let it come to room temp first?
Connie Perks says
How did your refrigerated second rise turn out?
Little Bold Lady says
Landed the recipe the first time. I can’t always say that, so it validates the clarity of the instructions. Thank you. The back story is my husband made a fantastic bacon jam and I’ve had a crave for a brie/jam jammed in my brain for a bit too long.
Therefore, woke up at midnight and woke up my starter Doughlores. Totally forced the bulk rise (even living in Cocoa Beach FL) I cranked up my oven options – yes, the vision made me desperate.
I had a beautiful loaf which I could slice thin, thick, medium – you want a slice 7mm – no problema! There is a part of me that thinks I was just lucky. But I’ll report back when I do this again.
Joseph says
I love the name of your starter!
Matt says
Made this using 80% king arthur bread flour and 20% dark rye, it definitely needed a substantial amount more water (at least 60g more water) to get the dough to not feel so tight after I first mixed it together. Other than that adjustment for my flour change everything went exactly per the plan/instructions and it came out amazing! Thanks for the recipe!
Andrea says
Best sourdough! I know it will become a staple in our house. Doubled it and followed recipe to a “T.” Wonderfully clear recipe that works!
Karie says
Making this bread now. Does it really need to rise 10-12 hours? It looks doubled to me after 6 hours. Thanks!
Britney says
I’m going to make this soon! I have two 7.75×3.75×2.5 pans Fat Daddio brand. They are not angled like a normal loaf pan as they are straight sides. How would I scale this recipe or do you think it would work in one of these?
Guy says
It really does take 10 hours plus! For a while I thought maybe my starter was asleep. Finally shaping and 1 1/2 hour more.
2:00 am bake and… Success on the first try.
Carol Catanese says
Thank you. I have not tried this but will do so today.
I followed your basic outline for making sourdough bread (I already had starter), and your method resulted in reproducible loaves, every time! I actually use whole wheat, or mostly whole wheat flour and still a standout. Thank you!
Jill S says
Tried this recipe yesterday, sliced into the loaf this morning. It looks beautiful, smelled so wonderful, and tasted like perfection this morning. Thank you for the easy to understand recipe. I’ve purchased your book as well and can’t wait for it to arrive later today!
Patria de Carson says
Hello! I’ve been using this recipe since last year, and with wonderful results! However, I had to make a new starter this year. It is all bubbly and nice, but when I make the recipe, it does not bulk rise. Last year, I was using the 100g starter + 255g water adjustment, so am I this year. I’m placing it inside the oven with the door closed and the light on, and the thermometer reads 68-70 degrees F. I’m also covering with a damp kitchen towel. I wonder if the towel is creating too much humidity or if I should use the standard starter/ratio…with the warmer weather approaching, I hope that if it is the environment temperature, then it will get easier. I’m getting so frustrated because we love this recipe so much at home! Any information or advice will be greatly appreciated. Thank you!
Dru says
I had great success with this recipe it came out wonderfully. I was wondering if you had any advice for cold fermenting this recipe to mske it more sour?
Jade says
Baking a Sourdough Sandwich loaf for the first time with this recipe. It was so easy. As I am living in a tropical country, it takes about 6 hours in all to get the bread done. It was so soft and spongy. The crust was thick but not too hard, making it so easy to slice. Everyone in the family loves it. This recipe is a keeper. Thanks Clever Carrot! Will try more of your other recipes.
Richardi says
Really liked your easy sandwich loaf recipe. Great for toast, fried bread and sandwiches. Consistent results!
Tricia says
Delicious and consistent! Thank you Clever Carrot for the recipe! I’ve gotten so many compliments from everyone who tried it! 😀
Stephanie says
I have made this bread twice. Both times it did very well for the first rise, however it didn’t rise much the second time. I waited as long at 3 or 3 1/2 hrs on the second rise and it didn’t rise. I baked it anyway and it came out extremely sour. Any idea why? I’ve used my starter to make other breads and it’s not nearly as sour.
Emilie Raffa says
Hi Stephanie! Great question. Some variable in the process changed. In your case, because the dough rose well during the bulk fermentation, we can rule out lack of sourdough starter strength. I’m thinking for the second rise, it needed more time and and a warmer temperature (75 F+) to give it a boost in rise and speed. As for the sourness, this could be due to a higher percentage of acetic acid in your starter (think: vinegar). This can happen when you don’t refresh your starter often or if it’s held at a warmer temperature.
Jamie says
Our family really likes this recipe. I double it and bake two loaves each week.
Do you think there’s a way to make it more sour? Maybe a cold ferment after shaping?
Emilie Raffa says
Hi Jamie! Yes: a cold ferment/second rise can deepen the sourdough flavor. Just make sure to let the dough continue to rise the next day, if needed, so that it puffs up before baking. This will take more time since the dough is cold. But it will get there! Transfer to a warm spot if available, to speed things up.
Sandra Finigan says
I don’t have a mixer with a dough hook. Can this be done by hand? How long would you knead for?