Made with all purpose flour and just a touch of butter, learn how to make soft, tender sourdough sandwich bread with bubbly, active sourdough starter. Recipe adapted from my bestselling book:
Artisan Sourdough Made Simple.
Out of all the sourdough bread recipes I make on repeat (my beginner sourdough bread recipe,
sourdough focaccia and sourdough pancakes to name a few!), this easy sourdough sandwich bread gets the most requests. Why? It’s soft. It’s buttery. It makes the kitchen smell like magic.
And the best part: you made it yourself. No junk or preservatives. Just simple sourdough with a soft crust, subtle tang and fluffy crumb that holds up to slicing, toasting and sandwiches (anything really).
Below, you’ll find my step-by-step walkthrough and baking schedule. You’ll also get three solid
variations (cinnamon raisin, whole wheat and bread flour) plus more sandwich loaf recipes in my book for inspiration.

Good To Know:
- What most bakers get wrong: the second rise goes for too long. This creates over proofed dough that bakes up flat. Follow my recommended timing and tips to master this step.
- Pan size matters. Want a taller loaf? Use an 8.5×4 inch pan instead of the standard 9×5 inch pan. Both work, but the smaller size will give the dough a nice upward boost.
- Use softened butter. If it’s cold, it won’t blend into the dough.
- Make it vegan. Swap in your favorite plant-based butter. Just check the label. Some brands are very salty.
- Temperature controls time. Warm kitchen? The dough will rise fast. Cold kitchen? Give it more time. Watch the dough and not the clock.
How To Make Sourdough Sandwich Bread {Step-By-Step Recipe}
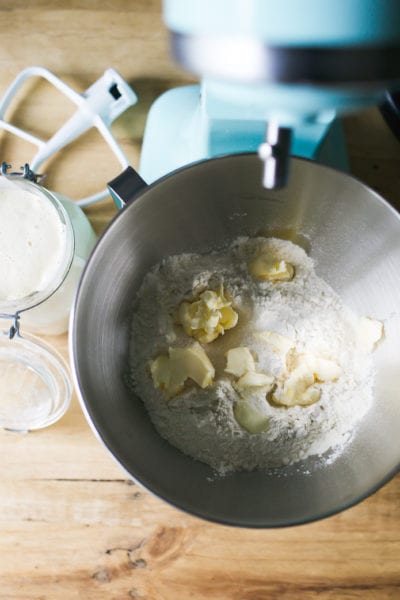
Step 1: Mix the Dough
To Start: Add the flour, softened butter, sugar and salt to a bowl. I like using a stand mixer for this recipe. The dough is naturally a bit sticky; the machine makes it easier to handle. Mix with the paddle attachment until the butter looks like crumbs.
Mix in your bubbly, active sourdough starter and water until everything comes together. Cover and rest for 30 minutes to relax the dough before kneading.
Note: If you need assistance with your sourdough starter, read my companion articles Feeding Sourdough Starter: My Best Tips & Tricks and Troubleshooting Sourdough Starter.
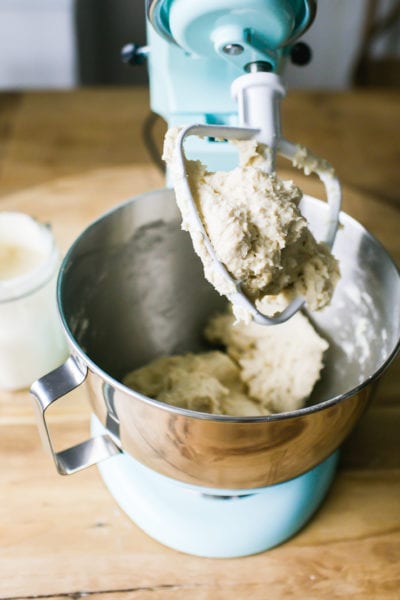
After 30 minutes of resting…
Remove the paddle attachment and switch to the dough hook. Knead until soft and supple, about 6-8 minutes. Note: on this particular day, my dough was stickier than usual so I added a sprinkle of flour to even it out. You can do that too.
No Stand Mixer? Knead the dough by hand on a lightly floured surface until it feels smooth, soft and elastic, about 8-10 minutes. Don’t worry about under/over kneading. If it’s springy (not sticky) you’re good to go.
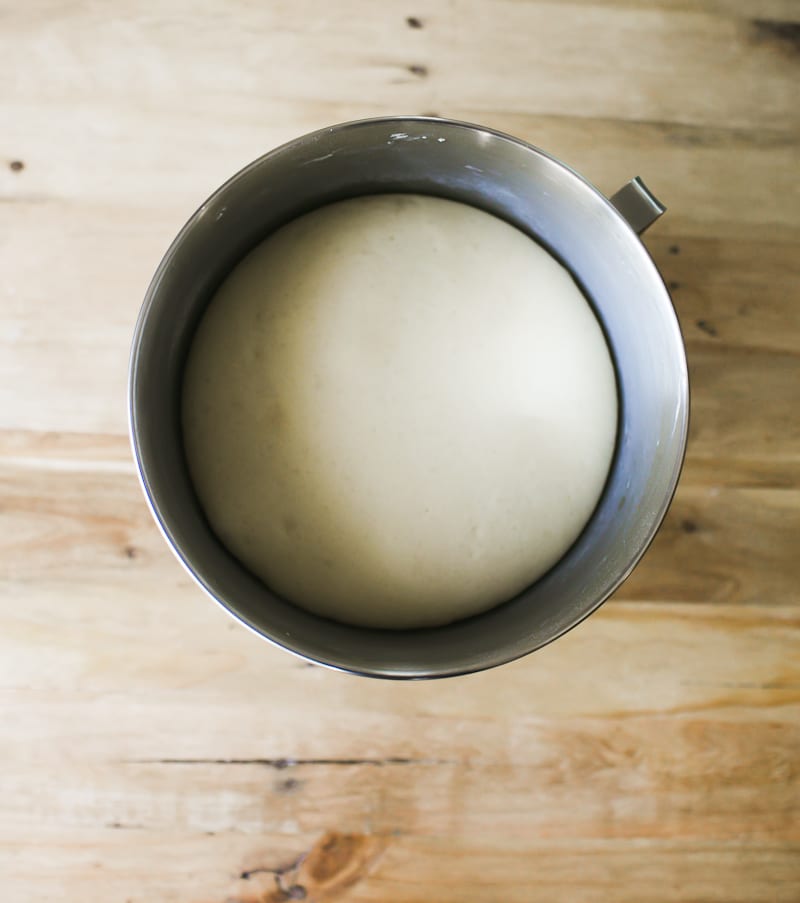
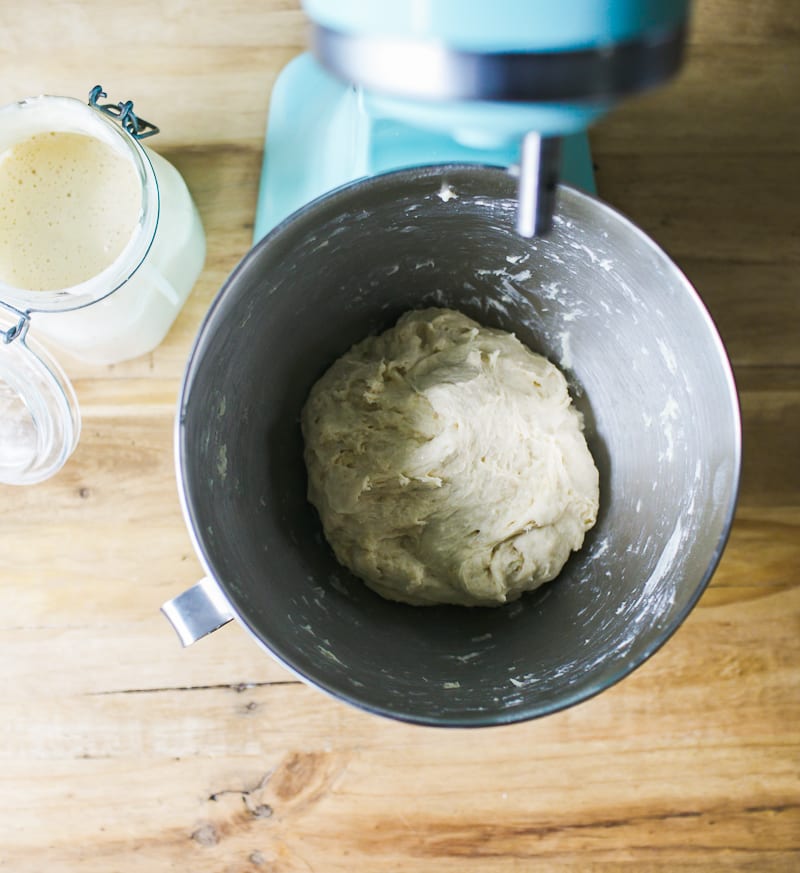
Step 2: Bulk Rise (Overnight)
Cover the bowl with plastic wrap and let the dough rise overnight at room temperature (68 F), about 10-12 hrs. The dough is ready when it’s puffy, airy and has doubled in size.
Tip: This is an overnight sandwich dough. However, you can do a same-day bake instead (see my Sample Baking Schedule).

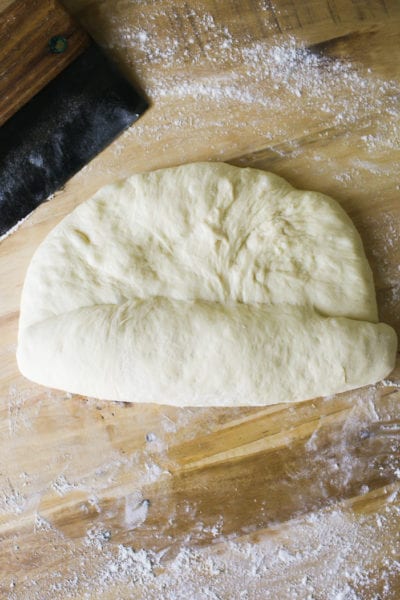
Step 3: Shape the Dough
Remove the dough onto a lightly floured surface. Gently flatten to release the air bubbles (you don’t want big holes like ciabatta!).
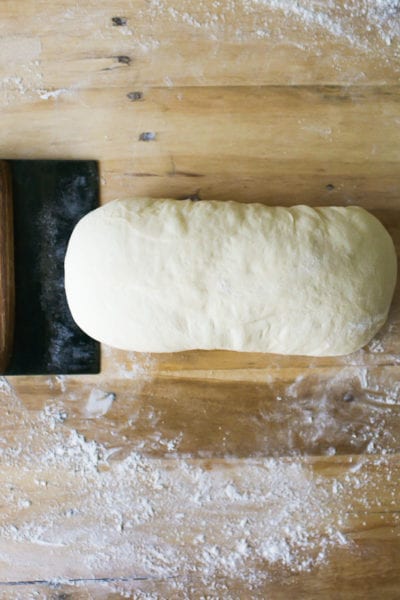
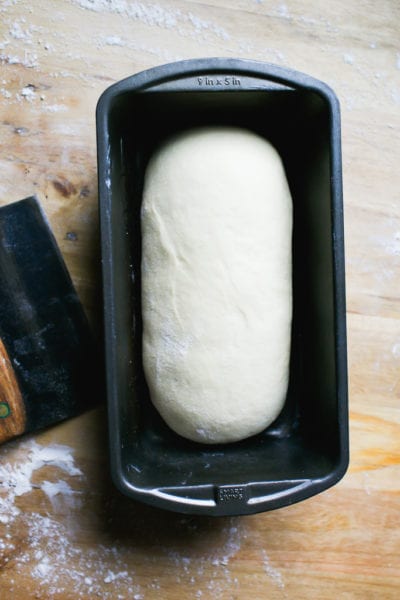
Roll the dough into a log, tucking the ends underneath. Then, with floured hands pull the dough towards you creating surface tension to tighten its shape. Place the dough into a buttered loaf pan, but make sure it’s seam side down.
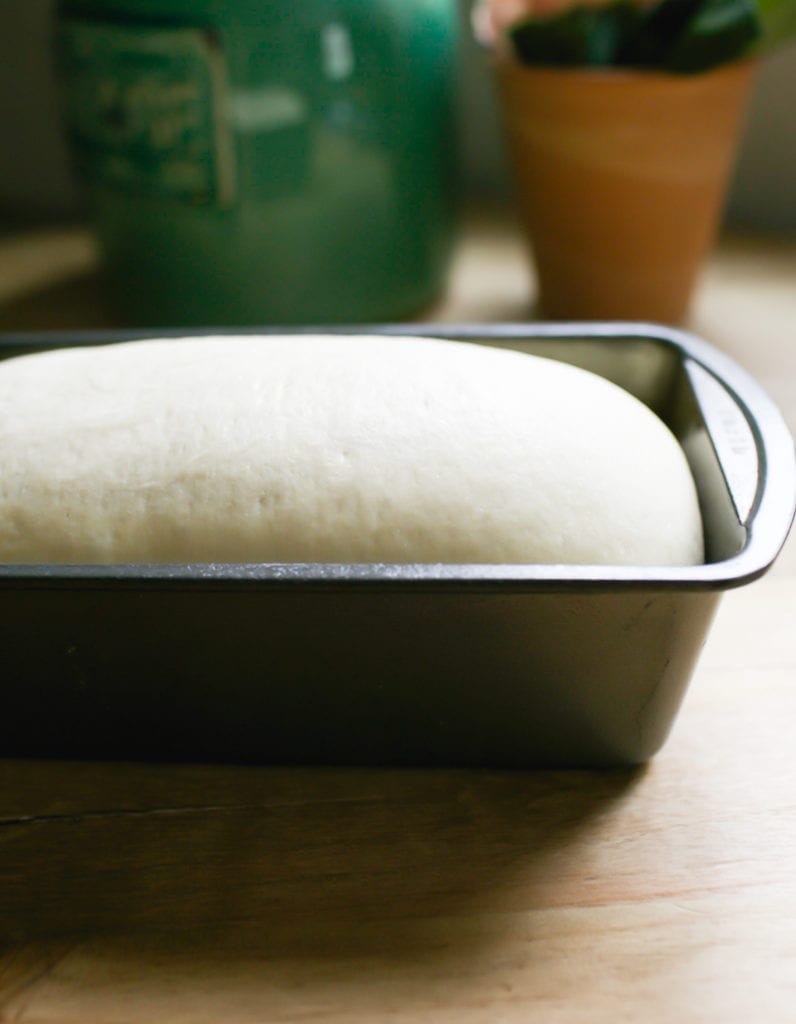
Step 4: Second Rise
This step is crucial. When done correctly, your loaf will build back additional strength needed for good oven spring. Cover the pan with lightly oiled plastic wrap so the dough doesn’t stick to the top. Let rise until the center domes about 1 inch above the rim of the pan. You’e not going for double in size or sky scraper height; just notably puffy and less dense.
Tip: Cold Kitchen? Your second rise might take longer than expected @ 68 F. Be patient with this step. Plan on 1 1/2 -2+ hours depending on your specific room temperature and starter strength. If you’re short on time, use a proofing box or my DIY warm oven trick to speed things up (see “Helpful Tips” in the recipe card below).

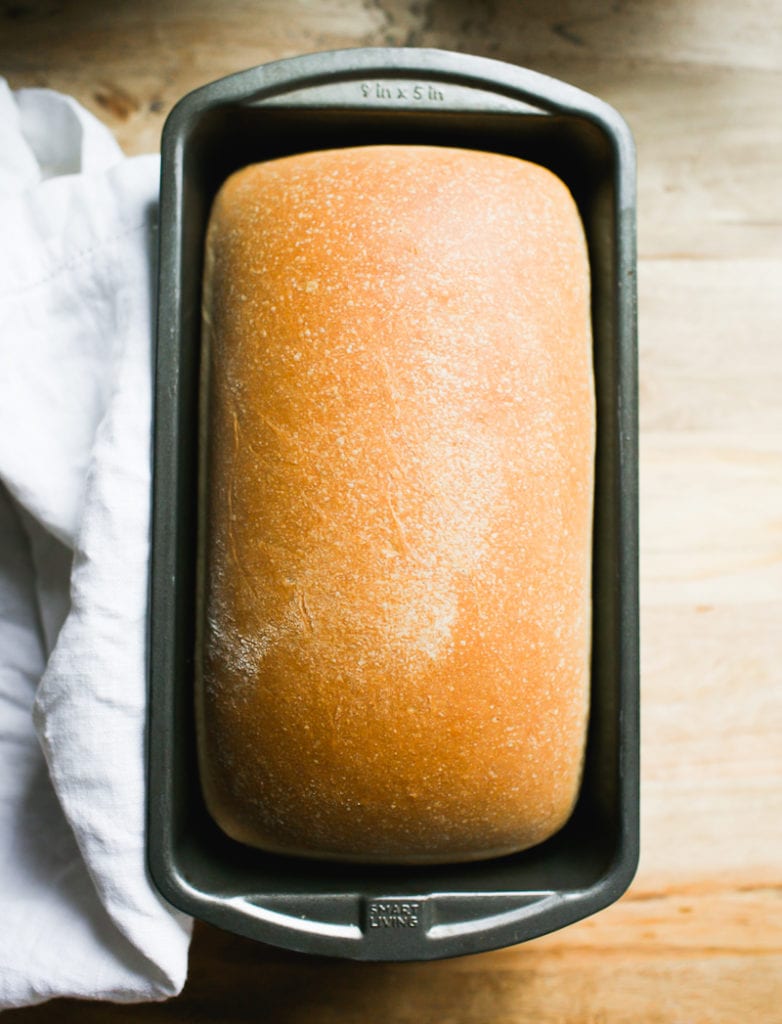
Step 5: Bake The Bread
Preheat your oven to 375 F. For better oven spring, preheat to 500 F instead, then lower the temperature to 375 F when the dough goes into the oven. Bake on the center rack for 45-50 minutes or until golden brown.
Cool in the pan, then transfer to a wire rack. Wait an hour before slicing (skipping this step can turn the inside gummy).
Tip: Have an extra loaf pan? Some bakers create a makeshift “lid” by placing a separate, upside loaf pan on top of their pan before baking. This traps steam inside, creating a humid environment for the dough to rise avoiding potential blow-outs or tears, and keeps the crust soft. It’s similar to using a Dutch oven for my sourdough bread recipe.
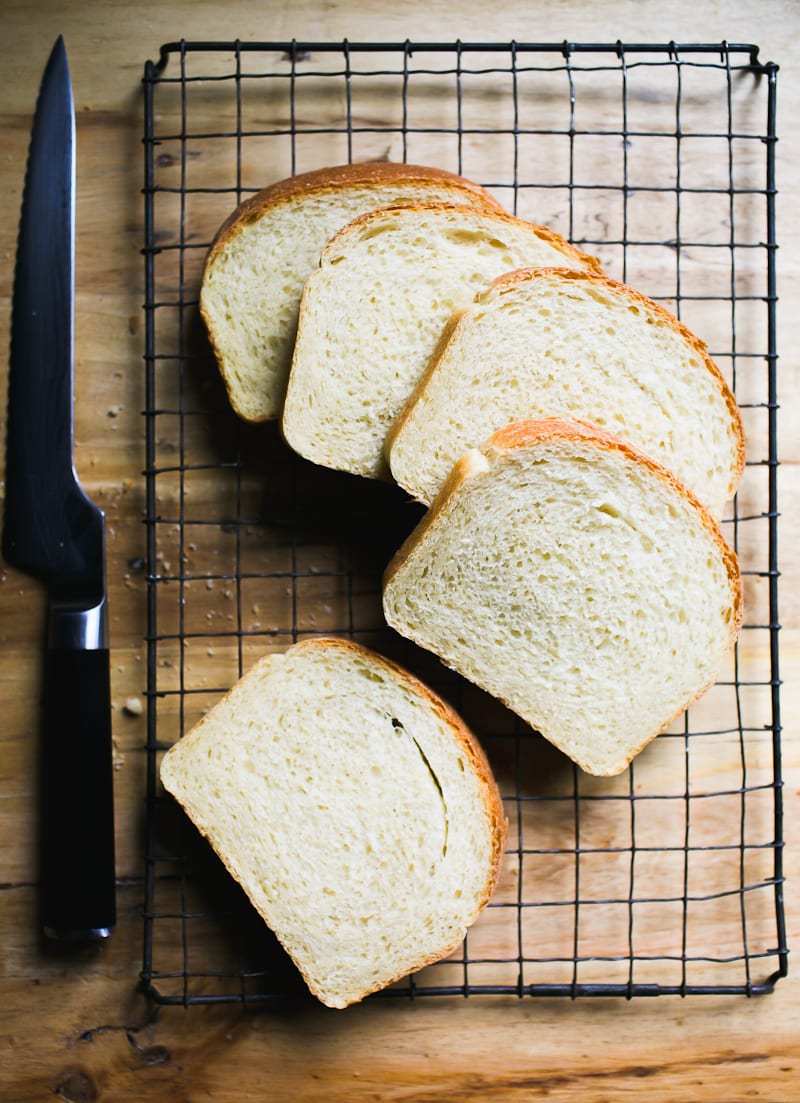
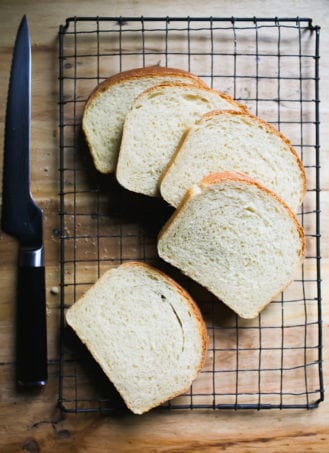
Slice & Store
You’ll need a good serrated knife (I use this one). For a moderately priced option, try this knife instead. If your bread slices are really uneven, consider this collapsable bread slicer with 3 different thicknesses: thin, medium and thick to guide you along.
What I do at home: If you have a large family, or just eat a lot of bread, I highly suggest doubling this recipe. Bake (2) loaves side by side and freeze whatever you don’t eat. This loaf can be frozen whole, covered tightly in plastic wrap or as individual slices.
Sourdough Sandwich Bread Variations
- Whole Wheat: Replace 20% of all purpose flour with whole wheat or white whole wheat flour. If the dough seems dry (whole grain flours absorb more liquid), add more water as needed to achieve a workable consistency. Do this 1 teaspoon at a time.
- Bread Flour: Do an even swap, adding more liquid if the dough is dry. For example, King Arthur Bread flour is very thirsty so more liquid might be needed. If using Gold Medal bread flour which is not as absorbent, additional adjustments might not be necessary.
- Sourdough Cinnamon Raisin Bread: You’ll find my step-by-step post here. The vanilla-soaked raisins make it a community favorite!
What To Bake Next
In addition to the above variations, a natural next step for sandwiches and breakfast fare would be my easy, NY-style sourdough bagels (they are so incredibly chewy and addictive) and these super soft sourdough english muffins. I’m excited to see what you make next.
Sample Overnight Baking Schedule (68 F)
Feel free to adjust the start times below as needed. It’s flexible. For a same-day bake, start early in the morning and bulk rise at a warmer temperature.
Day 1 (Evening)
- 4:30 PM: Feed sourdough starter (to activate)
- 8:00 PM: Mix dough
- 8:30 PM: Rat 30 minutes, then knead.
- 9:00 PM: Cover and bulk ferment, room temp @ 68 F overnight (10-12 hrs).
Day 2 (Morning)
- 7:00-8:00 AM: Check the dough (should be doubled)
- 8:15 AM: Shape dough
- 8:30 AM: Second rise (1 1/2 – 2+ hours)
- 10:30 AM: Preheat oven
- 10:45 AM: Bake
- 11:30 AM: Cool
By signing up, you agree to receive emails from The Clever Carrot. Unsubscribe at any time.
Easy Sourdough Sandwich Bread
- Prep Time: 12 hours
- Cook Time: 50 minutes
- Total Time: 12 hours 50 minutes
- Yield: 1 loaf 1x
- Category: Sourdough Bread
- Method: Oven-Baked
- Cuisine: American
- Diet: Vegetarian
Description
A simple and easy recipe for homemade sourdough sandwich bread. Made with all purpose flour and just a touch of butter. I like to make the dough at night so we can have fresh bread in the morning. This loaf freezes well (whole or sliced). I recommend this loaf pan.
Helpful Tips:
- For best results, weigh your ingredients with a scale instead of using measuring cups. Weight and volume measurements are not equal, only approximate! For example: If your starter is very bubbly, 1/4 cup might only weigh 30 g which is too little for this recipe (you need 50 g). The dough will take forever to rise. Same goes for the flour: 4 cups might weigh over 500 g depending on how tight the flour was packed into the cup. More flour = dry dough.
- This recipe works with Whole Foods 365 Everyday, King Arthur and Trader Joe’s all purpose flour. If using another brand with a lower protein content (i.e. Gold Medal, Pillsbury, Heckers) consider reducing the total water amount by 15 g.
- For a variation of this recipe with more sourdough starter, please choose one of the following adjustments below, keeping the rest of the ingredient quantities the same:
- 100 g starter + 255 g water
- 150 g starter + 250 g water
Additionally, because temperature controls time: you can also increase your surrounding temperature for the bulk or second rise, as needed. Place the dough in a proofing box set to 75-80 F. Or, preheat your home oven to 75-80 F and then shut it off immediately (use an oven thermometer to make sure it’s set to exactly 80 F and not higher!). Place the covered dough inside until it bulks up. Do no use this option overnight- it will be too warm.
Ingredients
- 500 g (4 cups) all purpose flour
- 60 g (4 tbsp.) unsalted butter, softened, cut into cubes
- 12 g (1 tbsp.) sugar
- 9 g fine sea salt
- 50 g (1/4 cup) bubbly, active sourdough starter (100% hydration)**
- 270 g (1 cup + 2 tbsp) warm water
Instructions
Baking Schedule: this is an overnight dough which takes approximately 10-12 hrs to rise @ 68 F. Start the night before, in the evening, and plan to bake the following day. If it’s warmer than 68 F the dough will take less time to rise. Alternatively, start in the morning and bake in the afternoon or evening.
Mix the Dough
In a stand mixer fitted with the paddle attachment, add the flour, butter, sugar and salt. Mix on low speed until combined; the butter should look like crumbs.
Add the starter and warm water. Mix until the flour is fully absorbed (get in there with your hands to finish mixing). The dough will feel slightly sticky and elastic at this stage. Cover with plastic wrap or a damp towel and let rest for 30 minutes. Meanwhile, replenish you starter with fresh flour and water.
After the dough has rested, switch to the dough hook and run the machine on medium-low (#3 on a KitchenAid) for 6-8 minutes. The dough will feel soft and supple and not stick to your hands. If it does, add a dusting of flour.
Note: If you do not have a stand mixer, the dough can be made by hand. After mixing and resting for 30 minutes, knead the dough on a lightly floured surface for 8-10 minutes, or until smooth, soft and elastic. Do not worry about under/over kneading. Relax into the process and focus on the texture, not the time.
Bulk Rise
Cover the bowl with plastic wrap and let rise overnight at room temperature (68 F) until double in size, about 10-12 hrs. Please refer to the Baking Schedule above for additional rise time options.
Shape the Dough
In the morning, coat an 8.5×4 inch loaf pan with butter.
Remove the dough onto a lightly floured work surface. Gently flatten the surface to release any large air bubbles.
Roll the dough into a log tucking the ends underneath. Rest for 5-10 minutes. With floured hands, gently cup the dough and pull it toward you to tighten its shape. Using a bench knife, place the dough into the loaf pan seam side down.
Second Rise
Cover the dough with lightly oiled or buttered plastic wrap. Let rest at room temperature until it has risen to about 1-inch above the rim of the pan (check the height by looking at the domed center portion of the dough). You are not looking for it to double in size. For timing, this can take anywhere from 1 1/2-2 hours (or more!) depending on temperature and the amount of sourdough starter used. Remember, the warmer it is, the faster the dough will rise. Refer to the “helpful tips” at the top of this post.
Preheat your oven to 375 F. Note: For higher oven spring, preheat to 500 F instead. Reduce to 375 F once the dough goes into the oven and bake as directed.
Bake the Dough
Bake the dough on the center rack for about 45-50 minutes, or until golden brown. Cool in the pan for at least 10 minutes, and then transfer to a rack to cool completely. This sandwich loaf will stay fresh for up to 3 days, stored in a plastic bag at room temperature.


Comments
Libby Rose says
Hi! I want to let this proof in the fridge overnight because 10-12 hours would put me at baking this in the middle of the night. Any tips for how long / when to take it out? I don’t see this in the schedule options. It’s 4pm now I’d like to bake tomorrow at 7am!
Shelly says
I tried this recipe but my bread came out really dense what did I do wrong?
Emilie Raffa says
Hi Shelly! There are so many reasons for this: inadequate gluten development, insufficient kneading, too short of a rise time, over proofed dough… If you remember your exact process, including the rise times, current room temp. and/or any changes made to the recipe, I can better troubleshoot.
Tonya says
Do you have any recommendations on the ratio when you are using freshly milled flour? I attempted the recipe last week with freshly milled- and it tastes pretty good but it is quite dense. I didn’t know if I needed to add more or less flour or water. Thank you!
Emilie Raffa says
Hi Tonya! Freshly milled flour tends to be more thirsty than all purpose flour. Modifying a recipe will take a bit of trial and error. And it depends on the variety you’re using too. But generally speaking, you’ll typically need to add more water to the dough so that it bakes up less dense. The final result won’t be exactly like the recipe, but still good in texture and taste.
Roseann says
Easy and forgiving recipe. I have made it with AP flour and bread flour and also 1/2 and 1/2 with whole wheat flour. Never adjusted the amount and it always comes out perfect. Delicious every day sandwich bread.
Emilie Raffa says
Great feedback, thank you Roseann!🥰
Brittany says
Started this at 8am yesterday morning and baked around 7:30pm. Sliced it this morning for the kids breakfast and it’s peeeeerfect! Thanks so much for the recipe! It was the first time I used my active starter! We have never been ready at the same time before 🤣 so I’ve only done lots of discard recipes.
Emilie Raffa says
Haha… I so get this. Timing is everything! And such a learning curve. Glad it worked out Brittany!
Jade says
Mine is not rising past the 1 inch mark and has been resting for 4 hours now. When can I bake it?
Emilie Raffa says
Hi Jade! Time, temperature and sourdough strength all work together to make bread dough rise. If starter strength is not the issue, I recommend moving the dough to a warmer spot to boost the rise. In the oven (off) with the light on is a quick fix. Just keep your eye on the dough; it gets hot in there.
Renata says
I used the 100g starter with extra water and got a liquid instead of dough, are you sure about the amount of water?
Emilie Raffa says
Hi Renata! The measurements are correct. If using 100 g of starter, the total amount of water should be 255 g. Is it possible you combined 255 g water + 270 g water per the original recipe (w/ 50 g starter?). Just a thought. 🥰
Ruth says
This turned out beautiful. I doubled up and baked them side by side in a square tin, like old style batch bread. I also did an overnight cold proof, only because I wanted to bake them first thing in the morning. It worked beautifully. Two tall perfect loaves.
Emilie Raffa says
Hi Ruth! What a great idea to double up the recipe and bake in one tin. Do you mind my asking… What was the size of your tin? 🥰
Natalie says
I’ve been making this recipe for years and love it! I prefer to do the 100g of starter option and always make two loaves at a time. It’s our favorite and so simple to make!
Have you ever tried making it with bread flour? How much did you adjust the water? Currently out of all purpose flour and having a large bag of bread flour I need to get through. Thanks!
Emilie Raffa says
Hi Natalie! Yes, I have made it with bread flour before and sometimes even 1/2 and 1/2. Since bread flour has a higher protein content, it may come out a bit chewier than the original recipe but it will still be excellent. As for water, start with the called for amount with AP flour and then increase in small increments until you achieve the desired consistency. This recipe is very forgiving! 🥰
Natalie says
Thank you so much! I will give it a try
Paul says
I’m new to Sourdough Bread baking, and this was my fifth recipe I think.
Not only was this my best sourdough made, it’s the best I’ve ever eaten, and I’ve eaten a lot from small and large bakeries. It’s soooo soft, and the perfect texture and Tangy-ness.
I mixed and kneaded it all by hand, which almost made me wait until my new mixer came before making this, but I’m glad I didn’t wait. I enjoy kneading and if anything I over-kneaded this. Probably 15-20 minutes yet it might’ve just felt that long and was really only 8-10 minutes, lol.
I used rectangular cast iron bread pan, Dutch oven style pans. I covered it for the first 20-25 minutes then removed the top. I’d guess I baked it 42-45 minutes total, at 375, but preheated at 500.
It’s a light-medium dark I’d say. DON’T slice the loaf too soon. I also let this one cool in the pan for about 45 minutes. I didn’t slice it for around 2.5 hours and it was barely warm inside and out.
Thank you so much for sharing this recipe, it’s magnificent.
Emilie Raffa says
Hi Paul! Wow, the best you’ve ever eaten?! That’s awesome!! I love to knead by hand when given the time. It’s very therapeutic. I hope the success you’ve had with this loaf keeps you going on your sourdough journey. You’re well on your way!
Kevin M says
Excellent base recipe with very consistent results. Great taste and texture. I substitute home made maple syrup for sugar at 1.5 x wt. and olive oil for butter at equal wt. with excellent results.
Emilie Raffa says
Hi Kevin! Sounds delicious! This basic recipe lends itself nicely to substitutions. Thanks for sharing 🙌🏻
Nancy Smith says
This was my first time making sourdough sandwich bread. The instructions were so easy to follow. It turned out great. My family wants me to bake it all the time. Please keep up the great recipes.
Emilie Raffa says
Hi Nancy! I’m so glad you had success on your first try! Doesn’t it feel good when your family enjoys your bread baking?! 🥰
Mila says
Absolutely amazing bread! So fluffy and tastes AMAZING!
Emilie Raffa says
Hi Mila! Thanks for sharing! I’m so glad you think this bread tastes amazing!🥰
Dianne says
I was so impressed with this bread. Great recipe, easy to follow instructions. My first loaf was so soft and pillowy. Thanks so much!! It’s a keeper!!
Emilie Raffa says
Hi Diane! Thank you!
Deborah says
Thank you so much for the lovely recipe. I have a few questions for you 20% of 4 cups using whole wheat flour really threw me for a loop lol. I don’t believe it rose as much as I thought it would. The taste is delicious but I’m still not very good at slicing. My slices are too thick. Any suggestions? Also, could I substitute honey for the sugar? Thank you again.. Deborah
Emilie Raffa says
Hi Deborah! Try letting the bulk fermentation go a little longer to get more of a rise. This happens sometimes when using whole wheat flour. Yes, you can sub honey for the sugar (the texture will change slightly). As for slicing, get a good serrated bread knife and cut the loaf on its side. This is really helpful. PS: if you are a beginner baker, take notes. You’d be surprised at how much you’ll learn when you go back and revisit what worked and what didn’t.
Pam Jacobs says
This is my go to recipe for sandwich bread. We are a family if 2, I make a couple loaves at a time. Slice them and freeze them. That way we can grab a couple of slices to make garlic Texas toast on spaghetti nite. Or French toast on a Sunday morning. Or grilled cheese sandwiches with some red pepper tomato soup.
Emilie Raffa says
Hi Pam! I often slice and freeze the slices too. All of your sandwich bread ideas sound amazing – and red pepper tomato soup. Yum. Thanks for sharing!
Samantha says
I use a Pullman loaf pan, should I put it in to bake just as the rise gets to the the top of the pan or deflate it some after it reaches about an inch over the rim?
Emilie Raffa says
Hi Samantha! Yes, bake is when the rise gets to the top. I’m assuming you do the second rise with the lid on, right? I wouldn’t deflate it first before baking.
Clarisa Skinner says
Is it okay to do the final rise overnight in the refrigerator?
Jerry Head says
This is my second loaf. I am going to do the final rise in the fridge. We’ll see.
Jerry Head says
I did my second rise overnight in the fridge. Next morning I still needed it to sit on the counter for couple hrs. However, it put off having to bake it at 1am.
Emilie Raffa says
Yes! You can definitely do that. Heads up: it might not rise that much in the fridge, depending on where you are in the process. So give it more time at room temperature the following day, as needed.
Emilie Raffa says
Hi Clarisa! Yes, you can do this. The dough won’t rise too much in the fridge overnight; give it more time at room temp. the following day if necessary.
Pam says
I just put my first double batch in oven. My family loves this bread. It’s a great recipe and so easy to follow. This is the third time making the loaf style bread and honestly it’s getting easier.
Emilie Raffa says
Love this! Thank you Pam! 🥰
Tori says
Hands-down, the best and easiest recipe I’ve used for my sourdough. Everyone in the family is obsessed and I’m almost making four loaves a week!! I do live at a higher elevation so I have been messing with the recipe a little bit. I found that if I do 70 g of starter and 230 g of water it works a little bit better for me.
Emilie Raffa says
Hi Tori! I’m not an expert in high altitude baking, so I know your adjustments will be helpful to whoever reads this and needs it. Thank you for taking the time to comment! PS: 4 loaves!
Michelle says
I love this recipe!! I appreciate the details given!
I’m wondering if the overnight bulk rise could be done in the fridge. I live in a warm climate (south Florida) and I’m having a tricky time nailing down the bulk ferment timing. I keep overproofing due to the warm temperature.
Emilie Raffa says
Hi Michelle! Absolutely. I’d give it a few hours at room temperature first to give it a boost. Then cover with lightly oiled plastic wrap (or transfer to a dough tub) and do the rest of the bulk rise in the fridge. This should help control the rise. The next day, if your dough needs more time to rise, do so at room temperature. PS: you can always bulk rise during the day, shape, and chill the dough in the loaf pan overnight to bake the following morning. Something to play around with as well…🥰
Dina M Abramo says
I’m really happy with the results of my sourdough starter and the sandwich bread I made! Your notes are SO helpful and I love the recipes. I’ve made the artisan bread and focaccia so far and they were delicious! Thank you so much for the detailed instructions; it really helps! I’ve made bread before but this is the first time making SOURDOUGH bread and it definetely has a learning curve! Having patience is key for me!
Emilie Raffa says
This is really great to hear Dina. Thank you. Patience is *huge* when you bake sourdough. It literally forces you to slow down and pay attention! II’m happy you’re having success with your starter & breads 🥰
Paul says
What a wonderful sourdough bread the only thing one loaf is just not enough CAN I double the reciepe and make two loafs at a time thanks
Pj says
Yes, it doubles nicely
Shannon says
I doubled and used 300g of starter!!! It gave it a wonderful true sourdough taste! Love it!!! It got a bit hard on top so I lightly rubbed it with a stick of butter before it cooled.
Manuela says
Can this loaf be made with milk instead of water?
Emilie Raffa says
Hi Manuela! I haven’t tested this particular recipe with milk only. I suspect it would be more fluffy. If you experiment, consider doing a 50/50 combo to start, and work your way up from there until you reach your desired texture.
Tonya says
I’ve made this twice and it is hands down the absolute best sourdough recipe I’ve ever made. I have made dozens of different recipes even one of Emilies (the beginners one) and I still think this is the best recipe ever. The bread stays soft for well over a week and it’s just so delicious. I actually wanted to try and take this recipe and make rolls with it, instead of a loaf. I hope it will work
Brandi says
I have made this numerous times only loaf bread I make with bread flour or all purpose it great bread both pan sizes have their plus. Way worth using as base recipe no regrets.
Terri says
I precisely followed all the steps, making sure to measure using a scale. My kitchen air temperature is 68°. After 14 hours of bulk fermentation, my dough has not risen 😞. Any thoughts? I’ll still continue with the bulk fermentation and hope and pray!
Mary says
Is your starter strong and well established? Did you use an active starter or discard from the fridge?
Emilie Raffa says
Hi Terri! Sourdough (dough) needs three things to rise: strong starter, temperature, and time. It sounds like your starter may not have been active enough. So I’d start there, feeding it as needed to make it vibrant and strong. For temperature, you might want to place your dough in a warmer spot during bulk fermentation (this will give it a boost). Try inside the oven with the light on. And finally: time. The dough will alway take longer to rise in cold weather, especially with a sluggish starter. Try these tips and see how you go!
Haley says
Delicious sandwich bread! Mine took much longer to rise as I have a cold house, but it was totally worth the wait. Soft and moist but sturdy enough to hold up in a sandwich. This is the first recipe I’ve tried with my starter that actually had a noticeable sour taste to it. Will definitely make again!
Mary Wright says
My 6 qt kitchen aid mixer specifically says to not use dough hook at more than speed 2. You recommend speed 3 and I am reluctant to do that. I will use speed 2 but wonder if you should change your instructions and what my results will be at a slower speed.
Looking forward to your feedback. Thanks.
Jerry Head says
I use speed 3 in my older Kit hen Aide and it works well.
Emilie Raffa says
Hi Mary! I’ve never encountered any issues. However, if you are reluctant, go ahead and try speed 2. It will take a bit longer to come together. But the end goal is the same. The dough should feel soft and supple, not sticky. Hope this helps! 🥰
Sue says
Made this bread today! I measured by the recipe to the gram, and I loved working with this dough. I did not preheat at a higher temperature as I did not want too much additional oven spring. The texture appears like a really nice sandwich bread but the feel in your mouth is a little off and the taste is flat. Maybe a salt/sugar ratio thing? Perhaps I undercooked it just a tad at 45 minutes even though the crust was quite well browned. Not sure what I did wrong, but practice makes perfect and I’ll get another loaf baked soon!
Mary says
Can you tell me what the purpose would be to increase the starter and water amounts?
I used the 50 grams of starter but it has taken my dough in the bread pans all day to rise, and it still hasn’t risen to the top. If I use more starter will it rise quicker?
Thanks
Sandy says
Using more sourdough starter and less water create a faster fermentation cycle and a more dense chewier dough with less tang.
julie hynes says
I have the same question as Mary, my dough has been in the pan for over 3 hours and it is not to the top of the pan? It grew but did not make it to the top of the bread pan. I am hoping it works anyway.. and love to get feed back on this also.
Tasha says
Mine took almost 12 hours for the second rise, but eventually did. lol I think it just has to do with the temperature of your kitchen being a little to cold.
Mary says
I am trying the sourdough sandwich loaf today. It is now on the final rise before baking. If I use a cast iron enamel bread pan with a lid, like a Dutch oven, do I keep the top on for the entire baking time? Or do I remove it like when I make the beginning artisan boule? Thanks for your recipes. They are so easy to follow and delicious!
Mary Cate says
I have the same question!
Lisenell says
Beautiful, great tasting bread and an easy recipe.
Dee Thistle says
I have been watching videos and listening to people on YouTube. This by far was the best explanation and it only took a few minutes to read but most importantly, understand what bulk fermentation was and what to do afterwards thank you thank you thank you
Katie says
Such a good recipe! I refrigerated the dough during bulk rise, it took 24 hours to double. It was DELICIOUS and had so much sourdough flavor you don’t normally get in a sandwich loaf.
Sandy says
By bulk fermenting it for 24 hours you created an extra sour sourdough loaf!
T Rose says
I have tried a couple other sandwich loafs, but this one was super easy, added tips and came out looking just the the picture. Excellent Sandwich bread. I will be making this again. Thanks Emilie!
Miranda says
Can you use plant-based butter?
Hannah says
I make it with plant based butter and it comes out great!
Tanga Stewart says
Made this sandwich sourdough bread yesterday. Delicious! It is very soft and holds together. After cooling we made meatloaf sandwiches. The bread was perfect. It held together was soft and moist not dry and crumbly. Will definitely do this again! Thank you!
Mary says
Hi there!
I have loved making your different breads. I made this one for the first time, and it is delicious. However, my loaf did crack around the edges; what did I do wrong?
Thank you for your time, and advice.
Lindsey says
This is delicious and super easy. I added cinnamon swirl-perfect for toast.
Laura Tiffany says
My first loaf of sourdough sandwich bread
Nhi says
Hi i can I replace the butter for olive oil? I would like to make it allergy friendly for my son.
Karen says
This was fantastic! Thanks for including the measurements in cups, etc. I discovered after buying my sourdough starter that my kitchen scale doesn’t actually weigh in grams, so it was great having everything listed both ways. Turned out delicious and was very easy to make.
Andrea says
Hi!! I’m new to sourdough but I really want to try your recipe since I already make my own regular sandwich bread. My question is, can I use a lidded pan for this recipe? And if yes, how tall do I let it rise on the second rise. Thank you!
Meeghan says
Hi! (Obviously im not the creator) but I used the lidded loaf pans for mine. It rises all the way towards the lid usually and bakes perfectly square!
Catherine Remus says
I followed the ingredient amounts, in grams, exactly but when mixing it was extremely stiff and lumpy not shaggy hard and lumpy. Hopefully it will soften up after autolyzing. Can I add more water at that point or is it too late?
Mickey says
Can I do honey instead of sugar ? Is it the same amount as the sugar. If so do I add the honey to the starter and water. Thank you Mickey
Eric Miller says
I am experimenting with using heirloom /heritage turkey red wheat flours and was wondering if you could advise on adjustments to this recipe if using 100% whole wheat flour and if using 100% bolted wheat flour. Thank you.
Amy says
Great straightforward recipe that I will use over and over! Made a delicious and soft loaf. I doubled it and froze one for later.
Nicole Cumberbatch says
I’m a newbie to making sourdough bread. I followed you recipe exactly as given and my first sourdough sandwich bread came out AMAZING and DELICIOUS!
Thank you so much for sharing
Danielle says
I just made this bread and it is by far the softest sourdough sandwich I have ever made. I definite keeper!!!
Pip Hyde says
Hi,
Question my bread came out cakey, I didn’t put in as much salt as I used salted butter, also had to cook longer as internal temp was WAY under 95c
Im guessing should be same as boules… any advice would greatly accepted.