This marshmallow recipe is a messy job, but totally worth it! Tons of tips and tricks shared for the fluffiest marshmallows ever. Your cup of hot cocoa awaits…

How To Make Marshmallows
There are a few ways to do this. But first, it’s interesting to note that most marshmallow recipes contain corn syrup and/or raw egg whites which makes them soft and fluffy. The problem is, I’m not a fan of corn syrup and most people freak out about raw eggs. So, what is one to do?
Use evaporated milk.
Yes, it’s true. I’m not exactly sure what kind of magical powers it posses. But evaporated milk does in fact makes the fluffiest marshmallows ever, without having to add any of the above ingredients. It’s the best kept secret.

Here’s another tip- your cooking tools are just as important as your ingredients. If you’re short on any of them, the process is going to be a little bit tricky. You will need the following items in this order:
- Patience
- Clutter free workspace
- Stand mixer
- Cooking spray
- Non-stick 8×8 or 9×13 pan
- Parchment paper
- Candy or digital thermometer (this is the one I use)
- Rubber spatula
- Sifter
- Powdered sugar & cornstarch
- Sharp knife, pizza wheel or kitchen scissors
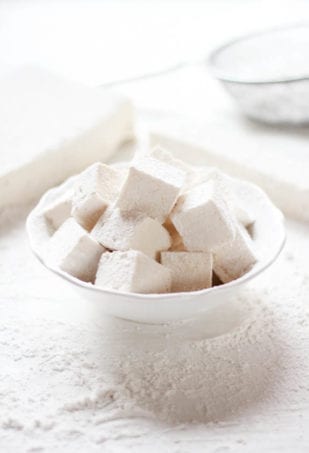
And now, kindly prepare yourself for a fleet of snowy white photos with comprehensive instructions at the end of the post (I had to lure you in somehow- this is a long one!) Sunglasses are optional.


I have to say, this marshmallow recipe tastes way better than store-bought, and the best part is, you have total control over the quality of ingredients. Of course they’re a bit messy, and yes your fingers will get sticky- but the truth is, they’re a lot of fun to make. Once you have this basic recipe down you can add different extracts, toppings and sugars to make it your own (try it with my homemade vanilla sugar!). Follow these tips and tricks, and you will have beautiful, fluffy marshmallows every time.
Tips:
- Space is your friend. If your kitchen lacks counter space, move this project to a clean kitchen table. Position your stand mixer near an outlet, and set up all cooking tools and ingredients before you begin.
- Prepare your pan right away. Marshmallows set very quickly, so be sure to have your pan prepped and ready to go. All pans need to be generously coated in cooking spray and lined with parchment paper. I recommend using something non-stick, but glass or metal will do.
- Do I really need a candy or digital thermometer? Yes. In order for your marshmallows to set properly, the milk and sugar must be heated to approximately 235-240 F. Regular thermometers only go up to 220 F. This is the thermometer I use for my sourdough bread, and it works here too.
- Get to know your rubber spatula. This is the one and only tool that will get the fluff out of the bowl. Keep in mind, because marshmallows are very sticky you will not be able to scrape every last bit out of the bowl. You will not have a perfectly smooth finish to the top as well. This is all OK.
- Powdered sugar & cornstarch… why both? Even though powdered sugar has a small amount of corn starch in it, additional cornstarch acts as a moisture barrier preventing the marshmallows from becoming sticky. Make sure to sift your mixture before coating the marshmallows (you don’t want any clumps!).
***And last but not least- because evaporated milk is a tan color, your mixture will initially be brown. Do not fret! After 10-15 minutes of mixing on high speed your marshmallows will become a soft, creamy white color. I was skeptical at first but it’s true.


By signing up, you agree to receive emails from The Clever Carrot. Unsubscribe at any time.
Homemade Fluffy Marshmallows
- Yield: 6–8 servings 1x
- Category: Dessert
- Method: Mixer
- Cuisine: American
- Diet: Gluten Free
Description
It’s a messy job, but totally worth it! This recipe uses evaporated milk, which is my best kept secret for fluffy homemade marshmallows. No corn syrup or raw egg. The marshmallows need to set overnight before cutting into delicious squares. Recipe adapted from Food Network.
Ingredients
Ingredients
- cooking spray
- 1/2 c. water + 1/4 c.
- 3 tablespoons (3 packets) unflavored powdered gelatin
- 2 c. sugar
- 1/2 c. evaporated milk
- 1 vanilla bean or 1 tbsp. pure vanilla extract
- 1 1/2 c. powdered sugar
- 1/2 c. cornstarch
Cooking tools:
- clutter free workspace
- stand mixer
- non-stick 8×8 or 9×13 pan*
- parchment paper
- candy or digital thermometer**
- rubber spatula
- sifter
- sharp knife, pizza wheel or kitchen scissors
Tips:
*I recommend using a non-stick pan, but glass or metal will do. For thick marshmallows, use an 8×8 pan. For thinner marshmallows, use a 9×13 pan.
*In order for your marshmallows to set properly, the milk and sugar must be heated to approximately 235- 240 F. Use a candy or digital thermometer to double check.
Instructions
- Generously coat the bottom and sides of your pan with cooking spray. Cut a piece of parchment paper to fit the inside; you should have about 2 inches of overhang on each side. These will be your ‘handles’ for easy removal.
- Pour 1/2 cup water into the bowl of a stand mixer fitted with the whisk attachment. Add the gelatin and allow to soften, about 10 minutes.
- Meanwhile, in a large saucepan combine the sugar, evaporated milk and 1/4 cup water. Whisk over low heat until the sugar has dissolved. Then, increase the heat and bring the milk mixture to a gentle boil. Continue to cook without stirring, until a digital thermometer registers 235- 240 F, about 10-15 minutes or more, depending on the heat.
- Add this hot milk mixture to the gelatin and beat on low speed until incorporated (see important note below).
- If using a vanilla bean, slice it in half lengthwise with a pairing knife. Scrape out the seeds using the blade of the knife. Add the seeds (or vanilla extract) to the mixer.
- Increase the speed to high and beat until thick, fluffy, and tripled in volume, about 10-15 minutes. Your marshmallows will be a glossy, creamy white color.
- Using a rubber spatula, quickly scrape out the mixture into the prepared pan. Lightly coat your spatula with cooking spray and smooth out the surface. Marshmallows set very quickly, so you will need to work fast. Do not worry about getting every last bit of marshmallow out of the bowl or making the top perfectly smooth! Allow the mixture to set, uncovered (not refrigerated) for at least 8 hours- overnight.
- After the marshmallows have set, add the powdered sugar and cornstarch in a large bowl. Whisk thoroughly to combine.
- Spoon some of the mixture into a sifter, and sift over the top of the marshmallows and a cutting board.
- Using the parchment handles, remove the marshmallows from the pan and place onto your board.
- Dust a large chef’s knife, pizza wheel, or kitchen scissors with the powdered sugar/cornstarch mixture so that they do not stick to the marshmallows.
- Cut the marshmallows into 1-inch squares. Toss the marshmallows into the mixture to prevent sticking.
- Store in an airtight container for up to 1 week.
Notes
Because evaporated milk is a tan color, your mixture will initially be brown. Do not fret- after 10-15 minutes of mixing on high speed, your marshmallows will become a soft, creamy white color.

Comments
wendy@chezchloe says
Hi! Not sure how I got here but glad I did. I love making marshmallows when I do have the time and patience. I look for an organic corn syrup but had not heard of using evaporated milk. But will for sure try it for my peppermint marshmallows. Thanks. wendy
Emilie says
You’re welcome Wendy! Using evaporated milk is a great and reliable substitute. I was shocked at how well it works. Your peppermint marshmallows sound fantastic by the way… Have fun with the recipe :)
Adri says
Beautiful! I adore homemade marshmallows. I was on a real kick with them a few years ago, and I remember that even though I thought I had “cleaned up” , as I walked around my kitchen I saw a fine dust of confectioner’s sugar and cornstarch everywhere! I had to laugh… and then I”d eat another marshmallow. One year, I actually did them on my back patio. No kidding. It turned out to be a really good solution.
I find your use of evaporated milk intriguing. The technique is new to me… I have got to give this method a go. I have always entranced by watching the string of hot syrup as it was absorbed into the egg whites. I love watching as the mixture mushrooms to such a volume that it looks as though it might overflow the mixture bowl.
Congratulations on a beautifully realized recipe and marvelously done post. Brava! Happy Holidays!
Emilie says
How funny- that powdered sugar mixture sure does get all over the place! Great idea to do it outside. I have this really ugly disposable table cloth that I plan on using next time. I’ll just wrap the whole thing up and throw it in the trash ;)
I think you will really appreciate the use (and ease) of the evaporated milk. It is so amazing how it transforms these marshmallows into soft, puffy deliciousness. What’s even more amazing, is that the mixture starts out brown and then turns completely white. I was shocked!
We wrapped these up and gave them away as holiday presents. They are a huge hit with grown-ups and kids alike! I hope you enjoy. Happy holidays Adri xx E
Merryl Chantrell says
Thanks for the super easy recipe. I cannot tolerate raw egg whites so this recipe is great.
Looks yummo too.
Emilie says
You are quite welcome Merryl! I know a lot of people who cannot tolerate raw egg whites as well, so that was one of my motivations behind this recipe. The results are very similar, if not the same. Using evaporated milk is a great tip :)
The Wooden Spoon says
This is just in time! I was planning on making marshmallows this weekend- this is very helpful. Thanks!
Emilie says
Oh, how funny is that? I guess it’s that time of year ;) If you’ve never made them before, this is a very reliable recipe. Enjoy!
Alessandra (DinnerinVenice) says
Um. Wow. Insanely delicious looking. I must do this with my kids ASAP! Have you tried them in hot cocoa? I think we must.
Emilie says
Your kids will LOVE making these! We definitely had a lot of fun with this project. And they are delicious in hot chocolate too! So soft & creamy… and if you can make them with vanilla bean, even better :)
Laura (Tutti Dolci) says
Gorgeous marshmallows and I love that you made them without corn syrup. Can’t wait to try!
Emilie says
Thank you Laura! Replacing the corn syrup with evaporated milk works like a dream. You will never believe how soft and fluffy they are! I hope you enjoy :)