Ready to level up your sourdough? Learn how to add fillings to any sourdough bread recipe with this step-by-step technique and video, plus an easy, olive sourdough bread with thyme, lemon zest & Parmesan cheese.
Adding fillings to bread dough, such as fragrant rosemary, olives, dried fruit (even chocolate chips!) will enhance the flavor and texture of any sourdough bread recipe. It takes about 2 minutes tops, and it’s exceptionally easy to do. You just have to know when to do it.
This tutorial and video will teach you how to add fillings to sourdough, with step-by-step instructions. I’ve also included an easy olive sourdough bread recipe adapted my book Artisan Sourdough Made Simple, so you can practice what you’ve learned right away.
Step #1: Mix the Dough & Let it Rest
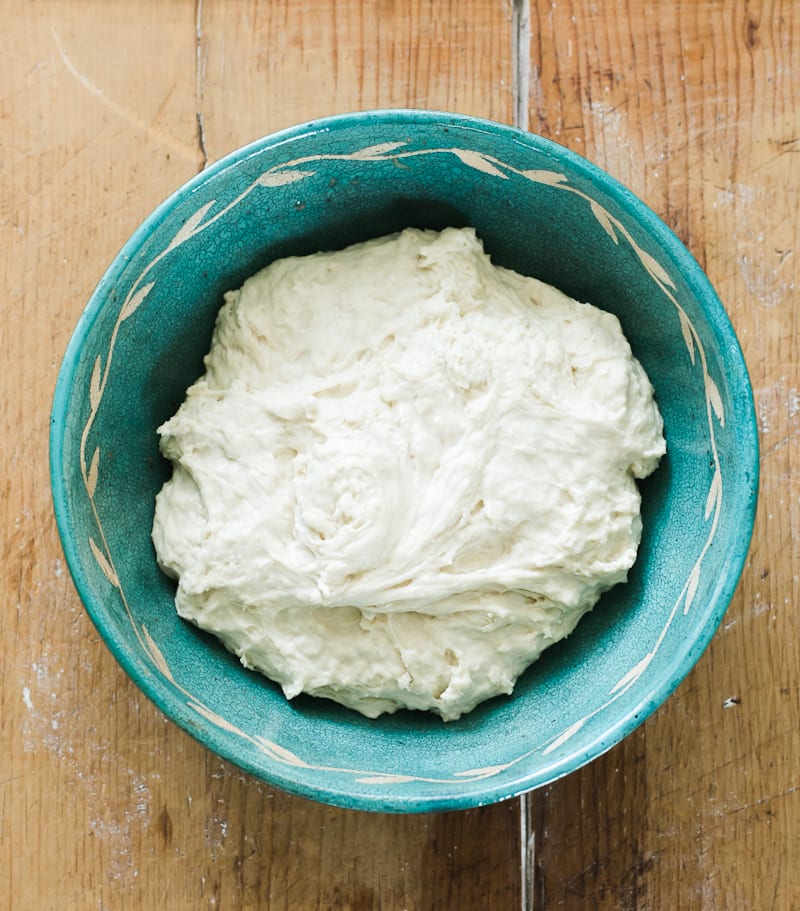
Combine the wet and dry ingredients to form a rough dough. Pay attention to the texture at this stage: it should feel stiff and shaggy. The key now, is to let it rest for 30 minutes to 1 hour.
The technical term for this (first) resting period after the initial mix, is called is called autolyse.
During autolyse, the flour hydrates and the gluten begins to form. As a result, the dough morphs from stiff and shaggy to soft and manageable. This is what you want. When the dough is soft and manageable, it’s easier to add fillings to the dough.
Tip: Can a stand mixer be used instead? Absolutely. The same steps apply: mix the dough and let it rest. Add the fillings. On low speed, using the dough hook, mix the dough to incorporate. Check out my Sourdough Cinnamon Raisin Bread to see this in action.
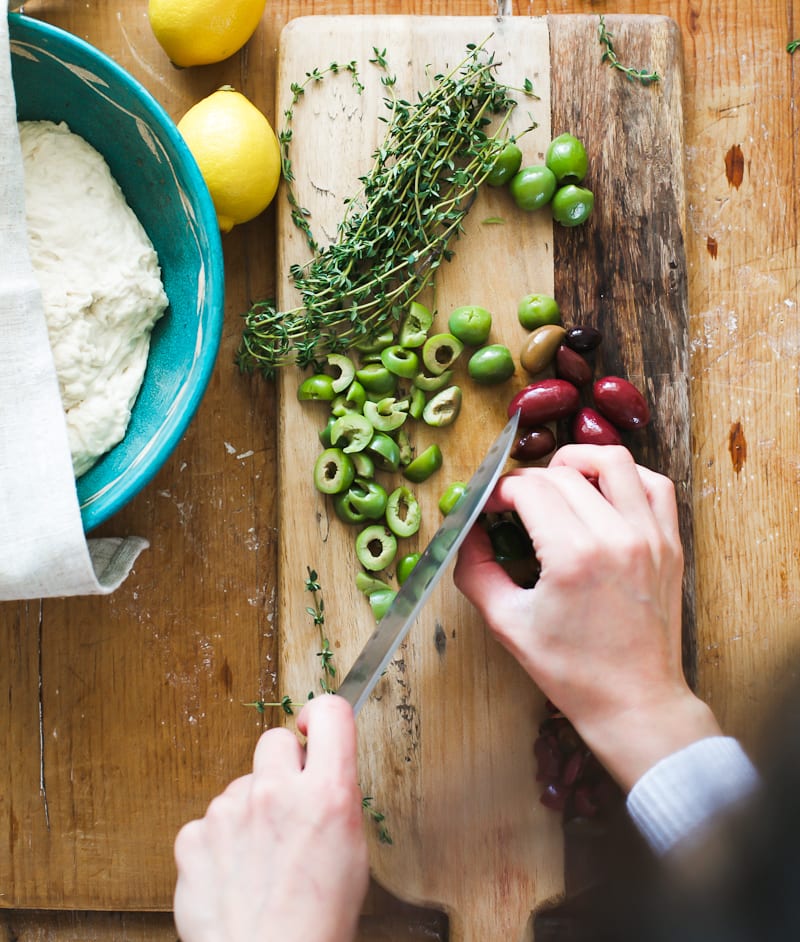
Step #2: Prepare the Fillings
Here I’m using mixed chopped olives, lemon zest and thyme. You can use any fillings you’d like, about 1 cup (100g- 130g) for every dough made with 500 g of flour.
Tip: What about dried fruit or nuts? In most cases, you’ll need to soak the dried fruit and nuts first. Otherwise, they tend to absorb additional water in the dough (which can make it dry). For nuts, toast them first for extra flavor if preferred, then soak in water. Drain and pat dry.
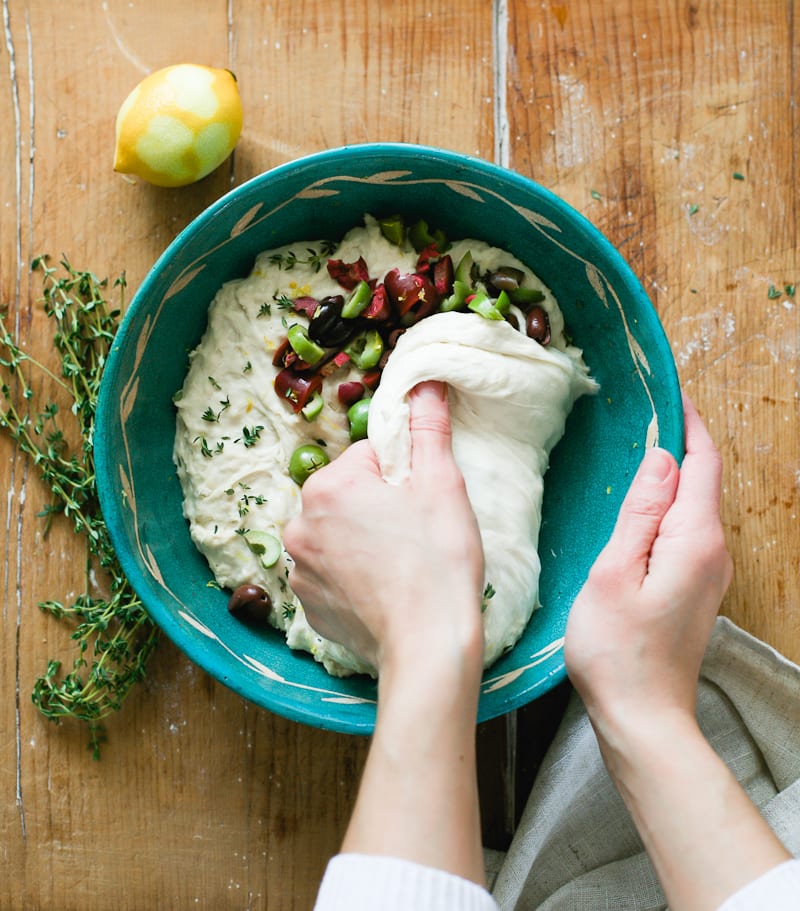
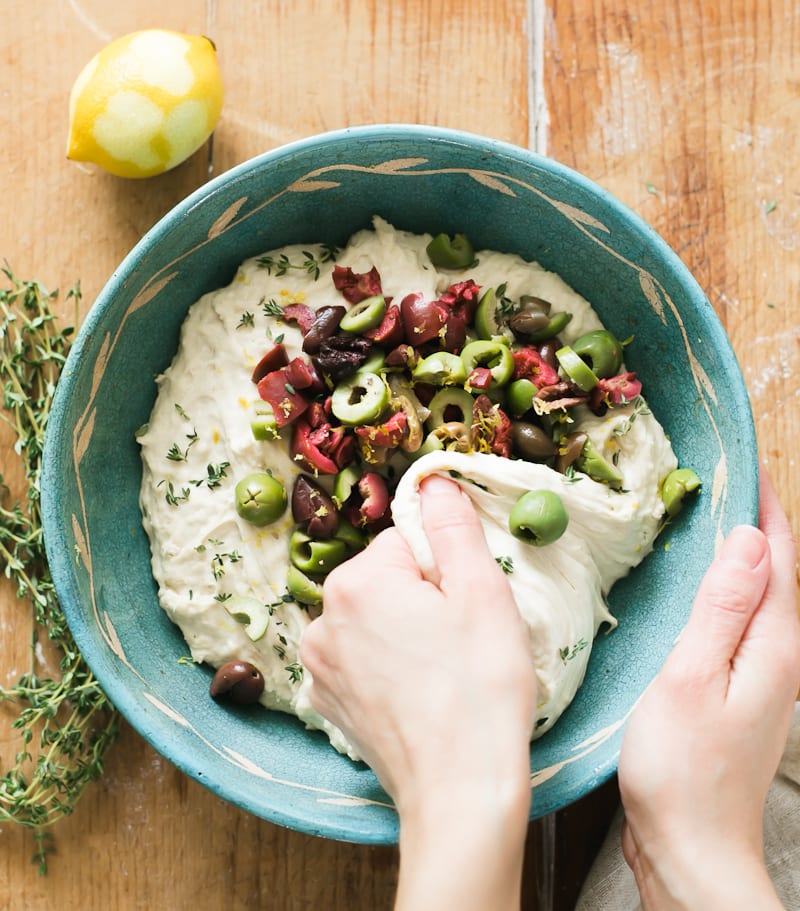
Step #3: Stretch and Fold the Dough
To incorporate the fillings, sprinkle them over the top of the dough. Use the stretch and fold technique to tuck them into the dough. To do this, stretch the dough upward and fold it over toward the center of the bowl. Give the bowl a turn and repeat (stretching, folding & turning) until you have tucked all the fillings into the dough.
Tip: Some of the fillings will pop out as you go. This is ok. Just smush them back into the dough- otherwise they might burn.
What’s Next?
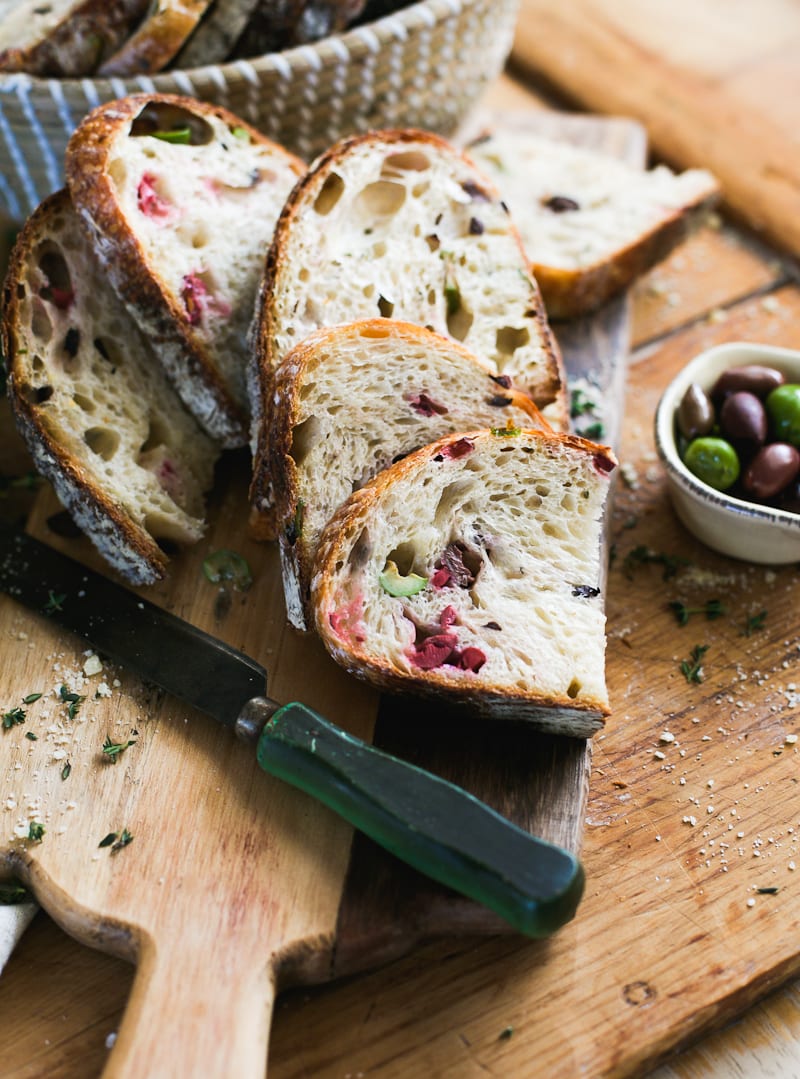
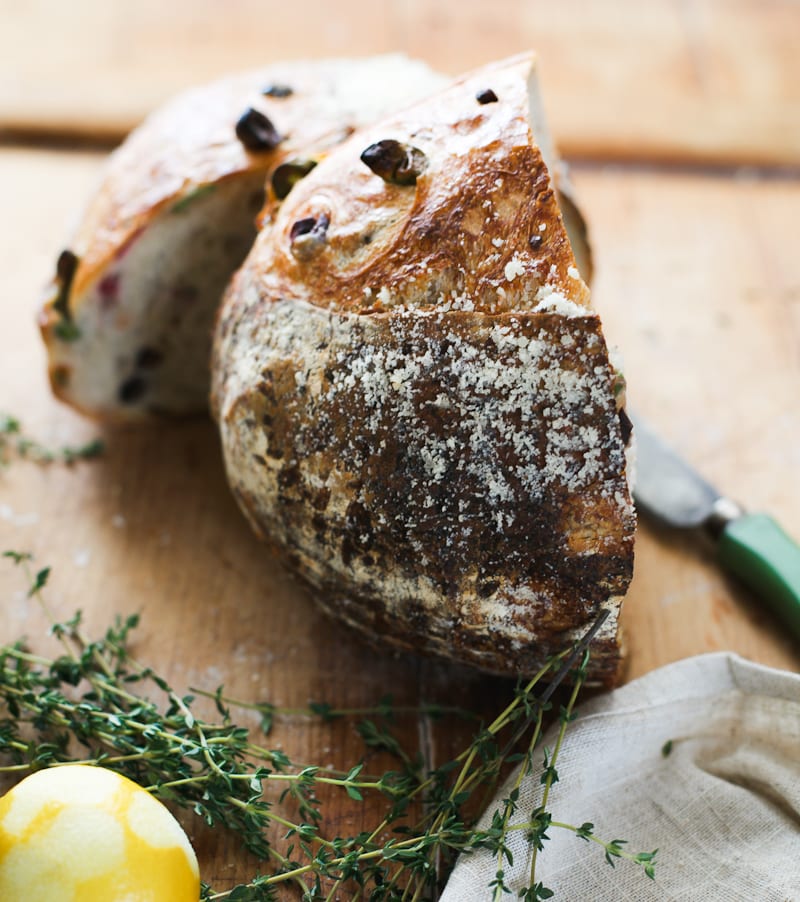
Let’s make some rustic, homemade bread! Below you’ll find my easy olive sourdough bread recipe with thyme, lemon zest and Parmesan cheese + a sample baking schedule. The plump, juicy olives act as natural steam injectors as the dough bakes, creating a soft and tender interior crumb! We love this bread for sandwiches or toasted with fresh basil pesto and goat cheese.
Sample Baking Schedule
Note: if making this dough in the summer skip the overnight rise (as mentioned below). Bulk rise during the day; when the dough has almost doubled in size, cover and chill the whole bowl overnight. Bake the following day.
In the evening…
- 8 PM (or later): Make the dough. Rest for 30 minutes.
- 8:30 PM: Add the fillings.
- 8:35 PM: Cover and let rise overnight @ 68 F (10-12 hrs); @ 70 F (8-10).
- 9:05 PM: Optional stretch & fold
- 9:35 PM: Optional stretch & fold
In the morning…
- 6 AM: Check dough. Adjust time, as needed. Shape, second rise, bake.
By signing up, you agree to receive emails from The Clever Carrot. Unsubscribe at any time.

How To Add Fillings to Sourdough: Easy Olive Sourdough Bread Recipe
- Prep Time: 5
- Cook Time: 50
- Total Time: 55 minutes
- Yield: 1 Loaf 1x
- Category: Sourdough Bread
- Method: Oven-Baked
- Cuisine: American
- Diet: Vegetarian
Description
Level up your sourdough bread with chopped olives, woodsy thyme, fragrant lemon zest & Parmesan cheese. Recipe adapted my book Artisan Sourdough Made Simple.
Ingredients
Dough
- 50 g (1/4 cup) bubbly, active sourdough starter
- 360 g (1 1/2 cups) water
- 470 g (about 4 cups) bread flour
- 30 g (1/4 cup) all-purpose flour
- 9 g (1 1/2 tsp) fine sea salt
Fillings
- 120 g (1 heaped cup) pitted mixed olives, roughly chopped
- 2 g (1 tbsp) picked thyme leaves
- Zest of 1 lemon
- 80 g (1/2 cup) ground Parmesan cheese, optional
Instructions
- Make the Dough: In a large bowl, whisk the starter and water together with a fork. Add the flours and salt. Combine to form a stiff dough, then finish mixing by hand to fully incorporate the flour. Cover with a damp towel and let rest for 30 minutes.
- Add the Fillings: After the dough has rested, add the olives, thyme, lemon zest and parmesan cheese (if using) to the bowl. Gently knead the fillings into the dough, using the stretch and fold technique, To do this: stretch the dough upward and fold it over toward the center of the bowl. Give the dough a turn and repeat (stretching, folding and turning) until the fillings are tucked into the dough.
- Bulk Rise: Cover the bowl with lightly coated plastic wrap and let rise at room temperature until double in size. This will take about 8 to 10 hours at 70 F (21 C). Note: if making the dough in the summer, the rise time will be considerably less; bulk rise during the day and chill the whole bowl overnight when almost double in size. Optional Step: If you’d like, for added structure, do 1-2 sets of stretch and folds during the bulk rise, spaced 30 minutes apart.
- Shape: Remove the dough onto a lightly floured surface. Shape it into a round or oval and let rest for 5 to 10 minutes. Meanwhile, line a proofing basket with a towel and dust with flour. With floured hands, gently cup the dough and pull it toward you to tighten its shape. Then place the dough into your basket, seam side up.
- Second Rise: Cover the dough and let rest until noticeably puffy but not fully risen, about 30 minutes to 1 hour, depending on temperature. Alternatively, chill the dough overnight, up to 8 hours. Let rest at room temperature while the oven heats up before baking. Preheat your oven to 450 F (230 C). Cut a sheet of parchment paper to fit the size of your baking pot.
- Score: Place the parchment over the dough and invert the basket to release. Sprinkle the dough very lightly with flour and rub the surface to coat. Make one long, off-center cut down the length of the loaf using a small knife or razor blade. Use the parchment to transfer the dough into the baking pot.
- Bake: Bake the dough on the center rack for 20 minutes, covered. Remove the lid, and continue to bake for 30 minutes. Lift the loaf out of the pot and finish baking directly on the oven rack for the last 10 minutes. Cool for 1 hour before cutting into slices.
Notes
This loaf will stay fresh up to 1 day stored at room temperature in a plastic bag.

Comments
Wendy G says
I am making your Seeded Pumpkin Cranberry bread from your book. It is so wet after adding soaked cranberries. Can I do more stretch and folds to build up gluten?
Emilie Raffa says
Hi Wendy! Yes! You can do more folds if you want. For the cranberries, next time, pat dry on a paper towel before adding to the dough. That will help absorb any excess moisture.
Priscilla says
What can I add to sourdough sweet dough to make a savory bread?
sophia says
hello i’m new to sourdough baking. you say to put the dough in the basket seam side up. how do i know what side the seam is on after shaping into an oval? sorry if that seems stupid. also, do we usually cook the bread seam side down? thank you so much
Sam says
Hi, basically the seam side is the bottom, so you put this side to the top in the shaping basket, so that as you’ve correctly said, the seam will be on the bottom when you turn it out to bake it.
Susan says
I used about 3/4 pound of bulk sage sausage, 1 medium onion and 1 clove of garlic. I sauté the onion and garlic a bit in a cast iron pan until they begin to color then add the sausage in chunks and stir to brown the sausage and mix everything together. I cool the mixture until it is cool enough to handle and fold it in as directed here. I was very nervous doing it the first time, but it worked great and was a big hit for the crew when we were playing cards.
shrea kuile says
Thanks for sharing the different types of recipes. You mentioned the ingredients and instructions which will make easy to prepare them at home. All food items are healthy and delicious. I like your blog nd also prefer organic products.
Lucie Moulton says
I have your cookbook and was so glad to see it posted here to include the comments. I’m just curious about shaping it into a loaf…..and then what vessel is it best to bake it in, a Dutch oven or a staub braised that has more wrong to fit a long loaf?
Scott says
This is very tasty.
Leeroy says
I’m wondering about your advice to bring your loaf out of the fridge prior to baking as the oven heats up. I’m in my 10th year of home sourdough baking and I’ve always put the loaf into the Dutch oven straight out of the fridge. This advice came from several bakers sites. There seems to be different views on this.
Noah says
It depends on the grade of fermentation of the bread. If your dough is still very under fermented it does make sense to take it out of the fridge beforehand. However the time which the oven takes to heat up will most certainly not be enough. It would take at least an hour after there is some noticeable growth happening outside of the fridge. In terms of oven spring there is no difference between baking straight out of the fridge and said method, as the yeasts in the dough reach the same preferable fermentation temperatures whilst baking, just at different times. Generally taking your dough out of the fridge before baking makes sense if you don’t know exactly how far the fermentation on your dough is. But it seems that you have already a good intuition for that.
Billy says
I enjoy using this recipe. Over the end of year holidays I used roasted/then chopped pecans with rehydrated (and drained) cranberries. It was a big hit with the relatives and neighbors as gifts. I like the japaleno/sharp cheddar inclusions as well.
Cory says
Hi. Thank you so much for your website. I use your beginners sourdough recipe and it’s perfect every time. I tried this olive loaf however and it’s been a mess! The dough was super wet, I thought about adding more flour but was too nervous because I just didn’t know. Fast forward overnight, still sticky/wet and sadly hasn’t risen in the oven. As I’m new and not sure how to navigate troubleshooting any thoughts? I do weigh, I used King Arthur for both flours. Thank you so much!
Meagan says
Do you think fresh parsley would be a good alternative in this recipe? It is what I have at home!
Emilie Raffa says
Sure thing! You can absolutely add parsley. Throw in some roasted garlic and it will be REALLY good.
Angela says
This recipe is so incredibly delicious. I would spend good money for a loaf of bread of this taste and appearance! I skipped the parmesan and it was still such a wonderful burst of flavors without being overpowering.
Emilie Raffa says
Thank you so much Angela! 🥰
Camiella says
This recipe is perfect! I have played around adding different herb and even sundried tomatoes always turns out great
Jayesh says
Hi Emilie, I made the stuff olive and rosemary sourdough bread and it turned out to be very tasty airy and soft.
Annette Fries says
This recipe is amazing. Took it to a party today and it disappeared before I could take a picture. Another great bake thanks to the clever carrot.
Micki says
Hi Emilie, first off, I’m so impressed with your cookbook. I have learned so much and my bread turns out amazing every time I make it. I started baking during Covid and now it’s a habit!!
The recipes are so easy to follow and the ingredients are easy to find and always impress my big family and friends. I have made both sweet and savory recipes.
EmS says
Do you knead the dough between letting it rest and adding the fillings? I can’t imagine adding the fillings then kneading it would be very wise. But there is no step to knead the dough.
EllenMe says
you don’t knead sourdough, the stretch and fold method is when you incorporate the fillings.
Lenora Roland says
We enjoyed this bread! Thank you for a great recipe. I didn’t have fresh thyme so used fresh chopped rosemary.
Jennifer Burch Madden says
I love baking sourdough loaves. A college friend in Oregon mailed me some of her starter last year. I am hooked. My next door neighbor makes wine at one of our local Virginia wineries. His partner and I plan to do wine & sourdough swaps. That will be fun. I am beginning to learn more about add-ins; I have used herbs and cheeses, yet not olives. This recipe looks great, and your tips are very helpful. Thanks for sharing this with us. Cheers!
Yuliana Nikolaeva says
I’m complete beginner yet my loaf turned out insanely good just by following your simple instructions. Thanks to the amazing recipes you’re sharing I’m no longer intimidated of making sourdough at home
Susan says
Help. I made your pumpkin cranberry loaf. So wet after it doubled in size. Very sticky runny. What do I do please email me. I recommend your book to all my friends and family. Need to know what to tell them
Emilie Raffa says
Hi Susan! For the pumpkin loaf, it’s hard to say without knowing your exact conditions. However, it could be a few things:
– Too much liquid in the dough
– The specific flour type/brand was unable to absorb the amount of liquid (flour is like a sponge; if it’s over saturated nothing will soak in).
– Ambient temperature might have been too warm and/ or
– Dough was over proofed (rose for too long).
Next time: make sure to weigh (not measure) your ingredients for accuracy, use bread flour (not ap flour- try King Arthur brand), and monitor your current room temperature and rise of the dough. Note: The recipe in the book recommends a 6-8 hour rise time at 70 F. Compare that given timeframe to your timeframe and perhaps fill in the gaps. Hope this helps!
Susan says
Thank you so much for the reply. I did use bread flour and weighed all ingredients. What might have happened is that I had a lot of juice from my oranges perhaps too much. If that happens again should I just add a little more flour to help it bind a little better. I did bake the bread, it didn’t rise as much but was delicious. I will make it again. I’m in San Diego so the weather was pretty good. Love your book and have given it as gifts many times. 🥰
Linda says
I have made this bread several times and it is truly AMAZING!!! Makes a
Great panini!! I also gave it as a gift. I felt so gourmet!
Thank you! Your cookbook has inspired me.
Emilie Raffa says
Oooo…. your panini idea sounds so good. Totally gourmet! I’ll have to try that. Yum. Thanks so much, Linda! xx
Linda says
Oh you are welcome! I used Smoked Gouda, Turkey, caramelized onions and Mayo
It was ridiculously good
Emilie Raffa says
Sounds incredible. I haven’t had smoked Gouda in ages and now I’m hungry!!
Jim Martin says
Emilie, can I add the fillings during the bulk rise? While that affect the rise?
Julie says
Hi Emilie, love your book ! Its the only one i use, your recipes do not fail. I just finished making your overnight baguette and they turned out beautiful. So fun to bake…… I incorporataed rosemary in the dough, did not use thyme. i want to also use basil since i have a lot in my garden and I’d like to add grated parm cheese. If I add grated parm, should i add more water? will it interfer with gluten developement so maybe i should use bread flour? could you help guide me on this pls? looking at your recipes – for the olive bread you use bread flour, for the baguette you use APF. what is the reason for the difference? Thanks for your help !
Julie
Emilie Raffa says
Hi Julie! Thank you SO much. Very kind to comment here- thrilled you like the recipes :)
For the baguettes: the parm should be ok in the dough, as is. I don’t think it will hinder the gluten development. I’ve used this technique before without any issues. Substituting with bread flour will change the entire texture of the baguettes. And depending on the brand of bread flour, the water level might have to be adjusted too (adjusting dough formulas is like building a house of cards!). I’d start with adding the cheese first, using the ap flour, and see how things go.
PS: I use bread flour for my olive sourdough recipe for structure, paired with 1/4 cup of ap flour to soften the texture (this combo works best with King Arthur flour). For the baguettes, ap flour is preferred so the texture is not too chewy. In my experience, bread flour makes chewier baguettes with a less crispy crust.
Jamie Hilly says
I made this bread the other day and I think it was the best bread I’ve ever made! It was delicious and so beautiful. Thank you for all of your amazing recipes. I love them all!
Emilie Raffa says
You are very welcome Jamie! :)
Rana says
Hi, first I just wanted to say thanks for sharing your sourdough knowledge with the world. I started using your website last year and now I regularly make loaves with no recipe, it’s all in my head. So, thank you. I make a 175grm wholemeal / 325grm white mix. I live in sunny Sydney, Australia, where I believe your starter originated :)
Second, I wanted to ask about adding seeds and grains. I have been advised by a nutritionist that bread is fine but more seeds and grains in the bread is much preferred, on account of it improving / controlling blood sugars. I have seen a few recipes suggesting to soak seeds and grains before adding them. But given you are the Oracle of all things sourdough, I wondered if you have experimented with adding seeds and grains and if you have any suggested quantities or other tips for doing this. Hopefully I can figure out what works to allow me to continue eating delicious loaves.
Thanks very much in advance.
Emilie Raffa says
Rana, you are very welcome. Thank you for the kind words- it made me smile this morning! And yes! That’s where my starter originated (love Sydney). Regarding the seeds & grains: I would soak them first before adding to the dough. Just like dried fruit and nuts, they can absorb additional moisture in the dough which will ultimately change the texture of the finished bread. Make sure to drain well and pat dry if needed. Flax seeds can be a bit slimy after soaking. Try 50-60 g to start. Hope this helps! xx
Happie says
So fun and creative! Can’t wait to do this for our next family summer event, perfect for this time of the year.
Thank you for always sharing such great ideas!
(Review provided by a support team member for theclevercarrot.com)
Emilie Raffa says
Thanks so much! Enjoy! xx