Think you can’t bake artisan sourdough bread at home? Think again! Sourdough Bread: a Beginner’s guide is your go-to recipe resource for simple, easy sourdough bread without kneading. Make the dough in the morning or at night- it will come together in under 10 minutes.

In 2013, my resolution was to bake more bread.
I researched, tested and baked countless loaves with both good and mixed results. My journey began with this no-knead artisan bread recipe and eventually, I worked my way up to the holy grail: Sourdough. My passion for creating easy sourdough bread recipes and preserving traditional culinary arts inspired my bestselling book Artisan Sourdough Made Simple which has connected me to like-minded bakers all over the world!
So, if you’re curious about sourdough bread and don’t know where to begin, you’re in the right spot. This sourdough bread recipe has been THE MOST popular recipe on my blog for over a decade and continues to earn millions of pageviews a month. Welcome to the journey.
What You’ll Learn
In this tutorial, you’ll learn how to make simple sourdough bread with step-by-step instructions and videos for guidance. There’s no kneading involved, and a bread machine or a stand mixer is not required. My sourdough bread recipe is perfect for beginners. I’ll explain a complex topic in simple terms without the stress!
But before you dive in, here’s a secret: sourdough bread is more than just a recipe… it’s an understanding.
There are similar sourdough bread recipes out there and yet no two loaves look alike. The process is all about method, timing and personal touch. Use this tutorial as a guide and make your own adjustments as you go. Once you have a few loaves under your belt, the process will become an imminent rhythm, and in the end, you will have created your very own masterpiece that is the ultimate reward. Just don’t forget to eat your mistakes (might I suggest homemade sourdough breadcrumbs)?
Jump To
- Sourdough Bread Recipe
- Step by Step Instructions
- Sourdough Starter 101
- Sample Baking Schedule
- Sourdough FAQ

So, What is Sourdough?
In a nutshell, sourdough is slow-fermented bread.
It’s unique because it does not require commercial yeast in order to rise. Instead, sourdough bread is made with a live fermented culture a sourdough starter, which acts as a natural leavening agent.
Sourdough is known for its characteristic tangy flavor, chewy texture and crisp, crackly crust. From a health standpoint, it dominates when compared to supermarket loaves. The naturally occurring acids and long fermentation help to break down the gluten, making it more digestible and easy for the body to absorb. And it tastes darn good!

Sourdough Starter 101
Before you begin, you’ll need a sourdough starter.
Simply put: a sourdough starter is a live culture made from flour and water.
Once combined the mixture will begin to ferment, cultivating the naturally occurring wild yeasts and bacteria present within the mixture. A small portion of this culture is used make your bread dough rise.
But it doesn’t stop there.
Your starter must be kept alive with regular feedings of flour and water to maintain its strength for maximum rising power.
How to Feed your Sourdough Starter
Every baker has their own method, and with practice you’ll eventually develop your own routine.
Here’s my method: I pour off some of the culture (about half) and then feed what’s left in the jar with equal weights of flour and water. I whisk well with a fork until it’s lump-free. Then, I let it rest at room temperature or in a warm spot (75-80º F/ 24-26º C is ideal) until it becomes bubbly and active.
PS: I use this the jar for my sourdough starter and I LOVE it.
When is my Starter Ready To use?
Your stater is ready to use when it becomes bubbly and doubles in size.
This can take anywhere from 2-12 hours or more depending on temperature (the warmer the better) and the condition of your starter. Be patient!
Float Test: If you’re still unsure whether it’s ready to use drop a small amount, about 1 tsp, into a glass of water. Do this when the starter is a peak height before it collapses. If it floats to the top it’s ready to use. If it sinks, your starter should be fed again.
Where to Obtain a Sourdough Starter
All sourdough starters are different.
They can be made from scratch, purchased online, or if you’re lucky, someone will share a portion of their starter with you.
Starters range from thick to thin in texture and can be made with a variety of flours. I use two different starters; one is homemade and the other was a gift from my friend Celia. She dried a portion of her starter and mailed it all the way from Sydney, Australia.
How To Use A Starter
After you’ve fed your starter and it’s bubbly and active, pour the amount you need out of the jar to weigh or measure for your recipe. That’s it.
Then, don’t forget to feed what’s left in the jar with more flour and water to keep the process going.
Any leftover sourdough starter can be used to make sourdough discard recipes, even my homemade sourdough pasta.
Storage Options
If you only bake a few times a month, keep your starter in the fridge and feed it once a week. If you’re an avid baker, store your starter at room temperature and feed it at least once a day.
Looking for more info on sourdough starters? Check out Feeding Sourdough Starter: My Best Tips & Tricks & Sourdough Discard 101: Recipes & Faqs Answered.

How to Make Sourdough Bread: Step-By-Step Guide
Step #1: Mix The Dough
Combine the following ingredients in a large bowl (I use a fork):
- 250 g water
- 150 g bubbly, sourdough starter
- 25 g olive oil
Add:
- 500 g bread flour (such as King Arthur)
- 10 g fine sea salt
Squish the mixture together with your hands until the flour is fully absorbed. The dough will feel dry, rough and shaggy.
Cover the bowl with plastic wrap, reusable wax wrap, or a very damp kitchen towel and let rest or ‘autolyse’ for about 30 minutes. After the dough has rested, work it into a ball directly in the bowl (it doesn’t have look perfect).
TIP: For best results, weigh all of your ingredients with a digital kitchen scale. Measuring cups are not as accurate. Please visit Sourdough FAQ for more details.
What is Autolyse?
This is the first resting period right after you mix the dough.
It jumpstarts gluten development without kneading. Strong gluten = good bread.
For timing, autolyse can range anywhere from 15 minutes to 1 hour or more depending on the type of bread you’re making and your own personal baking schedule. A minimum of 30 minutes works best for this recipe. However, when time permits, I’ll let it go for an hour. The dough will become more soft and manageable to work with afterwards.
A Note on Salt: some bakers prefer to add salt only after autolyse because it might slow down the gluten development. I’ve followed this technique for years, but no longer do so. I prefer to mix everything all at once. It’s practical, effective and produces excellent loaves (plus, you won’t forget to add the salt later on!). I’ll leave the choice up to you.

Step #2: Bulk Rise
Now the dough is ready to rise.
Cover the bowl and let rise at room temperature, about 68-70 F.
How Long will it take?
The dough is ready when it has doubled in size and no longer looks dense.
This can take anywhere from 3-12 hours depending on your current room temperature, the potency of your sourdough starter and the specifics of your surrounding environment.
For example, in the summer the dough can take anywhere between 2-4 hours @ 85º F/ 29º C. In the winter, it will take longer about 10-12 hours @ 68º F/ 20º C. Temperature controls time.
And remember: because sourdough bread does not contain instant yeast it will take longer to rise. Watch the dough and not the clock. Be flexible.
Optional Step: Stretch and Fold the Dough
About 30 minutes into the bulk rise, you have the option to perform a series of ‘stretch & folds’ to strengthen the bread dough {click here for a step-by-step tutorial}. Although it’s not mandatory, this technique will add height and structure to the finished loaf and it’s fun to do.
Watch the video below!


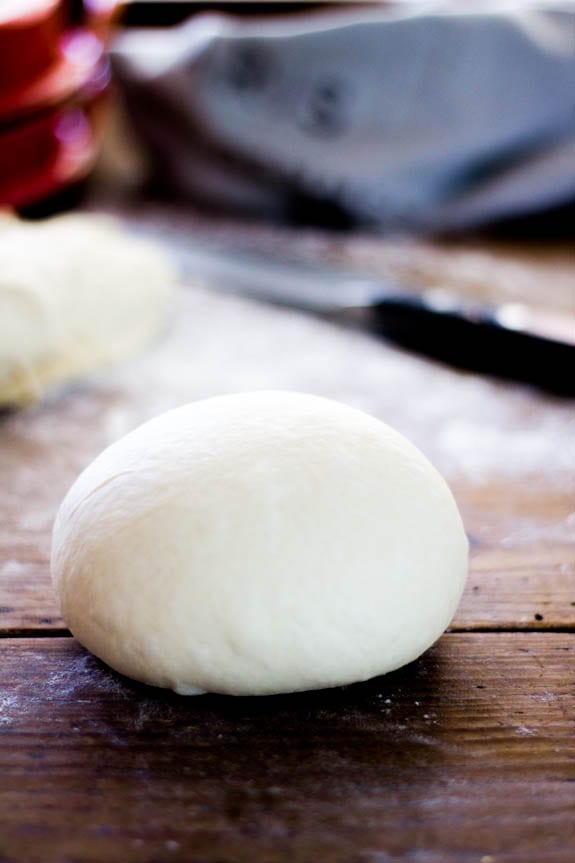
Step #3: Divide & Shape The Dough
Remove the dough onto a lightly floured surface.
Cut the dough in half to make 2 loaves, or leave it whole for a single loaf.
How to Shape a Round Sourdough Boule (Loaf)
Starting at the top, fold the dough over toward the center. Give it a slight turn, and then fold over the next section of dough. Repeat until you have come full circle. Or, use the envelope shaping technique outlined below.
Watch the video!

Step #4: Choose a Baking Pot
I bake my sourdough bread in a Dutch oven.
You can also try the Challenger Bread Pan, another vessel I use for baking, that can accommodate both round and oval shaped loaves.
The pot traps in heat and moisture which is essential to achieving artisan style bread at home.
Steam plays a key role in how the bread will open up or ‘bloom’ while baking and the Dutch oven helps to control this process.
You can use any oven safe pot that can heat up to 450º F/ 232º C (including the lid and handles).
TIP: In the past, I’ve tried baking on pizza stones and cookie trays with no luck. The crust would harden too quickly, forcing the bread to tear on the bottom and sides. I used various steaming methods to remedy this, however I found them to be extremely cumbersome and not realistic for everyday use. Nothing worked. The lack of moisture in my home oven was evident and using a pot for baking was the only practical solution.

Step #5: Second Rise
After shaping the dough, it needs to rise again.
Generously coat the bottom of your Dutch oven with cornmeal (or line the bottom with non-stick parchment paper instead) and place the dough inside.
This time, the dough will rise for a shorter period about 30 minutes- 1 hour.
The dough is ready when it’s puffy and no longer dense. It does not need to double in size.
Preheat your oven to 450º F/ 232º C during the tail end of the second rise.
TIP: Instead of doing a free form second rise in the Dutch oven, use a cloth lined proofing basket or 8-inch bowl instead. Either option will contain the dough and hold its shape properly during the second rise.
Step #6: Score the Dough
After the second rise, and right before the dough goes into the oven, make a slash about 2-3 inches long down the center of the dough.
This allows the steam to escape and for the dough to expand during baking.
You can use a small serrated knife, paring knife or bread lame.

Step #7: Bake the Sourdough Bread
Place the lid on top of the pot and reduce the oven temperature to 400º F/ 204º C.
Bake on the center rack for 20 minutes.
When 20 minutes is up, remove the lid. Your bread will be pale and shiny like the picture above.
Continue to bake (uncovered) for an additional 40 minutes or until deep, golden brown. The internal temperature should read 205-210º F/ 96-98º C.
Cool on a wire rack for at least a 1 hour before slicing. Be patient!
If you cut into it too soon, the texture will be gummy…
TIP: During the last 10 minutes of baking, crack open the oven door (optional). This allows the moisture to escape, leaving your sourdough bread with a crisp crust. Alternatively, remove the bread from the pot and let it bake directly on the rack. The latter produces a more crisp crust.


Additional Sourdough Recipes & Resources
Sourdough Starter:
- Beginner Sourdough Starter {Recipe}
- Feeding Sourdough Starter: My Best Tips & Tricks
- Sourdough Discard 101: Recipes & Faqs Answered
Sourdough Bread Recipes:
- Beginner’s Guide to Sourdough Focaccia Bread
- Best Sourdough Pizza Crust (No steel or stone!)
- Best Sourdough Pasta (1 hour or Overnight)
- Light Whole Wheat Sourdough
- Easy Sourdough Sandwich Bread
- Soft Sourdough Cinnamon Rolls
- Best Sourdough Pancakes
Sourdough Bread Tips & Techniques:
- How to Stretch and Fold Sourdough {Video}
- How to Shape a Round Sourdough Boule {Video}
- Why Won’t My Sourdough Bread Rise?
- Bread Flour vs. All Purpose Flour: What’s the Difference?
Sourdough Tools & Supplies:
Baking Schedule
- Friday Evening: Feed your starter, cover the jar, and leave it on the counter overnight. If you keep your starter in the fridge, it might need two feedings to perk back up (feed it in the morning & in the evening).
- Saturday Morning: Check your starter: if it’s alive and bubbling, you can make the dough to rise during the day. Or, feed it again in the afternoon to make the dough in the evening for an overnight rise. Remember to use the float test mentioned above to make sure your starter is ready to use.
- Saturday Morning/Evening (or whenever your starter is ready): Make the dough. Leave on the counter to bulk rise at room temperature. In the summer, if your dough rises quickly and you’re not ready to bake, cover the whole bowl with lightly oiled wrap and chill until ready to use.
- Sunday Morning: cut and shape the dough. Place in Dutch oven for second rise. Slash. Bake. Cool. Eat.
Sourdough Bread Recipe
Print
Sourdough Bread: A Beginner’s Guide
- Prep Time: 13 hours
- Cook Time: 1 hour
- Total Time: 14 hours
- Yield: 1 loaf
- Category: Sourdough Bread Recipes
- Method: Oven-Baked
- Cuisine: American
- Diet: Vegan
Description
This beginner sourdough recipe is perfect for bakers looking to jump right in! It’s is a low-hydration dough, meaning it will yield a ‘tight’ crumb (small holes). It is great for sandwiches and toast.
Ingredients
- 150g/ 5.35 oz bubbly, active sourdough starter
- 250g/ 8.80 oz warm water, preferably filtered*
- 25g/ .90 oz olive oil
- 500g/ 17.65 oz bread flour (not all purpose flour)
- 10g/ .4 oz fine sea salt
- fine ground cornmeal, for dusting
*For a more soft and pliable dough, you can increase the water up to 300 g- 325 g total. Please use a cloth lined bowl (instead of the Dutch oven for the second rise).
**You will need a 5 1/2 or 6 quart Dutch oven for baking
***This recipe was tested with King Arthur Bread Flour, Gold Medal Bread Flour, Pillsbury Bread Flour
Instructions
Make the Dough
Whisk the starter, water, and olive oil in a large bowl. Add the flour and salt. Squish everything together with your hands until all of the flour is absorbed. The dough will be dry and shaggy. Cover the bowl with plastic wrap, reusable wrap or a clean, very damp kitchen towel. Let rest (autolyse) for 30 minutes or up to 1 hour, if preferred.
After the dough has rested, work the dough in the bowl into a rough ball, about 15 seconds.
Bulk Rise
Now the dough needs to rise.
Cover the bowl with wrap or a very damp kitchen cloth. Let rest in a warm spot to rise. The dough is ready when it no longer looks dense and has doubled in size. This can take anywhere from 3-12 hours depending on the temperature of your ingredients, the potency of your starter and surrounding environment. For example, in the summer rise times can take anywhere between 2-4 hours @ 85º F/ 29º C whereas in the winter, the dough will take about 10-12 hours @ 68º F/ 20º C.
Optional Step: Stretch & Fold the Dough
During bulk rise, you have the option to perform a series of ‘stretch & folds’ to strengthen the dough. Start 30 minutes into the bulk rise. Gather a portion of the dough, stretch it upwards and then fold it over itself. Rotate the bowl ¼ turn and repeat this process until you have come full circle to complete 1 set. Do this once or twice spaced about an hour apart. Although this step is not mandatory, it will increase the total volume and height of your bread. Click here for a step-by-step video tutorial.
Cut & Shape the Dough
Divide your work surface in half; lightly flour one side (for cutting) and leave the other half clean (for shaping).
Remove the dough from the bowl, and place onto the floured section so that it does not stick. You do not need to ‘punch down’ the dough; it will gently deflate as you fold and shape it.
Cut the dough in half to make 2 loaves, or leave it whole for a single loaf.
To shape, use a bench scraper to move your dough to the non-floured section (if there is any flour present, it will be difficult to shape- brush away any excess). Starting at the top, fold the dough over toward the center. Give it a slight turn, and then fold over the next section of dough. Repeat until you have come full circle.
Then flip the dough over and place it seam side down. Using your hands, gently cup the sides of the dough and rotate it, using quarter turns in a circular motion. You can also pull it towards you to even out the shape. Repeat this process until you are happy with its appearance. *See note below.
Second Rise
Now the dough needs to rise again, but for a shorter period of time.
Coat the bottom of your Dutch oven with cornmeal. Alternatively, use parchment paper to prevent sticking (this is what I do, now). Place the dough inside for a second shorter rise, about 30 minutes to 1 hour and cover with the lid of the pot or a very damp cloth. The dough ready when it is slightly puffy but not double in size.
Preheat your oven to 450º F/ 232º C towards the tail end of the second rise.
Score the Dough
Right before your bread goes into the oven, make a shallow slash about 2-3 inches long (or more) in the center of the dough. Use a bread lame, sharp pairing or a small serrated steak knife. The cut should be about 1/4-inch deep.
Bake the Dough
Place the bread into the oven on the center rack (lid on) and reduce the temperature to 400° F/ 204° C. Bake for 20 minutes. Remove the lid, and continue to bake (uncovered) for an additional 40 minutes or until deep, golden brown. Keep in mind that all ovens are different; you might have to make minimal adjustments to these temperatures.
You can also take the internal temperature of your bread to double check that it is done. For sourdough, it should read about 205-210º F/ 96-98º C.
Remove the bread from the oven, and cool on a wire rack for at least an hour before slicing. Don’t cut too soon or else the inside will have a gummy texture!
Notes
When shaping, the idea is for the dough to catch enough surface tension on a non-floured area in order to create a tight ball. If there is flour present, it will slide around… and drive you nuts.
Sourdough FAQ
1.) I only have all purpose flour. Can I still make this recipe?
For best results, use bread flour for this dough. If you only have all purpose try my Artisan Sourdough with All Purpose Flour instead.
2.) Can I add whole wheat flour to this recipe?
You can, but I wouldn’t. The dough will be too dry and dense without adjusting the water quantity. Try my Light Whole Wheat Sourdough for more whole grain goodness.
3.) Your beginner recipe here uses 150g of sourdough starter. The Everyday Sourdough in your book uses only 50g. What’s the difference? And why?
- When I first learned how to bake sourdough bread, I used 150g of starter. Overtime, it was too much to maintain (especially when doubling and tripling recipes). So, I scaled down. That’s why most recipes in my book Artisan Sourdough Made Simple include 50 g of starter instead. One amount is neither right or wrong; it’s just a matter of preference.
4.) What’s the purpose of olive oil in this recipe?
Adding olive oil to sourdough was the method I followed when I first learned how to bake. The natural fat emulsifies the dough and makes a plush crumb.
5.) Why do some of your recipes call for the second rise in a Dutch Oven? And others in a cloth- lined bowl?
The freeform Dutch oven second rise will only work with dry, low hydration doughs (like this one) because it will not spread out too much. On the flip side, when working with wet, high hydration doughs you’ll need to use a cloth-lined bowl sprinkled with flour to holds it shape. Otherwise, it will spread.
6.) Why don’t you preheat your Dutch oven before baking?
Because this recipe follows a freeform second rise directly in the baking pot, it cannot be preheated beforehand. The dough will begin to cook before going into the oven!
However, if you are doing the second rise in a cloth-lined bowl as mentioned in question #5 above, you can preheat the pot if you’d like. When bread dough is placed into a hot pot it begins to expand instantly which is great for the overall shape and structure of the bread. And in fact, I use to follow this technique when I first started baking. But overtime, I found the preheat to be too cumbersome for small kitchens with little kids running around. Plus, I kept burning my wrists. Long story short: you can achieve comparable results without the preheat. The choice is up to you.
7.) Can I halve the dough to bake 2 loaves? If so, what will that do to the baking time?
Yes, you can definitely halve this recipe. Bake for 20 minutes (lid on) and 30 minutes (lid off). Check at the 45 minute mark.
8.) If I halve the recipe, where should I store the second dough if I’m not baking at the same time?
Store the second dough in the fridge until ready to bake. Place the dough in a cloth-lined floured bowl (seam side down) and use the cloth overhang to cover it. If the dough is in the fridge for longer than 1 hour, rest at room temperature while the oven heats up.
9.) How do I get the dough out of the cloth-lined floured bowl?
Open up the cloth overhang to reveal the dough in the bowl. Place a piece of parchment paper on top of the dough. Flip the bowl over. Remove the bowl and cloth. The dough is now smooth side up and ready to be scored.
10.) Can I have the measurements for this recipe in cups, please?
- 3/4 cup bubbly, active starter
- 1 cup + 1 tbsp warm water
- 2 tbsp olive oil
- 4 cups bread flour
- 1 1/2 tsp fine sea salt
NOTE: Weight and volume measurements are not equivalent, only approximate. I strongly recommend weighing your ingredients instead. With that said however, I understand the convenience of measuring cups. For best results, please aerate the flour first (I fluff it with a fork directly in the bag), then lightly spoon and level it into the cup. Too much flour will make the bread dense. If your sourdough starter is very bubbly, the volume amount might be off. If necessary, add up to 1 cup as needed. Finally: the water can be increased up to approximately 1 1/3 cups, for a more soft and pliable dough.


Comments
Alexa says
My husband keeps our house between 65-68 degrees year round. Is the bulk rise more depend on indoor temperature or outdoor weather conditions? Thank you for your help!
Emilie Raffa says
Hi Alexa, indoor temperature is the most significant because that’s where the dough is rising.
Bernadette says
I am having trouble with my dough being too droopy… It won’t ball or holds it shape… Ideas?
Emilie Raffa says
Hi Bernadette! Have you made any changes to the original recipe? Are you weighing your ingredients? What’s the current room temperature? If you can provide a bit more info I’ll be able to help troubleshoot. Thanks!
Kelly C says
Thank you so much for creating this guide. I was so confused on if my starter was ready to use and this guy made it very easy to understand. I baked my first sourdough loaf and it’s the best bread I’ve ever baked.
Shruti says
Hi Emilie! My brother got me hooked to baking sourdough! It is what I look forward to now every Friday evening into Saturday morning:) I have now been baking every weekend for the past month and a half!
My questions: is one able to double the recipe? If so, how does the bake time change if I make one huge loaf? How does one determine whether the baking dish is appropriate in size for the bread, taking into account that it expands during baking?
Thanks so much for this!
Shruti
Emilie Raffa says
Welcome Shruti! That’s fantastic! Fun isn’t it? Ok, so for this recipe: I would not double it, unless you plan to bake (2) separate loaves (not one huge bread- it won’t fit in the pot). Hope this makes sense :)
Shruti Gollerkeri says
Thanks Emilie! Yes that makes sense. Much appreciated!
Emilie Raffa says
You’re very welcome! :)
Brandi Reaves says
This is my first tome baking bread, and your recipe is easy to follow and delicious!
Question: if I divide in half before the second rise in the Dutch oven, but only want to bake 1/2 of the dough, do I put the other 1/2 in the fridge before or after the second rise?
Thanks so much!
Emilie Raffa says
Hi Brandi! Yes: you can hold the other half in the fridge until ready to bake. Shape it, place it in a cloth lined and floured proofing basket, cover, and do the second rise in the fridge.
Alma says
Thank you for making this so much easier. My first batch was delicious and pretty as well 🥰
Sarah says
Thank you for this recipe! I’ve tried other sourdough bread recipes that are complicated and needed refrigeration, etc, and it was too much of a hassle. Let’s be honest, those of us who keep sourdough bread is not going to have a fridge that has a lot of space because we probably do all sorts of other things like make yogurt! Anyway, I absolutely loved this recipe and so do my kids. Not surprised because I love all your other recipes such as carrot cake, sourdough sandwich bread, cinnamon bread. I don’t need to second guess or doubt any of your recipes now! Thank you!!!
Emilie Raffa says
Sarah, you are too funny. My fridge is totally crammed! I’m super happy you had success with the recipe. Thanks for taking the time to comment. xx
Michael says
Do you have a sourdough roll recipe?
Emilie Raffa says
Hi Michael! I have a few roll recipes in my book Artisan Sourdough Made Simple.
Charlotte says
This recipe is relatively easy to following and the bread was DELICIOUS! Would highly recommend :)
Emilie Raffa says
Yay! Thanks so much Charlotte! Appreciate the feedback :)
Sibbo says
Fabulous demistification of the process. Thanks to my daughter for pointing your web page out. Am now even using the discard recipes as well!
:-)
Emilie Raffa says
Sibbo, thank you! How wonderful. Sourdough is a super fun craft. Happy baking!
Rod strong says
Emilie
I have been following your recipe for two years now. I always struggled with sourdough and you have given me a tuturial that has been fun as well as educational. I have to admit I make pretty good sourdough time after time thanks to this blog! Thanks Emilie
Ps your book is great too
Rod
Emilie Raffa says
Rod, thank you so much. I’m thrilled to hear this. I appreciate your support too. Happy baking!
Tina says
Have you tried baking your sourdough bread in a ninja foodie? If so, how did you do it?
Thank you! Love your recipe and directions. Have been using it for some time now.
Emilie Raffa says
Hi Tina! Thanks so much! Re: the ninja foodie, I haven’t tried it. In fact, I had to look it up because I didn’t know what it was, lol. Sounds pretty cool though, if it could work :)
Jason says
40 minutes uncovered is way too long! Are you sure that’s not a mistake?
Emilie Raffa says
Hi there! The baking times are correct. However, all ovens are different (especially convection). To troubleshoot, check for accuracy with an oven thermometer and/or reduce the bake time as needed in your case.
Rod says
What a wonderful experience. from “starter” to finish
Emilie Raffa says
Excellent ;) Thanks Rod!
linda Azuar says
This is my 3rd attempt and it turns out to be amazing. The smell, the outlook, and the taste are just perfect. Better than store-bought. I can be proud of myself. Thanks a lot/
Emilie Raffa says
Linda, this is fantastic! Thanks so much for stopping by to comment. Enjoy and happy baking :) x E
Liz Taylor says
Do you feed the left over starter so you can keep it going
Emilie Raffa says
Hi Liz! Yes: always keep a portion of leftover starter to keep the feeding cycle going. This article, Feeding Sourdough Starter: My Best Tips & Tricks is very helpful.
Karen Folan says
I am so frustrated. I made wonderful bread following your instructions but had to sacrifice my starter when we went away for a while and turned off the fridge freezer. I now can’t make a new starter, have tried 7 times but the starter more than doubled on day 3 or 4 then fades and never rises by more than about a third. I live in Spain and it was very hot during the summer but it is much cooler now but still no success, after weeks of patience. I’m using the same flour, and even tried switching from tap to bottled water, but still no success. Any thoughts?
Emilie Raffa says
Hi Karen! I know, sourdough starters can be a bit frustrating in the beginning. But hang in there. You’ll get it going! Two things come to mind in your case. First, on day 3-4 there will always be a slow down in starter growth. It’s because your starter needs more time to cultivate the yeasts. So this is normal. Second, you mentioned temperature. In most cases, if it’s not warm enough, your starter won’t get the boost in needs during the creation process. I would use warmer water in your feedings, and make sure to keep it in a warm spot at the temperature indicated above. Your starter needs consistency. Also: try a warm water bath: place your starter jar in a bowl of very warm water. Keep it there for a while and change out the water occasionally as it cools down. This will also give it a boost. Try these tips and see how you go. More info linked here.
Heather K. says
This sourdough recipe & the starter recipe are amazing! I’ve tried many other recipes that didn’t work for me. This was easy & less steps than most of the starter recipes I’ve found & this one actually works!! Thank you for sharing your recipe 🙂
Emilie Raffa says
Thank you Heather! I appreciate your feedback and kind words! Glad it worked out for you :)
Cheryll Calabia says
Can I use this recipe to make bagettes instead of a loaf?
Kathleen says
Thanks for such great instructions. One question: how deep should the slash be?
linda Azuar says
About 2 inches deep.
Kathleen says
Thank you. After I read the instructions again where it said to make a slash 2″ long, I thought you probably meant 2″ deep. Or do you mean a slash that is both 2″ long and 2″ deep?
Thanks for clarifying.
Emilie Raffa says
Hi there! The cut should be 2-3 inches long and about 1/4-inch deep (in comparison, 2-3 inches deep would be too much!). Hope this helps :)
Amalia says
I use this recipe every week ! Yhank you for sharing :)
Emilie Raffa says
You are very welcome! Enjoy :)
Donna says
Hi Emilie
I am enjoying your sourdough instructions/recipes and just found that your starter’s “mother” was from Australia and shared my mother’s name – Priscilla.
You may not be aware that your link to your baking schedule is not working (anchor #baking-schedule)
cheers
Julie Mazzoleni says
Hi Emily
I have your book and its the only one i use. I have a question – I love your high hidration dough, i love the fact that I shape in the AM and I can then put in the fridg and bake it later in the day – when I’m ready. This schedule really works for me. Can I do this with ALL your breads in the book? most all others list to bake in an hour or so. I’d like to shape, rest in the fridg and bake later in the day.
If you recommend not doing with other breads, can you explain why.
Thanks much
Julie
Emilie Raffa says
Thank you Julie! So great to hear ;) Yes: this schedule can be done with most other breads in the book. Just keep an eye on the bulk rise. You don’t want it to go for too long, otherwise the dough won’t survive a long second rise in the fridge (it will be over proofed). You can always shorten the bulk slightly, to give it extra time as needed in the fridge.
Lindsay says
Followed the instructions to the letter and ended up with a beautiful looking and very tasty sourdough loaf
Ivan says
Hi Emilie! Thank you for your knowledge. I have just backed my bread with this recipe and it came out all pale. I kept it with the closed lid for 20 minutes at 204C, and then removed the lid, reduced temperature to 98C and kept for 40 minutes more. Did I do something wrong in terms of the temperature?
Martin says
I may be wrong but it’s the internal temperature of your bread that should reach 98c for it to be cooked. Re read the instructions and check what temperature the oven should be at.
Rob says
Excellent for a bread-baking newbie:
Best bread recipe I have followed yet. I was gifted some sourdough starter and have been trying out various recipes- this is the first that has yielded positive (dare I go so far as to even say ‘edible’) results.
The directions are thorough and well explained and my resulting bread was delicious. I tried a variation with less salt (about 30%) and replaced it with 7g of mixed seasoning (garlic granules, cardamom, rosemary, and oregano) which also resulted well.
Definitely following this recipe for future endeavors.
Steve says
Very helpful for a first timer. Thanks.
Sandra says
My go-to recipe for sourdough!
Len says
Really like this recipe. I’m often short on time, so I do a second rise overnight in the fridge, tightly wrapped in a rice flour dusted cloth lined bowl or basket. Next morning, unwrap and let rise under a clean kitchen towel. At room temperature of 76 degrees, it takes about three hours to reach an internal temp of 65 degrees. Bake as per recipe.
Emilie Raffa says
Sounds fantastic, Len! Thanks for sharing your tips with us.
Teri says
I’ve been baking with my sourdough starter for a little over a year now. This is by far the easiest and tastiest loaf I’ve baked. I really appreciated not having to pre-heat the Dutch oven. It came out beautifully. Thank you for this recipe.
Emilie Raffa says
Excellent, Teri! Glad you’ve had success with the recipe :)
John MacEachern says
I made this Sourdough Bread recipe and it was nothing short of FANTASTIC! My wife gave it an A++ which is very difficult to achieve. what a great and simple recipe! Thank You.
Emilie Raffa says
So great to hear, John! Thank you! I appreciate your feedback. Happy baking :)
Lydia says
I found this simple recipe and method in standard measurements very helpful in beginning my attempts at making sourdough bread. Thank-you for your thoughtful instruction! I did make some adjustments, at the advice of a friend who has more experience making sourdough bread. I added 2 Tbls olive oil with the water and used 3 Cups unbleached all purpose flour and 1 Cup whole wheat. The results were delicious!
Emilie Raffa says
Lydia, I appreciate your feedback. Thanks so much! Your variation sounds wonderful.
Cam D' Toro says
Thanks for your recipe, followed the steps and results were great. Just something to add, would it be possible to put the temperature in Celsius? You know that we can read this from the rest of the world, and not necessarily we are measure temperature in Fahrenheit.
Emilie Raffa says
Sure thing! I’ve updated and post and recipe to include the Celsius conversions.
Steve Timbrook says
I’ve made well over 100 loaves since starting to use this recipe in April 2020. All have been successful, with good crumb, crust and tang. But, I never seem to get much of a second rise. I was reminded of this when I used a loaf pan yesterday. Good oven spring, but very little volume increase in second rise. Bulk fermentation always at least doubles, sometimes more. Finger push test depresses and slowly rises back up. Should I just quit obsessing about little second rise? BTW, took the bagel Zoom class and made a batch the next weekend. They turned out great.
Emilie Raffa says
Hi Steve! In short, the answer is yes ;)
Here’s why: a second rise that follows a long bulk rise (i.e. bulk dough that has more than doubled/tripled in volume) will not rise much during the second fermentation. You’re looking for the dough to become slightly puffy and less dense, not necessarily notably risen.
Conversely, a second rise that follows a shorter bulk (i.e. 3-4 hrs @ 78 F) will need a much longer second rise. All recipe formulas are different. If you can spot the difference, you’ll be one step ahead. PS: if you have good oven spring, following the method you’re currently using, then you’re doing it right!
Steve Timbrook says
Thanks, Emilie.
Steve
Crystal says
I love this recipe. It is the best one I have found for a simple sour dough. I have been making it for over a year now and have it memorized. The flow of making it is simple and it tastes so good.
Maureen Welsh says
So I am totally new to sourdough bread, I have had a few flops but I keep trying. Am I understanding correctly. Feed my starter, let it bubble, measure, mix, rise, rise, etc etc. But once I take off what I need for the bread (my starter), do I put the remaning starter in frig or do I feed that which was just fed before putting remainder in the frig (I bake once a week currently). So the leftover, if using the next week, goes right into frig or do I feed it again. Thank you for your time and for sharing your talent with all of us.
Angela says
Hi Maureen. I am new to sour dough bread making too. I put my starter straight back in the fridge, without feeding again. When i take it out again i let it get to room temperature then feed it. X
Brenda says
i have done maybe ten sourdough loaves using this recipe. all taste good but the shape was off, it spread in my dutch oven, so i added some of the optional water. one time i did try using a cloth lined bowl, but the recipe does NOT say to flour it. yikes, what a mess. i just saw that it should be floured in the additional notes. so, next time i will do that as the loaf has spread each time. it makes the most awesome toast or dry bread for bruschetta! it is such fun to make sourdough bread, thank you!
Giulia says
Struggled for so long to get a good rise and a proper ear on my sourdough but this recipe worked amazingly. I used 400g strong white plus 50g malt/wholegrain bread flour and 50g kamut flour (despite me later reading comments which suggested not to use wholegrain unless adjusting water content! Whoops). Loved the inclusion of a suggested baking schedule which worked great. Got a fantastic rise and a lovely ear, best loaf I’ve made yet. Recently received ‘Artisan Sourdough Made Simple’ as a gift and I can’t wait to try out more.
Ruth says
Hi there, is there such a thing as gluten free sourdough bread?
Thanks
Emilie Raffa says
Sure thing! You’ll need a dedicated GF starter to make GF sourdough bread. There are many recipes online for both!
Cindy King says
This by far is the simplest Set of directions for sourdough that I have come across. Thank you, Cindy King
Tori Roessler-Studebaker says
I’ve made this bread twice now, and I’m finding that the rise isn’t as high as I normally get it to be while baking. Am I doing something wrong/
Marcia says
I love this recipe! Beautiful, large loaves! In the past 6 or 7 months though, my loaves keep coming out flat. I replaced my starter, bought a digital scale…. made it last night and the dough looked just right. But it came out of the oven flat. I don’t have a proofer, so I try to use a windowsill for proofing. Any suggestions?
Christina says
So easy & delicious!!
Steven Timbrooki says
I just bought Artisan Sourdough Made Simple and want to make the quick baguette twist recipe. I have a two trough metal baguette pan. Can I just divide the dough into two instead of three loaves? Would I still bake to an internal temperature of 209-210 F like I do for your basic sourdough recipe, which works perfectly for me? Maybe extend the bake time by 5-10 minutes?
Emilie Raffa says
Hi Steve! Yes: two loaves + the metal baguette pan should work. The bake time will increase (internal temp will stay the same). Alternatively, for 3 loaves, bake 2 in the pan, followed by the 3rd one when you’re ready. PS: thanks for your support!
Steve Timbrook says
Great Zoom bagel class, Emilie. I made a batch last weekend and my bagel snob friend from NYC pronounced them “Good!”
kim says
made my first loaf using your instructions. It came out great! This is such a good resource! Next I’m planning to experiment with increasing the hydration and possibly adding some raisins and walnuts. Wish me luck!
Emilie Raffa says
Sounds fantastic, Kim! Enjoy!
helene says
I made this recipe with 3/5 strong wholemeal flour and 2/5 all purpose flour. It was all looking perfect. the dough was raising beautifully even after I divided and shaped (I had to leave to raise a little longer than the hour suggested). I do not have s dutch oven, so I put the dough in thick bottom pan with a lid in the oven.
the breads completely collapsed and I got more thick pancakes than boules.
what did I do wrong? was it my flour (that’s the only thing I had in the house St the time)
Emilie Raffa says
Hi Helene! Oh no, sorry to hear that. With bread, anytime you make changes to the original recipe, there’s a bit of trial and error involved; all steps are connected. The combination of flours could’ve been the culprit (it’s best to use strong bread flour, exclusively). Additionally, based on what you’ve described, it sounds like the dough was over proofed (rose for too long). This could’ve happened during the bulk rise, or second rise, my guess is the latter. I’d shorten the second rise a bit next time, it’s better to err on the side of under proofed for the second rise. Hope this helps!
Diana Bontecou says
I have had some success with this recipe and some not so great. Right now I am struggling with my starter. Fed it on last Saturday and it is doing nothing. What should I do?
Rick B says
I just made this recipe, turned out great. I do have a question.
Can i use my stand mixer for the mixing as my hands dont operate like they used to……
Thanks
Rick
Emilie Raffa says
Hi Rick! Absolutely. A stand mixer works perfectly well for this recipe.
Rick says
Thank You
Nina Paul says
Thanks for sharing this, can you please tell if this is a vegan recipe or not.
Emilie Raffa says
Hi Nina! This recipe is vegan. Enjoy :)
Does Size Matter? says
Hi there, I finally got my starter going after 1 month of it looking dead in the cool Canadian winter (to anyone else feeling disheartened: I was there – don’t give up!!).
Now I want to make my 1st loaf, but I only have a 2-qt. Pyrex round glass casserole dish, with lid. Is it too small or can I use that to bake? If yes, how do I adjust the recipe and baking times? Do I halve all the measurements? Please help! Thank you :)