This no-knead artisan bread recipe is perfect for beginner bakers. Made with instant yeast and baked in a Dutch oven, my easy step-by-step photos and instructions will teach you exactly how to make crusty, bakery-style bread at home— no kneading required.

Interested in baking homemade bread? Jim Lahey’s No-Knead Bread recipe is an excellent starting point. His method follows an incredibly easy formula: mix the dough and let it rise overnight. That’s it.
You don’t need a stand mixer or a bread machine, and there’s no kneading involved! Just 2 minutes of prep time and the rest is hands-off. The result? A gorgeous, perfectly golden crusty loaf with a soft, chewy interior.

How To Make Easy Homemade Bread (Step-By-Step Recipe)
Step 1: Mix The Dough
First, clear away all kitchen clutter: bills, toys, rogue phone chargers— you’ll want a clean surface to work on.
In a large bowl, mix the dry ingredients: flour, instant yeast, and salt. Add water and stir to combine. As the dough thickens, switch to your hands and bring everything together. It’ll look shaggy, wet, and sticky.
Instant Yeast vs. Active Dry Yeast: What’s The Difference? While both types of yeast make bread dough rise, instant yeast can be added directly to the dough. Active dry yeast needs to be dissolved (or “bloomed”) in warm water first. If that’s what you’re using, bloom it before mixing.

Step 2: Let The Dough Rise (Overnight)
Transfer the dough to a lightly oiled container and cover loosely with oiled plastic wrap to prevent sticking. Let it rise at room temperature (about 68-70 degrees F) for 12 hours to overnight.
Your dough is ready when it has puffed up in volume, about 1.5–2x the original size. You will also see lots of bubbles.
Pro Tip: If your kitchen’s chilly and the dough seems sluggish, place it in the microwave with the light on (door ajar). The gentle warmth helps wake up the yeast (my friend Celia gave me this genius tip!).


Step 3: Shape The Dough (And Let It Rest Again)
Flour a piece of parchment paper. Remove the dough from its container and place it on top. Fold the dough in half (like a book) and then fold it again. Sprinkle the surface with more flour to prevent sticking.
To shape: gently tuck the edges of the dough under itself to form a round ball. Place seam side down on the parchment like so…


Cover loosely with oiled plastic wrap and let it rest again until puffy. It will start to spread out slightly as it rises- this is ok. The 2nd rise will not take as long as the first, but expect to wait about 30 minutes- 1 hour depending how warm your kitchen is.

Step 4: Preheat The Oven
About 30 minutes before baking, preheat your oven to 500 F with a Dutch oven inside (lid on).
Why a Dutch oven? Steam is essential for that shiny, crisp crust. The pot traps moisture, which allows the dough to form a beautiful, artisan-style crust (for reference, baking without steam might cause the crust to harden too quickly which equates to dense and heavy bread). No Dutch oven? Any heavy oven-safe pot with a lid will do, as long as it can heat up to 450 F+.
Once the pot is hot, carefully slide your hand underneath the parchment paper and invert the dough into the pot. The seam will now be facing up. Take a look…


Step 5: Bake The Dough
Place the pot in the oven and immediately lower the heat to 400°F. Bake covered for 40 minutes, then uncover and bake for another 15–20 minutes until the crust is deeply golden.
Want to be sure it’s fully baked? Check the internal temperature. It should read 200–205°F. I use this digital thermometer and swear by it.


Step 6: Let It Cool
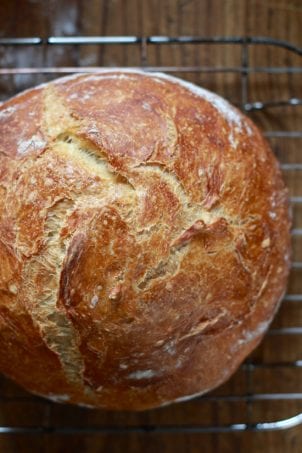
Transfer the loaf to a wire rack. Tap the bottom— it should sound hollow and feel light. You’ll hear it crackle as it cools (bread music!). Let it rest for at least 1 hour before slicing. Cutting too soon can result in a gummy crumb. Trust me, I speak from experience. And there you have it: easy, no-knead artisan bread!

Final Thoughts…
When I first started baking, I had no idea what I was doing. Jim Lahey’s no-knead method changed that. It’s forgiving, low effort, and tastes like you bought it from a fancy bakery! If you’re just beginning your bread journey, this recipe will give you the confidence to level up— to sourdough bread, light brioche hamburger buns (fan favorite!), pull apart brioche rolls, and beyond. Not only does it taste good, this loaf cost less than $1 to make!
By signing up, you agree to receive emails from The Clever Carrot. Unsubscribe at any time.
Jim Lahey’s Easy No-Knead Artisan Bread
- Yield: 1 loaf 1x
- Category: Yeast Bread
- Method: Oven-Baked
- Cuisine: American
- Diet: Vegan
Description
An incredible recipe for no-knead artisan bread baked in a Dutch oven. I like to make the dough in the evening (after dinner) to rise overnight. It’s fantastic for sandwiches, crostini, and to mop up delicious sauces! Recipe adapted from Jim Lahey’s No-Knead Artisan Bread.
Ingredients
- 390g (3 cups) bread flour (not all-purpose) + more for dusting
- ¼ teaspoon instant yeast
- 1¼ teaspoons fine sea salt
- 320g (about 1 1/3 cups) water
Notes
I use King Arthur Bread Flour & SAF instant yeast. You can use any 5 1/2- 6 quart Dutch oven, cast iron, enamel, Pyrex or ceramic bakeware (with lid) that can heat up to 500 degrees F.
Instructions
In a large bowl add the flour, yeast, salt and water. Stir until a rough dough forms. If it seems very dry, add more water.
Transfer to an oiled container and cover loosely with plastic wrap. Let rise for 14 hours- overnight, at room temperature (about 70 degrees). Your dough is ready when it has puffed up in volume, about 1 1/2 -2x its original size. *See note below.
Lightly flour a sheet of parchment paper and place the dough on top. Fold dough in half and then fold it in half again.
Shape the dough into a ball by tucking the sides underneath itself, and place onto the paper, seam side down. Cover and rest again until puffy but not fully risen, about 30 minutes- 2 hours depending on how warm your kitchen is.
Preheat your oven to 500 F. Put a (6 quart) dutch oven pot inside for 20 minutes. When ready to bake, remove pot from the oven. Place your hand underneath the parchment paper and invert the dough into the pot. The seam will be facing up. Cover the pot with the lid.
Place your bread into the oven, and reduce the temperature from 500 to 400 F. Bake for 40 minutes, covered. Remove the lid and bake for an additional 15 to 20 minutes, until golden brown.
To make sure that the bread is completely cooked through, take its temperature. Carefully tip the bread onto its side and insert a thermometer into the bottom. It should read 200-205 F. If not, place it back into the oven until it is ready (extra time in bread baking is a good thing). If you’re worried about the top getting too brown, put the lid back on.
When your bread is ready, transfer to a wire rack to cool. It should feel light and make a hollow sound when you give it a knock underneath. Let it cool for at least 1 hour. Cutting it too soon might ruin the texture resulting in a gummy crumb!
Notes
If your dough isn’t puffed and bubbly after the initial rise, place it in the microwave with the light on (keeping the door ajar). The warmth from the light will give the yeast a boost. My friend Celia gave me this tip and it works like a charm, especially in chilly kitchens!

Comments
Janet A Hogan says
I made the artisan bread. My husband loved it. Only thing, how to keep it past 1 day. The bread became hard to cut on the second day.
Please advise.
Thank you.
Robert olsen says
I follow your recipe to a t. I use bread flour, whole wheat, and ap flour. I always use 1/2 ts instant yeast. it always come out perfect cooked in a tramontina 9.5 bread dutch. thank you and Jim for the knowledge.
Emilie Raffa says
Thanks for sharing your feedback, Robert!
Jane says
Is this recipe suitable for wholemeal bread flour?
Thanks
Grace says
This bread recipe is amazing! Super simple and easy to follow. Did it with my Dutch oven, and minimal mess. I let my bread rise for about 16 hours- would recommend!
Kecia says
The easiest and tastiest artisan bread I’ve ever made. My kids loved it too. Super moist in the inside and held its structure well while remaining moist for days after.
Great recipe that has given me the confidence to try more difficult bread recipes !!
Donna Mahanna says
How much starter do you use instead of store bought yeast when making this recipe?
John Parkes says
Family approves. Perfectly crusty and tasty.
Laura says
Hello, love this but I can’t get the “invert into a pan” technique down. It kind of flops off the parchment paper and becomes misshapen. Can you do a video of the technique, point me in the direction of one, or explain in more detail how to do this? I just can’t figure it out.
Donna H says
You might want to try what I do – I just pick the whole thing up – parchment and all – and set it in my dutch oven. It’s easiest if you and another person each hold 2 corners. Kind of gently lower it in – no “plopping” and no inverting necessary. The parchment is fine in the oven, but I like to take a scissors and cut off any that would otherwise hang over the edge. Please let me know if you try this. Good luck!
Michele Regan says
I do the same. Never invert the bread.
Cheryl Litherland says
I bought the 32 oz containers you have a link to, made my dough and put it in the container and lightly covered with the oiled plastic wrap to rise. In the morning the dough had risen so much overnight that about 1/2 of the dough had dripped over the edge and onto the countertop. I couldn’t figure out how a container like that could hold rising dough, and guess my thoughts were correct. Should I next try to rise my dough in a glass bowl?
Emilie Raffa says
Hi Cheryl! My guess is temperature + rise time length. The warmer it gets, the faster the dough will rise which means you might have to shorten your rise time so the dough doesn’t overproof (or spill out of the container). Rise times always need to be adjusted based on your current ambient temperature. Next time, use a glass bowl to rise the dough. Or, try a high-sided dough tub with measuring marks- you’ll be able to track the dough as it grows. Hope this helps.
Bob says
Hi , I just made the bread for the first time today, and found it successful and enjoyable except for 1 glitch. The inside was great, but the crust was way too hard. In fact , I needed to use an electric knife in order to cut through the crust.
HELP ! What went wrong ??? My only guess is that the oven was too hot. I followed the recipe temps verbatim. At the end, the continued bake @15 – 20 min , without the lid ,I baked 20 min. I did so due to color. Perhaps that was too long ?
Thanks
Shannon says
I threw a batch of ‘rustic’ dough in the frig for the next day after starting too many tasks. The next day I baked it, thought it was burnt, but thankfully didn’t throw it away because after it cooked and was sliced it is delicious. Then ‘My Bread’ delivered from Amazon and I learned that method of bread baking is an official ‘technique.’ Sign me up! It’s easy and tastes great. I have more dough on the frig right now… trying wheat and rye.
Emilie Raffa says
Ahhh… love this. You sound like me “too many tasks”. It’s nice to have a dough that’s forgiving, and ready for you when you need (knead) it. 🤣
Pete says
Can I make this in a 4″ x 8″ loaf pan inside a Dutch oven? I like the size better for slicing for sandwiches,
Dona Sickels says
I’ll preface my comment by saying that I’ve been making yeast bread for over thirty years. That said, is the finished loaf supposed to be about 2” tall? I’m guessing that given the small amount of yeast used that it is. Do you have another recipe where the bread is bigger? I think I’ll try it again as the bread is delicious, but with more yeast.
Emilie Raffa says
Hi there! Thanks for sharing your experience. The finished baked loaf should be taller than 2 inches. In your case, my sense is that your dough might have over proofed during the first rise and/or second rise. Do you remember the timing for both? And your current ambient temp?
Danny says
Perfect flour to water ratio! Better even than Lahey’s ratio in his book!
Emilie Raffa says
Cheers, Danny! Thank you!
Rebecca Andrew says
Perfect and perfectly easy!
Emilie Raffa says
Thank you for your feedback Rebecca!
Glenyce says
I’m wanting to make this recipe, but all I have is a 5 quart Dutch oven. Will this work?
Emilie Raffa says
Hi there! Yes, a 5-quart Dutch oven will work just fine.
Mary says
First time baking with your recipe…probably one of the best breads I’ve made, crusty and perfect flavor! Thank you!
Emilie Raffa says
You’re very welcome Mary! 🥰
Gail says
This bread is amazing. I will make it over and over again
Emilie Raffa says
So glad you enjoyed it Gail! 🥰
Geetanjali says
Made this bread for the first time and it came out perfect! Kept the dough overnight in an unheated oven with the light on as it’s still cold in New Jersey! I also did not turn over the dough but just put the parchment paper with the dough in the heated Dutch oven.
Anonymous says
Anonymous says
Lidia says
Sorry! “…let the dough overnight to proof”, not “the bread”.
Lidia
Spring says
Hi: been making this bread for years, but I never leave it overnight. I mix it in the morning, leave it to raise for 4/5 hours (this is how the original reads) in my closed microwave and heat and cook same day. Works every time! Also, per JL’s mention, I add 1/4-1/2 tsp of red wine vinegar to the water when I heat it.
Emilie Raffa says
Wonderful! I’ve never heard of the vinegar tip before… thanks for sharing! So interesting!
Lindsay says
Made it twice now and both times the bread rose well but was spread out after shaping/wouldn’t go into a ball. The taste is great but it’s sad that the loaf is flatter and wider than tall/puffy.
Keith says
I have made this bread several times now, it has been excellent every time. If I want it to last long enough to make it to the dinner table, I have to make a second loaf. I sometimes put corn meal on the bottom of dutch oven or some rosemary on the top for a twist but your recipe is perfect from the get go!
Don Donadio says
Why is this recipe different from the same recipe in his book?
Rachel says
Hi Emilie,
Will you please clarify what “14 hours- overnight” means? is it 14 hours OR overnight? 14 hours or more, possibly overnight?
Lindsay says
I wondered this too! Clarification would be great!
Marylou Kormann says
12 – 18 hours works for me…don’t really see much difference in the loaf.
Lidia says
Hi Rachel,
I think Emilie specified that she began the process of this bread after she takes dinner and let the bread overnight to proof. That probably means that she let the dough proof for 14 hours (overnight) and the next morning she began to “attack” it and continue with it until she bakes it. So, if she takes dinner at 7 pm and let’s say, she begins the dough at 8 pm, then the next morning at 10 am she will continue to work this dough until she bakes it. I hope this makes sense. At least, this is my understanding.
Lidia
austin says
Why is it so important for the seam side down to proof and the seam side up to bake? What is the idea behind it?
thanks
Alexis says
I think its just so that it looks cool, so that it has that texture on the top like you see at the store. But, I figure this could be optional.
Fionnuala Ni Eidhin says
Hello,
My dough is sitting ready to rise. I have a green pan pot, will this do? Do I need to oil it or put parchment paper at the bottom of the pot?
Thank you
Emilie Raffa says
Hi there! I’ve never baked in a green pan pot. I would check online with the manufacturer to see if it can heat up to 400 F (both the handles, pot and lid). That would be your best bet. Do not oil the pan; line it with parchment paper to prevent sticking.
Austin says
Hi Emilie, I just found your site so have not tried anything yet, the bread looks so good. Question for you, do you measure the flour & water in cups or weigh the ingredients for this particular recipe? Thanks.
Austin says
one more question, what’s the temperature of the water?
Emilie Raffa says
Water temperature is totally up to you, based on your current room temperature. For example, this recipe is written in conjunction with a 70 F room temp. + overnight rise. Based on that, I would use cool-ish water around 60- 65 F so the dough is not over proofed in the morning. However, if your current room temp. is 67-68 F, I’d use warmer water, say 80- 85+ F or so. Does that make sense? You have to adjust the recipe based on your current conditions, for this dough or any dough. Hope this helps!
Austin says
I am not a bread maker and am new to your website, I am learning, and I can only follow the recipes, :-) so that’s what I will do, set my bread proofer to 70 F and use a thermometer to get a similar water temperature to make this recipe, the bread looks awesome! will make it soon. thank you for the lovely and detailed recipe!!
Lidia says
Hi Austin,
As per my experience and my mom’s or grandmother’s experience, the water should feel good at your hand wrist, more to warm not cold. We ‘ve never used a thermometer to measure the temperature of the water and trust me, my mother used to bake all her life, every week 7 big loafs of bread.
Lidia
Emilie Raffa says
Hi Austin! I weigh my ingredients for best results. It’s more accurate. This is because the conversion from metric to volume, in any recipe, is not equivalent (only approximate). And in baking, accuracy is key!
Connie says
I know you linked the container you put it in but if I don’t want to spend that much (or need that many) any suggestions for something I may already own? Is something taller better than wide (like a bowl would be wider)? Thanks!
Gerardo says
HI, Do i need a dutch oven to bake this bread? can I use another type of thingy to bake ir?
Emilie Raffa says
Gerado, any oven-proof vessel with lid will work. Just make sure both the pot and handles can heat up to the temperature specified in the recipe.
Robert says
Only a dutch oven will truly work. Don’t let the novices tell you differently.
WENDY KAUFFMAN says
I just made this in a ceramic loaf pan with foil as a lid and it came out beautifully
Kort says
Thank you so much for sharing this! I don’t have the money for a Dutch oven and really want to try this out
Ulrike says
Not sure if you have Aldi in your area but I bought several there including a bread crockpot with a domed lid all under 30 dollars . Costco has sales also . Just make sure it’s a metal knob I had plastic blow in my oven at 450 .
Ulrike says
Correction not crockpot – bread baker
Traci says
Really enjoyed making this. First time making bread that we wanted to eat. Thanks for this fun recipe.
Emilie Raffa says
Traci, glad you enjoyed it! Thanks for your feedback :)
Naomi Rechter says
Love this recipe – tried others with similar ingredients but this method produces the best results. I know you said below you can double it to make two loafs at once. Can you cook the doubled ingredients as one whole loaf to make larger slices (mine are pretty small!)
Thanks!
Maday Bosca says
This recipe is so easy and delicious. Wishing I could post pictures of the breads I’ve been making lately. Thank you.
Melanie says
I have never made bread before. I can’t knead dough very much as I have always had weak wrists. I bought a clay baker and made this bread recipe. And now I have been making it for almost a year. The bread is light, super tasty and no extra ingredients. Flour, salt, water and a wee bit of yeast. My family and anyone who gets a slice absolutely loves it. I am still super amazed that I am making bread. Thanks so much for posting this recipe.
Emilie Raffa says
You are very welcome! I’m glad you like it. Thanks for taking the time to comment, Melanie :)
Jane says
Thanks for this recipe. Made and added black olives. Question though……Do you put the lid on when heating up the pot?
Jane says
Let me reply to myself…….yes Jane…..if you read the entire page you would know that. (Insert embarrassed emoji.) Did I mention I love your website and have your book? :-) Thanks again!
Courtney says
What if I don’t have instant yeast on hand – could I use active dry yeast and activate it in a small amount of water before adding it in with the flour?
Allison M. says
Flavor wise it’s great but my bread seems dense. Having trouble getting a nice rise on my loaf. Do I need to make more of an effort to get it into a smaller ball during the prodding stage?
Emilie Raffa says
Hi there! Dense bread is usually an indicator of 1 or 2 things: inadequate gluten development and/or over proofed dough (rose for too long). Next time, try shortening the rise time a bit, allowing the dough to only double in size. Additionally, proper shaping (tighter ball) will help during the proofing stage.
Marcel says
I left the dough out for 24 hours, but had a busy day and forgot about it today. Can I leave it out another night and bake it tomorrow?
Emilie Raffa says
Marcel, it all depends. I would have to see a picture of the dough (it might be over proofed).
If it’s completely flat by now, it might have exhausted its rising strength which would ultimately make your bread flat. However, you can always use the dough to make focaccia instead.
May says
Hi this tasted amazing and it looks SO pretty! Only thing is, I don’t think I see anything about putting any oil in the Dutch oven? My loaf got stuck to the bottom of the pan and when I finally managed to get it off the whole bottom came off. My theory is I didn’t put enough flour on the top of the bread before flipping it into the Dutch oven. Could this be it? If not, any tips on how to prevent this next time?
Emilie Raffa says
Hi May! To prevent sticking, line the pot with non-stick parchment paper next time. This will do the trick. In your case, it could have been the flour- it’s hard to say. Also: I never use oil (it will burn). Hope this helps!
Kevin Renaud says
14 hours is kind of an unwieldy time….it’s either shortly before bed to bake in the morning, or in the early morning, to bake at night.
Can i prepare the dough in the early afternoon and bake it the following morning, which would be around 24 hours?
Rachael Chow says
Can i use whole wheat bread flour instead?
Thanks!
Rachael
Emilie Raffa says
Hi there! For best results, I would follow this whole wheat recipe instead.
Gay says
Was there a link for the WW recipe? Tx!
Steve Knight says
I am 81 years snd have not baked bread for many years. I am now making my 6th loaf today. it’s fantastic. All my friends want more so I’m on lock down having the pleasure of making this bread for them. it gives me a great sense of pleasure to give them every extra loaf. its so easy if you just follow the instructions. thank you snd Mr. Lahey!!! 5 stats!!!
Tony from Brooklyn says
Once I’m done with the 2nd proofing the dough, can I store the dough in the refrigerator until I need to use it? I don’t mind waiting for the dough rise overnight but I don’t want to have to always plan a day ahead.
I’d like to reach into my fridge (or freezer?) and have it ready to bake.
How long could I store it for?
Emilie Raffa says
Technically yes. But for this recipe, no. Here’s why: a long overnight bulk rise followed by a long second rise in the fridge will likely lead to over proofed dough. Alternatively, make the dough in the morning or afternoon. When it has almost doubled in size chill the whole bowl; it will continue to grow in the fridge. The next day, shape, do the second rise and bake.
Mercedes says
Can you provide more feedback on the timing for someone that may need to do a bulk rise in fridge? Let’s say we let it double on the counter, how long can it proof in the fridge? I followed the recipe exactly as written but I felt my loaf was slightly gummy, not horrible but definitely not perfect. I did let it rise on counter for 12 hours overnight, then did a preshape and final shaping. It was easy to handle throughout the whole process, not wet, sticky or runny. It was one of the easiest recipes to follow. But I would prefer if it was less gummy and not sure what adjustments I need to make and if it would help to do a cold proof. I also would like to understand why your recipe doesn’t require a cold rise in fridge, what makes it different than other recipes that require it? Just curious and looking to learn.
Elizabeth says
I made this 2 x using the grams measurements. Each time it has been too runny to form into a ball. I went to check Lahey recipe He calls for 400 g of flour and 300 g water. I’ll try his and let you know how that works. BTW still tastes good.
Emilie Raffa says
Elizabeth, did you use bread flour instead of all purpose flour? That could be the issue.
Russ Lewis says
Have a house in Big Bear Lake CA. The elevation is 6843 feet. Do I have to change amount of ingredients, temp, or cooking time? Bread comes out a little doughy. Your help would be appropriated. Having a blast trying. I’m a big bread lover. Thank you, Russ
Emilie Raffa says
Hi Russ! Most likely. But truth be told: I’m not an expert on high altitude baking, so I don’t have exact specifics for your. King Arthur Flour as a few articles on this; I recommend searching up some of their info for best results.
Shirley says
I can’t get the crust to form. It’s just darker dough, not the real thing. Should I spray the dough with water before putting the pot into the oven?
Emilie Raffa says
Hi there! I’m not sure I understand your comment? Please provide more info- happy to help.
Ellen says
Emilie- do you know if it’s okay to use sourdough starter in this recipe instead of store bought yeast? And if so, how much?
Thanks,
Ellen
Emilie Raffa says
I would use about 50 g. Add a bit more flour to the recipe though. There is water in the sourdough starter and it will make the dough stickier.
Kathy says
Hi, Shirley, I heat my pot in the oven for about 1/2 hour. Plop your dough in when you’re ready, be sure to cover it, and after about 30 minutes, take the pot out of the oven and lightly spritz the dough with water, 3 or 4 pumps. Cover it back up and pop it back into the oven. Check it in about 10 or 15 minutes to see if you’re liking the color, if not, give it a little more spritzing. It works well for me, I get a nice, crisp (but not so crisp it cuts your mouth) crust. I hope this helps!
Denise says
Hi. I am baking this in a Le Creuset Dutch oven. Do I need to coat the pan with anything? Also, I am curious to know why it is baked with seam side up. Thank you! PS: I love your photos!
Toni says
I don’t see the “other dishes” to use if I don’t have a Dutch oven. Help
Pablo says
Hi, I use a ceramic pot with a lid. It doesn’t really closes tight, so I put some foil paper between the lid and the pot to seal it. I’ve heard that you can use pyrex or even a flipped stainless steel bowl as a cover over a baking stone or tray. Good luck!