Think you can’t bake artisan sourdough bread at home? Think again! Sourdough Bread: a Beginner’s guide is your go-to recipe resource for simple, easy sourdough bread without kneading. Make the dough in the morning or at night- it will come together in under 10 minutes.

In 2013, my resolution was to bake more bread.
I researched, tested and baked countless loaves with both good and mixed results. My journey began with this no-knead artisan bread recipe and eventually, I worked my way up to the holy grail: Sourdough. My passion for creating easy sourdough bread recipes and preserving traditional culinary arts inspired my bestselling book Artisan Sourdough Made Simple which has connected me to like-minded bakers all over the world!
So, if you’re curious about sourdough bread and don’t know where to begin, you’re in the right spot. This sourdough bread recipe has been THE MOST popular recipe on my blog for over a decade and continues to earn millions of pageviews a month. Welcome to the journey.
What You’ll Learn
In this tutorial, you’ll learn how to make simple sourdough bread with step-by-step instructions and videos for guidance. There’s no kneading involved, and a bread machine or a stand mixer is not required. My sourdough bread recipe is perfect for beginners. I’ll explain a complex topic in simple terms without the stress!
But before you dive in, here’s a secret: sourdough bread is more than just a recipe… it’s an understanding.
There are similar sourdough bread recipes out there and yet no two loaves look alike. The process is all about method, timing and personal touch. Use this tutorial as a guide and make your own adjustments as you go. Once you have a few loaves under your belt, the process will become an imminent rhythm, and in the end, you will have created your very own masterpiece that is the ultimate reward. Just don’t forget to eat your mistakes (might I suggest homemade sourdough breadcrumbs)?
Jump To
- Sourdough Bread Recipe
- Step by Step Instructions
- Sourdough Starter 101
- Sample Baking Schedule
- Sourdough FAQ

So, What is Sourdough?
In a nutshell, sourdough is slow-fermented bread.
It’s unique because it does not require commercial yeast in order to rise. Instead, sourdough bread is made with a live fermented culture a sourdough starter, which acts as a natural leavening agent.
Sourdough is known for its characteristic tangy flavor, chewy texture and crisp, crackly crust. From a health standpoint, it dominates when compared to supermarket loaves. The naturally occurring acids and long fermentation help to break down the gluten, making it more digestible and easy for the body to absorb. And it tastes darn good!

Sourdough Starter 101
Before you begin, you’ll need a sourdough starter.
Simply put: a sourdough starter is a live culture made from flour and water.
Once combined the mixture will begin to ferment, cultivating the naturally occurring wild yeasts and bacteria present within the mixture. A small portion of this culture is used make your bread dough rise.
But it doesn’t stop there.
Your starter must be kept alive with regular feedings of flour and water to maintain its strength for maximum rising power.
How to Feed your Sourdough Starter
Every baker has their own method, and with practice you’ll eventually develop your own routine.
Here’s my method: I pour off some of the culture (about half) and then feed what’s left in the jar with equal weights of flour and water. I whisk well with a fork until it’s lump-free. Then, I let it rest at room temperature or in a warm spot (75-80º F/ 24-26º C is ideal) until it becomes bubbly and active.
PS: I use this the jar for my sourdough starter and I LOVE it.
When is my Starter Ready To use?
Your stater is ready to use when it becomes bubbly and doubles in size.
This can take anywhere from 2-12 hours or more depending on temperature (the warmer the better) and the condition of your starter. Be patient!
Float Test: If you’re still unsure whether it’s ready to use drop a small amount, about 1 tsp, into a glass of water. Do this when the starter is a peak height before it collapses. If it floats to the top it’s ready to use. If it sinks, your starter should be fed again.
Where to Obtain a Sourdough Starter
All sourdough starters are different.
They can be made from scratch, purchased online, or if you’re lucky, someone will share a portion of their starter with you.
Starters range from thick to thin in texture and can be made with a variety of flours. I use two different starters; one is homemade and the other was a gift from my friend Celia. She dried a portion of her starter and mailed it all the way from Sydney, Australia.
How To Use A Starter
After you’ve fed your starter and it’s bubbly and active, pour the amount you need out of the jar to weigh or measure for your recipe. That’s it.
Then, don’t forget to feed what’s left in the jar with more flour and water to keep the process going.
Any leftover sourdough starter can be used to make sourdough discard recipes, even my homemade sourdough pasta.
Storage Options
If you only bake a few times a month, keep your starter in the fridge and feed it once a week. If you’re an avid baker, store your starter at room temperature and feed it at least once a day.
Looking for more info on sourdough starters? Check out Feeding Sourdough Starter: My Best Tips & Tricks & Sourdough Discard 101: Recipes & Faqs Answered.

How to Make Sourdough Bread: Step-By-Step Guide
Step #1: Mix The Dough
Combine the following ingredients in a large bowl (I use a fork):
- 250 g water
- 150 g bubbly, sourdough starter
- 25 g olive oil
Add:
- 500 g bread flour (such as King Arthur)
- 10 g fine sea salt
Squish the mixture together with your hands until the flour is fully absorbed. The dough will feel dry, rough and shaggy.
Cover the bowl with plastic wrap, reusable wax wrap, or a very damp kitchen towel and let rest or ‘autolyse’ for about 30 minutes. After the dough has rested, work it into a ball directly in the bowl (it doesn’t have look perfect).
TIP: For best results, weigh all of your ingredients with a digital kitchen scale. Measuring cups are not as accurate. Please visit Sourdough FAQ for more details.
What is Autolyse?
This is the first resting period right after you mix the dough.
It jumpstarts gluten development without kneading. Strong gluten = good bread.
For timing, autolyse can range anywhere from 15 minutes to 1 hour or more depending on the type of bread you’re making and your own personal baking schedule. A minimum of 30 minutes works best for this recipe. However, when time permits, I’ll let it go for an hour. The dough will become more soft and manageable to work with afterwards.
A Note on Salt: some bakers prefer to add salt only after autolyse because it might slow down the gluten development. I’ve followed this technique for years, but no longer do so. I prefer to mix everything all at once. It’s practical, effective and produces excellent loaves (plus, you won’t forget to add the salt later on!). I’ll leave the choice up to you.

Step #2: Bulk Rise
Now the dough is ready to rise.
Cover the bowl and let rise at room temperature, about 68-70 F.
How Long will it take?
The dough is ready when it has doubled in size and no longer looks dense.
This can take anywhere from 3-12 hours depending on your current room temperature, the potency of your sourdough starter and the specifics of your surrounding environment.
For example, in the summer the dough can take anywhere between 2-4 hours @ 85º F/ 29º C. In the winter, it will take longer about 10-12 hours @ 68º F/ 20º C. Temperature controls time.
And remember: because sourdough bread does not contain instant yeast it will take longer to rise. Watch the dough and not the clock. Be flexible.
Optional Step: Stretch and Fold the Dough
About 30 minutes into the bulk rise, you have the option to perform a series of ‘stretch & folds’ to strengthen the bread dough {click here for a step-by-step tutorial}. Although it’s not mandatory, this technique will add height and structure to the finished loaf and it’s fun to do.
Watch the video below!


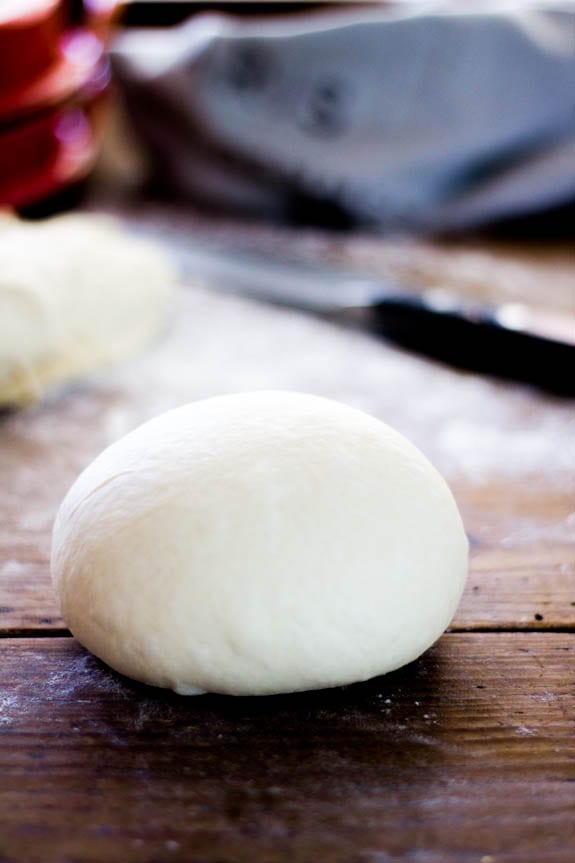
Step #3: Divide & Shape The Dough
Remove the dough onto a lightly floured surface.
Cut the dough in half to make 2 loaves, or leave it whole for a single loaf.
How to Shape a Round Sourdough Boule (Loaf)
Starting at the top, fold the dough over toward the center. Give it a slight turn, and then fold over the next section of dough. Repeat until you have come full circle. Or, use the envelope shaping technique outlined below.
Watch the video!

Step #4: Choose a Baking Pot
I bake my sourdough bread in a Dutch oven.
You can also try the Challenger Bread Pan, another vessel I use for baking, that can accommodate both round and oval shaped loaves.
The pot traps in heat and moisture which is essential to achieving artisan style bread at home.
Steam plays a key role in how the bread will open up or ‘bloom’ while baking and the Dutch oven helps to control this process.
You can use any oven safe pot that can heat up to 450º F/ 232º C (including the lid and handles).
TIP: In the past, I’ve tried baking on pizza stones and cookie trays with no luck. The crust would harden too quickly, forcing the bread to tear on the bottom and sides. I used various steaming methods to remedy this, however I found them to be extremely cumbersome and not realistic for everyday use. Nothing worked. The lack of moisture in my home oven was evident and using a pot for baking was the only practical solution.

Step #5: Second Rise
After shaping the dough, it needs to rise again.
Generously coat the bottom of your Dutch oven with cornmeal (or line the bottom with non-stick parchment paper instead) and place the dough inside.
This time, the dough will rise for a shorter period about 30 minutes- 1 hour.
The dough is ready when it’s puffy and no longer dense. It does not need to double in size.
Preheat your oven to 450º F/ 232º C during the tail end of the second rise.
TIP: Instead of doing a free form second rise in the Dutch oven, use a cloth lined proofing basket or 8-inch bowl instead. Either option will contain the dough and hold its shape properly during the second rise.
Step #6: Score the Dough
After the second rise, and right before the dough goes into the oven, make a slash about 2-3 inches long down the center of the dough.
This allows the steam to escape and for the dough to expand during baking.
You can use a small serrated knife, paring knife or bread lame.

Step #7: Bake the Sourdough Bread
Place the lid on top of the pot and reduce the oven temperature to 400º F/ 204º C.
Bake on the center rack for 20 minutes.
When 20 minutes is up, remove the lid. Your bread will be pale and shiny like the picture above.
Continue to bake (uncovered) for an additional 40 minutes or until deep, golden brown. The internal temperature should read 205-210º F/ 96-98º C.
Cool on a wire rack for at least a 1 hour before slicing. Be patient!
If you cut into it too soon, the texture will be gummy…
TIP: During the last 10 minutes of baking, crack open the oven door (optional). This allows the moisture to escape, leaving your sourdough bread with a crisp crust. Alternatively, remove the bread from the pot and let it bake directly on the rack. The latter produces a more crisp crust.


Additional Sourdough Recipes & Resources
Sourdough Starter:
- Beginner Sourdough Starter {Recipe}
- Feeding Sourdough Starter: My Best Tips & Tricks
- Sourdough Discard 101: Recipes & Faqs Answered
Sourdough Bread Recipes:
- Beginner’s Guide to Sourdough Focaccia Bread
- Best Sourdough Pizza Crust (No steel or stone!)
- Best Sourdough Pasta (1 hour or Overnight)
- Light Whole Wheat Sourdough
- Easy Sourdough Sandwich Bread
- Soft Sourdough Cinnamon Rolls
- Best Sourdough Pancakes
Sourdough Bread Tips & Techniques:
- How to Stretch and Fold Sourdough {Video}
- How to Shape a Round Sourdough Boule {Video}
- Why Won’t My Sourdough Bread Rise?
- Bread Flour vs. All Purpose Flour: What’s the Difference?
Sourdough Tools & Supplies:
Baking Schedule
- Friday Evening: Feed your starter, cover the jar, and leave it on the counter overnight. If you keep your starter in the fridge, it might need two feedings to perk back up (feed it in the morning & in the evening).
- Saturday Morning: Check your starter: if it’s alive and bubbling, you can make the dough to rise during the day. Or, feed it again in the afternoon to make the dough in the evening for an overnight rise. Remember to use the float test mentioned above to make sure your starter is ready to use.
- Saturday Morning/Evening (or whenever your starter is ready): Make the dough. Leave on the counter to bulk rise at room temperature. In the summer, if your dough rises quickly and you’re not ready to bake, cover the whole bowl with lightly oiled wrap and chill until ready to use.
- Sunday Morning: cut and shape the dough. Place in Dutch oven for second rise. Slash. Bake. Cool. Eat.
Sourdough Bread Recipe
Print
Sourdough Bread: A Beginner’s Guide
- Prep Time: 13 hours
- Cook Time: 1 hour
- Total Time: 14 hours
- Yield: 1 loaf
- Category: Sourdough Bread Recipes
- Method: Oven-Baked
- Cuisine: American
- Diet: Vegan
Description
This beginner sourdough recipe is perfect for bakers looking to jump right in! It’s is a low-hydration dough, meaning it will yield a ‘tight’ crumb (small holes). It is great for sandwiches and toast.
Ingredients
- 150g/ 5.35 oz bubbly, active sourdough starter
- 250g/ 8.80 oz warm water, preferably filtered*
- 25g/ .90 oz olive oil
- 500g/ 17.65 oz bread flour (not all purpose flour)
- 10g/ .4 oz fine sea salt
- fine ground cornmeal, for dusting
*For a more soft and pliable dough, you can increase the water up to 300 g- 325 g total. Please use a cloth lined bowl (instead of the Dutch oven for the second rise).
**You will need a 5 1/2 or 6 quart Dutch oven for baking
***This recipe was tested with King Arthur Bread Flour, Gold Medal Bread Flour, Pillsbury Bread Flour
Instructions
Make the Dough
Whisk the starter, water, and olive oil in a large bowl. Add the flour and salt. Squish everything together with your hands until all of the flour is absorbed. The dough will be dry and shaggy. Cover the bowl with plastic wrap, reusable wrap or a clean, very damp kitchen towel. Let rest (autolyse) for 30 minutes or up to 1 hour, if preferred.
After the dough has rested, work the dough in the bowl into a rough ball, about 15 seconds.
Bulk Rise
Now the dough needs to rise.
Cover the bowl with wrap or a very damp kitchen cloth. Let rest in a warm spot to rise. The dough is ready when it no longer looks dense and has doubled in size. This can take anywhere from 3-12 hours depending on the temperature of your ingredients, the potency of your starter and surrounding environment. For example, in the summer rise times can take anywhere between 2-4 hours @ 85º F/ 29º C whereas in the winter, the dough will take about 10-12 hours @ 68º F/ 20º C.
Optional Step: Stretch & Fold the Dough
During bulk rise, you have the option to perform a series of ‘stretch & folds’ to strengthen the dough. Start 30 minutes into the bulk rise. Gather a portion of the dough, stretch it upwards and then fold it over itself. Rotate the bowl ¼ turn and repeat this process until you have come full circle to complete 1 set. Do this once or twice spaced about an hour apart. Although this step is not mandatory, it will increase the total volume and height of your bread. Click here for a step-by-step video tutorial.
Cut & Shape the Dough
Divide your work surface in half; lightly flour one side (for cutting) and leave the other half clean (for shaping).
Remove the dough from the bowl, and place onto the floured section so that it does not stick. You do not need to ‘punch down’ the dough; it will gently deflate as you fold and shape it.
Cut the dough in half to make 2 loaves, or leave it whole for a single loaf.
To shape, use a bench scraper to move your dough to the non-floured section (if there is any flour present, it will be difficult to shape- brush away any excess). Starting at the top, fold the dough over toward the center. Give it a slight turn, and then fold over the next section of dough. Repeat until you have come full circle.
Then flip the dough over and place it seam side down. Using your hands, gently cup the sides of the dough and rotate it, using quarter turns in a circular motion. You can also pull it towards you to even out the shape. Repeat this process until you are happy with its appearance. *See note below.
Second Rise
Now the dough needs to rise again, but for a shorter period of time.
Coat the bottom of your Dutch oven with cornmeal. Alternatively, use parchment paper to prevent sticking (this is what I do, now). Place the dough inside for a second shorter rise, about 30 minutes to 1 hour and cover with the lid of the pot or a very damp cloth. The dough ready when it is slightly puffy but not double in size.
Preheat your oven to 450º F/ 232º C towards the tail end of the second rise.
Score the Dough
Right before your bread goes into the oven, make a shallow slash about 2-3 inches long (or more) in the center of the dough. Use a bread lame, sharp pairing or a small serrated steak knife. The cut should be about 1/4-inch deep.
Bake the Dough
Place the bread into the oven on the center rack (lid on) and reduce the temperature to 400° F/ 204° C. Bake for 20 minutes. Remove the lid, and continue to bake (uncovered) for an additional 40 minutes or until deep, golden brown. Keep in mind that all ovens are different; you might have to make minimal adjustments to these temperatures.
You can also take the internal temperature of your bread to double check that it is done. For sourdough, it should read about 205-210º F/ 96-98º C.
Remove the bread from the oven, and cool on a wire rack for at least an hour before slicing. Don’t cut too soon or else the inside will have a gummy texture!
Notes
When shaping, the idea is for the dough to catch enough surface tension on a non-floured area in order to create a tight ball. If there is flour present, it will slide around… and drive you nuts.
Sourdough FAQ
1.) I only have all purpose flour. Can I still make this recipe?
For best results, use bread flour for this dough. If you only have all purpose try my Artisan Sourdough with All Purpose Flour instead.
2.) Can I add whole wheat flour to this recipe?
You can, but I wouldn’t. The dough will be too dry and dense without adjusting the water quantity. Try my Light Whole Wheat Sourdough for more whole grain goodness.
3.) Your beginner recipe here uses 150g of sourdough starter. The Everyday Sourdough in your book uses only 50g. What’s the difference? And why?
- When I first learned how to bake sourdough bread, I used 150g of starter. Overtime, it was too much to maintain (especially when doubling and tripling recipes). So, I scaled down. That’s why most recipes in my book Artisan Sourdough Made Simple include 50 g of starter instead. One amount is neither right or wrong; it’s just a matter of preference.
4.) What’s the purpose of olive oil in this recipe?
Adding olive oil to sourdough was the method I followed when I first learned how to bake. The natural fat emulsifies the dough and makes a plush crumb.
5.) Why do some of your recipes call for the second rise in a Dutch Oven? And others in a cloth- lined bowl?
The freeform Dutch oven second rise will only work with dry, low hydration doughs (like this one) because it will not spread out too much. On the flip side, when working with wet, high hydration doughs you’ll need to use a cloth-lined bowl sprinkled with flour to holds it shape. Otherwise, it will spread.
6.) Why don’t you preheat your Dutch oven before baking?
Because this recipe follows a freeform second rise directly in the baking pot, it cannot be preheated beforehand. The dough will begin to cook before going into the oven!
However, if you are doing the second rise in a cloth-lined bowl as mentioned in question #5 above, you can preheat the pot if you’d like. When bread dough is placed into a hot pot it begins to expand instantly which is great for the overall shape and structure of the bread. And in fact, I use to follow this technique when I first started baking. But overtime, I found the preheat to be too cumbersome for small kitchens with little kids running around. Plus, I kept burning my wrists. Long story short: you can achieve comparable results without the preheat. The choice is up to you.
7.) Can I halve the dough to bake 2 loaves? If so, what will that do to the baking time?
Yes, you can definitely halve this recipe. Bake for 20 minutes (lid on) and 30 minutes (lid off). Check at the 45 minute mark.
8.) If I halve the recipe, where should I store the second dough if I’m not baking at the same time?
Store the second dough in the fridge until ready to bake. Place the dough in a cloth-lined floured bowl (seam side down) and use the cloth overhang to cover it. If the dough is in the fridge for longer than 1 hour, rest at room temperature while the oven heats up.
9.) How do I get the dough out of the cloth-lined floured bowl?
Open up the cloth overhang to reveal the dough in the bowl. Place a piece of parchment paper on top of the dough. Flip the bowl over. Remove the bowl and cloth. The dough is now smooth side up and ready to be scored.
10.) Can I have the measurements for this recipe in cups, please?
- 3/4 cup bubbly, active starter
- 1 cup + 1 tbsp warm water
- 2 tbsp olive oil
- 4 cups bread flour
- 1 1/2 tsp fine sea salt
NOTE: Weight and volume measurements are not equivalent, only approximate. I strongly recommend weighing your ingredients instead. With that said however, I understand the convenience of measuring cups. For best results, please aerate the flour first (I fluff it with a fork directly in the bag), then lightly spoon and level it into the cup. Too much flour will make the bread dense. If your sourdough starter is very bubbly, the volume amount might be off. If necessary, add up to 1 cup as needed. Finally: the water can be increased up to approximately 1 1/3 cups, for a more soft and pliable dough.


Comments
Mackenzie says
I cut it in half, I should bake one at a time right? First time making sourdough😉
Emilie Raffa says
Hi there! If you only have 1 baking pot, bake one dough at a time. You can keep the second dough in the fridge while the first one bakes :)
Klare says
Hi Clevercarrot, I’m following your sourdough starter recipe and am soon to embark on my first loaf. Your recipe calls for 130 grams of starter but your starter recipe is 120 grams. Do I keep feeding the starter to get 260 grams and then remove half? Sorry, I’m a confused courgette 🤪
Emilie Raffa says
Hi there! If you do not have enough starter (which is absolutely fine!), discard less at your next feeding and keep adding more flour and water until you’ve reached your desired amount. It’s flexible :)
Joanne Atkinson says
Hi = I am new to sourdough baking so will be giving your recipe a try. Here in Melbourne, Australia I have flavoured olive oils. Garlic and Rosemary flavoured olive oil is my favourite. Could I use this in the recipe instead of basic olive oil to add flavour or will the difference “interfere” with it in some way? Thanks & cheers. Jo.
Nicole says
Hey there Emilie,
I am trying to work out how to make gluten free sourdough do you have any recipes for me? I would be forever grateful.
I have a gluten one going too but live in Australia and I have to make a few loaves of gluten free to feed 20 people on a retreat that have many allergies. I am so grateful for any help you can give me desperate Nicole 😂
Emilie Raffa says
Hi Nicole! Unfortunately, as of right now, my GF sourdough is still not perfected :( I’ll update here when the recipe is edible (lol).
Nicole says
Thank you i really appreciate that. 🙏 before August 18 would be awesome (lol) thats when the retreat is 🤣
Jerry says
I use one of those cookie sheets that are insulated under my Dutch oven and it works perfectly to stop bottom of bread from over baking
Emilie Raffa says
Excellent tip, Jerry!
Charlie says
Many thanks for taking the trouble to reply and the clarification. Great recipe!
Jessica says
Going to make this tomorrow but quick question – do you preheat the oven the 450 and put the loaf in then reduce to 400 or wait until it’s down to 400 to put the loaf in?
Judy says
I’ve just sliced into the best sourdough loaf I’ve ever made and certainly the most delicious! Thank you for your recipe, video and easy to follow instructions. I’ve been making all types of bread for over a year now and have tried several sourdough recipes. I can say I’ve found my recipe! I did the folding during the first rise period and did five folds in total (folded about every 30 to 45 minutes). I am just so excited about this recipe and can not wait to make some loaves to share with family and friends.
Charlie says
Hi, have I missed something in the instructions or is there no kneading stage? It seems to go from autolyse directly to bulk rise. In which case what would be the difference between the 2? In any case I did a kneading stage and the results were pretty good for a first effort.
Emilie Raffa says
Hi Charlie! Kneading not necessary in this recipe. However, I do include the optional step of stretch and folding the dough, which is a minimal kneading technique. Either way, you are more than welcome to knead the dough for this recipe. It’s up to you.
To further clarify: there are a few differences between autolyse to bulk rise. First, the autolyse stage is much shorter than the bulk rise (30 minutes). Second, after autolyse, you return to the bowl to work the dough into a ball (before the bulk rise). This is a significant step. It’s the last time you can adjust the dough. Meaning, if it needs more flour or water, or if there are some clumpy bits that need more mixing, now’s the time to do it. Finally, working the dough into a ball after autolyse allows for more even fermentation (bulk rise).
Hope this helps!
Claire says
Hi. These are the clearest instructions for sourdough I have seen. I plan to try it having completed my starter (also from your instructions). I got stumped at the measurements. Baking is a science so precision is needed, but I don’t have a digital scale. So Inhad to abort my plans to bake today. Is there anything I can do to adjust to a regular scale and liquid measuring cup?
Emilie Raffa says
Hi Claire! Thank you. I’m glad you’ve found this guide helpful. If you have a regular kitchen scale, as opposed to a digital one, you can still use it to weigh all of the ingredients including the liquid. For volume measurements, I’ve included the approximate equivalents in the FAQ section. Hope this helps!
Claire says
Thank you, I will try this.
JJ says
Thank you so much! I am making today!
JJ says
This is my first time trying sourdough and your recipe for the starter is perfect and mine has now more than doubled on day 7. Not much sour smell now though. When. Bread making do I add the starter when it is at its peak, or after it falls before discard when it is hungry? Sorry if I missed it somewhere and thank you so much for sharing your info!
Emilie Raffa says
Hi there! Yes: use your starter at peak height for best results. Keep in mind: the starter can also be used when it falls, if you catch it early on before it loses all strength.
Daniela says
It worked it worked it worked! I diligently followed your starter instructions and then baked this lovely bread once it was ready. Beautifully sour and so delicious. Thank you!
Pamela says
I have made the most gorgeous, delicious batards using your recipe. Thanks!
Susan Poolarea says
I followed this exactly and it was amazing. I consider this the authoritative guide to making sourdough. Thank you for how thorough it is!
Emilie Raffa says
Excellent, thank you Susan! You are very welcome. Appreciate the kind words :)
Winkles46 says
hi there,
first time making sourdough!
The dough took overnight to rise, but is so so sticky, that I cannot do the folding. I’m going to stick it in the oven anyway after the second rise, but wondered what happened?
I stuck to the measurements in the recipe
Emilie Raffa says
Hi there! Could be a few things: type/brand of flour used, warm dough and/or over proofed dough. All lead to sticky textures. Next time, cut back on the amount of water used and shorten the bulk rise is necessary. That should help!
Tammy Miller says
Thank you so much for this recipe! I bought an amazing starter online and used her recipe and it was an epic fail. Yours was foolproof and it tasted awesome!
Emilie Raffa says
Thanks Tammy! I’m so glad it worked it for you. Sourdough is one of those things… its more of an understanding rather than a recipe, which was the inspiration and drive behind this post. Happy baking :)
Rona Gregory says
Sorry I’m a sourdough virgin and a little confused! why do you preheat the oven to 450F while the bread is rising, presumably on the side as the instructions don’t mention putting it in the oven … only to reduce it to 400F when it’s time to bake it? Many thanks!
Emilie Raffa says
Hi Rona! To boost the rise. Since all ovens are different, and most are slightly inaccurate, starting at a higher temperature helps to promote better oven spring. The temperature is then reduced for the duration of the bake, as this particular dough requires a lower temperature.
Bob McClellan says
Very instructive-reading through the early information for beginner’s helped begin the journey of sourdough bread baking.
I am wondering if you use the same bread recipe for baguettes? If so, do you have a video on shaping baguettes? If you use a different recipe for baguettes where can it be found?
Emilie Raffa says
Fantastic Bob, thank you! For baguettes, it’s a totally different ball game. You need a wetter dough, a different flour (sometimes ap flour is used) and the method itself is different. I wouldn’t modify this recipe. I don’t have a specific sourdough baguette recipe on the blog; you can find my beginner baguette “twists” in my book.
Clare Short says
I have made starter and a good loaf. Thank you for such clear guidance.
Can I make a sourdough loaf with brown flour using your instructions?
Thanks
Clare
Emilie Raffa says
Hi Clare! You can, with adjustments. Try 100g whole wheat flour + 400g bread flour + 325g water (you can add more if the dough is very dry) + 25g olive oil.
Kim says
Hi Emilie, I found this very helpful! Thank you for all the little tips. I feel more confident I can do this now :-) Kim
Emilie Raffa says
Kim, you are very welcome. I wrote this tutorial back when I felt there was very little clarity on the subject, and wanted to create something achievable for beginners. Glad you’ve found it helpful! Sharing tips and personal experience is what it’s all about. Enjoy x E
Greg says
I struggled to make sourdough bread until I tried your beginner’s recipe. It is clearly described and REALLY WORKS!
Thank you.
Emilie Raffa says
Greg, this is excellent! You are very welcome. Sourdough is truly more than just a recipe; it’s an understanding. You’ve got it! xx
Annie says
Hello, this bread is delicious! I was wondering if I could double the portions in this recipe. If so what would my new baking times be?
Emilie Raffa says
Hi Annie! You can certainly double this recipe. Make two batches, in two separate bowls, and bake the doughs back-to-back. Baking time & temperature remains the same.
Annie says
Thank you! I was wondering if I could double the proportions and just have one larger bread to fill out my 5QT Dutch Oven more. Would that work?
Emilie Raffa says
Ahhh…. got it. OK. I don’t think a doubled dough would fit in a 5 QT. You’ll need a bigger pot. With that said however, I’m a firm believer in experimentation, so if you end up testing it out please let us know :)
Annie says
Hahaha ok I’ll report back with results if I go through with it! Thanks for getting back to me! :)
As a side your bread is so delicious, I daydream about it sometimes!
Emilie Raffa says
Sounds perfect! And thank you!! :)
Natis says
I’ve tried to bake a good sourdough loaf for a really long time and this recipe helped me achieve my first good sourdough loaf!! It’s really soft and has a good crust! The crumb is uniform and the loaf had a good ear and rise! My family really likes it too!! 😃
Side note: I increased the hydration to 60% (300g of water) and my final dough temperature was about 29.8 degrees celcius. My bulk fermentation was around 3.5 hours since room temperature where I live is 29 degrees celcius. I also preheated my dutch oven and baked for 30 minutes at 230 degrees with the lid on and 15 minutes with the lid off, both at 230 degrees celcius.
Emilie Raffa says
Fantastic, Natis! Thrilled to hear this. Thanks for sharing your feedback with us! I always love to hear how bakers make recipes their own. That’s what it’s all about!
Denise Leopold says
I first baked this (my first ever sour dough bread) one and a half years ago. I love it so much, I keep baking it. I have read your instructions so often I don’t need it for making anymore. I have also altered the recipe for part whole wheat, have added seeds. Alter the wetness of the dough and have throughly enjoyed playing with it. Thank you so much for this recipe and hints about how to alter it.
Denise
Emilie Raffa says
Denise, I love this! Second nature sourdough ;) You are very welcome- thank you for sharing your feedback. xx
Allie says
This bread comes out perfect every time
Emilie Raffa says
Excellent! great to hear, Allie! xx
Wayne says
You have taught me how to make sourdough starter and sourdough bread. I’m on my fifth loaf, and though the shape is somewhat rough, the taste is incredible. I have been using organic rye to make and feed my starter. I have used both the recipe on this site with the olive oil and your everyday recipe in your book. I like the addition of the olive oil. Thank you for sharing your knowledge. I hope to progress to other recipes in your book as I gain experience.
Emilie Raffa says
Wayne, when I first started baking sourdough, I always told myself: you can’t have it all! Sometimes my loaves were pretty, other times they were flat, and more often than not my scoring was lackluster. With consistent practice and repetition, beauty subsequently followed and I learned that only taste and texture mattered. You will absolutely get there! Side note- isn’t the olive a nice addition? I love the smoothness it adds to the dough. Enjoy x
Aleta says
I am intruiged by all of this and considering attempting making my own sourdough. I will need to purchase an ovenproof dish – what capacity does it need to be to fit this loaf into? Would 3 litres be big enough? (Sorry I am living in a metric country).
Emilie Raffa says
Hello Aleta! A 3 liter oven-safe pot with lid can be used if you halve this recipe. To make this recipe as is, which is a standard size loaf, your would need a bigger pot, about 5- 5 1/2 liters.
Christine says
Got it! But, do i need to put on the lid while baking it?
Emilie Raffa says
Yes! Put the lid on while baking :)
Christine says
Hi, if I don’t have a Dutch oven, can I use any pot? As for the baking, do i put the pot in as well or I gotta put the dough on a baking tray? Thanks!
Emilie Raffa says
Hi Christine! You can use any oven-safe pot with lid. Just make sure the pot and handles can heat up to 450 F. Alternatively, you can bake the dough on a tray, but you’ll need to add steam to your oven (otherwise the bread will form a crust too quickly and it will be dense and hard). Using a pot is my preferred method for bread baking; the results are reliable and consistent.
Dan says
Wish I could make this. I miss sourdough bread. I live in Thailand and the Thai don’t like bread unless it’s laced with heavy doses of sugar or sweet mayonnaise (YUCK!). Also, I live in an apartment so I don’t have an oven. Only thing closest to an oven I have is an toaster oven. Also, I don’t know if I could find the ingredients here. :(
Emilie Raffa says
Hi Dan! I didn’t know that about Thai bread- so interesting!
Diana Bontecou says
I am completely new to this bread baking craze, and this recipe was a great way to get started. A friend has kept giving me starter and I finally took the plunge and followed your very simple instructions. I have a fresh baked loaf of bread.
Thank you!
Emilie Raffa says
Fantastic, Diana! So glad you gave it a try :)
Kathy says
Hi, would you please publish this recipe with teaspoons and cup measurements.
Or you could just email to me, whatever is easier. Thanks , can’t wait to bake some sourdough bread.
Kathy
Emilie Raffa says
Hi there! The volume equivalents are listed in the FAQ section at the very bottom :)
Steve Timbrook says
I’ve used your basic sourdough bread recipe for boule, batard, and pullman loaves with great results. I’d like to try making bagettes. Will I need to adjust the hydration level? If I use the basic recipe to make 2 bagettes can you give me an idea of baking times since there will be no lid and the loaves will be less thick?
Emilie Raffa says
Hi Steve! For baguettes, which are more advanced, you would use a completely different recipe, hydration level, method and bake time. I wouldn’t adjust this recipe; it just won’t work. To get started, I have a beginner baguette recipe (they are twists) in my book (linked here). Alternatively, I would search “sourdough baguettes” online and see which recipe jumps out at you.
Steve Timbrook says
Time to expand my horizons. Thanks, Emilie.
Steve
Emilie Raffa says
You are very welcome, Steve. Enjoy.
Mima says
Hi, what would be the approximate calories for this recipe please? Would be really helpful to know if you do know, thanks!
Vikki says
Amazing bread thank you so much. I’ve surprised myself at the lovely loaves that have come out lol. And the no kneading has been a blessing as I’ve ehlers danlos. But I would like to share something with you if like me sometimes the crust is too hard. Once you take the bread out the oven wrap it in a tea towel and pop it on the side to cool not on a rack. You’ll get a softer crust. My Nanna always did this probably as she had false teeth lol. And it also helps the crust not burn so quickly making toast.
I do also have a question when I put my sourdough starter in the fridge all that seems to happen is I get hooch on the top after a few days. Do you know why that is.
Thank you x
Emilie Raffa says
Hi Vikki, thanks for sharing your tips! Nanna’s are the best ;) Regarding your sourdough starter, the liquid on top is normal. This will happen after after it’s been in the fridge and/or at room temperature for a while, un fed. It’s a sign your starter needs fresh flour and water.
Tish Amborn says
I have made this bread many times in the last months and am always happy (except once when I didn’t let it rise enough so my fault lol)
But I have a question – After the resting phase I always have these little hard spots throughout the dough – like the size of a pencil eraser, or smaller – it doesn’t seem to affect the bread outcome but I am always tempted to pick them out. Does this ever happen to you?
Emilie Raffa says
Hi Tish! Are you referring to the first rest (autolyse)? If so, the hard spots could be small clumps of flour that did not incorporate into the dough properly. Next time, you can add a bit more water to the recipe and/or spend more time mixing the dough in the beginning and then again after the first rest. This way, you’ll be sure all of the flour as been absorbed into the dough.
Rebecca says
Made this yesterday for the first time.
Delighted with how it turned out, (tried to post a photo here but couldn’t) thank you for sharing your expertise with us all!
Perfect for making sandwiches for my lunchbox.
Excited to try other recipes now
Emilie Raffa says
You are very welcome Rebecca! Feel free to tag me on IG: @theclevercarrot. I’d love to see what you make :)
Vicky says
I just finally made this yesterday after doing SO much research on your blog and elsewhere. It came out pretty great! But, it was a bit more dense than I wish.. How do I modify this to get a more open crumb? Still just a basic sourdough loaf, no fancy add-ins. I see recipes elsewhere of course, but since I’ve been following your method 100% from starter to now, I don’t want to try to stray too far just starting out!
Emilie Raffa says
Hi Vicky! Dense bread usually comes from under developed gluten (dough didn’t rise long enough) and/or a starter that’s too acidic. I’d start there first and make changes as needed. For a more open crumb, this particular dough is a low hydration dough. It’s more indicative of a tight knit and smooth crumb. However, increasing the hydration by adding more water to the dough will help to open it up. Additionally, an open crumb requires gentle handling, proper fermentation, shaping and most of all: trial and error.
Pam says
I made this yesterday and it was amazing. I did a really long rise, 12-14 hours in a cool environment because of my schedule. What a strong dough! Held its shape beautifully 🥰. I baked as per the recipe but will do 5 minutes longer next time. My oven can be wonky. Tonight we are having pizza made with the starter discard. I’m going to have to get over my guilt at throwing out the discard or my current sourdough fixation could get out of hand.
Emilie Raffa says
Sounds perfect, Pam. Yum! Totally understand about the discard- you can find more recipe here Sourdough Discard 101: Recipes & Faqs Answered.
Julie Small says
This recipe is super. I am quite new on the sourdough journey and was thinking of giving up until I tried your advice. So glad I stuck with it. Would like to purchase your book but not really wanting to use Amazon. Can you advise where I can get one. Julie UK
Emilie Raffa says
Hi Julie! Thank you for the support ;) Book Depository (linked here) delivers worldwide with free shipping.
Valerie says
Extremely helpful guide I have just made my best sourdough yet. Now I need to find a dutch oven that you can actually put in the over.. Any advice as advertisements don’t say if their pots are ovenproof or not! Good tip to place parchment on top of dough before tipping into cooking pot.
Emilie Raffa says
Thank you Valerie! Le Creuset pots are fantastic. Also: the Challenger Bread Pan works beautifully.
Valerie says
Thanks for reply but Challenge pots are so expensive far beyond my purse. I am using a self baster that although cumbersome is producing excellent results. In the meantime I am looking for a second hand suitably sized Le Creuset.
Joe says
Cuisinel makes a cast iron Dutch oven which has handles on the deep section and the shallow lid, which can also be used as a skillet. Cost around $50. The bread can be cooked in the shallow part allowing easy access once deep half is removed.
Valerie says
I have now found in Shropshire Netherton Foundry that makes the Dome. This consists of an iron bottom tray where the formed loaf is placed and a dome that fits over the top. Apparently the Foundry works with the Challenger manufacturer too. It is currently being produced for me and I will let you know how it performs when it arrives.
Jodi says
I started baking sourdough bread over a year ago when the pandemic forced all of us home. I searched the internet and tried many many recipes. Yours consistently produced the best loaves, and I liked that olive oil was included. My specialty has become sourdough with jalapeno and cheddar and I have several bread aficionados who have told me it is worthy of selling in a bakery! So, thank you for your recipe. I have baked perhaps 100 loaves since last March, using a variety of recipes. Most of my loaves, rolls, bagels, etc.. I have given away to happy friends and relatives. Thank you again.
Emilie Raffa says
Jodi, thank you so much. I’m thrilled to hear this. What a beautiful way to connect with friends & family! xx
Callie says
Why might my loaf not rise? Starter looks great and passes test. I don’t notice doubling of size during bulk rise. Any tips?
Emilie Raffa says
Hi there! In your case, it’s most likely temperature and time- both variables are related. If it’s cold by you, try letting the dough rise in a warmer spot. If it’s warm, just give the dough more time to double in size. More info with specific details here.
Tracey says
Can you use milk when making this recipe?
Emilie Raffa says
Hi there! I’ve never tried it! I’m sure you can, but the overall texture and taste will be different.
meg says
Thank you for such a thorough post! I’ve never made bread before so I’m sure it will be a huge learning process, but I’m so excited to try this out!
Emilie Raffa says
You are very welcome, Meg. Thanks for taking the time to comment! Enjoy sourdough!
Anmol says
Hi Emilie,
Your recipe is really very easy. The taste is still in my mouth. The bread was really very soft. Can we try any variation with this? What do you think?
Emilie Raffa says
Sourdough is very flexible. Depending on the variation you’re after, you can add fillings (rosemary, olives etc) after the first rest (autolyse). additional recipes here and here.
Deborah says
If I am using fresh milled Glenn wheat flour are there any changes I need to make for this recipe?
Emilie Raffa says
Deborah, this is a great question. I’ve never made this recipe with Glenn wheat flour. However, when using any freshly milled flour, they tend to be a bit weaker in strength (this is not a bad thing; it’s just the nature of the product). I think you’ll be fine using your flour in this recipe, perhaps with the 250 g of water and a few stretch and folds for added strength.
El says
Is it possible to use this dough for a pizza base? I’ve been baking this bread for over a year and me and my family love it! I haven’t been able to find a good sourdough pizza recipe. Thank you! ;)
Emilie Raffa says
Hi there! I’d bump up the water to a minimum of 350 g. This recipe, as is with the 250 g of water, would be too dry for pizza dough baked in a home oven. Let us know how it comes out!
Una Joy says
This is a great recipe. I don’t eat much wheat and followed it using 50/50 white and wholemeal spelt and some wholemeal rye. The addition of oil does indeed make for a ‘plush crumb’ – what a lovely description. I always add oil to yeasted bread and hadn’t found other sourdough instructions that included it. The addition of oil was the detail that made me give this recipe a try. The first loaf was perfect. I delighted in the sound of the crust, that little crackle when gently pressed. It tasted wonderful. I have been baking on and off for 40 years and wanted to return to sourdough. Forty years ago I experimented with sourdough and used to make rather sour tasting loaves – those were the days when there wasn’t any sourdough bread – or any such thing as artisan bead – on sale in the UK, outside London, to compare it with, but I was happy enough with it. In retrospect it was an ‘acquired taste’. However, having eaten some very good sourdough since then I wanted to find a way to recreate the best of them at home. My return journey was hit and miss; tough crust, dense chewy crumb, nothing like the delicious spelt and rye sourdough from the local market. And then I found The Clever Carrot. The light touch, not too much kneading, clear instructions combined with the kind of information that encouraged me to use my own judgement, demystified the process. I guessed that the dough would be heavier and to adjust my expectations. The stretch and fold is somewhat less stretchy and I gently wriggle it whilst letting gravity do the rest. The dough is less open. But once it’s risen and in the oven the magic happens. I bake on baking paper as suggested, in my late mum’s big old le Creuset. My mum would have loved this bread!
Thank you Emilie. I ordered your book from my local bookshop.
Emily says
I never comment on blog recipes, but need to make an exception for this one. This loaf turns out beautifully every time I make it. This, and your sourdough cinnamon roll recipe, are absolute perfection. Thanks!
Emilie Raffa says
Emily, thank you so much for taking the time to comment. I’m thrilled you like the recipes :)
Emilie Raffa says
Una, what a beautiful comment. Thank you. This really made me smile. Sourdough really is a journey, one that ebbs and flows, and what makes it truly unique is that it’s completely your own. Thanks again for your support. And I’m thrilled you like the oil in the dough ;)