Think you can’t bake artisan sourdough bread at home? Think again! Sourdough Bread: a Beginner’s guide is your go-to recipe resource for simple, easy sourdough bread without kneading. Make the dough in the morning or at night- it will come together in under 10 minutes.

In 2013, my resolution was to bake more bread.
I researched, tested and baked countless loaves with both good and mixed results. My journey began with this no-knead artisan bread recipe and eventually, I worked my way up to the holy grail: Sourdough. My passion for creating easy sourdough bread recipes and preserving traditional culinary arts inspired my bestselling book Artisan Sourdough Made Simple which has connected me to like-minded bakers all over the world! Lucky me 😉
If you’re curious about sourdough bread (and don’t know where to begin), trust me, you’re in the right spot. My beginner sourdough bread recipe has been THE MOST popular recipe on my blog for over a decade and continues to earn millions of page views a month. Welcome to the journey!
What You’ll Learn
In this tutorial, you’ll learn how to make simple sourdough bread with step-by-step instructions and videos for guidance. There’s no kneading involved, and a bread machine or a stand mixer is not required. My sourdough bread recipe is perfect for beginners. I’ll explain a complex topic in simple terms without the stress! But before you dive in, here’s a secret: sourdough bread is more than just a recipe… it’s an understanding.
There are similar sourdough bread recipes out there and yet no two loaves look alike. The process is all about method, timing and personal touch. Use this tutorial as a guide and make your own adjustments as you go. Once you have a few loaves under your belt, the process will become an imminent rhythm, and in the end, you will have created your very own masterpiece that is the ultimate reward. Just don’t forget to eat your mistakes (might I suggest homemade sourdough breadcrumbs)?
Jump To
- Sourdough Bread Recipe
- Step by Step Instructions
- Sourdough Starter 101
- Sample Baking Schedule
- Sourdough FAQ

So, What is Sourdough?
In a nutshell, sourdough is slow-fermented bread.
It’s unique because it does not require commercial yeast in order to rise. Instead, sourdough bread is made with a live fermented culture a sourdough starter, which acts as a natural leavening agent.
Sourdough is known for its characteristic tangy flavor, chewy texture and crisp, crackly crust. From a health standpoint, it dominates when compared to supermarket loaves. The naturally occurring acids and long fermentation help to break down the gluten, making it more digestible and easy for the body to absorb. And it tastes darn good!

Sourdough Starter 101
Before you begin, you’ll need a sourdough starter.
Simply put: a sourdough starter is a live culture made from flour and water.
Once combined the mixture will begin to ferment, cultivating the naturally occurring wild yeasts and bacteria present within the mixture. A small portion of this culture is used make your bread dough rise.
But it doesn’t stop there.
Your starter must be kept alive with regular feedings of flour and water to maintain its strength for maximum rising power.
How to Feed your Sourdough Starter
Every baker has their own method, and with practice you’ll eventually develop your own routine.
Here’s my method: I pour off some of the culture (about half) and then feed what’s left in the jar with equal weights of flour and water. I whisk well with a fork until it’s lump-free. Then, I let it rest at room temperature or in a warm spot (75-80º F/ 24-26º C is ideal) until it becomes bubbly and active.
PS: I use this the jar for my sourdough starter and I LOVE it.
When is my Starter Ready To use?
Your stater is ready to use when it becomes bubbly and doubles in size.
This can take anywhere from 2-12 hours or more depending on temperature (the warmer the better) and the condition of your starter. Be patient!
Float Test: If you’re still unsure whether it’s ready to use drop a small amount, about 1 tsp, into a glass of water. Do this when the starter is a peak height before it collapses. If it floats to the top it’s ready to use. If it sinks, your starter should be fed again.
Where to Obtain a Sourdough Starter
All sourdough starters are different.
They can be made from scratch, purchased online, or if you’re lucky, someone will share a portion of their starter with you.
Starters range from thick to thin in texture and can be made with a variety of flours. I use two different starters; one is homemade and the other was a gift from my friend Celia. She dried a portion of her starter and mailed it all the way from Sydney, Australia.
How To Use A Starter
After you’ve fed your starter and it’s bubbly and active, pour the amount you need out of the jar to weigh or measure for your recipe. That’s it.
Then, don’t forget to feed what’s left in the jar with more flour and water to keep the process going.
Any leftover sourdough starter can be used to make sourdough discard recipes, even my homemade sourdough pasta.
Storage Options
If you only bake a few times a month, keep your starter in the fridge and feed it once a week. If you’re an avid baker, store your starter at room temperature and feed it at least once a day.
Looking for more info on sourdough starters? Check out Feeding Sourdough Starter: My Best Tips & Tricks & Sourdough Discard 101: Recipes & Faqs Answered.

How to Make Sourdough Bread: Step-By-Step Guide
Step #1: Mix The Dough
Combine the following ingredients in a large bowl (I use a fork):
- 250 g water
- 150 g bubbly, active sourdough starter
- 25 g olive oil
Add:
- 500 g bread flour (such as King Arthur)
- 10 g fine sea salt
Squish the mixture together with your hands until the flour is fully absorbed. The dough will feel dry, rough and shaggy.
Cover the bowl with plastic wrap, reusable wax wrap, or a very damp kitchen towel and let rest or ‘autolyse’ for about 30 minutes. After the dough has rested, work it into a ball directly in the bowl (it doesn’t have look perfect).
TIP: For best results, weigh all of your ingredients with a digital kitchen scale. Measuring cups are not as accurate. Please visit Sourdough FAQ for more details.
What is Autolyse?
This is the first resting period right after you mix the dough.
It jumpstarts gluten development without kneading. Strong gluten = good bread.
For timing, autolyse can range anywhere from 15 minutes to 1 hour or more depending on the type of bread you’re making and your own personal baking schedule. A minimum of 30 minutes works best for this recipe. However, when time permits, I’ll let it go for an hour. The dough will become more soft and manageable to work with afterwards.
A Note on Salt: some bakers prefer to add salt only after autolyse because it might slow down the gluten development. I’ve followed this technique for years, but no longer do so. I prefer to mix everything all at once. It’s practical, effective and produces excellent loaves (plus, you won’t forget to add the salt later on!). I’ll leave the choice up to you.

Step #2: Bulk Rise
Now the dough is ready to rise.
Cover the bowl and let rise at room temperature, about 68-70 F.
How Long will it take?
The dough is ready when it has doubled in size and no longer looks dense.
This can take anywhere from 3-12 hours depending on your current room temperature, the potency of your sourdough starter and the specifics of your surrounding environment.
For example, in the summer the dough can take anywhere between 2-4 hours @ 85º F/ 29º C. In the winter, it will take longer about 10-12 hours @ 68º F/ 20º C. Temperature controls time.
And remember: because sourdough bread does not contain instant yeast it will take longer to rise. Watch the dough and not the clock. Be flexible.
Optional Step: Stretch and Fold the Dough
About 30 minutes into the bulk rise, you have the option to perform a series of ‘stretch & folds’ to strengthen the bread dough {click here for a step-by-step tutorial}. Although it’s not mandatory, this technique will add height and structure to the finished loaf and it’s fun to do.
Watch the video below!


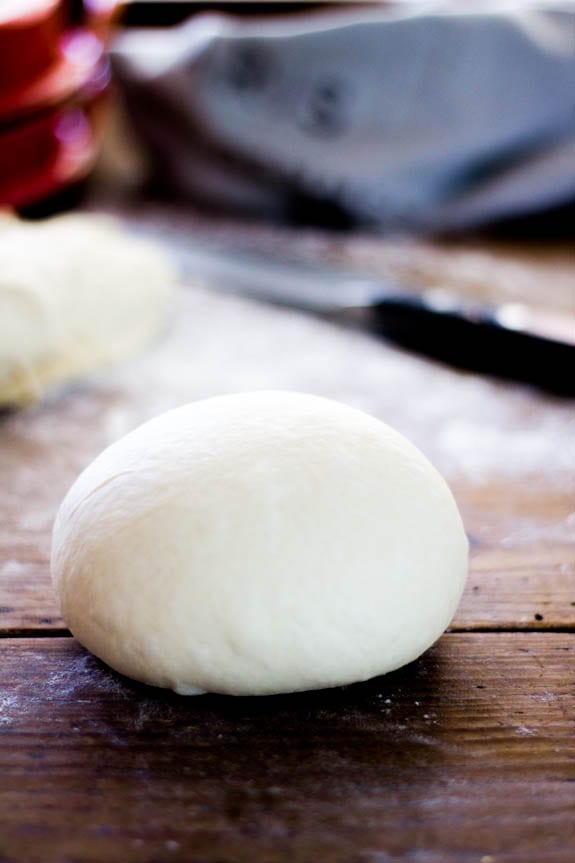
Step #3: Divide & Shape The Dough
Remove the dough onto a lightly floured surface.
Cut the dough in half to make 2 loaves, or leave it whole for a single loaf.
How to Shape a Round Sourdough Boule (Loaf)
Starting at the top, fold the dough over toward the center. Give it a slight turn, and then fold over the next section of dough. Repeat until you have come full circle. Or, use the envelope shaping technique outlined below.
Watch the video!

Step #4: Choose a Baking Pot
I bake my sourdough bread in a Dutch oven.
You can also try the Challenger Bread Pan, another vessel I use for baking, that can accommodate both round and oval shaped loaves.
The pot traps in heat and moisture which is essential to achieving artisan style bread at home.
Steam plays a key role in how the bread will open up or ‘bloom’ while baking and the Dutch oven helps to control this process.
You can use any oven safe pot that can heat up to 450º F/ 232º C (including the lid and handles).
TIP: In the past, I’ve tried baking on pizza stones and cookie trays with no luck. The crust would harden too quickly, forcing the bread to tear on the bottom and sides. I used various steaming methods to remedy this, however I found them to be extremely cumbersome and not realistic for everyday use. Nothing worked. The lack of moisture in my home oven was evident and using a pot for baking was the only practical solution.

Step #5: Second Rise
After shaping the dough, it needs to rise again.
Generously coat the bottom of your Dutch oven with cornmeal (or line the bottom with non-stick parchment paper instead) and place the dough inside.
This time, the dough will rise for a shorter period about 30 minutes- 1 hour.
The dough is ready when it’s puffy and no longer dense. It does not need to double in size.
Preheat your oven to 450º F/ 232º C during the tail end of the second rise.
TIP: Instead of doing a free form second rise in the Dutch oven, use a cloth lined proofing basket or 8-inch bowl instead. Either option will contain the dough and hold its shape properly during the second rise.
Step #6: Score The Dough
After the second rise, and right before the dough goes into the oven, make a slash about 2-3 inches long down the center of the dough.
This allows the steam to escape and for the dough to expand during baking.
You can use a small serrated knife, paring knife or bread lame.

Step #7: Bake The Sourdough Bread
Place the lid on top of the pot and reduce the oven temperature to 400º F/ 204º C.
Bake on the center rack for 20 minutes.
When 20 minutes is up, remove the lid. Your bread will be pale and shiny like the picture above.
Continue to bake (uncovered) for an additional 40 minutes or until deep, golden brown. The internal temperature should read 205-210º F/ 96-98º C.
Cool on a wire rack for at least a 1 hour before slicing. Be patient!
If you cut into it too soon, the texture will be gummy…
TIP: During the last 10 minutes of baking, crack open the oven door (optional). This allows the moisture to escape, leaving your sourdough bread with a crisp crust. Alternatively, remove the bread from the pot and let it bake directly on the rack. The latter produces a more crisp crust.


Additional Sourdough Recipes & Resources
Sourdough Starter:
- Beginner Sourdough Starter {Recipe}
- Feeding Sourdough Starter: My Best Tips & Tricks
- Sourdough Discard 101: Recipes & Faqs Answered
Sourdough Bread Recipes:
- Beginner’s Guide to Sourdough Focaccia Bread
- Best Sourdough Pizza Crust (No steel or stone!)
- Best Sourdough Pasta (1 hour or Overnight)
- Light Whole Wheat Sourdough
- Easy Sourdough Sandwich Bread
- Soft Sourdough Cinnamon Rolls
- Best Sourdough Pancakes
Sourdough Bread Tips & Techniques:
- How to Stretch and Fold Sourdough {Video}
- How to Shape a Round Sourdough Boule {Video}
- Why Won’t My Sourdough Bread Rise?
- Bread Flour vs. All Purpose Flour: What’s the Difference?
Sourdough Tools & Supplies:
Baking Schedule
- Friday Evening: Feed your starter, cover the jar, and leave it on the counter overnight. If you keep your starter in the fridge, it might need two feedings to perk back up (feed it in the morning & in the evening).
- Saturday Morning: Check your starter: if it’s alive and bubbling, you can make the dough to rise during the day. Or, feed it again in the afternoon to make the dough in the evening for an overnight rise. Remember to use the float test mentioned above to make sure your starter is ready to use.
- Saturday Morning/Evening (or whenever your starter is ready): Make the dough. Leave on the counter to bulk rise at room temperature. In the summer, if your dough rises quickly and you’re not ready to bake, cover the whole bowl with lightly oiled wrap and chill until ready to use.
- Sunday Morning: cut and shape the dough. Place in Dutch oven for second rise. Slash. Bake. Cool. Eat.
Sourdough Bread Recipe
Print
Sourdough Bread: A Beginner’s Guide
- Prep Time: 13 hours
- Cook Time: 1 hour
- Total Time: 14 hours
- Yield: 1 loaf
- Category: Sourdough Bread Recipes
- Method: Oven-Baked
- Cuisine: American
- Diet: Vegan
Description
This beginner sourdough recipe is perfect for bakers looking to jump right in! It’s is a low-hydration dough, meaning it will yield a ‘tight’ crumb (small holes). It is great for sandwiches and toast.
Ingredients
- 150g/ 5.35 oz bubbly, active sourdough starter
- 250g/ 8.80 oz warm water, preferably filtered*
- 25g/ .90 oz olive oil
- 500g/ 17.65 oz bread flour (not all purpose flour)
- 10g/ .4 oz fine sea salt
- fine ground cornmeal, for dusting
*For a more soft and pliable dough, you can increase the water up to 300 g- 325 g total. Please use a cloth lined bowl (instead of the Dutch oven for the second rise).
**You will need a 5 1/2 or 6 quart Dutch oven for baking
***This recipe was tested with King Arthur Bread Flour, Gold Medal Bread Flour, Pillsbury Bread Flour
Instructions
Make the Dough
Whisk the starter, water, and olive oil in a large bowl. Add the flour and salt. Squish everything together with your hands until all of the flour is absorbed. The dough will be dry and shaggy. Cover the bowl with plastic wrap, reusable wrap or a clean, very damp kitchen towel. Let rest (autolyse) for 30 minutes or up to 1 hour, if preferred.
After the dough has rested, work the dough in the bowl into a rough ball, about 15 seconds.
Bulk Rise
Now the dough needs to rise.
Cover the bowl with wrap or a very damp kitchen cloth. Let rest in a warm spot to rise. The dough is ready when it no longer looks dense and has doubled in size. This can take anywhere from 3-12 hours depending on the temperature of your ingredients, the potency of your starter and surrounding environment. For example, in the summer rise times can take anywhere between 2-4 hours @ 85º F/ 29º C whereas in the winter, the dough will take about 10-12 hours @ 68º F/ 20º C.
Optional Step: Stretch & Fold the Dough
During bulk rise, you have the option to perform a series of ‘stretch & folds’ to strengthen the dough. Start 30 minutes into the bulk rise. Gather a portion of the dough, stretch it upwards and then fold it over itself. Rotate the bowl ¼ turn and repeat this process until you have come full circle to complete 1 set. Do this once or twice spaced about an hour apart. Although this step is not mandatory, it will increase the total volume and height of your bread. Click here for a step-by-step video tutorial.
Cut & Shape the Dough
Divide your work surface in half; lightly flour one side (for cutting) and leave the other half clean (for shaping).
Remove the dough from the bowl, and place onto the floured section so that it does not stick. You do not need to ‘punch down’ the dough; it will gently deflate as you fold and shape it.
Cut the dough in half to make 2 loaves, or leave it whole for a single loaf.
To shape, use a bench scraper to move your dough to the non-floured section (if there is any flour present, it will be difficult to shape- brush away any excess). Starting at the top, fold the dough over toward the center. Give it a slight turn, and then fold over the next section of dough. Repeat until you have come full circle.
Then flip the dough over and place it seam side down. Using your hands, gently cup the sides of the dough and rotate it, using quarter turns in a circular motion. You can also pull it towards you to even out the shape. Repeat this process until you are happy with its appearance. *See note below.
Second Rise
Now the dough needs to rise again, but for a shorter period of time.
Coat the bottom of your Dutch oven with cornmeal. Alternatively, use parchment paper to prevent sticking (this is what I do, now). Place the dough inside for a second shorter rise, about 30 minutes to 1 hour and cover with the lid of the pot or a very damp cloth. The dough ready when it is slightly puffy but not double in size.
Preheat your oven to 450º F/ 232º C towards the tail end of the second rise.
Score the Dough
Right before your bread goes into the oven, make a shallow slash about 2-3 inches long (or more) in the center of the dough. Use a bread lame, sharp pairing or a small serrated steak knife. The cut should be about 1/4-inch deep.
Bake the Dough
Place the bread into the oven on the center rack (lid on) and reduce the temperature to 400° F/ 204° C. Bake for 20 minutes. Remove the lid, and continue to bake (uncovered) for an additional 40 minutes or until deep, golden brown. Keep in mind that all ovens are different; you might have to make minimal adjustments to these temperatures.
You can also take the internal temperature of your bread to double check that it is done. For sourdough, it should read about 205-210º F/ 96-98º C.
Remove the bread from the oven, and cool on a wire rack for at least an hour before slicing. Don’t cut too soon or else the inside will have a gummy texture!
Notes
When shaping, the idea is for the dough to catch enough surface tension on a non-floured area in order to create a tight ball. If there is flour present, it will slide around… and drive you nuts.
Sourdough FAQ
1.) I only have all purpose flour. Can I still make this recipe?
For best results, use bread flour for this dough. If you only have all purpose try my Artisan Sourdough with All Purpose Flour instead.
2.) Can I add whole wheat flour to this recipe?
You can, but I wouldn’t. The dough will be too dry and dense without adjusting the water quantity. Try my Light Whole Wheat Sourdough for more whole grain goodness.
3.) Your beginner recipe here uses 150g of sourdough starter. The Everyday Sourdough in your book uses only 50g. What’s the difference? And why?
- When I first learned how to bake sourdough bread, I used 150g of starter. Overtime, it was too much to maintain (especially when doubling and tripling recipes). So, I scaled down. That’s why most recipes in my book Artisan Sourdough Made Simple include 50 g of starter instead. One amount is neither right or wrong; it’s just a matter of preference.
4.) What’s the purpose of olive oil in this recipe?
Adding olive oil to sourdough was the method I followed when I first learned how to bake. The natural fat emulsifies the dough and makes a plush crumb.
5.) Why do some of your recipes call for the second rise in a Dutch Oven? And others in a cloth- lined bowl?
The freeform Dutch oven second rise will only work with dry, low hydration doughs (like this one) because it will not spread out too much. On the flip side, when working with wet, high hydration doughs you’ll need to use a cloth-lined bowl sprinkled with flour to holds it shape. Otherwise, it will spread.
6.) Why don’t you preheat your Dutch oven before baking?
Because this recipe follows a freeform second rise directly in the baking pot, it cannot be preheated beforehand. The dough will begin to cook before going into the oven!
However, if you are doing the second rise in a cloth-lined bowl as mentioned in question #5 above, you can preheat the pot if you’d like. When bread dough is placed into a hot pot it begins to expand instantly which is great for the overall shape and structure of the bread. And in fact, I use to follow this technique when I first started baking. But overtime, I found the preheat to be too cumbersome for small kitchens with little kids running around. Plus, I kept burning my wrists. Long story short: you can achieve comparable results without the preheat. The choice is up to you.
7.) Can I halve the dough to bake 2 loaves? If so, what will that do to the baking time?
Yes, you can definitely halve this recipe. Bake for 20 minutes (lid on) and 30 minutes (lid off). Check at the 45 minute mark.
8.) If I halve the recipe, where should I store the second dough if I’m not baking at the same time?
Store the second dough in the fridge until ready to bake. Place the dough in a cloth-lined floured bowl (seam side down) and use the cloth overhang to cover it. If the dough is in the fridge for longer than 1 hour, rest at room temperature while the oven heats up.
9.) How do I get the dough out of the cloth-lined floured bowl?
Open up the cloth overhang to reveal the dough in the bowl. Place a piece of parchment paper on top of the dough. Flip the bowl over. Remove the bowl and cloth. The dough is now smooth side up and ready to be scored.
10.) Can I have the measurements for this recipe in cups, please?
- 3/4 cup bubbly, active starter
- 1 cup + 1 tbsp warm water
- 2 tbsp olive oil
- 4 cups bread flour
- 1 1/2 tsp fine sea salt
NOTE: Weight and volume measurements are not equivalent, only approximate. I strongly recommend weighing your ingredients instead. With that said however, I understand the convenience of measuring cups. For best results, please aerate the flour first (I fluff it with a fork directly in the bag), then lightly spoon and level it into the cup. Too much flour will make the bread dense. If your sourdough starter is very bubbly, the volume amount might be off. If necessary, add up to 1 cup as needed. Finally: the water can be increased up to approximately 1 1/3 cups, for a more soft and pliable dough.


Comments
Mike says
A wonderful loaf – it’s everything I wanted it to be, and more – being only a week old, the sour starter already had a very mature flavor. Thanks!
Emilie Raffa says
You’re very welcome Mike! Thanks for sharing your feedback.
Angela says
Hi Emilie!
I just wanted to tell you how much I appreciate your recipes and methods. I have your book and absolutely love it! You really have made the process of making sourdough bread so very simple. I’ve had your book for several years now, and I use it all the time, and always tell my friends about it! I also appreciate your blog and all the recipes you share with us here, although to anyone who is wondering, I would highly recommend getting your book and then using the blog as a companion to it! I’m always impressed at how you respond to all the comments here – you are a gem! Thank you!
Emilie Raffa says
Much appreciated, Angela. Thank you so much :) I’m loving that you use this site as a companion. Your kind words made me smile!
Donna says
Bulk rise- how long can you let it rise? I realize it could take as much as 12 hours but that could end up being in the middle of the night so can you let it go longer until you can proceed to baking the loaf?
Emilie Raffa says
Time, temperature, quantity & strength of your sourdough starter controls the rise of the dough. It will always vary! For timing, especially with a long slow rise (8-10+ hrs) adjust your schedule: start the dough in the morning and bulk rise at a warm room temp. during the day for a same day bake. If you run out of time, you can always cover and chill the bowl overnight and continue the next day. Alternatively, rise the dough overnight in cooler temperatures to slow down the rise. Bake in the morning.
Jena says
Hi Emilie!
Your recipe has made the entry into sourdough SO much less intimidating for me, thank you! Would this recipe allow for cinnamon sugar inclusions at the end? I’ve never added anything to mine, so I don’t want to mess up the balance!
Emilie Raffa says
Fantastic! You’re very welcome. To clarify, do you mean a cinnamon-sugar swirl?
Krystyna Sikorska says
The recipe calls for 150g of starter, but for light whole wheat is only 50g of starter. Why such a difference?
Krys
Emilie Raffa says
Hi there! They are just two different recipes. Using 150 g paired with a warm ambient temperature will get you a faster rise, whereas 50 g of starter at a moderate room temperature will slow down the rise. It just depends on what you’re looking to achieve.
Sarah says
This recipe looks great, will it work cooking it in an Aga please? And I don’t have a lidded pot that can take the temp of the hot oven, but I can put a cold shelf over the top for the first 20 minutes, would that work? thanks so much!
Emilie Raffa says
I don’t see why not? I’ve never cooked with an Aga before so please let me know how it goes. I’m curious. About the cold shelf, I’m not sure what that is… however, if you are able to cover the pot with anything that resembles a lid (and is oven safe) you should be fine.
Sarah says
Thanks so much for your reply 😊
The cold shelf is solid metal and is used for cooling the temp directly above something, for example a cake that may need a little longer but doesn’t need to brown any more. You slide it in full width on the runners directly above. I’ll let you know how I get on!
Emilie Raffa says
Very interesting. I’m intrigued by all of this. Yes, definitely keep me posted. I’m sure other baker’s here would love to see how it plays out too.
Elisabeth Lauer says
I followed your recipe to create my starter and had great results by day 8. I made my first loaf of bread using your Beginner’s guide recipe and made two beautiful, perfect loaves following your instructions. There is so much complicated advice out there that it was refreshing to read simple, clear, and concise directions. Thank you!
Emilie Raffa says
Ahhh this makes me so happy. Thank you Elisabeth! xx
Ed Kirkpatrick says
Well, I tried this recipe 3 times. The first two turned out OK. This time I followed your schedule and made the dough last night, let it proof overnight, and this morning just about 12 hours later I folded it into a ball, let it rise in my cast iron casserole, and baked it at 425* for 20 minutes, then 400* for 40 minutes. The interior temp was 203* I let it sit for about an hour, sliced into it and it was dense, partially uncooked, and gummy. I tested the oven temp set to 400* and it was 415*. I did not split the dough in two, because I wanted a larger loaf. Thoughts? Thanks!
Emilie Raffa says
When bread is dense, we know at some point during the process the gluten structure and/or handling was affected. How long did you let the second rise go for? How much water was in the dough? Did you weigh or measure your ingredients? Thanks!
Ed Kirkpatrick says
Thanks for responding. I followed the recipe exactly weighing all ingredients. I set the dough out covered overnight, so it had a 12-hour rise. This may have been too long. I did the last rise in my casserole covered in the oven on the “proof” setting for about an hour. It still tasted good and made toast but was not good for sandwiches.
Thanks! Ed
Giulia says
I am at day 8 of making the starter but the starter never bubbled or doubled in size at any of the previous days. I did followed the process of discarding 1/2 and then adding 1/2 cup flour and water 1/4 cup warm (more hot than warm)water. Why is the starter not bubbling or doubling in size?
Thank you
Emilie Raffa says
In this case, temperature is usually the main culprit. Starters need warmth to activate and rise, ideally 75 F. I would keep feeding your sourdough starter, but transfer it to a warmer spot during the process. You can also try the hot water bath tip: place your starter jar in a bowl of hot water and leave it on the counter (do not submerge). You’ll start to see little bubbles forming from the bottom up. Also: I feel like your starter might be too thin in texture. Add more flour, one spoonful at a time, to thicken it up if needed.
Giulia says
I have it at a temperature between 40*C to 50*C. Any comments?
Thanks
Emilie Raffa says
The temperature is too hot (40-50 C is 104-122 F, correct?). You’ll need to move it to a cooler place and/or use cooler water in your mix. Otherwise, yeast production will die off, which is why you’re not seeing activity. For ambient temperature, 24 C (75 F) is ideal.
Giulia says
Thanks I will try it
Martha Cowley says
I have followed this site to create a starter and am baking my first loaf with a happy sourdough starter. However, I’m in Colorado at elevation 5300 feet above sea level. I can’t get my internal bread temperature above 200.
Any suggestions?
Samantha says
I am also near Denver but at 7800’. The water boiling point is lower at elevation, 197* (7500’) vs 212* at sea level. Therefore your bread’s internal temp will never even get to 200*. I’ve adjusted my expectations to roughly 185*, the difference between my elevation and sea level. I recommend you join the “High Altitude Baking” FB group. They’re marvelous.
Emilie Raffa says
This is great info, Samantha. Thank you for chiming in!
Emilie Raffa says
Question: how did the bread come out regardless of internal temp? Texture? Any specific details would be great!
Samantha Shall says
Well, my bottom was still a little burnt and the whole exterior a little overcooked. I’m going to try adding more water when I bake again on Sunday, since our climate is so dry. And I’m just starting so I’m currently using an oven safe stock pot instead of a Dutch oven. I’m hoping to get one of those soon. I think that might help with heat distribution.
Maria M. says
Fantastic recipe and the best instructions I’ve seen anywhere! I bake 2 loaves at a time using two cast iron dutch ovens. I always share the second loaf with family, and neighbors. I bought your book and plan trying each of your recipes. Thank you for turning me into a sourdough convert!
Emilie Raffa says
Love this! And thank YOU for continuing to share your sourdough with the world too :)
Elizabeth R Simpson says
Crazy easy to make, my loaf came out beautifully! It did take all night to double but not a problem. Get it together in the evening and forget it. What other recipes can I make with this starter?
Emilie Raffa says
Fantastic! Omg, you can make all kinds of things with your sourdough starter. This is just the beginning! Search my site for all kinds of sourdough recipes, including sourdough discard recipes and have a look in my book too: Artisan Sourdough Made Simple.
Brittany Hunter says
My dutch oven lid has spikes on it for auto basting. Will auto basting work well while baking breads?
Emilie Raffa says
This is a great question. And I don’t know the answer! I’m trying to picture what these spikes look like in my head… I want to say yes, it should be fine. But I would call the manufacturer to double check.
Maddie says
Honestly this is a great guide and recipe. I’ve tried a few and none come out this well. My starter is perfect as well. Thank you for sharing! I have one question. Once stored, do I have to take some starter out before feeding it? Or can I just add to it? Thanks again!
Emilie Raffa says
Wonderful- thank you so much! I would discard before feeding it again. You don’t have to discard much; just observe the condition and scoop some off the top if there’s hooch or any discoloration.
Maria says
I like this recipe. You clearly have thought it out carefully and in-depth. I started making my starter 20 days ago and today I decided to make my bread. I think I did everything right, but when I took the lid off the pot and put the bread back in the oven for 40 mins.. I checked on it in 30 and it was burnt and rock solid. My oven was at 200°C. I’m very disappointed as it took so long and I was so excited. Just something to be wary of in future and for others to learn from my mistake. Not sure what the problem was so I don’t know the solution, other than check the bread more frequently :( it looked like it was in there at least 10-15 mins too long.
Judy says
Hi, I’m new to sourdough bread as everyone on this blog! My question is what is your opinion on using the proofing option on your oven ? Does it speed up the long proof ?
Thanks for your help
Lauren says
Hello! This was my first time making sourdough. My loaf came out thin and squatter, like it spread in the Dutch oven. My starter looked great and passed the float test. The bread tasted great and had pretty good texture and lots of holes. I was generous with how long I let it rise, but during the last rise in the Dutch oven, it spread out. I am baking at sea level, could it be that I need to use less water? If so, how much would you recommend? Thank you!
Antonia Tychansky says
Emilie, I’ve made this bread and loved it so much that I bought your “Artisan Sourdough Made simple” book
This recipe uses 150g starter to 500g flour but most of the recipes in the book use 50g starter and 500g flour
Is the book correct? Seems like a huge difference
Thanks!
Emilie Raffa says
Hi there! Book is correct. It just includes different recipes for variety. Play around and see what you like!
Kathleen says
Hi Emilie my “Jane Dough” is 4 days old and I’m excited to see how she does. I love the grey French towel in one of your photos – can you tell me where you got it, please? Thank you!
Emilie Raffa says
Welcome Jane Dough! Love this name. The towel is from Sur La Table 100 years ago! I doubt they still have it, but it’s worth a look.
Kathleen says
Thank you, I will! Jane finally floated in water tonight – 14 day mark and my dough is proofing for the night! Fingers crossed!
matthew griffin says
does convection oven make a difference or should I use conventional ?
Emilie Raffa says
This recipe was written for conventional ovens. I would use that for best results!
Abby says
Hello! I made my dough last night and realized at 10:30 that it had already doubled. I didn’t want to bake it then so I stuck it in the fridge. Now what? Should I let it come to room temp before shaping and doing the second rise?
Thank you!
Emilie Raffa says
Totally fine. You did the right thing. Next step: since it’s already doubled, you don’t need to let it come to room temp before baking. Go ahead and shape for the second rise.
Melissa says
I have no idea what I am doing, I’ve read so many articles and have gotten advice from others, but to be frank..I’ve figured out I have been over thinking sourdough! I forgot what I had “learned” followed your recipe and instructions and after a week of feedings, I made my first official loaf of sourdough last night! It was a little dense, BUT even my extremely picky husband (who will tell you if your cooking/baking sucks) tell me it was delicious! So, first thing this morning, I started another loaf! Thank you for making it simple and reminding people to take it a step at a time❤️ happy baking!
Emilie Raffa says
You are very welcome. I really appreciate this. Overthinking was my problem when I first started. In fact, I went from beginner’s luck (near perfect loaves) to dense hockey pucks after comparing my bread to other bakers’ methods and recipes. What most people don’t realize about sourdough is that yes, there’s science involved. But it’s also an art form, a BEAUTIFUL art form, that cannot be replicated with perfection. It will always differ from baker to baker. So keep going and don’t look back!
sapna says
Hi Emilie,
I know you don’t recommend Organic flour for sourdough starter. Do you recommend not using organic flour for bread making also. If you do use organic flour, could you give some tips on what I need to different for baking bread? Thank you
Emilie Raffa says
Organic flour is totally fine for bread baking. I recommend it, and use it all the time. You won’t need to do anything different really, except observe. The enzyme activity will vary in these flours, making the dough rise faster/slower depending on temperature. Just observe.
Laura N says
My starter Phoebe came to life on 12/9/2023, and on Jan. 7 I made my first successful sourdough loaf with your beginner recipe. I’ve since made 3 more loaves with this recipe and they continue to get better and better. Your site is a trove of wisdom and sourdough joy. Thank you! I have two older kids and needed a hobby—this is perfect. There is something so primal and satisfying about bread making, like I feel connected to the past and the earth, ya know? I’m excited to try your other recipes and buy your book. Also my husband and younger daughter love my bread. Thank you again!
Emilie Raffa says
This warmed my heart, thank you Laura. And yes: I do know. I totally know! Sourdough is indeed primal: it connects you, it grounds you, and if you really dig deep, it will teach you about yourself (for example, I’ve learned that when I neglect to feed my starter for whatever reason, I’ve usually neglected myself in some way, like I need to drink more water or eat sitting down!). It truly is a journey, one that unfolds over time. Enjoy every minute of it!
Sarah says
I have made this recipe several times turns out amazing every time. But my question is, can I omit the oil completely? I’ve seen some sourdough recipes without any oil.
Emilie Raffa says
Yes! Absolutely. You can omit altogether or replace with water.
Stephen says
I made this beginners loaf yesterday using a wholewheat starter I have had for a month and following the instructions exactly. All went well and the bread is nice. However it turned out quite dense ( a bit denser than your own photos above). I happen to like this and don’t want huge holes but evidently the dough didn’t rise as much as it should despite my having a proofing box and keeping the dough at about 24C. I think the main difference may be to do with the flour. My organic ‘white’ actually contains some bran. It looks creamy in colour but bakes to a light brown. It has 13.5% protein.
Being lazy I left out most of the stretching & folding (you say that is optional) and don’t wish to hang around the kitchen all morning waiting for dough to relax etc.
I have watched 100s of Youtubes on sourdough – they all say different things but getting it to rise properly seems to be the most difficult, even with controlled temp and a good starter. And judging a 2x increase in volume is almost impossible without measurement + maths. Perhaps none of it matters as long as the product is eatable and you are not hoping to sell it!
This isn’t rteally a question, just a comment. Obviously one has to practise this game.
Emilie Raffa says
Hi there! Yes: the rise is hard to judge without practice and repetition. If you have one, a high sided dough tub with measuring marks would be very helpful in your case. It’s a good investment. With regards to dense bread: a 100% whole wheat starter @ 150 g will yield a heavier bread compared to a loaf made with a 100% white flour starter. Plus, if you think the bran in your flour is contributing to a slow rise/dense texture, consider trying another brand. Here are two articles you might find helpful:
https://www.theclevercarrot.com/2018/01/why-wont-sourdough-rise/
https://www.theclevercarrot.com/2021/01/feeding-sourdough-starter-my-best-tips-tricks/
Stephen says
Yes I have read all that. Many thanks! But it has thrown up a new question: why is it so necessary to double the volume during bulk rise if you are then going to fold it back into a ball, crush all those bubbles and then proof it to LESS than double? What would happen if you baked it immediately after the bulk rise without doing any folding at all?
This must be a daft question but I have not seen the reasoning anywhere!
Laura says
I have the same question while baking my first loaf!
Ann Marie P Schmidt says
I have been trying for about a year to make Sourdough bread. And for some reason i’ve always messed up. I thought it could be my starter, I thought it could be the weather, the amount of flour I used. I was so confused! How could it be that someone just happened to come across Sourdough yeast growing and create a bread way back in the day??!!. I couldn’t even do it with Modern conveniences! Haha.
Turns out, FIRST time I did your recipe and it was perfect! You have no idea how extatic I am that this is doable! I’m so happy to know my yeast is perfectly fine.Thank you so much for making such an easy to follow recipe. Girl, You have made my day!
Emilie Raffa says
Yay! You’ve made MY day. Thank you so much! xx
Jim Dumond says
I am having a small problem with the texture of my bread. It is too dense. I did follow all instructions to the letter, but I’m not achieving an open pore type of bread. Don’t know if it’s from living at altitude (5000′), or possibly not letting rest long enough on the second rise. I do let it rest for 1 hours as stated.
Please help.
Emilie Raffa says
Hi there! Walk me through your process with exact rising times, temperatures, brand/type of flour & exact amount of water used. And, are you weighing or measuring your ingredients? Thanks!
Jim Dumond says
After feeding my starter and letting it sit for a day or two, I use your recipe exactly as called out. I let the dough rest for one hour, make a rough ball after, let it rest another hour, pull and fold, rest another half hour, and pull and fold a second time. I have the dough resting in the oven with a light on overnight. I’ve done two loaves of bread with the 250 grams of water as called out. These were dense. I’m trying another bake with 325 grams of filtered water, reading elsewhere that more moisture would help with a more open consistency.
I’m using Gold Medal bread flour.
Yes, I’m weighing each ingredient.
Kyla R says
This was my first successful sourdough loaf! I had previously tried two other recipes and failed. The instructions are thorough and easy to follow. My loaf turned out beautifully. Also very helpful is Emilie’s guide to feeding sourdough starter. Will be recommending to friends who are just getting into sourdough.
Emilie Raffa says
Excellent. Thank you so much! I appreciate your kind, helpful feedback.
micky moos says
first try: the loaf would not turn the dark brown as you sugggested.i took it out of the dutch oven after forty minutes with the lid off (the first twenty minuts with the lid on) for a total of sixty minutes. i the took it out of the dutch oven and continued to bake at 400 degrees for another 20 inutes. the loaf turned a pale tan, but not the deep brown i wanted and you suggested. help please.
Emilie Raffa says
Sounds like your dough was under proofed. This is what happens when the rise was off at some point- the crust just doesn’t get dark. Could be inaccurate oven temp as well (an oven thermometer helps with this). How long did you let it bulk rise for? Second rise? And what was the ambient temperature?
Morgan Henderson says
I put mine in the oven to proof with a very wet towel over it and it turned out great! Crunchy outside, soft inside. Delicious !!
Emilie Raffa says
Wonderful! Thank you Morgan!
Pamela Feierabend says
First time baking sourdough bread. My starter is a two weeks old and healthy. I used KA bread flour, let in bulk ferment for 14 hours at 69-70 degrees. The dough was stuck to the bottom of my bowl when I went to turn it out. All my ingredients were weighed. When I shaped into a round and put in Dutch oven for 2nd rise, the round didn’t hold its shape. It’s baking now and I expect I’ll have a short, squatty loaf of bread. Any suggestions?
Emilie Raffa says
Sometimes dough will stick to the bottom of the bowl during this bulk rise. This is normal, especially if you are using a higher amount of water in the mix. To remedy this, try lightly oiling the bowl. If the dough didn’t hold it’s shape during the second rise, it’s most likely due to how much water was in the dough- it will just spread out. To contain it shape, do the second rise in a cloth-lined floured bowl or proofing basket instead.
Tatiana says
I’m new to this and I don’t have a dutch oven can I still make the bread? I made the crackers with the leftovers and they came out great.
Emilie Raffa says
You can, but you’ll need to add additional steam to the oven to promote a high rise and artisan crust. Steam prevents the crust from hardening too quickly, which would subsequently hinder the rise. Any oven safe put with lid (besides a Dutch oven) that can heat up to 400 F+ would be sufficient. Alternatively, you can try placing a metal pan, like a brownie pan, on the bottom shelf while the oven heats up. When it comes to temperature, add a bunch of ice cubes to the hot pan, immediately place the dough inside, shut the oven door, and bake. This creates instant steam. Spraying the inside walls of a hot oven with water (use a spritzer water bottle) helps to create steam too.
Tatiana says
Thank you for the tips, it came out great.
Rebecca says
LITERALLY PERFECT. This is my first try with sourdough- or bread at all- and this recipe turned out PERFECTLY. I’ve made it twice and the second time I did an overnight cold proof in the fridge after shaping, instead of on the counter, and it was even better. Having found perfection immediately, I may never try another recipe 😂
Emilie Raffa says
Excellent! This is SO GREAT to hear Rebecca, thank you. I really appreciate you taking the time to leave feedback. Happy baking!
Sam says
Thank you so much for this! Just made my 1st loaf ever & it came out so yummy! My crust wasn’t very crispy but I like it a little softer.
Emilie Raffa says
You are very welcome! Glad to hear your loaf was successful. For a crispier crust: remove the bread from the pot and bake directly on the oven rack for the last 10 minutes.
Dinah says
It was fun to make and came out great!
Emilie Raffa says
Great! Thrilled to hear this. Thank you Dinah :)
Pat says
Wonderful recipe!! First time I could make a sourdough starter that produces great tasting bread. This recipe isn’t for someone who wants to make sourdough bread quickly. All good things take time. My advice is for people to follow the instructions to a tee. I used a scale to measure the ingredients and think that makes a difference.
Emilie Raffa says
Excellent advice and great tips. Thank you for sharing your experience :)
Hannah Capestany says
Do you think this recipe will still work out if I half it for a 3qt Dutch oven?
Emilie Raffa says
Might be too small (I’m trying to picture it in my head). But you can give it a try. The loaf will be very “plump!” Alternatively, divide the dough in half and bake two separate loaves back to back (store the second dough in a floured, cloth-lined small bowl in the fridge while the first one bakes).
Heaven says
Can I add inclusions to this recipe?
Emilie Raffa says
Yes. Add whatever you’d like (i.e. olive, fresh rosemary, cheese etc) after the first rest/autolyse step. The inclusions will be much easier to incorporate because the dough will be a lot softer.
Bailey says
Loved this recipe! Just made sourdough for the first time today with starter I got from a friend. Mine turned out a little dense but I think I know how to fix that next time. Very happy overall! My loaf looks just like hers in the pic!
Emilie Raffa says
Excellent! Sourdough takes practice. Lots of practice. Some loaves will be a little dense, some will be near perfect. That’s how we learn! xx
Jennifet says
I ordered the book and so looking forward to reading!!
Can I please have the sour dough focaccia recipe in cups? Waiting on my scale to arrive and made the starter, ready and can’t wait to try!
Afra Adam says
Hi
Can you provide the measurements for yeast substitute instead of making sourdough starter please?
Emilie Raffa says
Hi there! I haven’t tested this recipe with yeast. You might want to try this no-knead bread recipe instead.
Frankie says
How do you get the measurementes right? I don’t understand how you could ever measure 5.35 oz or something like that?
Kelly says
You use a kitchen scale
Emilie Raffa says
Hi there! Digital scale. When you toggle the button from grams to ounces, the measurements you see listed in the recipe are the exact equivalent.
Kelle says
Do you bake right after 2nd rise, no could proofing?
Can you do the 2nd rise in the frig then after 30 min to an hour, then take the bread from the frig to score and bake?
The sample schedule has the example of starting the starter one evening, making the dough the next day,then the next morning baking.
Thanks for help. New to sourdough. I have my starter. Just trying to figure out a simple way to bake and figure out the timing and schedules. I see most recipes bulk ferment overnight or same day then cold retard so it seems you have to plan days ahead to bake. I was drawn to this recipe thinking I could start early and have bread late evening or start late evening and ferment overnight to bake early morning.
Emilie Raffa says
In this beginner recipe, no. But you can cold proof if you want with some adjustments. In terms of establishing a baking schedule, for same day bread to enjoy in the evening: bulk ferment at a warm room temp. (75+) during the day, and then cold proof in the fridge until ready to bake in the evening. Alternatively, for an overnight dough: make the dough in the evening and bulk ferment at a cooler room temp. overnight. Do your second proof in the morning and then bake.
Roxanne Jorgensen says
What are the adjustments for cold proofing? please. Thanks
Marilyn Andress says
I’m new to sour dough baking. My niece gave me a start yesterday and since I’m blizzardly snowed in today I decided to give it a try. It was overwhelming trying to understand the posts I was finding until I came across The Clever Carrot. The step by step instructions were easy to follow and my very first loaf was a success!! I got up at 4 am to start the process and even mixed up a batch of pancake batter with the “discard” that we had for breakfast. I think I’m hooked and will order your book. I wish I could post a picture of my loaf. Though not perfect it was beautiful. The crust was very crispy but the bread was really tender.
Emilie Raffa says
This is SO GREAT to hear. Thank you, Marilyn! Happy baking!
Claudia says
Just amazing! Perfect each time!
Thank you for sharing
Emilie Raffa says
You are very welcome Claudia!
Ashley Konstant says
My loaves continue to come out extremely dense! Am I not letting it rise long enough? I have been following the 10-12 hr recommendation. My starter was active and passed float test before I attempted this!
Emilie Raffa says
Walk me through your process… What brand/type of flour are you using? Are you weighing or measuring your ingredients? What temp. is the dough rising at? How long is your second proof? Any additional info, including changes to the original recipe would be very helpful. Thanks!
Judy Sherako says
So why dont you let bread rise in frig after initial rise…. I see some people leave in frig from 12-36 hours…. Does this affect the rising process….?
Emilie Raffa says
Great question. This is a beginner recipe. And while it’s common to cold proof overnight or longer in some recipes, in my experience, this step is where the process goes wrong for first time bakers. The dough is either over proofed from too long of a bulk rise, second rise or both. Timing is everything with sourdough. In the post, my goal is to streamline/simplify the process for best results. However, feel free to try what works for you! Always follow the specific method outlined by the baker- each step builds on the one before!
Christian Orr says
How much starter do you keep?
Emilie Raffa says
It depends on how often I bake (and how much is needed for my recipes). Anywhere from 1/2 cup – 1 cup is where I’m currently at. It’s flexible.
Steve Monichino says
Hey Emilie and thank you.
I’ve followed & used your discard pancake a number of times previously.
Today is the first time I have baked “artisan” sourdough in the oven only having baked it in a bread machine before. Following your recipe but using the bread machine to knead I must say am totally stoked with the result. So thank again.
Steve M.
Emilie Raffa says
This is excellent feedback, thank you! A lot of people ask me about bread machines & kneading, so I hope they see your comment. I’m thrilled it’s working for you.