Homemade sourdough bagels? Absolutely! With just 10 minutes of prep, this easy, overnight recipe uses active sourdough starter for the ultimate soft & chewy NY-style bagel. Customize with zesty everything bagel spice, sesame seeds and more! Recipe adapted from my bestselling book: Artisan Sourdough Made Simple.
Here’s the scoop: sourdough bagels are nothing like yeasted bagels. They’re more flavorful. Less dense. Intensely chewy. You can eat two without getting a massive stomach ache. And the crust? It’s incredibly thin and crispy, and absolutely life changing! I highly recommend eating one warm, straight from the oven. If you’re into sourdough bread and want to expand your arsenal of sourdough bread recipes, this recipe is for you. It comes straight from my bestselling book, Artisan Sourdough Made Simple.
Now, before you get going, I do realize homemade sourdough bagels might seem challenging at first. But I promise, it’s not rocket science. This post breaks down the entire process step-by-step, from making the dough, to shaping, boiling and baking the bagels.
Sourdough Bagels Ingredients (You Will Need):
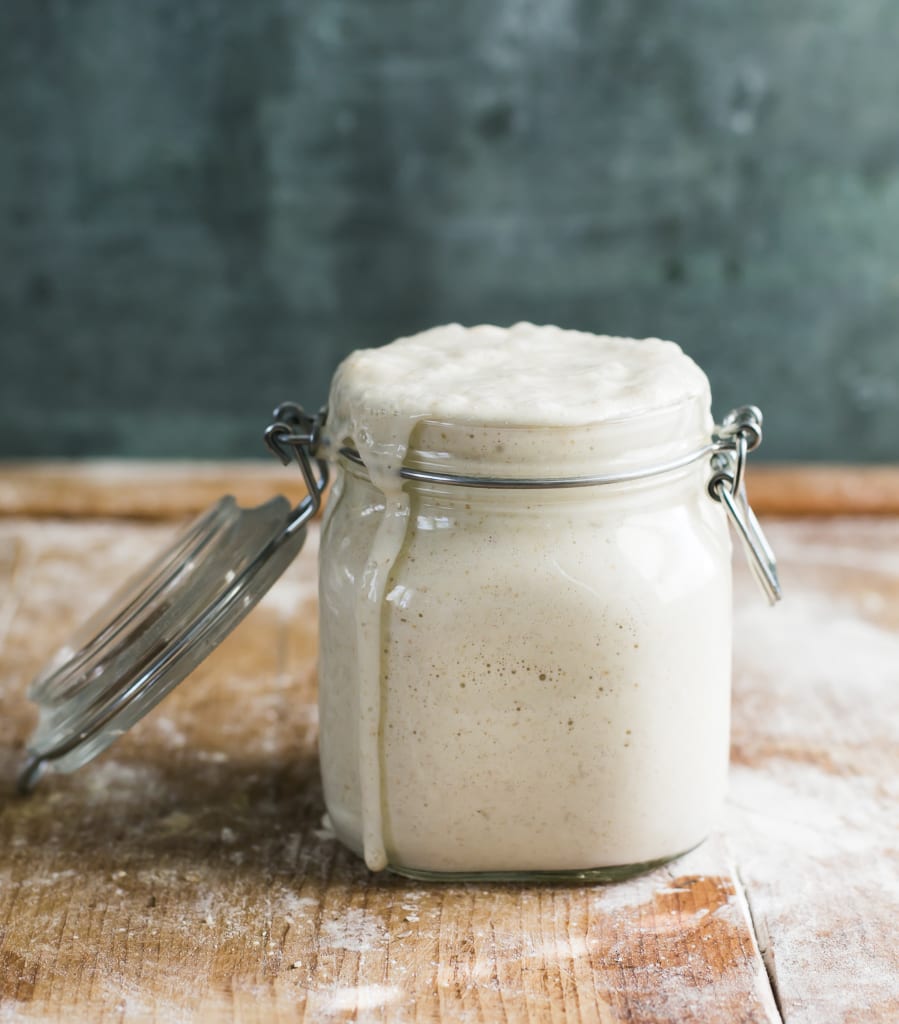
- Bubbly, active sourdough starter
- Good quality bread flour (I use King Arthur)
- Optional mixed toppings, such as Everything Bagel Spice, poppy, sesame, flax or sunflower seeds
How to Make Homemade Sourdough Bagels
First, you need a game plan. Understand this: Sourdough bagels include several steps, which can be broken down into manageable chunks. I recommend splitting the process over 2 days. Make the dough in the evening and let rise overnight in cooler temperatures; shape, boil and bake the bagels following day. See my Sample Baking Schedule for additional options.
Step #1: Mix the Dough
- Whisk the water, sourdough starter and sugar together in a large bowl. Add the flour and salt. Combine to form a rough dough; it will be very dry and stiff. Tip: you really need a large bowl or high sided dough tub. This dough is very strong and rises quite high especially when using King Arthur Flour.
- Cover and let rest at room temperature for 1 hr to relax the gluten. Return to the bowl, and work the dough into a semi-smooth ball. You’re are now done with the dough.
TIP: Why is the dough so dry? Bagels require a low hydration dough. The dry, stiff texture is easy to shape and produces a tight-knit interior crumb. This is what you want for bagels. Do not be tempted to add more water!
Step #2: Bulk Rise
Cover the dough, and let rise overnight at room temperature until double in size. This should take about 10-12 hrs @ 68 F; 8-10 @ 70 F.
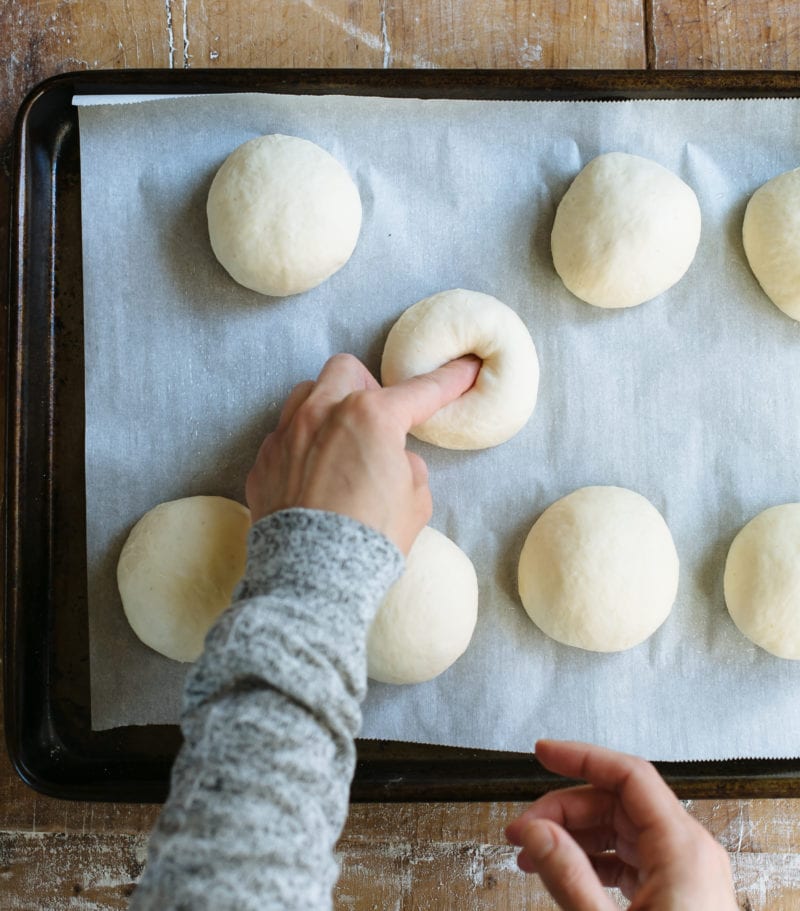
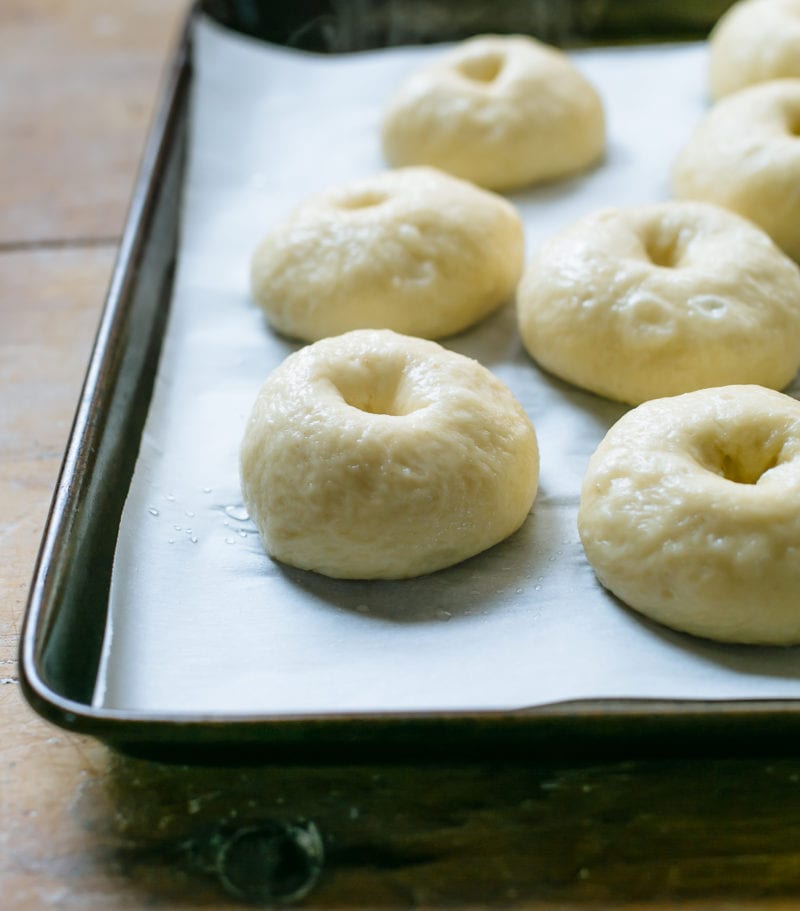
Step #3: How to Shape Sourdough Bagels
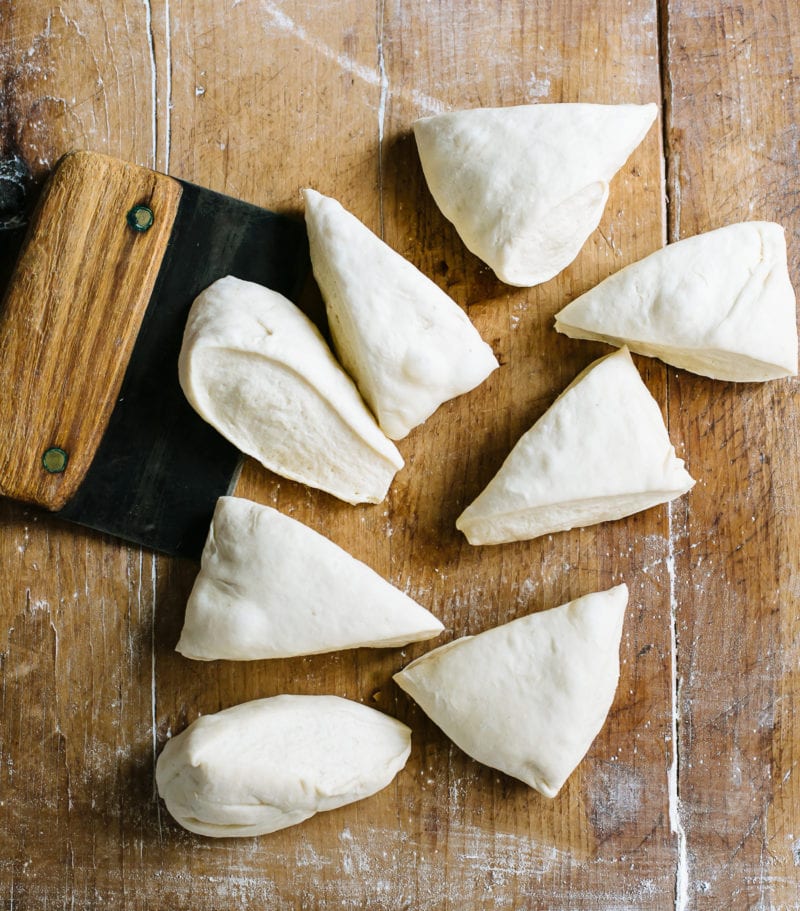
- Divide dough into 8 equal pieces, about 115 g each. Use a digital kitchen scale for accuracy.
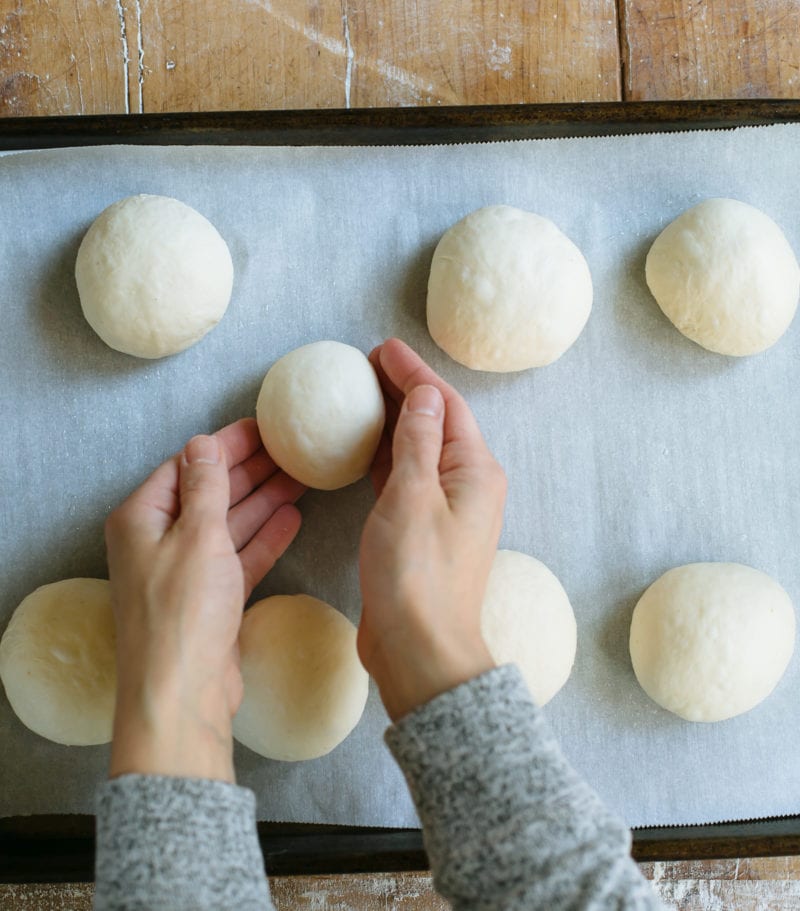
- Roll each piece into a ball. Place onto a parchment-lined sheet pan. Rest for 10-15 minutes.
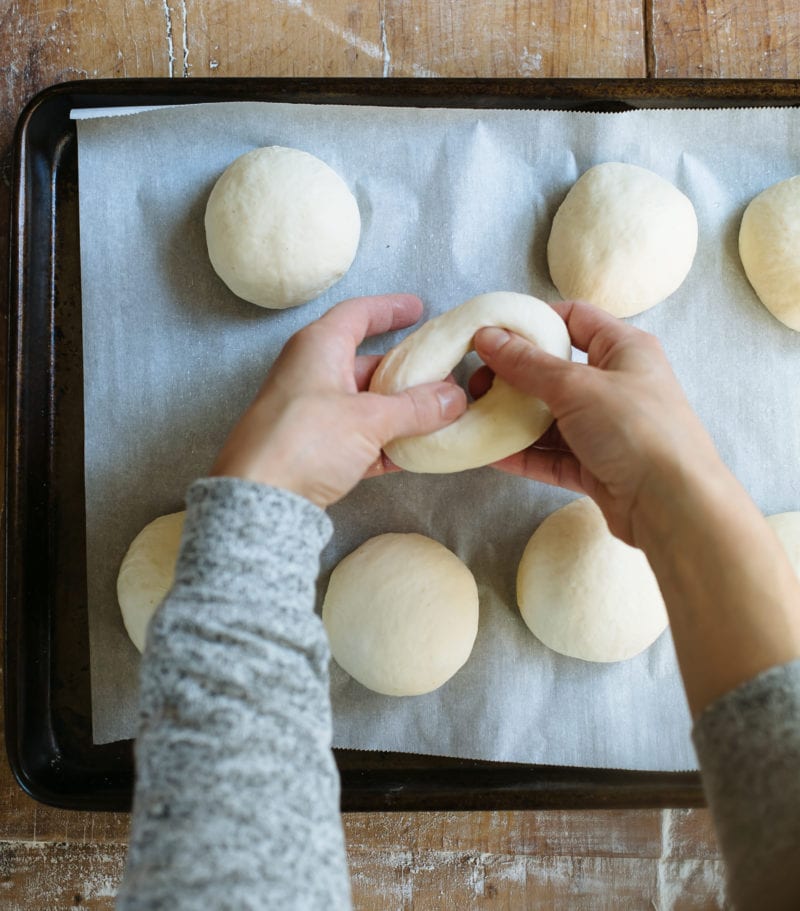
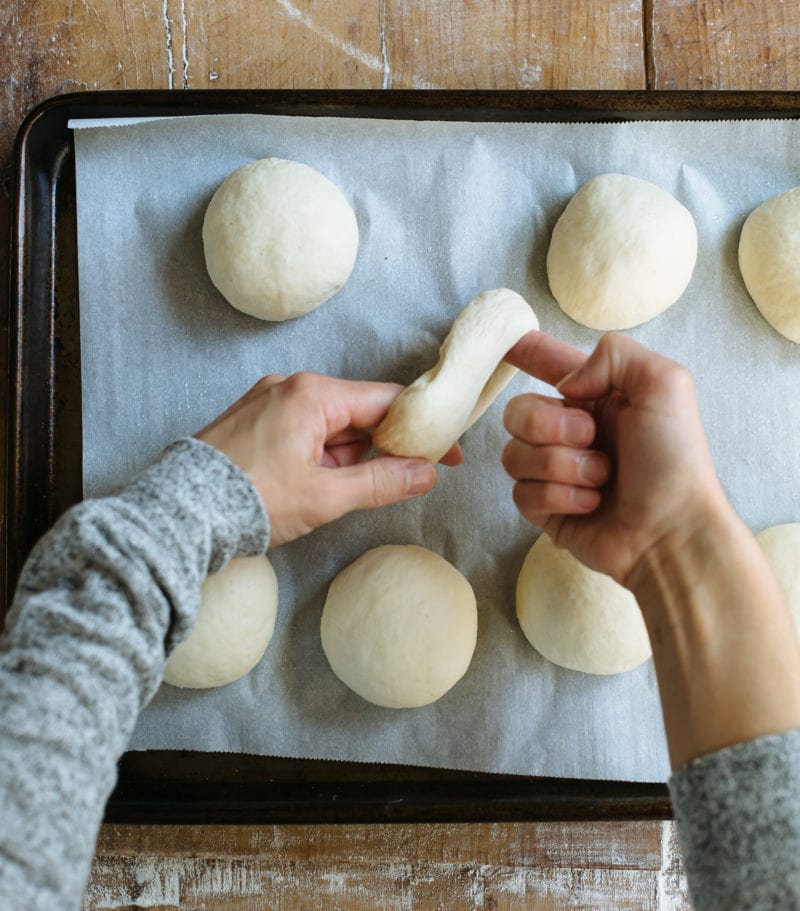
- Poke a hole into the center of each dough. Gently stretch the opening, using your fingers to roll it around.
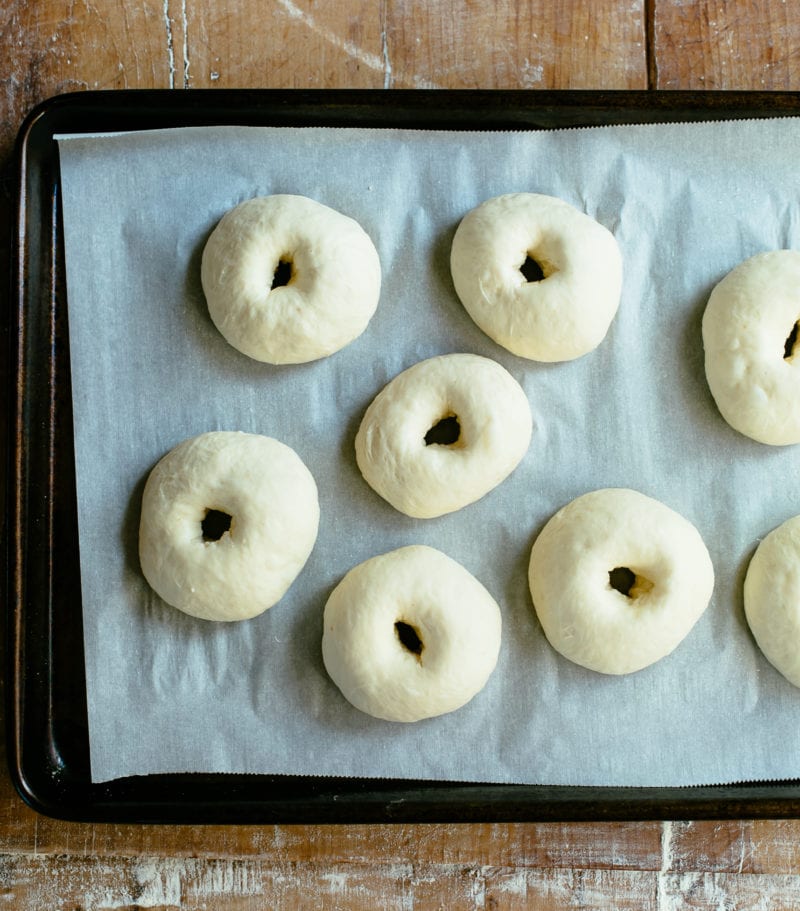
Step #4: Second Rise
- Now the dough needs to rise again, but only for a short period of time. Cover and let rest at room temperature for 20 minutes; the dough will puff up slightly.
- Meanwhile, boil a pot of water. Add the honey (this adds color and flavor to the crust) and whisk well.
- Preheat your oven to 425 F. Set up a topping station: add seeds to a rimmed tray or shallow bowl.
Step #5: Boil The Bagels
- Gently lower 2-3 bagels into the pot and let float to the surface. Simmer for 30 seconds on each side for a thin crust.
- With a large slotted spoon, transfer the bagels onto the sheet pan, rounded side up. They will look weird and bumpy (totally normal) and feel slightly wet.
TIP: Why boil bagels in the first place? It helps to set the crust before baking. Otherwise the dough would puff up and rise too high. You can’t skip the boiling step- it’s part of what differentiates bagels from bread.
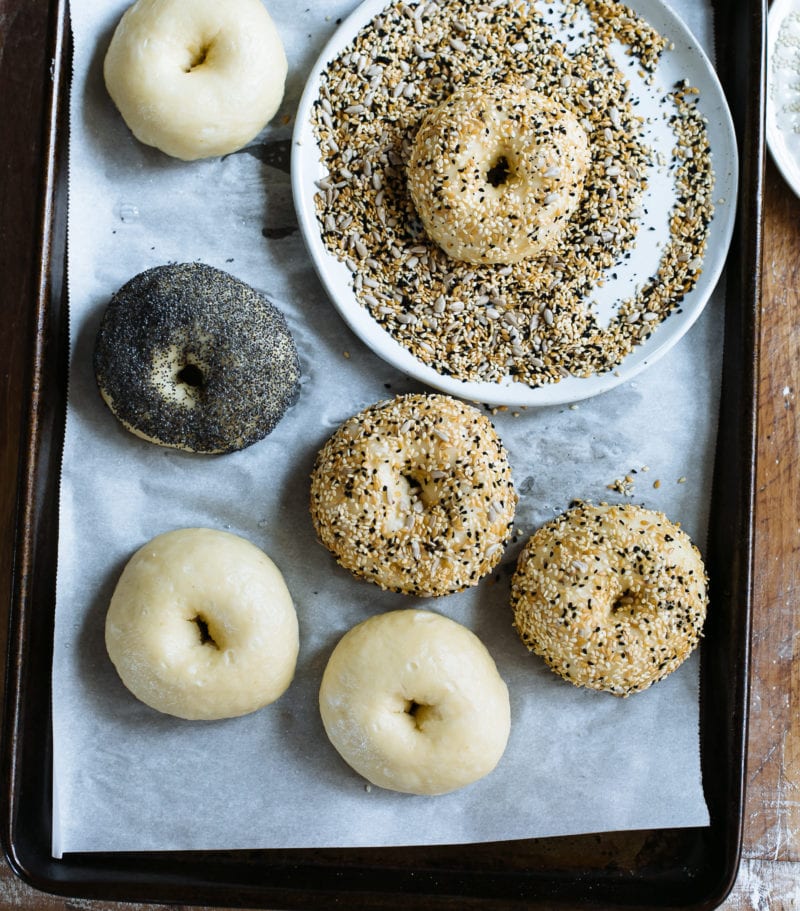
Step #7: Top Bagels with Seeds
- When the bagels are slightly cool but still wet, dip the rounded side into the toppings. Leave a few plain (the crust is amazing).
- Place back onto the sheet pan.
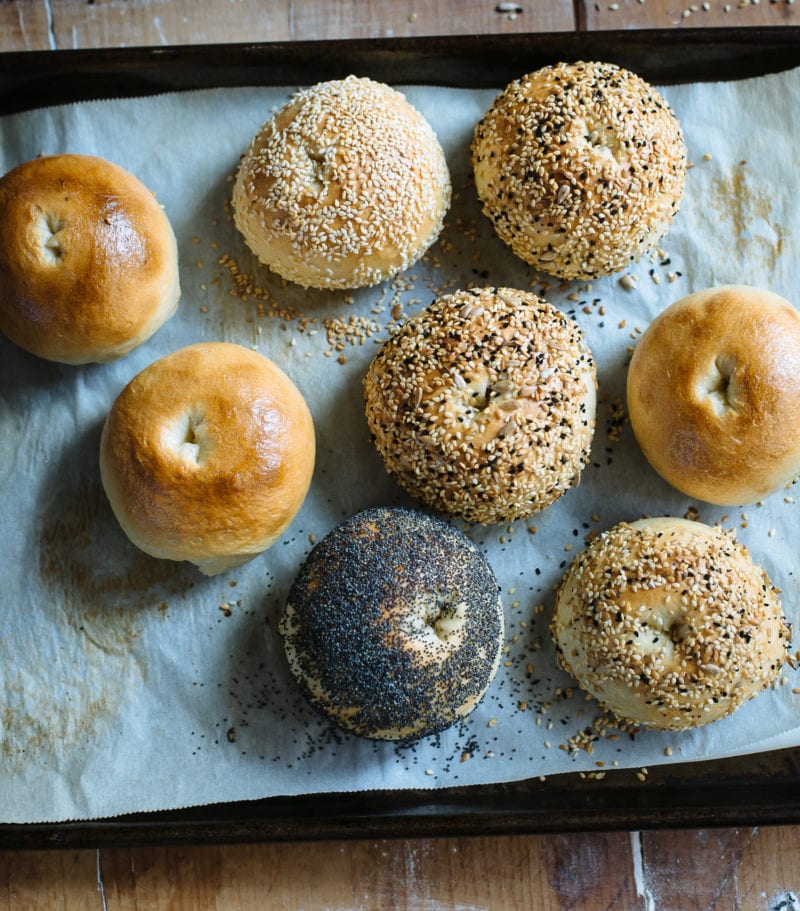
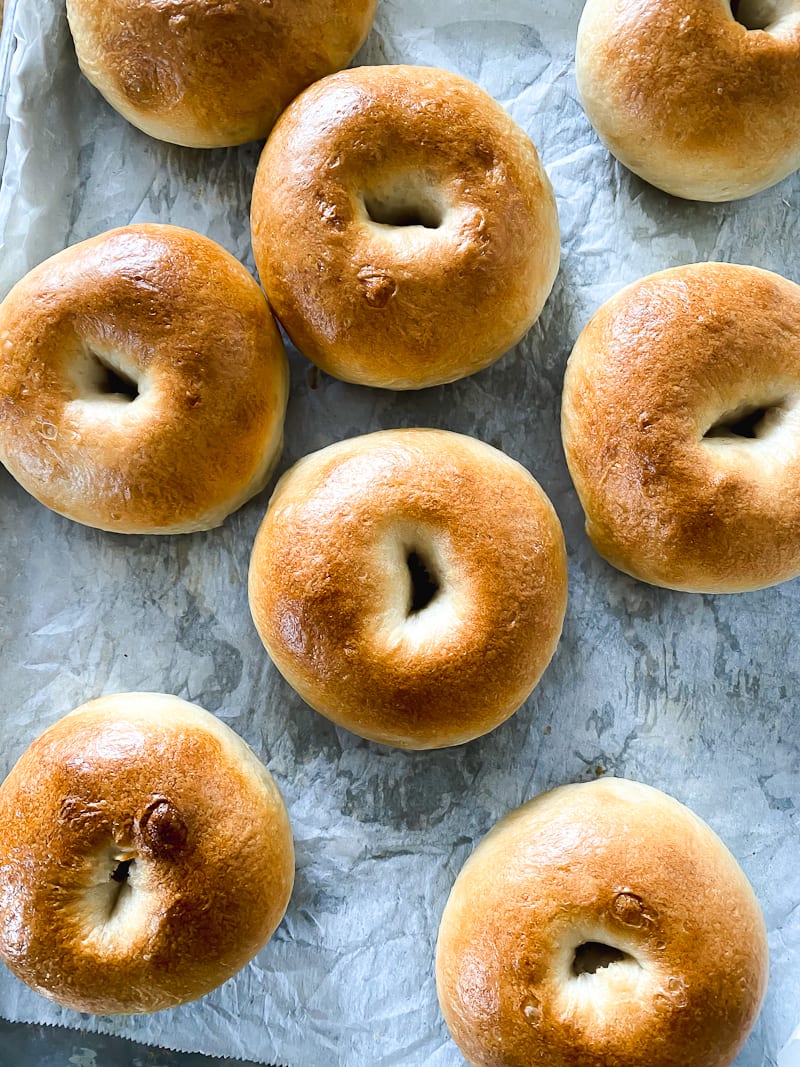
Step #8: Bake the Bagels
- Pop the sheet pan into the oven and bake for 20-25 minutes @ 425 F.
- Transfer to a wire rack to cool slightly (but please, do yourself a favor and enjoy one warm, straight from the oven!)
- To serve, top with salted butter, veggie cream cheese, smoked salmon etc. Or just eat plain. The choice is yours!
How to Store Bagels
I’ll be honest with you, your first batch of homemade bagels will be gone in a day. They’re just SO good.
But, if you do have any leftover, store in a plastic bag at room temperature for up to 2 days (although they are best enjoyed fresh before they get rubbery).
Bagels also freeze well; freeze them whole or sliced, covered in plastic wrap and a layer of foil, for up to 3 months. Warm in a low oven or toaster before serving.
Sample Baking Schedule
- Saturday Evening (8 PM): Make dough & let rise overnight @ 68 F. Note: in the summer, the dough will rise faster. Skip the overnight rise and make the dough during the day. Once almost doubled in size, cover and chill the whole bowl overnight. Proceed using the cold dough the following day.
- Sunday Morning (whenever you get up): Shape, boil, top & bake bagels.
More Sourdough Bread Recipes To Try!
- Sourdough Bread: A Beginner’s Guide
- Beginner’s Guide to Sourdough Focaccia
- Sourdough Pizza Crust {No steel or Stone!}
- Best Sourdough Pancakes
- Easy Sourdough Sandwich Bread

Best Sourdough Bagels (Soft, Chewy, Easy!)
- Prep Time: 15 hours
- Cook Time: 20-25 minutes
- Yield: 8 bagels
- Category: Sourdough Bread
- Method: Oven-Baked
- Cuisine: American
- Diet: Vegetarian
Description
With just 10 minutes of prep, this easy, overnight recipe uses active sourdough starter for the ultimate soft & chewy NY-style bagel. Customize with zesty everything bagel spice, sesame seeds and more! Recipe adapted from my bestselling book: Artisan Sourdough Made Simple.
Ingredients
For the Dough
- 150 g (3⁄4 cup) bubbly, active sourdough starter
- 250 g (1 cup plus 2 tsp) warm water (See Notes below for temperature range)
- 24 g (2 tbsp) granulated sugar
- 500 g (4 cups plus 2 tbsp) King Arthur bread flour
- 9 g (1 1⁄2 tsp) fine sea salt
- Cooking spray or oil, (for coating the plastic wrap)
For the water bath
- 20 g (1 tbsp) honey
Toppings
- Mixed seeds, such as poppy, sesame, fennel, flax and sun flower seeds or Everything Bagel Spice.
Notes
- Water temperature: In winter, I use 85-95 F water (29-35 C) to give the rise a boost. In summer, I use cooler water, about 55- 60 F (13-16 C) to slow down and control the rise.
Instructions
- Make the Dough: In a large bowl, whisk the starter, water, and sugar together with a fork. Add the flour and salt. Combine to form a rough dough, then finish mixing by hand until no lumps of our remain. The dough will be very stiff and dry. Note: it’s important to use a large mixing bowl- this dough is strong and rises quite high. As a mixing alternative, use a stand mixer fitted with the dough hook; run on low speed for 5 to 6 minutes to combine and knead.
- Cover the dough with a very damp towel and let rest for 45 minutes to 1 hour. After the dough has rested, work the mass into a semi-smooth ball, about 15 to 20 seconds.
- Bulk Rise: Cover the bowl with plastic wrap that has been lightly coated in oil to prevent sticking. Let rise until double in size, about 10-12 hrs when the temperature is 68 F (20 C); 8 to 10 hours @ 70°F (21°C). Note: in the summer, rise the dough during the day. Once the dough is almost double in size, cover and chill the whole bowl overnight (it will continue to rise slightly in the fridge). Proceed using the cold dough the following day.
- Shape: Line a sheet pan with a nonstick silicone mat or parchment paper. If using parchment, lightly coat with cooking spray or oil to prevent sticking.
- Remove the dough onto a non- floured work surface. Flatten the dough into a rectangle and divide into 8 equal pieces, about 115 g (4 oz) each. Gather the ends, flip the dough over, and roll each piece into a ball. Let the dough rest on your lined sheet pan for 10 to 15 minutes to relax the gluten.
- Working with one ball of dough at a time, poke a hole straight through the center. Move your finger around in a circular motion to gently stretch the dough until the hole is about the size of a walnut. You can also lift up the dough, insert both index fingers through the center hole, and barrel roll to gently stretch the opening. When finished, place the dough back onto the sheet pan. It’s okay if the hole shrinks slightly. Repeat shaping the remaining dough.
- Second Rise: Cover the dough with a damp towel and let rest at room temperature for 15 to 20 minutes. The dough will puff up only slightly at this stage.
- Meanwhile, bring a medium pot of water to a boil. Add the honey and whisk well to dissolve. Preheat your oven to 425°F (220°C). Add the seeds to a rimmed tray or shallow bowl.
- Boil the bagels: Add 2 to 3 bagels into the pot and simmer for 30 seconds on each side for a thin crust. Note: if using cold dough from the fridge, the bagels might not float to the surface right away. Give them a nudge after 30 seconds or so and be patient. Using a slotted spoon, transfer the bagels back the sheet pan you used earlier, placing them rounded side up.
- Once slightly cool but still wet, dip the rounded side of the bagels into the seeds to coat. Place back onto the sheet pan and finish boiling the rest of the bagels.
- Bake: Place your sheet pan on the center rack. Bake the bagels for about 20 to 25 minutes. Flip them over to briefly cook the bottom side, about 1 to 2 minutes or less. When ready, your bagels will be puffed up, light golden brown, and feel light to the touch. Transfer to a wire rack to cool, but indulge yourself and eat one (or two) warm.
The chewy texture of bagels is best enjoyed when made fresh. Store in a plastic bag at room temperature for up to 2 days. Bagels also freeze well; freeze them whole or sliced, covered in plastic wrap and a layer of foil, for up to 3 months.


Comments
jess says
obsessed, my whole family uses this recipe, we’ve made hundreds of bagels at this point. followed exactly. thank you!
Jessica says
Hi! I’m curious if you ever do an egg white wash on the top of the bagels after boiling them to help hold the toppings? Also, my bagels had steam cracks – any suggestions for avoiding this? Do you have this issue? Thanks!
Rebecca says
First time making bagels and these came out great!! Will definitely use this recipe again.
Geoff says
Hi, Great recipe and easy to follow. Only problem I encountered was the bagels sticking to the parchment after shaping and making the hole. Any tips?
Thanks, Geoff
Emilie Raffa says
Hi Geoff! Yes! Did you lightly coat the parchment paper with oil before shaping the dough (step 4)? This helps tremendously, and will prevent the dough from sticking. If you did coat the paper, and the dough still stuck to it, consider using more oil next time or opting for a non-stick silicon baking mat instead (if you have one). A final thought: double check the brand of parchment you’re using. Believe it or not, they’re not all “non-stick!” I learned this the hard way with cheap parchment paper from the dollar store ;)
Kass says
Absolutely love your recipe. I’ve made other ones and they do not compare to yours. I was wondering can you scale this recipe up to make more bagels?
Emilie Raffa says
Thanks Kass! I’m gad you like them :) Sure, you can definitely scale this recipe. Use a large dough tub to double it, or make two (or three!) batches in separate bowls. Enjoy!
Casey M says
Hi! Do I have to do the second rise in the fridge overnight?
Emilie Raffa says
Hi Casey! Normally, I do the second rise at room temperature. However, you’re more than welcome to do the second rise overnight in the fridge. To do so: in Step #5 (in the recipe at the end of the post), shape the dough into balls, place onto your lined sheet pan, dust with flour, cover well with plastic wrap and chill overnight. In the morning, proceed to Step #6 (poking a hole in the dough to create bagels etc) and you’ll be good to go.
Vinod says
I enjoyed watching the live Zoom tutorial. It was great to see how you manipulate the dough. In addition it was helpful to see what the sourdough starter and dough texture should look and feel like. Afterwards I made my own bagels and they turned out perfect! thank you so much.
Emilie Raffa says
Fantastic! Thank you! Bread is a very visual craft, I agree. I’m glad you found the zoom tutorial helpful. Thanks for the feedback :)
Himalayan Chef says
Good recipe and technique, Emilie. Thanks for the post. I do have one recommendation that I think greatly improves the “authenticity” of the bagels. If the water bath is alkaline, it makes the bagels darker and gives them that pretzel like flavor. The easiest way to do this is to take 1-2 cups of baking soda and roast it on a baking sheet at 250 F for an hour or so. This converts the sodium bicarbonate to sodium carbonate, with increased alkalinity. Instead of honey (or brown sugar) I use a tablespoon or two of malt powder from our beer making supplies.
Emilie Raffa says
Hi there! What a great tip. I’ve never heard of roasting baking soda before! Question: how much of it do you add to the water? Thanks!
Amanda says
Love this recipe! Shaped them prior to putting them in the fridge overnight for an easy boil and bake in the morning and they still turned out great! Made a double batch and froze all the extra bagels to have have on busy mornings! After a quick microwave with a damp towel and a toast, they are still delicious!! Best fresh out of the oven for sure 😊
Emilie Raffa says
Hi Amanda! Yes! That’s totally the idea. Breaking up the bagel making process over 2 days makes it more manageable, and even better, you get fresh baked bagels in the morning. Great microwave tip, too.
Lauren says
Wonderful recipe! My first attempt they came out perfect! I found other recipes that call for malt or other ingredients that aren’t very accessible. Your blog has been such a helpful resource for me in my “sourdough journey” lol.
Emilie Raffa says
Fantastic, Lauren! Thanks so much for your feedback. I’m glad you’ve found the info here helpful! Yes: I purposely excluded malt due to accessibility, but also because I don’t use it for anything else! I typically don’t write recipes with single use ingredients unless they are 100% worth it, and/or they can be re-purposed elsewhere.
Sam says
Super excited to have found the straightforward recipe. The only problem for me, was it seems like my dough was quite dry, how do I tell if it has enough moisture? In the final baking of the bagels, many of them came out with cracks in them.
Emilie Raffa says
Sam, this is a great question. To ensure the correct amount of moisture is in the dough, make sure to weigh (not measure) your ingredients. Additionally, during the first 45 minute to 1 hour rest, give the dough sufficient time to absorb the water- this is key. If the dough is notably dry from that stage onward, add a touch more water until you achieve a texture that you can work with. Also: for cracked bagels, it’s possible the surface of the dough was exposed to too much air at some point and/or your oven is too hot.
Stephanie says
This recipe is my favorite! I make it all the time, anyways turns out great.
Emilie Raffa says
Thank you Stephanie! :)
arnav says
Another great meal from your site…find myself coming here every single day now. I made it exactly
Emilie Raffa says
Yay! This is SO amazing to hear, thank you!
TK says
I just ordered your cooking and I am so excited. Can’t wait to try this recipe…..you explain things so well! I do have a question….in the past when I have tried bagel the toppings seemed to burn. Is there a way to prevent this? Thank you!!
Emilie Raffa says
Thank you TK! Burnt bagel toppings, this is a common issue. I’ve found that “Everything” bagel topping burns the most- it’s the onion or garlic. However, sesame seeds don’t really toast that much? Anyway, a few things: first, check your oven temp. with a thermometer for accuracy. Second, identify which toppings burn the most. Group them together on your baking tray, and cover only that section, not the whole thing, with foil to prevent burning. Finally, play around with your oven rack positioning. If the tray is too close to the top, the toppings will brown faster.
Carolyn says
Great, easy recipe! My first recipe ever, using my first ever sourdough starter. Was thrilled with how these turned out. SUCCESS! Thank you!
Emilie Raffa says
Excellent, Carolyn! Thanks so much for your feedback :)
Jess says
Can I do the final rise overnight in the fridge once the bagels are shaped? I’d like to be able to just wake and bake.
D says
I have flipped bagels halfway through the bake in order to avoid this issue.
Himalayan Chef says
Jess, you can definitely shape the bagels and let them rise in the refrigerator. That is the technique Peter Reinhart uses in his famous recipe. I like Emilie’s method because my shaped bagels sometimes over-rise. Sourdough strength can vary. The dry exterior breaks, allowing too much of the bagel bath liquid to seep into the bagel.
Emilie Raffa says
Hi Jess! Absolutely: you can do the final rise overnight in the fridge. However, I like to chill the dough when it’s shaped as “dough balls” (not bagels yet). See Step #5. Then, in the morning, I’ll poked a hole in the center to make bagels, and continue with the rest of the recipe. Does that make sense? This way, the dough won’t overproof on the overnight.
Danielle says
This recipe was amazing! The directions are super easy to follow. The bagels came out better than I imagined. They have such a nice crust with an light and airy middle. I am so excited to make these again with different toppings. Thank you for sharing!
Keris says
Hi! Do you think this would work the same with King Arthur 1:1 Gluten Free Flour?
Ellen says
I made these bagels according to your step by step guide except for the bake time. By the time the bagels were baked for 25 minutes, they still haven’t achieved this light golden brown color so I baked them for about 5 min more until the color looked right. But then even though the inside was soft and chewy, the shell came out really hard with the bottoms slightly burnt. What should I have done instead ?
Amanda says
CanI want to make cinnamon raisin bagels with this recipe? I’d so, when would I add them?
Thank you!
Amanda says
My auto-text did not help me in the above post.
I want to make cinnamon raisin bagels with this recipe. If possible, when would I add them? Before the first bulk?
Emilie Raffa says
Hi Amanda! No worries ;) The raisins would go in after the first rest (45 minutes to 1 hour). They will be much easier to incorporate because the dough will be softer. I recommend soaking the raisins in a little bit of warm water while the dough rests. Drain and dry thoroughly before adding to the dough.
Amanda says
Thank you!
Do I add cinnamon with the flour at the beginning of the recipe? Or should I just sprinkle on top?
I love this recipe and your sourdough bread recipe as well!
Vera Kay says
oh dear I forgot the sugar don’t know why made your recipe so much what can I expect ?
Himalayan Chef says
You can expect good bagels. Sugar is actually not common in bagel making; but it helps the rising, and also helps form a darker crust.
Mocha says
This is a great recipe! I usually feel like futzing with recipes but this one was great just is. So easy, I didnt even need a food processor and they turned out so good
Renee says
Hi. I am new to sourdough baking. I just started my sourdough starter and it is now ready to bake with. How do I use it? Do I feed it in the morning and then make this recipe at night? How soon do I use the starter after feeding it? I am hoping to make these bagels today and I will update on the results. Thank you.
Emilie Raffa says
Hi Renee! To use your starter, you’ll need to feed & activate it (every time) prior to making bread dough. This takes time. Check out this post for additional information, Feeding Sourdough: My Best Tips & Tricks.
More specifically, for this recipe: I would feed your starter in the afternoon. Make sure to leave it in a warm spot to rise (75-78 F is ideal). Otherwise, it will take a long time. When it’s ready (bubbly and double in size) make the dough in the evening, and let rise overnight. In the morning, make bagels.
Note: your starter will take anywhere from 2-12 hrs. to become active. Timing depends on how warm it is and the strength of your sourdough starter.
Good luck and enjoy!
Renee says
Hi Emilie. Thank you so much for your reply. Well, I made the bagels and I’m sad to say they didn’t turn out. I have tried making bagels twice now and both times I have failed. I’m not sure what I am doing wrong. I use a scale for the measurements – my dough rose over night. I shaped them – the first time they were too sticky and I couldn’t get them off the payment paper to boil so I just baked them as is. They turned out kind of like round baguettes. The second time I added more flour and I was able to get them off, but they lost their shape and their fluff and they turned out hard and chewy. Any thoughts on what I’m doing wrong? Thanks.
Philomena says
Made this recipe last night / this morning. So easy to follow and great results. Can’t wait to make again. Thanks!
Christine R says
Hi
I finally made these and they came out fabulous! The instructions were clear, and the process pretty darned easy! I used 3 different toppings: Everything Bagel seasoning; Cocoa-cinnamon, chia seeds, and some cardamom; black pepper/kosher salt, chia seeds.
Thank you for a great recipe!! 😊
Emilie Raffa says
Christine, this is so great to hear. Thank you! The cocoa-cinnamon topping sounds insanely good.
Casey says
Could this recipe be made with less sugar? I have to watch sugar intake, just curious if it would still work?
Emilie Raffa says
Hi Casey! Absolutely, yes. You can leave the sugar out and skip the honey in the water bath.
Sam says
This is a staple at our house now! I make them almost every Sunday for the last couple of months and we eat them for breakfast. I don’t think other bagels can compare now. Such a fantastic recipe!
Emilie Raffa says
Thank you Sam! Homemade sourdough bagels are in a league of their own, aren’t they?! I’m glad you liked the recipe. Enjoy!
Vera Kay says
Hi Emilie
Can i use frozen blueberries instead of dried.
Thank you
Emilie Raffa says
Vera, I wouldn’t recommend it. Fresh blueberries have too much moisture, which might make the dough too wet.
Vera says
Thank you Emilie what quantity of dried blueberries for 500grm flour appreciate you replies Vera
Emilie Raffa says
I would experiment with 100-120 g to start. You can always add more if you’d like.
Sheila N says
This is such a fantastic, easy to follow recipe. I had shied away from making bagels, thinking it was far too complicated. Your recipe really broke down the steps and made the entire process so easy and effortless. The first batch were polished off in hardly no time! Am making my second batch now. Thank you Emilie!
Emilie Raffa says
You are very welcome, Sheila! Homemade bagels, especially with sourdough are something else, aren’t they? We love them too.
Vera Kay says
Made these started at 3.30 pm 12.30am put in fridge to prove overnight made them at lunch time dough so easy to handle they look amazing thank you so so much Emilie.
Emilie Raffa says
Thrilled you liked them Vera! xx
Vera Kay says
Hi Emilie
When i have rested 45mins then shaped the ball could I put straight into fridge to bulk ferment overnight and do you brush plain ones with egg white.
Thank you greetings from Australia.
Vera Kay
Emilie Raffa says
Hello Vera! Yes, you can do that: rest the dough for 45 minutes and then bulk in the fridge overnight. Keep in mind though, the dough won’t rise in the fridge- it’s too cold. The next day, give it more time at room temperature if needed, to double in size. As for the egg white: I do not brush the plain ones. I only use it (sometimes) to make the toppings stick. Either option will work.
Vera says
Thank you so much Emilie
Vera
Sophia says
Do you think I could make this with AP flour or does it have to be bread flour?
Emilie Raffa says
Sophia, bread flour is best. It has a higher protein content which gives the bagels more structure and makes them delightfully chewy.
CJ says
You can add some wheat gluten to the AP flour, in a pinch. I’ve made these with a lighter white / wheat mixed flour because that’s what I had around, and added 1 Tbsp wheat gluten, with good results. I’ve made these three times, once with the dough in the fridge overnight before boiling. It works really well. Nice sourdough flavor. Thanks.
Emilie Raffa says
Excellent tips, thank you CJ!
Sophia says
Thank you Emilie! I didn’t see your reply and ended up making them with AP flour because that was all I had. They came out great! I’ll have to try it with bread flour and see if they’re even better! Thank you so much for the recipe. As a expat New Yorker, it’s such a joy to know that I can have New York bagels anytime I want now!
Emilie Raffa says
Yay! So glad it worked out Sophia! Did you happen to use King Arthur AP flour? That’s what I’d recommend in a pinch. xx
Lori says
This was my first time making bagels, and they were literally the best I’ve ever tasted! I was shocked. Thank you, this recipe is kind of amazing :)
Emilie Raffa says
Thrilled to hear this! Thanks so much Lori! xx
Westengenoma says
These are fabulous!
Emilie Raffa says
Excellent! So glad you like them!
Jessica Heller says
Fabulous recipe! I’ve made at least 10 batches in the past week! Thank you so much, what a wonderful find!
Emilie Raffa says
Oh my goodness… AMAZING! I’m thrilled you are enjoying the recipe. Thanks Jessica :)
Lori says
These are ridiculously good and surprisingly easy. Thank you!
Emilie Raffa says
Thank you so much, Lori! xx
mcga says
love love love
so easy – first time even trying this sourdough venture much less making a bagel!! IN LOVE with this!! I always search for a great bagel and this by far is one of the best I have EVER eaten….AND I MADE IT! WOW!! i impressed myself thanks to you!!
Emilie Raffa says
Ahh… thank you so much! Sourdough bagels are one of the best under the radar recipes- totally not as difficult as one would think, right? And SO delicious. Thanks for your feedback- it’s much appreciated :)
Jennifer Eccles says
This is my favorite bagel recipe! I make pizza bagels for the kids. After boiling use a pastry brush to coat tops with pizza sauce. Sprinkle on shredded mozzarella cheese and bake. Two dozen won’t last the day in our house!
Emilie Raffa says
Jennifer, what a GREAT idea! Wow. I’m going to try it. My kids would love it too!
Natalie says
Another winner! I have been making sourdough bagels using another method and they have always been way too dense, hard to cut through and tough to chew after the first day. But these are as amazing as you said they would be! Super light and fluffy – and your directions were perfect. I’ll never go back to the other method again!
Susie says
Just finished making and eating these. Yum! I accidentally added the honey to the dough but it didn’t matter. I made plain, sesame and everything. Too bad it takes so much starter and only makes 8…or maybe that’s a good thing!😂
Divyanshu says
I enjoyed watching the live Zoom tutorial. It was great to see how you manipulate the dough. In addition it was helpful to see what the sourdough starter and dough texture should look and feel like. Afterwards I made my own bagels and they turned out perfect!!! Thank you so much for this delicious recipe!
Renee says
Could the bagels be refrigerated overnight after being shaped for the second rise? hoping to do all the prep work of xmas eve so i can’t just bake them off on xmas morning
Emilie Raffa says
Hi Renee! Yes, absolutely. I would shape them into balls (don’t poke them yet- do it the following morning), and chill overnight. Boil and bake on Christmas morning!
Sheri says
You will be glad you made these! Delicious and easy. Probably the best bagels I have had and we make it a point to try lots of new bagel bakeries in Philadelphia. I don’t think the recipe mentions putting the dough into a lightly oiled bowl overnight, but I recommend that step before letting it rest overnight. I added Trader Joe everything seasoning and it is great! No need to toast when fresh out of the oven but also good toasted if you prefer. I used a kitchenaid mixer to knead the dough on low speed about 7 min. I am not a hand kneaded – lol.
Veronika Chytrackova says
Hi there. I haven’t made these yet, but want to try your recipe. I love blueberry bagels so want to ask. Would it work if I add blueberries into this recipe? Or does there need to be a different for blueberry bagels? Thank you, V.
Emilie Raffa says
Hi there! Yes: adding blueberries to my basic bagel dough recipe will work. Use dried (not fresh) and soak them in warm water during the first 45 minute-1 hour rest. Drain well and pat dry with a paper towel before adding to the dough.
Jessica Heller says
Thank you! Just the info I needed as well!
jhon says
This has been my all time favorite. Thank you chef for this yummy 😋 recipe. I will also try. Keep going
Emilie Raffa says
Fantastic! Thanks so much :)
Ksenia says
Hello! Is it possible to buy a record of the class? Couldn’t find this option via link you provided :( Thank you!
Emilie Raffa says
Hi there! Unfortunately, you cannot purchase a recording of this specific class. However, if you’re looking for another Sourdough Bagel class here is the link to my new baking class schedule. When you book a spot, you’ll also receive a recording after the show airs (it expires after 60 days).
Shoshana says
I tried these in the cinnamon raisin version on two separate occasions. they did not rise well at all even though my starter was excellent and I am an experienced with sourdough. I mentioned it to someone, and he told me the cinnamon can kill the starter and to mix that in at a later time. just thought I’d mention that so if anyone else tries it they may have better luck with it!
Emilie Raffa says
Hi there! Thanks for your feedback. Yes: sometimes the cinnamon can hinder the performance of sourdough. It can slow down the rise. As a remedy, you can add it after the first rest and/or make sure to extend the rise time to foster adequate gluten development. Hope this helps :)
Pat S says
These were easy to make a delicious. Perfect crisp crust! Made a small adjustment for hydration level of my starter. Followed the tip for cooler water to slow the rise. Couldn’t be happier with this recipe.
Rikki says
I enjoyed watching the live Zoom tutorial. It was great to see how you manipulate the dough. In addition it was helpful to see what the sourdough starter and dough texture should look and feel like. Afterwards I made my own bagels and they turned out perfect!!! Thank you so much for this delicious recipe!
Happie says
Love love love this recipe!
Just signed up for your class, congratulations!!
Cannot wait to make the bagels for a beach morning this summer with my family, we all look forward to this!
Jerry Gottheil says
Now let’s have your take on another Jewish bread-the BIYALI cousin to the bagel. In sourdough, of course.