This easy, step-by-step whole wheat sourdough bread recipe (and video) is light and flavorful, not heavy and dense. Made with 20% whole wheat flour. Naturally leavened with active sourdough starter. Ideal for sandwiches, toast and soup.
Whole grain flours are prized for their toasty, earthy flavors. Packed with plenty of fiber and nutrients, their natural complexity is a perfect match for any slow-fermented sourdough bread recipe. However, in bread baking there are rules…
You can’t just swap white flour for whole wheat flour and expect the same results (unless you like dry and dense bread). Adjustments need to be made.
In this post, you’ll learn how to make exceptional whole wheat sourdough bread that’s not only light, crisp and airy, but is good for you too. {Browse my full collection of sourdough bread recipes here}
How To Make Whole Wheat Sourdough Bread {Step-By-Step Recipe}
Step 1: Mix The Dough
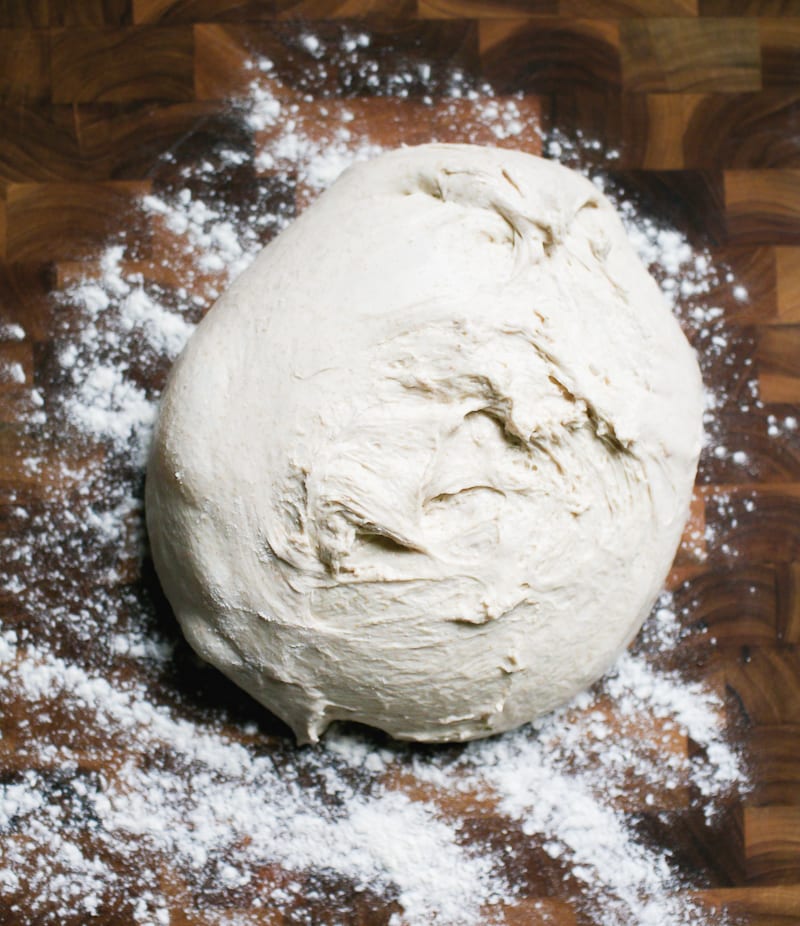
To Start: Weigh your ingredients using a scale. Mix the sourdough starter and water together in a large bowl. Add the flour and salt. Stir to combine, and then squish by hand to form a rough dough. This dough is very sticky, around 75% hydration. It’s like playing with wet mud. Very satisfying! Cover the bowl and rest for 1 hour- this is your first rest.
Tip: Whole wheat flour is thirsty. Because it absorbs more water than regular all purpose flour, extending the “autolyse” or first resting period gives the dough ample time to hydrate. The texture of the dough will be noticeably different after the full hour: it will be softer, and more extensible to stretch and fold later on.
Step 2: Bulk Rise With Stretch & Folds
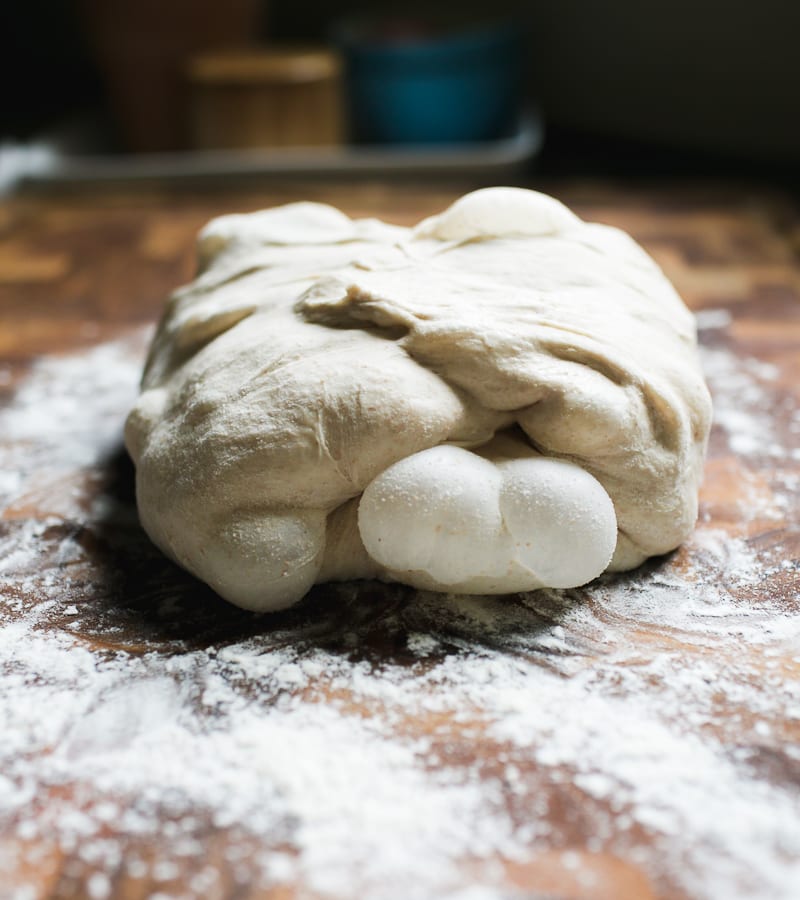
Now the dough needs to rise. During this stage, you’ll stretch and fold the dough to strengthen the gluten and boost the height of the bread. I like to do 4 sets spaced 30 minutes apart. The dough will become soft, pillowy, and a bit stiffer by the 4th set which is what you want.
When finished with the folds…
Cover the bowl with lightly oiled plastic wrap, and continue to bulk rise, untouched at 75-78 F for about 2-3 hours. The dough is ready when it’s puffy, airy, and almost doubled in size. Chill overnight.
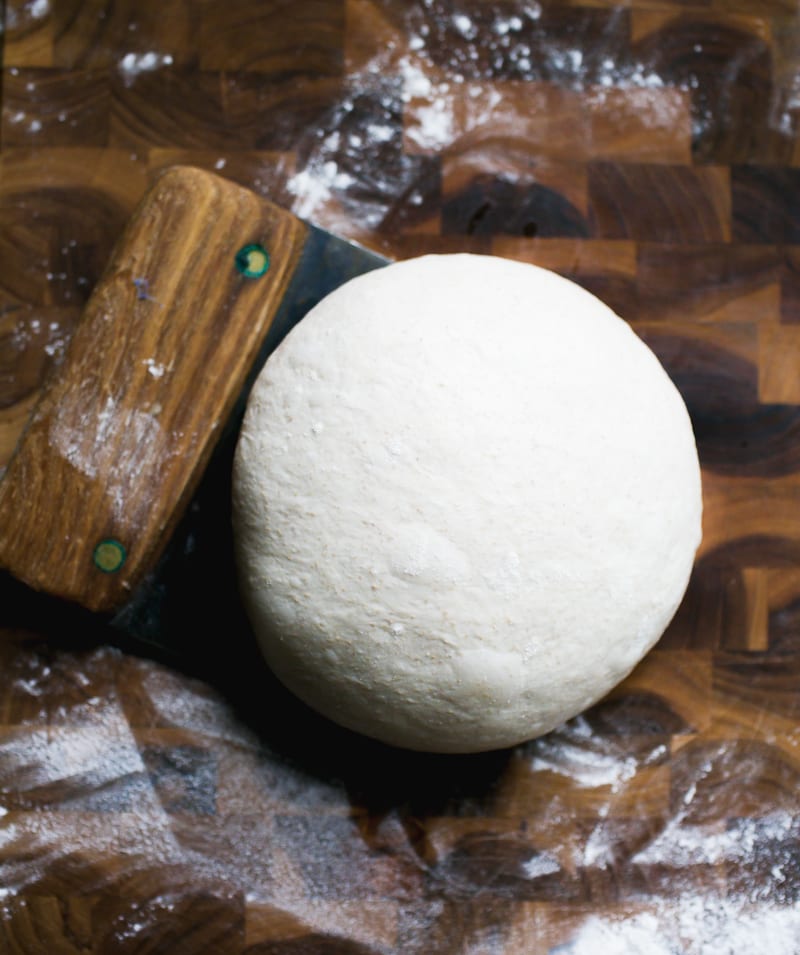
Step 3: Shape The Dough
In the morning, you’re going to shape the dough twice to build extra strength. The first shaping is called “pre-shape” and the second one is the “final shape.”
Pre-shape
Remove the cold dough onto a floured surface. Rest for 10-15 minutes to take the chill off. Shape the dough into a loose ball. Cover and rest for 20-30 minutes.
Final Shape
Using a bench knife for guidance, flip the dough over and shape it again (a little bit tighter this time). Place into a lined bowl of proofing basket seam side up. Cover the dough with the vloth overhang.
Tip: Pre-shaping Bread Dough: not every sourdough recipe needs it. High hydration doughs (like this one) benefit from the extra support to hold its shape. Otherwise, it might spread when baking.
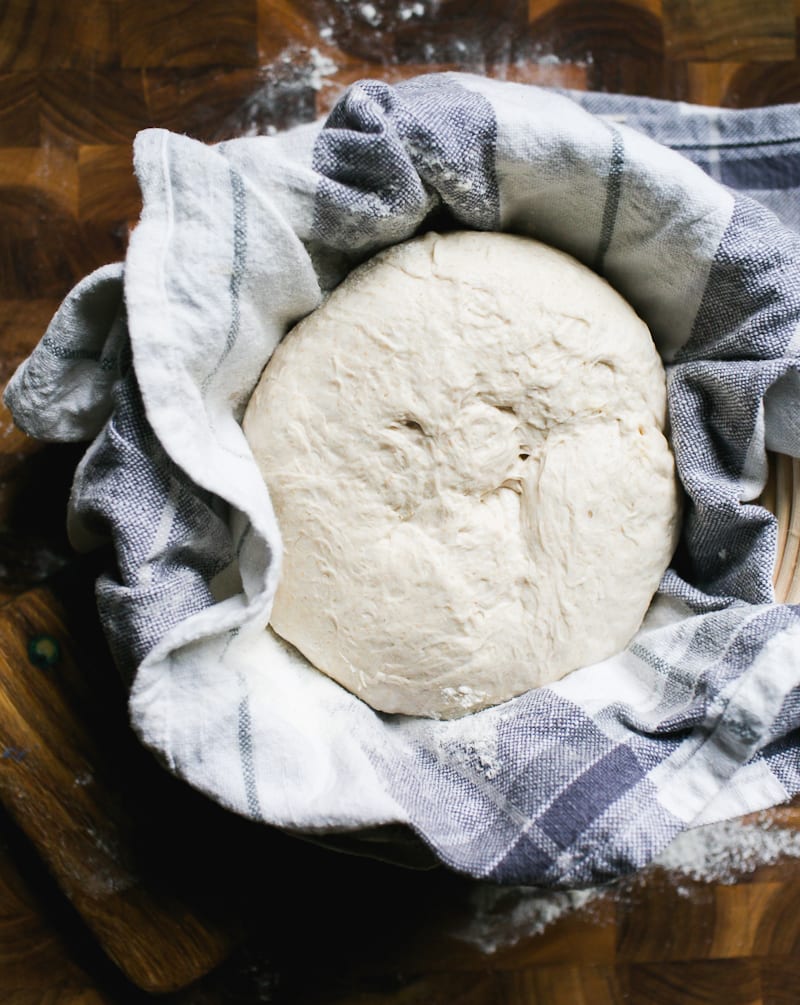
Step 4: Second Rise
The dough needs to rise again, but only briefly. Rest the dough in the warm spot you used earlier for about 30 minutes to 1 hour. The dough is ready when it’s puffy and looks plump. It should not be super cold or dense-looking prior to baking. Preheat your oven.
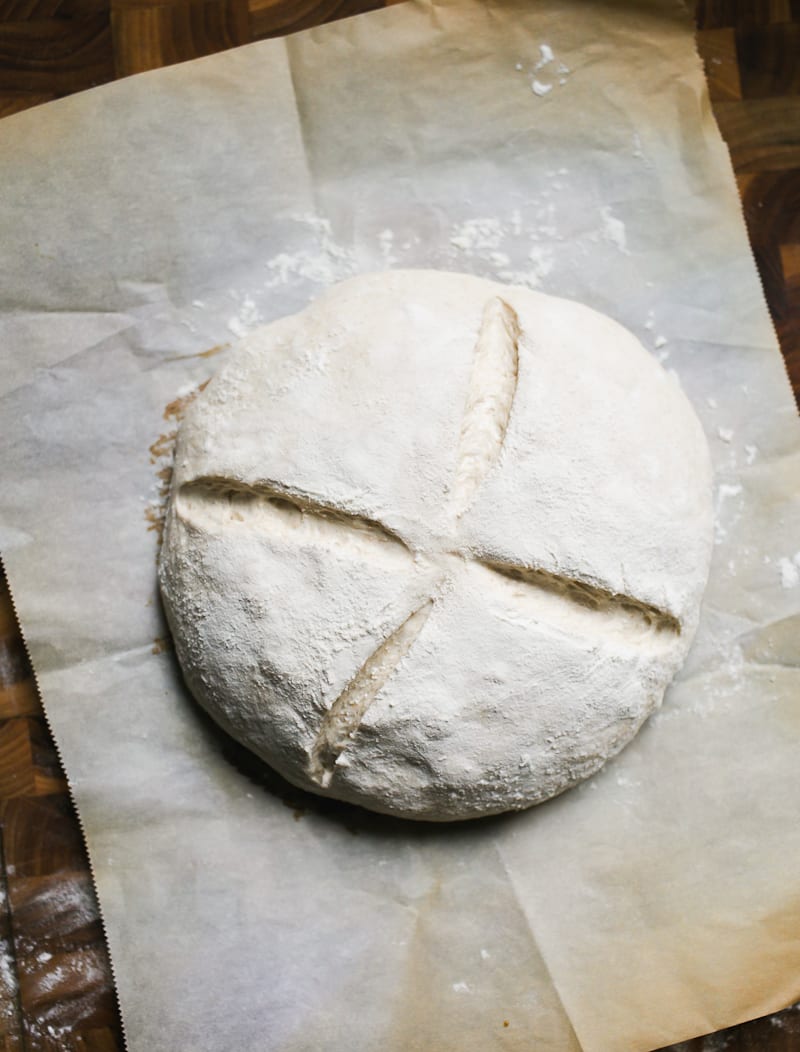
Step 5: Score The Dough
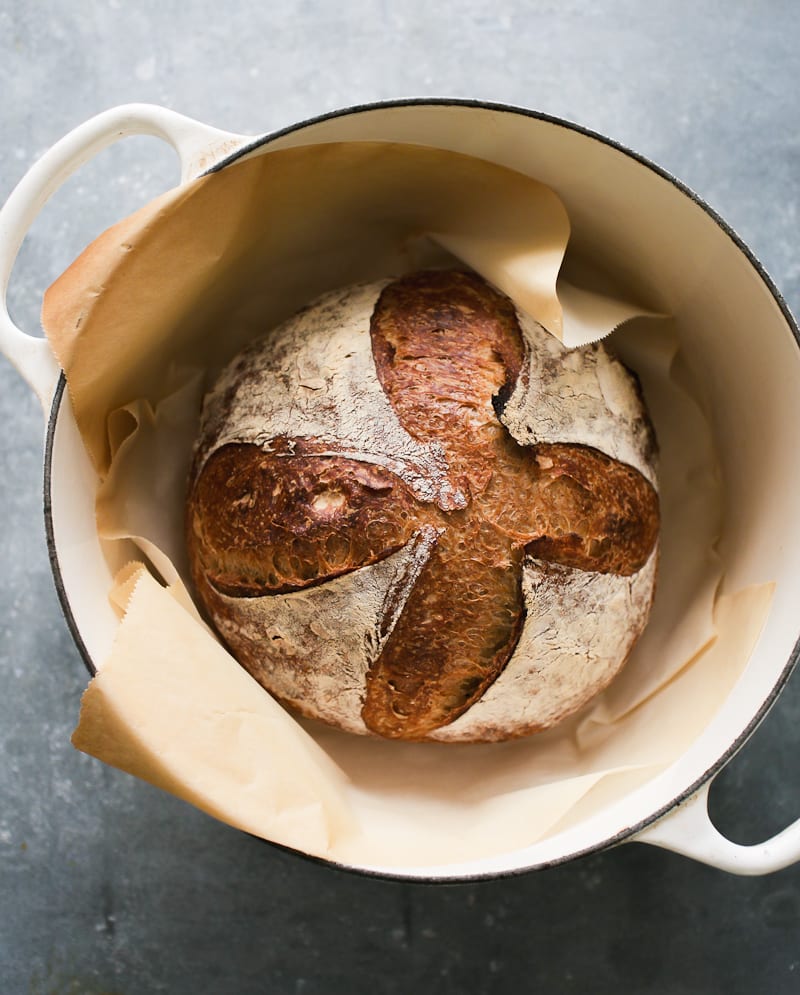
Invert the dough onto a sheet of parchment paper. Flour the surface. Using a bread lame or small serrated knife, score the dough at 12, 3, 6 and 9 o’clock, turning the parchment paper as you go. Alternatively, make one long slash down the center- do whatever you feel comfortable with. Scoring takes practice.
Step 6: Bake The Dough
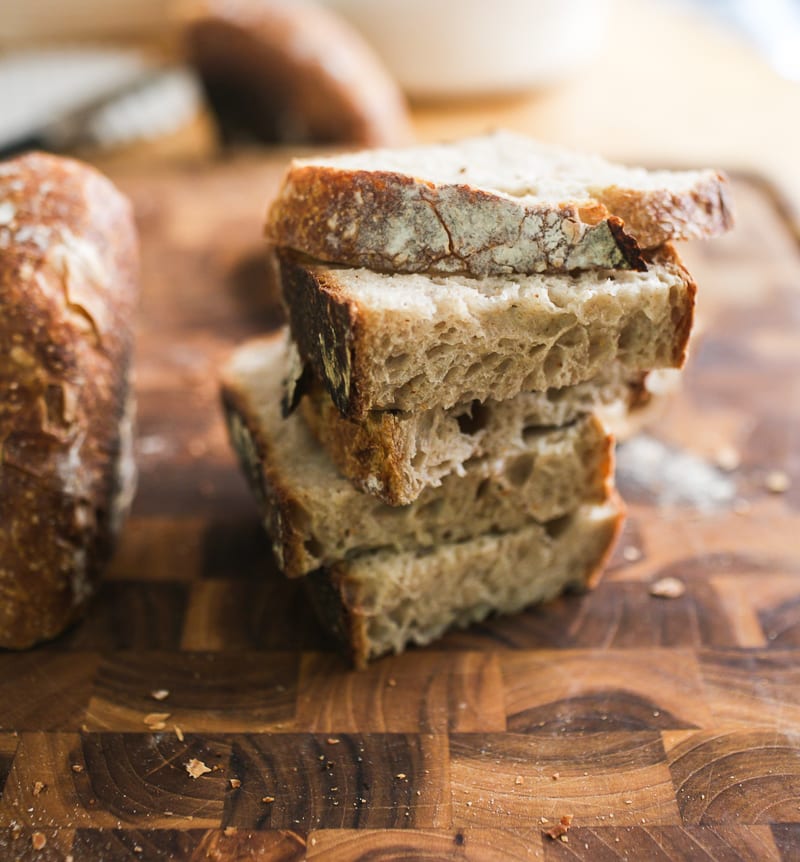
Place the dough in a Dutch oven or another oven safe pot with lid. You don’t have to preheat it first. Pop the lid on top, and bake @ 450 F for 20 minutes. Remove the lid and bake for an additional 40 minutes or until golden brown. Remove the bread from the pot. Cool on a wire rack for 1 hour before slicing, otherwise the interior crumb might taste gummy. How good does this look?!
Let’s Talk About Taste.
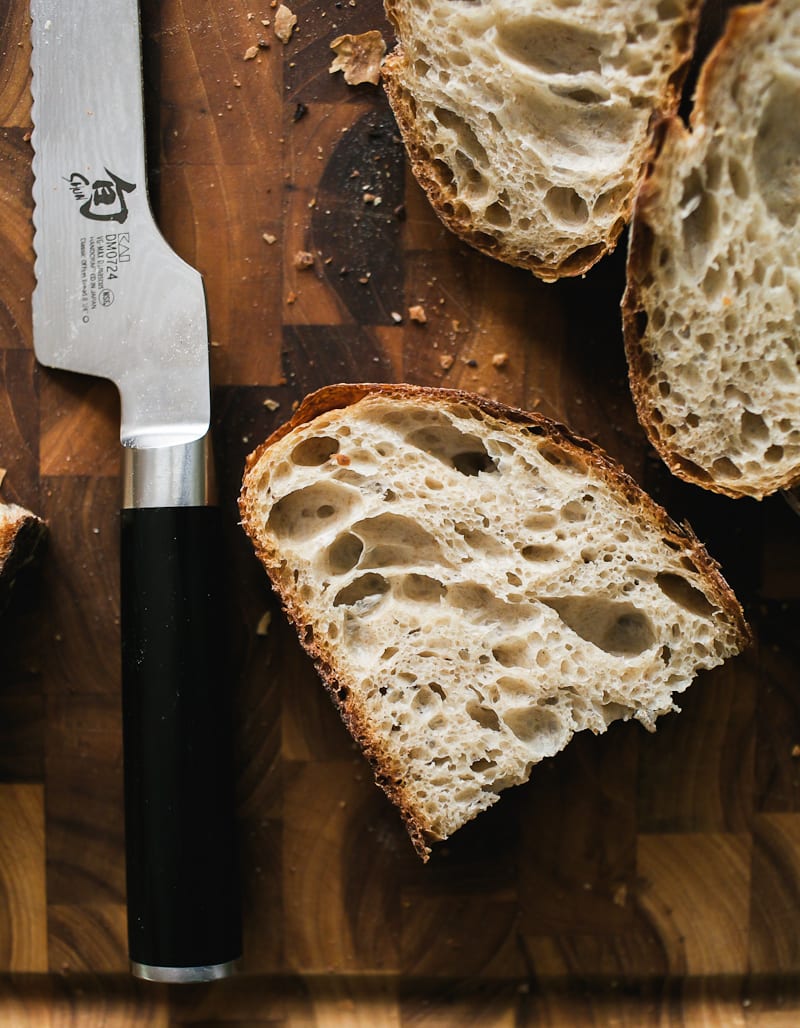
Because this dough is made with only 20% whole wheat flour, the taste is mild and nutty, with a light texture.
For a heartier loaf, you can increase the whole wheat flour up to 30% with additional water (see recipe card below). However, the biggest mistake I see with bakers is attempting these higher %’s without understanding that it can cause extremely dense and heavy bread. Start small, practice, and work your way up.
Then once you’ve mastered this recipe, have a look at my classic sourdough bread recipe, this easy sourdough sandwich bread and my light and airy sourdough focaccia!
Sample Baking Schedule
Whole wheat doughs tend to rise faster than all-white doughs, especially in warm weather. To avoid over proofed dough, I like to make this recipe in the afternoon (usually between 2-3 PM), when i know I’ll be home to do the stretch and folds. The dough is shaped and baked the following morning.
Late Afternoon
- 2:00 PM: Mix the dough/rest for 1 hour
- 3:00 PM: 1st Stretch & Fold
- 3:30 PM: 2nd Stretch & Fold
- 4:00 PM: 3rd Stretch & Fold
- 4:30 PM: 4th Stretch & Fold
- 5:00 PM: Bulk Rise for 2-3 hrs @ 75-78 F
- 7:00 or 8:00 PM: Chill overnight
- 6:00-8:00 AM (the next day): Shape and bake the dough.
By signing up, you agree to receive emails from The Clever Carrot. Unsubscribe at any time.

Light Whole Wheat Sourdough Bread
- Yield: 1 loaf 1x
- Category: Sourdough Bread Recipes
- Method: Oven-Baked
- Cuisine: American
- Diet: Vegan
Description
An easy recipe for whole wheat sourdough bread that’s light and flavorful (not heavy and dense). Made with 20% whole wheat flour. The dough can be made in advance and baked the following day. Ideal for sandwiches, crostini, and morning toast with jam.
Ingredients
- 50g bubbly, active sourdough starter (100% hydration)
- 350g – 375g warm water (80–85 F)* See note below
- 400g bread flour
- 100g whole wheat flour
- 9g fine sea salt
Notes & Substitutions
* Flour is like a sponge. Depending on the brand you’re using, it might not absorb all of the water. Start with 350g of water if you’re using a low protein bread flour, less than 12.7%.
For best results, use a scale to weigh your ingredients. If using measuring cups, please aerate the flour first, lightly spoon it into the cup, and then level off the excess with the back of a knife.
Instructions
Baking Schedule
Whole whether doughs tend to rise faster than white doughs, especially in warm weather. To avoid over proofed dough, I like to start mixing in the afternoon (usually between 2-3 PM) when I know I’ll be home to stretch and fold the dough. Please adjust your rise times based on temperature.
Make the Dough
Combine the sourdough starter and water in a large bowl. Add the flour and salt. Mix with a fork and then finish by hand to fully incorporate the flour. It will feel very wet and sticky. Cover with a damp towel or wrap and let rest for 1 hour on your countertop, returning to the bowl after the first 30 minutes to work the dough into a rough ball.
Bulk Rise with Stretch and Folds
After the dough has rested for 1 hour, do your first fold.
Gather a portion of the dough, stretch it upward, and fold it over toward the center of the bowl. Give the bowl a 1/4 turn and repeat 3 more times, stretch and folding the dough to come full circle around the bowl (4 folds = 1 set). If the dough still feels slack after the 1st set, do an additional 4 folds around the bowl to tighten the dough.
For best results, do 4 sets total spaced 30 minutes apart resting the covered dough in a warm spot in between each set (see tip below). Notice how the dough will tighten after the 4th set. See video for technique.
When finished with the folds, cover the bowl and continue the bulk rise (untouched) at 75-78 F for about for 2-3 hours. The dough is ready when it has almost doubled in size. Wrap and chill the whole bowl overnight; the dough will continue to rise only slightly in the fridge when the dough is warm.
How to Create Warm Spot for Bread Dough: Preheat your home oven to the lowest setting for 30- 45 seconds and then shut it off. Place the covered bowl of dough inside to bulk up. The temperature should be 75-78 F and no higher than 80 F. Use an oven thermometer (and common sense) to keep track of the temperature. Dough that is too warm will become wet, sticky, and a tricky to work with. Alternatively, I highly recommend using a proofing box.
Shape the Dough
The following morning, make sure the dough has doubled in size. If not, give it more time to bulk up, if needed. This is important to build strength.
Line a small bowl (or proofing basket) with a cotton or linen cloth. Sprinkle with flour. You’re going to shape the dough twice to build extra strength.
Preshape
Remove the cold dough onto a floured surface. Let rest for 10-15 minutes to take some of the chill off. Shape the dough into a loose ball using the envelope technique. Starting at the top of the dough, stretch and fold it over toward the center. Then stretch and fold the bottom of the dough toward the center. Repeat on the left side…and then the right side. Using a bench scraper, scoop up the dough and flip it over so the smooth side is facing up. Cover and rest for 20-30 minutes.
Final Shape
After the dough has rested, flip it over again (the smooth side should be facing down now). Shape it again following the steps above. Flip it back over. With floured hands, gently cup the dough and pull it toward you in a circular motion to tighten its shape. Place the dough into the lined bowl or proofing basket seam side up. Cover with the cloth overhang.
Second Rise
Rest in the warm spot you used earlier for 30 minutes to 1 hour. The dough is ready when it looks puffy and has risen slightly, but has not yet doubled in size. The dough should not be very cold prior to baking.
Preheat your oven to 450 F towards the tail end of the second rise.
Cut a sheet of non-stick parchment paper to fit the size of your baking pot, leaving enough excess around the sides to remove the bread.
Score the Dough
Place the parchment over the dough and invert the bowl to release. Sprinkle the dough with flour and gently rub the surface with your hands. Using the tip of a bread lame, small, serrated knife or a razor blade, make four shallow 4-inch long cuts at 3, 6, 9, and 12 o’clock around the dough. Use the parchment paper to transfer the dough to a Dutch oven (or another oven safe pot with lid).
Bake the Dough
Bake the dough on the center rack for 20 minutes, covered. Remove the lid, and continue to bake for 40 minutes and golden brown.
When finished, transfer to a wire rack. Cool for 1 hour before slicing, for best texture.


Comments
Hannah says
I love this recipe. Compared to others I have read, it is so clear and low fuss and the result is delicious and so tender. Have made at least 10 times and am searching for another dutch oven to start doubling up the recipe and bake 2 at once.
2 questions:
After the first bulk rise, can the dough sit in the fridge longer than overnight, like 24 or 36 hours before the shaping period?
Also, if I want to increase the percentage of whole wheat to white flour, what adjustments might I need to make? More water? more/less starter?
Brenda says
Just wondering if anybody knows the calorie count for this bread?
Sherry says
I absolutely love your start to finish schedule. So helpful. Thank you!
Kati says
Can I use whole read wheat bread flour only in this recipe?
Chaya says
Hey! I was wondering if I leaving the dough overnight in the fridge until the following afternoon is too long?
Thanks so much.
Raj says
Thanks for the excellent recipes. I tried the whole wheat sourdough recipe, but despite my wife’s warning, I added the Whole wheat chapati flour, which made the bread extremely heavy. Do you have a recommendation for which whole wheat flour brand to use? Thanks, -raj
Sheila says
Actually I have had good success by reducing the baking time to 20 min covered and 20 min uncovered. I wrap in a dry towel to cool. I also use the maximum amount of water and usually more than 50 starter, closer to 60. The crust is not too hard and the bread is more moist.
Sheila
VALESKA PARKER says
Thank you for the information. Last week I tried making wheat sourdough bread, different recipe. The baking time ended up burning my beautiful loaf. The inside was delicious but outside was more crispy than anyone would ever want to eat..lol
manda tam says
After my 3rd set it is really tight. When I start doing the 4th set, my dough start tearing and becomes more loose. The more I tried to do the folding, the more running it gets. Did over stretched? Also, when I take the dough out of the fridge and left on counter, the dough spreads. What do you think I did wrong?
ted says
Success at my first focused attempt at making sourdough bread! I attribute this to the stepwise details in your guide, which helped me gain an understanding of what needs to be happening with the dough as I went along. Also, it didn’t dawn on me until I went to do it, that beginning the bread-making process depends on the ‘readiness’ of the starter. So I was delayed as I had to redo the feeding process once. Fortunately, I was able to quickly gain loose control over that, and set it up to peak at a time convenient for me. It was very gratifying to get such a great tasting result when it really counted – for my bread-eating-afficionado Mom’s birthday!
Gail Owens says
Starting to make this. My ingredients look way more than yours in the video. And my is so sticky, but I feel like I might be adding too much flour to make up for it. On the 2nd fold and waiting. Will let you know when I’m done.
Audrée-Anne says
Hello Emilie!
I was wondering if you could explain why this recipe has a resting period of the dough overnight in the fridge while this step is not listed in your basic sourdough bread recipe.
Thank you in advance for your answer!
Lisette says
Did you get an answer, I was wondering the same thing?
Myra says
This is my go to sourdough recipe, made many times. I have cut the cooking time post lid removal to 27 minutes ( from 40) . Perfect size for 2 people
Stephanie says
I made a few changes to this recipe to suit my schedule and figured I’d share so that others in the same situation might know that they may also have success with a little deviation! Fear not!
I followed this recipe’s measurements but DOUBLED it as some others in the comments said they had. Since I wanted one of the loaves to take to a family member the next day, I cooked one loaf in the evening (omitting the extended proof in the fridge like this recipe calls for) and put the other in the fridge covered until the following day when I had a chance to pop it in the oven. Both loaves turned out great!
As someone who hasn’t made sourdough many times this recipe was very manageable (I did it all in one day!). In the past I did not weigh my ingredients because I did not have a scale and I used bread flour and ww instead of regular white flour. I really think that I can attribute the success of the bread to both of those changes – it made the dough so much easier to work with than loaves of my past.
I ALSO changed the temperatures…I preheated the oven to 450 degrees WITHOUT the dutch oven in it. Some comments (and past experience) have found that the bottom of the loaf can be a touch overdone…but maybe next time I’ll try it. After 450 degrees for 20 minutes, I removed the lid of the dutch oven and turned the temperature down to 400 for the remaining 40 minutes.
Jody says
Just ordered your book while waiting for my starter to be ready to use! I already have her name all picked out: Audrey II (after the talking Venus fly trap in Little Shop of Horrors who exclaims “Feed me Seymour, I’m hungry” as its famous line LOL).
Question: Does the Dutch oven have to be cast-iron based? I have an enameled CLAY Dutch oven. Not sure if this will work or if I should invest in a cast iron one. Thank you!!
Bella says
Hi! I’m using whole wheat bread flour, would i use the same ratio of ingredients?
Abby says
I LOVE your recipes, I’ve baked a few loaves following your beginners guide and they’ve always turned out beautifully so I’m excited to try this one with 20% whole wheat flour! I’m curious about some of the differences between these two recipes as I’m trying to understand the intricacies that go into tweaking formulas, and I am wondering if you could explain why the basic sourdough recipe calls for 150g of starter for 500g of flour, while this one only uses 50g? The precise science behind baking is always so interesting to learn!
Andrea says
I made your regular sourdough with great success! Moving onto the whole wheat today and curious why you don’t add olive oil to this recipe? Many thanks for sharing!
Emilie Raffa says
Hi Andrea! You’re very welcome! It’s just a different style recipe. Adding oil changes the texture of the crumb and crust, making the interior more plush and tender. However, sourdough bread is perfectly delicious without it!
Rene says
If waiting to 2-3pm, when is the last time the starter should be fed, that morning or the night before? thank you
Laurie says
I have been making your sourdough bread recipe every week now for a couple years and it’s fantastic I decided to try this white whole wheat version this morning thinking I could do it simultaneously before reading down and seeing that you refrigerate it overnight. Is this necessary or is it possible to bake it seem day?
Sarah says
This is THE recipe. Best loaf I’ve ever made. Your website has been my go-to guide for the past 3 years on my sourdough journey, and really, all your recipes are fantastic. This is the one where every step turned out perfectly. I’m so proud of myself and thankful for your site as resource. Thank you for sharing your expertise!
Darrell says
Great recipe!!..Can I use this recipe to make sourdough rolls?
Laura says
I love this recipe! It’s my favorite of all I’ve tried, hands down. I have lifting restrictions for a couple weeks so cannot use my cast iron lidded pot. Does this bread work well in a loaf pan?
Patti says
Thank you for all your advice and information. I followed your instructions in the first lockdown in March 2020, and have been making and eating this bread ever since. I always slice and freeze it and eat it toasted. To make slicing easier, after the loaves have cooled down, I store them overnight in a (reused) plastic bag. The crust becomes softer and the bread becomes a bit rubbery and smells delicious. I can then cut it in quite thin slices which I like. I just need to remember to allow 2 days for the finished product.
Greta says
Started 25 hours ago, doubled the recipe, did everything according to recipe up until after bulk fermentation was done, then I divided the dough, preshaped, rested, shaped again and put in containers for refrigeration. After 15 hours, I preheated my oven and when it was ready, I removed the bowls, tipped the dough out onto parchment, slashed and placed in cold dutch ovens to bake. I also lowered the temp to 425F for the 1st 20 minutes covered, 10 more minutes covered at 400F, then 25-30 minutes uncovered until internal temperature was 205F. Bottom crust wasn’t too tough, bread is delicious! I will definitely be making it often!
Floaf says
I have made this recipe 50ish times. It keeps getting better. Recently, i doubled the recipe with great results. I freeze a loaf and chill the starter for a few weeks so i only have to make it half a often.
Emilie Raffa says
Fantastic! Great tip, thank you :)
Sierra says
Can I double this recipe to make two loaves? Or can I just cut the dough ball in half to make two? Would those be too small?
Jessica Knight says
I have played around with this recipe for a while now. I do preheat to 450 and bake at 400. 20 minutes with the lid on, and about 30-35 with the lid off. I also personally like the water around 330 grams. I had been adding whole wheat to the regular sour dough recipe but love the result of this much more. Thanks!!
Lil says
This was the first time I’ve ever made sourdough bread. Let me start by saying that the recipe was well written and easy to follow so thanks for that. My husband is the bread maker in the family and getting a compliment from him on my baking is no small thing. He LOVED this bread. This recipe is a keeper. Thanks for sharing it!
Laura says
This is currently my go to recipe. It’s a really nice tasty bread, the schedule is idea for my lifestyle, it’s super easy but yet covers all the bases for a good sourdough bread, stretch & folds, overnight CR, etc. Perfect loaf for seed additions, too.
Michelle says
Great recipe!! So delicious
Mary Lou Itel says
Can I use a standard bread pan instead and skip the Dutch oven method?
Charlie says
Hi – I have made this recipe a few times and it comes out great, except that the bottom of the loaf burns a bit. I have used the oven and also the grill (since it’s too hot to use the oven). It’s obviously harder to control the heat using the grill, but the same thing happened in the oven. Should I try a lower heat and bake longer?
Candice says
My loaf also had a burned bottom. I noticed the white sourdough recipe said to drop the oven temp to 400 after the first 20 minutes. I’m going to try that next time.
Renee says
The pan is too close to the heat source. Move your top oven rack up as high as you can and still be able to fit your Dutch oven (with lid).
Also place a cookie sheet on the lower rack between the heat source and Dutch oven. These will help you not burn the bottom of your bread.
Gitts says
I made this and it came out perfect! Awesome recipe from the site that taught me about sourdough
LeahP says
Hi Emilie,
Thank you for your sourdough starter and light sourdough bread recipes. I love the nutty note and the open crumb. I’m still working on the oven spring (which I dont get always and It’s my fan forced oven’s issue). I have to do some work arounds like oven temperature and best vessel to cover the dough while baking to have a perfect loaf however, your recipe is the best and the easiest ive tried and I am thankful I’ve came across your website and yes I will try Shannon’s tip too. Again, many thanks to you.
Nick says
Hello. I often find great advice online, but shamefully I rarely take time to comment and leave feedback.
On this occasion, however, I really felt compelled to say thanks and make a recommendation.
I baked my first sourdough loaf today (well, started yesterday, finished today!) and followed your recipe ‘to the letter’. The result, is nothing short of fantastic.
Whilst no part of the process is particularly complex, there are lots if steps and plenty of potential ‘banana skin’ moments for the novice throughout.
So, thank you, your recipe helped this beginner bake like an expert, and the video helped remove anxiety associated with traslating instruction into practice.
Highly recommended. Thank you :)
Farhaana says
Hi! Could you give me the measurements to increase the whole wheat to 30% ?
By the way, I’ve tried the recipe as is with great success :)
Michael Gallagher says
Hi there,
I followed your steps to the T, but my bread looks like a big cookie in the oven.
During the stretch and folds I could see the dough rising, but after the bulk rise of 3.5 hours it didn’t seem to double after that. So I threw it in the fridge. The house temperature as 72-75°F.
12 hours later I took the bread out of the fridge it was firm and naturally cold. Almost like a someone’s cheek on a winter’s day. In your video yours seemed very light and bouncy. What do you think happened?
Emilie Raffa says
Hi Michael! The dough needed more time to rise. Rise times can vary based on environmental temperature (the warmer it is the faster the dough will rise) and sourdough starter strength. Given that the dough didn’t double before you chilled it was the indicator. Next time, give it more time to rise at your current room temp Or use the tip (in the recipe) for creating a warm spot for the dough to rise. Both will help.
In comparison to my dough, it was bouncy because it was properly fermented and not cold- probably about 78 F or so.
Michael says
Thank you Emilie,
I’ll keep at it and give it a go. Thank you for the time to reach back out :)
Jessi says
Hi wonderful recipe . I ended up adding olives to one of the loaves during the first fold. I followed your sourdough add in recipes to add the olives in. Should I still rise for 2 hours then overnight in fridge ? I was guessing it was ok to continue to follow this recipe the same and just add in. Thanks so much I’ll let you know how it turns out
Emilie Raffa says
Hi Jessi! Yes, you are correct. For add ins, continue to follow the recipe here as written, adding more time as needed to the bulk rise (sometimes olives can weigh down the dough). Always watch the dough and not the clock!
Sondra says
Hi Emilie,
I’m wondering when the best time is for adding additional ingredients into the dough, such as seeds or herbs. Please advise and thank you!
Sondra
Emilie Raffa says
Hi Sonda! You can add them after the first 1 hour rest or during the 1 fold. Either one will work.
Nina Sarah says
Hi, I would like to ask if I still have to use unbleached bread flour or can I use regular bread flour? Thank you.
Emilie Raffa says
Hi Nina! Both unbleached or regular flour will work for this specific recipe, and bread baking in general (we tend to stay away from bleached flour when feeding a sourdough starter).
Shanon R. says
This was the first attempt at true sourdough bread that has ever worked for me. Thank you!
Tweaks:
1. I do not have a dutch oven or any oven proof container with a lid so I baked mine in two bread loaf pans stacked on top of each other and wrapped in foil. Worked beautifully!
2. I did not have whole wheat flour so instead of the 100g of whole wheat flour, I did a 80:20 mixture of rye flour to white flour instead. It worked and tastes great!
Emilie Raffa says
Shanon, this is excellent feedback. I love these tips, especially the bread pan hack. Thank you!
Lauren says
Made this for the first time today and was blown away! I was sure that it wouldn’t turn out because I hit a few snafus along the way… 1 – My dough seemed super, super wet early in the process so I used flour on my hands, instead of water to do the envelope folds, so I was a little nervous. 2 – My dough developed a little bit of a skin on it during the second day steps, so I kinda folded them in, but there were definite hard spots. Despite my issues, the bread was perfect! So so tasty, with a great texture. Thank you!
Emilie Raffa says
You’re welcome, Lauren! I’m so glad it worked out for you!
Cindy says
This was my very first sourdough bread. The directions were just what I needed as I had so many questions. Oh so good!!
Emilie Raffa says
Thanks so much Cindy!
Bernie Scott says
Are we supposed to preheat Dutch oven too? The video looks like we don’t!? Most recent pies I see say to preheat pan also. Thanks!
Emilie Raffa says
Bernie, it’s up to you. I used to preheat my Dutch oven in the past. But as I continued to bake, I stopped doing so (too many burnt wrists!). The results were comparable.
Liane Liora says
Hi Emilie! I have a whole wheat bread flour – should I purchase a white bread flour, and a regular whole wheat flour, to make this recipe rather than use the whole wheat bread flour in place of the whole wheat? Or just adjust the water? Thanks so much for your thoughts!
Melissa Abehsera says
I find this to be a excellent recipe and the steps are easy to follow.
Could you kindly gibe me the measurements in ounces and cups.
Would be extremely helpful.
Thank you
David Martin says
20% Whole Wheat does not make 80% White Flour “healthy”. Try making your bread with 100% Sprouted White Berry Whole Wheat or Sprouted Spelt flour. Now you have something truly healthy!
Natalie says
Hi! Do you have to put it in the fridge, or could you leave it out longer on the counter and bake it that night? Thanks!
Emilie Raffa says
Hi Natalie! Yes, you most certainly can. Leave the dough to rise at room temperature and bake it later, when you’re ready.
Stacey Komarek says
This is a great recipe as all of your recipes are! Your book is my sourdough Bible!
Emilie Raffa says
Thank you Stacey! You are so very kind! If you’re feeling inspired, do join our live baking classes. Tons of fun!
Is says
Hi Emilie,
I have made this recipe quite a few times now and I love it! Thank you! I started with your beginner recipe and then went onto this which seems to work more consistently for me! I assume I am doing it all correctly as I love the texture but just wondered if it is supposed to be slightly sticky inside though not bad sticky? Either way it is good!