This easy, step-by-step whole wheat sourdough bread recipe (and video) is light and flavorful, not heavy and dense. Made with 20% whole wheat flour. Naturally leavened with active sourdough starter. Ideal for sandwiches, toast and soup.
Whole grain flours are prized for their toasty, earthy flavors. Packed with plenty of fiber and nutrients, their natural complexity is a perfect match for any slow-fermented sourdough bread recipe. However, in bread baking there are rules…
You can’t just swap white flour for whole wheat flour and expect the same results (unless you like dry and dense bread). Adjustments need to be made.
In this post, you’ll learn how to make exceptional whole wheat sourdough bread that’s not only light, crisp and airy, but is good for you too. {Browse my full collection of sourdough bread recipes here}
How To Make Whole Wheat Sourdough Bread {Step-By-Step Recipe}
Step 1: Mix The Dough
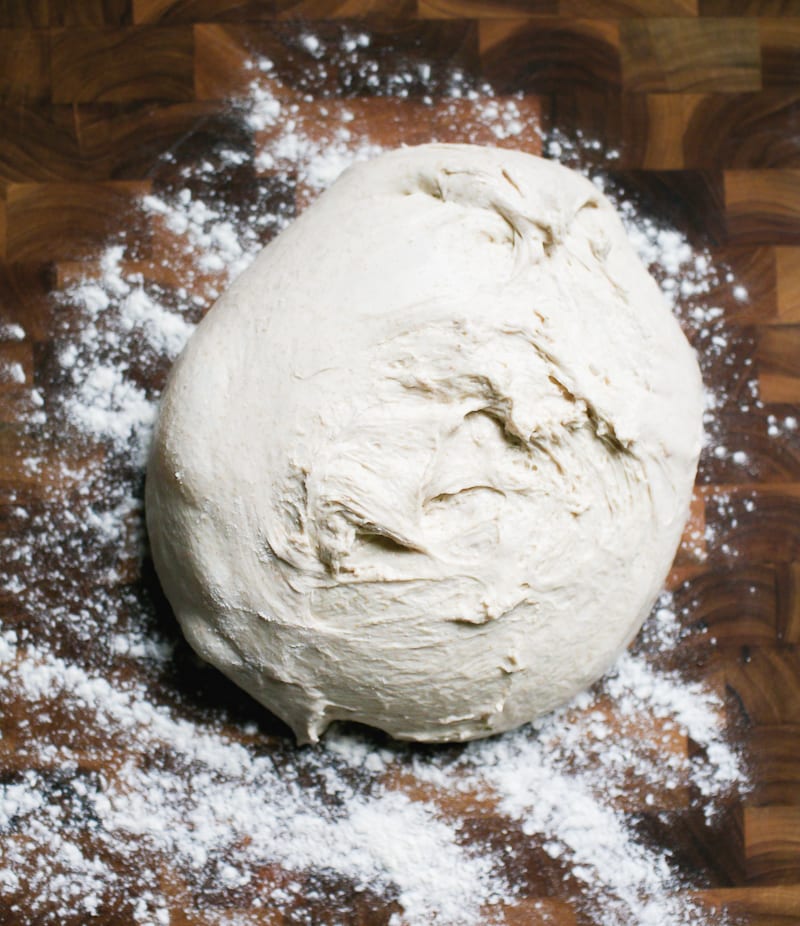
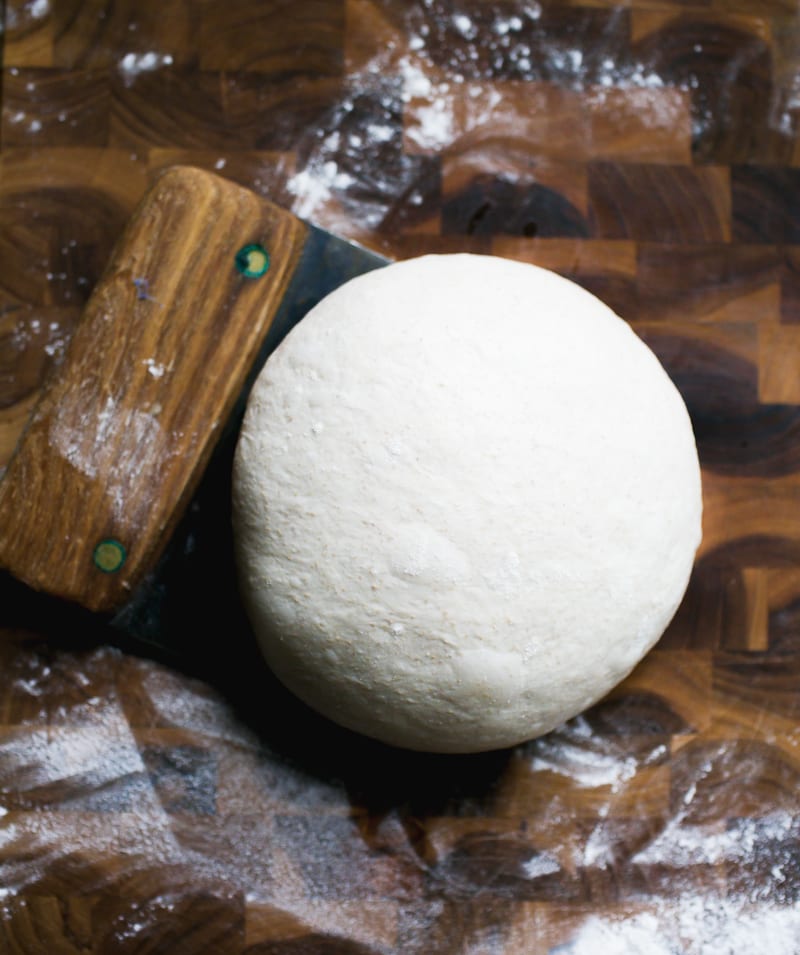
To Start: Weigh your ingredients using a scale. Mix the sourdough starter and water together in a large bowl. Add the flour and salt. Stir to combine, and then squish by hand to form a rough dough. This dough is very sticky, around 75% hydration. It’s like playing with wet mud. Very satisfying! Cover the bowl and rest for 1 hour- this is your first rest.
Tip: Whole wheat flour is thirsty. Because it absorbs more water than regular all purpose flour, extending the “autolyse” or first resting period gives the dough ample time to hydrate. The texture of the dough will be noticeably different after the full hour: it will be softer, and more extensible to stretch and fold later on.
Step 2: Bulk Rise With Stretch & Folds
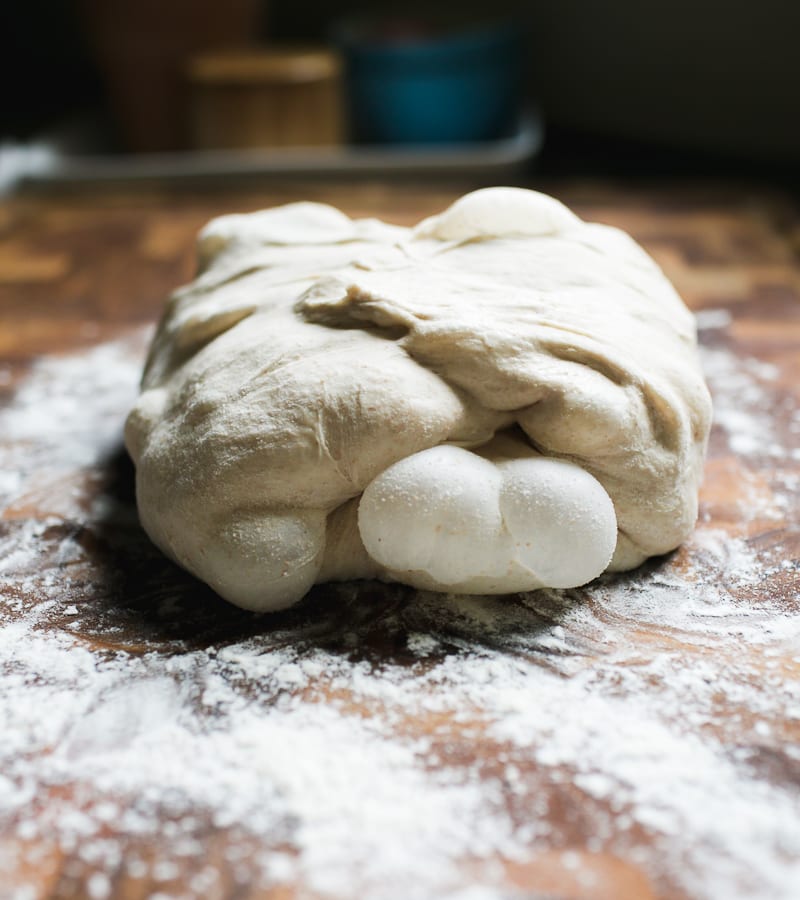
Now the dough needs to rise. During this stage, you’ll stretch and fold the dough to strengthen the gluten and boost the height of the bread. I like to do 4 sets spaced 30 minutes apart. The dough will become soft, pillowy, and a bit stiffer by the 4th set which is what you want.
When finished with the folds…
Cover the bowl with lightly oiled plastic wrap, and continue to bulk rise, untouched at 75-78 F for about 2-3 hours. The dough is ready when it’s puffy, airy, and almost doubled in size. Chill overnight.
Step 3: Shape The Dough
In the morning, you’re going to shape the dough twice to build extra strength. The first shaping is called “pre-shape” and the second one is the “final shape.”
Pre-shape
Remove the cold dough onto a floured surface. Rest for 10-15 minutes to take the chill off. Shape the dough into a loose ball. Cover and rest for 20-30 minutes.
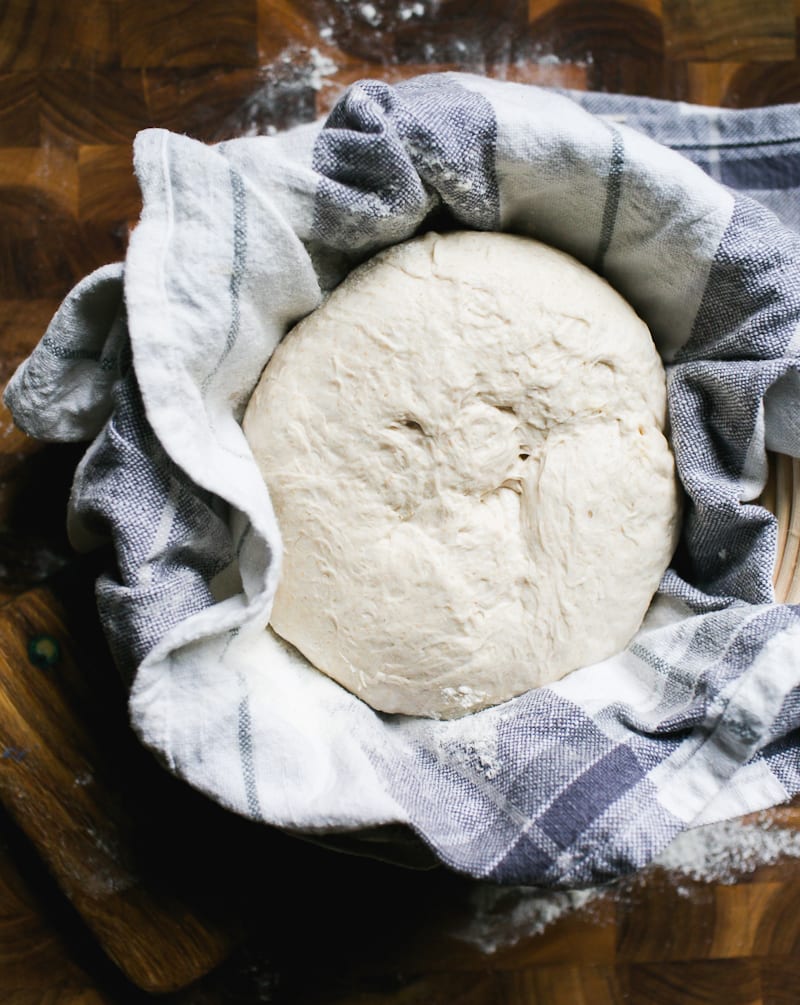
Final Shape
Using a bench knife for guidance, flip the dough over and shape it again (a little bit tighter this time). Place into a lined bowl of proofing basket seam side up. Cover the dough with the vloth overhang.
Tip: Pre-shaping Bread Dough: not every sourdough recipe needs it. High hydration doughs (like this one) benefit from the extra support to hold its shape. Otherwise, it might spread when baking.
Step 4: Second Rise
The dough needs to rise again, but only briefly. Rest the dough in the warm spot you used earlier for about 30 minutes to 1 hour. The dough is ready when it’s puffy and looks plump. It should not be super cold or dense-looking prior to baking. Preheat your oven.
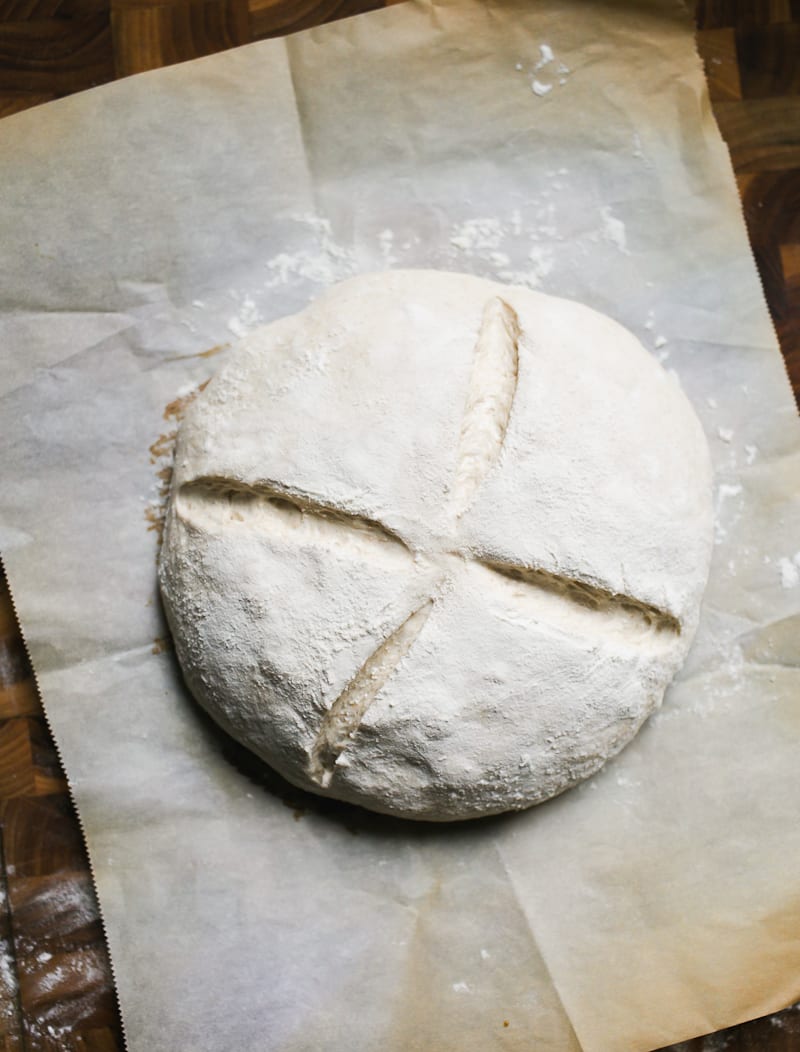
Step 5: Score The Dough
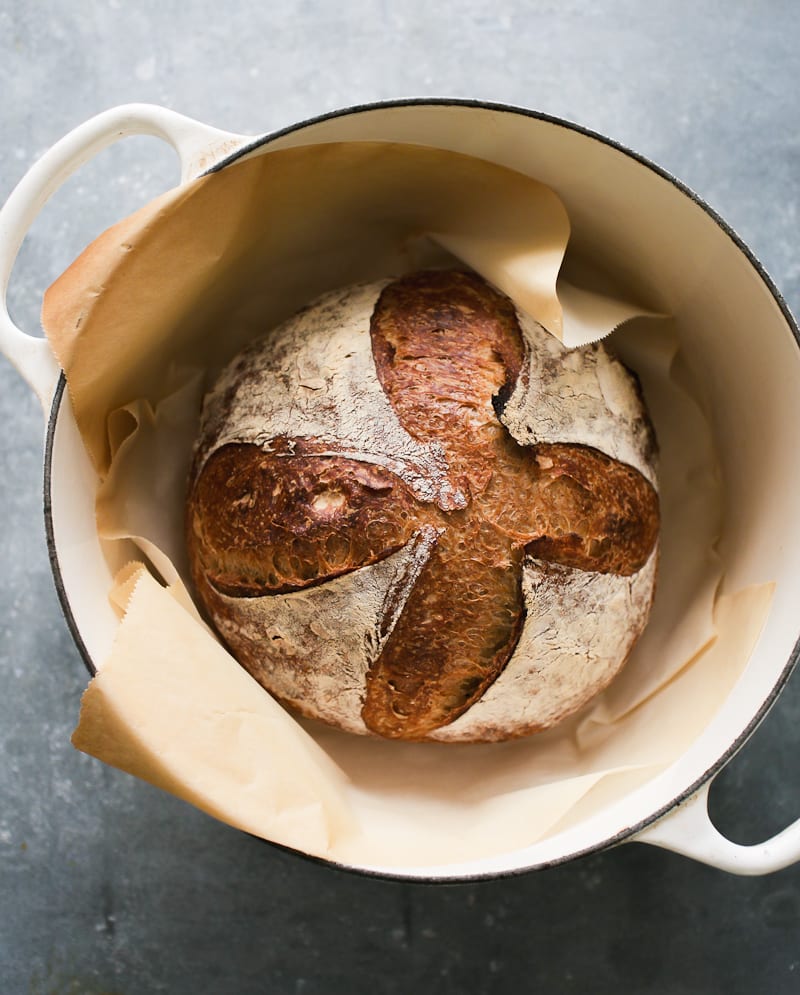
Invert the dough onto a sheet of parchment paper. Flour the surface. Using a bread lame or small serrated knife, score the dough at 12, 3, 6 and 9 o’clock, turning the parchment paper as you go. Alternatively, make one long slash down the center- do whatever you feel comfortable with. Scoring takes practice.
Step 6: Bake The Dough
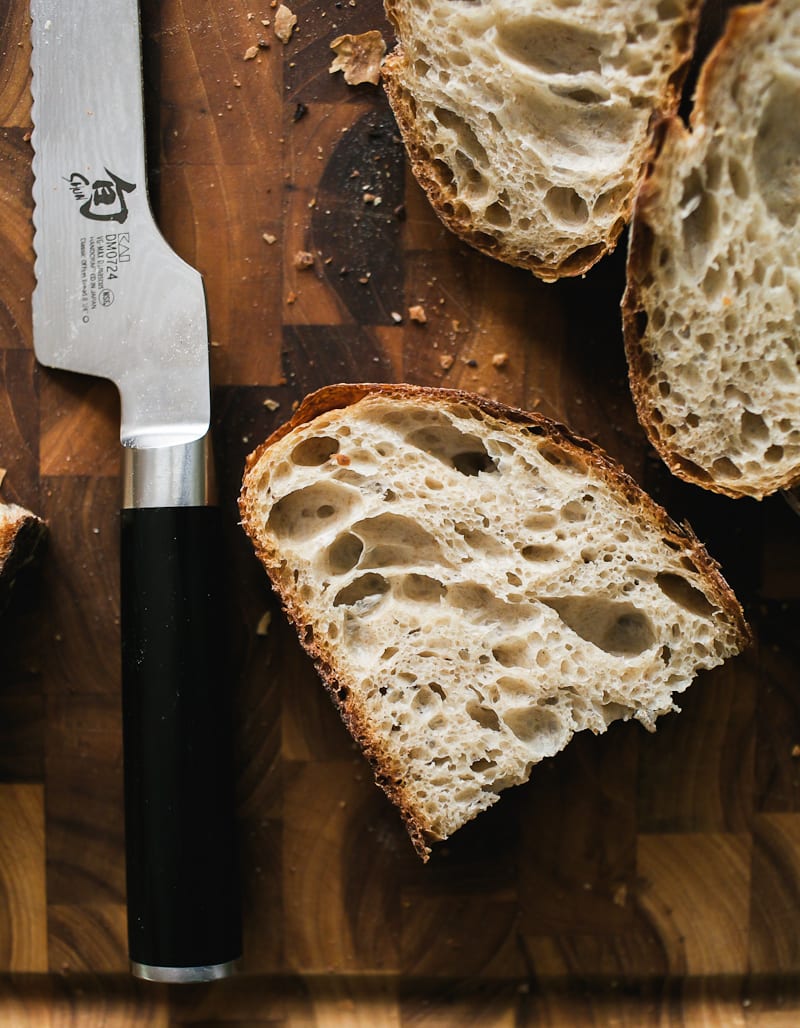
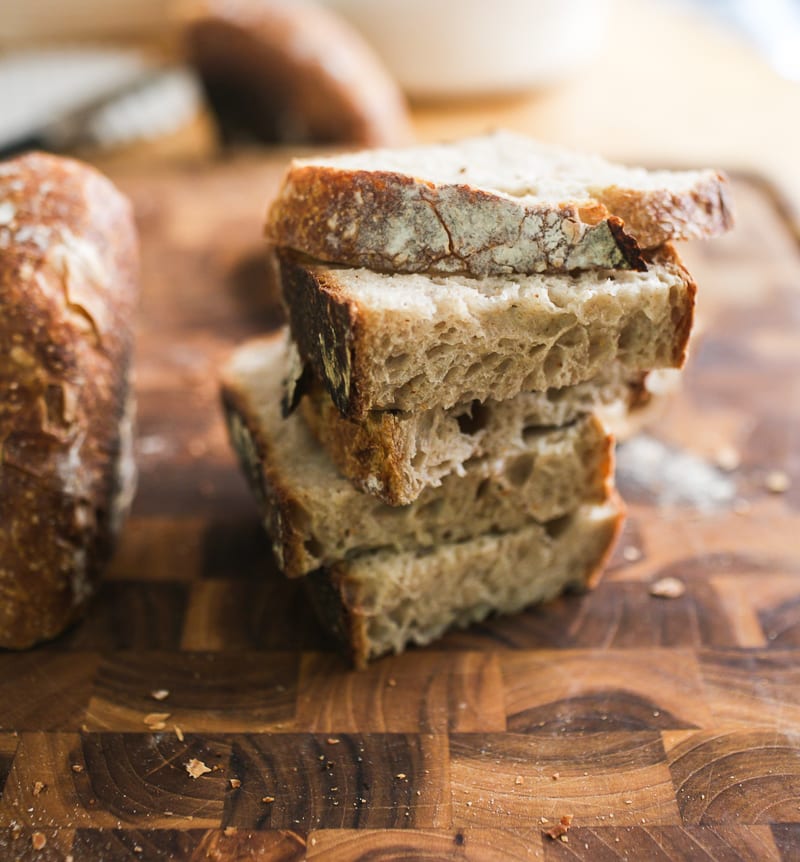
Place the dough in a Dutch oven or another oven safe pot with lid. You don’t have to preheat it first. Pop the lid on top, and bake @ 450 F for 20 minutes. Remove the lid and bake for an additional 40 minutes or until golden brown. Remove the bread from the pot. Cool on a wire rack for 1 hour before slicing, otherwise the interior crumb might taste gummy. How good does this look?!
Let’s Talk About Taste.
Because this dough is made with only 20% whole wheat flour, the taste is mild and nutty, with a light texture.
For a heartier loaf, you can increase the whole wheat flour up to 30% with additional water (see recipe card below). However, the biggest mistake I see with bakers is attempting these higher %’s without understanding that it can cause extremely dense and heavy bread. Start small, practice, and work your way up.
Then once you’ve mastered this recipe, have a look at my classic sourdough bread recipe, this easy sourdough sandwich bread and my light and airy sourdough focaccia!
Sample Baking Schedule
Whole wheat doughs tend to rise faster than all-white doughs, especially in warm weather. To avoid over proofed dough, I like to make this recipe in the afternoon (usually between 2-3 PM), when i know I’ll be home to do the stretch and folds. The dough is shaped and baked the following morning.
Late Afternoon
- 2:00 PM: Mix the dough/rest for 1 hour
- 3:00 PM: 1st Stretch & Fold
- 3:30 PM: 2nd Stretch & Fold
- 4:00 PM: 3rd Stretch & Fold
- 4:30 PM: 4th Stretch & Fold
- 5:00 PM: Bulk Rise for 2-3 hrs @ 75-78 F
- 7:00 or 8:00 PM: Chill overnight
- 6:00-8:00 AM (the next day): Shape and bake the dough.
By signing up, you agree to receive emails from The Clever Carrot. Unsubscribe at any time.

Light Whole Wheat Sourdough Bread
- Yield: 1 loaf 1x
- Category: Sourdough Bread Recipes
- Method: Oven-Baked
- Cuisine: American
- Diet: Vegan
Description
An easy recipe for whole wheat sourdough bread that’s light and flavorful (not heavy and dense). Made with 20% whole wheat flour. The dough can be made in advance and baked the following day. Ideal for sandwiches, crostini, and morning toast with jam.
Ingredients
- 50g bubbly, active sourdough starter (100% hydration)
- 350g – 375g warm water (80–85 F)* See note below
- 400g bread flour
- 100g whole wheat flour
- 9g fine sea salt
Notes & Substitutions
* Flour is like a sponge. Depending on the brand you’re using, it might not absorb all of the water. Start with 350g of water if you’re using a low protein bread flour, less than 12.7%.
For best results, use a scale to weigh your ingredients. If using measuring cups, please aerate the flour first, lightly spoon it into the cup, and then level off the excess with the back of a knife.
Instructions
Baking Schedule
Whole whether doughs tend to rise faster than white doughs, especially in warm weather. To avoid over proofed dough, I like to start mixing in the afternoon (usually between 2-3 PM) when I know I’ll be home to stretch and fold the dough. Please adjust your rise times based on temperature.
Make the Dough
Combine the sourdough starter and water in a large bowl. Add the flour and salt. Mix with a fork and then finish by hand to fully incorporate the flour. It will feel very wet and sticky. Cover with a damp towel or wrap and let rest for 1 hour on your countertop, returning to the bowl after the first 30 minutes to work the dough into a rough ball.
Bulk Rise with Stretch and Folds
After the dough has rested for 1 hour, do your first fold.
Gather a portion of the dough, stretch it upward, and fold it over toward the center of the bowl. Give the bowl a 1/4 turn and repeat 3 more times, stretch and folding the dough to come full circle around the bowl (4 folds = 1 set). If the dough still feels slack after the 1st set, do an additional 4 folds around the bowl to tighten the dough.
For best results, do 4 sets total spaced 30 minutes apart resting the covered dough in a warm spot in between each set (see tip below). Notice how the dough will tighten after the 4th set. See video for technique.
When finished with the folds, cover the bowl and continue the bulk rise (untouched) at 75-78 F for about for 2-3 hours. The dough is ready when it has almost doubled in size. Wrap and chill the whole bowl overnight; the dough will continue to rise only slightly in the fridge when the dough is warm.
How to Create Warm Spot for Bread Dough: Preheat your home oven to the lowest setting for 30- 45 seconds and then shut it off. Place the covered bowl of dough inside to bulk up. The temperature should be 75-78 F and no higher than 80 F. Use an oven thermometer (and common sense) to keep track of the temperature. Dough that is too warm will become wet, sticky, and a tricky to work with. Alternatively, I highly recommend using a proofing box.
Shape the Dough
The following morning, make sure the dough has doubled in size. If not, give it more time to bulk up, if needed. This is important to build strength.
Line a small bowl (or proofing basket) with a cotton or linen cloth. Sprinkle with flour. You’re going to shape the dough twice to build extra strength.
Preshape
Remove the cold dough onto a floured surface. Let rest for 10-15 minutes to take some of the chill off. Shape the dough into a loose ball using the envelope technique. Starting at the top of the dough, stretch and fold it over toward the center. Then stretch and fold the bottom of the dough toward the center. Repeat on the left side…and then the right side. Using a bench scraper, scoop up the dough and flip it over so the smooth side is facing up. Cover and rest for 20-30 minutes.
Final Shape
After the dough has rested, flip it over again (the smooth side should be facing down now). Shape it again following the steps above. Flip it back over. With floured hands, gently cup the dough and pull it toward you in a circular motion to tighten its shape. Place the dough into the lined bowl or proofing basket seam side up. Cover with the cloth overhang.
Second Rise
Rest in the warm spot you used earlier for 30 minutes to 1 hour. The dough is ready when it looks puffy and has risen slightly, but has not yet doubled in size. The dough should not be very cold prior to baking.
Preheat your oven to 450 F towards the tail end of the second rise.
Cut a sheet of non-stick parchment paper to fit the size of your baking pot, leaving enough excess around the sides to remove the bread.
Score the Dough
Place the parchment over the dough and invert the bowl to release. Sprinkle the dough with flour and gently rub the surface with your hands. Using the tip of a bread lame, small, serrated knife or a razor blade, make four shallow 4-inch long cuts at 3, 6, 9, and 12 o’clock around the dough. Use the parchment paper to transfer the dough to a Dutch oven (or another oven safe pot with lid).
Bake the Dough
Bake the dough on the center rack for 20 minutes, covered. Remove the lid, and continue to bake for 40 minutes and golden brown.
When finished, transfer to a wire rack. Cool for 1 hour before slicing, for best texture.


Comments
Bread Person says
This is an amazing recipe! Everything worked out like the video. The bread really blew up in the oven as well; the final product was 8 to 10 inches around. I also used a whole wheat sourdough starter. The only thing I would change, would be to add some salt; it needed it. I will definitely keep this recipe and refer it to others!
Anil Shirwaikar says
Can you add butter or oil to this recipe to get a softer crust/crumb?
Nic says
Hi Emilie,
I’ve tried this recipe a couple of times now, but I can’t seem to get it right. My dough seems very sticky and I’m not getting any rise out of it in-between the stretch and folds. It then doesn’t double in size over the period before I place it into the fridge and hence not changing much over the time it is in the fridge. Any suggestions? Could I leave it out overnight instead of placing it in the fridge? The end product tastes ok, but I think it is a little denser than it should be. It also doesn’t increase in height or size when it is being baked. Any ideas?
Thanks,
Nic
Emilie Raffa says
Hi Nic! When bread dough takes a while to rise, in any recipe, you have to address the following 3 variables: starter strength, time & temperature.
For your starter, do the float test to ensure that it’s strong. Drop a tsp. of bubbly, active starter into a glass of water; if it floats it’s ready to use). Time & Temperature are connected. The warmer the temp, the faster the dough will rise. You can try using warmer water in your dough mix (try 85-90 F) and let the dough ferment in a warmer spot (78 F is ideal).
Alternatively, you can definitely do an overnight rise instead. Make the dough in the late evening, use cool or room temp water to control the rise (you don’t want over proofed dough in the morning), cover, and let rise overnight. Give it a short second rise in the morning, about 30 minutes and then bake.
Regarding the stickiness, there could be too much water in the dough or the type of flour is not very absorbent. Weigh your ingredients for accuracy and/or cut back on the amount of water in the recipe, about 15-30 g. You can always add more as your mixing.
Hope this helps!
Anne Fraser says
Struggled with this as there is no source of sugar in the recipe. Doesn’t yeast need sugar?
My dough never rose during the pre refrigerator Time. Awaiting the end results knowing there isn’t a good rise as I get in my regular sourdough.
Also the amount of starter seems too littl.e
Emilie Raffa says
Hi Anne! Typically, sugar is not found in a “lean” sourdough dough formula, which is made from sourdough starter, flour, water & salt. It’s usually found in recipes made with instant yeast. However, some sourdough recipes do include it from time to time. If this is your preference, you are more than welcome to add some sugar to this recipe.
With regards to the rise, make sure your starter is strong, use warmer water in your initial dough mix (85-90 F) and let the dough rise in a warmer spot (78 F is ideal). These suggestions will give the dough a boost.
Anne Fraser says
Thanks for the input. I will try it with one tablespoon. Maple syrup. I also increased the salt slightly.
My first attempt at the whole wheat tastes good but didn’t have the rise as much as I would have liked.
My started is always fresh and full of bubbles etc.
I appreciate your knowledge and attention.
Heather says
I found this recipe after trying another wheat sourdough recipe that wound up far too dense. I had success from the first time I made this and find the instructions to be very clear. This is now my go-to recipe for wheat sourdough. It bakes up beautifully and is not at all dense. I bake for 30 min. with cover and 30 without as it seems to make the best overall color and crumb in my oven. Thanks for sharing this recipe!
Oona says
Hey! I’ve followed this recipe many times now and I’m over the moon about it! I’ve played with different ratios and am learning a lot. My timing is off today- I wanted to use my starter at the height of it’s power, which was this morning because I fed it last night – so I’m going to finish my last stretch and fold around 1:30 pm. Is it a bad idea to cover and keep it in the fridge until tomorrow morning around 7 AM? Will the dough over proof? Should I cook it tonight instead? Let me know! Thanks so much!
Ashley says
After you say to shape a second time and place seam side up, your next step says to score and bake… is there a step I’m missing that says when to transfer to the dutch oven and flip over?
Emilie Raffa says
Hi Ashley! After the second rise, place a piece of parchment over the dough; flip the dough over so that it’s now resting on top of the parchment paper. Score the dough. Transfer the dough (on the parchment) into the baking pot. There’s no need to flip it over in the pot. Then bake! Full details in the recipe card at the bottom of the post. Hope this helps :)
Ashley says
Thanks! I don’t know how I missed that in the instructions, but I went back and saw what I was missing. Just cut my first slice and it was delicious. Sharing this recipe with my friends!
Emilie Raffa says
No worries, Ashley! Yay! Glad you liked it :) xx
Mariette Nel says
This is my first recipe I had success with as a newbie sourdough baker! How would I double this recipe in order to bake 2 loaves at the same time (I have a large oven)? When do I divide the dough in 2 pieces, just before shaping? If so, is it too late to add chopped olives, rosemary only to the one loaf? Thank you so much in advance!
Emilie Raffa says
Hello Mariette! You have two options: double the recipe and bulk rise in a very large bowl or high sided dough tub to accommodate the increased dough size. Divide and shape after the bulk rise. You can also double the recipe and bulk in two separate bowls.
For add-ins, you’ll want to incorporate them after the first rest (not after shaping). If you’d like one dough with add-ins and one dough plain, divide the dough after the first rest, split the dough into two separate bowls, and fold in whatever you’d like the one of the doughs.
Jen says
Wow, this turned out really good! I thought it was too wet compared to the previous non-whole wheat batches I had done, but the crumb came out beautifully and I like the taste more than regular sourdough.
Emilie Raffa says
Fantastic! Glad you liked it Jen :)
Denise says
What can you do to prevent the bottom of the bread from burning ?
I purchased a cast iron dutch oven and now the bottoms of the loaves are burnt if I bake it the amount of time listed in the recipe
Emilie Raffa says
Hi Denise! This is actually quite common. It usually has to do with oven temp. and/or placement of the pot. But not to worry. Here’s what I recommend: first, make sure to use an oven thermometer to determine that the oven temperature is accurate. Second, place the pot on the center rack with a cookie sheet on the rack directly below it (not underneath the pot). This will shield the heat from the bottom up protecting the crust underneath. Finally, sometimes when a dough is really well fermented, and possibly even over fermented, the loaf browns a lot faster causing it to eventually burn. This is something to keep in mind as you continue to bake.
Sean Minter says
Thank you so much for your lovely tutorial, my sourdough has gone through the process of four folds doubled in size. Confirm I must leave it to chill over night now?
Emilie Raffa says
Hi there! Yes: at this point, you can chill the whole bowl overnight (or even use the dough later today for a same day bake). Just a heads up- I typically put this dough in the fridge when it’s almost doubled in size; it will continue to rise slightly so I plan for that on the front end. In your case, just keep an eye on it, and see what it does.
Bev says
So many good reviews. I am trying your recipe for the first time and was planning to add more starter than is called for (100 grams). Would that still work? Also I am accustomed to cold proofing my dough for up to 36 hours after the shaping step and then scoring & baking it cold. Your recipe outlines a different method. Wondering if it would be adaptable to these changes?
Emilie Raffa says
Hi there! Sure. Two things. The dough might rise a bit faster with more starter, so adjust your timeline accordingly. Additionally, the dough might be more sticky. Start with a smaller amount of water first, to compensate. As for the 36 hr proof, I haven’t tested it specifically with my method so I don’t know off the top of my head. Perhaps shorten the bulk just a little bit… enjoy!x
Bev says
Thanks so much. I actually stuck with your recommended hydration and the dough was lovely and billowy when I put it in the fridge. Fingers crossed for a successful shaping tomorrow. Then back in the fridge for another over night cold proofing before scoring and baking.
Do you find you get a better rise & crumb when the dough is at room temp? So many people recommend baking straight from the fridge as it is easier to score. Thanks again for your response.
Emilie Raffa says
You’re very welcome. Glad it worked out. Re: the crumb, yes I do! My preference is room temp. dough. However, you can absolutely achieve an excellent rise & crumb with cold dough (straight bake from the fridge) only if the dough was properly fermented. The cold proof technique is very specific and bakers formulate their methods accordingly. Time, dough temp, gluten development determine the final product. Change one thing and the results might change! Here’s a tip: if you don’t cold proof but want firmer dough for scoring, pop the dough in the fridge for 30 minutes beforehand. This will help a bit.
Beverley says
Thanks again for walking me through the process. Shaping after the cold proof worked like a dream. Ended up scoring and baking it after 30 minutes in the fridge. Lovely rise and crumb. I will definitely add your recipe to my go-to file. Thanks again
Sheila Gunderson says
I have successfully made this recipe once and starting a second loaf. My husband would like a the crust a bit more tender. Do you recommend increasing the uncovered baking time?
Jennifer says
The first hour when cooling, wrap the dough in a damp towel. That helps soften the crust a bit.
Julie Stander says
I’ve been lightly spraying the bread with water just before baking. The crust takes longer to harden so the bread has more time to expand (read this on another site). The other result is the crust is softer.
Claire says
First time making wholewheat sourdough and it was my best bake ever! Thrilled with the results thanks to the easy-to-follow recipe and video.
Emilie Raffa says
You are very welcome, Claire! xx
Marcy Grote says
so only adjustment for 30% is 150/350?
Sarah says
I’ve been making this recipe weekly for the past couple of months and I love it! The next thing I would like to try is adding mix-ins/flavors. Do you have any recommendations fit herbs, spices, nuts, or any combos? Also, if there’s a point in the recipe that’s best for adding things in, I would love to know! Thank you.
Emilie Raffa says
Fantastic! Great to hear, Sarah!
For mix-ins, add them after the first rest. The dough will be much softer and more manageable. Try chopped rosemary, chopped olives, thyme or lemon zest. Toasted walnuts and/or raisins would be excellent. For nuts and raisins, soak them in water while the dough rests; then drain well and pat dry before adding to the dough (if you skip the soaking step, which is fine too, sometimes the nuts or raisins will absorb too much moisture in the dough which changes the crumb structure).
As for technique, you can incorporate the mix-ins during a stretch and fold. Video linked here.
Enjoy! x
Kamyar says
I just wanted to say thank you for this amazing recipe. My bread turned out exactly as shown in the pictures and it tasted great.
Emilie Raffa says
Fantastic! Glad you enjoyed it!
Denise says
Do you have a recipe for the starter or did I mess that ?
Emilie Raffa says
Hi Denise! Yes: we have a recipe for sourdough starter (linked here). You can also purchase directly from my shop.
Denise says
Thank you !!!
I am excited to try this bread recipe ! We love sour dough bread
Liz says
Hi, if I’m baking it without a dutch oven but a fan-forced function what should the temperature be? Tks
drustranger says
First, this recipe does not contain 20% whole wheat flour. It contains 25% whole wheat flour if you look at the ratio of the 400g white bread flour to the 100g whole wheat flour. But, the 50g of starter (with maybe 20g of flour?) adds a small amount of additional non-whole-wheat flour if you count it as well.
Second, the towel completely stuck to my loaf of bread even though I used at least 3x the amount of flour to dust the towel as was shown in the video. As a result, removing the towel from the dough in the next to last step caused a Great Deflation, and I had to set it aside for a 3rd rise. Next time, for the final step, I’ll just put the dough in the Dutch oven that I plan to cook it in, along with some oil to keep it from sticking, no towel required.
Last, the end result was pretty good, with an airier loaf & larger holes than I’d been getting previously with whole wheat flour. So thank you for that!
Emilie Raffa says
Hi there! Thanks for your feedback. Glad you liked the recipe.
For clarification, the percentage of whole wheat flour indicated in the recipe, 20% is in fact correct (20% of 500 g total flour = 100 g whole wheat flour). With regards to the dough sticking, some bakers prefer to use rice flour instead of wheat flour to line the cloth. I personally don’t do this but many have used this technique as a successful alternative. I do not recommend putting oil in the Dutch oven- the dough will absorb the oil as it rests causing it to stick to the pot and burn!
Joan says
This recipe is awesome! My starter was ready in only a couple of hours so ended up putting it in the Friday’s at around 2:00 pm. Didn’t bake until 7:00 am the next morning. Oven rise was amazing! Taste was delish. Thanks for a great recipe Emilie!
Emilie Raffa says
AMAZING! Thanks for the feedback Joan! :)
Jean says
Hello,
Really delicious bread. I’ve made it a few times, but I do get an overly toasty bottom. Any advice would be great. Thanks, Jean
Emilie Raffa says
Hi Jean! Try placing a cooking sheet on the rack below your baking pot (not directly underneath it). This will shield the heat from the bottom up, helping to protect the bottom crust.
Florence says
Hi Emilie, thank you for your sharing. My bread is very sticky. I don’t know what I did wrong.
Emilie Raffa says
Hi Florence! There are many variables to consider here. Too much water, the type/brand or flour used, the temperature (both ambient and water) can make bread dough sticky. Make sure to weigh your ingredients for best results, do not substitute or change the flour types or quantities, and perhaps use cooler water in your mix. Hope this helps!
Mary-Ann Gajdostik says
I make this bread daily. I have found that turning the temp to 400 (ten minutes after removing the lid) gives me the best results. I use about 80 g starter and 375 g warm water with the give amount of flour and salt. I love this recipe and this bread. The instructions were so helpful.
Sharon Bennett says
Wonderful, Wonderful, wonderful. A rich beautiful loaf, full of flavor.
This is my first attempt with the light whole-wheat 🍞 bread recipe.
And great success. I used 120 grams of starter. Why? I have so much!
My husband has used the discard for both pancakes and waffles, next
The banana bread.
I’m sure enjoying baking bread.
Sheri Reid says
I’ve made this recipe several times and it’s absolutely delicious! Thanks so much for sharing. Would it work to roll into a log and put it in a loaf pan overnight to let it rise and bake into sandwich bread? I know that you have sandwich bread recipes but I just really love working with this one and was wondering if it would work to make this adjustment.
Emilie Raffa says
Hi Sheri! Sure! Since the dough won’t rise much in the fridge, make sure to give it more time at room temperature the following day. It should look plump and puffy before baking. Otherwise, the loaf will be too dense. PS: coat the pan in butter and cover with oiled plastic wrap (or whatever you’d like to use) on the overnight.
Sheri Reid says
Amazing. Thanks so much!!
Irene says
.
Do you heat the Dutch Oven in the oven when you preheat? And how long do you preheat your oven?
Lucy says
I love this recipe and make this bread regularly. It always turns out fantastic! Is there a way to use this dough to make a loaf in a loaf pan? I was thinking of omitting the stretch and folds and trying to shape in to a loaf pan. Would this work or should I just use one of your other recipes for a loaf?
Thanks!
Liz says
Did you try it in a loaf pan?
Deborah says
Hi Emilie,
Thanks again for your wealth of information! I’ve used this recipe a number of times with beautiful (and tasty) results! Here’s a related question…if I wanted to make sourdough whole wheat rolls, would you recommend that I just divide this dough into several roll-sized bits; or would it make more sense to use the Easy Bread Basket Rolls in your book with whole wheat subbed in for a portion of the AP or bread flour? Thanks!!
zahra says
I’ve used your starter recipe and beginner sourdough – both turned out great. Just did the whole wheat for the first time using 30% WW flour. Baked as directed, internal temp was 208 and crust looked quite dark/almost burnt. However the inside, bottom of the bread looks a bit underdone. Is it best to reduce temp and bake for same time, bake for longer? or any other thoughts? thanks!
Joanna says
Hi, i am ready to bake but now due to circumstances I have to go out. What can I do. Best site for bread and Thankyou for taking the time to answer questions. Excellent service.
Julia says
I’ve been making the recipe from your sourdough beginner’s guide with GREAT success and wanted to try this one . . . Your instructions and videos are so thorough and helpful. My only question is, in the beginner’s guide, the instructions say to preheat the oven to 450 and then decrease it to 400; in this recipe, the instructions say to preheat the oven at 450 and that is the only temperature mentioned. 450 seems high to bake for the whole time. Is that correct or should I take it down to 400 like in the other recipe?
Emilie Raffa says
Hi Julia! The instructions here are correct. Sometimes, different recipes require different bake times and temperatures- it all depends on how much water is in the dough (along with additional factors). Great question!
Rita says
same question…I’m thinking she would have corrected this if we were to turn down the temp on it. So far, I’ve baked it several times and the only problem is the bottom of the bread is sometimes a bit scorched, so I’ll try her trick of putting a cookie sheet under (not directly under, but on the shelf below) the bread.
Sofia says
Hi! I’ve been using this recipe consistently and love it! I also consistently forget that I’m making it and end up sticking it in the oven at some random point after folding… this is the first time I’m setting timers, and I’m wondering what the point of the fridge time is? I’ve never done that before (not for any reason other than I usually forget and leave my dough on the counter all night ha!). If I don’t mind staying awake with my dough, is it necessary to have the fridge time?
Thanks!
Emilie Raffa says
Hi there! Fridge time is not necessary; it helps control the rise. This dough, like most wholegrain doughs, can over proof quickly. The fridge slows it down. For an overnight dough, just start later in the evening, use cool water and let it rise on the counter.
Kira says
Hi there! I have a whole wheat sourdough starter that I’ve been wanting to use but having a hard time finding recipes that use it (since most use whole wheat flour with sourdough starter). Do you think I would I be able to use the whole wheat sourdough starter with this recipe? If so, how should I adjust the ingredient ratios? Thanks so much!!
Emilie Raffa says
Hi Kira! Yes, you can use it. Since your starter is most likely thicker than mine (whole wheat flour absorbs more water than white flour), you would just need to add more water to the dough to compensate. I don’t have an exact amount for you (I do this by feel), but if the dough feels very dry after mixing add more, 1 tbsp. at a time. Alternatively, if the dough doesn’t feel dry, just leave it alone- adding more water is not obligatory.
Kira says
Wonderful thank you so much!
Lauri says
Just wanted to comment what a wonderful site and recipe this is! I’ve made a few beautiful loaves following this recipe and have a great starter thanks to you as well! Just tried my first ads to this one – added sun dried tomatoes and Kalamata olives (added during second strech and fold) – CAN”T WAIT to see how it comes out (in second proofing now)
Thank you so much!!!
Emilie Raffa says
Lauri, thank you SO much. Appreciate the kind feedback!! And oh my goodness, the sun dried tomatoes and olives sound amazing. I’m sending you a virtual bottle of basil oil and a sprinkle of Parm for dunking.
Rachel says
Oh one more thing, the other recipe I use 100 g starter instead of 50? Could that be the cause ? Also I rose for 6 hours in your recipe bc my kitchen is cold (63 F?) , maybe it was still under proved ?
Emilie Raffa says
Yes: the dough definitely needed more time to rise- it was under proofed (63 F is very cold). For reference, the rise times listed in my recipe are based on a 75-78 F room temperature. The amount of starter is not the issue.
Rachel says
Just made it. Why did my bread have so many large holes inside ? I’ve made regular sourdough several times before (another recipe) and this was never an issue. Could it be … the shorter first proof vs double shape/ folding ? I followed the weight ingredients listed so I don’t think it’s over hydration as the internet says could be one cause. (The regular sourdough recipe I usually make is a 12 hr first proof, in the fridge overnight , shape/ fold once, then a 1 hr proof for 475 with lid x 30 min then no lid x 10-20 min)
Emilie Raffa says
Hi Rachel! It’s tricky to say without seeing a picture of the bread. I would also need to know your exact ambient temperature, length of bulk & second rise, and brand of flour to help trouble shoot. But off the top of my head: it’s possible the dough was either under or over proofed.
Additionally, with sourdough: as you continue to bake you will come across many different recipes, methods, and variations. Each one is formulated to work with a specific amount of starter, temperature and bake time. So comparing back and forth might send you down the rabbit hole! There’s no one size fits all approach :)
Rachel says
Your response is helpful. I favor it was underproved . Thanks !
Emilie Raffa says
My pleasure :)
Maggie says
This bread sounds delicious. If I want to add some cracked wheat to this bread, how much would you recommend? And, would cracked wheat be considered to be flour, or an add-in? BTW, I love the recipes in your book.
Emilie Raffa says
Hi Maggie! You know, this is a great question. I’ve never done it before so I’m unable to advise with specifics. Cracked wheat could go either way (add-in vs. flour) depending on its coarseness. My guess would be to start off with a very small amount, which might need to be soaked beforehand depending on what you’re using. Dough formulas can be very fickle sometimes- it doesn’t always work out!
Brandon says
Bread is currently in the oven… Sure hope it goes well, took 10 days to finish the starter.
The guide overall was excellent with the video… but it’s slightly difficult to follow on a phone at times due to all the scrolling… I think perhaps the ingredients and recipe itself should be consolidated towards the top, with notes and expanded information at the bottom of the page.
Emilie Raffa says
Hi Brandon! Thanks for the feedback- will keep it in mind :)
Julia says
I really agree with Brandon. The recipe is great but would love a more consolidated format.
Noelle says
Love this recipe! Have made it multiple times now and it always tastes delicious. Wondering if I could sub out the whole wheat with rye flour? I have one whole wheat started and now a rye starter as well. Thanks!
Emilie Raffa says
Hi Noelle! Rye flour is lower in gluten than whole wheat flour, so you might have to reduce the total water amount to compensate. Additionally, the dough texture and the final bread texture will change (not a bad thing- just a heads up that it’s a different style of bread). If you experiment, please let us know!
Mary says
I’ve made this with rye flour many times and it turns out very well! I also add two tablespoons of caraway seeds when I do the first set of folds.
Emilie Raffa says
Mary, sounds so good! Did you do an even swap of rye to whole wheat? I’m curious because a few other bakers inquired about doing so. Sounds delish. :)
Mary McKane says
Initially I did an even swap, but I have also used slightly more rye flour (200g/300g bread flour) because I wanted more rye flavor and it still worked well. It does take a while to bulk rise, so I skip the refrigeration. Thanks for your very easy to follow recipes! I’ve been working my way through your book as well- English muffins are on deck this weekend!
Lizzy says
Hi! I was wondering if I wanted to make a larger loaf would I just double the recipe and leave the timeline the same? I’ve baked this loaf a few times and LOVED it. Just wanted more bread.
Emilie Raffa says
Hi there! You can absolutely double this recipe. I’d make two separate batches (in two bowls) and keep the timeline the same.
Grace says
I made a double batch and separated the dough at the preshape stage. It turned out beautifully! Only difference was that it took less time to cook in my oven. After taking the lid off it only took about 25 minutes to bake!
Emilie Raffa says
Perfect! Thanks for sharing Grace :)
Lisa says
I cannot tell you how much I appreciate your timeline included in the recipe.
Emilie Raffa says
Timing is everything with sourdough- I totally agree! And the good news, is once you have the basic idea of how things work, the timeline can be adjusted to suit your schedule. Enjoy!
Jenny C says
I make this bread all the time. My family loves it! I recently noticed my local specialty store carries whole wheat bread flour. I’m going to ask them, but was curious if you’ve ever tried 100% ww bread flour vs. 100 g of ww flour. Thanks!
Emilie Raffa says
This is a great question. Believe it or not, I’ve never worked with whole wheat bread flour before. I’ve heard about it, but have never seen it! I’m sure you could use it in this recipe, but you would have to adjust the water quantity. Flour is like a sponge and each brand/type absorbs differently. It wouldn’t be an even swap. If you experiment, let us know! xx
Mary says
Hi Emilie, I recently started baking sourdough bread and love your recipes. I have a question about the baking temps. I first made your beginners white sourdough recipe several times before moving on to the wheat bread. I had become accustomed to turning the temp from 450 to 400 for the white so I automatically did the same for the wheat. But now I noticed there is no instruction to turn it down. It turns out perfectly, so I wondered why the baking temperatures are different for the two breads?
Anne Johnson says
I have the exact same question as the person above regarding the baking temperature differences between your beginners sourdough bread and the whole wheat sourdough bread, but I don’t see your answer. Please help. Thank you!
Emilie Raffa says
Hi there! Not all bread recipes bake at the same temperature. It depends on the overall formula, including the flour to water ratio, type of flour used, and the baker’s preference for baking. This dough is a bit wetter, so it bakes at a higher temperature to evaporate the moisture faster. Hope this helps!
Amelia says
Hi , I am from Singapore. Your basic sourdough for beginners is easy to follow but the dough always comes out with a dense and chewy texture. Tried your Light whole wheat sourdough recipe yesterday and my first attempt was an overproofed dough which cannot hold its shape during pre-shape stage. I bulk ferment for 6h because the dough only rise about 75%. The next morning, it failed at pre-shaping, so I got to throw away the dough. I would like to try again but with smaller loaf so that there’s less wastage should I fail again haha. Can I half every ingredients except for the 50g starter to remain? Smaller dough is easier to handle and trial & error. I have ordered your book a few days ago and is awaiting its delivery,,,😁
Emilie Raffa says
Hi Amelia! Sourdough definitely takes practice- but don’t give up :) The temperature and type/brand of flour is different in Singapore. This will effect the outcome of your bread which is why some recipes have to be adjusted. You might consider reducing some of the water in the dough and shortening the rise time. Additionally, you can halve this recipe, keeping the starter the same (again, you might want to reduce the water). Hope this helps a bit!
Susanna says
Hi Amelia. Is there a possibility you underestimated the rise? The fact that it failed at pre-shaping sounds like over fermenting. When I first started making sourdough (not that long ago), I found bowls to be very deceptive. If the dough has risen only a little, the volume increase might be a lot more because bowls are thinner at the bottom and widen at the top. The rise is based on the increase in volume, not the actual height, otherwise different shaped bowls would produce different results.
Emilie Raffa says
Hi Susanna! My rise times are based on the specific temperature range given in the recipe. It’s possible your ambient temperature was not the same as mine, which is why your dough possibly under/over proofed. This is normal. None of us can work in the same ambient conditions which is why we need to make changes as we go. I would need to know more about your experience, timeframe, temp. and any additional changes or adjustments made in order to see where the dough went wrong. Thanks!
Amelia says
Hi Susanna
Thanks for your input. I think the reason was because I followed the recipe using 370g water. I tried again using 350g plus half a tablespoon water. I then used 324g bread flour of 13.1% protein & 76g of AP flour of 11% protein instead of 400g bread flour. I actually calculated the protein of my own flour to match King Arthur’s bread flour of 12.7% protein. The resulting bread was fantastic!
My gauge for bulk fermentation is when the surface of the dough is not sticky to touch even if there’s no visible bubbles on top. However I can see bubbles throughout the dough because I bulk ferment it in a glass bowl. I now also flour my work station more generously to prevent the dough from sticking when I coax it out to bowl to pre-shape. How do you gauge your bulk fermentation, Susanna?
Am I go doing it correctly, Emilie? It rarely increases to double for my case. Only once, and that’s the second time my dough failed at pre-shape. I wonder if it’s because i only lightly floured the work station.
Audrey-Anne Veillette says
Hi,
Does my starter need to float to bake with it?
If it’s sinking, does that mean it isn’t good?
Thanks !
Emilie Raffa says
Hi Audrey! Yes: when your starter passes the float test, it’s active. Use it to make bread dough. When it sinks, there’s nothing wrong with it; it’s just not as active anymore. It will require another feeding to activate and perk back up.
Christine Yan says
Hi there! I’ve been making this sourdough every weekend and have loved it so far. I was wondering what the maximum amount of time is that I can leave the dough in the fridge? For example, I’m going skiing tomorrow and leaving early, like 6am. Could I leave the dough in the fridge overnight and only begin the next steps at, say 6 or 7pm the next day? Many thanks!
Emilie Raffa says
Hi Christine! Great question. Sourdough doesn’t always have the same “long lasting” strength like instant yeast. It’s also not as predictable. So to answer your question, technically, it just depends on the dough and the strength of your starter. I would say give it a try, and if you get the dough in the fridge at the right time (meaning it’s not quite double in size), then it won’t over proof by the time you get to it. If you experiment, let us know how it goes!
Jen says
After always making your AP sourdough recipe I gave this one a try. Your instructions are great and so easy to follow. I LOVE the taste, but mine came out much more dense/gummy. It was still really good but not as airy and as many holes as your picture. Do you have any suggestions or ideas what causes this? Should I increase the water? I did keep the dough in a warm spot. Thanks!
Emilie Raffa says
Hi Jen! Due to the nature of bran, which tends to weigh down the dough, whole wheat bread will always be more dense than regular white sourdough. However, if it’s really dense, it usually has to do with inadequate gluten formation. You might need to extend the bulk rise to give the gluten more time to develop. Additionally, gummy bread usually indicates a loaf that was cut into too soon, or a loaf that was slightly undercooked. Hope this helps!
Joyce says
Hi Emilie,
I am so glad I found your website and bought your book. My family and I love all your recipes. I especially love this light whole wheat recipe. I’ve made it several times in a round Dutch oven, for a round loaf, and a roasting pan, for an oval loaf. My question is baking at the recommended temperature the bottom of my loaves are hard to cut through because they are not quite burned but much thicker. The rest of the loaf is perfect though, crispy on the outside and soft on the inside. What adjustments can I make?
Emilie Raffa says
Hi Joyce! This has happened to me before. Totally get it.
Here are three things you can try:
1.) Place a cookie sheet on the rack below your baking pot (not directly underneath it). This will shield the heat from the bottom up to protect the bottom crust.
2.) Try preheating your baking pot before the dough goes.
3.) Allow the dough to warm up at room temperature for longer before baking.
In my experience, troubleshooting sourdough is a matter of trial and error. Feel free to try some or all of the above suggestions solo or simultaneously.
joyce says
Thank you so much for your reply. I will try your suggestions. I also wanted to let you know how amazing your sourdough banana bread is too! My kids get so excited when they see me making it
Emilie Raffa says
Yay! Thanks so much! xx
Ambika Agarwal says
Hi Emilie,
I am trying out the whole wheat sourdough bread the third time. I was wondering what material to use for the oil wrap? Secondly do you bake the batter split in two one after the other or in the same oven? Also what size Dutch oven would you recommend? I am in the process of buying one. Thank you so much for such detailed information that you have been sharing.
Emilie Raffa says
Hi there! I use plastic wrap or reusable beeswax wrap- whatever I have on hand. Foil will work too, as long as its oiled to prevent sticking.
For the dough, I usually bake just one loaf. For two loaves, I split the dough in half after the bulk rise and bake them side by side in pots. If you cannot accommodate a side by side bake, bake one dough after the other leaving the second dough in the fridge.
For the Dutch oven, a 5 1/2 qt is perfect!
Hope this helps :)
Noelle says
This recipe is great! I made two loaves at the same time since it was a little time consuming. I forgot to let them rise in a warm spot for the first two hours and they still came out great! Wondering if rye flour would work instead of whole wheat?