This easy, step-by-step whole wheat sourdough bread recipe (and video) is light and flavorful, not heavy and dense. Made with 20% whole wheat flour. Naturally leavened with active sourdough starter. Ideal for sandwiches, toast and soup.
Whole grain flours are prized for their toasty, earthy flavors. Packed with plenty of fiber and nutrients, their natural complexity is a perfect match for any slow-fermented sourdough bread recipe. However, in bread baking there are rules…
You can’t just swap white flour for whole wheat flour and expect the same results (unless you like dry and dense bread). Adjustments need to be made.
In this post, you’ll learn how to make exceptional whole wheat sourdough bread that’s not only light, crisp and airy, but is good for you too. {Browse my full collection of sourdough bread recipes here}
How To Make Whole Wheat Sourdough Bread {Step-By-Step Recipe}
Step 1: Mix The Dough
To Start: Weigh your ingredients using a scale. Mix the sourdough starter and water together in a large bowl. Add the flour and salt. Stir to combine, and then squish by hand to form a rough dough. This dough is very sticky, around 75% hydration. It’s like playing with wet mud. Very satisfying! Cover the bowl and rest for 1 hour- this is your first rest.
Tip: Whole wheat flour is thirsty. Because it absorbs more water than regular all purpose flour, extending the “autolyse” or first resting period gives the dough ample time to hydrate. The texture of the dough will be noticeably different after the full hour: it will be softer, and more extensible to stretch and fold later on.
Step 2: Bulk Rise With Stretch & Folds
Now the dough needs to rise. During this stage, you’ll stretch and fold the dough to strengthen the gluten and boost the height of the bread. I like to do 4 sets spaced 30 minutes apart. The dough will become soft, pillowy, and a bit stiffer by the 4th set which is what you want.
When finished with the folds…
Cover the bowl with lightly oiled plastic wrap, and continue to bulk rise, untouched at 75-78 F for about 2-3 hours. The dough is ready when it’s puffy, airy, and almost doubled in size. Chill overnight.
Step 3: Shape The Dough
In the morning, you’re going to shape the dough twice to build extra strength. The first shaping is called “pre-shape” and the second one is the “final shape.”
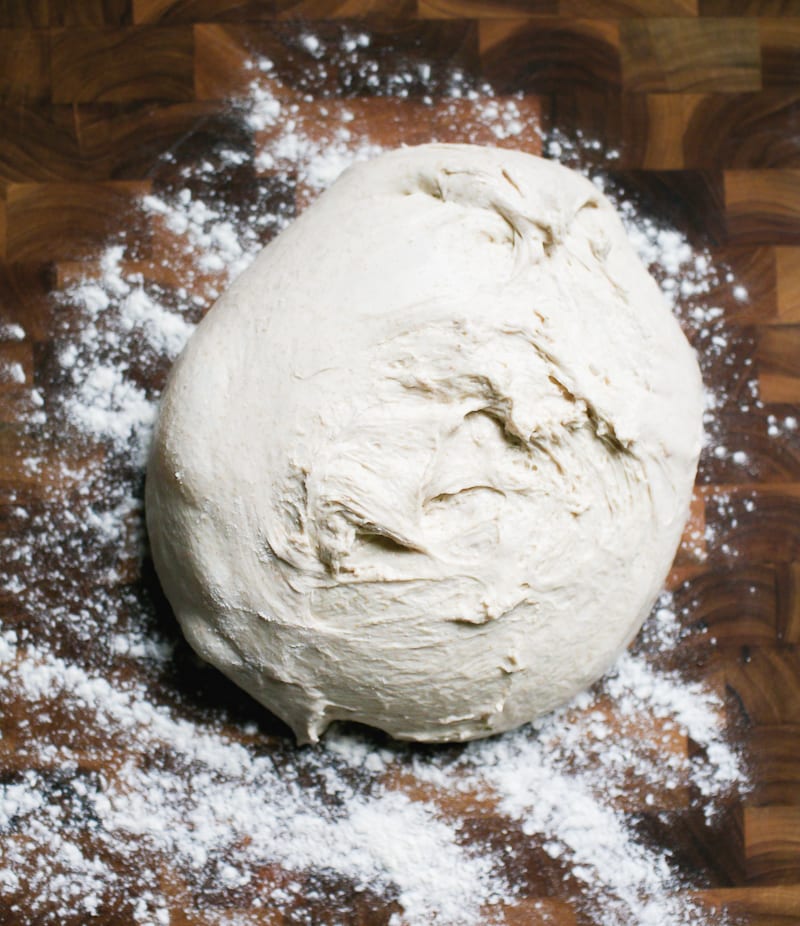
Pre-shape
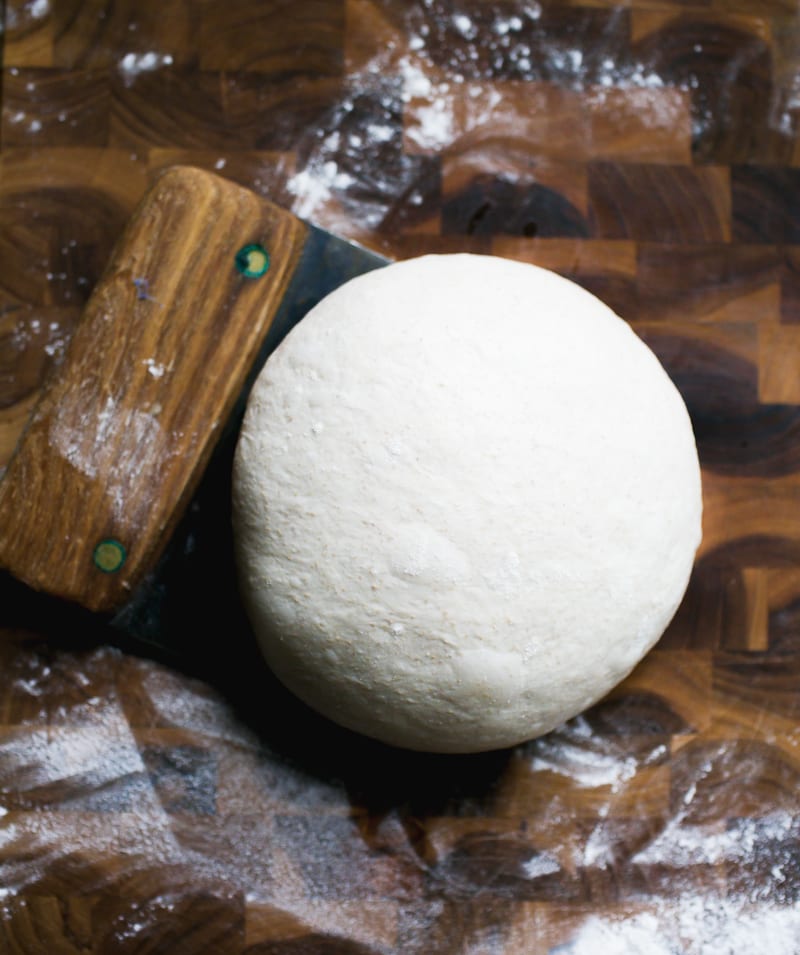
Remove the cold dough onto a floured surface. Rest for 10-15 minutes to take the chill off. Shape the dough into a loose ball. Cover and rest for 20-30 minutes.
Final Shape
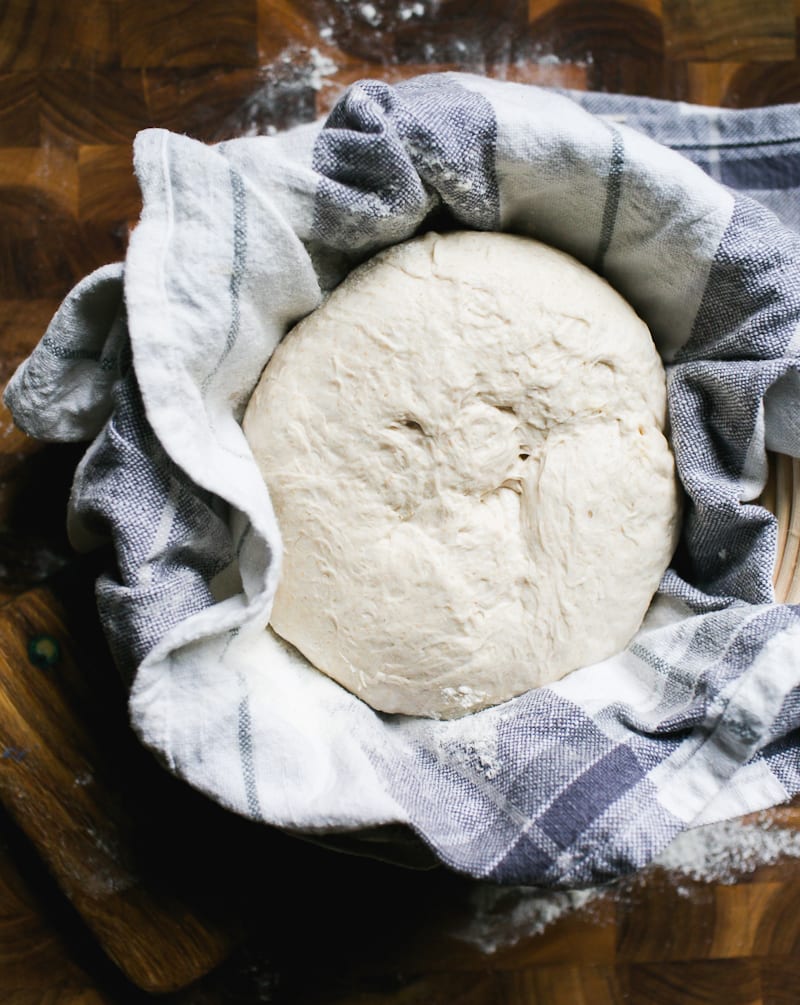
Using a bench knife for guidance, flip the dough over and shape it again (a little bit tighter this time). Place into a lined bowl of proofing basket seam side up. Cover the dough with the vloth overhang.
Tip: Pre-shaping Bread Dough: not every sourdough recipe needs it. High hydration doughs (like this one) benefit from the extra support to hold its shape. Otherwise, it might spread when baking.
Step 4: Second Rise
The dough needs to rise again, but only briefly. Rest the dough in the warm spot you used earlier for about 30 minutes to 1 hour. The dough is ready when it’s puffy and looks plump. It should not be super cold or dense-looking prior to baking. Preheat your oven.
Step 5: Score The Dough
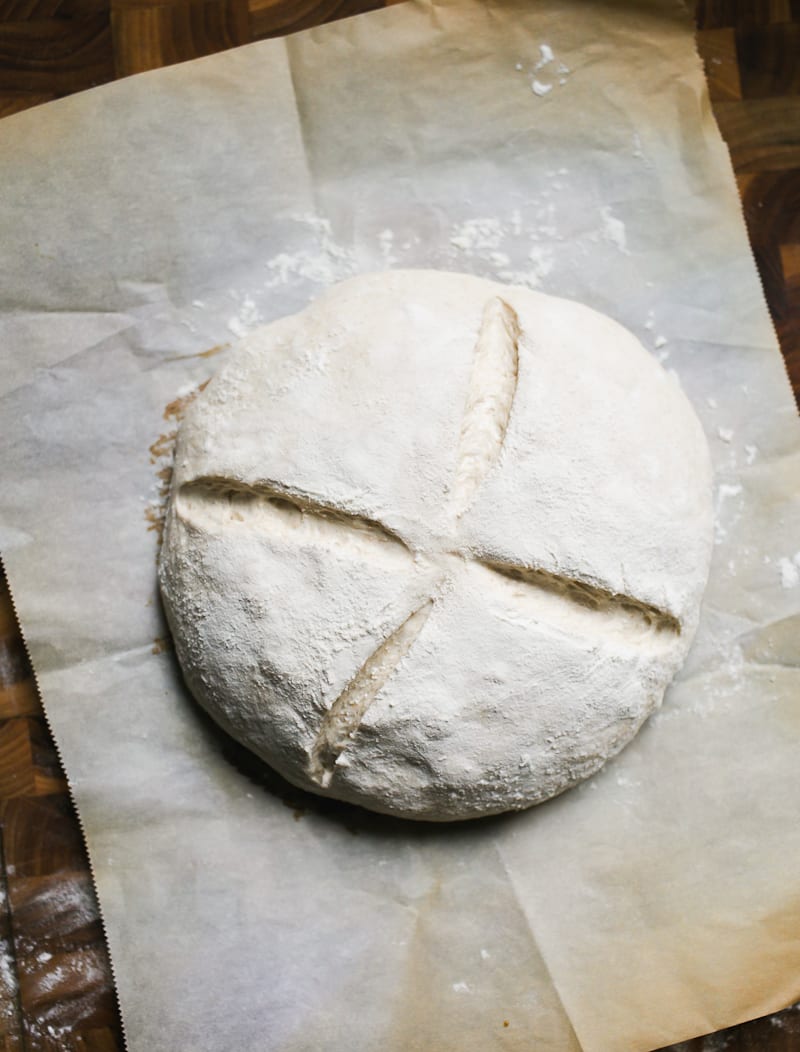
Invert the dough onto a sheet of parchment paper. Flour the surface. Using a bread lame or small serrated knife, score the dough at 12, 3, 6 and 9 o’clock, turning the parchment paper as you go. Alternatively, make one long slash down the center- do whatever you feel comfortable with. Scoring takes practice.
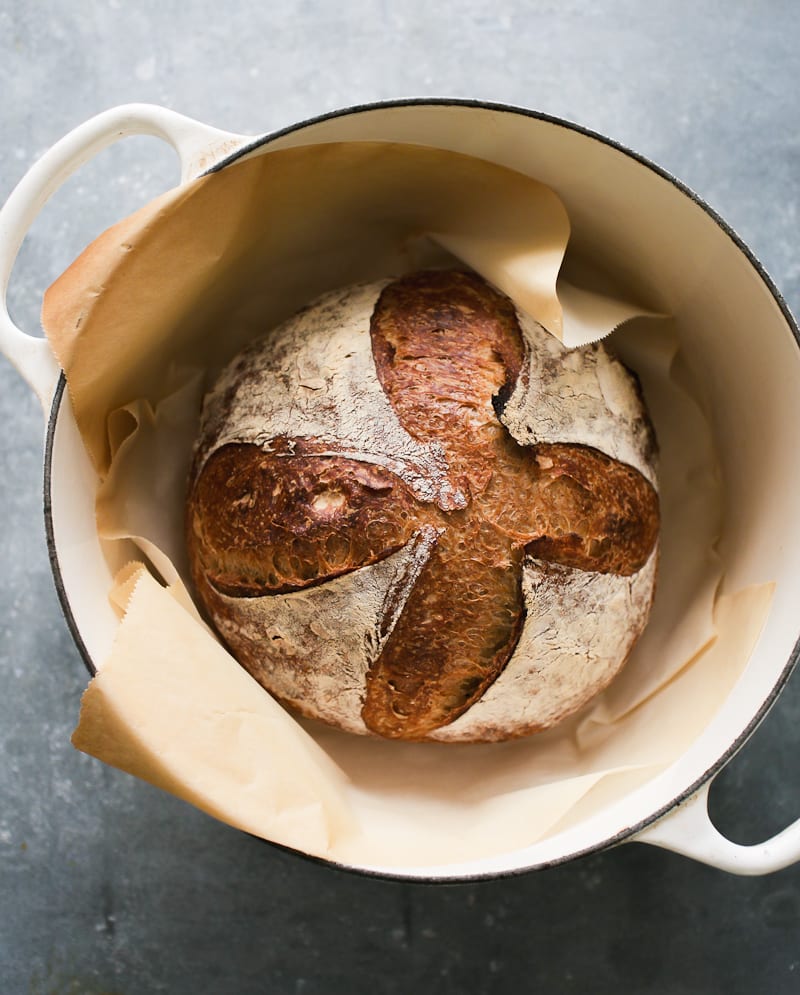
Step 6: Bake The Dough
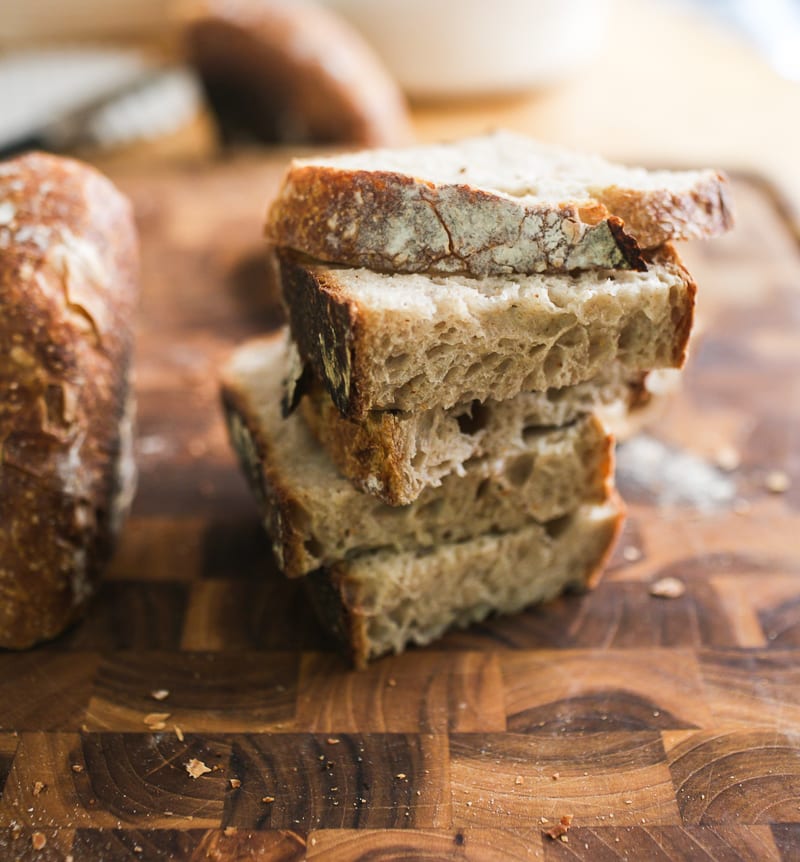
Place the dough in a Dutch oven or another oven safe pot with lid. You don’t have to preheat it first. Pop the lid on top, and bake @ 450 F for 20 minutes. Remove the lid and bake for an additional 40 minutes or until golden brown. Remove the bread from the pot. Cool on a wire rack for 1 hour before slicing, otherwise the interior crumb might taste gummy. How good does this look?!
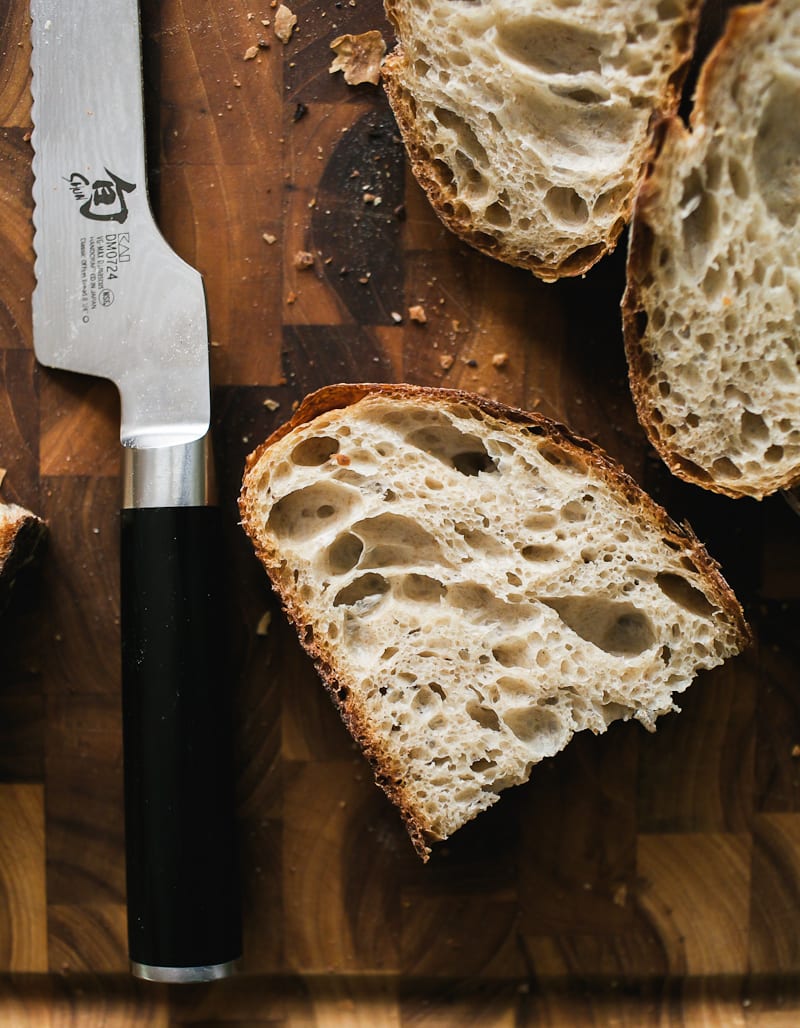
Let’s Talk About Taste.
Because this dough is made with only 20% whole wheat flour, the taste is mild and nutty, with a light texture.
For a heartier loaf, you can increase the whole wheat flour up to 30% with additional water (see recipe card below). However, the biggest mistake I see with bakers is attempting these higher %’s without understanding that it can cause extremely dense and heavy bread. Start small, practice, and work your way up.
Then once you’ve mastered this recipe, have a look at my classic sourdough bread recipe, this easy sourdough sandwich bread and my light and airy sourdough focaccia!
Sample Baking Schedule
Whole wheat doughs tend to rise faster than all-white doughs, especially in warm weather. To avoid over proofed dough, I like to make this recipe in the afternoon (usually between 2-3 PM), when i know I’ll be home to do the stretch and folds. The dough is shaped and baked the following morning.
Late Afternoon
- 2:00 PM: Mix the dough/rest for 1 hour
- 3:00 PM: 1st Stretch & Fold
- 3:30 PM: 2nd Stretch & Fold
- 4:00 PM: 3rd Stretch & Fold
- 4:30 PM: 4th Stretch & Fold
- 5:00 PM: Bulk Rise for 2-3 hrs @ 75-78 F
- 7:00 or 8:00 PM: Chill overnight
- 6:00-8:00 AM (the next day): Shape and bake the dough.
By signing up, you agree to receive emails from The Clever Carrot. Unsubscribe at any time.

Light Whole Wheat Sourdough Bread
- Yield: 1 loaf 1x
- Category: Sourdough Bread Recipes
- Method: Oven-Baked
- Cuisine: American
- Diet: Vegan
Description
An easy recipe for whole wheat sourdough bread that’s light and flavorful (not heavy and dense). Made with 20% whole wheat flour. The dough can be made in advance and baked the following day. Ideal for sandwiches, crostini, and morning toast with jam.
Ingredients
- 50g bubbly, active sourdough starter (100% hydration)
- 350g – 375g warm water (80–85 F)* See note below
- 400g bread flour
- 100g whole wheat flour
- 9g fine sea salt
Notes & Substitutions
* Flour is like a sponge. Depending on the brand you’re using, it might not absorb all of the water. Start with 350g of water if you’re using a low protein bread flour, less than 12.7%.
For best results, use a scale to weigh your ingredients. If using measuring cups, please aerate the flour first, lightly spoon it into the cup, and then level off the excess with the back of a knife.
Instructions
Baking Schedule
Whole whether doughs tend to rise faster than white doughs, especially in warm weather. To avoid over proofed dough, I like to start mixing in the afternoon (usually between 2-3 PM) when I know I’ll be home to stretch and fold the dough. Please adjust your rise times based on temperature.
Make the Dough
Combine the sourdough starter and water in a large bowl. Add the flour and salt. Mix with a fork and then finish by hand to fully incorporate the flour. It will feel very wet and sticky. Cover with a damp towel or wrap and let rest for 1 hour on your countertop, returning to the bowl after the first 30 minutes to work the dough into a rough ball.
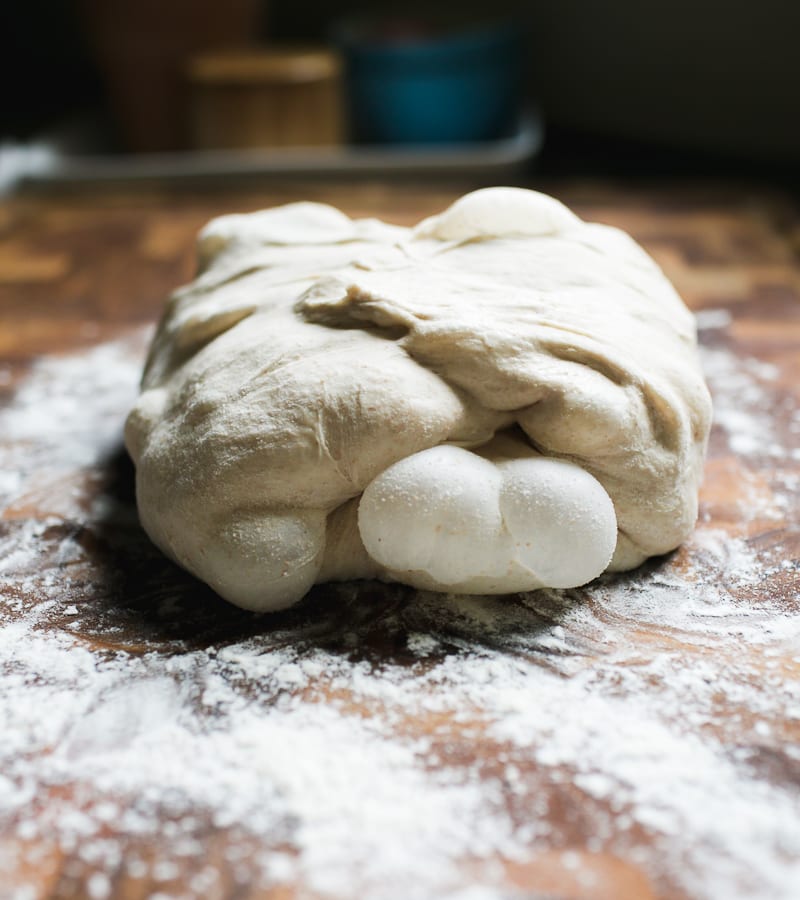
Bulk Rise with Stretch and Folds
After the dough has rested for 1 hour, do your first fold.
Gather a portion of the dough, stretch it upward, and fold it over toward the center of the bowl. Give the bowl a 1/4 turn and repeat 3 more times, stretch and folding the dough to come full circle around the bowl (4 folds = 1 set). If the dough still feels slack after the 1st set, do an additional 4 folds around the bowl to tighten the dough.
For best results, do 4 sets total spaced 30 minutes apart resting the covered dough in a warm spot in between each set (see tip below). Notice how the dough will tighten after the 4th set. See video for technique.
When finished with the folds, cover the bowl and continue the bulk rise (untouched) at 75-78 F for about for 2-3 hours. The dough is ready when it has almost doubled in size. Wrap and chill the whole bowl overnight; the dough will continue to rise only slightly in the fridge when the dough is warm.
How to Create Warm Spot for Bread Dough: Preheat your home oven to the lowest setting for 30- 45 seconds and then shut it off. Place the covered bowl of dough inside to bulk up. The temperature should be 75-78 F and no higher than 80 F. Use an oven thermometer (and common sense) to keep track of the temperature. Dough that is too warm will become wet, sticky, and a tricky to work with. Alternatively, I highly recommend using a proofing box.
Shape the Dough
The following morning, make sure the dough has doubled in size. If not, give it more time to bulk up, if needed. This is important to build strength.
Line a small bowl (or proofing basket) with a cotton or linen cloth. Sprinkle with flour. You’re going to shape the dough twice to build extra strength.
Preshape
Remove the cold dough onto a floured surface. Let rest for 10-15 minutes to take some of the chill off. Shape the dough into a loose ball using the envelope technique. Starting at the top of the dough, stretch and fold it over toward the center. Then stretch and fold the bottom of the dough toward the center. Repeat on the left side…and then the right side. Using a bench scraper, scoop up the dough and flip it over so the smooth side is facing up. Cover and rest for 20-30 minutes.
Final Shape
After the dough has rested, flip it over again (the smooth side should be facing down now). Shape it again following the steps above. Flip it back over. With floured hands, gently cup the dough and pull it toward you in a circular motion to tighten its shape. Place the dough into the lined bowl or proofing basket seam side up. Cover with the cloth overhang.
Second Rise
Rest in the warm spot you used earlier for 30 minutes to 1 hour. The dough is ready when it looks puffy and has risen slightly, but has not yet doubled in size. The dough should not be very cold prior to baking.
Preheat your oven to 450 F towards the tail end of the second rise.
Cut a sheet of non-stick parchment paper to fit the size of your baking pot, leaving enough excess around the sides to remove the bread.
Score the Dough
Place the parchment over the dough and invert the bowl to release. Sprinkle the dough with flour and gently rub the surface with your hands. Using the tip of a bread lame, small, serrated knife or a razor blade, make four shallow 4-inch long cuts at 3, 6, 9, and 12 o’clock around the dough. Use the parchment paper to transfer the dough to a Dutch oven (or another oven safe pot with lid).
Bake the Dough
Bake the dough on the center rack for 20 minutes, covered. Remove the lid, and continue to bake for 40 minutes and golden brown.
When finished, transfer to a wire rack. Cool for 1 hour before slicing, for best texture.


Comments
Diana says
I’m new to making sour dough bread. I made a loaf with wheat pastry flour because it’s all I had. It was perfect. I bought King Arthur wheat the second time and the last two loaves were dense and heavy. More water maybe?
Sarita says
I am new to sourdough bread baking, let alone the difference in using wheat flour versus unbleached, but this recipe is no fail if followed. As mentioned, trust the process and you too will have a bakery window worthy loaf of artisan bread!
Beatriz says
Mine was completely undercooked! I tried putting it back in the oven but it stayed undercooked from the inside and hard as a rock from the outside.. any idea what could’ve happened?
Pete D says
I don’t know, but it might have been too cold before you put it in the oven?
Alesha Petermann says
Do you have to cold ferment in the fridge before mine takes longer to rise due to my house being colder? Can I shape first then put in the fridge or no?
Sally Miller says
I made my first loaf of sourdough bread today using this recipe. It turned out fabulous and delicious. So much easier than I thought it would be. Thank you for a great recipe.
Melissa says
I am using a cast iron dutch oven. Should I preheat it like I have done with other breads?
Pamela R. says
This recipe is wonderful! The flavor and texture are both perfect, and the crispiness of the crust was LOVELY! But, I have a dilemma. I find it very hard to score the relaxed nature of warm dough after it’s second rise, and the final shape is affected as well because the dough continues to spread rather than spring. Should I reduce the amount of water in the recipe, or retard the dough (a second time) in the fridge for 30 min to an hour before scoring & putting it in a dutch oven and baking as directed? Another recipe I’ve had success with followed the final shaping with an overnight retard, then flip dough, score, and bake immediately. That method was the easiest to score and had much taller oven spring, but the crust was much thicker than desired, even when using a proofing bag. Would like to find a blend of both recipes if you think that would work?
Joleen says
I want to try this recipe. Do you have to mix by hand or can you use a stand mixer and hook? Thanks, Joleen
Carol Greene says
This was a wonderful recipe…a bit different from my base sourdough recipe…but it made a gorgeous loaf. Great look and taste…but not heavy on the whole wheat. A keeper! I’ve been baking bread for years but I still appreciated the precise, easy to follow directions and pictures too!
Maddy says
Is it ok to leave the dough in the fridge for ~2hrs instead of over night?
Emily says
Did you try this? Wanting to know the same thing!
Cristen Glover says
Love love love this recipe! May I leave the proofing dough in the fridge for 36 hours? I came down with a cold overnight and can’t imagine working with the dough today.
Jamien Jacobs says
From my experience with this recipe, yes! The flavor just gets better and better
Olivia says
Amazing recipe! Saving this one fore sure. I soaked some chia, flax, and pumpkin seeds and added them during my third stretch and fold. Made the perfect seeded multigrain, thank you so much!
Linda says
I just made my first light whole wheat sourdough loaf and it turned out awesome! Her instructions were clear and simple to follow.
Barb Canada says
yes but can you bake without putting in fridge overnight
Patricia Riley says
I have had excellent results with both the beginner sourdough loaf and the light whole wheat loaf.
Why is the whole wheat loaf baked at a higher temperature that the beginners’ white loaf and why is there no oil in the whole wheat loaf?
Patricia Riley says
Dave says
Anxious to try this recipe!
One question..do you preheat the Dutch oven or does the proofed dough go into a cold Dutch oven into a preheated oven @ 450..?
Thanks, Dave
Steven Timbrook says
I use a preheated Dutch oven for a boule and a room temperature Graniteware roaster if I’m making a batard. The thinner roaster heats up much quicker than a room temperature Dutch oven does.
Both methods produce a nice crust and crumb. I find that 360 g of water works best for me for shaping the dough.
Pamela says
This recipe is fool proof! I want to double the recipe, could you advise how long to bake it for please and at what temperature?
Michelle says
I just wanted to clarify, that the baking temperature is 450 degrees for the entire bake? I baked according to the instructions and my loaf burned.
Niki Mallett says
I love this recipe so easy! I add in 25 grams of molasses and it’s perfect! I’ve not timed it well and ran out of time left it out all night in my cool (65 degrees??) kitchen and it works out fine! I do the double shape and leave it out for a second rise much longer more like 3 hours. I typically do a longer second rise then suggested and this 400/100 mix of flours has just the perfect texture. I have your sourdough cookbook (currently loaned out to my mom!!) and ever recipe is the 💣
I’ve always wanted to go to your restaurant in the city… someday we’ll get there! Appreciate you ❣️
Shirley says
This is my go-to recipe. I bake 2-3 times a week. I always come back to this after trying something new. It never disappoints.
LeeAnn says
BEST BREAD EVER!! I for months have had nothing but failed loaves, followed this recipe to a T and got my first PERFECT loaf! It wasn’t gummy, it had nice airy crumb, crunchy and chewy the best of all worlds! Thank you for such a great recipe and step by step instructions! 🤌🏼😍
Niki Mallett says
Emily’s sourdough cookbook has a ton of never fail recipes! I’ve loved them all!
Margatet says
This internet version of ingredients states “50g” or starter while your website states “150g”. Both add same portions of flour and water? Which is correct?
Emilie Raffa says
Hi there! Can you clarify which 2 recipes you are comparing? This one and the beginner sourdough recipe on my site? Thanks!
Peggy says
Yes
Peggy says
I guess the best question is how much starter do you use for this beginner light whole wheat sourdough recipe? Thanks!!
ivy says
those are two different recipes- this one calls for 50g :)
Julie Burton says
This recipe with all the tips is amazing! Thank you so much, I didn’t change a thing. I will say you need to trust in the process! My sour dough loaf looks so pretty and smells DELICIOUS!
Magda says
This bread is amazing, light and easy to make.
I have one question though. Would it be possible to swap wheat starter to whole grain rye starter? Would it change texture of the bread, require different timing or method? The flour used for dough would still be wheat , 20% whole, I intend to only swap starter flour
Emilie Raffa says
Thank you Magda! Glad you liked it. And yes: you can swap the starter. The overall texture might change slightly but that’s inevitable when making adjustments to original formulas. Add more flour if you find the dough too sticky. Additionally, keep an eye on the rise. Rye flour is very active!
Mary says
in your instructions it says to let the dough rest an hour on the counter, but returning to the bowl after 30 minutes to shape into a ball. Does that mean rest on the counter for 30 minutes, return it to the bowl and shape it into a ball and then let it rest for another 30 minutes then begin the stretch and folds?
Emilie Raffa says
Hi Mary! Yes. You are correct.
Nicole says
What if I don’t have a bread basket for final proof?
Emilie Raffa says
Hi Nicole! A cloth-lined bowl, like a mixing bowl, will work instead.
Nicole says
Thank you! 💛 🥖
Katrina says
I’ve made lots of bread but have never seen this technique for folding and tightening the dough. That explains a lot of flat loaves! The instructions were perfect and ready l easy to follow and the bread was delicious with just the right crunch in the crust.
Joanne Bansen says
I started my sourdough journey almost 3 years ago & this is my go to recipe! I’ve made it countless times. I add olive oil to the mix which adds to the crumb & taste. Thanks for the easy to follow recipe (I’ve memorized it!)
Steve Timbrook says
I’ve made this recipe at least a dozen times. It has always produced a decent loaf of bread for me. After the first few time using 375 g of water I reduced water to 360 g, which was easier for me to work with. My baking schedule is to prepare the dough in the morning using starter that had been fed after the last loaf and put immediately into the refrigerator. I put the starter jar in a pan of hot tap water for about 30 minutes, give it a float test, which it will pass if stored in the refrigerator no more than about 15 days. I bulk rise during the day and bake in the evening.
Last Saturday prepared the dough in the morning and started the bulk rise at 9:30 am. At 2:30 pm, about halfway through the bulk rise, I had a family emergency out of town. I put the dough in the refrigerator, packed a suitcase and left. I returned late Wednesday evening and Thursday morning I removed the dough from the refrigerator and let it come to room temperature. It was obviously over-proofed. I did the usual 2nd rise steps and put the loaf into a cold DO and put on a pre-heated lid. I baked at the usual time and temperature and noticed not much oven spring when the lid was removed after 20 minutes. When the full hour was done the loaf was not as high as usual but it had a decent crumb and was, as you would expect, quite sour. This is a very forgiving recipe, Emilie. Thanks for all your tips and videos.
Monica Porter says
LOVE this recipe!! I’ve made two loaves just the past few days. Can you double this to make a larger boule?
Marilyn says
I get a little nervous because it doesn’t hold much shape until chilled overnight. I did 2 shapes in the morning and now putting bannetons in fridge to ferment longer. Will bake tomorrow. I like the sour flavor.
Natasha says
Do I need to put in fridge over night or can I leave out from starting in the morning and cook in the evening?
Marilyn says
I would guess it might be too warm and it will over proof.
Diane says
Do you ever bake sourdough with home milled wheat berries? I am just leaning and was wondering if I can use fresh milled hard red wheat, which is whole wheat in this recipe? I have learned that fresh milled flour acts different in sourdough recipes.
Ariana says
This bread is amazing!! I made it yesterday and turned out great. I live in a very small apartment so I don’t have a proper oven (I just have a toaster oven). In case anyone else is in a similar boat, I baked it in a loaf pan, did the first 20 min with a small tray of water next to the pan to create steam, then I removed the water tray and baked for the remaining 40 min. Absolute perfection, and bonus points that my boyfriend loved it too! Thanks
Vanessa says
Awesome tip, thanks!
Erich says
Excellent recipe- thanks for posting, and for adding so much detail to the notes!
I had excellent outcomes with reduced batch sizes of the same proportions.
Also I let my dough rest in much warmer setting for longer times at rest for my first batch- about 82-85 deg. As the author notes it will be a wetter stickier batch which is difficult to shape- but turned out extremely fluffy and flavor was amazing. The accident turned out to be my family’s favorite bread ever.
Also- it’s a good idea to train your starter with the stone ground whole wheat you use in the recipe.
April M. says
The most amazing wheat sourdough! I only wish I could bake multiples to keep in the deepfreeze for quick use. It rose beautifully & made the perfect loaf. You’re my new fav! I wish I could show you a picture!
Rebecca says
Love this recipe so much. I’m a beginner to bread, but from the get-go your recipe’s bread has turned out perfect for us every time.
A small question I have – what do you mean by a “lightly oiled wrap” to cover the dough before chilling? I’ve been using a plastic bag which is working but would like to follow your direction!
Thanks so much for the great recipe and helpful video.
ivy says
i used olive oil on cling wrap & it turned out great :)
Linda says
You gave us a baking schedule!! Girl look at you, sharing and caring. Hugs
Denise says
Thank you! I enjoy your site. I appreciate your helpful tips.
I recommended your site to several friends and family. 😊
Ashley Jo says
I have made your Beginner’s Sourdough several times and love it. I decided to try this one today. I have read through the directions several times and want to clarify: should the entire bake be at 450 degrees? In the Beginner’s recipe, you heat to 450 but then reduce to 400. I don’t see any change in temp here. thanks!
NICK STEPHENS says
second try and excellent bake.thankyou
Steve Timbrook says
Hi Emilie,
I made this last weekend using 375 g of water and it turned out great. If I increase to 150g of starter will that give a quicker bulk rise? If I do use 150 g of starter, would I need to change any of the other variables such as amount of water, time in the 450 F oven?
Steve
STEPHANIE says
Favorite recipe so far, so happy with the outcome of the bread!
Yin says
Also, instead of using bread flour in the bread recipes you gave, can I use all-purpose flour?
Mary says
I started the bread maki g process this morning . I doubled the recipe. The first 2 hour bulk rise will be finished at 1:45 this afternoon. Can I still put it in the frig this afternoon until tomorrow morning or do I need to complete the bulk rise and bake today?
Thank you!
Gillian says
Just wondering can I bake sour dough bread in regular bread pans instead of a Dutch oven? I grind my own flour and would like to use more whole grain, can I or will it be too dry?
Linda says
I’ve tried about 10 recipes for sourdough so far and this will now be my go to. Letting it ferment slowly in the fridge added additional flavor as well as the perfect addition of wheat flour. I use 100g starter however and a bit less water.
Hannah says
I love this recipe. Compared to others I have read, it is so clear and low fuss and the result is delicious and so tender. Have made at least 10 times and am searching for another dutch oven to start doubling up the recipe and bake 2 at once.
2 questions:
After the first bulk rise, can the dough sit in the fridge longer than overnight, like 24 or 36 hours before the shaping period?
Also, if I want to increase the percentage of whole wheat to white flour, what adjustments might I need to make? More water? more/less starter?
Brenda says
Just wondering if anybody knows the calorie count for this bread?
Sherry says
I absolutely love your start to finish schedule. So helpful. Thank you!