This post will teach you how to make a beginner sourdough starter at home, step-by-step. All you need is flour, water and a little bit of patience. Before you know it, you’ll have your very own bubbly, active sourdough starter to make my best sourdough bread recipe, sourdough focaccia and more! Grab your personal sourdough starter feeding chart.

Looking to bake sourdough bread? First: you’ll need a sourdough starter. Without it, your bread won’t rise. It’s the absolute heart and soul of sourdough baking. Creating a sourdough starter from scratch is not hard to do. However, the process is intimidating, especially for beginners. Let’s change that.
Adapted from my bestselling book Artisan Sourdough Made Simple, I will demystify and simplify the process with step-by-step recipe instructions. In approximately 7+ days (yes, it takes that long- there are no shortcuts) you’ll get approximately 1 cup of bubbly, active sourdough starter which is more than enough to make bread, including my best sourdough bread recipe with olive oil (most popular recipe on my blog!). More sourdough bread recipes here.
Sourdough is more than just a recipe; it’s an understanding. So before we dive in, let’s define.
What Is Sourdough Starter?
A sourdough starter is a live, fermented culture of flour and water filled with wild yeast and bacteria from our environment. A small portion is added to sourdough bread dough to make it rise. Commercial yeast IS NOT required.
Sounds a bit weird, right? Of course it does. Know this: natural “wild” yeast is all around us. It can be found in a bag of flour, in the air, on your hands etc. Just because you can’t see it, doesn’t mean it’s not there and doing its thing. It’s like magic.
How Long Will It Take?
To create a sourdough starter from scratch, the overall process will take 7 days (or more) from start to finish. It’s not instant. First, you’ll create the starter with whole wheat flour to jumpstart fermentation. Then, you’ll continue to feed it with regular all purpose flour or bread flour to cultivate the wild yeasts and friendly bacteria. Once it’s created, you’ll keep it alive with ongoing feedings and care, which you can read about here.
When Will It Be Ready To Use?
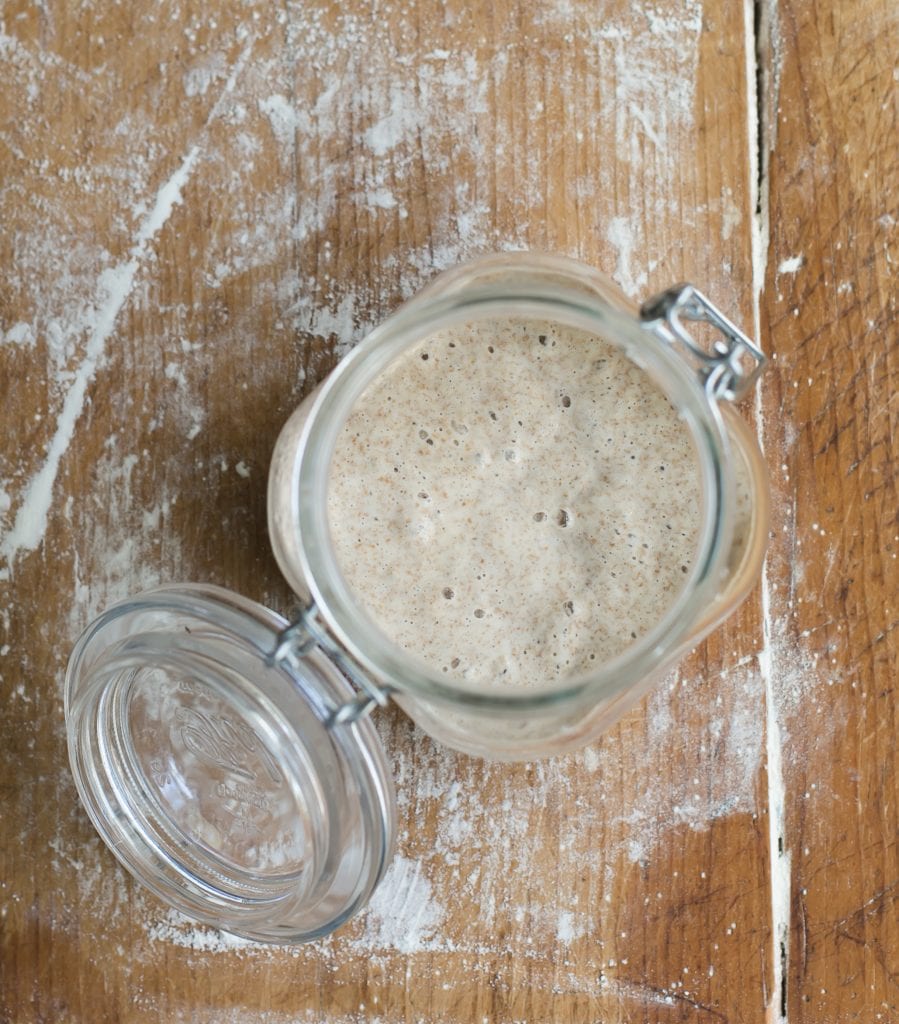
Your starter is ready to use when it has doubled in size, with plenty of bubbles on the surface and throughout the culture.
NOTE: It’s not uncommon for it to take up to two weeks or more for the starter to become active. It all depends. I know this timeframe sounds a bit vague, but growing yeast in a jar (that’s basically what you’re doing) can be unpredictable at times. Please be patient if the process takes time for you- it’s normal.
Is It Difficult To Do?
Absolutely not! In short: you’re basically adding flour and water to a jar, feeding it with more flour and water and waiting for it to become bubbly, active and double in size. That’s it. Most of your time involvement is hands-off. Can I ask you a favor though? Don’t overthink it. There’s a ton of sourdough information out there, and you will fall down a major rabbit hole if you start poking around. Just stick to this tutorial for now, follow the steps as written and just go for it.
Beginner Sourdough Starter Recipe {Step-By-Step}
You Will Need:
Supplies
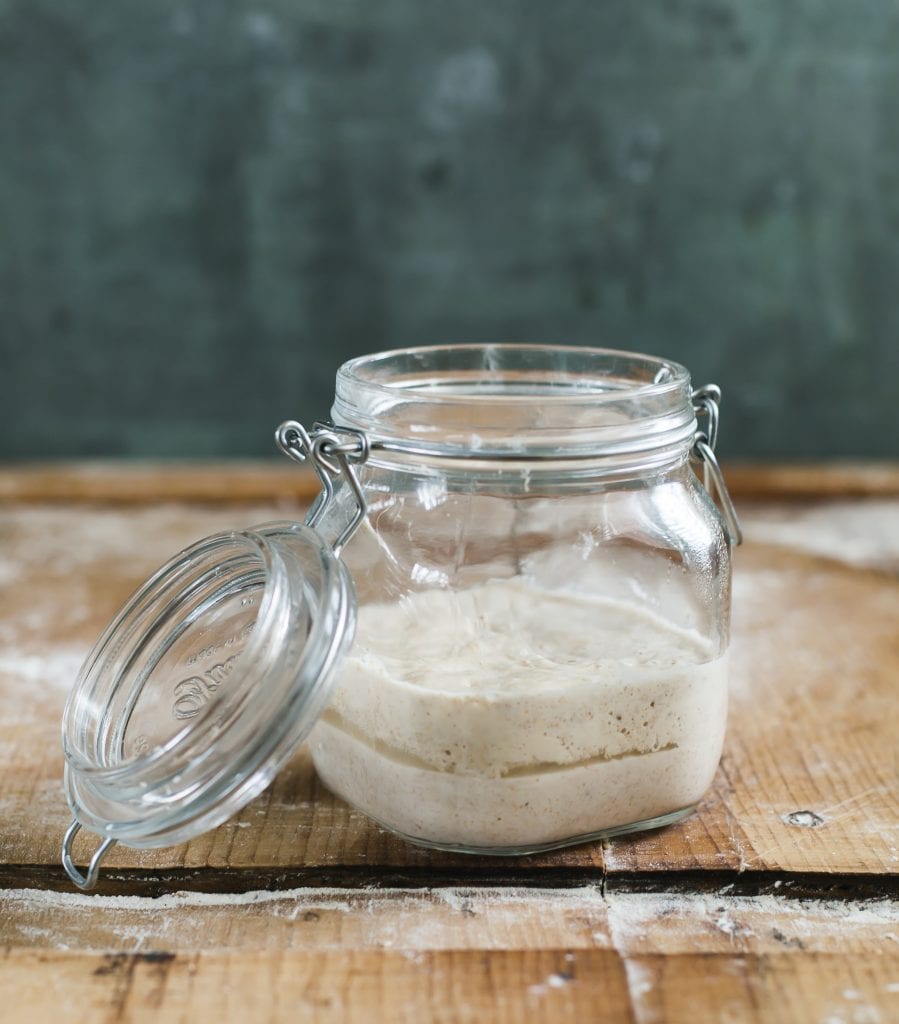
- 3/4 L jar (I use this one)
- Digital scale
- Small rubber spatula
Ingredients
To create the sourdough starter on Day 1:
- 60 g (1/2 cup) whole wheat flour
- 60 g (1/4 cup) water
To feed the sourdough starter each day (Days 3-7):
- 60 g (1/2 cup) unbleached all purpose flour or bread flour
- 60 g (1/4 cup) water
NOTE: Use regular, unbleached all purpose flour or bread flour for best results. I use flour from KAF, Trader Joe’s or Whole Foods. As for organic flour, I first learned that it wasn’t always successful when first creating a sourdough starter (sourdough can be finicky). However, due to the widespread use of glyphosate, I’ve been inspired to re-test with organic flour. The results were good. Please experiment with what resonates. For the water, filtered or tap water is fine. Use the latter if you know it’s mostly chemical/chlorine free.
Day 1: Make The Sourdough Starter
- First, download and print out this chart. It’s your daily “at a glance” feeding schedule to keep you on track.
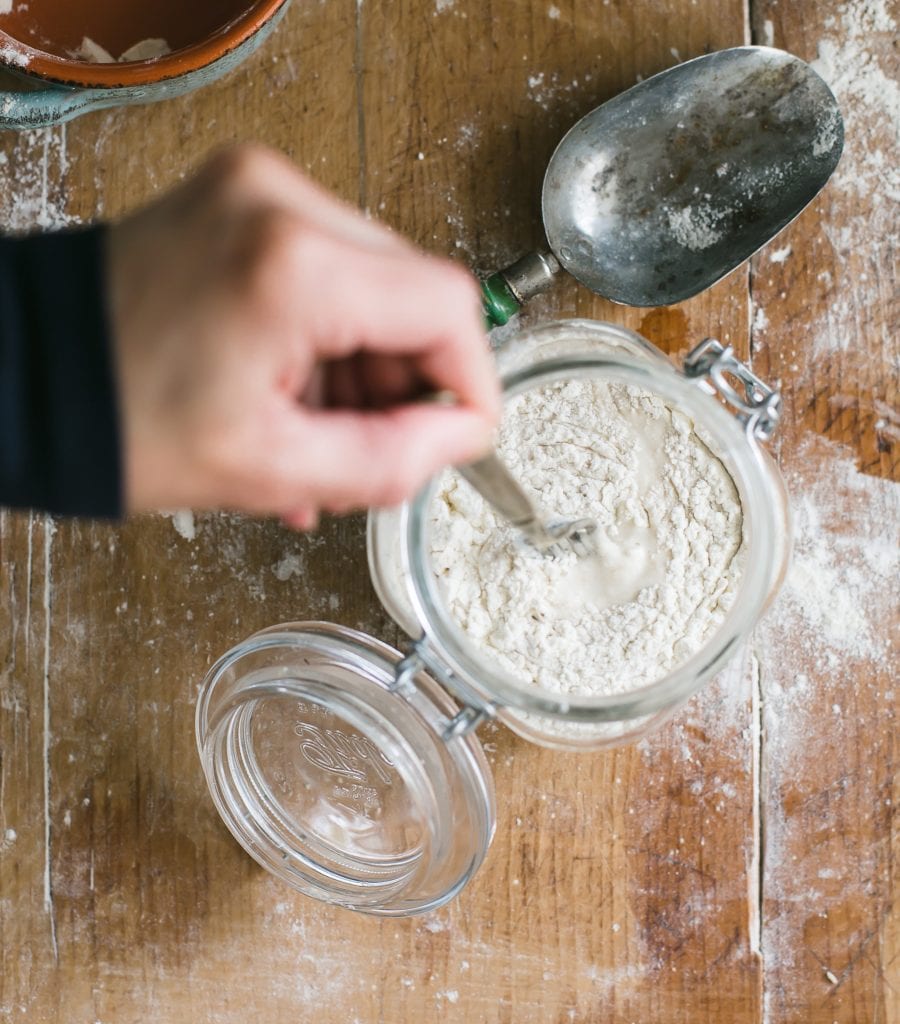
- Add 60 g (1⁄2 cup) of whole wheat flour and 60 g (1⁄4 cup) of water to your sourdough starter jar. Total yield: 120 g sourdough starter.
- Mix with a fork until smooth; the consistency will be thick and pasty.
- Cover with plastic wrap or a lid, and let rest in a warm spot, about 75 F for 24 hours.
Temperature Tips: Temperature is very important. If it’s too cold, your starter won’t rise and the process will take longer. Consider the following tips if you’re looking for a warm, 75 F spot. Place your starter on a cookie sheet inside the oven (turned off) with the light on for a only few hours to give it a boost (please don’t leave it there overnight- the environment will become too warm). Monitor the temperature with an oven thermometer. You can also use a proofing box set to your desired temperature, or a microwave with the door ajar and the light on.
Day 2: Got Bubbles?
- Today, you’re going to check if any small bubbles have appeared on the surface.
- Bubbles indicate fermentation, which is what you want. However, it’s okay if you don’t see anything right away; the bubbles might have appeared and dissolved overnight while you were sleeping. This happens quite often.
- You do not have to do anything else on Day 2. Just let it rest in your warm spot for another 24 hours. Feel free to stir once or twice to oxygenate the mixture.
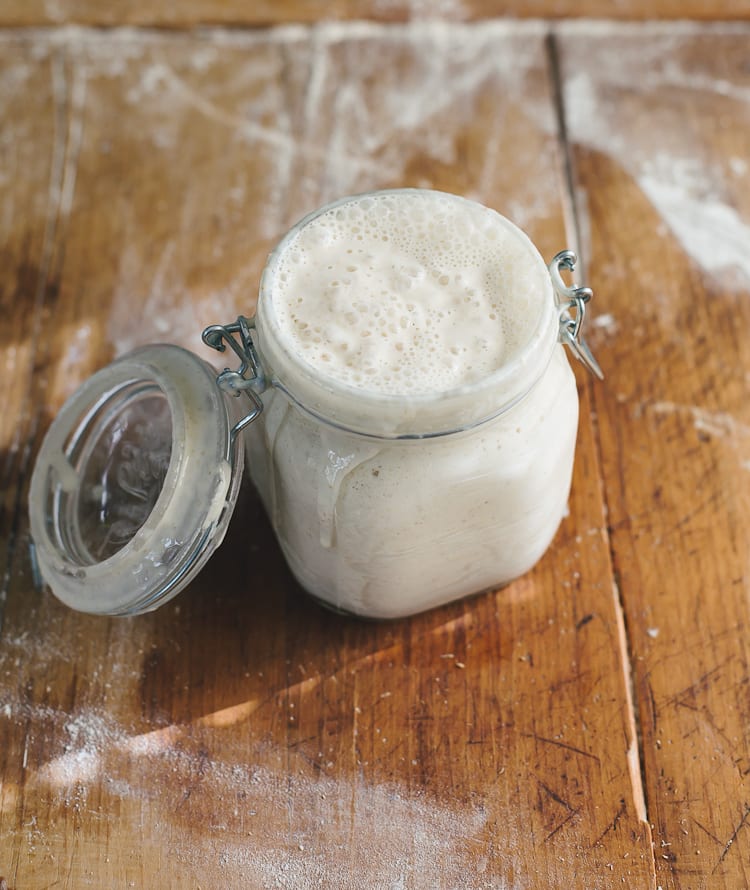
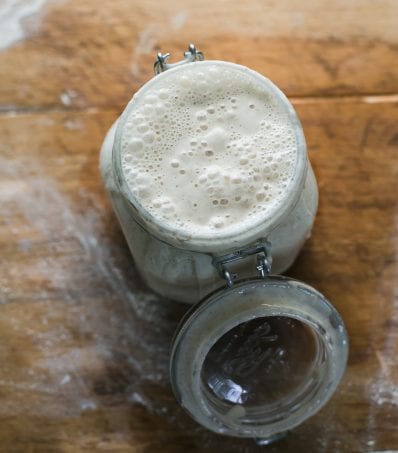
Tip: What’s That Brown Liquid? During the creation process, and even after your starter has been established, a dark liquid might appear on the surface (the image below shows the liquid in the middle of the starter). This liquid is called “hooch” and is an indication that your starter is hungry. It also has a very distinct smell, similar to rubbing alcohol or gym socks. This is normal. Don’t freak out. Any time you see this liquid, it’s best to pour it off before feeding it with fresh flour and water.
Days 3-7: Feed Your Sourdough Starter
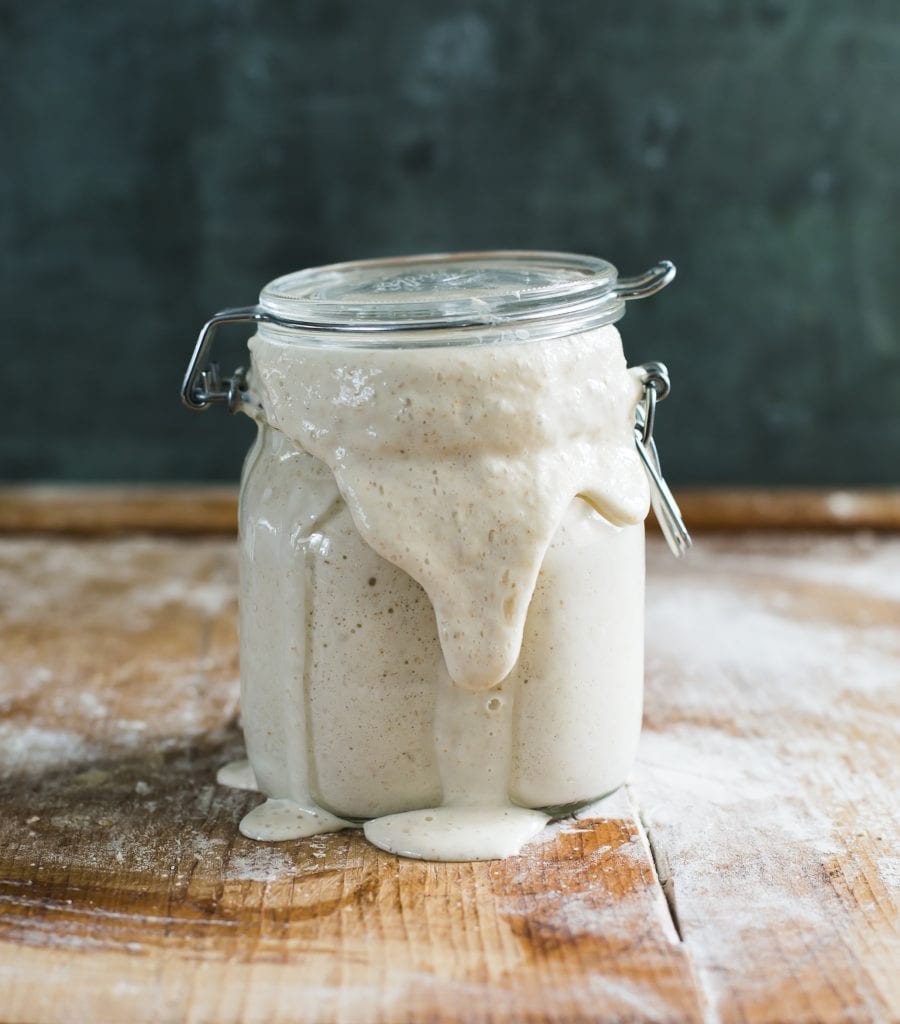
Whether bubbles are visible or not, it’s time to start the ongoing feeding process. As the natural yeasts begin to develop, your starter will rise. Bubbles will form on the surface. Eventually, your starter will fall back down or “collapse” indicating that it’s time to feed it again. The goal: is to increase the total quantity to about 236 g (1 cup) following the specific feeding ratio outlined below on each day.
Before you begin, a few tips for success:
- Establish a feeding schedule. Feed your starter at the same time each day. This will train your starter to rise and fall predictably, which is what you want. Consider feeding your starter in the morning when you wake up. Again, this is where my feeding chart comes in handy.
- Track the growth. Place a rubber band or piece of masking tape around the jar to measure the starter as it rises. When it falls, you’ll see streaks of starter on the sides of the jar.
- Keep your jar clean: Use a small rubber spatula to scrape down the sides of the jar to prevent mold growing up the sides.
- Be patient. This is a slow, gradual process. Remember: temperature (75 F) and consistency (daily feedings @ approximately the same time each day) is key.
Day 3:
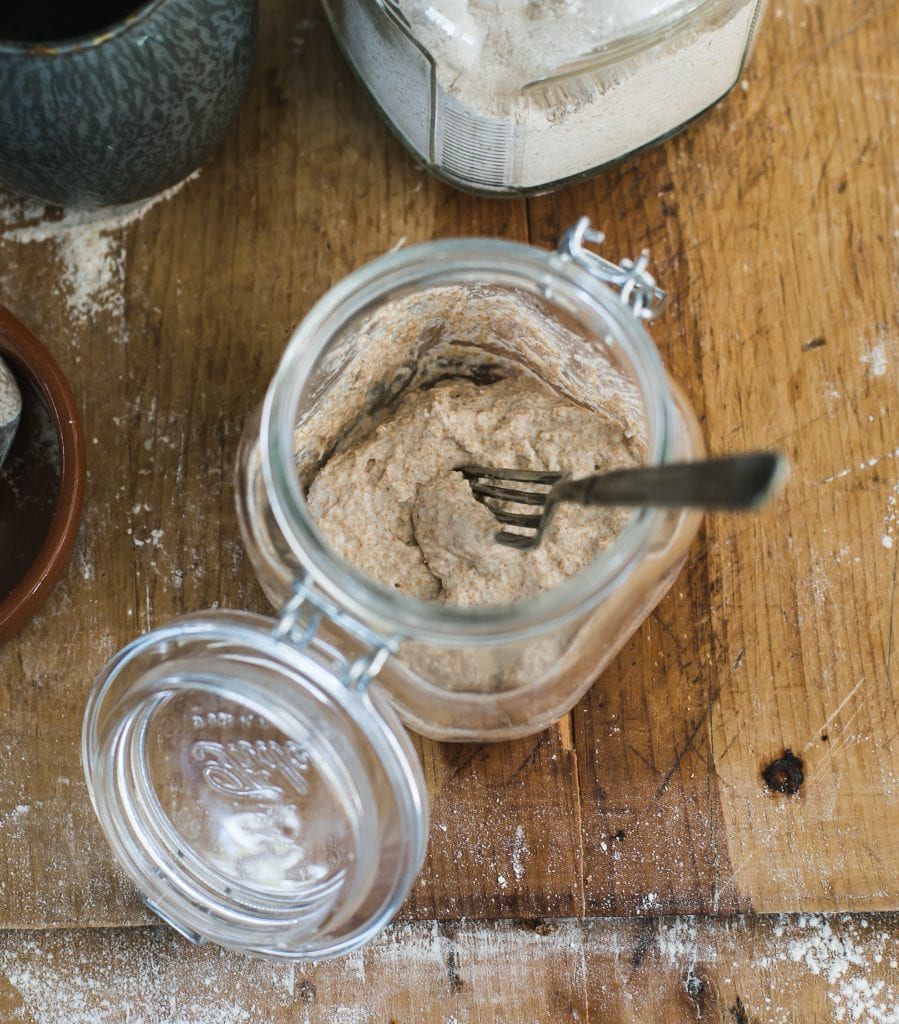
- Remove and discard half (60g) of your sourdough starter from the jar. To do so: use a spoon to scoop it out, or pour the starter directly into a bowl to weigh (you can also just eyeball it- the amount doesn’t have to be exact). The texture will be very stretchy.
- To the jar: Add 60 g (1⁄2 cup) of all-purpose flour + 60 g (1/4 cup) of water. Mix with a fork until smooth. Scrape down the sides with a small rubber spatular. The texture should resemble thick pancake batter or plain yogurt at this point.
- Cover and let rest in a warm spot, 70-75 F for 24 hours.
- Total yield: 180 g starter.
Day 4:
- Remove and discard half (90 g) of the sourdough starter.
- To the jar: Add 60 g (1⁄2 cup) of all-purpose flour + 60 g (1/4 cup) of water to the jar. Mix well and scrape down the sides.
- Cover and let rest in a warm spot for 24 hours.
- Total yield: 210 g starter.
- Note: The growth of your starter might appear to slow down on Days 3-4, after switching to all purpose or bread flour for the ongoing feedings. This is normal. Your starter needs more time to adjust. Be patient.
Day 5:
- Remove and discard half (105 g) of the sourdough starter.
- To the jar: Add 60 g (1⁄2 cup) of all-purpose flour + 60 g (1/4 cup) of water. Mix well.
- Cover and let rest in a warm spot for 24 hours.
- Total yield: 225 g starter
Day 6:
- Remove and discard half (112 g) of the starter.
- To the jar: Add 60 g (1⁄2 cup) of all-purpose flour + 60 g (1/4 cup) of water. Mix well and scrape down the sides.
- Cover and let rest in a warm spot for 24 hours.
- Total yield: 232.5 g starter
Day 7:
- Remove and discard half (116.25) of the sourdough starter.
- To the jar: Add 60 g (1⁄2 cup) of all-purpose flour + 60 g (1/4 cup) of water. Mix well, and scrape down the sides.
- Cover and let rest in a warm spot for 24 hours.
- Total yield: 236 g starter
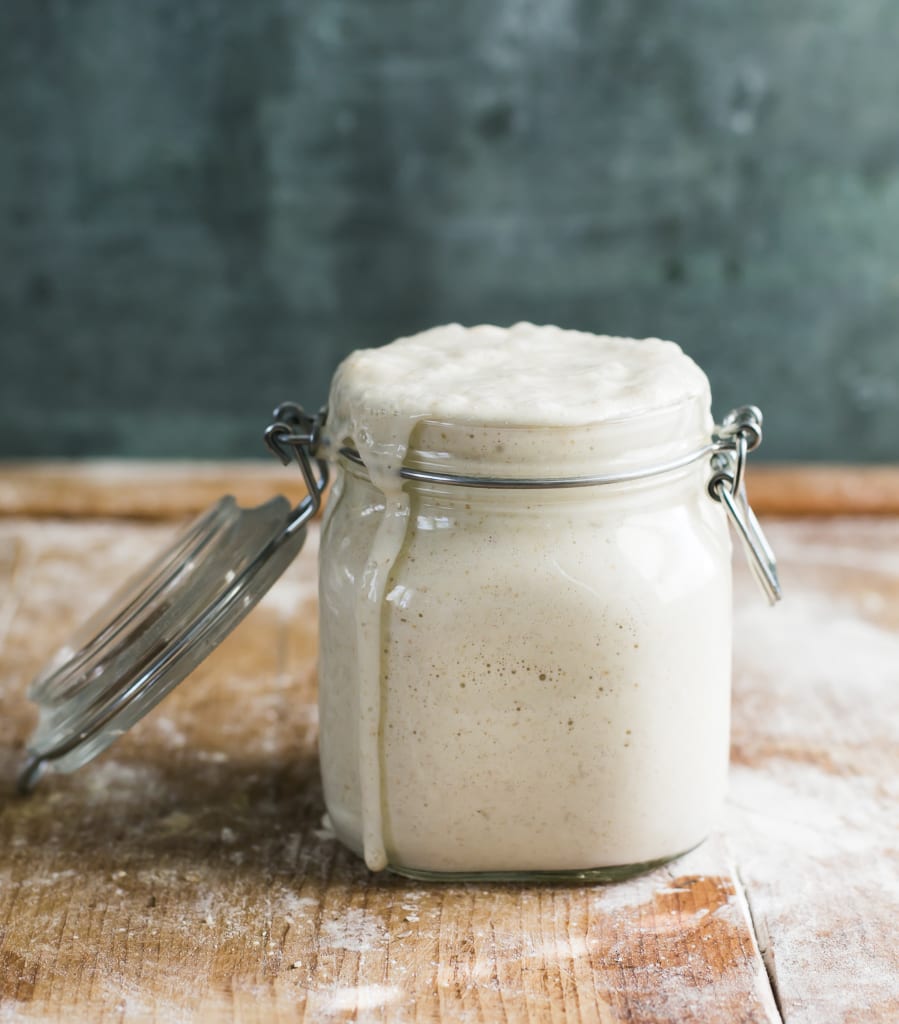
Day 7-8: A Sourdough Starter Is Born!
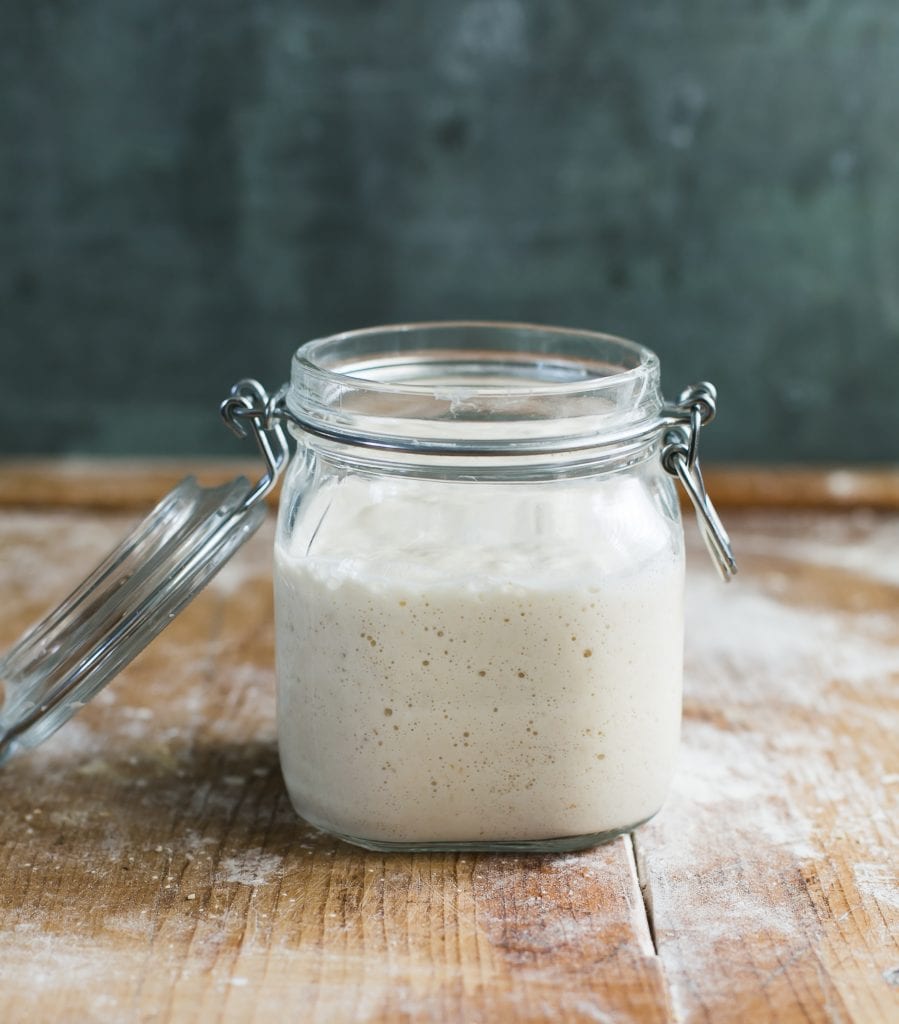
- By now, your sourdough starter should have doubled in size. You should see plenty of bubbles, both large and small. The texture will now be spongy, fluffy, and similar to roasted marshmallows (think: s’mores). It should also smell pleasant and not like stinky gym socks. If these conditions are met, your starter is now active.
- The very last step is to transfer your sourdough starter to a nice, clean jar. Do this only if your current jar needs a good scrub. Otherwise, leave it as is.
- In keeping with tradition, you can also name your sourdough starter (and please do). My starter is called Dillon after my oldest boy. It’s bright and bubbly, just like him ;)
- Now you’re ready to bake. Start with my beginner sourdough bread recipe- you’re going to love it!
Feeding & Maintaining Sourdough Starter For Ongoing Care
So you’ve created a sourdough starter! Now what? Just like any living creature, your starter must be kept alive with regular feedings, proper storage, and ongoing care to keep to maintain its strength. If your starter is not strong, your bread will not rise. Once you’re starter is established, read my companion article to learn exactly how I do it- Feeding Sourdough Starter: My Best Tips & Tricks. Have more questions? Read troubleshooting your sourdough starter.
Note: You will need to feed your starter every time prior to making bread dough and to maintain it (keep it alive).
How To Store Sourdough Starter
At Room Temperature: If you bake often, let’s say a few times a week, store your starter at room temperature. This will speed up fermentation, making the starter bubbly, active, and ready to use faster. Room temperature starters should be fed one to two times a day, depending on how quickly they rise and fall.
In the Fridge: If you don’t bake that often, store your starter in the fridge covered with a lid. You’ll only need to feed it about once a week or so to maintain its strength when not in use (you can just feed it cold and then pop it back in the fridge right afterwards; no need to warm it up first). When you are ready to make dough, feed your starter at room temperature as needed, to wake it back up.
Frequently Asked Questions & Helpful Info:
1.) What If my starter is not ready after 7+ days?
Feed every 8-12 hours (not 24) and continue the same formula: Discard half starter. Feed (Add): 60g flour & 60g water and store at 70-75°F / 21-24°C. Too runny? Add an additional 1-2 tbs of flour. Note: the most common reason for your starter not starting is cold temperature.
2.) Can this sourdough starter be made with all purpose flour only?
Yes. The process might take a little longer.
3.) Can sourdough starter be made with bread flour only?
Yes. Because it’s more “thirsty” than AP flour, add more water if the texture is too thick.
4.) Can this sourdough starter be made with whole wheat, spelt flour or rye flour only?
Yes. Like bread flour, whole grain flour absorbs more water than all purpose flour, so adjust the texture with additional water your starter is too thick.
5.) Can sourdough starter be made with bleached flour?
Yes. But it’s not recommended. The chemicals can throw off the fermentation process. Some readers have reported success, however. Your choice!
6.) Why do you use whole wheat flour in the beginning of the recipe? And then switch to all purpose flour for the ongoing feedings?
Whole wheat flour is used to jumpstart the fermentation process. All purpose flour or bread flour is used for the ongoing feedings because it’s inexpensive, practical and suitable for everyday baking.
7.) On Days 3 & 4, my starter is not as bubbly compared to Days 1 & 2. Growth is slowing down. Why?
As mentioned in question #5, whole wheat flour is used in the beginning to jumpstart fermentation. This is why you saw bubbles right away. When you switch to all purpose or bread flour for the ongoing feedings, growth will inevitably slow down on Days 3-4, as your starter needs time to adjust to the new flour. This is normal. Growth is still happening.
8.) For the daily feedings, you mention to feed your starter “equal parts” flour and water by weight. For example: 60 g (1⁄2 cup) flour + 60 g (1⁄4 cup). But the volume conversions (measuring cups) are not equal. Is this a typo?
No. It’s not a typo. “Equal parts” refers to feeding by weight only. Not measuring cups. Here’s why: different ingredients weigh different amounts based on density. For example 1 cup of flour can weigh anywhere from 125-150 g depending on how it was packed into the measuring cup. 1 cup of water can weigh anywhere between 236-250 g. Because weights are constant, it streamlines the process for accuracy. It is the preferred measuring unit in bread baking. The volume approximates are listed for convenience because not everyone has a scale.
9.) Can I use the sourdough discard from Day 1-7 for something else?
In the beginning, I typically don’t recommend using the discard (it’s usually really smelly and discolored). I recommend using the discard after the starter has been established. However, everyone will have a different experience with this. If it looks good- use it! And yes, you can save it to create a new, separate sourdough starter if you’d like. For more info please read Sourdough Discard 101: Recipes & Faqs Answered.
By signing up, you agree to receive emails from The Clever Carrot. Unsubscribe at any time.
Beginner Sourdough Starter Recipe
- Yield: appx. 236 g (1 cup)
- Category: Sourdough Starter
- Method: 1-Bowl
- Cuisine: American
- Diet: Vegan
Description
Looking for an easy, sourdough starter recipe for beginners? Adapted from my bestselling book Artisan Sourdough Made Simple, follow my no-nonsense, step-by-step guide for practical tips, tricks, and ongoing care- anyone can do it. Use it to make my famous golden, crusty sourdough bread recipe.
Please read my notes below before you begin.
Notes, Tips & Expectations:
- Download & print personal sourdough starter feeding chart {here}.
- The overall process takes ~7+ days, if the temperature is warm enough, ideally 70-75 F. However, it can take up to 2+ weeks or more for a strong starter to become established. Do not ignore the importance of temperature.
- Growth will seem to slow down on Days 3-4. This delay is commonly called a “false” start. It’s also normal- the yeast needs time to cultivate. Please be patient!
- You will need one large 3/4 L jar, or something of similar size (I use this one). Place a rubber band or piece of masking tape around the jar to measure the starter’s growth as it rises.
- To clarify feeding your starter: “equal parts” refers to equal weights only, not measuring cups. Example: 60 g (1/2 cup) flour + 60 g (1/4 cup) water. Same weight. Different volume. Not a typo. Why? Flour is light, fluffy and full of air pockets, so it takes up more space in a measuring cup (but weighs less than water). Water is more dense and compact; it takes up less space but weighs more than flour. That’s why their cup measurements don’t match, even when their weights are identical. Many bakers get confused by this. I’ve included volume measurements for convenience since not everyone owns a scale. But, do choose one measurement system and stick with it for feeding!
Ingredients
Note: Once your starter is established, make your first loaf using my sourdough bread recipe.
- 1x (5lb) bag all purpose flour or bread flour (I use either KAF, Trader Joe’s, or Whole Foods)
- 1/2 cup (60g) whole wheat flour (I use KAF whole wheat)
- Water, preferably warm around 85 F
Instructions
Before you begin: Establish a feeding schedule. Meaning, feed your starter at the same time each day. This will establish consistency, which sourdough starters love. Consider feeding your starter in the morning when you wake up.
Day 1:
- Combine 60 g (1⁄2 cup) of whole wheat flour + 60 g (1⁄4 cup) of warm water in a large jar. Mix with a fork until smooth; the consistency will be thick and pasty.
- Cover with plastic wrap, reusable wax wrap, or a lid and let rest in a warm spot, about 70-75 F for 24 hours. Temperature is important.
- Total approximate yield: 120 g starter
TIP: Looking for a warm, 75 F spot? Place your starter on a cookie sheet inside the oven (turned off) with the light on for only 1-2 hours (it can get hot in there, so keep you eye on it!). Center rack is best. You can also use a proofing box set to your desired temperature, or a microwave with the door ajar and light on.
Day 2:
Check to see if any bubbles have appeared on the surface. If you don’t see anything, it’s okay. The bubbles might have appeared and dissolved overnight while you were sleeping. Feel free to stir once or twice to oxygenate the mixture. Otherwise, you don’t have to do anything else now. Rest the starter for another 24 hours.
TIP: During the creation process, and even after your starter has been established, a dark liquid might appear on the surface and throughout the culture. It has a very stinky smell, similar to rubbing alcohol or gym socks. This liquid is called “hooch” and is an indication that your starter needs to be fed. It’s normal. Any time you see this liquid, it’s best to remove it along with any discolored starter present.
Day 3:
- Remove and discard half (60g) of your sourdough starter from the jar. To do so: use a spoon to scoop it out, or pour it directly into a bowl to weigh (you can also just eyeball the amount- it doesn’t have to be exact). The texture will be very stretchy.
- To the jar: Add 60 g (1⁄2 cup) of all-purpose flour + 60 g (1/4 cup) of water. Mix with a fork until smooth. Scrape down the sides with a small rubber spatular. The texture should resemble thick pancake batter or plain yogurt at this point.
- Cover and let rest in a warm spot, 70-75 F for 24 hours.
- Total yield: 180 g starter
Day 4:
- Remove and discard half (90 g) of the sourdough starter.
- To the jar: Add 60 g (1⁄2 cup) of all-purpose flour + 60 g (1/4 cup) of water to the jar. Mix well. Scrape down the sides.
- Cover and let rest in a warm spot, 70-75 F for 24 hours.
- Total yield: 210 g starter
Note: The growth of your starter might appear to slow down on Days 3-4, after switching to all purpose or bread flour for the ongoing feedings. This is normal. Your starter needs more time to adjust. Be patient.
Day 5:
- Remove and discard half (105 g) of the sourdough starter.
- To the jar: Add 60 g (1⁄2 cup) of all-purpose flour + 60 g (1/4 cup) of water. Mix well. Scrape down the sides.
- Cover and let rest in a warm spot, 70-75 F for 24 hours.
- Total yield: 225 g starter
Day 6:
- Remove and discard half (112 g) of the sourdough starter.
- To the jar: Add 60 g (1⁄2 cup) of all-purpose flour + 60 g (1/4 cup) of water. Mix well. Scrape down the sides.
- Cover and let rest in a warm spot, 70-75 F for 24 hours.
- Total yield: 232.5 g starter
Day 7:
- Remove and discard half (116.25) of the sourdough starter.
- To the jar: Add 60 g (1⁄2 cup) of all-purpose flour + 60 g (1/4 cup) of water. Mix well. Scrape down the sides.
- Cover and let rest in a warm spot, 70-75 F for 24 hours.
- Total yield: 236 g starter
Day 8:
When your starter is fully active, do the float test. Feed your starter, wait for it to double in size, and then drop a teaspoon of bubbly starter into a jar of water; if it floats to the top it’s ready to use.
Storage Options
If you bake often, store your starter at room temperature (feed it 1x-2x a day to keep it active). If you plan to bake only once in a while, store it in the fridge to preserve its strength (feed it 1x a week). When storing your starter in the fridge, there’s no need to bring it to room temperature first before feeding it. Just give it some flour and water and pop it back in the fridge.

Comments
Dana Mae says
Hi there. I grew up on sourdough and since I lost my grandmother we haven’t gotten back to sourdough pancakes. My youngest loves them and my oldest would love her own start. I used to feed the one my grandma kept but I’ve never made my own. Can I use a gallon glass jar and double the start so I can send some home with my oldest daughter and keep some here at home for my youngest? Thanks in advance!
Emilie Raffa says
Hi there! Yes, you can. However, it might be more efficient to make a single starter first. Once it’s established, feed it everyday (without discarding) to reach your desired quantity. Then portion into containers and distribute.
Patty Brown says
Thank you for this post.
It seems wasteful though to discard the dough…
1. Why not transfer to a larger container and double the flour and water at feeding times?
2. Wouldn’t you get the same results?
3. Can the excess be refrigerated for future use instead of refeeding the small batch?
Also, a short video walking through the steps and showing the actual results would help those who are visual learners.
Thanks again.
Emilie Raffa says
Hi Patty! You’re very welcome. When first creating a sourdough starter, it’s necessary to discard some of it to refresh and balance out the acidity levels. You’re in the process of cultivating bacteria- it needs to be fresh. Plus, if you do not discard, your starter will grow exponentially in size! Once it’s established however, feel free to modify the process to avoid waste. For example, sourdough discard can be used to make additional sourdough recipes like pancakes and muffins (check out my recipe section for ideas). Or, keep your main starter jar in the fridge, and only take out what you need to feed for your recipe (i.e. if you need 75g active starter for a sourdough bread recipe, take out 25 g of starter from the fridge and feed it with 25 g flour + 25 g water. You’ll have nothing leftover.
Jen Grenell says
First all, thank you for the instructions on how to get started. I’m a first timer, and about to start the journey of making my first sourdough starter.
Question… After the 7 day process, when you say “replenish what’s left”, do you feed with the same instructions detailed in day 3 where you remove and discard about half of your starter, and feed with 60 grams of all purpose flour and 60 grams of warm water, and then mix with a fork til smooth?
Many thanks for your great content!
Emilie Raffa says
Hi there! Once your starter is established, feed your starter following a 1:1:1 ratio. So for example, if you have 25 g of starter in the jar, feed it with 25 g of flour and 25 g of water. It doesn’t have to be 60 g. You’re matching the flour and water quantities to the amount of starter you have. More detailed info here: https://www.theclevercarrot.com/2021/01/feeding-sourdough-starter-my-best-tips-tricks/
Titas Saha says
Even after day 8, my starter doesn’t have enough bubbles. Still after every feeding its rising and doubling itself.. but not sure if the process is working, since it still not bubbly. Please help.
Emilie Raffa says
Hi there! This is normal. The process can take up to 2 weeks or more. Here’s why: starters need time, temperature (ideally 75+ F), consistency and patience. Try reducing the water to achieve a thicker consistency (do not get caught up on exact amounts) and/or switching to bread flour to boost the enzyme activity. Feed it at the same time each day- in the morning is the easiest. And as always, find a warm spot for it to rest when stored at room temperature. More info here:
https://www.theclevercarrot.com/2018/03/troubleshooting-your-sourdough-starter/
Pearl says
Here you remove progressively more (by weight) of the starter and then feed 60g each of flour and water, but in another post you recommended doing a 1:1:1 feeding ratio. Is that only for after the starter is good and established? I was doing remove half and add 60g water and 60g flour, but on day 4 it stayed flat after bubbling and growing like crazy on day 3. Today is day 5 and I did a 1:1:1 ratio today. I’m hoping I haven’t totally ruined it. Which is correct during the beginning phase, where we’re establishing the starter? Thank you in advance.
Terry says
I noticed this too, after realizing after a week that I’d been removing the same amount of starter that I was adding in flour and water, and wondering why my volume kept increasing. To correct this I removed half the starter and added the previous amounts of flour and water, but then wondered if I should have added more to keep pace with the volume of starter. Like Pearl I noticed that these amounts do not increase, so that the ratios are not 1:1:1 but something less.
Emilie Raffa says
Correct. Follow the ratio in this post to create/establish a sourdough starter. This specific ratio builds up the total quantity to roughly 1 cup. Once it’s established, then you can switch to the 1:1:1 ratio for ongoing feedings. You didn’t ruin your starter. The amounts don’t have to be exact. You’re actually looking to maintain the right consistency (thick pancake-like batter) since your starter will look different on different days. In your case, adjust with more/less flour and water as needed so it looks right. Then continue.
Hali says
Hi! Can I use a 1 L jar? Would that make a difference?
Emilie Raffa says
Yes! That’s totally fine.
Jenny says
So if you opt to put it in your oven or microwave with the light on for 1 to 2 hours, then what? Does it have to stay warm for the rest of the 22-23 hours? Trying to find a good, warm spot and not sure how long it needs to stay at that 75-80° sweet spot.
Emilie Raffa says
Sourdough starters will only maintain a specific temperature if they are consistently stored in a proofing box. Most of us don’t have proofing boxes. So it’s OK if the temperature decreases. Just keep it in a warm spot for your desired length of time to give it a boost. Note how long it takes to rise and make adjustments from there.
Terry says
What if I forgot to remove any starter on Day 3, and just added the flour and water?
Emilie Raffa says
It’s OK! The process is forgiving. Just remove a portion before the next feeding to catch up.
Kelsey Hammerschmidt says
I misunderstood the directions and have only been removing 60g of starter every day instead of removing half but still adding 60g flour and 60g water. Have I ruined my starter? Do I need to start over?
Emilie Raffa says
Not at all! You’re just following a specific ratio in the beginning to build up your starter to approximately one cup. It doesn’t have to be 100% exact. At this point, simply adjust your feeding schedule/quantities and continue.
Michele says
I live on the boat in the carribean Temperatures inside the boat can get hot 90+ especially when we leave the boat and close it up. Will this be too hot for the starter?
Emilie Raffa says
Hi there! Definitely hot, but with some adjustments you will be able to keep a successful sourdough starter. First, use cooler water in your feedings. Second, use slightly more flour than water by weight for a thicker starter (the reason you’re doing this is bc starters tends to rise and fall very quickly in hot climates; more flour will help to stabilize it). Third, do you have a fridge on the boat? Or a cooler? I recommend storing it in there when you’re present. However, leaving it inside the boat longterm without refrigeration will not be good! Hope this helps.
Bill Scheffler says
If I follow your Beginner Sourdough Starter Recipe and discard 1/2 of my starter beginning on day 3, then add 60g water and 60g flour I’ll have 180g of the mixture. If on day 4 I discard 1/2, I’ll have 90g of the stater remaining, then add 60g water and 60g flour, I’ll have a total of 210g of the mixture, etc., etc. as the days continue. Is this what I am supposed to be doing or rather than discarding 1/2 each day am I trying to have 60g of the stater to mix with the new 60g of water and 60g of flour? Thank you.
Christine says
It was a rollercoaster but I’m glad I persevered! On the second day it doubled in size and I thought this was going to be easy… but then nothing else happened after that. I kept feeding and eventually saw a little bit of movement each day. After 30 days it’s finally ready! I’ve baked a couple delicious loaves. Don’t give up! I ended up using the oven light with the door closed half the time… it felt very warm but turns out that’s what it needed! Now it’s rising on the counter without issues.
Stephanie Tuggle says
Oh my goodness – 30 days! My friend and I are on day 11 and we are struggling. Progress is VERY slow. It smells good but doesn’t want to grow. Mine has been in my oven with the light on for 10 straight days. The temp stays in the right range. Any tips for how you kept yours going?
Sherry Loomer says
good day, I have my starter working and I am on day 7, so far all is good with one exception, it has not doubled in size, it’s bobbling and looking good just not growing? I assume I should just continue feeding it daily until that happens?
Penny says
I have been wanting to try my hand at sourdough but until I found your blog, I was nervous. You have very clear instructions and hints! Before I go and purchase a jar, I wonder if it has to be a glass jar? Can I use a plastic jar with a lid? (Ziploc brand?)
Emilie Raffa says
Hi Penny! You can use whatever kind of jar you’d like, glass or plastic. I always suggest shopping if your house first before buying anything new ;) For me personally, I use glass as I’ve been switching away from plastic these days. But plastic can be used too.
Penny says
Thanks for the reply! Another question. My house is never at 75-80 degrees. Where would I park my starter for 24 hours at a time? Any hints?
Luke says
Do you keep the jar latched down and sealed after the first 7 days? Or do you continue to cover with only Saran Wrap/gas permeable coverings?
Emilie Raffa says
Yes. Sealed. If I see it growing too quickly, I’ll loosen the latch and let the lid rest on top of the jar.
Nancy says
Has anyone tried using a small amount (I used 10g) of wheat flour to try and get it going again? I am on day 4. Also seeing if not sealing the lid down helps. I have been keeping mine in the microwave w/light on.
Emilie Raffa says
Hi Nancy! On days 3-4, the growth typically slows down a bit when you switch to all purpose or bread flour for the ongoing feedings. Your starter needs time to adjust. This is normal. However, you can use 10g of whole wheat flour if you want, but it will change the overall type of starter you have once it’s fully established. It’s up to you! Heads up: don’t make too many changes during the creation process; starters like consistency. I’d recommend feeding it at the same time each day, with the same type of flour in a warm spot (try a warm water bath on the counter so you can see it).
Nancy says
Thank you so much for your reply! So, what kind of starter do you think I will end up with by using those 10g of wheat flour? Does it vary much in taste?
Nancy says
Has anyone tried using a small amount (I used 10g) of wheat flour to try and get it going again? I am on day 4 of the starter process. Mine has only had the hooch at the top yesterday (day 3) and today (day 4) with no bubbles and very thin. I am trying what one person suggested of not sealing down the lid as well and have been keeping mine in the microwave w/light on.
V says
There are some great questions in the comments but no replies. Please reply.
Gina says
I’ve been reading through the questions and comments. Most of the unanswered questions have already been answered in older comments. I’m sure she doesn’t have time to answer the same questions over and over.
Joann Prendergast says
After you have your completed starter and are keeping in fridge, when you feed it once per week do you remove half still or just add to it?
Emilie Raffa says
Hi Joann! Yes: remove and discard a portion of your fridge starter before feeding it again. More tips and advice here: https://www.theclevercarrot.com/2021/01/feeding-sourdough-starter-my-best-tips-tricks/
Chandle says
What does it mean if there is a brown layer (looks like hooch maybe?) but on the bottom, not the top?
Emilie Raffa says
It’s most likely hooch that’s just settled on the bottom (instead of the top). This is very possible. To remove it, try tiling the jar to allow it to pour out with ease. Then give you starter a good feeding of fresh flour and water.
Andy says
Tried your sourdough starter, worked a treat, and also tried your sourdough bread recipe, also worked a treat, thankyou so much for explaining everything in great detail, aswell as attaching all the helpful videos, made everything nice and easy 🙂, ours is called…….Trevor lol.
Emilie Raffa says
Andy thank you so much! I really appreciate your feedback. I’m thrilled everything is working out for you- happy baking!
Special Monkey says
Seems like a great recipe. My starter was looking pretty useless 12+ hours in, but on the 2nd day morning the whole wheat (KA) pasty mix looks to have tripled in size! I was tempted to start feeding it then, or maybe when it begins to deflate? In any case, I’ll try to follow instructions and wait until day 3 to begin feeding. I think the whole wheat flour really helps get things going (I think due to more yeast being present on the grain husk bits? I wasn’t having much luck using a recipe which called for a watery mix of 1/4 cup AP flour and 1/2 cup of warm water to start … I got a lot of separation and possible hooch … Hoping this works out much better, thanks for a great recipe!
Emilie Raffa says
Hi there! You are correct: whole wheat flour helps to jumpstart the fermentation process, which is why you’re seeing activity on day 2. This is good. Once your starter falls back down or “deflates” start the ongoing feedings with white flour. Now, since the growth will slow down on days 3-4 due to feeding with ap or bread flour (not whole wheat flour), my advice is to feed it at the same time each day. This will train your starter to rise and fall predictably, which is important for timing. Starters love consistency. Finally, speaking to the other recipe that you followed: the texture was most likely watery because all purpose flour absorbs less water than bread flour (and there was probably too much water in the jar to begin with). This causes separation and hooch faster. And when the weather is warm= even faster. You can easily correct this for any starter by simply adding more flour, and focusing on achieving the correct texture which should look like thick batter.
Ben says
I’m at day two and my starter is loking bubbly and happy :) It’s really cold here in Germany and my house is poorly insulated, so I put my starter in the boiler room in my basement. The temperatures are always cozy down there, might be a good tipp for people in colder climates. Just don’t put it on you boiler directly, that would be too hot ;)
Emilie Raffa says
Excellent tip, Ben. Thank you for sharing!
Yalcin says
I really liked that you answered all possible questions. Thanks for detailed instructions. I am 35 yo male who have no interest in kitchen but tries to make his own bread :-)
Emilie Raffa says
You are very welcome! I try my best :)
Naomi L. says
Sorry if this is a bit long, but wanted to be thorough. I began the starter on a Monday with the unbleached wheat flour. Tuesday it looked awesome! It had lots of bubbles and had more than doubled. Wednesday I feed it according to instructions with unbleached bread flour. Repeated for Thursday, no real growth since Tuesday. Thinking maybe my flour was too old or something, I switched to a new bag of KA unbleached all purpose. So Friday & Saturday fed with the apf. It hasn’t grown at all since Wednesday. On day 3 it had quite a bit of hooch, which I stirred in, that thinned it quite a bit. After that, only slight amounts of hooch developed, which I poured off. Also, I placed a mini string of lights around the jar to maintain a good temperature. There’s been no mold or pinkish coloring at all. I used weight for the feedings. The started has not grown at all and it’s been over a week. Very frustrated as your directions were so clear. Any suggestions?
Emilie Raffa says
Hello! Ok so first: string lights around the jar is the cutest idea ever and I can’t get the image out of my head now ;) And second: it’s normal, albeit frustrating, for the growth of your starter to slow down on days 3-4 when you switch to feeding with white flour (instead of continuing with whole wheat flour). This is where most people make changes to the recipe thinking something has gone wrong. Too many changes, and your starter will get a little defiant. They love consistency. Here’s what I recommend: continue using KA bread flour for the added enzymes, and make sure to rest your starter in a warm spot, ideally 75F+. Starters need warmth. Since it’s been cold here, I’ve been using a warm water bath (small bowl filled with hot water with my starter jar placed inside, but not submerged) with regular water changes. Every time I walk past it in the kitchen, I check to see if any bubbles have formed at the base of the jar. I hope this info helps a bit! Keep us posted on your progress.
Robyn says
Still making starter but trying so hard very confused
Emilie Raffa says
Sorry to hear that Robyn! The creation process does take time. Is there anything specific we can help you with?
Amy Sterling Casil says
I’m going to leave a bit longer review because I am so grateful to Emilie for her detailed instructions and her commitment to really giving everyone the information they need to succeed.
I made a lot of different breads several years ago while living in Southern California. I did have a home-made starter but almost all the breads I made also had commercial yeast in them. The starter back there wasn’t as vigorous as the one I have made now using Emilie’s detailed instructions. The results were up and down.
I quit eating and making bread for several years, but when I read about the health benefits of fermented foods, I suddenly realized that maybe I could start making bread again – using sourdough.
In the meantime, we moved to Southwest Florida. So if you’re going to make sourdough in a humid climate like ours, be aware, the starter’s gonna be a beast! My starter is less than a month old and more mature and vigorous than my So Cal starter got in over a year of use and feeding.
I have made 3 of Emilie’s basic sourdough loaves with this total beast of a starter, two pizza doughs that make my Philly-born/raised husband crazy, and there are sourdough blueberry muffins in the oven right now.
I have read a lot of info about sourdough in recent weeks and all I have to say is, follow Emilie’s instructions and make her recipes. I used to always use King Arthur Flour and I have used “whatever” this time – regular store bread and AP flour – I have locally-bought whole wheat flour, rye, etc. You will see info all over the map about sourdough, including some that say to feed the starter every 8 hours. Look, people have lives – you can put it in the fridge so it can sleep.
Emilie should be the “authority” for you and yes, I do mean over King Arthur which is what I followed before. Thank you so much, Emilie. You are improving our diets, nutrition, and baking!!
Emilie Raffa says
Amy, thank you for taking the time to leave such a sincere, thoughtful and thorough comment! To me, time is one of the greatest, most valuable gifts you can give and receive. So thank YOU. Your words made my day! I’m also super excited to hear that sourdough is treating you well in SW Florida. Starters love warmth, so it’s no surprise that your starter is a beast. In fact, I always say: temperature should be listed as an “ingredient” because two people, in two different climates, can follow the exact same recipe and have two, totally different breads! And that’s part of the fun. Thanks again for your support. It’s an honor to assist you (and everyone here!) on their sourdough journey ☺️
Margaret Wickizer says
This is my first time trying the Sour Dough Starter and got to Day 6.. MOLD and nasty smell!! What went wrong I wonder. I even made a sour dough bread yesterday from some of the discard! I’m so bummed.
Emilie Raffa says
Hi Margaret! Mold is the worst. I’m so sorry to hear that. It’s hard to pin point the exact cause; mold can be finicky. However, it could be temperature. Is is warm by you? Is your stored at room temperature? Any additional info you can provide will help to troubleshot. Additionally, after each feeding and for ongoing care: make sure to scrape down the sides of the jar with a small rubber spatula (if you have one) or something similar to prevent mold from growing on the side of the jar.
Lisa says
Hi,
It’s my first time making sourdough starter and I only have organic flour and prefer to use organic. I noticed you made a note not to use organic. Is there any way I can adjust the recipe so that I can still use my organic flour?
Thanks for your help!
Emilie Raffa says
Hi Lisa, great question. Honestly, I would just go ahead and use it and see what happens (the only adjustment to make would be to use another flour). It’s very possible that your starter will be successful- it’s happened to other bakers. I just like to give people a heads up just in case, since organic flour is usually more expensive than regular flour. Let us know how it goes!
Lisa says
Hello again,
I used organic whole wheat flour with success as it grew in size and saw results within a few hours.
The next day I discarded the hooch and continued feeding after transferring into a new mason jar as the smell was unbearable.
It still smelled incredibly bad each morning so I transferred it into a new jar for the 2nd time today (today is day 5).
I also noticed the starter was runny and has not grown within the past few days.
I tried googling an answer to my issues and an article suggested I incorporate some whole wheat flour. So instead of all AP flour, I mixed in about 1/3 whole wheat + 2/3 AP today.
I re-read your comments and am afraid I made a mistake as I did not realize you suggest not to make any changes.
Can you offer some tips/advice as to what may have gone wrong or if I should try to continue working with this current starter?
Thank you for your help!
teresa kilbury says
Thank you! I think I’ve got a working starter. Appreciate your thorough and concise instructions!
Emilie Raffa says
Excellent! Congrats Teresa! Happy baking :)
Juergen Stark says
Hi, very helpful. One item that doesn’t make sense on the sour dough starter: Days 4, 5, 6 indicate keeping about half of the starter and adding 60g white and 60g water. It looks like the ratio is supposed to be 1 to 1 to 1. However after Day 3, “half of the starter” would be 90g, not 60g. So assume, the correction is to keep 60g of the starter (not half)? Thanks
Emilie Raffa says
Hi there! The ratio for creating a sourdough starter is slightly different than the 1:1:1 ratio for ongoing feedings. During the creation process, the ratio listed in the recipe gets the total amount up to approximately 1 cup, so you have a god amount to use for baking.
Isa says
Hi!! I’m currently on Day 4 and so excited after a failed attempt at a starter a few years ago. Anyway, I was reading ahead and saw that after your starter is active, you should transfer to a clean jar. Is that step necessary? I already have her in a beautiful jar and don’t want to transfer unless I have to :) thank you so much for this really helpful guide!
Emilie Raffa says
Hi there! No, it’s not. It’s just a suggestion, especially if your jar looks like it could use a good bath (feedings get messy and crusty overtime). Do what you think works best! And you’re very welcome. Happy baking :)
Laura Leddy says
I added a cup of flour with a bit more of 1/4 cup of water on the third day by mistake.
Is my starter ruined?
Emilie Raffa says
Not at all! Starters like consistency, but they can bounce back easily. In fact, the texture of your starter will change quite frequently, based on temperature and type of flour used. To correct: for the next few feedings, focus on what the texture should look like, not necessarily the amounts at this point. You want it to look like thick, pancake batter. Once you get back on track, then switch to exact amounts.
Kelly says
its about to be day 3 and the hooch is sitting at the bottom. does that mean this yeast is no good?
Morgan says
Oh my goodness I’m such a dummy! I grabbed bleached flour I already split the starter, so I used wheat flour again should I be okay? I’m running to the store to get unbleached as we speak!
Emilie Raffa says
Hi Morgan! I’m a bit late to answer! How did it turn out? FYI- Using bleached flour is not the end of the world. I just like to give bakers a aheads up, especially if their starter is not successful after the first try!
Emilie Raffa says
Hi there! Someone else had this exact same question ;) Hooch at the bottom is fine. Just tilt the jar and pour it out, if possible. The yeast is not dead. Hooch is an indication that your starter needs to be fed. So, give it a good feeding of fresh flour and water and continue with the process.
Sue says
I started feeding the starter on day 2, as opposed to leaving it till day 3 (doh!)
Do I need to restart?
Emilie Raffa says
Not at all! Just continue with the recipe. Your starter will adjust automatically with regular, consistent feedings.
Kalie Niederhauser says
I stuck the starter on day 1 in the oven with the light on and forgot about it. So it has definitely doubled in size. Is that okay?!
Emilie Raffa says
Yes! It’s completely fine! Everyone will have a slightly different experience with the creation process, based on their current environment and tips used. Just continue feeding it until fully established.
Wendy Adams says
When you store your new starter in the refrigerator and feed it weekly do you have to continue discarding half?
Do you continue adding 1/2 cup flour and 1/4 cup of warm water each time you feed it?
Also how long before you plan to use it do you leave it out?
How much yeast is required for a regular size loaf?
Thanks
Linda says
My sourdough starter had doubled in size on day four. It has not done that since . But I keep feeding it and it is now day seven. Do I just keep going with feeding it? Thank you.
Gail says
I’m on day 6 and my starter is very watery! Won’t sure if I’m doing anything wrong!
Please help!
teresa kilbury says
Thank you for clear, concise directions for getting started! Looking forward to baking with my starter and trying out different recipes.
george johnson says
Would it be possible to use existing sourdough bread or crumbs from a good English muffin to jumpstart the early sourdough building process?
Lori Friday says
How much starter do you use for making a loaf of bread?
Linda says
Once the starter has been established, should I keep discarding some of the mixture every time I feed it?
Pamela says
I tried this (just finished day 7) and it only did the super cool doubling thing on Day 2, failed the float test on Day 7.
I am totally willing to keep feeding it for another week or two, but want to make sure I’m not doing something wrong (and wasting my time!) I used the jar recommended, but I’m wondering if that was for storage only as the seal is definitely TIGHT not lose as coverage recommends.
Kylee says
Not sure if this helps but I use a similar jar, but I removed the seal part of the jar and don’t fully close it. I put the lid on but that’s it! I found that this works well and my sourdough is doing really well (currently on day 5).
Nancy says
Thank you! I am on day 4 and only have the hooch at the top. It did great on the 1st and 2nd day but has looked like thin pancake mix yesterday and this morning (no bubbles) so I am going to try not locking the lid and see what happens.
Kendra Krehbiel says
I am not sure if I am doing it correctly. My started isn’t double in size on day 3, 4, 5 or 6. It double in size on Day 2 but that is it.
Do I keep discarding half of it and replenishing it with the 60 g of water and flour until something happens? I am at a lost here.
Jillian says
By far the most understandable and helpful sourdough starting post/recipe out there!
Mallory says
Hi, I have a question about the maintenance of the starter once it is made. How much flour and water do you feed it to maintain it?
Thank you!
Jurgen says
This is going to be a cool thing.
Day 1 1/2 already nearly double, plenty of bubbles. A little smelly but it is alive.
I tried this several times over the years and never got one going and all
I can think of is I didn’t use filtered water and the chlorine killed it or
it was winter and too cold?
One question I have is I used a double layer of cheeze cloth to cover it.
Should I have used a standard ball jar metal lid instead?
jurgen combs says
Well I think cheeze cloth is not a good cover and going to go back to loosely
closed lid on my ball jar. couple of days without a rise just made a layer of hooch each day.
Neha says
I tried this starter recipe and although my starter rose very nicely in day3 after feeding, it settled down after a few hours and hasnt risen after that. Its been 10 days now and its at the same level I started at, maybe just very slightly more.
Janet Decuir says
I live this recipe!!! I’m sharing it on facebook!!!
Lindsay W. says
I fed the starter on day 3 (midday) and forgot to feed on day 4 but I did feed early on day 5. Do you think it might still be ok?
Jim says
Hi Emilie,
Before trying your sourdough starter recipe, I tried 5 others that I found on the web and had 5 flops. I followed everyone’s exact and they worked really well until I got to the 4th day and I waited for a couple of more days and all I got was something that smelled sour and no bubbles. I suppose I was expecting the same thing with yours but when it worked on the 4th day and the 5th and so on I was elated!
So I tried your recipe for making sourdough bread using a Dutch oven. After going through all the pulls a folds and then wait a day and taking from the refrigerator letting it warm up and going through all the next few steps. When it came out of the oven it was sort of like a disc that was about 1 1/2 inches high and I almost had to take a saw to it to cut through it. I was afraid that I might break off a tooth trying to eat it so it went in to the trash.
I know it wasn’t your fault or the recipes fault but I wasn’t certain exactly what was wrong. So, have a bread maker, I followed the directions for making a loaf in there. It actually worked! Then only thing was it was a very heavy loaf any somewhat moisty, but the taste was very good. I would like to try your other method again but am not certain what went wrong. Anyway thank you for getting me going with a sourdough starter. Can you perhaps give e some pointers? I should let you know that my starter is 100% whole wheat is that a problem?
Caitlin says
I followed this and had success with my starter! I plan to store it in the fridge. When it’s ready to use I know I should pull it out and feed it and then take the amount called for in the recipe. Can I save the rest not called for in the recipe, feed it one more time and pop it back in the fridge?