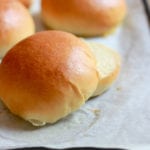
This recipe for light brioche hamburger buns proves that you can make seriously good hamburger buns at home. With a dough that’s simple to make and easy to handle, you’ll never buy brioche burger buns from the store again!

We like our burgers on soft, buttery brioche-style rolls and this recipe looked like a great starting point to experiment. What’s interesting, is that this brioche burger bun is lighter than most traditional brioche recipes (hence the title). It’s still soft and fluffy, but not quite as eggy and rich. Even the color is a bit lighter. Incredible!
In my opinion, nothing beats all-natural bread. Whether it’s a thick slice of sourdough bread or sandwich bread, good quality hamburger buns are absolutely life-changing. The taste, quality, and healthiness can’t be beat. These buns are the perfect vessel for sandwiches too! Just wait until you try them.

How to Make Light Brioche Hamburger Buns {Step-By-Step Recipe}
Step #1: Make the Dough & Let it Rise

- Whisk the warm water, milk, yeast and sugar in a small bowl; set aside. Beat the egg in a separate bowl.
- To a stand mixer fitted with the paddle attachment: add the bread flour, all purpose flour, salt and butter. Mix the ingredients until the butter is the size of pebbles.
- Add the yeast mixture and the beaten egg. Run the mixer on medium-low speed (I used #3 on my Kitchen Aid) until a dough forms, about 5-8 minutes.
- Scrape down the sides of the bowl and shape the dough into a ball. It will be sticky.
- Cover bowl with plastic wrap and let the dough rise until it has doubled is size. Depending on how warm your kitchen is, this will take about 1-3 hours (mine took 1 1/2 hrs @ 70 degrees F.)
TIP: Giving the dough enough time to rise is crucial in bread baking. In the past, I have rushed this step which caused my bread to be very dense. Rise times will vary, so be patient. Remember to watch your dough and not the clock!

Step #2: Cut The Dough
- Once your dough has risen, dump it out onto a lightly floured work surface.
- Then, gently flatten the dough to get rid of any air bubbles. Using a bench scraper (or a chef’s knife) cut the dough into 8 equal portions.
- If you have a digital kitchen scale weigh each portion so that they’re all the same size. Do this by weighing the entire ball of dough first, and then divide by the number of rolls you want to make.

Step #3: Shape The Dough Into Balls
- To shape, gently flatten each piece of dough like a pancake.
- Pull up each side pinching it together in the center. Repeat until the ball is sealed. Flip the ball over (seam side down) and move to an un-floured part of your board. It will be easier to roll this way.
- To finish, place your palm over the top and gently roll into a smooth ball.
- Transfer each ball onto a parchment lined baking sheet.


Step #4: Second Rise
- The dough will need to rise again, this time for a shorter period than the initial rise.
- The balls should look puffy and slightly risen, about 1- 1/2 hrs. When they’re ready, gently brush each one with egg wash. See how puffy they are?
TIP: At this point, you could add sesame seeds to the top of your rolls if you’d like.

Step #5: Bake The Dough
- Preheat your oven to 400 F and place a shallow metal baking pan on the oven floor.
- Before the dough goes in, add about 1/2 cup of water to the pan to create steam. This will help keep the bread nice and moist.
- Bake for about 15-20 minutes or until golden brown. Transfer to a wire rack to cool completely.

More Delicious Brioche & Bread Recipes to Try!
- How to Make Brioche Rolls
- How to Make Brioche Loaf
- Light Brioche Hamburger Buns (whole wheat)
- Sourdough Bread: A Beginner’s Guide
- Easy Sourdough Sandwich Bread
Light Brioche Hamburger Buns
- Prep Time: 15 minutes
- Rise Time: ~4 hours @ 70 F:
- Cook Time: 20 minutes
- Total Time: 4 hours and 35 minutes
- Yield: 8 buns
- Category: Yeast Bread
- Method: Oven-Baked
- Cuisine: American
- Diet: Vegetarian
Description
Adapted from the NY Times, this recipe for light brioche hamburger buns is perfect for BBQ fare, sandwiches (try bacon, egg & cheese!) and so much more. You’ll never buy from the store again!
Ingredients
Dough
- 1 cup warm water, about 75–85 F
- 3 tablespoons warm milk (I prefer whole milk)
- 2 teaspoons active dry yeast
- 2 1/2 tablespoons granulated sugar
- 1 large egg
- 3 cups bread flour
- 1/3 cup all-purpose flour
- 1 1/2 teaspoons fine sea salt
- 2 1/2 tablespoons unsalted butter, softened
Egg wash
- 1 large egg
- splash of water
Toppings
- sesame seeds (optional)
Instructions
- Whisk together the warm water, milk, yeast and sugar; set aside. Beat the egg in a separate bowl.
- Add the flours, salt, and butter to the bowl of a stand mixer. Using the paddle attachment, mix the ingredients until the butter is the size of pebbles.
- Add the yeast mixture and the beaten egg. Run the mixer on medium-low speed (I used #3 on my Kitchen Aid) until a dough forms, about 5-8 minutes.
- Scrape down the sides of the bowl if necessary, and shape the dough into a ball. It will be sticky. Cover bowl with plastic wrap or a very damp kitchen towel, and let the dough rise until it has doubled is size, about 1- 3 hours @ 70 F. *See notes below.
- Line a baking sheet with parchment paper. Using a floured dough scraper (or chef’s knife), divide the dough into 8 equal pieces. If you have a scale, weigh each piece to guarantee that they’re all the same size.
- To shape the dough into balls, gently flatten each piece like a pancake. Gather the ends and pinch the dough to seal in the center. Flip the dough over, cup the surface with your palm, and roll into a ball. Transfer to your baking sheet, placing them a few inches inches apart. Cover and rest for 1-2 hours, or until puffy and slightly risen.
- To make the egg wash, beat the egg with a splash of water. When the buns are finished with the 2nd rise, gently brush each one with egg wash. At this point, you could add sesame seeds to the top of your rolls.
- Preheat your oven to 400 F. and place a skillet or metal baking dish on the oven floor. Before the dough goes in, add about 1/2 cup of water to the pan to create steam. This will help keep the bread nice and moist. Bake for about 15-20 minutes or until golden brown. Transfer to a wire rack to cool completely.
Notes
Giving your dough enough time to rise is crucial in bread baking. Rise times will vary depending on temperature, so be patient. Remember to watch your dough and not the clock!

Comments
Bob says
Hi!
Made these buns and loved them!
If I was looking to make a more traditional brioche bun (that is more eggy and rich), how could I alter this recipe to achieve that goal?
More eggs? butter?
Thanks!
Sakura Hyo says
Hi.. I’ve been looking for burger buns recipes that are fluffy and not fall apart when topped with juicy patties. I think I’ll try your recipe and this is perfect time to open up a converter table.
One small question, why don’t you use grams instead for weight measurement? Are cups measurement accurate?
Bob says
I was just wondering if I made a larger batch, if there was any stage where it was possible to freeze the pre-baked buns, so I can have them fresh on demand?
Emilie says
Hi Bob! Yes- you absolutely can freeze these buns to have them fresh on demand. What I do, is after I pull them out of the oven I let them cool completely. Then I wrap each one individually in plastic wrap, then foil. The buns can be frozen up to 3 months (if they last that long!). I hope this helps. Happy baking :)
David says
Can I make the buns smaller for sliders?
Jose says
Hello! I’ve tried these buns and they are amazing! I just have one question. If you need to make more than 8 buns at a time, say you need around 24 or 32 buns how would you proceed? Can you double the recipe or do you need to make 4 separate batches??
Thank you for your response!!
Emilie says
Hello! I’m so glad that you liked the recipe! It’s one of our favorites too.
In terms of making larger quantities, I’ve only doubled the recipe in my past experience. If you need 3-4x the recipe, you might want to make 2 double batches to be on the safe side (does that make sense?). Alternatively, instead of 8 buns/recipe, you might be able to get 10-12 if you want them a smaller size.
Hope this helps! Happy baking :)
Emily says
These are my favorite buns! I’ve made several other recipes & nothing can touch these. I make multiple batches at once & freeze the rest. Yummy! Thank you for sharing!!!
Emily
Emilie says
You are so welcome Emily! I’m happy that you like them :)
Kat says
Hello! Just wanted to say thank you for this amazing recipe. This is the first time I make rolls and they turn out so perfect and lord knows I have experimented with bread and roll recipes for years! My boys LOVED them. Made a batch last night and already have another batch rising =) Thank you Miss Emelie!
Chris says
Trying this now. I made the recipe 1 1/2 times as I had a block of fresh cake yeast that I found for the first time in years. It bubbled like a volcano while proofing in the water/milk mixture! Added a little wheat germ in place of some of the all-purpose flour. Sure hope they come out. I’ve tried many recipes for hamburger buns in the past and hadn’t cared for with the texture for a hamburger but these looked great. Thanks
Chris says
Great texture and taste. I could’ve made 18 buns rather than 12, though. They’re enormous! I shaped 6 like hamburger buns and 6 as hot dog buns, used 2 sheet pans to bake. I used ice cubes rather than water when ready to place in the oven. Each rose to the size of small loaves of bread. Now, we’ll just use as we would for bread instead of buns. They came out like and airy with lots of layers. I know they’ll toast well, too. Thanks for the easy to follow recipe.
PseudoShea says
Made these today using the dough cycle in my bread machine. I halved the recipe (kept the amount of eggs and all-purpose flour the same though) and it made 8 perfectly sized buns. Delicious, soft, and beautiful! Great recipe.
bakerangel says
I’ve made them for a barbecue this weekend and they were amazing! Thanks for sharing this great recipe.
Emilie says
You are quite welcome!!! Thank you for taking the time to stop by and comment. I really appreciate it :)
Kristin says
I made these hamburger buns this evening, and they were AMAZING!! Super easy and fail proof :) Thank you for a recipe I’m sure I will use again and again!
Alex S. says
Made this tonight. I’ve been working with a variety of brioche recipes. These were amazing. I feel like my dough was a bit too sticky to handle, at least to form. The rolls came out great, but I’d like to know your recipe in Grams to be more precise if possible. Thanks!! :) :)
Luca says
I’ve been trying to make soft buns for burgers for a while, since the ones you can buy here on mainland Europe are disgusting and dry. Most of the recipes I’ve tried so far have been hard and disappointing. I was particularly attracted by this recipe as I’ve made brioche many times (I live in France) and it sounded like a great idea.
Maybe it was because I converted the cups to grams wrong, but I ended up using half as much flour again in order to produce anything remotely resembling a dough. I ended up using my experience of brioche dough to judge it. It could also have been the European flour, which is quite different from that in the USA. However, once baked they were so soft and tasty! I will definitely be making these again as they were the perfect complement to burgers. Thank you so much for sharing.
Emilie says
Hi Luca! I know how frustrating it can be when a particular recipe doesn’t turn out… I’m glad that you had success with this one! It sounds like your experience with brioche and overall judgement in baking really played a key role in how they turned out. That’s the key to bread baking, being flexible and making adjustments as you go. Thank you so much for taking the time to comment- I really appreciate your feedback :)
kara says
I just made these today and they turned out wonderful !!!! they looked so good and felt bad for eating them :) I now have the perfect bun for this summer’s barbecues.. thanks so much for posting this!!!
Emilie says
You are quite welcome Kara! Eat as much as you want (they go fast, don’t they?) In addition to burgers, they’re great for sandwiches too… my kids love how soft they are. Enjoy! :)
Gloria says
I have made these hamburger rolls three times now – each time with different flours (all-purpose, bread flour, and whole wheat flour). Each time they have turned out wonderful! I have a regular mixer, so I knead the dough by hand for 8 to 10 minutes. I love kneading dough! The first time I made the recipe, I just put all the flour in – the dough was very dry, so I added a little water as I kneaded, and it ended up great. Depending on the humidity, flour amounts can vary, so now I add all the flour, except the last 1/3 cup. Then I can add it if necessary or not, depending on the dough’s consistency. My husband loves having these rolls in his lunch!
Emilie says
Hi Gloria! That’s FANTASTIC! You’ve got the right idea by judging the flour & water amounts based on the current temperature. That’s what it’s all about! I will be posting a recipe for whole wheat rolls myself in a couple of weeks… Stay tuned. Thanks for stopping by to comment! :)
Moon says
Hi!
I made these yesterday and they turned out delicious! I replaced the all-purpose flour by rye flour and sprinkled some caraway, sunflower and pumpkin seeds on top. I kneaded it by hand as I don’t have a KitchenAid (yet!). Served with some chestnut and mushroom veggie burger and that was a great dinner.
I think they will make a regular comeback during the summer bbqs.
Thank you for the recipe!
Sarah says
I’ve made these at least ten times and they’ve come out perfect every time….until today. The tops split when they baked, they didn’t brown evenly over the top and, while they are perfectly fluffy on the inside, the bottoms are blackened. Still edible but not nearly as pretty and perfect as they usually are. I can’t think of anything I did differently. Any ideas of what might have gone wrong or how I can avoid this in the future?
Emilie says
Hi Sarah! I’m so sorry to hear about your bread. I have had similar things happen to me in the past so I know how you feel :(
Although I am not an expert, it sounds to me like your oven could possibly be the culprit. Uneven browning is usually due to inaccurate oven temperatures and hotspots. Also, an oven that is too hot will create excessive ‘oven spring’ (rise). This is not necessarily a bad thing, however sometimes it will cause the outside of the bread to harden before it has had a chance to fully rise. This will cause splitting.
If you don’t already have one, I would recommend getting an oven thermometer to regulate the temperature. Hopefully that will work! Good luck and let me know how it goes!!! ;)
June says
These came out perfect following the recipe! They were so attractive that my husband photographed and posted them in Facebook. Thank you for warning that the dough is very wet! I would have been tempted to add more flour. Will never buy hamburger buns at the grocery store again.
Emilie says
Yay! I love a good success story. Baking bread is a lot of fun, isn’t it? I would love to see your photograph too! Feel free to stop by my Facebook page if you’d like: https://www.facebook.com/TheCleverCarrot. Thanks for the feedback June! :)
Gisli says
Made this recipe twice, failed the first time, succeeded the second time today. Figured that I had too much of yeast and let it rise too much. Now I am gonna make some burgers with these delicious buns :)
I used all organic ingredients which makes these better in some way ;)
Emilie says
That’s wonderful Gisli! I’m glad that you were able to make successful adjustments to the recipe. And I’m sure they tasted superb with all organic ingredients. That always seems to be the case, doesn’t it? ;)
Odie says
You mentioned adding 1/2 c of water be added to the pan. Did you mean the pan the buns are being baked on? Wouldn’t that make a gooy mess? Thx
Emilie says
Hi Odie! Sorry for the confusion- The pan that I’m referring to is a baking pan that you place into the bottom of the oven and fill with water to create a steamy environment for the bread. This is separate from what the actual rolls are baked on. The rolls are baked on a baking tray or cookie sheet (not in the pan with water!). Hope this helps! :)
Lydia says
New to bread making, and I was wondering why you have the additional 1/3 cup all-purpose flour….why not use all bread flour?
Emilie says
Hi Lydia! Great question- the addition of 1/3 c. of all purpose flour gives these rolls a (slightly) cake-y or fluffy texture. This is because it has less gluten than bread flour.
Bread flour on the other hand, has a higher gluten content and is preferred in bread baking for its elasticity and overall texture. In this recipe, is adds a nice ‘chew’ to the rolls. FYI- I’ve made this many times with only bread flour and it works beautifully.
I hope this answers your question! Feel free to drop by if you have any other questions- I’m happy to help ;)
Peter G says
Very good recipe, turned out very well – both buns and brioche shape. Many thanks!
Emilie says
You are quite welcome! Thanks for trying out the recipe and stopping by to comment. I really appreciate it! :)
dora says
Making my second batch of these wonderful buns. You will be happy with this recipe, follow to the letter, you won’t be disappointed.
Emilie says
Hi Dora,
I actually just finished rolling out a batch of these as well! How serendipitous ;) For dinner, we’re having slow-cooked pulled pork, homemade bbq sauce and these delicious rolls! Thanks for stopping by!
Sarah says
You’ve created a monster! These turned out so well that I want to make them every day. I cook a LOT (and have my own food blog too) but making yeast breads is new for me. These were easy and are gorgeous and delicious. We will be channeling summer and having burgers on these tonight. Thanks for a great recipe!
Emilie says
Ha ha… a bread monster? Those are the best ones! ;)
I’m so glad that you decided to give this recipe a try. Yeast breads are not very difficult, and once you get going it’s hard to stop! And knowing that you can make bread from scratch is very rewarding. We love these rolls for sandwiches too- they’re the kids’ favorite. You can even make mini ones to dunk in soup… Thanks for stopping by Sarah! :)
James says
Hi Emilie, these look amazing ! can’t wait to try this recipe. Just a quick question, not sure if someone has already ask this and iv’e missed it. Just wondered if u can freeze these and how long will they keep if so.
thanks James.
Emilie says
Hi James! After I bake the rolls (and they have cooled completely), I individually wrap them in plastic wrap and place into the freezer. They should last about 3-6 months, but if wrapped properly possibly longer. I hope this helps! :)
Bridget says
Please could you tell me in pounds and ounces? Live in the UK so cups mean nothing to me !!
Julian says
Just baked a full batch of these to complement a pulled pork I made the day before. Followed directions to a T (though I had to mix by hand because I don’t have a stand mixer). Still turned out perfectly! Definitely bookmarking this one for future reference :)
Emilie says
Hi Julian! Thanks for taking the time to comment… I always enjoy hearing about the different experiences people have with the recipes (and don’t get me started about bread- I could talk about that for ages!). And you mixed everything by hand? That’s fantastic! Good to hear that it didn’t give you any trouble :)
Allison says
Hi, Julian! Thank you for sharing that you made this by hand. That is what I will try doing this weekend, as my stand mixer is in storage. Your comment gave me encouragement!
Michael says
Just made these to go with some pulled pork we are having tomorrow. My first attempt at Brioche and they turned out great, thank you!
Emilie says
Yay! I love a good success story… these rolls would be perfect for pulled pork. Great idea :)
Sophie says
These turned out fantastically for me – and I am very much a novice baker! Thanks for the lovely, step-by-step tutorial. They were perfectly light for a brioche and not too rich – this is now my go-to recipe for all future buns!
Just a quick question – you mentioned you usually freeze these for future use? Do you freeze at the raw dough stage or once baked? Can you let me know your process for freezing and defrosting these wonderful buns?
Thanks!
Emilie says
Hi Sophie! I am SO happy that you had success with this recipe! Isn’t it fun making homemade buns?
As far as freezing goes, I freeze them after they are baked. Once cooled completely, I usually wrap them in plastic wrap (individually) and then pop them into the freezer. I’m sure you could freeze them in a large ziploc bag as well. Just make sure to stack them in between parchment paper so that they do not stick.
I hope this help! :)
Laura says
These look so delicious! I am looking at trying them this weekend.
Have you had success doubling this recipe? I know there are some bread recipes that are a failure if doubled. I would love to get a double batch of these, but didn’t know if I should double it or mix two single batches separately.
Emilie says
Hi Laura! You will lOVE these rolls. My kids go crazy for them :)
As far as doubling the recipe, I’ve never done that before so I can’t speak from experience. I would make 2 separate batches this time just to be on the safe side!
Good luck & let me know how they turn out!
Alex says
I know it’s been a while, but I made a double batch today. They are currently on their last rise. Im a bit worried because on the first rise, I left for about an hour and a half, it rose a little too much. Probably due to the extremely hot weather here. I wanted a brioche bun for sloppy joes, so I’m giving this a try. I’ll let you know how it turns out.
Emilie says
Sounds great! What you are experiencing (fast rise) is normal; baking methods & schedules must be adapted to weather change. In the summer, the dough will rise incredibly fast! But you already low that ;) I think they will turn out great!
Rebecca says
Emilie, When I let the rolls go through the second rise, they spread out A LOT over the course of an hour. I ended up reshaping and baking in a dish (packed tightly) instead, which worked fine. Any advice as to why they might have spread so much during the second rise?
Emilie says
Hi Rebecca!
This happens to be a high hydration dough, which just means that it contains a large amount of liquid. The extra moisture in the dough causes it to spread out when rising. It’s actually very common.
To avoid this, my best advice would be to make sure that you shape the ball into a tight ball in order to successfully hold its shape. If it’s not tight enough or the seam is not closed underneath, it will spread. To do this, you need to create adequate surface tension when rolling. After tucking all of sides underneath the dough and closing the seam as best as you can, place your palm over the top (cupping the dough). Roll it towards you and around in a circle until it gathers into a tight ball. Keep going until it’s nice and tight. It is best to do this on a un-floured surface so that it doesn’t slide around.
Shaping free form rolls takes some practice and I’ve had many epic failures! I’m so happy that you chose to bake it all in one dish instead of giving up. Well done! And I hope all of this information helps… if you have any other questions, please so not hesitate to ask! Good luck :)
Will Baker says
Dear Emilie, I tried these last night and they turned out great! I was amazed at how little time it took. Maybe 5 min prep and another 5 to rollout into buns. Easy! I am going to experiment with your recipe by wrapping a salami in the dough and then baking. I will let you know the results.
Emilie says
Welcome Will! I’m so glad that you liked the recipe. It is pretty easy to put together, especially in the warmer months when the dough rises super fast! I’ve also used this recipe for regular sandwich bread, baking it in either 1 or 2 9×5″ loaf pans. You might want to give it a try!
I think your salami idea is fantastic by the way… I’d love to hear how it turns out. Let me know!
PS- I will be posting more bread recipes in the next couple of months- be sure to check back :)
Emilie says
Hi Mariz!
I’m so sorry to hear that your other recipe didn’t turn out so well. Such a bummer when that happens, right? I hope you enjoy this one! If you have any questions, check out the comment/convo by James (above). I’ve included some great tips! Good luck :)
Mariz Mansour says
Thanks for this recipe, they look amazing!
I have just tried another burger bun recipe but it didn’t turn out to be great, however, I am gonna try this recipe soon and even maybe post a picture of the fruits of my labor. :)
James says
I do have another question. What do you find is the best way to store these? I tried wrapping them I plastic wrap but that didn’t seem too good
Emilie says
I find that these are best consumed within 1-2 days of baking. Once completely cooled, I’ve stored them several different ways; sometimes I throw them into a Ziplock back, other times I just cover them with plastic wrap in a big bowl, and I’ve even gone as far as wrapping each one individually in plastic. I usually don’t have a problem with freshness. Hope this helps!
James says
I’ve followed this recipe and although they came out quite well I found mine to be slightly harder than I expected. I’ve had similar brioche buns before that were very soft
and spongy. Any idea where I could be going wrong? Not enough needing, not enough rising? I used a kitchenaid stand mixer with the dough kneading for 10 mins then let the dough rise for 2 hours in a warm room. Then another 2 hours after portioning them. I want to perfect this.
Emilie says
Hi James! Great question. In my experience, there are several factors that can make bread hard/tough/dense/heavy.
Here are some examples:
1.) Too much flour. This particular brioche dough should be extremely wet & sticky. Adding too much flour will make it heavy & dense. Make sure to WEIGH all of your ingredients for accuracy. King Arthur Flour has an excellent master conversion chart that you can reference.
2.) Initial rise time too short. This used to be my #1 problem with homemade bread baking. I always rushed this step and every single time it led to heavy, dense bread. Rise times will vary depending on temperature and yeast strength, so it’s crucial to watch your dough and not the clock. Depending on the day, this dough can take anywhere from 1 1/2-3 hours @ 80 degrees F to rise. In the colder, winter months it will usually take longer. It also helps to proof your dough in the same container every time so you can visualize how fast/slow the dough is rising. When it hits a certain point, you know it’s done. You can monitor the rise time better this way.
3.) 2nd rise time too long. Your dough does not need to rise for as long as the initial rise, nor does it need to double in volume. It’s ready when it’s slightly puffy. If it rises for too long, it will not get enough oven spring to create a round shape. Instead it will be heavier & flat. For the second rise, I usually let my dough rise for 45 min- 1 hour @ 80 F. Again, when it’s cold it might take a little longer (I never go over 1 1/2 hours). When it doubt, it’s better to underproof.
4.) Not enough steam in your oven. Often times this will cause the exterior of the bread to get really hard which hinders the rising process in the oven. Usually your bread will tear or ‘blow out’ as a result.
Based on your experience above, I believe that your dough was kneaded sufficiently (I run my KitchenAid for 8-10 minutes on speed 3). However, I think your initial rise time might have been too short; try increasing your initial rise time and definitely decrease your 2nd rise. And don’t forget to weigh all of your ingredients!
I hope this helps! If you have anymore questions please feel free to get in touch. I’m happy to help. Good luck :)
James says
Finally nailed it thank you so much. Your extra advice made all the difference and they look identical to your pictures, they are the right softness that I would expect and they taste perfect. Finally a brioche roll worthy of my already perfected homemade burgers.
Emilie says
That’s incredible! I’m so glad that you were able to finally nail down the recipe. Isn’t it tasty? If you have any other bread baking questions, feel free to stay in touch :)
Ashley says
In the ingredient list it says 3 TB of milk, but in the instructions it says 1 cup. I’m assuming to use the 1 cup. I am planning on making these for Sunday, a reward for my first 5k of the summer! Please let me know, thanks
Emilie says
Hi Ashley! I see how it can be a little bit confusing…
The ingredients list is correct; use 3 TB of milk. In addition to the milk, you are to add 1 cup of warm water (this part is listed in the instructions and not in the ingredients). Does that make sense?
I’m going to adjust the recipe just in case others have the same concerns. Thanks for bringing it to my attention!!! And congrats on your 5K! :)
Alessandra (DinnerinVenice) says
These look so perfect! And such a simple recipe too!
Emilie says
Thank you Ale! Yes, it’s a very basic recipe. Once you have the fundamentals down you can experiment with all kinds of different shapes and loaves. It’s very flexible. Enjoy!
Eleanor Norton says
I have baked these buns several times now with great success. My family loves them! I have want to bake a loaf using the same recipe. How long should I bake a loaf?
Anne @GtSlamseysFarm says
These look so good. I guess they’d be a slightly healthier version for breakfast too – minus the hamburger.
Emilie says
Haha… yes. That would be true. But not quite as fun, right? My kids love these for breakfast, myself included. With coffee. Thanks, Anne! :)
Anna @ Crunchy Creamy Sweet says
These are gorgeous! I love the perfectly browned tops! Pinning!
Emilie says
Thank you Anna!
silvia says
Simply sensational! I wish I had a couple of those right now…Thanks again for another inspiring post! Silvia
Emilie says
You’re welcome Silvia!! You’re such a talented baker, you’ll be able to whip these up in no time! All of your bread looks fabulous :)
Fatima musa sadiq says
Omg beautiful just before I made this commenr,I rushd to the kitchen nd
made my dough right now its kept safe nd about to start rising Lol can’t wait….thanks for sharing :-D
Emilie says
Oh, I’d love to hear how they came out! Good I hope ;)
celia says
Now they look like the PERFECT hamburger bun! Lovely step-by-step instructions too, Em! :) xx
Sue says
Any idea how to make these multi grain ….my husband is diabetic and would love to make these but just a bit less carbs for him.
Emilie says
Hi Sue! Good question… I’m not sure how to make these multi-grain as I’ve never done it before. It sounds delicious though. I’ll have to investigate that one! :)
Melanie says
I’m wondering if you have investigated making them whole grain yet. They look scrumptious, but I too am diabetic and these would cause a huge rise in blood sugar for me.
Matt says
Maybe a multigrain flour instead of the heavy plain flour
Emilie says
Hi Matt!
Sure, you can play around with multigrain flour. Just keep in mind that the rolls will be more dense because of this. You might want to do 50/50. I did a version here: https://www.theclevercarrot.com/2014/06/light-brioche-hamburger-buns-whole-wheat/
Sandra @ Kitchen Apparel says
These are just way too beautiful!!! People would go nuts if I had some of these at our next BBQ.
Kelly @ Inspired Edibles says
I have never been a very patient bread-maker but when I see these step by step photos and how beautiful these little bundles are, I can’t think of a good excuse why I shouldn’t be making these. And I love the idea of just using good old fashion ingredients without the binders, emulsifiers and preservatives. Just like the olden days — our grandmas would be proud ;-). Lovely illustrations Emilie and a perfect time indeed to be posting these for bbq season — what a glorious day!
Laney says
What gorgeous photos! And nothing could replace a wonderful homemade bun for a summer bbq…
Emilie says
Ah, yes I have to agree with you on that one Laney. Homemade is definitely the best when you can swing it! I like to make a big batch to freeze… Thanks for stopping by! :)
Steve says
can I ask how you freeze them?
do you do it after you have shaped the 8 buns and left them to rise for the final time?
many thanks
Steve
Emilie says
Hi Steve! I only freeze the buns after I bake them. I allow them to cool completely, wrap individually in plastic wrap, and then cover in foil (this will add extra protection against freezer burn). They defrost pretty quickly too. Hope this helps! :)
Bruce says
We’ve been searching for a soft hamburger bun for many years but today our search has ended. Tried this recipe this morning and knew from the dough stage that this bread was going to be something special. After the second proofIng, just before the buns went into the oven I was encouraged by how beautifully they had risen. Had them tonight with homemade hamburger patties and was v2ery pleased. Now we can finally make at home a burger bun that matches our favourite local diner.
Can’t recommend enough.
Emilie Raffa says
Thank you! So glad you liked the recipe, Bruce! x
Laura (Tutti Dolci) says
I love brioche, these are gorgeous!
Emilie says
I love brioche too Laura! Almost too much I think… It’s just so buttery and delicious!
Cheryl Haff says
What is different from Brioche and plain Hamburg rolls?
Emilie says
Hello Cheryl,
A typical brioche recipe includes butter, eggs and a little bit of sugar. Most rolls do not (just flour, yeast, water salt etc).
Jocelyn (Grandbaby Cakes) says
Those are serious some beautiful buns!!!!
Emilie says
Thanks sweets! <3
rally says
I made these delicious brioche and they are delicious but I would like ti make som with a thinner crust.
Can you tell me how?
thank you
Angelica
Emilie says
Hi there! So glad you liked the buns! Thanks for the feedback :) For the crust, it shouldn’t be thick at all… Were the buns fully cooked in the center and lightweight? It’s sounds to me like your oven might be too hot. Check next time with and oven thermometer and/or lower the oven temp about 10-20 or so. Hope this helps!
Revati says
Gosh just look at those smooth and glossy tops on the buns! Lovely pictures, Im tempted to make a batch but not sure if our Indian flour will hold up..
Emilie says
Thank you Revati! I’m so curious about Indian flour…what’s it like? I’ve never used it before :)
Alla says
These were the best hamburger buns I have ever made. I did add half a cup more of bread flour because my dough looked way too wet. And they were gorgeous, lightly sweet, gentle to the bite! Mmmmm. Thanks! Alla
Emilie says
Hi there!
Thanks for the feed back! So glad you enjoyed them! Yes, this dough is definitely wet (which is sometimes tricky to handle). I’m happy to hear that additional flour made it more manageable :)
Jane says
Hey! I’m in the process of making these, on my second rise. The dough is really nice, all I had was bread flour and pastry flour so I just used pastry instead of a.P. (I prefer a lighter bread anyways). The dough wasn’t too sticky, very nice dough actually. Excited to try these tonight with my home made burger patties!!
Alex says
Can you make the dough the day before, refrigerate and bake the next day?
SweetieS says
So is the dough supposed to be very wet or is it ok to add more flour to the dough until the dough doesn’t stick to my hands. I assume this happened because I live in a warmer State.
Emilie Raffa says
Hi there! Yes, you’ll need to add more flour. Could be from inaccurate measuring, brand of flour, using ap flour only (instead of bread + ap) and the warmer temperatures. Hope this helps!
Liz says
I just made only using plain flour… Should be interesting I’ll let u know the results ?
Emilie Raffa says
Yes! Do let us know :)