This no-knead artisan bread recipe is perfect for beginner bread bakers. Made with instant yeast and baked in a Dutch oven. Follow my easy step-by-step photos and instructions to bake this simple bread at home!

Interested in baking your own bread? Jim Lahey’s No-Knead Bread recipe uses an incredibly easy formula: Simply mix up the dough and let it rise overnight. You don’t need a stand mixer or a bread machine, and there’s no kneading involved! Just 2 minutes of prep time and the rest is hands off. The result? A gorgeous, perfectly golden crusty loaf with a soft and chewy interior.
YOU WILL NEED:
- 5 1/2 qt. Dutch Oven (or another oven-safe pot with lid)
- Bread Flour (Target has the best price)
- Instant yeast
- Parchment Paper
- Container (for the dough to rise)

How To Make Easy Homemade Bread
Step #1: Mix The Dough
First things first: Clear away all kitchen clutter and find yourself a nice workspace. This includes all bills, kids’ toys and random phone chargers. Then, in a large bowl add the dry ingredients (flour, yeast and salt) and mix with water to combine. As it becomes difficult to stir, get in there with your hands and mush everything together. It will be wet and sticky, with a shaggy appearance…
Instant Yeast vs. Active Dry Yeast: What’s The Difference? While both types of yeast make bread dough rise, instant yeast can be added directly to the bread dough along with the rest of the ingredients. Active dry yeast needs to “bloom” first in water before using. This recipe uses instant yeast, although active dry yeast can be used with the blooming modification step mentioned above.

STEP #2 LET The Dough RISE
Transfer the dough to a lightly oiled container and cover loosely with oiled plastic wrap. Let the dough rest at room temperature (about 70 degrees F) for 14 hours- overnight. Your dough is ready when it has puffed up in volume, about 1 1/2- 2 x the original size. You will also see lots of bubbles.
TIP: If your dough isn’t puffed and bubbly after the initial rise, place it in the microwave with the light on (keeping the door ajar). The warmth from the light will give the yeast a boost. My friend Celia gave me this tip and it works like a charm, especially in chilly kitchens!


STEP #3 SHAPE THE DOUGH & LET IT RISE AGAIN
Flour a sheet of parchment paper. Remove the dough from its container and place it on top. Fold it in half (like a book) and then fold it in half again. When you are finished folding, add more flour to the parchment paper (be generous so that it doesn’t stick). Shape the dough into a ball by gently tucking the sides underneath itself. Place it onto the paper seam side down, like so…


Cover loosely with oiled plastic wrap and let it rest again until puffy. It will start to spread out slightly as it rises- this is ok. The 2nd rise will not take as long as the first, but expect to wait about 30 minutes- 1 hour depending how warm your kitchen is.

Step #4 Get Ready to Bake
About 1/2 hour before your dough is ready, preheat your oven to 500 F. Place a Dutch oven with the lid on top inside for 20 minutes to heat up. Why use a Dutch oven? Steam is essential in bread baking! The lid traps in the residual moisture which allows the dough to form a beautiful, artisan-style crust. If you do not have a Dutch oven, any oven-safe pot with lid will work. Just make sure it can heat up to 450 F.
When the Dutch oven is nice and hot, carefully slide your hand underneath the parchment paper and invert the dough into the pot. The seam will now be facing up. Take a look…


Step #5 Bake the Dough
Place the bread into the oven, and immediately reduce the temperature from 500 to 400 F. Bake with the lid on for 40 minutes (this will trap the steam inside making the bread moist). Then, remove the lid, and bake for an additional 15-20 minutes or until the crust is a deep, golden brown.
TIP: To be sure that your bread is fully cooked, I highly recommend taking its temperature. I use this digital thermometer and LOVE it. The internal temperature should read between 200-205 F for this recipe. If not, bake the loaf a little longer (extra time in bread baking is a good thing).


Step #6: Let It Cool
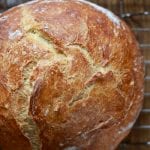
When your bread is done, remove it from the oven and transfer to a wire rack. It should feel light and sound hollow when you knock on the bottom of the loaf. You’ll also notice a wonderful crackling sound as it cools. Let it rest for at least 1 hour before cutting into it. Doing so too soon might ruin the texture of the bread, resulting in a gummy crumb! Trust me, I speak from experience. And there you have it- easy, no-knead artisan bread!

Final Thoughts…
For all you beginners out there, I had absolutely no clue how to bake bread when I first started. With practice, I’ve found that the no-knead approach is a great starting point for anyone. It will give you the confidence to take on more challenging recipes like sourdough bread, as you continue to develop your skills and intuition. To me, baking bread at home is truly a rewarding experience. And not only does it taste good, this loaf cost less than $1 to make!
Looking For More Beginner Bread Recipes?
- Light Brioche Hamburger Buns (fan favorite!)
- No-Knead Honey Whole Wheat Bread
- Pull Apart Brioche Rolls
Jim Lahey’s Easy No-Knead Artisan Bread
- Yield: 1 loaf
- Category: Yeast Bread
- Method: Oven-Baked
- Cuisine: American
- Diet: Vegan
Description
An incredible recipe for no-knead artisan bread baked in a Dutch oven. I like to make the dough in the evening (after dinner) to rise overnight. It’s fantastic for sandwiches, crostini, and to mop up delicious sauces! Recipe adapted from Jim Lahey’s No-Knead Artisan Bread.
Ingredients
- 390g (3 cups) bread flour (not all-purpose) + more for dusting
- ¼ teaspoon instant yeast
- 1¼ teaspoons fine sea salt
- 320g (about 1 1/3 cups) water
Notes
I use King Arthur Bread Flour & SAF instant yeast. You can use any 5 1/2- 6 quart Dutch oven, cast iron, enamel, Pyrex or ceramic bakeware (with lid) that can heat up to 500 degrees F.
Instructions
In a large bowl add the flour, yeast, salt and water. Stir until a rough dough forms. If it seems very dry, add more water.
Transfer to an oiled container and cover loosely with plastic wrap. Let rise for 14 hours- overnight, at room temperature (about 70 degrees). Your dough is ready when it has puffed up in volume, about 1 1/2 -2x its original size. *See note below.
Lightly flour a sheet of parchment paper and place the dough on top. Fold dough in half and then fold it in half again.
Shape the dough into a ball by tucking the sides underneath itself, and place onto the paper, seam side down. Cover and rest again until puffy but not fully risen, about 30 minutes- 2 hours depending on how warm your kitchen is.
Preheat your oven to 500 F. Put a (6 quart) dutch oven pot inside for 20 minutes. When ready to bake, remove pot from the oven. Place your hand underneath the parchment paper and invert the dough into the pot. The seam will be facing up. Cover the pot with the lid.
Place your bread into the oven, and reduce the temperature from 500 to 400 F. Bake for 40 minutes, covered. Remove the lid and bake for an additional 15 to 20 minutes, until golden brown.
To make sure that the bread is completely cooked through, take its temperature. Carefully tip the bread onto its side and insert a thermometer into the bottom. It should read 200-205 F. If not, place it back into the oven until it is ready (extra time in bread baking is a good thing). If you’re worried about the top getting too brown, put the lid back on.
When your bread is ready, transfer to a wire rack to cool. It should feel light and make a hollow sound when you give it a knock underneath. Let it cool for at least 1 hour. Cutting it too soon might ruin the texture resulting in a gummy crumb!
Notes
If your dough isn’t puffed and bubbly after the initial rise, place it in the microwave with the light on (keeping the door ajar). The warmth from the light will give the yeast a boost. My friend Celia gave me this tip and it works like a charm, especially in chilly kitchens!

Comments
Geetanjali says
Made this bread for the first time and it came out perfect! Kept the dough overnight in an unheated oven with the light on as it’s still cold in New Jersey! I also did not turn over the dough but just put the parchment paper with the dough in the heated Dutch oven.
Lidia says
Sorry! “…let the dough overnight to proof”, not “the bread”.
Lidia