This post will teach you how to make a beginner sourdough starter at home, step-by-step. All you need is flour, water and a little bit of patience. Before you know it, you’ll have your very own bubbly, active starter ready to make THE BEST sourdough bread, sourdough focaccia, homemade sourdough pizza crust and much more!
Looking to bake incredible sourdough bread? First: you’ll need a sourdough starter. Without it, your bread won’t rise. It’s the absolute heart and soul of sourdough baking. Creating one from scratch is not hard to do. However, the process can seem intimidating (especially for beginners). Let’s change that. Adapted from my bestselling book Artisan Sourdough Made Simple, I will demystify and simplify the process with step-by-step instructions.
Once your starter is established, it can be used for a wide variety of sourdough bread recipes including this scrumptious sourdough bread with olive oil (most popular recipe on my blog!), my sourdough focaccia, sourdough pizza crust, sourdough sandwich bread and soft sourdough cinnamon rolls to name a few!
What is a Sourdough Starter?
Sourdough is more than just a recipe; it’s an understanding. So before we dive in, let’s define. Simply put: a sourdough starter is a live fermented culture of fresh flour and water. Once combined, the culture will begin to ferment and cultivate the natural yeasts found in our environment. A small portion is added to your bread dough to make it rise. Commercial yeast IS NOT required.
Sounds a bit weird, right? Of course it does. And it should. Know this: natural “wild” yeast is all around us. It can be found in a bag of flour, in the air, on your hands etc. Just because you can’t see it, doesn’t mean it’s not there and doing its thing. It’s like magic.
How Long Will It Take?
To create a sourdough starter from scratch, the overall process will take 7 days (or more) from start to finish. It’s not instant. First, you’ll create the starter with whole wheat flour to jumpstart fermentation. Then, you’ll continue to feed it with regular all purpose flour to cultivate the wild yeasts and friendly bacteria.
When Will it Be Ready To Use?
Your starter is ready to use when it has doubled in size, with plenty of bubbles on the surface and throughout the culture.
NOTE: It’s not uncommon for it to take up to two weeks or more for the starter to become active. It all depends. I know this timeframe sounds a bit vague, but growing yeast in a jar (that’s basically what you’re doing) can be unpredictable at times. Please be patient if the process takes time for you- it’s normal.
Is it Difficult to Do?
Absolutely not! In short: you’re basically adding flour and water to a jar, feeding it with more flour and water over time, and then waiting for it to become bubbly and double in size. That’s it. Most of your time involvement is hands-off. Can I ask you a favor though?
Don’t overthink it.
There’s a lot of sourdough information out there, and you will fall down a major rabbit hole if you start poking around. Just stick to this tutorial for now and follow the steps as written.
Beginner Sourdough Starter Recipe
You will Need:
Supplies
- 3/4 L jar (I use this one)
Ingredients
To create the starter:
- 60 g (1/2 cup) whole wheat flour
- 60 g (1/4 cup) water
To feed the starter each day (Day 3-7):
- 60 g (1/2 cup) unbleached all purpose flour or bread flour
- 60 g (1/4 cup) water
NOTE: Use regular, unbleached all purpose flour or bread flour for best results- skip organic. The enzymes are different which can hinder the rising process the first time around. I use either KAF, Trader Joe’s or Whole Foods. Filtered water or tap water is fine. Use the latter if you know it’s mostly chemical/chlorine free.
Day 1: Make the Starter
- Before you begin, establish a feeding schedule. In other words, feed your starter at the same time each day. This will establish consistency, which sourdough starters love. Consider feeding your starter in the morning when you wake up.
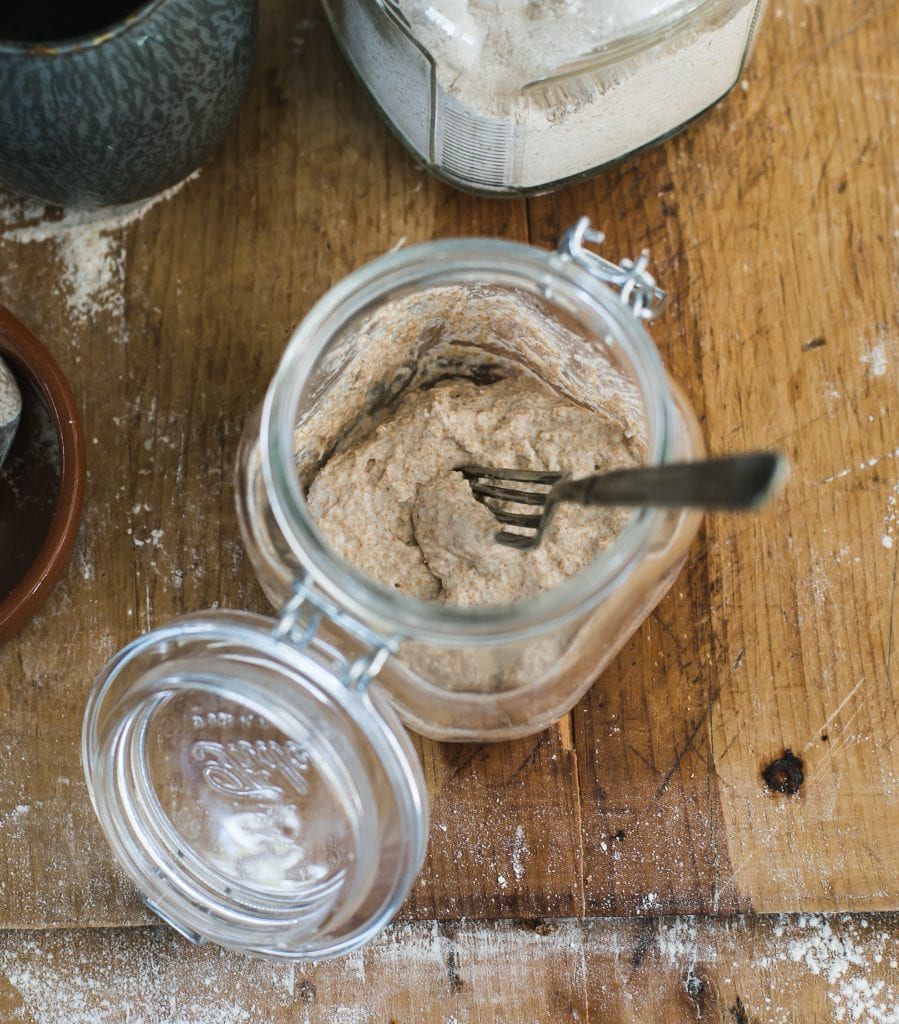
- Combine 60 g (1⁄2 cup) of whole wheat flour and 60 g (1⁄4 cup) of warm water in a large jar.
- Mix with a fork until smooth; the consistency will be thick and pasty. If measuring by volume, add more water to thin out the texture if needed. Cover with plastic wrap or a lid, and let it rest in a warm spot, about 75-80 F for 24 hours.
TIP: Looking for a warm spot? Place your starter on a cookie sheet inside the oven (turned off) with the light on for a few hours (but not overnight- it might become too warm). You can also use a proofing box set to your desired temperature, or a microwave with the door ajar and the light on.
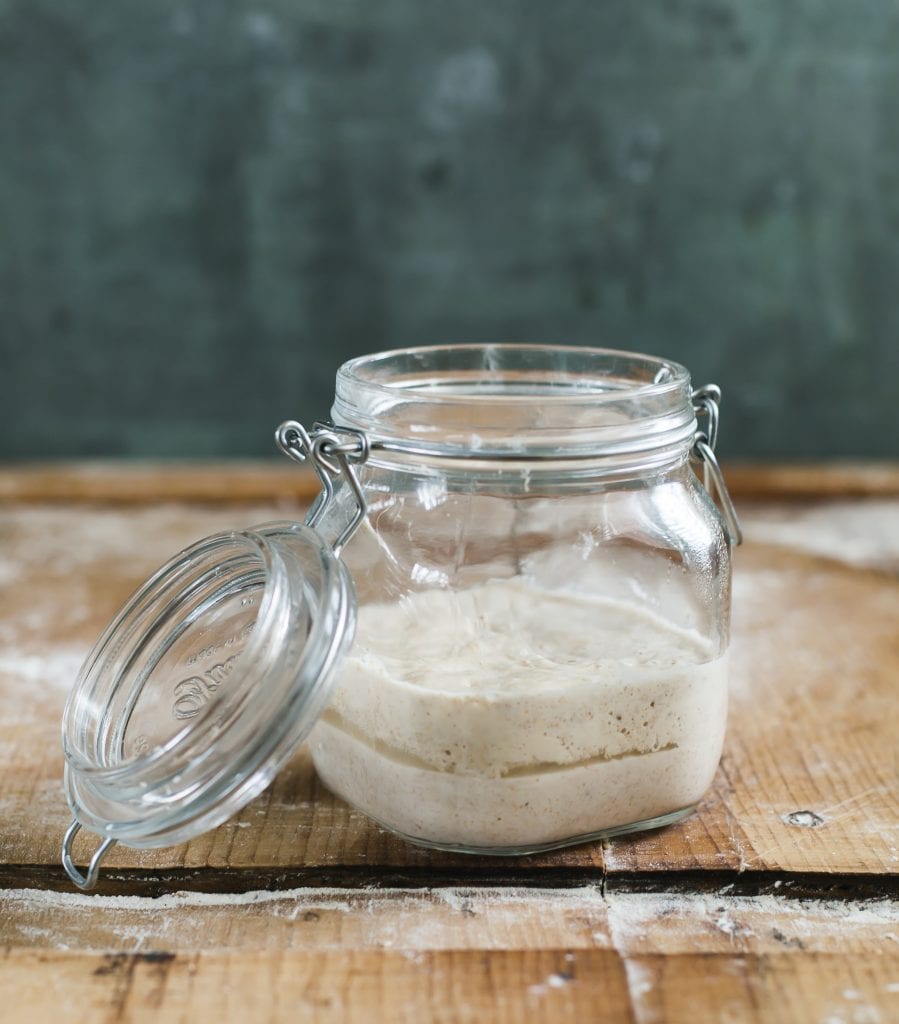
Day 2: Got Bubbles?
- Today, you’re going to check if any small bubbles have appeared on the surface.
- Bubbles indicate fermentation, which is what you want! However, it’s okay if you don’t see anything right away; the bubbles might have appeared and dissolved overnight while you were sleeping. This happens quite often.
- You do not have to do anything else right now. It does not need any flour or water. Just rest the starter in your warm spot for another 24 hours.
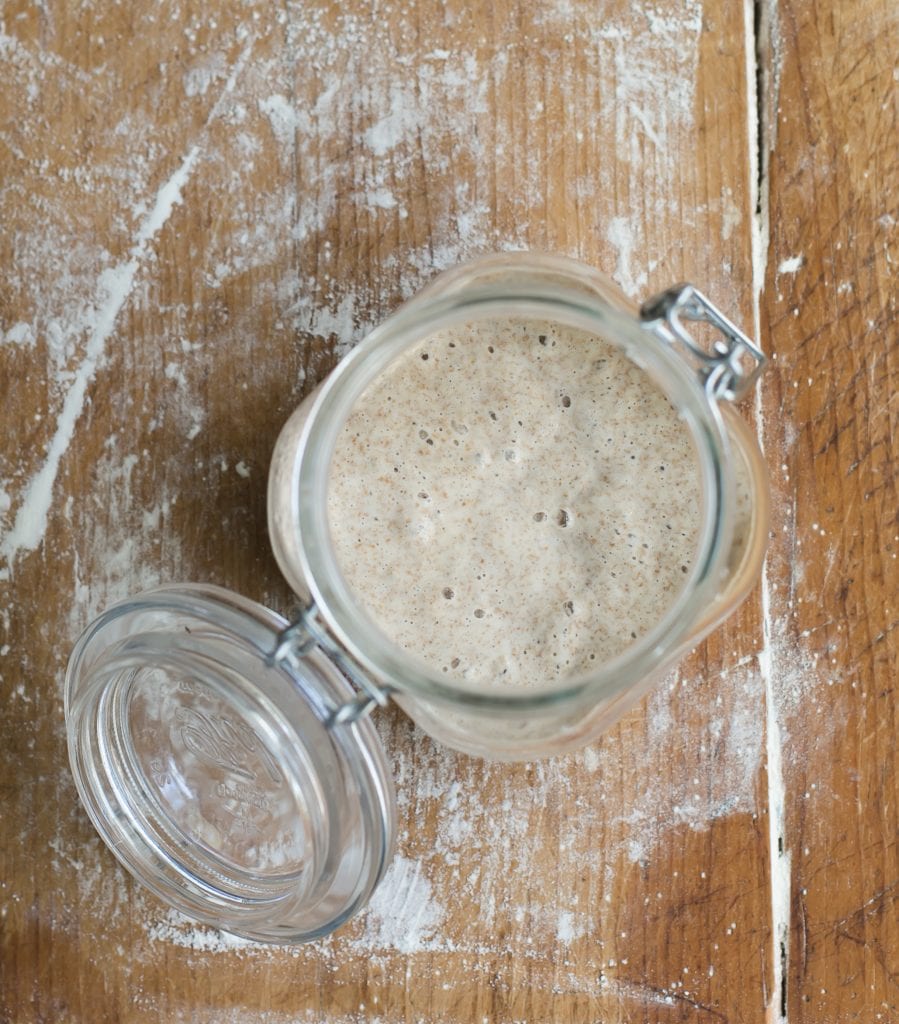
Day 2 (Con’t): What’s that brown liquid?
- During the creation process, and even after your starter has been established, a dark liquid might appear on the starter (the image above shows the liquid in the middle of the starter- it’s usually found on the surface).
- This liquid is called “hooch” and is an indication that your starter needs to be fed. It also has a very stinky smell, similar to rubbing alcohol or gym socks. This is normal. Don’t freak out. Any time you see this liquid, it’s best to pour it off, along with any discolored starter present. However, on Day 2 just leave the hooch alone; you can get rid of it tomorrow when you start the feedings.
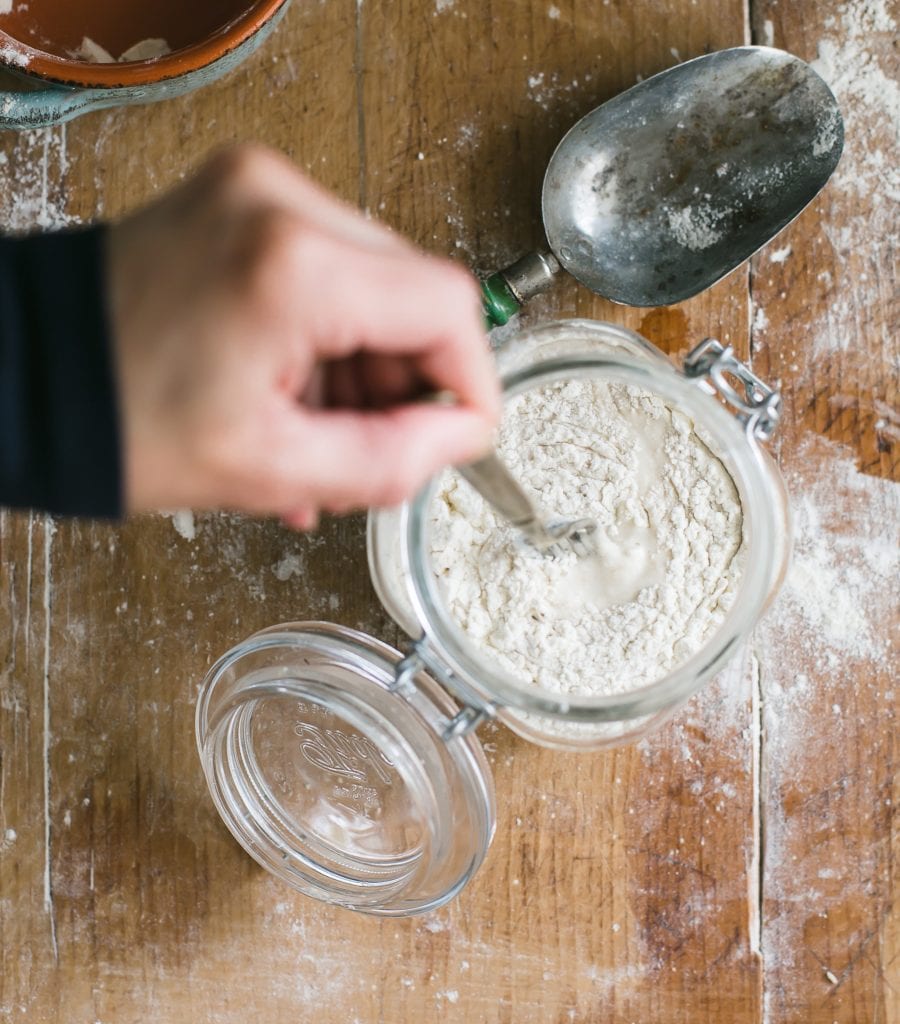
Day 3: Feed Your Starter
- Whether bubbles are visible or not, it’s time to start the ongoing feeding process.
- Remove and discard approximately half of your starter from the jar (you should have about 60 g left). Use a spoon. The texture will be very stretchy. Add 60 g (1⁄2 cup) of all-purpose our and 60 g (1/4 cup) of warm water. Mix with a fork until smooth.
- The texture should resemble thick pancake batter or plain yogurt at this point so add more water as needed. Cover and let rest in your warm spot for another 24 hours.
DAYS 4, 5, & 6: Keep on Feeding!
- Repeat the same feeding process as outlined on Day 3:
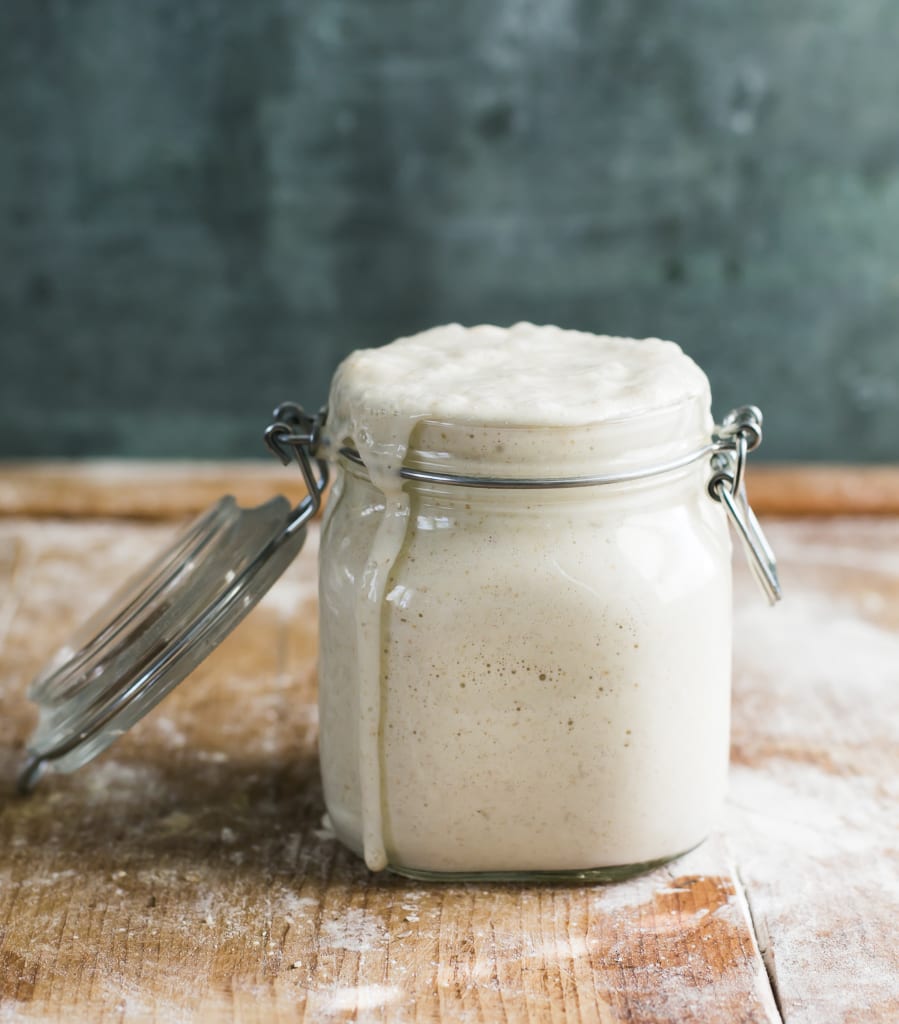
- Remove and discard half of the starter, and feed it with 60 g (1⁄2 cup) of all-purpose flour and 60 g (1/4 cup) of warm water. As the yeast begins to develop, your starter will rise, and bubbles will form on the surface and throughout the culture.
- When the starter falls, it’s time to feed it again.
TIP: Place a rubber band or piece of masking tape around the jar to measure the starter’s growth as it rises.
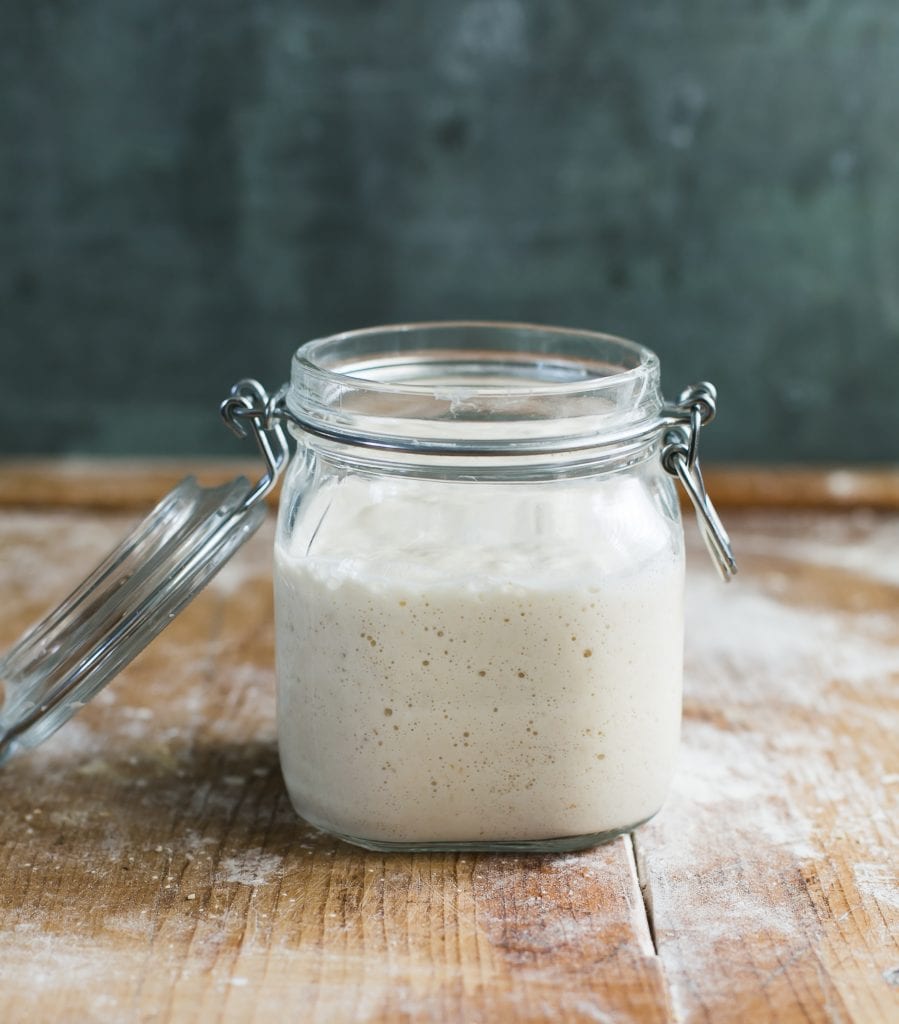
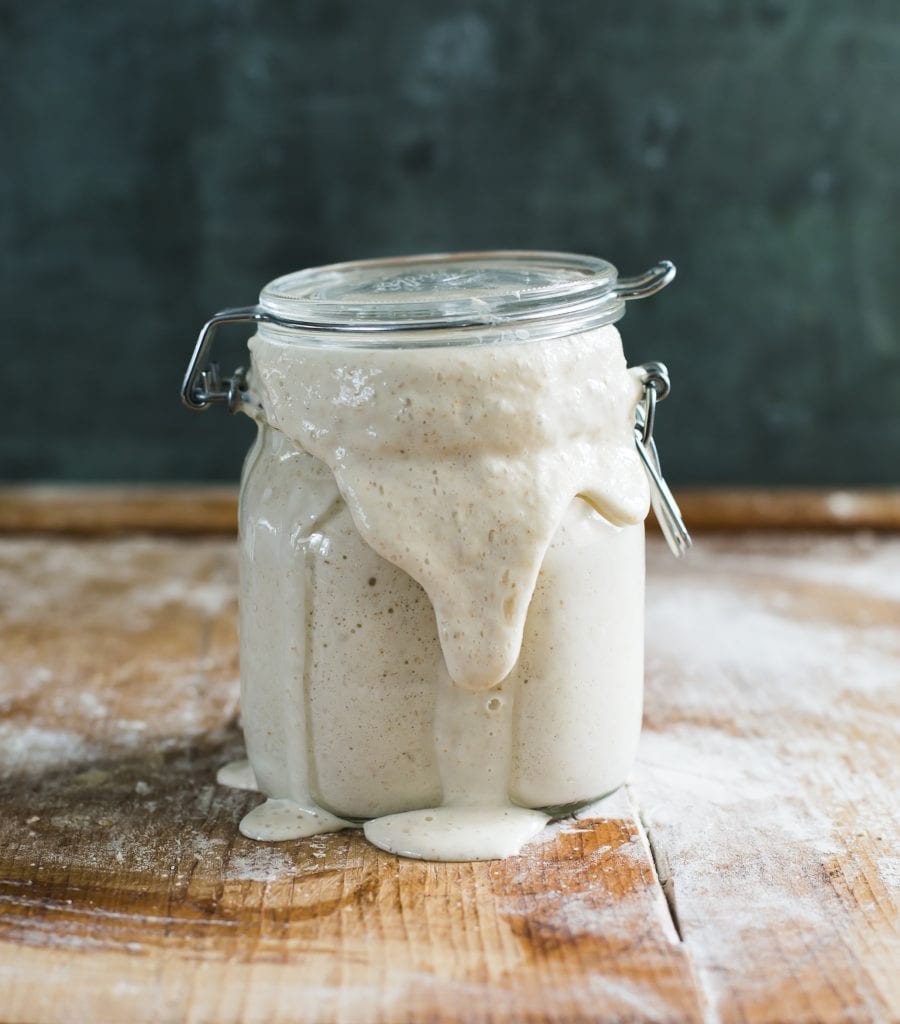
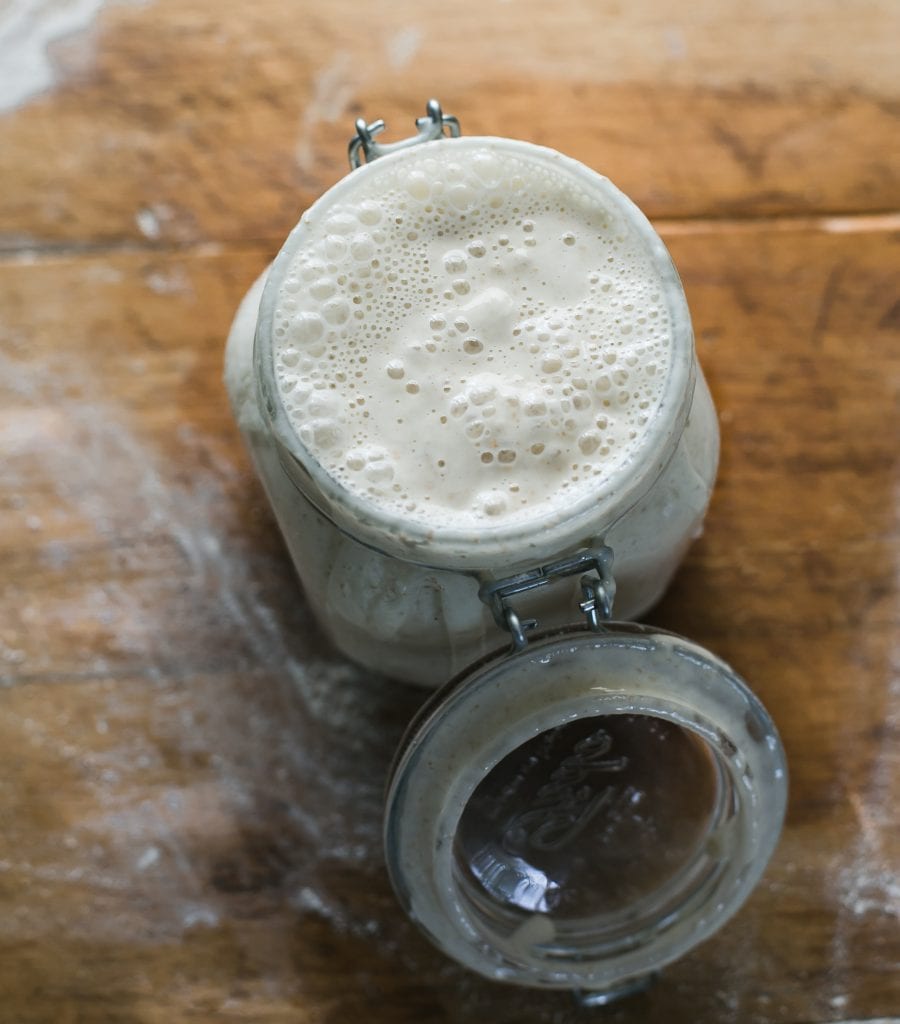
Day 7: A Sourdough Starter Is Born!
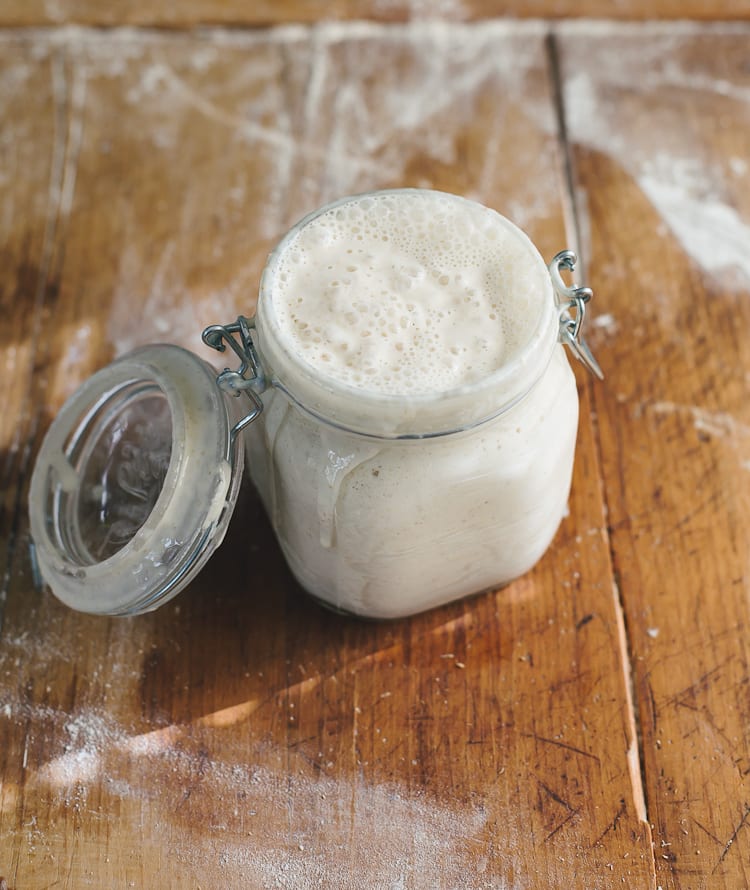
- By now, your sourdough starter should have doubled in size.
- You should see plenty of bubbles, both large and small. The texture will now be spongy, fluffy, and similar to roasted marshmallows (think: s’mores). It should also smell pleasant and not like stinky gym socks. If these conditions are met, your starter is now active.
- The very last step is to transfer your sourdough starter to a nice, clean jar. In keeping with tradition, you can also name it (and please do!). My starter is called Dillon after my oldest boy and it’s bright and bubbly, just like he is ;)
- Now you’re ready to bake! Start with my beginner sourdough bread recipe- you’re going to love it!
What’s Next? Let’s Make Bread!
- Sourdough Bread Recipe (reader favorite!)
- Beginner’s Guide to Sourdough Focaccia
- Best Sourdough Pizza Crust (No steel or stone!)
- Feeding Sourdough Starter: My Best Tips & Tricks
- Troubleshooting Your Sourdough Starter
A Few Tips for Ongoing Care…
So you’ve created a sourdough starter! Now what?
Just like any living creature, it must be kept alive with regular feedings to maintain its strength. If your starter is not strong, your bread will not rise. Caring for your starter is much easier than you’d think, and certainly won’t take hours of your time.
Note: You will need to feed your starter every time prior to making bread dough and to maintain it (keep it alive).
How to Feed a Sourdough Starter
Feeding Routine:
- Begin by removing and discarding about half of your starter.
- Replenish what’s left in the jar with fresh all purpose flour and water.
- Cover loosely, and let it rise at room temperature until bubbly and double in size. Once it falls, the bubbles will become frothy and eventually disappear. Then you’ll know it’s time to feed your starter again.
- Feed your starter everyday if it’s stored at room temperature. If you keep it in the fridge, feed it once a week.
PS: If you miss a feeding, don’t worry- your starter is not going to die. It might look ugly (and smell horrendous) but it usually just needs a few feedings to perk back up.
When is Your Sourdough Starter Ready To Use?
Your starter is ready when it shows all of the following signs:
- bulk growth to about double in size
- small and large bubbles on the surface and throughout the culture
- spongy or fluffy texture
- pleasant aroma (not reminiscent of nail polish remover/gym socks/rubbing alcohol)
If you’re having trouble spotting the signs, don’t forget to place a rubber band around the base of the jar to measure the starter’s growth.
You can also try the float test mentioned above: Drop a small dollop of starter into a glass of water. If it floats to the top, it’s ready to use.
How to Store Your Sourdough Starter
Once your starter is established, you have two storage options to consider.
At Room Temperature: If you bake often—let’s say a few times a week—store your starter at room temperature. This will speed up fermentation, making the starter bubbly, active, and ready to use faster. Room temperature starters should be fed one to two times a day, depending on how quickly they rise and fall.
In the Fridge: If you don’t bake that often, store your starter in the fridge covered with a lid. You’ll only need to feed it about once a week or so to maintain its strength when not in use (you can just feed it cold and then pop it back in the fridge right afterwards; no need to warm it up first). When you are ready to make dough, feed your starter at room temperature as needed, to wake it back up.
**TIP** For more info on sourdough starters please read Feeding Sourdough Starter: My Best Tips & Tricks.
Sourdough Starter Faqs
Yes. All purpose flour is easy to find, inexpensive and reliable for starter growth.
Yes. Because whole grain flour absorbs more water than all purpose flour, adjust the texture with additional water if it’s too thick.
Yes. Adjust the texture with additional water if it’s too thick.
Yes. But it’s not recommended. The chemicals can throw off the rising process. However, some readers have reported success with bleached flour. Your choice!
It might. To clarify: organic flour is not bad to use. The enzymes are just a bit different. This means the overall process might take longer than indicated. I recommend using all purpose flour instead because it’s more predictable (and less expensive!).
Whole wheat flour is used to jumpstart the fermentation process. If you do not have whole wheat flour, just use all purpose flour instead. The starter will be fine. I switch to all purpose flour for the feedings because it’s reliable, inexpensive and practical for everyday baking (remember, a portion of your starter is removed, discarded, or used for something else).
To refresh the acidity levels and to control the overall growth in size.
To learn more please read, Sourdough Discard 101: Recipes & Faqs Answered.
In the beginning, I typically don’t recommend using the discard (it’s usually really smelly and discolored). I recommend using the discard after the starter has been established. However, everyone will have a different experience with this. If it looks good- use it!
For more info please read, Sourdough Discard 101: Recipes & Faqs Answered.
If your starter is used to one type of flour, and then you swap it out for something else, just give it time to adjust. It might react immediately (in a good way!) or it might be sluggish at first and then eventually perk up.
For more info please read, Feeding Sourdough Starters: My Best Tips & Tricks.
Beginner Sourdough Starter Recipe
- Yield: appx. 240 g (1 cup)
- Category: Sourdough Starter
- Method: 1-Bowl
- Cuisine: American
- Diet: Vegan
Description
Looking for an easy, sourdough starter recipe for beginners? Adapted from my bestselling book Artisan Sourdough Made Simple, follow my no-nonsense guide for practical tips, tricks, and ongoing care- anyone can do it.
Ingredients
Note: Once your starter is established, use it to make my sourdough bread.
- 1x (5lb) bag all purpose flour or bread flour (I use either KAF, Trader Joe’s, or Whole Foods)
- 1/2 cup (60g) whole wheat flour (I use KAF whole wheat)
- Water (preferably warm around 85F )
Tips:
- The overall process typically takes 7 days, if the temperature is warm enough, ideally 75+ F. However, it can take up to 2 weeks or more for a strong starter to become established. Please be patient. Find a warm spot for your starter to rise (see tip in recipe below), and use warm water in your feedings if necessary to give the fermentation a boost.
- Only a small amount of whole wheat flour is used to jumpstart the fermentation process. If you don’t want to commit to a large bag, smaller bags are available in most grocery stores. Alternatively, you can use all purpose flour only.
- You will also need one large 3/4 L jar, or something of similar size (I use this one.).
Instructions
Before you begin: Establish a feeding schedule. In other words, feed your starter at the same time each day. This will establish consistency, which sourdough starters love. Consider feeding your starter in the morning when you wake up.
Day 1: Combine 60 g (1⁄2 cup) of whole wheat flour and 60 g (1⁄4 cup) of warm water in a large jar. Mix with a fork until smooth; the consistency will be thick and pasty. If measuring by volume, add more water to slightly thin out the texture if necessary. Cover with plastic wrap, reusable wax wrap, or a lid and let it rest in a warm spot, about 75-80 F, for 24 hours. Temperature is important.
TIP: Looking for a warm spot? Place your starter on a cookie sheet inside the oven (turned off) with the light on for an hour or two (it can get hot in there, so keep you eye on it!). Center rack is best. You can also use a proofing box set to your desired temperature, or a microwave with the door ajar and light on.
Day 2: Check to see if any bubbles have appeared on the surface. If you don’t see anything, it’s okay. The bubbles might have appeared and dissolved overnight while you were sleeping. You don’t have to do anything else now. Rest the starter for another 24 hours.
TIP: During the creation process, and even after your starter has been established, a dark liquid might appear on the surface and throughout the culture. It has a very stinky smell, similar to rubbing alcohol or gym socks. This liquid is called “hooch” and is an indication that your starter needs to be fed. It’s normal. Any time you see this liquid, it’s best to remove it along with any discolored starter present. However, on Day 2 just leave the hooch alone. You can remove it tomorrow when you start the feedings.
Day 3: Remove and discard approximately half of your starter from the jar (you should have 60 g left). The texture will be very stretchy. Add 60 g (1⁄2 cup) of all-purpose flour and 60 g (1/4 cup) of warm water to the jar. Mix with a fork until smooth. The texture should resemble thick pancake batter or plain yogurt at this point. Cover and let rest in your warm spot for another 24 hours.
As the yeast begins to develop, your starter will rise, and bubbles will form on the surface and throughout the culture. When the starter falls, it’s time to feed it again. TIP: Place a rubber band or piece of masking tape around the jar to measure the starter’s growth as it rises.
At a glance, your overall daily schedule with measurements should look like this:
- Day 1: 60 g flour + 60 g water = 120 g starter
- Day 2: Do nothing
- Day 3: Remove & discard half of the starter/ 60 g starter + 60 g flour + 60 g water = 180 g starter
- Day 4: Remove & discard half of the starter/ 90 g starter + 60 g flour + 60 g water = 210 g starter
- Day 5: Remove & discard half of the starter/ 105 g starter + 60 g flour + 60 g water = 225 g starter
- Day 6: Remove & discard half of the starter/ 112.2 g starter + 60 g flour + 60 g water = 232.5 g starter
- Day 7: Remove & discard half of the starter/ 116.25 g starter + 60 g flour + 60 g water = 236.27 g starter
Wondering if your starter is ready to use?
When your starter is fully active, do the float test. Feed your starter, wait for it to double in size, and then drop a teaspoon of bubbly starter into a jar of water; if it floats to the top it’s ready to use.
Storage Options
If you bake often, store your starter at room temperature (feed it 1x-2x a day to keep it active). If you plan to bake only once in a while, store it in the fridge to preserve its strength (feed it 1x a week). When storing your starter in the fridge, there’s no need to bring it to room temperature first before feeding it. Just give it some flour and water and pop it back in the fridge.

Comments
Christina Keiser says
Hello I’m in day four of my starter. Day one was amazing. It doubled in size on day two. I followed your instructions. On day 3 after adding the all purpose flour it was runny the next day. Today was day 4 and it was runny still. Very little activity. Should I be worried today I did 90g starter and 60 g all purpose flour and 60 g filtered water. I also have been using a fresh jar every time I discard. Looking forward to your feedback.
Rob E says
Hello! I’m incredibly grateful for sharing your recipe; it’s been both enjoyable and straightforward to follow. However, I’ve noticed my starter appears a bit underdeveloped—I see lots of tiny bubbles but none larger, which might be due to the cooler temperature in my home, especially during springtime in NY where my kitchen is on the lower level of a split level. Despite trying warmer water and even resorting to placing the starter in a warm bath, along with my usual sunny window and 2-hour oven light technique, I’m still facing this issue. Now, on day nine, I’m pondering if the ratios might be contributing as well. Should I continue with halving the starter then adding the 60g water and 60g flour ratio as per your suggestion (1:0.5:0.5), or would a 1:1:1 ratio, around 116-120g across, be more suitable? Additionally, I’ve been feeding only once daily and wonder if doubling the feedings, following your recipe, might be necessary. Your insights would be incredibly valuable. Thank you!
Saranya says
Hi Emilie
I’m more of a beginner with baking. I wanted to give my kids healthy baked food instead of store bought food. In my place, the temperature range from 91 F to 104 F. Should I feed the starter every 12 hrs due to this temp or follow as per the recipe. Can you please let me know how to work on the sourdough starter with this temperature range.
Thank You!!
Rebekah says
Hello,
Thanks for the recipe and instructions.
This is my first attempt at a sourdough starter. Today is day 6. I noticed yesterday it smells bad when I was feeding it. Is that normal or has something gone wrong?
Eduardo says
Hello, this is my first time attempting to do the sourdough starter and at day 3 had to leave town for for 3 days and when I came back my starter was bubbly, with hooch and the stinky smell but it wasn’t double in size, so I kept on going as if not a day went by since the last time I fed it, but is there a sign to know if the starter went bad?
Jacque says
Hi,
I just started my sourdough starter. I was curious if after day 7 I continue to discard half the starter add then add 1/2 cup of flour and 1/4 cup of water every day or if I have to create a new starter for my next loaf?
Thank you!
jane doe says
either feed it every day like you were or put it in the fridge and feed it once a week. you can take it out of the fridge and feed/bring to room temp before you bake again. the sourdough started should be able to be used over and over again.
Christina says
I am on day 5 and everything is going well. Today I noticed that the starters did rise and double in size but is falling almost back to my mark line. Should I feed it again even though it hasn’t been 24 hours?
Hannah J says
Hi, novice here. This is my second attempt making sourdough and my first time I was measuring w/cups and it grew green mold so I tossed and restarted. This second attempt is measured in grams and is going a lot better and super bubbly and definite hooch is forming but it’s not really doubling in size at all and it’s as of today it’s not smelling stinky but alcoholic/yeasty more similar to bread but now I’m worried that I’m seeing mold even though it could be old flour stuck to the side (only white). Help!
Sourdough Novice says
I have started this and am so excited. The first day it was very bubbly but then a really stinky hooch formed. Poured it away with the half to discard, and fed and the hooch was back after 12 hours. So I’ve discarded half and fed a little earlier to keep it going rather than leave it stinking. I’m keeping it in a warm spot (about 25c) so maybe that’s accelerating it? Or has it gone horribly wrong?! 😅
Leah Sisto says
Hello, I’m new to the whole sour dough starter and after reading your directions, I was wondering if when I feed it, do I only use the all purpose flour or can I feed with the whole wheat as well? Also, can I make a starter and use strictly whole wheat? I’m type 1 diabetic so if possible, I’d like to stick to the whole wheat.
Thanks in advance,
Leah
Emilie Raffa says
You can feed it with whole wheat flour if you prefer. It will just become a 100% whole wheat starter instead. Completely fine. Just keep in mind, when used in various sourdough bread and sourdough discard recipes, it will add a heartier taste and texture depending on the quantity used.
Collette says
This is the sourdough recipe I successfully used during the pandemic. It worked perfectly the first time and I kept it going for quite some time. Life changed and my poor sourdough starter perished. But now I’m coming back to this recipe to begin again.
Emilie Raffa says
Thanks for sharing your story Colette. It will inspire many others to keep going!
Emilie Raffa says
Yes. For an established up and running fridge starter, yes: discard once a week. Then, you feed what’s left in the jar with fresh flour and water.
Amanda Shelton says
When you say discard the top of the starter each day, can we simply use that to start another starter or is there a specific reason that we need to waste it?
Emilie Raffa says
When first creating a sourdough starter, no. I don’t recommend it. Typically, the discard is not the best quality (smelly, discolored, watery etc.) and it’s not worth saving. Too acidic. However, once your starter is up and running and you are feeding it regularly, and the acidity levels are more balanced and fresh, feel free to save the discard to create new starters, share with friends and/or use in sourdough discard recipes.
Teresa Atkins says
Hi Emily,
I’m just starting my journey on sourdough. My biggest question is the discard. Do I keep putting it in the same jar in the fridge as the day before? Or do I toss it if I’m not going to use it that day?
Thank for taking the time to give us all encouragement.
Teresa
Emilie Raffa says
It depends on where you are in your journey. If you’re creating a sourdough starter for the first time, I’d toss it. The quality is not the best. Too acidic. Alternatively, if you already have an established sourdough starter and you are feeding it regularly, you can save the discard. It can be used to create new starters, shared with friends and/or incorporated into sourdough discard recipes. Store leftover discard in the fridge. More details here: https://www.theclevercarrot.com/2020/10/sourdough-discard-101-recipes-faqs-answered-pancakes/
sophie says
I’ve made the starter and it’s great! I have it in the fridge but I want to make bread, so should I let it get to room temp before and when should I feed it?
Emilie Raffa says
Congrats! Yes, so to make dough: remove your starter from the fridge and feed it. Make sure to keep it in a warm spot to boost activity (try the hot water bath tip). Then wait until it becomes active. This can take anywhere from 2-12 hours depending on temperature and the strength of your sourdough starter. Heads up: since your starter has been in the fridge, and it’s cold, you might have to feed it a few times, not just once to perk it back up.
sophie says
Ok great thanks!
Craig says
I keep my house at a nice crisp 66…. I like it cool… will this keep a starter from starting?
Amanda says
I just started this Wednesday morning and have been keeping it in the oven. We keep our house quite cool (and it’s still dipping down to -10C outside over night), so I just turn the oven light on each morning for about an hour. We have a double oven and rarely use the bottom one so this works best for me as a storage place for my starter. This is my first time making a starter and it seems to be going good so far! This morning was the first “feeding” and it’s getting pretty bubbly already.
Emilie Raffa says
Excellent! Thanks for sharing your experience Amanda :)
Emilie Raffa says
Yes and no. It depends on where you’re at in your sourdough journey. If you’re creating a starter for the first time, then yes: I’d move your starter to a warmer spot to boost activity. Starters love warmer temps, ideally 72-75 F. Try the hot water bath tip if you prefer to keep your ambient temp around 66 F. Alternatively, if you already have a strong, established starter you might see some activity @ 66 F. For example, my starter is very, very vibrant and rises in both cool and warm temperature.
Amanda says
On days 4-7 do I keep the starter in a warm place still or is room temperature okay?
Emilie Raffa says
It’s try to keep it in a warm spot if you can. It doesn’t have to be too warm; 72-75 F is fine.
Petra says
Hello, I am just starting with my first sour dough starter ever. I would like to check if the lid should be tightly closed or it should be just loose? Would like to avoid some disaster in my kitchen or on my face :-)
Thank you and thank you for sharing this recipe! I am super excited to have my first sour dough made at home.
Petra
David says
I used a tight fitting lid, but my starter popped it open.
I don’t think it matters what kind of lid you use, as long as your starter is covered.
Danelle says
Storing my starter in the refrigerator. Just wondering, do I discard once a week when feeding or do I just feed and water it? Thank you very much for your reply.
Brittany says
You discard half and then add in an additional 60 g flour + 60 g water!
Emilie Raffa says
Yes. For an established up and running fridge starter, yes: discard once a week. Then, you feed what’s left in the jar with fresh flour and water.
Preethi Kanya says
This recipe is amazing, precise and extremely helpful.
Thank you so much.. I am now one of your fans 🥰
Poppt says
How can I dry my starter so I can bring on airplane with me?
Jirius Isaac says
I would also like to know if I can dry and transport my starter
Patricia Gillard says
I have a starter, and I am baking my 6 or 7th loaf right now. Every one of my loaves has been good. The last one I would call perfect. As i come across these sites I read almost every one i see. I just wanted to tell you that I am grateful that you show both grams and cups in this recipe. The class i took was all using cups and so far has worked great, so I really don’t want to buy a scale and store one as we are looking to downsize and move in the near future. I’m not against a scale, but well, like the pioneer woman in wagons, they didn’t need a scale, it was a passed down process, I might get a scale at some point, but right now I am so appreciative of people that show both measurements, instead of me having to figure out the conversion. Thank you!!
Carol Devine says
How much flour and water should I be using after Day 7 if my starter is not yet ready. I have been using a scale to measure out half of my starter before adding the 60 g flour and 60 g water.
Jennifer says
did you get a response? I’m wondering the same thing.
Stephen Mellini says
april 2nd 2024. Hi Emilie.. This is stephem mellini again. I have a question and a comment.
1. ? Do you actually have to process the starter for 7 days if you have an early performer that meets all of the requirements to use before the 7th day?
2. Comment. I had a thought let’s say a theory regarding the discard 50 %. If you are working on a a starter and since the composition would technically be the same and in 2 equal proportions of the ingredients,; when you discard the 50%, you would now have 2 identical mixes ie; one that you took the 50% from, and the other the 50% portion that was removed..
So is there anything to prevent you from treating both equally since they are virtually twins, and add the required flour and H2O to both of them and then have two starters ready to process at the same time..? depending on other factors like your baking amounts and schedule.. but the same development of the starter , the same effect would take place wouldn’t it? and you would have two identical batches going, n’est-ce-pas? or is this not a sound theory/practise?
thanks for your upcoming reply. and happy Easter
sincerely
stephen mellini love your site.
Charlie says
I don’t know for sure, and if Emilie has a better response go with that, but in my experience, so long as your starter is in good shape, ie no hooch and been fed regularly previously, yes both are identical. This is how people make a starter for a friend say, or how you might have your plain starter, and then begin feeding the other (what would have been discard) with wholewheat to make a wholewheat starter :)
Kim says
It’s day 4 of my sourdough started and it is very runny with no bubbles or rise. I accidentally used bread flour yesterday but switched to KSF today. It has been runny since I began to feed it on day 3
Should I do anything or wait and see what happens??
Caitlin says
This worked perfect! I had fluffy, stretchy, sweet smelling starter by day 7. I have never made it before and was a bit nervous throughout the process but I’m quite pleased. I will say that it ended up getting runny around day 3 so from days 4-7 I halved the water to 30g and it looked great by the end! Thanks for the helpful info.
Erin says
Hi Emilie! I’m on day 5 and my starter is incredibly liquidy in the mornings. I haven’t seen a ton of growth but I do see bubbles each day. I’m using a scale, king Arthur’s organic unbleached flour, warm filtered water. My starter mainly stays in a turned off oven but depends on temperatures that day. What do I need to do differently?
Emilie Raffa says
Your starter will look different on different days which is actually normal. So keep this in mind as you continue to observe your starter, even after it’s established. It’s alive and always changing! For liquidy starters, the flour to water ratio is off. We know you are using a scale, so it’s not your measurements. My sense is that too much time has elapsed during your feedings creating a runny texture and hooch on top. Additionally, the temp. in your oven (although turned off) might bee too warm and/or it’s been sitting in there for too long. Moving forward: store your starter on counter for the next week or so, feed your starter at the same time each day to promote a consistent rise and fall, and possibly switch to bread flour for your daily feedings instead of using organic ap flour. Bread flour absorbs more liquid. It will also give you starter an enzyme boost. These tips should help.
Brendan says
Is this another way of saying the temperature your starter is kept at may be too high?
In order for the schedule to be maintainable it needs to be on a 24 hour interval or eventually we’ll be getting up in the middle of the night to feed our starter.
If the starter seems like it needs to be fed sooner than 24 hours then finding a cooler environment should delay the fermentation reaction and help correct the schedule, right?
Day 4 mine also came out so runny that the starter couldn’t reasonably be separated from the hooch. I am also using a scale.
Leanne says
Hi! I’m on day 6 and it’s bubbling away which is great. But it’s smelling very vinegary. Do I need to feed it more than once again? I read that a vinegar smell could mean it’s hungry. Maybe I’m not discarding enough each time?
Krista says
Hi. Do you need to sterilize your jar before starting? Thanks!
Emilie Raffa says
No, this is not necessary. Although you can if you prefer.
Carlyn Perkins says
Hello! Just starting my starter, I noticed you had a tip that says cover loosely but then it also says you can cover with a lid? Should it not be airtight? I’m using a clamp jar, but should I not use that lid?
Emilie Raffa says
You can cover it loosely with a lid, letting the lid rest on top of the jar. Or, you can keep it airtight. Either one is fine. If doing the latter, you have to keep an eye on the jar. When it’s airtight, it builds up pressure fast which means your jar (if it’s glass) can burst if it’s not tall enough. Hope this helps.
Sarah says
I’m following your recipe to a T. I am on day 7, and my starter hasn’t risen at all. It’s not active, there’s no bubbles. The only good change its made is it now smells sour and not like horriffic gym socks anymore. What did I do wrong? Do you think it’s going to correct itself? Should I start over? I’ve made two jars just in case the first one didn’t work – and neither of them did lol I used water from my water dispenser, warm, and King Arthur AP flour. Do you think it’s because my flour was refrigerated?
Emilie Raffa says
Great questions. I think the issue is temperature. It’s not warm enough. Try to create a warm spot for your sourdough starter, about 72-75 F. Try the hot water bath tip (place your starter jar in a bowl of hot water and keep it in the counter; do not submerge). As it sits, you’ll see bubbles form on the bottom the jar and then up to the top. Change out the water when you can remember because it will get cold. Also, if your starter is on the thin side, which is how I’m picturing it for you, cut back on some of the water and/or switch to bread flour which absorbs more liquid. Bread flour will give your starter an enzyme boost as well. Hang in there!
Chelsea says
Can you mix the starter on day 1 or anytime during the process or just leave it alone?