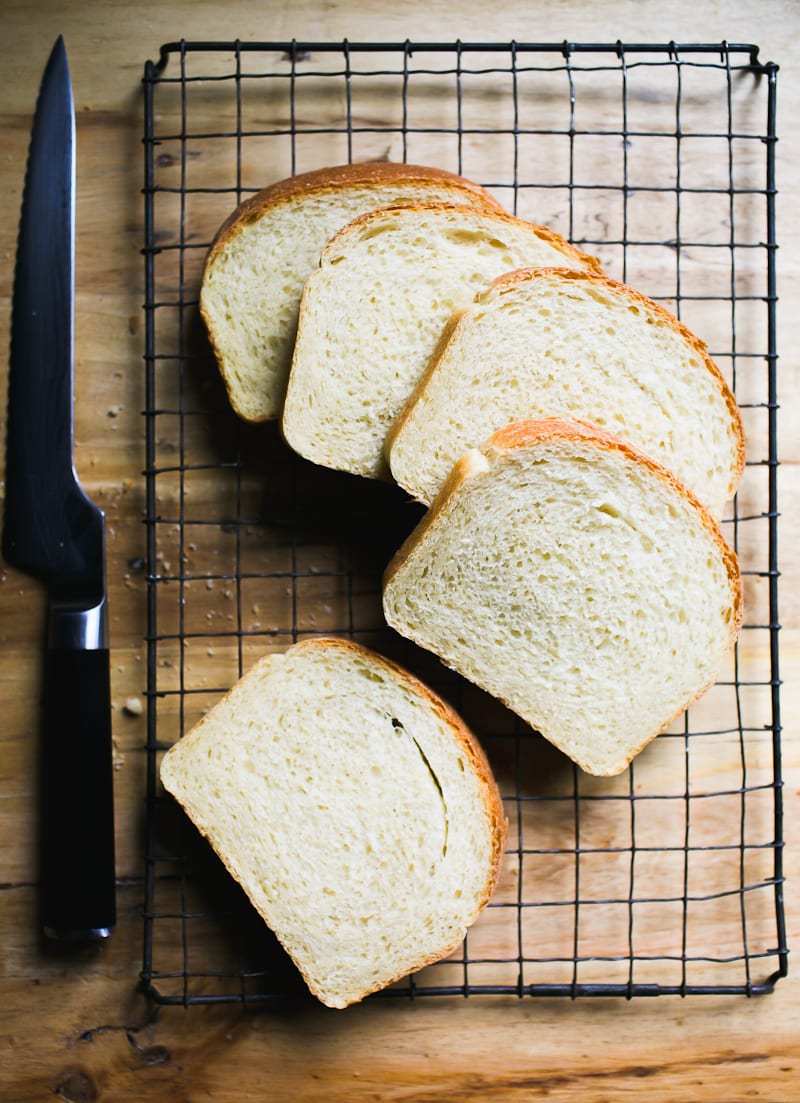
Made with all purpose flour and just a touch of butter, learn how to make soft, tender sourdough sandwich bread with bubbly, active sourdough starter. Recipe adapted from my bestselling book:
Artisan Sourdough Made Simple.
Out of all the sourdough bread recipes I make on repeat (my beginner sourdough bread recipe,
sourdough focaccia and sourdough pancakes to name a few!), this easy sourdough sandwich bread gets the most requests. Why? It’s soft. It’s buttery. It makes the kitchen smell like magic.
And the best part: you made it yourself. No junk or preservatives. Just simple sourdough with a soft crust, subtle tang and fluffy crumb that holds up to slicing, toasting and sandwiches (anything really).
Below, you’ll find my step-by-step walkthrough and baking schedule. You’ll also get three solid
variations (cinnamon raisin, whole wheat and bread flour) plus more sandwich loaf recipes in my book for inspiration.

Good To Know:
- What most bakers get wrong: the second rise goes for too long. This creates over proofed dough that bakes up flat. Follow my recommended timing and tips to master this step.
- Pan size matters. Want a taller loaf? Use an 8.5×4 inch pan instead of the standard 9×5 inch pan. Both work, but the smaller size will give the dough a nice upward boost.
- Use softened butter. If it’s cold, it won’t blend into the dough.
- Make it vegan. Swap in your favorite plant-based butter. Just check the label. Some brands are very salty.
- Temperature controls time. Warm kitchen? The dough will rise fast. Cold kitchen? Give it more time. Watch the dough and not the clock.
How To Make Sourdough Sandwich Bread {Step-By-Step Recipe}
Step 1: Mix the Dough
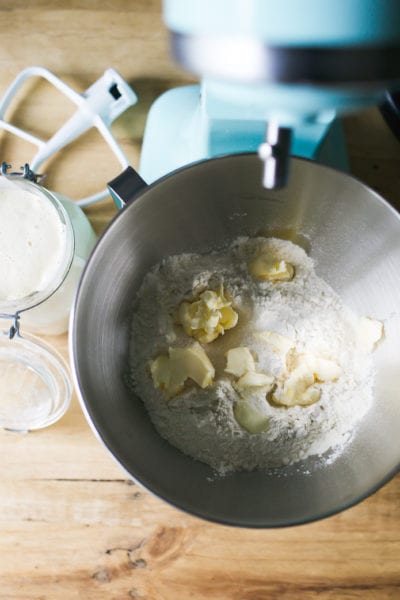
To Start: Add the flour, softened butter, sugar and salt to a bowl. I like using a stand mixer for this recipe. The dough is naturally a bit sticky; the machine makes it easier to handle. Mix with the paddle attachment until the butter looks like crumbs.
Mix in your bubbly, active sourdough starter and water until everything comes together. Cover and rest for 30 minutes to relax the dough before kneading.
Note: If you need assistance with your sourdough starter, read my companion articles Feeding Sourdough Starter: My Best Tips & Tricks and Troubleshooting Sourdough Starter.
After 30 minutes of resting…
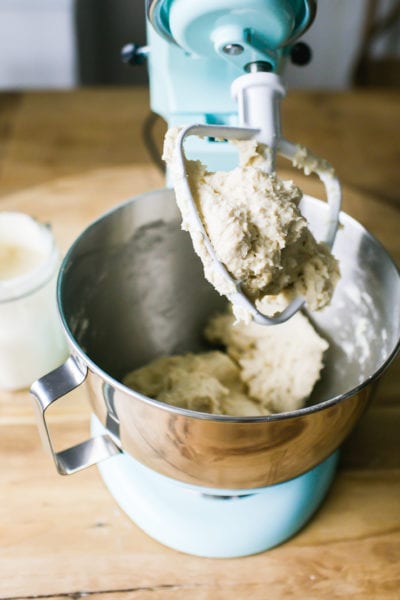
Remove the paddle attachment and switch to the dough hook. Knead until soft and supple, about 6-8 minutes. Note: on this particular day, my dough was stickier than usual so I added a sprinkle of flour to even it out. You can do that too.
No Stand Mixer? Knead the dough by hand on a lightly floured surface until it feels smooth, soft and elastic, about 8-10 minutes. Don’t worry about under/over kneading. If it’s springy (not sticky) you’re good to go.
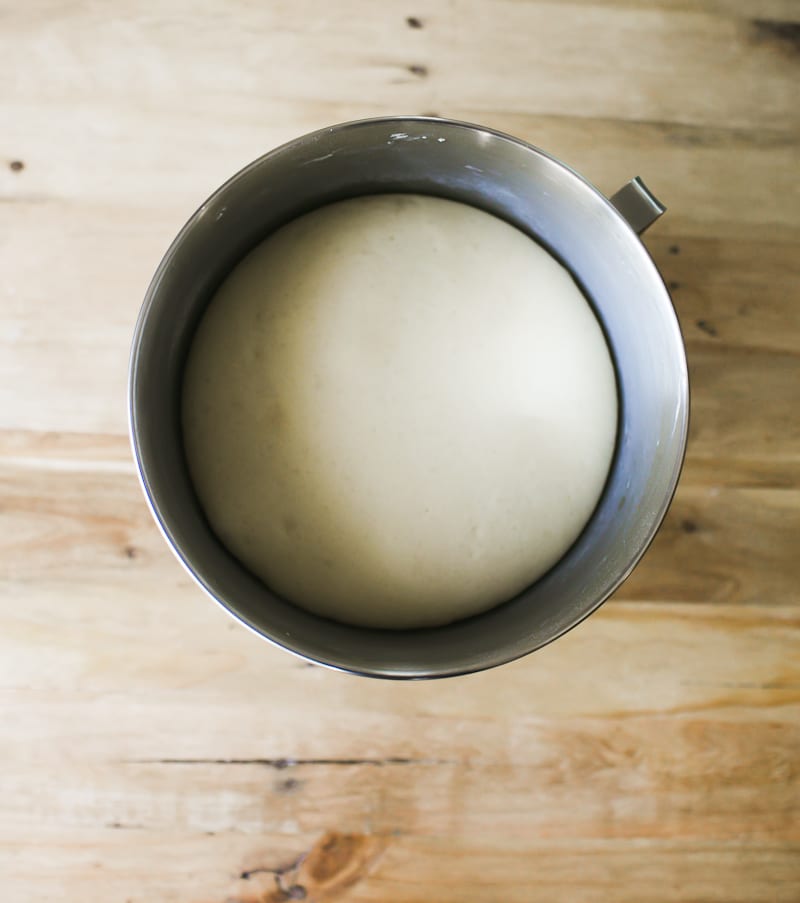
Step 2: Bulk Rise (Overnight)
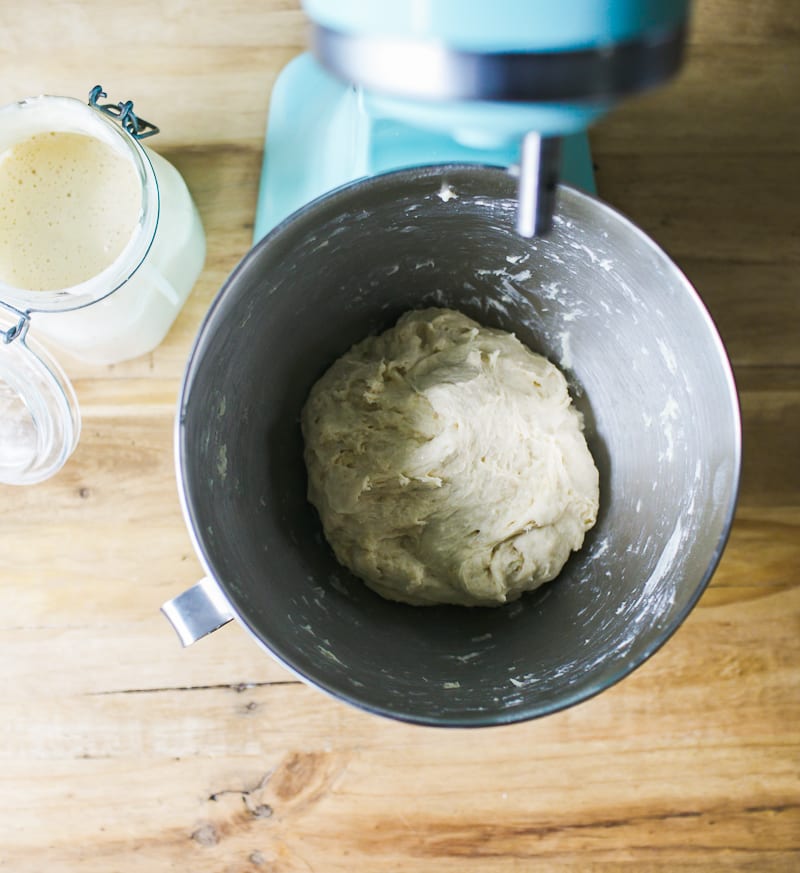
Cover the bowl with plastic wrap and let the dough rise overnight at room temperature (68 F), about 10-12 hrs. The dough is ready when it’s puffy, airy and has doubled in size.
Tip: This is an overnight sandwich dough. However, you can do a same-day bake instead (see my Sample Baking Schedule).

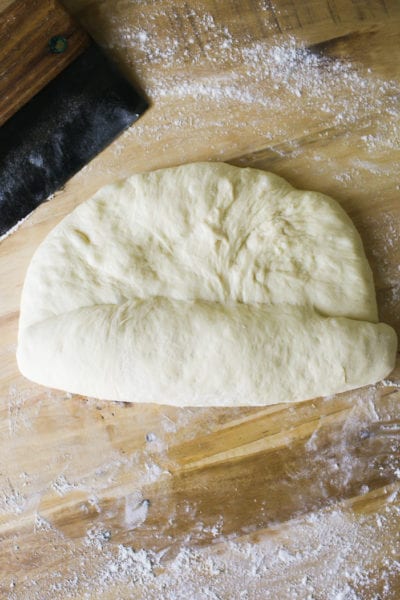
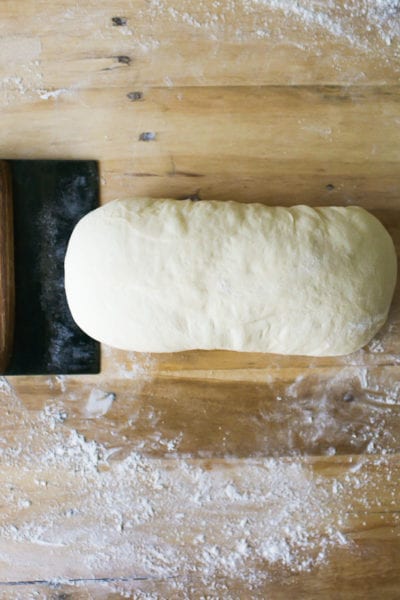
Step 3: Shape the Dough
Remove the dough onto a lightly floured surface. Gently flatten to release the air bubbles (you don’t want big holes like ciabatta!).
Roll the dough into a log, tucking the ends underneath. Then, with floured hands pull the dough towards you creating surface tension to tighten its shape. Place the dough into a buttered loaf pan, but make sure it’s seam side down.
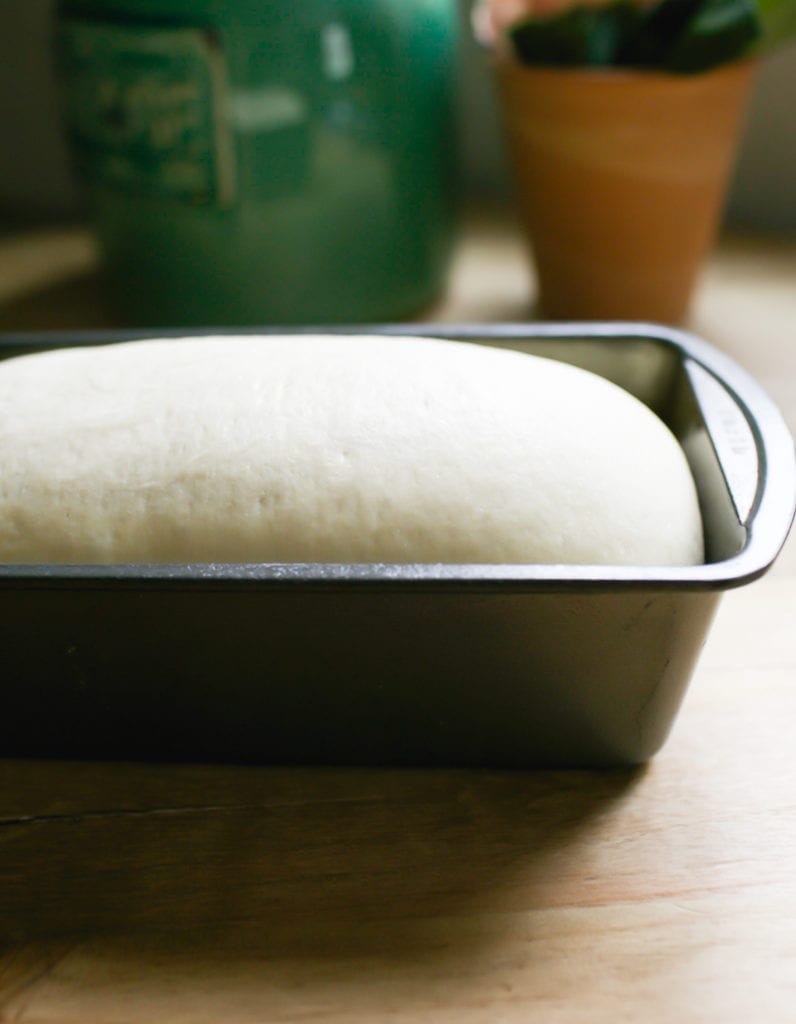
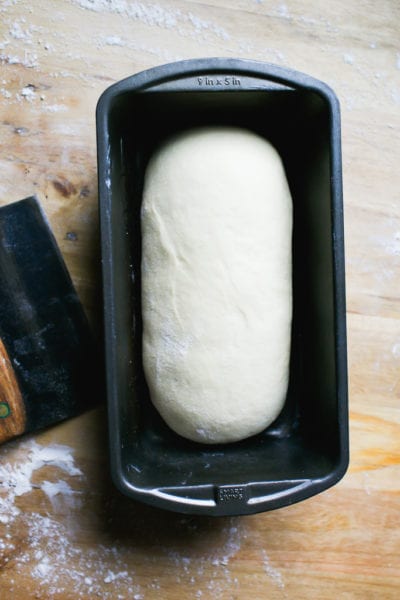
Step 4: Second Rise
This step is crucial. When done correctly, your loaf will build back additional strength needed for good oven spring. Cover the pan with lightly oiled plastic wrap so the dough doesn’t stick to the top. Let rise until the center domes about 1 inch above the rim of the pan. You’e not going for double in size or sky scraper height; just notably puffy and less dense.
Tip: Cold Kitchen? Your second rise might take longer than expected @ 68 F. Be patient with this step. Plan on 1 1/2 -2+ hours depending on your specific room temperature and starter strength. If you’re short on time, use a proofing box or my DIY warm oven trick to speed things up (see “Helpful Tips” in the recipe card below).

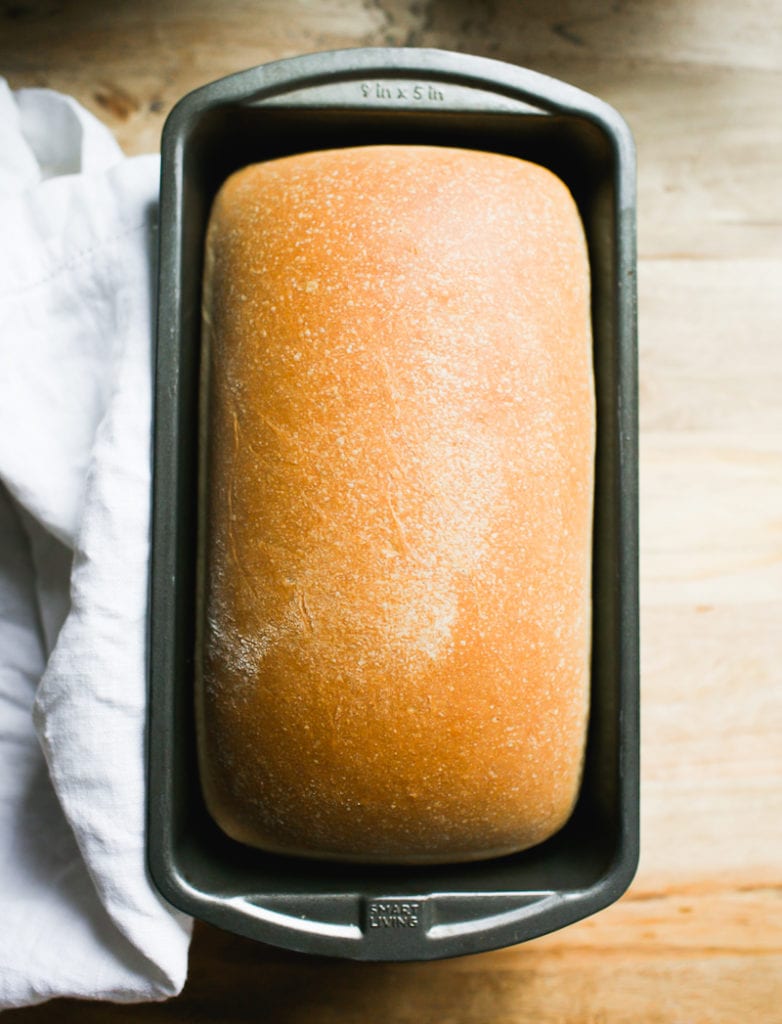
Step 5: Bake The Bread
Preheat your oven to 375 F. For better oven spring, preheat to 500 F instead, then lower the temperature to 375 F when the dough goes into the oven. Bake on the center rack for 45-50 minutes or until golden brown.
Cool in the pan, then transfer to a wire rack. Wait an hour before slicing (skipping this step can turn the inside gummy).
Tip: Have an extra loaf pan? Some bakers create a makeshift “lid” by placing a separate, upside loaf pan on top of their pan before baking. This traps steam inside, creating a humid environment for the dough to rise avoiding potential blow-outs or tears, and keeps the crust soft. It’s similar to using a Dutch oven for my sourdough bread recipe.
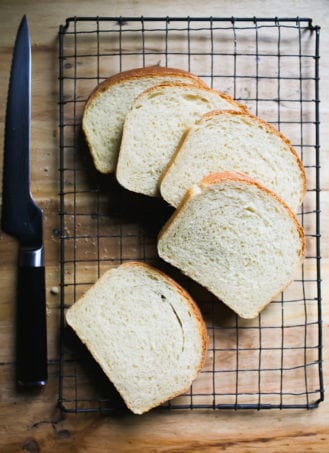
Slice & Store
You’ll need a good serrated knife (I use this one). For a moderately priced option, try this knife instead. If your bread slices are really uneven, consider this collapsable bread slicer with 3 different thicknesses: thin, medium and thick to guide you along.
What I do at home: If you have a large family, or just eat a lot of bread, I highly suggest doubling this recipe. Bake (2) loaves side by side and freeze whatever you don’t eat. This loaf can be frozen whole, covered tightly in plastic wrap or as individual slices.
Sourdough Sandwich Bread Variations
- Whole Wheat: Replace 20% of all purpose flour with whole wheat or white whole wheat flour. If the dough seems dry (whole grain flours absorb more liquid), add more water as needed to achieve a workable consistency. Do this 1 teaspoon at a time.
- Bread Flour: Do an even swap, adding more liquid if the dough is dry. For example, King Arthur Bread flour is very thirsty so more liquid might be needed. If using Gold Medal bread flour which is not as absorbent, additional adjustments might not be necessary.
- Sourdough Cinnamon Raisin Bread: You’ll find my step-by-step post here. The vanilla-soaked raisins make it a community favorite!
What To Bake Next
In addition to the above variations, a natural next step for sandwiches and breakfast fare would be my easy, NY-style sourdough bagels (they are so incredibly chewy and addictive) and these super soft sourdough english muffins. I’m excited to see what you make next.
Sample Overnight Baking Schedule (68 F)
Feel free to adjust the start times below as needed. It’s flexible. For a same-day bake, start early in the morning and bulk rise at a warmer temperature.
Day 1 (Evening)
- 4:30 PM: Feed sourdough starter (to activate)
- 8:00 PM: Mix dough
- 8:30 PM: Rat 30 minutes, then knead.
- 9:00 PM: Cover and bulk ferment, room temp @ 68 F overnight (10-12 hrs).
Day 2 (Morning)
- 7:00-8:00 AM: Check the dough (should be doubled)
- 8:15 AM: Shape dough
- 8:30 AM: Second rise (1 1/2 – 2+ hours)
- 10:30 AM: Preheat oven
- 10:45 AM: Bake
- 11:30 AM: Cool
By signing up, you agree to receive emails from The Clever Carrot. Unsubscribe at any time.
Easy Sourdough Sandwich Bread
- Prep Time: 12 hours
- Cook Time: 50 minutes
- Total Time: 12 hours 50 minutes
- Yield: 1 loaf 1x
- Category: Sourdough Bread
- Method: Oven-Baked
- Cuisine: American
- Diet: Vegetarian
Description
A simple and easy recipe for homemade sourdough sandwich bread. Made with all purpose flour and just a touch of butter. I like to make the dough at night so we can have fresh bread in the morning. This loaf freezes well (whole or sliced). I recommend this loaf pan.
Helpful Tips:
- For best results, weigh your ingredients with a scale instead of using measuring cups. Weight and volume measurements are not equal, only approximate! For example: If your starter is very bubbly, 1/4 cup might only weigh 30 g which is too little for this recipe (you need 50 g). The dough will take forever to rise. Same goes for the flour: 4 cups might weigh over 500 g depending on how tight the flour was packed into the cup. More flour = dry dough.
- This recipe works with Whole Foods 365 Everyday, King Arthur and Trader Joe’s all purpose flour. If using another brand with a lower protein content (i.e. Gold Medal, Pillsbury, Heckers) consider reducing the total water amount by 15 g.
- For a variation of this recipe with more sourdough starter, please choose one of the following adjustments below, keeping the rest of the ingredient quantities the same:
- 100 g starter + 255 g water
- 150 g starter + 250 g water
Additionally, because temperature controls time: you can also increase your surrounding temperature for the bulk or second rise, as needed. Place the dough in a proofing box set to 75-80 F. Or, preheat your home oven to 75-80 F and then shut it off immediately (use an oven thermometer to make sure it’s set to exactly 80 F and not higher!). Place the covered dough inside until it bulks up. Do no use this option overnight- it will be too warm.
Ingredients
- 500 g (4 cups) all purpose flour
- 60 g (4 tbsp.) unsalted butter, softened, cut into cubes
- 12 g (1 tbsp.) sugar
- 9 g fine sea salt
- 50 g (1/4 cup) bubbly, active sourdough starter (100% hydration)**
- 270 g (1 cup + 2 tbsp) warm water
Instructions
Baking Schedule: this is an overnight dough which takes approximately 10-12 hrs to rise @ 68 F. Start the night before, in the evening, and plan to bake the following day. If it’s warmer than 68 F the dough will take less time to rise. Alternatively, start in the morning and bake in the afternoon or evening.
Mix the Dough
In a stand mixer fitted with the paddle attachment, add the flour, butter, sugar and salt. Mix on low speed until combined; the butter should look like crumbs.
Add the starter and warm water. Mix until the flour is fully absorbed (get in there with your hands to finish mixing). The dough will feel slightly sticky and elastic at this stage. Cover with plastic wrap or a damp towel and let rest for 30 minutes. Meanwhile, replenish you starter with fresh flour and water.
After the dough has rested, switch to the dough hook and run the machine on medium-low (#3 on a KitchenAid) for 6-8 minutes. The dough will feel soft and supple and not stick to your hands. If it does, add a dusting of flour.
Note: If you do not have a stand mixer, the dough can be made by hand. After mixing and resting for 30 minutes, knead the dough on a lightly floured surface for 8-10 minutes, or until smooth, soft and elastic. Do not worry about under/over kneading. Relax into the process and focus on the texture, not the time.
Bulk Rise
Cover the bowl with plastic wrap and let rise overnight at room temperature (68 F) until double in size, about 10-12 hrs. Please refer to the Baking Schedule above for additional rise time options.
Shape the Dough
In the morning, coat an 8.5×4 inch loaf pan with butter.
Remove the dough onto a lightly floured work surface. Gently flatten the surface to release any large air bubbles.
Roll the dough into a log tucking the ends underneath. Rest for 5-10 minutes. With floured hands, gently cup the dough and pull it toward you to tighten its shape. Using a bench knife, place the dough into the loaf pan seam side down.
Second Rise
Cover the dough with lightly oiled or buttered plastic wrap. Let rest at room temperature until it has risen to about 1-inch above the rim of the pan (check the height by looking at the domed center portion of the dough). You are not looking for it to double in size. For timing, this can take anywhere from 1 1/2-2 hours (or more!) depending on temperature and the amount of sourdough starter used. Remember, the warmer it is, the faster the dough will rise. Refer to the “helpful tips” at the top of this post.
Preheat your oven to 375 F. Note: For higher oven spring, preheat to 500 F instead. Reduce to 375 F once the dough goes into the oven and bake as directed.
Bake the Dough
Bake the dough on the center rack for about 45-50 minutes, or until golden brown. Cool in the pan for at least 10 minutes, and then transfer to a rack to cool completely. This sandwich loaf will stay fresh for up to 3 days, stored in a plastic bag at room temperature.


Comments
Sharon says
I love this recipe, I’ve made it 3x in the last month. So tasty! However, the tops of my loaves keep on splitting, usually along the side. Any idea how to trouble shoot this one? Doesn’t affect taste, of course.
Laura Honeycutt says
Mine also split the same way. Did you figure out the trick to it??
Lacey says
I score mine before baking
Shelbi says
Can I make this with Einkorn flour? Would I need to adjust the amount of flour or water used?
Sarah says
Love this recipe! Third time making it but first time putting this in the fridge overnight so I didn’t have to stay up until 2 am to cut and shape and do second rise! Should I let it come to room temp before I shape and put in loaf pans?
Layra says
I’d like to make this dairy free. Could I replace the butter with oil and if so, how much?
Turia Penkalski says
I just wanted to let you know I made this with earth balance stick butter and it was pefect.
Cheryl Bennett says
Hi. I’m lactose intolerant can I use olive oil instead of butter?
Kimberly L Jackson says
Hello! I have a beautiful active starter, I followed your recipe to the letter. When I put the dough in the loaf pan, it didn’t rise very much. This is my very first time doing anything sour, so I would really like to know what happens.
NICOLE KENEHAN says
Can you swap, honey for the sugar?
Vicki says
I’m a novice sourdough baker and for my third loaf I decided to try your Easy Sourdough Sandwich Bread because I find the artisan style too crunchy for my old teeth. Wowza! The loaf turned out great – perfectly tender crust and a soft, fluffy interior.
Your directions were clear and well laid out making this a super easy recipe to follow. I think this is going to be my new go to bread recipe from now on.
Thank you!
PS – your book is on order and will be here in a few days! I look forward to trying more of you recipes. ♥️
ATK says
I am new to sourdough baking, and I also never leave comments. I have to say this is the yummiest bread I’ve ever had. My first try it turned out almost perfect following the recipe. The bread is soft, buttery, and isn’t even sour. Way easier than making a normal sourdough loaf, which I’m not a big fan of the tough crust on those.
HIGHLY recommend this recipe to any, even if you’re feeling intimidated just give it a try and follow the directions=).
Thank you for sharing this!
Cristina Barros says
Hi!
Can I freeze the bread once it’s done baking?
Lindy Gumede says
hi there,
thank you so much for the recipe! I attempted this recipe with my newly established starter from scratch!
I couldn’t believe it when my bread rose and baked beautifully! And tasted amazing! I am new to this sourdough bread what what and I’m based in South Africa!
so happy i came across your recipe.
thank you!
Lee says
I’m wondering if I can swap butter for olive oil? Would OO work?
Gabriela says
How can I adjust this recipe to use my 11 x4.5 Pullman loaf pan?
Emilie Raffa says
Hi Gabriela! Unfortunately, I don’t haven’t tested this to fit a Pullman loaf pan yet. Maybe someone in this thread will chime in? I know some baker’s here have done it successfully. 🥰
MaryAnne says
I did the base recipe x 1.5 to try in my Pullman size loaf pan and did not use the cover because I wanted the rounded top on the loaf. It fit my end goal perfectly.
Gabriela says
Thank you! I’ll try that
Shan says
I’m trying out your recipe tonight! Just covered for the bulk rise stage! I used bread flour and the 150g starter 250g water: will come back with an update after baking!! My question though, in the future if I use AP is that unbleached AP? Or just regular old AP. Please update recipe for us newbies that need more guidance!!
Emilie Raffa says
Hi there! I always use unbleached AP flour. 🥰
Tabitha Weber says
Has anyone made cinnamon rolls with this recipe? Did you make any modifications if so?
Emilie Raffa says
Hi Tabitha! I’ve never made cinnamon rolls with this particular dough. But I do have (2) separate recipes that might interest you:
Sourdough Cinnamon Rolls:https://www.theclevercarrot.com/2017/12/how-to-make-sourdough-cinnamon-rolls-step-by-step-guide/
Sourdough Cinnamon Raisin (Swirl) Bread:https://www.theclevercarrot.com/2020/08/sourdough-cinnamon-raisin-bread/
Tabitha Weber says
Thank you. I had seen those but had plans to make 2 loaves of the sandwich bread which I love and thought I’d do one sandwich and one cinnamon roll. I might still give it a go and see.
Meghan says
Thank you SO much for this recipe. I just started trying sourdough baking this month and all my first loaves have been like bricks. I appreciated that you offered higher starter amounts to account for winter temps. I think that made the difference. Still have room for improvement. But truly the first one that is edible and not a brick!
Emilie Raffa says
You’re very welcome. Most people don’t realize that their sourdough formula will inevitably change as the seasons do. What once worked in the summer is no longer applicable in the winter when it’s cold, and the dough takes forever to rise. Adjustments need to be made. Practical options are good. Temperature is so important in sourdough baking.🥰
Amy says
Made with bread flour and omg. This is the best bread I’ve ever eaten. Everyone who tried it said it was amazing. Definitely going to make more tomorrow because this loaf isn’t going to last very long! I sped up the process by having it proof in my oven with the light on.
Emilie Raffa says
Awesome Amy! Glad you liked it. That’s the problem with homemade sandwich bread- everyone is more inclined to eat it! You can always double the recipe if you have an extra pan and bake two loaves side-by-side.
Carree says
So glad you posted this Amy. I was going to ask if bread flour would be ok too, as I’m running low on AP flour.
And yes to the popularity of the sandwich shape, Emilie. Much more user friendly and don’t have to worry about filling, condiments, or butter sneaking through large sourdough holes, lol!
Brenda says
I am new to sourdough and this recipe turned out perfect! This will be my go to sandwich bread! Thank you for sharing your recipe!
Emilie Raffa says
You’re very welcome Brenda! Thanks for sharing your feedback and taking the time to comment!🥰
Lonna D says
Wondering if you can help me with Less sour bread. What haould i alter, as ive read so many conflicting options. My husband wount eat it when its sour but want the benefits! I will try this recipe again as its been a while. Thanks!
Audra says
It’s been over 3 hours and my dough hasn’t even come close to rising above the edges of the loaf pan. I followed all the directions and it proofed for 11 hours yesterday then I had to put it in the fridge overnight…. Did that mess it up?
Emilie Raffa says
Not at all! You need to adapt your timing now. When you put the dough in the fridge overnight, the dough temperature dropped (fridge temp. is appx. 36 F). Now, it needs more time at room temperature or in a warmer environment to rise. You’re watching the dough which is good- ignore the clock!
Linda says
You should rename this recipe THE Perfect and Easy Sourdough Sandwich Bread. I made my first loaf of it today and it is Aaa-mazing! I did reduce the salt because I wanted a lower sodium bread and my loaf was still perfect. It rose very well and is dee-licious!! Thank you so very much for sharing the recipe and instructions for making it.
Emilie Raffa says
Omg Linda, thank you. I love this!!! You are very welcome. Thanks for taking the time to share your feedback! 🥰
Mary Anne says
Can I add cinnamon and brown sugar before placing in the loaf pan to rise?
Emilie Raffa says
Ooo this sounds yummy! I’ve never tried it before but I don’t see why not! Let us know how it goes 🥰
Allie says
This recipe was so easy to follow and turned out great!
Shaye says
Is it okay to use bread flour or should it be ap?
Holly says
This is my favorite sourdough sandwich bread recipe.
Kaitlyn says
My bread taste delicious, but is not forming together, it is coming out like a spiral. Any insight to what I could be doing wrong? Thanks!
Trish says
Do I cover the pan whit another pan or aluminum foil when baking?
Sydney says
I leave mine open and it turns out perfectly! It’s not like a regular sourdough recipe where you need the moisture
Phoenix says
This is the best Sourdough Sandwich Bread! I use to make bread loaves with commerical yeast which came out good but I wanted to switch to something more gut-friendly.I couldn’t wait to cut a slice out of the oven. It was soft , delicious, and I would definitely make this again. My children love this bread compared to the artisan sourdough dough boule.
Violet says
This is my question too 😊
Amy says
Hi Emilia.
With the sourdough loaf my bulk rise is normally only 6 to 7 hours or so to double because it’s very hot and humid here. So I have never done an overnight loaf. (Maybe in the winter?)
If I do this sandwich loaf, after the bulk rise could I shape and then place in the fridge over night and bake the next morning?
Thanks
Mischael Buffkin says
I made this beautiful loaf a couple weeks ago while “snowed in.” That’s 3 inches of snow in central North Carolina. The bread was so good, and I am not an experienced bread baker, let alone sourdough, which I have only been doing since Christmas. Using my KitchenAid mixer for kneading is a real deal changer, since I hate hand kneading, get bored and stop before I should! Thank you for the recipe and your insights on sourdough.
Ruth says
This is such an amazing recipe!!! Thank you!!! We LOVE this bread! Because we love this bread we go through a lot! Is it possible to freeze the dough? I was hoping I could make a bunch of dough in advance and freeze it, so I could have it for those very busy weeks. If it is possible, at what stage would you freeze it? Also, what steps would you need to do to complete the recipe once it has thawed? Thank you so much for your help!!!!
Pau says
You can freeze the loaf after it’s baked and sliced. I do that with all bread I bake. Toast’s up as if it was baked same day.
Rebekah says
I really want to love this recipe because the flavor is divine, but for some reason both loaves I’ve made, so far, are really dense and heavy.
This time I’ve even let the shaped dough sit for longer to see if it will rise more but it’s still as heavy and dense. I’d love some suggestions.
Diane Morgan says
Mine too. I’m not sure how to make it more airy. 🤔
vikki Branscome says
Can you let it go longer than 12 hours on first rise? Say 14, if needed?
Erica says
This has been my go to sandwich bread recipe, my kids love it! I’m hoping to use the recipe with fresh milled flour. Will the recipe work with FMF, and are there any recipe alterations needed? Love your recipes!
Angela Schultz says
Great Information! What tips do you have for baking this recipe in a pyrex glass loaf pan? Would I need to adjust the recipe in any way or bake differently in any way?
Jennifer says
I just baked this with a ceramic Le creuset loaf pan! I believe ceramic and glass bake the same. I adjusted the temperature to 350 and baked for an additional 15-20 min. I kept checking the internal temp of the bread to get to 190. It worked perfectly!
Angela Schultz says
Awesome! Thanks so much 😁
Melanie says
Thank you so much for sharing your recipe! I am new to sourdough and this has turned out perfect and delicious everytime so far. Very easy recipe to follow and the notes were extremely helpful.
Rachel says
This is my go to recipe for sandwich bread. Very easy to make and tastes great. Thank you!
Ashley says
I’m so excited to try this recipe! If I do the overnight proof can I put it in the fridge until I’m ready to bake it? Or should I shape it first and put it in the loaf pan before putting it in the fridge?
Emilie Raffa says
You can do both. It depends on what your schedule dictates. For example, if you are in the middle of the bulk rise and time slips away, cover and chill until ready to bake. Give it more time to rise at room temperature if needed before continuing with the rest of the recipe. Alternatively, after the bulk, shape the dough, put it in the pan, cover with lightly oiled wrap, and chill overnight. Again, give it more time at room temperature (the next day) if needed, before baking. Hope this helps!
Courtney says
Hi, can you follow this recipe using gluten free flour/starter?
Sarah H. says
In baseball, after 2 strikes, you better connect and get a hit. This is where I was with making Soft Sourdough Sandwich Bread–too many strikes. I wondered if there was such a bread, one that I could successfully connect with and hit it out of the park.
Emilie, your recipe made it possible! Your instructions were clear without being too detailed. Especially helpful was the explanation and video of tightening the load before the final rise. When I felt the suppleness of the dough, I had good feelings about that home run! Baking, it smelled wonderful, like a loaf of bread should. Finished, it was golden brown and tempted me to slice into it minutes out of the oven. I refrained and waited till it cooled. The wait was worth it! Even without butter! The crumb is tender and yet pleasantly firm. Peanut butter and homemade strawberry jam?
Thank you for publishing your recipe. I will try it again, and again, and again.
Emilie Raffa says
Sarah, this was such a beautifully written comment. Thank you. I literally pictured you in the field! It’s interesting how you just “knew” it would work out after simply touching the suppleness dough- that’s your baker’s intuition right there. You need both instruction and inner guidance to be successful at sourdough. Well done 🥰
Cassi says
This has been our favorite sourdough sandwich bread recipe.
I double it and freeze one! My kids love making grilled cheese with it. Thanks for sharing this recipe!
Emilie Raffa says
This bread is SO good for grilled cheese. French toast too! Thank you Cassi 🥰
Hayley says
How long does the second rise usually take?
Kate says
Not sure where I went wrong. I mixed according to the recipe, and it’s such a dense hard ball of dough that I could barely kneed it… not sure if that’s normal. I have it covered in a bowl now and waiting til the morning to see if it rises 🫣
Sarah Gunn says
What should the loaf weigh when it comes out of the oven?
Sol says
Hello dear, I make your beginners sourdough often. I am going to try this one. I am curious why sandwich bread has less starter compared with beginners sourdough recipe. Thanks!
Dona says
Can I shape this into a boule
Kellie says
This is the go to sandwich bread recipe for my family!
Any chance you could provide nutrition info, please?
Mandy says
I’ve made a lot of sourdough sandwich loaves and this is one I make most often. It is simple and foolproof; it comes out great every time. Just whip it up in the evening, let it rest on the counter overnight and shape and final proof in morning….then bake. Simple. Makes a great loaf.
Samantha says
Can I replace the sugar with honey?
Madison says
I did this ones and it was great! I would do a volume replacement, not weight
Morgan says
Can you clarify what you mean by that?? Also looking to sub with honey!
Pawel says
Can I cold proof the dough overnight after shaping and bake in the morning right after dough is taken out from the fridge?
I’m looking for a recipe to fit my working schedule and that would work for me the best.
Thanks!
Emilie Raffa says
Yes, you can do this. Just make sure the dough has proofed enough on the overnight in the fridge. Otherwise, give it more time at room temperature to puff up before baking.
Scott R. says
I’ve used this recipe several times. I’m a Chef who’s hobby is baking. This recipe is perfect. There’s not much more I can say 🥰