Looking to improve your sourdough bread? This technique will do it! Learn how to stretch and fold sourdough with my easy step-by-step instructions and video.
Bakers use the stretch and fold technique to improve the quality of their sourdough bread.
When done correctly, it will strengthen the gluten and gently incorporate air into the dough without kneading. I talk more about this in my book Artisan Sourdough Made Simple. But for now: the benefit is increased volume, a lofty high rise, and if you’re lucky: a more open interior crumb. Plus, it’s the most satisfying sensory experience (who doesn’t love touching bread dough?!).
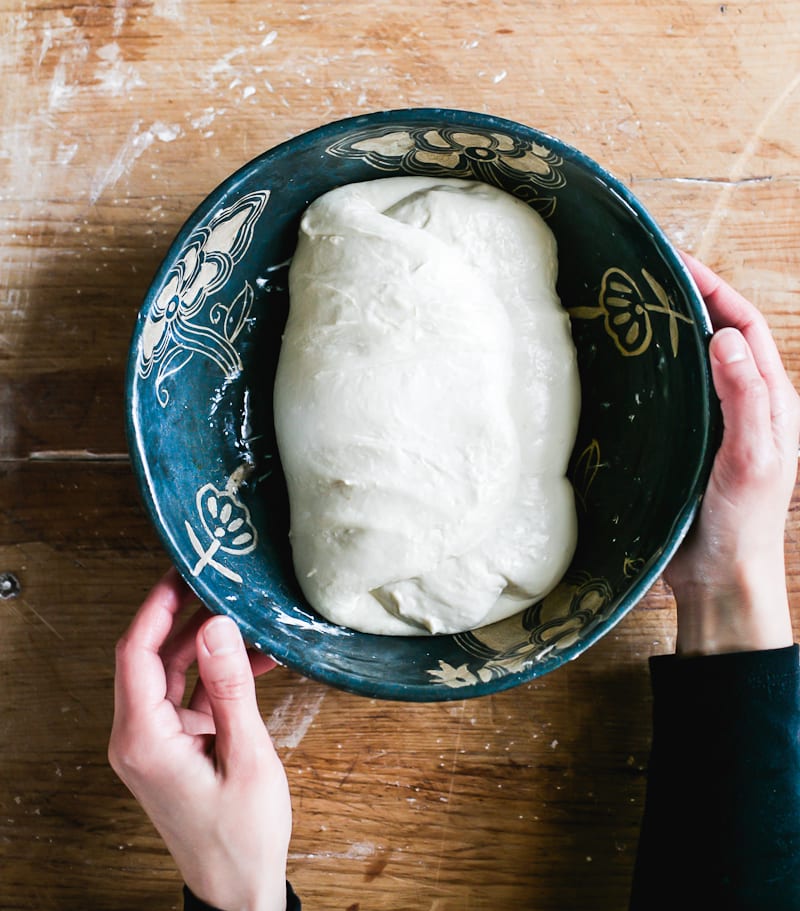
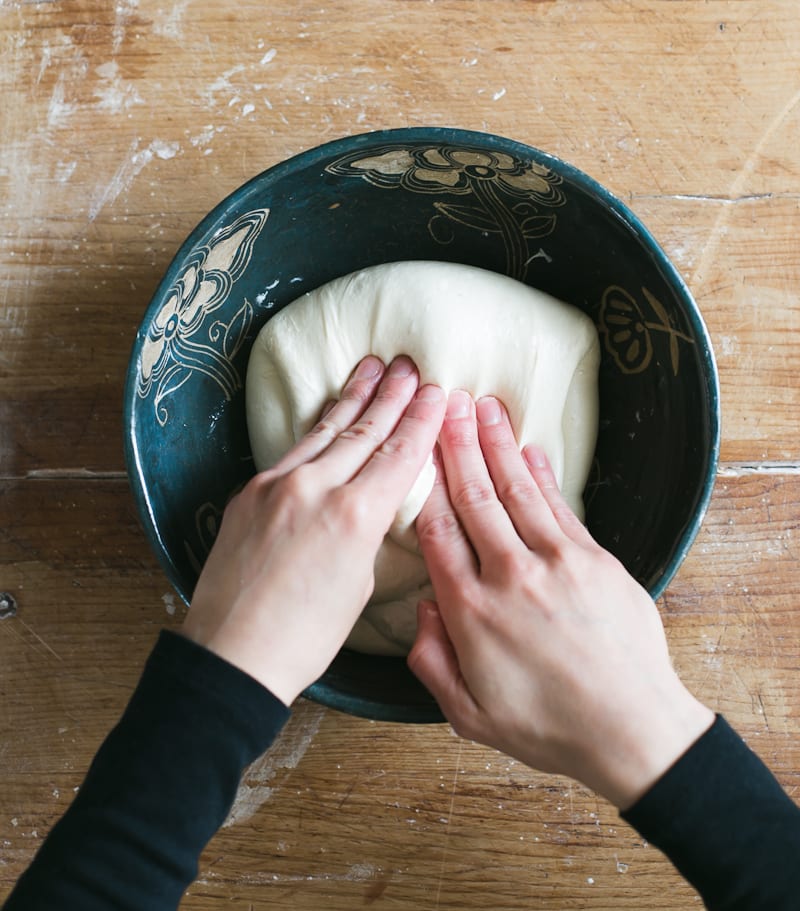
The technique can be done on the countertop or directly in the bowl; the latter option is what I’m showing you here.
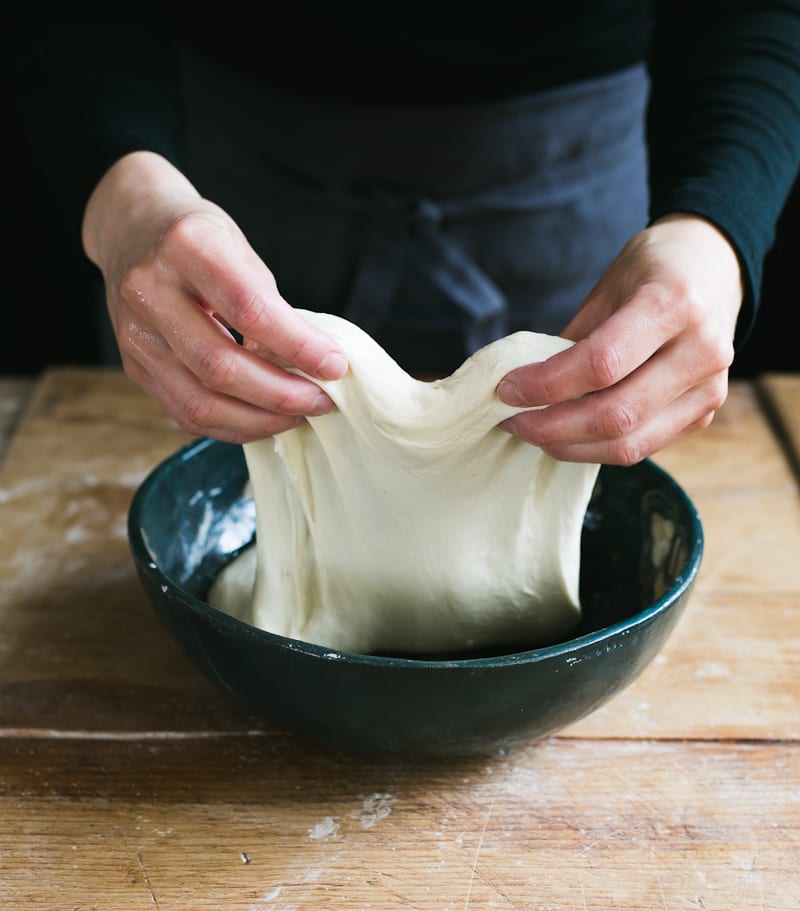
- Stretch the dough upward
With lightly wet fingertips, grab a portion of the dough and stretch it upward.
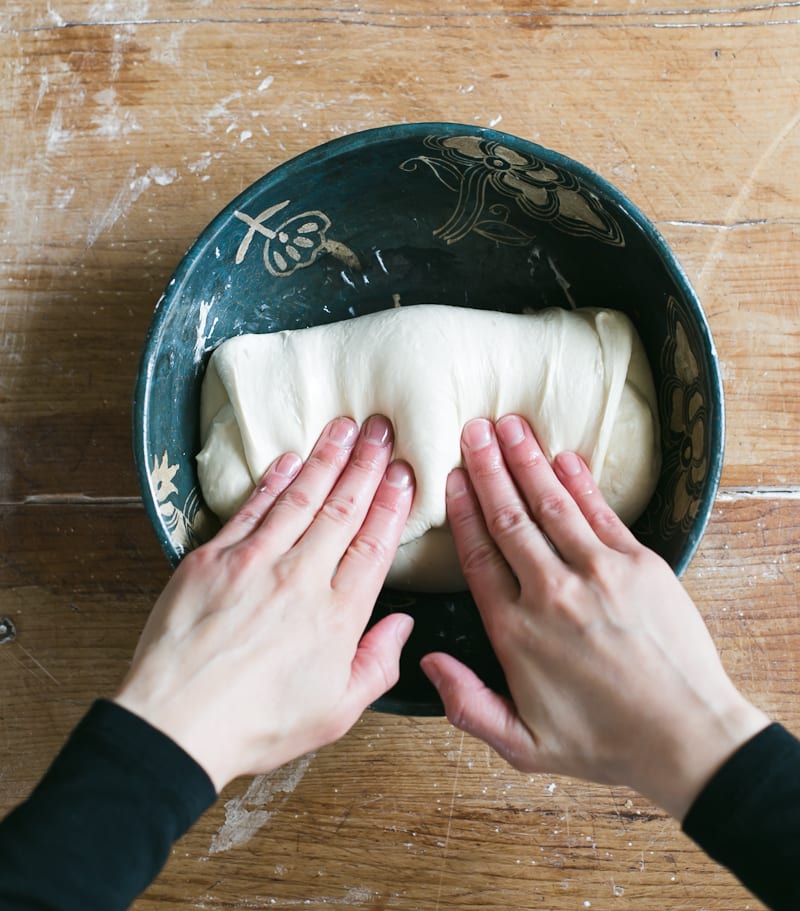
- Fold the dough
Fold the dough over toward the center of the bowl.
- Stretch and fold
Give the bowl a one-quarter turn and repeat: stretch the dough upward and fold it over toward the center.
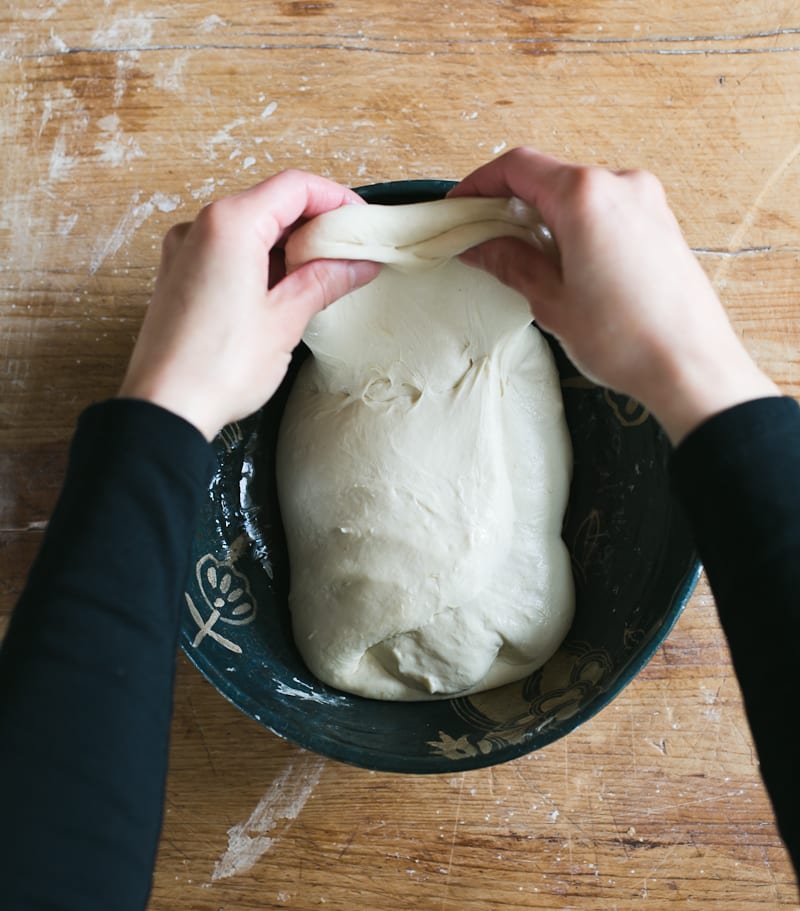
- Stretch and fold again
Continue until you have come full circle to complete 1 set, or 4 folds around the bowl.
Baker’s Tip: When you do the first fold, the dough will feel loose and elastic. As you continue, the dough will start to tighten up, usually around the 3rd or 4th fold. After about 2-4 sets, the dough will go from flat and dense to plump and jiggly. That’s how you’ll know the technique is working.
How Many Times Should You Stretch And Fold the Dough?
Stretch and folds are completed in sets. The first set is usually done about 30 minutes into the bulk rise. Then, you’ll complete up to 4 additional sets spaced about 15 minutes to 1 hour apart, depending on the dough’s flexibility and your own personal baking schedule.
Baker’s Tip: As a general rule of thumb, the sets for high hydration doughs (wet dough) can be spaced closer together because the dough is slack; about 15-30 minutes apart. For low hydration doughs (dry, stiffer dough), the gluten will need more time to relax, about 30 minutes to 1 hr. Otherwise it won’t stretch properly. As always, these are suggested timeframes. Watch the dough and not the clock!
So, Is It Worth it?
Absolutely! Once you get the hang of it, you’ll find ways incorporate the stretch and fold technique into your baking routine. And with practice and repetition, you’ll notice changes in the look, taste and feel of your sourdough bread. Just remember: not all doughs require it. However, it’s easy, practical and super effective when applied as an optional step.
Baker’s Tip: When you stretch and fold the dough it may (or may not) look similar to mine. This is normal. It might be stiffer or even looser; it all depends on the specific recipe you’re following. For reference in the video above, I’m using a dough that is approximately 70% hydration.

Comments
Yin says
Hi Emilie!
Thank you so much for your detailed instructions on how to enter the world of sourdough from starter to bread etc!! I’ve just been given a Dutch oven & am excited to explore baking sourdough bread etc.
Just a quick question – I have wholemeal (ie not wholemeal flour). Can this be used to make the starter?
Look forward to your advice. Thanks!
Regards
Yin
Raj Aggarwal says
Great tips
Ani says
In your directions you say not all doughs require the stretch and fold method. What types of dough would you not use the method?
Russ says
Why doesn’t anyone show a video of performing the first set of stretch and folds. This is where the process is messiest and where newbies (like me) feel things aren’t going the way we expected. Your video shows your dough with structure already, and where it is smooth and silky with enough consistency not to tear. Help me out with a video of the first set, please.
Sourdough Junkie says
The old timers did not use scales! Remember! Where ever you might get or buy a starter from: Alaska or Florida etc; it will become the starter where you keep it, and not be the same from where it came from. The new wild yeasties from your home or garden patio shelf will become dominate and the original strain will be lost. Let your starter catch wild yeasties when possible outdoors in all seasons and weather: Not freezing, catching rain, dust etc. So save your money and make your own, then you must name it; mine is 1946 Willys. 4 stars.
Anna Steenkamp says
Thanks so much for this simple explanation!
I am sorry I didn’t follow your recipe from scratch!
Can I do the bulk fermentation in the fridge , it’s too late at night to wait for 4 h . We are in summer so the bulk rise will be quick
Ulanda says
Hi there!
Needing some help.
I had a very active starter, 1:1:1 ratio, pretty thick.
When I stretch and fold my sourdough, it doesn’t really work. It’s “tough” per se, and won’t stretch so I just end up using two hands and forcefully pulling it over. I started the bulk rise hours ago and it really doesn’t rise much in between my attempts to stretch and fold.
Thoughts on what could be going on? 😣
Amber says
Probably needs more water/hydration?in the notes it says u can add up to 75ml more water and her dough looks to be alot more moist than mine when I followed the recipe without reafing tge notes originally
Nigel says
Thank you so much. I am a real beginner but I love the way you make it sound easy. I will continue to follow you (on social media), not literally 🤣
Corinne F Ibbitson says
I made this this morning. I did skip the stretch and fold. I am sorry I did. Next time I will definitely do this step. I think you should put this step before the “Bulk Rise” as I missed the step. Also my bread didn’t brown very much. It was dense but super tasty. Nothing a little butter and honey can’t fix. Thanks for all the help!! Great suggestions for us beginners!
Glenda says
Just deciding whether to try it. You make it look like something I can accomplish and enjoy!
Christine Baillargeon says
I am new at making Sourdough bread. I used my friend’s recipe for starter and I don’t know what I did wrong because my starter smelled like vomit and my bread was flat. I need some help.
Christina says
Your yeast died. You might need a new starter. I was super confused about the starter part when I first started (haha) and I realized that I was feeding too much water and not enough flour. So I changed it up and it helped me quite a bit. My first two tries at sourdough weren’t pretty. lol
Amy says
My first homemade starter just became active today! Thank you for the great step by step instructions!!
5 stars!!
Amy says
My first homemade starter just became active today! Thank you for the great step by step instructions!!
Kelli says
Very helpful explanations and videos!
Even though I know these techniques I always go back and read/watch your tutorials, and refer to your tips and techniques. TY for taking the time to post!
Emilie Raffa says
Ahhh. this is so great to hear. Thank you so much Kelli! I’m glad you’ve found them helpful :)
Lynn says
Hi,
After the final s&p,
Do you leave it on the counter overnight, and then refrigerate before baking?
Thanks
Lynn
Emilie Raffa says
It depends on the recipe you’re following! But generally speaking: after the last s&f, the dough will rise untouched until the bulk fermentation is finished. Whether this takes place overnight or during the day, again, it depends on the baker’s method.
Lynn says
Thanks,
I am following your boule recipe, and was unsure whether I should put it in the fridge at night, or just for a few hours before doing the cold bake.
Mike K says
First time sourdough maker. I found this advice very easy to understand. Clear, simple and also confidence building. I’m hooked !!!
Lynda Reed Neely says
Wonderful instructions. Helps a lot.
Rosalinda Munoz says
Thank you for all your tips, I am a beginner at making sour dough bread and I am addicted! Also I love making it and it gives me such pleasure to do it and wait how it will come out at the end.
Now, my question is my dough is quite sticky and can be handle unless I don’t mind getting my hands full of dough that is wasted, why? Too much water? Less water, denser bread, so I like a bread that is light, not like sourdoughs bread that are commercially made.
I did my own starter and k keep it in the fridge, once a week I get it out feed it and wait for it to double, if iam patient, and make bread, then I feed it again and put it back in the fridge after it has risen. Until the next week that I repeat it all over again.
I am just doing it all by my own sense after reading a few post of different people, I do it my way as I don’t like so much rigorous states on the starter, I also never through any away, why is this needed? Such a waste, why?
I use 150grs of starter to 500 of flour and so far I have had a good result!
Thank you for your post I liked it!
Rossi
Ping says
Do I apply the same technique if i would add rosemary and walnuts? Thank you.
Emilie Raffa says
Yes, absolutely! After I mix the dough and let it rest, I add the fillings using the technique outlined above.
Ping says
Thanks Emilie. I will certainly try your recipe.
Ashok K G says
Really good.
Dee says
Excellent! The instructions are clear and easy to follow. Making it today. Approaching the final rise. Thank You for being willing to help others along the way. 🙂
Brian Lampard says
Excellent article ,very helpful to a novice sourdough baker , clear and precise instructions with excellent video to demonstrate technique, thanks for sharing .
Emilie Raffa says
You’re very welcome, Brian! Thank you.
Glenda Boyce says
I wonder how the dough will rise if you keep stretxhing and folding it!
It got too late to keep going so I refrigerated it last night and got it back out this am. Hope that wont cause me any problems.
Emilie Raffa says
Hi there! This technique is done (and completed) within the first 2 hours of the bulk rise. For example, you can do up to 4 sets of stretch and folds spaced 30 minutes apart. It doesn’t interfere with the rise if performed within that timeframe.
Nancy Fair says
Thank you so much for the tips! My first loaf was beautiful and delicious!!
pat Salant says
Your soft innamon buns are awesome, I added 1/2 cup hydrated drained raisins, and switched brown sugar f9r wjite!
Valmor Luiz Buche says
Bom dia, obrigado pelas orientações, sucesso sempre.
Ruy cesar says
E aí, Valmor? Como ficou seu pão?
wendy says
great pics and so easy to follow.many thanks.
Emilie Raffa says
You are very welcome. Enjoy!
Kaltham says
Thank you so much
Emilie Raffa says
You’re very welcome!
Sam says
Thank you, Emelie. Very clear and precise and concise.
About 7 months ago I returned to baking my own bread (5 years in California in the 70s; 5 years in Belgium in the late 90s and early 2000s and finally these last 7 months in Winnemucca, Nevada. I’ve always kneaded my bread dough. I came on to your website because I wanted o know about folding the dough. I look forward to studying more of how you bake sourdough bread (I lean towards sourdough, simply because it’s alive and fun.).
With much appreciation,
Sam
Emilie Raffa says
Sam, you’re very welcome. Your bread baking journey sounds incredible. It must’ve been interesting working with all the different types of flour, especially the ones from Belgium. Stuff like that fascinates me! I hope you enjoy the posts and videos on this site :)
Judith Dickson says
Really helpful thanks, I made my first sourdough today after a friend gave me some of her starter. It certainly won’t be the last, I’m hooked!!
Judith Xx
Emilie Raffa says
Fantastic to hear, Judith! Have fun! xx
Diane says
Good reading. I plan to try all of them once I get my starter started. Anxious to make my first loaf. *****
Emilie Raffa says
Excellent! Happy baking, Diane!
Esther says
Hi, I just got your book and am so excited to start the sour dough process! You so clearly explain how to do the stretch and fold but i dont see where to incorporate that in the recipe. Looking at the recipes in your book, I dont see this step anywhere written in the book. Where would this step go? Thank you
Emilie Raffa says
Hi there! In the book, the stretch and fold technique is optional because it’s not required for every recipe (I go into this more in the sourdough steps explained section…). But in short, you would do them during the 1st half of the bulk rise. The process is flexible!
Debra says
I’m so excited to use your sourdough bread recipe. I was able to get some starter from a friend and then went to the store for the King Arthur bread flour….so right now I’m relaxing while it’s on it’s first rise and I’ll do that stretch and pull routine in about 30 minutes. Keep you posted.
Emilie Raffa says
Sounds amazing! Enjoy Debra! xx
Marian Pettit says
The written directions are clear & concise plus there’s a choice to watch videos for further clarity. Can’t wait to try
Emilie Raffa says
Thank you! Enjoy!
Phillip says
Would stretch and fold technique work in lieu of a regular knead for a low hydration whole-grain bread?
I’d like to do a no knead recipe but I want to make whole grain Bagels so the hydration level is going to be less than regular no knead recipes would be.
Emilie Raffa says
Hi Philip! Great question. Yes: you can use this technique instead of regular kneading. However, keep in mind: low hydration doughs require more resting time in between S&F sets. The reduced amount of water makes the dough stiff and less stretchy. Time alleviates this issue. For bagels, I would do maybe 1 or 2 folds (although I usually skip this step altogether for bagels- the dough is strong enough) and then leave it alone.
Jill Mann says
Practical, easy to follow, looking forward to trying out the techniques.
Emilie Raffa says
Thank Jill! Enjoy!
Juliette says
Hi, I am using home ground hard white flour and according to your recipe the dough seems very dry upon doing my first stretch and fold. Should I add more water? Your dough is pillowy and beautifully light, mine looks nothing like it, mine looks heavy and dry! Help…..
Emilie Raffa says
Hi Juliette! Great question. A few things: anytime we work with home ground flours, the texture of the dough will always be different when compared to doughs made with store bought flour. Home ground and commercially produced flours vary in protein content, texture, and strength which means they will absorb water differently. Hard wheat flour is very strong AND thirsty so I’m not surprised the dough needed more water! So yes: adding more is ok. Additionally, adding more time between the folds will allow the dough to hydrate more, making the texture softer and easier to stretch.
Julia says
Hi Emelie,
I posted a question recently about timing of stretching and folding, not sure if you saw it. When do you need to finish the process? Within the first half of the first rise, or earlier? Also I see in you book you recommend golden flax seed. It’s hard to find, is it worth seeking out over brown flax seed? And one more question 😃, in your book, regarding your pumpernickel bread, how is pumpernickel flour different from rye or dark rye flour? Could I use rye flour? Many thanks!
Emilie Raffa says
Thanks for following up- I missed the earlier comment. Please see my response!
For the flax seed, brown flax seed is totally fine to use as a substitute. Not a problem. Regarding the types of rye flour- light, medium, dark etc- it’s actually very interesting to learn about the inherent differences. King Arthur Flour has a great article on the subject {linked here} it’s a quick read. I believe you can sub dark rye for the pumpernickel flour with similar results.
Julia says
Thank you Emilie. I’m making your Mighty Multigrain in a couple days time. Spelt flour is new to me, so I’m looking forward to trying it out!
Julia says
Oh my gosh, it was delicious! My husband has a sandwich every day for lunch, so your book has been so much fun. Thanks Emilie!
Emilie Raffa says
I’m SO thrilled to hear this- happy for you! Thanks for taking the time to report back, Julia :)
Julia Speer says
Hi Emilie!
I love your website and your book. I’m having so much fun with your recipes. And your videos have been a HUGE help! I have a question about the timing of stretching and folding. Do I want to aim to do 1-4 sets (I know you say that number flexible) in the first half or so of the first rise? Like the first 1-3 hours? Is it advisable to stop the stretch and fold after a certain amount of time has passed, say 4 hours?
Thanks,
Julia
Emilie Raffa says
Hi Julia! Thank you! Generally speaking, stretch & folds are done within the first half of the bulk rise. So yes, you are correct: 1-4 sets would be completed within the first 1-3 hrs of the bulk rise, depending on how they’re spaced out. There’s no set rule as to when to stop the stretch and folds. However, the idea behind the technique is to strengthen the dough- you don’t have to go crazy with them. Usually 1-4 sets spaced 30 minutes apart or two sets spaced 1 hr. apart is sufficient.
Zively says
Hi! Thank you so much for your super easy and well explained sourdough starter recipe, I loved tending to my starter!, I am now working on the Sourdough bread for beginners recipe, followed instructions, but on the first hour when I stretch and fold my dough, it is not flexible, silky elastic as yours, what do you think is going wrong? I am letting it sit for another hour for the next stretch and fold. Thank you in advance for the help!
Emilie Raffa says
Hi there! Time, temperature and water will all help the dough relax making it easier to stretch and fold. So in your case, with the beginner recipe, extending the rest between sets is key- an hour should be good. Next time, you can also try adding more water to the initial mix and rise the dough in a warmer spot. Great question!
Blair says
Hello, I am having trouble getting my dough to double during the bulk rise. I’m trying stretch and folds but it still doesn’t seem to double, sometimes letting it sit 12+ hours. And then a second rise of 3+. My starter seems strong. I feed it once a day at 100% hydration, doubling and passing float test. I weigh ingredients and get good oven spring too, but the bread still seems dense. Please help! I’ve ordered your book, but didn’t know if you had any thoughts. I’m on my 4th loaf without it rising!
Evelyn Wagner says
Emilie Is it best to proof during rising to have double rise? My dough does not double
and when baking in oven flattens out instead of rising up. Please help
Evelyn
Emilie Raffa says
Hi there! It depends on the recipe you’re following, but generally speaking, if you’re new to sourdough it’s best for the dough to double in size. If you rush this step, the gluten will be underdeveloped and your loaf will be flat and dense.
Emilie Raffa says
Blair, if your starter is active, it’s most likely temperature; it’s not warm enough. Read this post for additional clarification: Why Won’t My Sourdough Bread Rise? Good luck!
Emilie Raffa says
Hi Blair! If you starter is bubbly, active and strong (and passes float test right before using) then the issue is most likely temperature. You need both to successfully rise sourdough bread. Next time, do the bulk rise in a warmer spot, ideally 75 F and see how it goes. Once the dough doubles, then we know adequate gluten has formed which should alleviate the denseness. Also, shorten the second rise- 3+ hrs is too long following a 12+ hr bulk rise. Hope this helps :)
Patrick Gathara says
Hi. Great post.
I am having trouble with doughs that as I stretch and fold seem to strengthen to a point and then go slack. I use water to wet my hands when handling the sourdough and wonder whether that gets into to the dough, making it slacker than it should. Also, can one do too many stretch and folds (which I imagine would be akin to over-kneading)?
Thanks,
Patrick
Emilie Raffa says
Hi Patrick! So many variables to consider here. First, what hydration % is the dough you’re working with? And paired with what type of flour? Temperature?
Additionally: too many stretch and folds to the point of over kneading is extremely rare. In fact, it’s very difficult to over knead (by hand). I don’t think that’s the issue in your case. Thanks!
Marian Anderson says
really need help—-every batch is different . Some rise some not much. trying rye plus white flour . Need to get a pattern, will your book do it ? Also do u have a video? for sale?
Emilie Raffa says
Absolutely! My best advice is to start small and practice a basic bread recipe (over and over again) until you get a better idea for how that particular flour feels, how the dough feels, how the temperature feels etc. If you keep making many changes, it will be hard to tell where you went wrong or right! If you’re looking for a good starting point, with practical tips and inspiring recipes, my book will definitely help you.
Todd O'Bannon says
High altitude. I am at 6200 feet. Should I adjust anything for the bread portion of the recipe. I’ve got the starter down perfect.
Beverly says
I am so confused.
First of all I love your emails, and recipes.
On the cinnamon raisin recipe you just gave us. Do I knead, and do the stretch and folds, or just knead.
Thank you
Emilie Raffa says
Hi there! Thank you! You do both. The kneading is done in the stand mixer and the stretch and folds are done during the bulk rise.
Avril says
Love it all! Thank you so much!
Ginger Good says
Hi Emilie. I have been making your Sourdough Beginner bread with great success for several weeks and finally was able to get your Artisan book. Love it! I want to increase my starter. Can I do this by not discarding half but increase the feeding amount according to the 1:1:1 ratio? By the way, thanks for going down the sourdough rabbit hole and sharing. I love to understand how things happen so you saved me the trip. Great instructions!
Thank you!
Emilie Raffa says
Hi there! Yes: to increase the overall quantity, do not discard and just keep feeding. And you are very welcome :)
Reyna says
I made my first starter during this spring. I have been loving it and loving using the stretch and fold technique. I have tried various searches about using the stretch and fold technique for non-sourdough recipes but have come up with nothing. Can you substitute this technique for non sourdough recipes and if so how?
Emilie Raffa says
Hi there! You can absolutely use this technique for non-sourdough recipes. How and when you’d do them depends on the recipe and method you’re following, but in general, the technique follows the same principle. Start during the bulk rise, do a few folds, and see how you go.
Anita Goulding says
I can highly recommend this blog, I am new to sourdough and have followed the blog to make my starter and first 2 loaves with success. Easy to follow instructions and videos.
Emilie Raffa says
Thank you! :)
Janet Coyle says
I’m just starting the sourdough journey and delighted to find this blog. My first batch is starting now (3rd day) and I’m almost frightened of my first loaf when the time is right. Love the blog!!!!!
Emilie Raffa says
Thank you! Enjoy :)
Eileen Ma says
Hi Emilie! I’m new to sourdough baking and I’ve had difficulty with my dough spreading instead of rising in the oven. I’ve now incorporated the stretching and folding technique and am using your artisan recipe for beginners. Two questions – my dough is pretty darn wet. It never seems to become dry and silky and elastic. Today it got to the point where it held a ball shape, but it still spread in the oven. What am I doing wrong? And if I’m stretching and folding, how do I know when my dough is ready if it never gets to the silky point? Should I just let it keep rising during the bulk fermentation? Am I just being impatient?
If you could talk me off the ledge, I would really appreciate it!
Thanks, Eileen
Emilie Raffa says
Hi there! It could be a few things. First, are you weighing your ingredients? There could be too much water in the dough. Second, the dough might be over proofed (rose for too long, which makes it spread and turn sticky) or under proofed (bulk rise cut short). See if any of this rings a bell first. Regarding the stretch and folds, the dough still needs to bulk after your folds. The technique itself is done in conjunction with the bulk rise. Does that makes sense? My gut is telling me your dough needs more time. So do a few folds, and continue to let it bulk until it doubles. This will help.
Kaitlyn says
I love your cookbook and blog! I have made several of the recipes, and have always had pretty satisfactory results (I created my starter using your book). I have lost count of how many times I have made your classic sourdough loaf, but I feel that I have finally gotten it down. I use 80 grams of starter, 350 grams water, and 500 grams bread flour. The first rise is usually 11-12 hours long.=, and I bake it in a clay baker. I would like, at some point, to try using less starter and a longer ferment for a more sour flavor. Do you have tips on this?
Emilie Raffa says
Hi there! Try using 50g of starter, bulking in a warm spot in the afternoon, and chilling the shaped dough overnight to bake the following day.