Have questions about sourdough? This troubleshooting guide offers practical tips and tricks to achieve a bubbly, active sourdough starter.
Without a doubt, the most intimidating aspect of sourdough baking is understanding its key element: the starter.
What is a sourdough starter you ask?
Simply put: a starter is a live fermented culture of flour and water.
Once it becomes bubbly and active a small portion is used to make your sourdough bread rise- no commercial yeast is required. It’s a technique that can be traced back thousands of years when instant yeast was not yet available to bakers.
Doesn’t sound too scary, right?
But there’s a catch…
A starter is not just this “thing” you create and walk away from forever.
It must be kept alive and well with additional feedings (flour and water) to keep it bubbly and active. Remember, it’s a living culture which must be cared for with intent. Otherwise, your bread won’t rise. Think of it like a pet that needs to be fed daily, or a house plant that needs water and a sunny window.
At its core, sourdough is about understanding and committing to an ongoing relationship.
As with all relationships however, there lies a bit of uncertainty.
You might ask yourself: “Am I doing this right? Why does my starter look different than yours? Why is it taking forever to rise? Is it dead?”
That’s why I’ve put together this article for you.
Most of the information is already covered in my book Artisan Sourdough Made Simple, but I’ve included additional details to answer any questions you might have and to open up the topic for discussion.
Two quick things before you begin:
1.) To streamline the process, this post assumes you have a working knowledge of a 100% hydration starter, made from equal parts regular wheat flour and water by weight. This is the most common type of sourdough starter. If you don’t have a starter, try my Beginner Sourdough Starter Recipe.
2.) This post is also very comprehensive. To avoid losing your mind as you digest the details, take your time and read through it a few times until the aha moment strikes!
Because eventually, it will…

Troubleshooting Your Sourdough Starter
1.) Why Won’t My Starter Rise?
Ahh yes… the million dollar question. It’s like asking: “Why won’t my 2-year-old sleep through the night?”
Because a sourdough starter is a living culture, like children of a certain age, they will definitely share some similarities. Each one will have their own unique personality and the “one size fits all approach” doesn’t always work.
Some bakers use science to explain these personality differences and others observe, follow their intuition and allow the starter to teach them. I implement both techniques.
Keep in mind, when troubleshooting your sourdough starter, it’s usually a combination of factors. In my experience, the rise time is based on temperature, ingredients, feeding frequencies, type of flour & the quantity of flour used.
Temperature
Starters love warm environments. The warmer the spot the quicker it will rise. But realistically, finding a warm spot can be challenging especially when baking in the winter. The ideal temperature is somewhere between 75-85 F.
Here are a few things you can do:
Try storing your starter in a cozy cabinet. It’s warm, draft free, and I have to say, my personal starter does really well in this snug little habitat. Experiment with a cabinet that’s near your stove for extra warmth.
Another option is to wrap the starter jar in a heating pad. One of my kombucha readers (Hi, Melanie!) suggested this tip and it’s very clever. The heating pad maintains the starter at an approximate temperature which can be adjusted to your liking.
A proofing box can also be used to control the temperature. This is the one I use, which is great for your dough too (it FOLDS FLAT!).
If you don’t have a proofing box, place your starter in the oven (turned off) with the light on. But please make sure to keep an eye on it and turn the light off, if necessary. It can get very hot in there! Another makeshift proofing box option is to use your microwave; just place the starter inside (turned off) with the light on.
Finally, try using warm water in your feedings. Around 80-90 F is a good temperature.
Note: regarding temperature, if your starter is exceptionally strong and vibrant, it will have no problem rising in warm OR cold environments, even in the fridge. My starter is a workhorse and will rise ANYWHERE. This is because it’s mature, well fed and cared for starter. Keep this in mind as you continue to develop a relationship with your personal starter.
Ingredients
A sourdough starter is made from flour and water. For best results, always use quality ingredients.
For the flour, please use something that is unbleached, unbromated, and does not contain chemicals.
Most non-organic U.S. flours, including my preferred brand King Arthur Flour, are enriched with vitamins and minerals including iron, folic acid and other vitamins. This is okay to use. I also like Trader Joe’s all-purpose flour for feedings.
However, it’s important to note that not all flours perform the same. Flour from the UK is going to have different enzyme and mineral levels than flour from the U.S., Japan, Australian etc. Even organic flours perform differently.
That’s why when troubleshooting your starter, it’s best not switch back and forth between brands at first. It’s too confusing and you won’t know where you went wrong. Stick to one brand, try to rule out additional factors that might be giving you trouble, and then make changes from there.
For the water, try using filtered or bottled water to avoid any trace chemicals or chlorine if you think it’s having a negative effect on the rise. I don’t have to do this at home, my tap is fine.
Feeding Frequencies
Ever have those days where you’re just ravenous?
Starters can be ravenous too. If at one point your starter was all bubbly and happy, and now it’s not rising anymore, it’s possible that it needs a few extra feedings to boost the yeast development. Assuming you understand how temperature and ingredients can effect the rise of your starter, try feeding it 2x per day and see what happens.
Also, if your starter has been stored in the fridge for a while, it’s going to need several feedings at room temperature to become bubbly. Have patience!

2.) What Type Of Flour Can I Feed It With?
Feed your starter with the same flour from which it’s made.
Now, let me just clarify: every baker has their own way of feeding their starter. And one method is not necessarily better than the next (just different).
To cut through the noise with reliable results, feed your starter with the same flour that’s in the jar. For example, if your starter is made with all purpose flour, feed it with all purpose flour. If it’s made with rye flour, feed it with rye flour. Easy.
By doing so, you’ll establish a consistent feeding routine and the rise time will become more predictable. Think about it this way: how would your dog feel if you fed him a different type of dry food each week? Starters are no different!
3.) How Much Flour and Water Does My Starter Need?
For a 100% hydration starter, feed it following a 1:1:1 ratio by weight.
For example, if you have 30 g of starter in the jar, feed it with 30g of flour + 30g of water. If you have 60g of starter, feed it with 60g of flour + 60g of water. Please use a kitchen scale for this! You can easily scale the initial starter quantity up or down, depending on how much you want to maintain now or in the future.
Again, every baker has a different method, but following a 1:1:1 ratio by weight will get you reliable results. Your starter will rise more predictably, and if you’re lucky, it will stay at its peak height for quite a while before it collapses.
4.) I Created a Starter Following the Instructions in Your Book… It Used to Be Bubbly, But Now Nothing’s Happening? Did I do Something Wrong? Should I Start Over?
Believe it or not, this is 100% normal.
Typically, when creating a starter from scratch, you’ll see bubbles on the surface around Day #3. When you start feeding it with flour and water on Day #4 and beyond, the bubbles may or may not appear as quickly. It makes sense to think that something’s wrong! But don’t panic.
In order to cultivate and develop the yeast within your starter, you need to feed it for several days in order to see results. The process can be unpredictable, and each person you talk to will have a different experience based on their personal situation and environment. It’s easy to get caught up and compare, doubt yourself, and think it’s not working.
So, should you start the whole process over?
No! Continue to follow the instructions in the book, but make sure to read this post a few times, including Sections 1-3 to familiarize yourself with possible troubleshooting factors. If you’re still stumped, please be patient and continue to feed your starter until it bubbles and doubles in size. Eventually, you will see results. It just takes time.
5.) What Type of Container of Jar Should I use for My Sourdough Starter?
I wrote a whole post on this. Click here.
6.) Does the Starter Jar Need To Be Airtight?
The jar or container can be airtight or covered loosely; it’s your choice.
If it’s airtight, just make sure the jar is large enough to accommodate the starter’s growth as it begins to rise (at least double in size). Otherwise it will burst through the jar.
If you choose a loose cover such as a cloth or something else that’s breathable, and a skin forms on the surface, that means too much air is getting into your starter. It’s not the end of the world if you see this. Just peel it off and/ or choose an airtight lid instead.

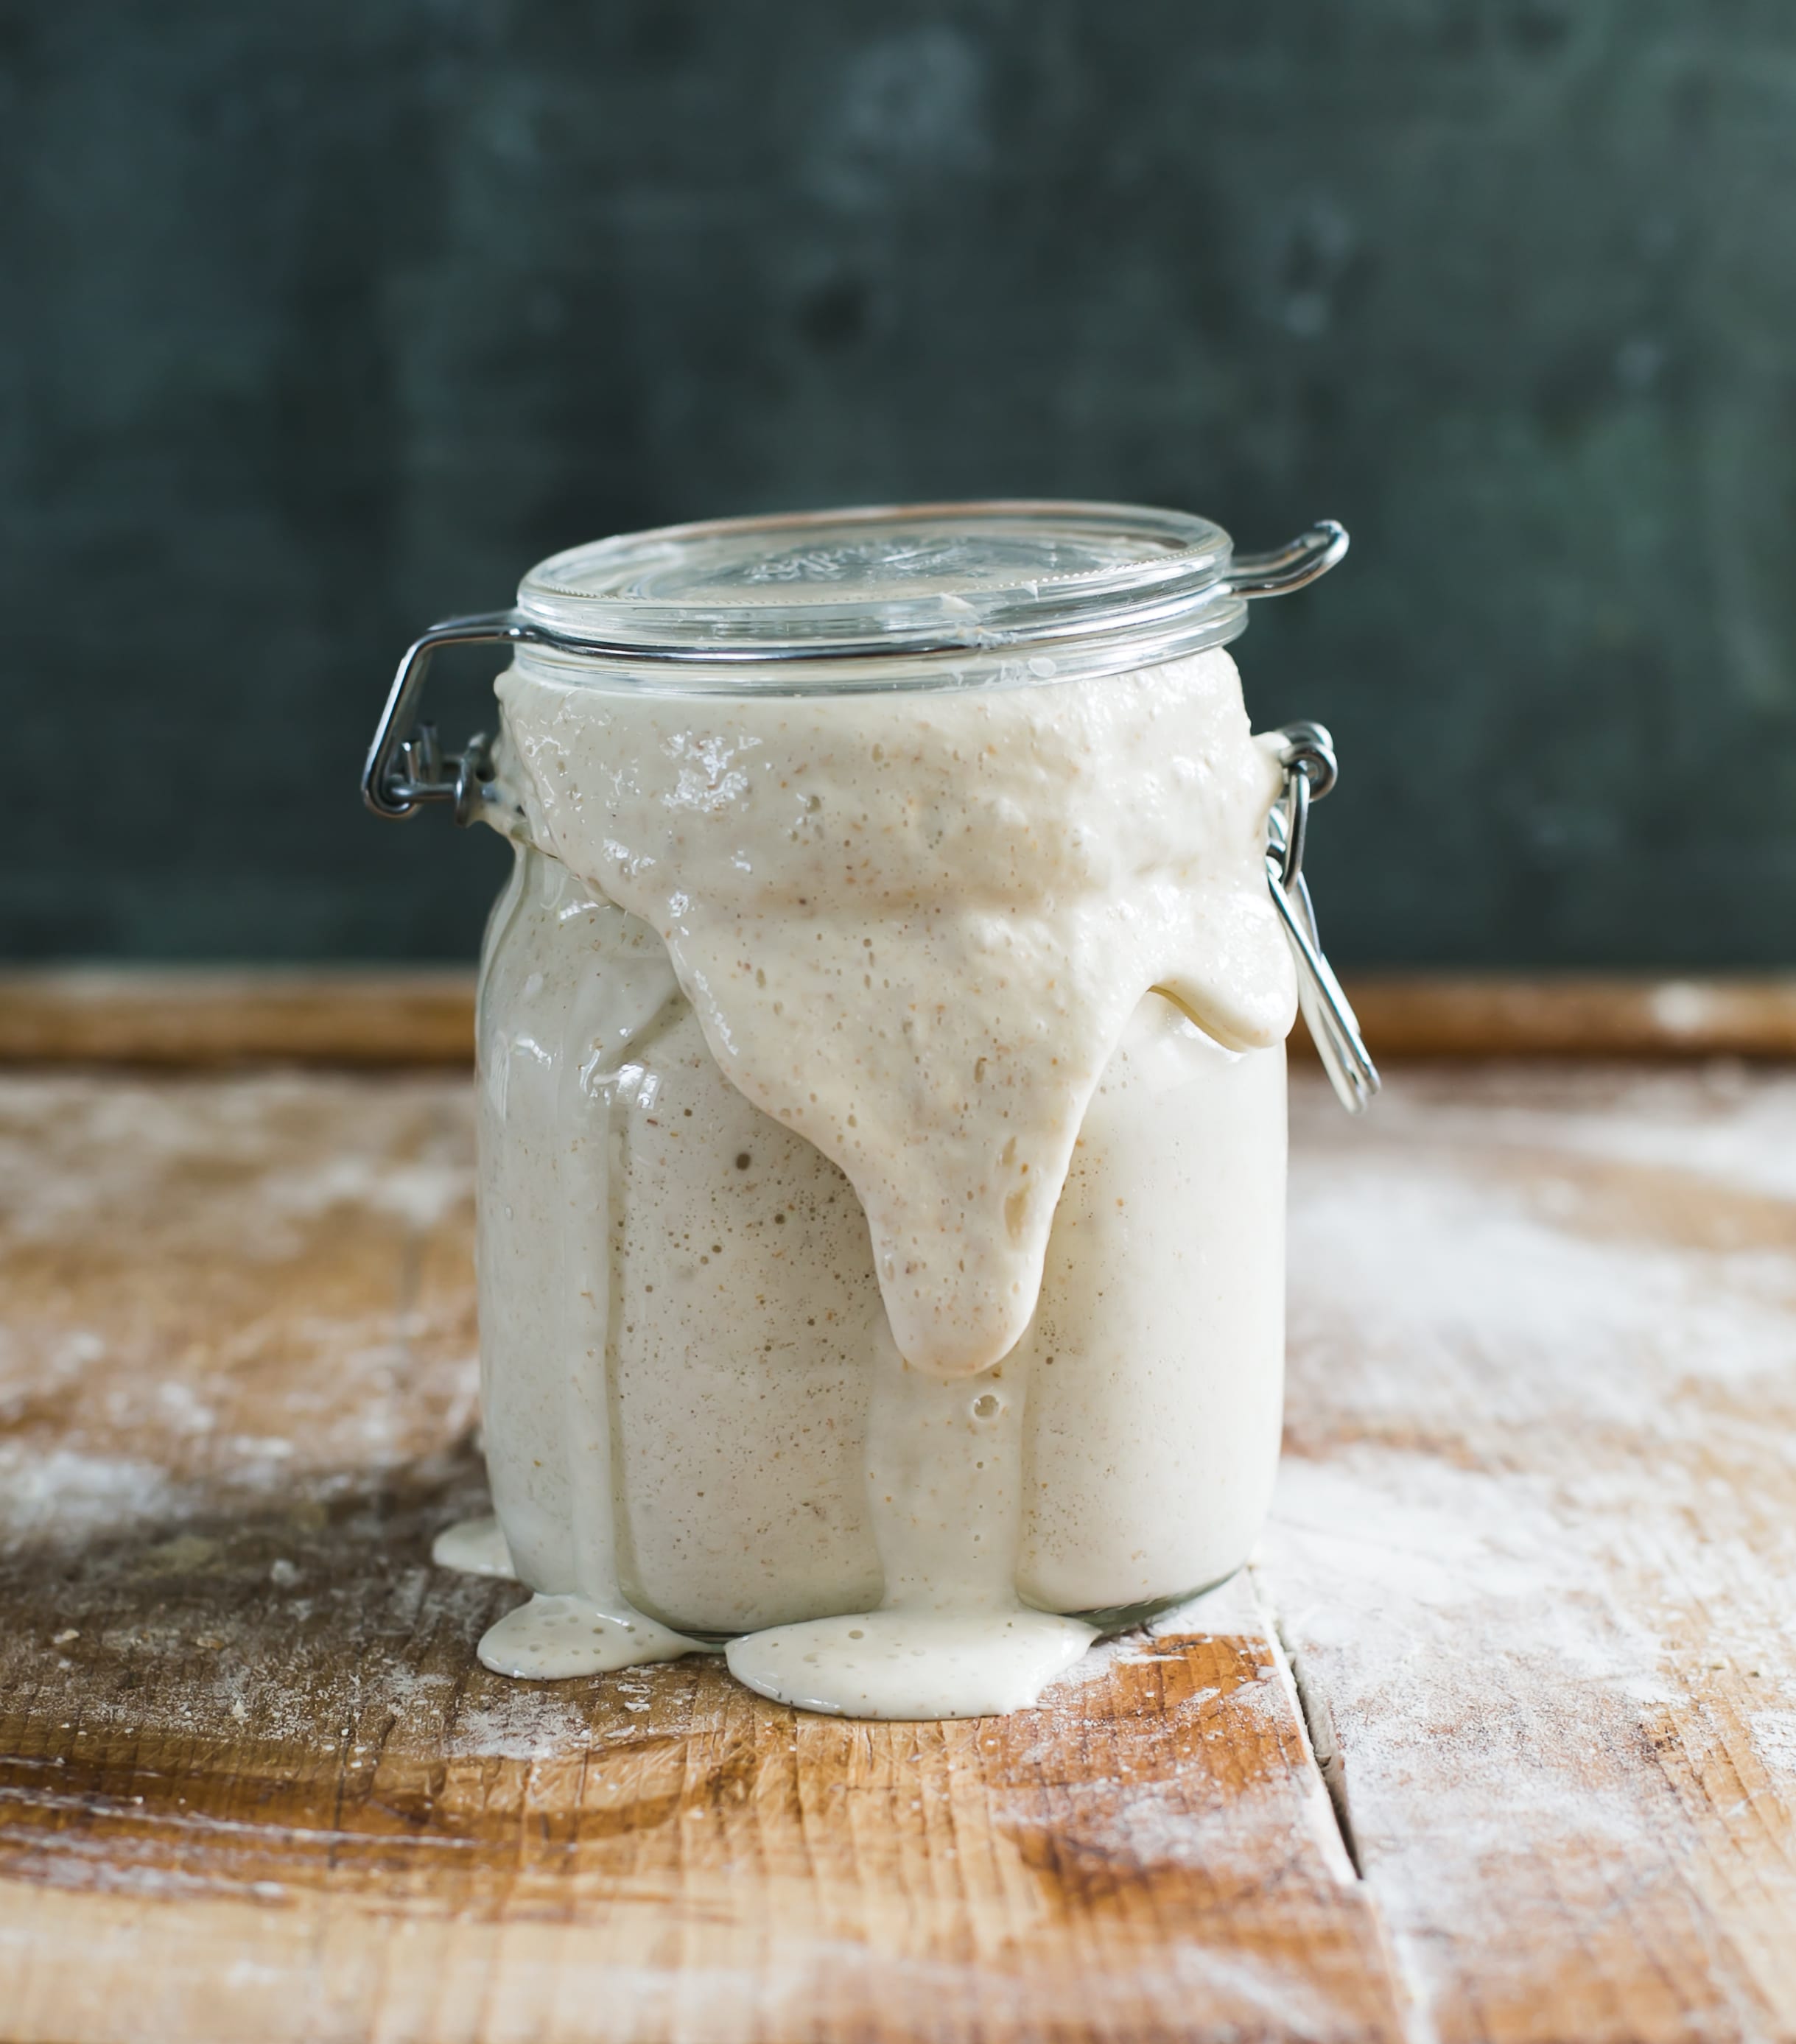
7.) What Is That Dark, Smelly Liquid On My Starter?
It’s called hooch which is an indication that your starter needs to be fed.
Don’t worry, it’s not dead. Just exhausted. This liquid is something you’ll see regularly, either on the surface of your starter or even within the culture itself (as pictured above), so get used to it! Because the liquid is unsightly and smells like gym socks, I pour it off with some of the discolored starter underneath and feed it right away. That’s all you have to do.
PS: hooch is not mold.
8.) What Should My Starter Smell Like?
First all all, your starter shouldn’t smell too vinegary, like gym socks, or nail polish remover. If it does, it just needs to be fed. Don’t freak out over this too much. At some point your starter will smell like this.
On the other hand, when your starter is in good shape it should smell fresh, fruity and yeasty.
So, what does that even mean?
Fresh, fruity, and yeasty aromas will vary from starter to starter. Some will smell like toasted coconuts and pineapple, others will smell like apple cinnamon. It’s actually very interesting to note all of the differences. Don’t worry if yours just smells tangy and not very “exotic.” Totally normal. The aroma all depends on what’s in the jar and how it’s cared for.
9.)What Happens If There’s Mold Growing On My Starter?
If you see mold, get rid of the entire starter!
In all my years of baking, I’ve never had a problem with mold. That doesn’t mean it can’t happen to you. In fact, several of you have emailed me regarding mold (oddly enough you’re all from eastern Australia. Weather issues?).
Mold can occur on the surface of the starter or on the jar itself. Its appearance can range from white and fluffy, to dark greenish brown, and even pink.
What gives?
Here’s what I know about mold: mold spores are everywhere. And it takes a perfect storm of variables (food, temperature, and water) to populate its growth. So, think about your current environment: is your starter jar near a fruit bowl (food source)? Is your current climate on the humid side (mold loves this kind of weather)? Are you using tap water (where trace chemicals and chlorine can be found)?
Because we all live in different environments it’s hard to pinpoint the exact cause. But if you can troubleshoot any of the above, it might lead you in the right direction. Consider moving your starter to a different room if you think location is part of the issue.
Paired with the variables above, mold can also occur if your starter hasn’t been fed often enough. Consider feeding it more frequently. This will keep the naturally occurring bacteria fresh and happy.
And finally: Sometimes mold can occur when something else lands in the jar. Last summer, a fly got stuck in my starter and the whole thing turned pink (not the fly, the starter). I’m not sure if the pinkish color was true mold or just a result of the unfortunate casualty. Either way, it’s something to pay attention to.
10.) How Do I Get Rid Of Fruit Flies?!
Short answer: you can’t.
When summer rolls around, get used to seeing fruit files because they LOVE sourdough starters. Love. Love. Love. It’s hard to prevent a fleet of flies swarming the jar but there’s a few things you can do.
First, make sure your starter is not near any fruit (for obvious reasons). Second, just relocate it. Sometimes, I keep mine in my bedroom and completely out of the kitchen where the main food sources reside- my husband thinks this is totally weird. Third, keep the lid on. This will not keep out the flies completely but it will help especially after you’ve moved the jar out of the kitchen.
If you have additional ideas on this one, I’m all ears! Please read the comment section below; you guys have THE BEST tips.

11.) Can My Starter Be Used With Gluten Free Flours To Make GF Bread?
Short answer: NO
Most sourdough starters are made from wheat flour and water, so therefore it contains gluten. If you want to bake gluten free sourdough you’ll need a gluten free starter. Remember that. I get many emails asking if my starter can be used to create gluten free sourdough, and it’s just not the real deal.
12.) If I Forget To Feed My Starter, Is It Going To Die?
Short answer: NO
No matter what I tell you here, the first time your starter gives you trouble, or it’s taking forever to rise, or whatever, you’re going to think it’s dead. I guarantee it. The Internet has scared people into thinking if your starter doesn’t rise instantly with a trillion bubbles on the surface, it’s completely broken and will never be usable again. EVER.
Please have a little faith. I have a starter that’s been siting in my fridge for over 1 year, unfed. I forgot it was even in there. After transferring it to a new jar, feeding it for several days in a warm spot, and just being patient, guess what?! It was still ALIVE!!! That’s all you have to do if you suspect your starter needs a little love. Starters are resilient creatures which require practice and patience.
Which brings me to my last point (hooray!)…
13.) Be Patient!
This is THE hardest tip to follow. But it’s undoubtedly the most important.
Who has patience these days when we have access to whatever we want on demand? Sourdough will teach you all about patience whether you like it or not. You can’t rush it. There are no shortcuts. No cheat sheets. Again, like parenting, eventually your 2-year-old will sleep through the night.
So, please read through these tips slowly and carefully and see what troubleshooting factors apply to your personal situation. Some days you’ll have a beautiful bubbly starter and other days it will act like a diva. And just remember: it’s usually a combination of factors that contribute to sourdough starter issues. Your starter behaves this way not to make your life miserable; it just wants you to pay attention. Take your time, feed it a million times if you have to, move it to a warmer spot, and just honor the relationship. It’s the only way you’ll learn.
My intent with this post was to include enough information to satiate your questions, without making you feel exhausted.
Believe me, this topic can go on for ages- there’s just so many scenarios. Feel free to comment below with additional thoughts and tips. Based on your feedback, I will make periodic updates to keep this post fresh and relevant! Happy baking, friends :)

Comments
James McLendon says
*sigh* I meant, “I suspect the issue in Eastern OZ”
Emilie says
No worries ;)
James McLendon says
You mentioned that folks from Eastern Australia tend to get mould.
I’m an expat from the mountains of NC, currently living in Brisbane, Australia.
I suspect the issue in western OZ has to do with the fact that it gets stinking hot in the summer, and the humidity is off the charts.
In summer, I’m finding that I put my starter in the fridge through the week, and take it out a couple of days before I want to use it (with appropriate feedings). Otherwise, the heat of the day is just too much for the little critters to bear.
I’ve also found that I need to transfer the little guy to a new home every couple of weeks. Otherwise, the lip of the container becomes a magnet for things gone wrong.
Emilie says
Hi James, thanks for the tips! Makes total sense. The Aussie summer heat can be brutal (but I love it- I used to live in Coogee Beach!).
Jen Achondo says
First I wanted to say I love your book. Until your hook I was terrified of making a sour dough starter. My question is my sour dough starter looks more like a paste, it’s kinda thick even when bubbly.. where yours in the pictures looks more like a liquid.. do you think I’m not using enough water? Is it supposed to be thin and more liquid? I’m using an organic stoneground wheat flour, does that make a difference? Thank you so much for answering all of these questions, your answers have seriously been so helpful.
Lilly says
I would like to know the answer to this as well.
Emilie says
Hi Lilly! Please see my response ;)
Emilie says
Hi Jen! Thanks so much! From what you have described, it sounds like there’s not enough water in your starter. First thing’s first, make sure to weigh all of your ingredients. And yes: the stone ground flour will make a difference. It absorbs MORE water than AP flour, which is why your starter is too thick (make sense?). In the book, I recommend using the WW flour during the creation process but then to feed it with AP flour. Doing so will give it a more liquidy and stretchy appearance. Hope I’ve answered your question!
Gerry G says
I’m so glad I just read your blog. I will now run to the store to buy the non-organic version of flour to see if that’s my problem.
Fingers crossed, you’ve helped me solve my mystery.
Emilie says
Hi Greg! Fingers crossed indeed! Hope your mystery is solved :)
Luc says
Be patient! Sound advice, I made a nice sourdough from scratch 5 years ago, it was so easy after 5 days bubbling away doubling in size in 4 to 8 hours.
Foolishly used all my sourdough to make pancakes and had to start over again. I thought no problem. Then unlike the first experience, after bubbling strong already on day 2, bubbled less on the third and will no longer bubble , no sourdoughwy smell , day 10 still the same.
I use freshly milled four from Bob Redmill’s Kamut grains.
Emilie says
Hi Luc! Although frustrating, what you are experiencing is not uncommon at all. The reader above this comment is experiencing the same thing- please read my response. Also: I would not feed it freshly milled flour to start. Stick with a good-quality all purpose flour when creating a starter from scratch. Once the yeasts have grown and developed, then switch to something else if you prefer. Freshly milled flour can be tricky to work because the enzyme levels are different than standard AP flour.
Cliff says
I have been following starter instructions very carefully, ingredients by scale, temp etc. I fed it once a day for ten days. Nothing seemed to happen. I moved to feeding twice a day for 5 more days. What i get is a great smelling result with air holes on surface but virtually zero rising by volume.
?????
Emilie says
Hi Cliff! Hmmm… The good news is that the yeast is cultivating (good smell, some air bubbles), but because it is not rising, it needs a boost for sure. My first recommendation would be to feed it 2x per day (which you already are doing) for at least 2 weeks. I know this sounds like a lot of time, but some starters just take longer than others to get going. Try storing it in a kitchen cabinet to keep it away from drafts, and other yeasty things, like fruit. If that doesn’t work, you flour might be old. I prefer King Arthur Flour. Hope this helps!
Venka says
Thank you! I really thought my starter died when my mum transferred it from a glass bowl to a stainless steel bowl. It did smell a bit like smelly socks and had settled with the solids at the bottom and “dirty” water on the top. I poured the liquid off and gave it a feed. Instantly the bubbles came back! Looking forward to baking with it for the first time.
Emilie says
Hi Venka! Fantastic! I’m happy to hear you stuck with it and didn’t throw it out. It’s easy to think your starter is dead when it looks and smells like swamp water. Usually, it just needs a good feed (or two) before coming back to life. Enjoy!
Diane Windsor says
Hi Emilie! I’ve been struggling with my sourdough for months – I had a pretty good starter, but could never get my bread to rise. Thanks to your book, I’ve been baking beautiful, perfect loaves! I love the precision of weighing the ingredients, and following your steps. Woo hoo! Thanks so much! <3
Diane Windsor
Allen, TX
Emilie says
Hi Diane! Thank you SO MUCH! I live for comments like these :)
Tracy says
Hello! I live at a high altitude (Boulder) and am attempting to make my first Sourdough starter. I noticed that within 24 hours, I have liquid on the bottom of my glass jar. It seems like everything I read, the expectation is that the liquid will be on top. Is it okay? Because of the altitude? Did I mess something up? (I probably did). Thank you for any insight you can give me!
Emilie Raffa says
Hi Tracy! Great question. While it’s typically more common for the liquid to be found on top of the starter, it can occur on the bottom and in the middle of as well. All normal. You didn’t mess something up at all. Just keep feeding it. I’m not an expert in high altitude baking, however you might have to decrease the water slightly to get the right texture. Continue to make adjustments as you go. Hope this helps!
Aleida says
Hi! My starter is still in its teething stages.
Some days I love it, others I want to hide it in the back of my fridge and give up!!
My question; the starter is bubbly, rises and smells right but doesn’t usually doesn’t pass the floating test. Does it need more feeding or am I waiting too long before using it?
Emilie says
Hi Aleida! Great question. It sounds like you are waiting too long before using it. Feed it at night before you go to bed, and then again in the morning (do this on a weekend when you know you are going to be home). Check on it every so often to see when it has doubled, do the float test, and take it from there. Good luck!
Virginia says
Hello!
How long can we leave our starter at room temperature, while feeding daily? It’s been a week now, and I feel it still needs more feedings but I didn’t want it to go rancid because it sat on the countertop for too long. When do we put it in the fridge for further long-term development?
Thanks!
Emilie says
Hi Virginia! You can leave your starter out at room temperature for as long as you wish. It won’t go rancid. It just needs to be fed everyday or every other day depending on your schedule and how often you plan to use it. I’ve left my starter out on the counter for over a week without feeding it simply because I forgot (and it’s totally fine). The appearance of hooch doesn’t mean it’s rancid either; it just means it needs to be fed again. You can put it in the fridge at anytime, if you prefer. Hope this answers your question!
Trevor says
I recently purchased 1 cup of 20 y/o starter. I put it in my fridge for 2 weeks then pulled it out for a few dats then started feeding it. I’ve geen feeding it for a week now but it doesn’t float in water (which is how I was s told I’d know it’d be ready for use) do I just continue to keeping feeding it and wait til it floats?
Emilie says
Hi Trevor! Great question :) First, I would contact the seller to see if they have any special instructions for you. I don’t know this particular starter, what hydration % it is, etc. Second, if I were you, I would keep feeding it at room temperature, in a warm spot if possible, daily. You might need to increase your feedings to 2x per day until you see some bubbles, it doubles, and then passes the float test. Hope this helps!
Greg says
Emilie,
Tried 3 different starter recipies, no luck, got your book and after 4 days I was amazed at how the starter rises. The question I have is when you say take out half of the starter out of the jar and feed with 60 grams of flour and 60 grams of water. Having weighed out the starter in the jar it was around 195 grams after day 4, half of that would be around 97 grams. Am I supposed to be following the 1:1:1 or is it OK to add more starter when I feed it. I am getting tired of having starters around and not having sourdough bread to eat.
Thank you,
Greg
Emilie says
Hi Greg! That’s wonderful to hear, thank you! Regarding your question: technically, you should always follow the 1:1:1 ratio for best results. However, it’s ok to play around to see what works for you if you are confident your starter is strong. For example, my personal starter is so strong it doesn’t always need a 1:1:1 feed every time. Because I know how it performs, I kind of feed it intuitively. Hope that makes sense. Good luck!
Greg says
Started a new batch of starter, #6 after the last batch ended up like all of the rest, a thick glob with no bubbles and did not rise. After looking at different sourdough websites I found one that said a sourdough starter will thrive in temps at 70-80 F. With winter fast approaching the kitchen is not a very warm place in the house, tried the oven lights on but with 3 bulbs it goes over 100F. It did say a proofing box and a water bath. I have an immersion heater for an aquarium and an old baked black enamel roasting pan that the heater fits into. Started a new batch of starter, a 50 – 50 mix of King Arthur organic whole wheat and all purpose flour, put into a pint mason jar and into the water bath it went. Kept the water at 75F and fed it for the next 7 days. I was amazed at how well it worked. This past Saturday night I followed the recipe for Everyday Sourdough made with my fresh starter and left it to rise in the oven with a pot of warm water under it. Sunday morning I opened the oven, took off the damp towel and saw the bowl full of risen dough. Followed the rest of the recipe and was treated to a wonderful tasting load of sourdough bread. It was chewy, had a nice sour taste and smelled great. No more store bought bread for us. I do have a few questions, the crust was OK but could have been crispier and could this recipe be baked in a 9×5 bread pan. Love the cook book and all the information in it. I will be trying many recipes. Love the Carrot hat on your new son!!!!!
Sarah says
I started my starter, and it had lovely frothy bubbles on day 4, 5, and 6. They all deflated, and not has almost no bubbles on day 10. It is just a goopy mess. Any suggestions?
Thanks!
Emilie says
Hi Sarah! Yes! Keeping feeding it. Anytime you starter deflates, during the creation process and beyond, it has lost all of it’s rising power and it’s time to feed it again. The more often you feed your starter, the stronger and more bubbly it will be.
Ellen Taylor says
Great guide. Covered everything to troubleshoot sourdough.
Thanks for sharing.
Emilie says
You are quite welcome, thank you!
Ben Horsbrugh says
Dear Emilie
Also another fan both of sourdough and your book. We have just moved on from the basic sourdough bread to the Focaccia and I sit in amazement watching four people polish off the whole lot in one meal. I have a couple of questions.
1) How to keep the sourdough starter from developing the nail polish odour? After returning from holiday to find my usual starter somewhat weak and smelling strongly of nail polish, I started a fresh sourdough starter a couple of weeks ago which quickly got going and worked well. Now it too has started to smell more like nail polish and less „fluffy“ (if an odour can be described like that). What do you suggest?
2) How to get a better fluffy bread structure as in the picture of the dill and white cheddar bread on page 44? My breads rise well, but tend to have a finer pore.
By the way, having spent a year during the 90s working in a German wholemeal organic bakery, one thing I always do is to throw a glass of water into the oven, after putting the bread in, usually onto an old baking tray at the bottom of the oven. The resulting blast of steam helps to create a great crust, but you have to let some of it out after about 15 minutes by opening the oven door and lowering the heat a little. I recently also made a wholemeal loaf only using freshly ground spelt – i.e. no other flour – and it worked well with a fantastic tasting crust.
Have a great weekend
Ben
Ben Horsbrugh says
Quick update to my comment. I just realised that the answer to question 2 is in the book! An amswer to question 1 would be great
Emilie says
Hi Ben! Apologies for the delay- I’m currently on maternity leave and taking a break from my inbox ;)
Ok: so let’s get to it..
1.) You can only avoid the nail polish odor by feeding your starter everyday, either at room temperature or in the fridge. It’s as simple as the that. The longer it sits, unfed, the stronger the odor will be.
2.) Great! I’m glad to hear you found the answer. Fluffy bread with an open crumb is part recipe and technique (and of course, practice!).
And PS: thanks for the water glass tip!
sarai says
I have been using all P Flour for 7 days, my starter looks very soupy, why is it? every time I see videos y looks elastic like, why mine is not like that? would it work?
Emilie says
Hi there! Are you weighing your ingredients? If it’s soupy, there might be too much water in the jar. Weighing all ingredients, including liquids, will give you the best results. Also: it could be your flour. Some brands don’t absorb as much as others. Just add a bit more next time during a feeding if you still think it looks soupy- it’s a very easy fix. Good luck!
SHANDRA MCCLANAHAN says
Hi! Your book was a gift from my mother in law and it’s the best thing ever! Thank you for this post, it has soothed my panic. As summer calms down my house is more consistently cool, I think this is causing my problem. I love your work, keep it up!
Emilie says
You are quite welcome, Shandra! Sourdough is an ever changing craft. Every baker has to adjust their methods as the seasons change and as their daily schedule changes. Once you get the hang of it, it’s pure bliss. Enjoy the book :)
Sean Mahan says
Your writing style is incredible. You kept my involved the whole post, and with a great knowledge as well. Thanks!
Emilie says
Hi Sean, thanks so much! I actually love to write, so this is a lovely compliment. :)
Gisela says
Hi Emilie,
I recently bought your Sourdough cookbook and love reading the beautiful book.
This morning I baked everyday sourdough bread with success but I have one issue. The parchment paper is glued to the bread and is so difficult to peel off. Do you know what is wrong?
A
If I do not want too crusty bread, is it ok to not bake the last 10 minutes in the oven (without the dutch oven? So, I just take out the bread out of oven?
Thanks much for the wonderful cookbook.
Gisela
Emilie says
Hi Gisela,
I learned this the hard way: not all parchment paper is created equal. It has to be 100% non-stick. And unfortunately, not all brands deliver on that promise. I had parchment stick to the bottom of my bread when I used the cheap stuff from the dollar store. NEVER AGAIN. What brand of parchment paper are you using? I recommend Reynolds, Costco (my personal fave) and King Arthur Flour.
For non crusty bread, or less crusty I should say, just leave the loaf in the pot for the full duration of the bake.
Greg says
Hi Evelyne
So much good information tks. One critical piece of information that seems to be missed everywhere including your posts which I am now assuming but would love factual clarification on is – “what stage is the starter in when ready to make bread”?
Do you add starter to the dough when
a. Its at its highest point of rise?
b. Just risen and now sinking?
c. At its lowest point?
d. Anytime?
No one ever states this answer about the state of starter when about to be used for baking clearly.
Please advise thank you.
Rgds Greg
Oz
Emilie says
Hi Greg, thanks for your comment! The questions you are referring to are addressed in my book Artisan Sourdough Made Simple. However, your starter is typically ready to use when it has doubled in size, has plenty of bubbles throughout the starter and on the surface, and passes the float test. When these conditions are met, you can use it as its highest point, or just when it starts to sink (as long as it passes the float test). Your starter will most likely not work at its lowest point, and “anytime” is questionable- it should meet the criteria mentioned above for best results. Hope this helps!
Greg says
Thanks so much. Just the perfect information. Its funny. Because its got a life of its own – its risen and returned to its low point before I am either around to bake or not noticed it. I’ll have to try and plan it all. Its why dry yeast is such a boon.
I think – oh need some more bread stop mix walk away. But sour dough !!!!! I owned a commercial bakery 4 decades ago and we cheated on sourdough and used wine to flavour bread and left the dough over hours to absorb and increase the flavours but I had no idea what culturwd starter requires in attention. New learning curve :)
Emilie says
Hi Greg! Glad you found this tutorial helpful. PS: I’ve never heard of using wine to flavor bread! Kind of cool ;)
Evelyne says
Hiya,
What a great post! I’m new with sourdough / levain bread-making. I have a “dry” sourdough (water-flour ratio 1:2).
When I am making bread I feed the starter, use the necessary amount once it has reached its peak. The dough rises well (using a mix of all-purpose flour and wholemeal flour), but once it has baked the bread is compact and heavy. Is there any tip for getting a fluffier dough?
Many thanks,
Evelyne
Emilie says
Hi Evelyne, thank for your comment! Regarding the texture of your bread, I think you will find this article more helpful.
Genesis says
Hi Emilie!
I absolutely love your cookbook and when I found out you were coming out with a sourdough book I just had to get it!! I started my starter a little under two weeks ago and I’m not sure if it’s ready to be used. It displays all of the characteristics you talk about (has large and small bubbles, smells good, right texture) but it will not double in size. I put a rubberband around the jar like you suggested and it does rise above it but it is nowhere near double. I have followed the suggestions in your post above (feed it KA flour, use filtered water, keep it in the oven with the light on) so I’m not sure if there is anything else I can do. I even tried the water float test and it did pass so my question is: is it ready to use or should I keep waiting until it doubles?
Emilie says
Hi Genesis, wow! Thank you so much! You must be cooking and baking up a storm in your kitchen ;)
Regarding your starter, although it’s displaying some of the signs, it sounds like it’s just not ready yet. And this is ok by the way, and totally normal- everyone will have a different experience with their starter in the initial stages. For best results, you should definitely wait until it doubles; are you following the 1:1:1 feeding ratio by weight? This helps tremendously.
If you’re already doing following this feeding ratio, and are still having trouble, then my next suggestion would be to discard all of your starter but 2 tbsp (it doesn’t have to be exact). Feed it with about 1/3 cup of flour and 1/3 cup of water (again, it doesn’t have to be exact here) and place it in a warm spot of your choice. Sometimes a starter will just need a very large feeding to give it a boost.
And then… if all else fails, I do offer my personal starter in small batches. Please visit my Shop for more details.
Good luck!
Genesis says
Yes! I make at least one of your recipes from your cookbook each week :)
Thank you so much for your advice! On day 14 my starter finally doubled and it’s been doing well since then. Two things I’ll note in case anyone is having similar problems:
1)The jar I originally had my starter in had a very large base so it was difficult to track any kind of change. I decided to move my starter to a pint glass (one you drink beer out of) and it made it so much easier to see when it doubled.
2) I realized that although I was discarding half the starter and feeding it with 60g of water and 60g of flour each day, I still had way to much starter for the amount I was feeding it. Even with discarding half I was still left with over 100g of starter. Once I read your reply I started discarding everything except 60g of starter and feeding it the way I had. I saw an instant change the next day so I think that is what really helped it!
I’m very happy with my starter now and have moved on to the actual bread making. Do you think you’ll write a Troubleshooting article for that? I’m having trouble getting the proofing right and I think that’s what has caused my loaves to come out so dense.
Emilie says
Hi Genesis, thanks for your feedback!
Using the right jar for your starter is certainly very helpful. Like you, I’ve found that using taller jars makes it alot easier to track the starter’s growth as it begins to rise.
As for feeding your starter, the 1:1:1 ratio is key. You can easily adjust the initial amounts too, to suit your needs (i.e. using 40g: 40g: 40g instead of 60 g for each.) Glad to hear that it’s working for you!
With regards to writing another troubleshooting article, do you have questions on how to get your bread to rise? Or questions regarding the texture? I wasn’t quite sure what you meant :)
Genesis says
Hi Emilie!
My question more relates to the texture of the bread once it has baked. When I made my first loaf I noticed the bread came out very dense. While I am new to sourdough I am not new to baking bread in general so I’ve been trying to figure out where I went wrong. I may have overproofed the dough but I also noticed the dough was very sticky both after the first rest and after the bulk rise. Should I start adding more flour whenever I notice it is sticking?
Anna says
Hi, just found your blog nd it’s fabulous! I’ve been making sourdough for years, and love it, and you’ve got an amazing resource here!
I have always fed my starter with strictly the same flour and have just inadvertently fed my starter self-raising flour (a miscommunication in decanting it into the right container). Is this fatal for the starter? I’m devastated!
Thanks in advance
Emilie says
Welcome Anna! Thank you so much :) Regarding your starter, this has happened to me before with cake flour. My starter didn’t die, but it came incredibly sluggish and it took forever to fix the problem. I also run into challenges when I switch flour brands (I guess my starter can be somewhat of a diva). For your situation, I don’t think it will die on you; I’d dump most of it out and transfer what’s left into a new clean jar. Then give it a big feed for several days in a warm spot. Be patient, it might take up to a week to become active again. But it should help!
Anna says
Thanks so much for your response Emilie, I’ll give your suggestion a try. I’ve just ordered your book and now can’t wait for it to arrive!
Emilie says
You got it, Anna! Enjoy! And thanks for the support!
ben says
ahh, I just mixed my rye starter I’ve been using for atleast 8 years with wholemeal wheat flour.. same same basically… I’ve just mixed a bit of the resulting bad mistake with a mix of rye and water… fingers crossed!!
Emilie Raffa says
Good luck! Hope it worked out for you! x
Courtney says
Hi Emilie,
I started my starter using Tartine’s method almost a week ago. The first several days it was incredibly active, and now nothing is happening, even right after I feed it. No rise, very few bubbles, etc. My question is should I stick to one a day feedings as I was doing before, or should I feed it every 12 hours to give the yeast more to work with?? Everything I read seems so contradictory that I’m not sure what to do.
Emilie says
Hi Courtney, I’m unfamiliar with the Tartine method off the top of my head… and I know how frustrating it can be with all the information out there! However, based on my experience, I would recommend feeding your starter at a 1:1:1 ratio (equal parts starter, flour, and water by weight) 1x a day for a few days in a warm spot (try the oven light trick). This should help perk it up. After a few days of doing this, if you think it needs an additional feeding, go ahead and do so. But I think the feeding ratio + warmth will help you!
PJ McWilliam says
Love your website and instructions on sourdough. Thanks for sharing! I am a complete newbie to sourdough, so I will try to remember to be patient with both myself and the starter.
BTW… I just finished reading “Sourdough,” Robin Sloan’s new novel. One of the main characters is an ancient sourdough starter, complete with all the quirks you mention and then some. I think you would enjoy it!
PJ
Emilie says
Hi PJ, thanks so much for your recommendation. I always love a good sourdough book! Happy baking :)
Sharon says
This is my first sour dough attempt! My starter doubles in size and looks mousse like with lots of air bubbles, but keeps failing the float test. I have been feeding it for a week now. I am using rye flour. Any suggestions? Thank you
Emilie says
Hi Sharon, it sounds like the yeast within your starter us definitely developing- so hang in there! If it’s very bubbly, mousse-like, and has doubled in size, it’s possible that you’re doing the float test after the starter has begun to collapse. If you place a rubber band around the base of the jar to mark exactly when it doubles, then do the test when it peaks. This should help a bit.
rubal says
Great ! you covered good points and tips. I started my first attempt 4 days back and still mix has not risen, it has few bubbles though. I read two ways of maintaining and feeding started, one with reducing the quantity to half and adding same amount(flour,water) and other where we just keep feeding every 24 hrs without removing the content.
I started by doing the second process and didnt remove the starter until yesterday after didnt see it double up or rise, but what impact both procedures have on overall starter process ?
also how can i use the throw away batter ? dont just want to discard in sink .
Thanks a lot!
Emilie says
Hi Rubal, I prefer the first method you’ve listed above. Feeding your starter at a 1:1:1 ratio yields a healthy starter and controls the overall amount in the jar (if you don’t discard any, it will eventually grow into a monster). Regarding any leftover starter, when in good condition, it can be used for a variety of recipes including waffles, pancakes, popovers and more. You can find detailed recipes and instructions in my book, Artisan Sourdough Made Simple.
Shar0n Butler says
Hello Emilie, Thank you for all the great tips! I make kombucha and the fruit flies love it as well. A good way to divert them is to place apiece of banana peel in a small jar (1/4 cup canning jar works great) and put a piece of foil with small holes in it on top near your starter. They will fly into the jar but cannot seem to get out. Empty the jar outside otherwise you get a swarm of flies back into the area!
Hope this helps.
Melanie C. says
Hi Sharon. I’m a little late to this post, but I make kombucha as well.
The banana peel tip is great since those darn fruit flies seem to love those
bananas. I got my supplies from Kombucha Kamp and her advice was to
put a small amount of kombucha in a cup with a few drops of dish liquid.
This also works really well although it is admittedly gross to see all those
dead fruit flies!
Emilie says
Thanks Melanie! All this kombucha talk makes me want to make my own now :)
Emilie says
Hi Sharon, I love this idea! And I’ve never heard of it before! So easy to do. Thanks so much for the tip :)
Gayle says
Just wanted to throw in there that I just removed sourdough starter from the back of my fridge a few weeks ago that was 2 YEARS OLD!! Yep, jar was dated and it was 2 years old. It was grayish on top with lots of Hooch. I scooped out a lot of the hooch and took a tablespoon of what was underneath. I fed it and within 3 days it was growing and bubbling and has been just fine! So, believe me when she says you can’t kill it..unless its moldy or slimy it is alive!!
Thanks!
Emilie says
Hi Gayle, isn’t it amazing how resilient starters can be? There’s a lot of misleading info out there which convinces us that it’s hard to keep our starter alive. Usually, it just needs good quality flour, water and some TLC!
Sonia says
Love your book, I made the brioche today
and it is amazing!
Emilie says
Hi Sonia, thank you so much! I think I could live on brioche bread ;)
Crystal says
You’ve covered everything! Amazing account and list of how to sort the starter and keep it alive. It is like a pet, as you say. I do like sourdough bread and will pin this to my list. Thank you, Emilie.
Emilie says
You are quite welcome, Crystal! Happy to hear that you found this guide helpful :)
Wajela Moer says
Does the elevation and/or air moisture difference between locations play a part in the hydration percent that should be used? (think: New York vs. Arizona). I find that a 100% hydration starter is waaaaay too runny and soupy and can’t even rise properly, but a 50% has a more predictable rise and fall.
Emilie says
Absolutely. I used to live in AZ ironically, and the dry weather definitely plays a role in the rise of your sourdough starter and the rise of the dough itself (and your skin!). If you find that adding more flour works for your environment, then go for it. Bakers have to adjust their flour to water ratios all the time based on climate and personal conditions.
michael foy says
I have started making sourdough breads from your book, but I always seem to end up with a very wet dough which sticks to everything, my starter is very vigorous, I always weigh the quantities. I use king arthur flour, but live in florida where it is warm. should I add more flour to make the dough have the same texture as shown in your book. I am a bit lazy, so put everything into the mixer with a dough hook, but no matter how long I knead it…
thanks
mike
Emilie says
Hi Mike, weather (especially humid climates) will have an effect on your dough. I think I mentioned this somewhere else in the comments, but bakers who are not in temperature controlled environments have to adjust their flour to water rations regularly based on their personal conditions. So, in your case, if the dough is too wet and tricky to handle you can either add more flour until it ‘feels’ right, or simply cut back on the water, 20 g at a time, to achieve your desired consistency.
Christine says
My culture seems very yeasty but
When I try the starter drop into water it sinks. I had made a loaf after 5 days and it looked fBulous and the dropped during baking.
What is going on?
Emilie says
Hi Christine, if your starter doesn’t pass the float test, I wouldn’t use it for baking. It might not be strong enough which is why your loaf might have dropped during baking. For best results, keep feeding it until it has doubled in size, and then try the test again.
alisa chevalier says
I’m having this problem too. I’ve been feeding it and feeding it for months now. 1 or 2x a day and it rises over 8 hours to double or slightly more but never passes float test. not sure what to do.
Emilie Raffa says
Hi there! If your starter doubles or triples, it’s active. You might be doing the float test too late. Try doing it sooner, before it falls.
Jim Yedor says
Emilie- I just got in “Artisan Sourdough Made Easy”. It is terrific and will help a lot of people bake some “really good bread”. I am especially appreciative of your treatment of starters which have been made to seem so mysterious yet are the basis for yeast raised bread from ancient times. There is always something new to try and after many years I switched my starter formula to 100% hydration. This worked very well but the hooch seemed to be after me ! For the past year I have used 50% water, 25% White Wheat flour and 25% Whole Wheat flour. The colony seems more active and more stable although less inclined to sour, as opposed to providing a reliable levain. Is there something in the Whole Wheat ph (or some other factor) that is keeping the little yeasties under control?
Emilie says
Wonderful, thank you so much for your support and feedback Jim. To answer your question, in my experience, whole wheat flour (and whole grain flours in general) have more enzyme/mineral activity than all purpose flour, and this tends to boost the activity within the starter. Rye flour is another popular choice. Just like you’ve mentioned, there’s always something new to try and if you’re method works, STICK WITH IT. There’s no right or wrong way :)
Kent Gaya says
Thanks for the trouble shooting guide. I have been trying to get my starter going since January with no luck. I think my kitchen is too cold in winter. Tried using the oven with the light off and on, but still no luck. Will try the heating pad idea next. I like your book and the recipes look yummy. Hope to try a recipe soon.
Emilie says
Thank you Kent. It’s very possible that the colder temperature is slowing down the rise of your starter, but the oven trick should work. If the heating pad doesn’t work, you might want to spoon out just a tablespoon of the starter (transfer it to a new jar), give it a really big feed, and go from from there. The bacteria within the culture might need to be heavily refreshed.
Kelly Mahan says
It’s so great to finish reading a post like this and actually understand what has been said! Love your writing style!
Emilie says
Hi Kelly! So glad you enjoyed it. Sourdough is one of those things that can be incredibly confusing, you know? Thanks again for your feedback :)
Laura says
Hi Emilie,
I purchased your book and absolutely love it and am anxious to begin making some sourdough breads. I am on about day 11 of my starter. It definitely doubles in size when I feed it and has loads of bubbles throughout, but it is not as frothy as the starter in your pictures and will not float when I put a drop in a glass of water as you suggested in your book. Is it just that it needs more time to culture or is there something else I should be doing to develop it more?
Emilie says
Hi Laura! It sounds like the yeast within your starter is definitely developing, which is a good thing.
However, you might be performing the float test after it has collapsed slightly (although it looks double in size). For best results, do the float test when your starter is at its peak height, or in other words, before it collapses. This can be tricky to judge sometimes, especially if you’re not at home. I would recommend putting a rubber band around the base of the jar to mark its growth as it begins to rise. This way, you’ll have some indication of the growth rate. You’ll also see when it collapses, as the starter leaves streaks down the side of the jar when it decreases in size.
Regarding the frothiness, you starter will look different on different days. It won’t always look like mine, which is normal. It won’t look like anyone else’s starter either. Starters are unique to you and your environment, regardless of the recipe you’re following. I wouldn’t worry about this too much. As mentioned above, try the rubber band trick and see if that helps you. Good luck!
Tania says
First time of making sour dough. Although my starter was lovely and I’ve been feeding it for 7 days now, my bread is too dense and heavy. There doesn’t seem to be air enough in it. Should I have left it to rise a lot longer. Left it for 5 hours and it doubled in size. My receipe didn’t say to knock out the air and let it rise again – should I have? Advice much appreciated. Flavour of the bread is beautiful.
Emilie says
Hi Tania! It’s hard to say without seeing a picture of your loaf, and reviewing the exact method you’re following. However, in my experience, dense and heavy bread is usually a result of a dough that didn’t rise long enough, rough handling, and/or incorrect measurements. Regarding knocking out the air and letting it rise again, I typically always do a second rise for my sourdough loaves. As a rule of thumb, if your dough looks dense before baking, it will be dense when it comes out of the oven.
Katie says
Great tips. One question: why doesn’t my starter float? Nor does it rise. It’s about a month old now. Stored in fridge. Fed biweekly. Smells fruity and yeasty. Took it out yesterday morning , let it come to temp. Fed it. Still this morning, no rise, no float. Bread it makes is dense.
Emilie Raffa says
Katie, when storing your starter in the fridge sometimes it needs a few feedings to perk back up. Give it a few days if necessary. Once it bubbles and doubles in size then do the float test. Do not bake bread with it beforehand; it will be dense.
SueV says
Fruit flies, as soon as you see them take a small mason jar put Apple cider vinegar, a little water and 3 or 4 drops of dish soap. Set it near where you see them, the vinegar attracts them, the soap makes them unable to fly out. Great article, answered alot of questions I have had about starters.
Emilie says
Hi Sue! I love this tip, thank you! I’ve never heard of it before but I will certainly remember it this summer when the flies take up residence in my kitchen! Excellent.
Mark says
Another trick is to pour a little wine into a cup, cover with plastic wrap, pop a few holes on top. The flies go in but can’t get out.
Emilie Raffa says
Thanks for the tip, Mark!
John Carlomano says
Thank you Emilie for your fantastic book and the detailed sourdough starter troubleshooting guide. I had tried creating a starter and baking sourdough bread for a few months last winter and then gave up for a few reasons. I picked up again this winter, looked for beginner recipes and came across your wonderful book and step by step action plan. I can tell other readers that your action plan works. I have baked 5 different sourdough breads so far this winter and have been pleased with each of the them. Key things that make a difference:
1. Find a warm spot for the starter – my starter (1:1:1) was being fed 2 times per day (8am & 8pm) for 2 weeks but did not show a healthy rise and fall when stored at room temperature (70 degrees). Putting it in the oven with the light on raises the temp to the high 70’s / low 80’s and made it grow bubbly and rise and fall as your photos show. Word of caution – put a post it note over the oven’s on – off switch to remind everyone not to turn the oven on. I learned that one the hard way – it cost 2 cambro tubs, plus bread dough plus levain.
2. Using a weck jar with straight sides and a close fitting glass lid for the starter makes it easy to clean and feed.
3. I feed the starter with King Arthur AP flour and bottled water.
4. When I don’t expect to bake for a few days I feed it at the same time in the morning, then let is rise for 3 hours then put it in the fridge. The day before I want to bake, I take it out of the fridge around noon, feed it again that night and then 12 hours later use some of the discard to make levain for the recipe.
Thank you for all that you do. I realize that taste is personal, but anything that you can to share about how to turn up the volume on the “sour” taste is greatly appreciated!
John C
Emilie says
Hi John! You are quite welcome :) Thank you for posting this information regarding your sourdough starter. I like the tip about leaving a post it note on the oven- makes 100% sense.
Boosting the “sour” taste in your bread is a little bit tricky because there’s no “one size fits all answer.” Starter quality, ingredients, temperature, specific bread recipe etc. all come into play. However, assuming you have a starter that’s fed at a 1:1:1 ratio with all- purpose flour, and you are following the Everyday Sourdough recipe from the book, here are a few things you can do based on my experience:
1.) Dough temperature makes a difference. Do the bulk rise at 80- 82 F (try the oven light trick for this), followed by an overnight second rise overnight in the fridge. I get great flavor results using this technique although sometimes the dough can be over proofed in the morning.
2.) Follow tip #1, but swap out 20 g of bread flour for whole wheat flour. The enzymes and minerals in the whole grains adds to the flavor profile.
3.) Don’t refresh your starter as often. The more you feed your starter (frequency, not amount) the more balanced the acidity levels will be. And you can tell by the aroma in the jar. If it smells fresh and fruity, the acidity levels are more balanced; if it’s strong and vinegary it will add a different flavor profile to the bread.
Now, with that said, to achieve a more “sour” bread you typically have to utilize a combination of these factors. Play around with the Everyday Sourdough using the techniques above and see what happens before moving onto another recipe. It takes a bit of practice but eventually you’ll achieve the results you’re after. Good luck!
Meg says
Thank you so much for taking the time to write this…. I just passed on some of my Juno, granddaughter of Priscilla starter, and instructed the adoptees…. I said so much if what you’ve written, and it feels good that stuff I’ve worked out is shared….yes, the starter is a living entity. I confess I talk to her! I also put a rubber band on the jar to show the level after I’ve fed her, so I can see immediately how active she is.
I’ve been working my way through your book, I just love it.
Emilie says
Hi Meg! I love that our starters are related ;) Sourdough truly is a living entity and don’t worry, I talk to my starter too. When I was at the tail end of writing my book, I honestly thought I was going to take my starter out to the bar for celebratory drinks! We are in such a committed relationship, lol. Glad to hear that you are enjoying the book. I certainly enjoyed writing it.
amy says
When feeding the starter, do I need to always remove a portion of the starter in my jar? I just purchased your book and created my first starter. On day 3, it states to remove a portion of the starter and then feed it. Days 4,5,6 are to follow the Day 3 feeding process – does that mean to 1) remove a portion of the starter and 2) then add to it?
Thanks so much for your help!
Emilie says
Hi Amy! Yes, according to the instructions in my book, in general, it’s best to remove a portion of the starter before feeding it. If you don’t, the starter will grow to a monstrous size and eventually overflow (and be difficult to manage). You’re also doing this to maintain balanced acidity levels within the starter for flavor.
To answer your specific questions:
1.) On Days 4,5,6, remove a portion of the starter before feeding it.
2.) Then, once you have removed some of the starter add more flour and water to the jar.
Hope this helps!
Rebecca says
Hi Emilie,
I am trying this for the first time. My starter finally doubled in size 8 days from day 0! yay. I’m gonna bake this weekend.
I seem to have to discard about 3/4 of the starter each time I feed it for the weights to be right. Is this normal?
Also, I’m not sure if you will get to answer this before I start baking, but if my starter has doubled in size and passes the float test and I then start making the dough with a portion of it, do I need to feed the rest of the starter before I store it in the fridge for a week?
Thank you, your site and book are amazing (will order the book soon).
Rebecca
James McCabe says
Also! Don’t discard the starter you remove! It’s treat day. Heat an iron skillet, then when it’s hot, add olive oil, pour the excess starter in like a pancake, spread out if you have to but keep it about 1/4 in thick. While the bottom is frying, add some chopped scallion, seasoning, salt on the top, your choice. some chopped onion. When the bottom is at a golden brown, flip it and finish frying. Remove to a plate, cut that crip crust in 4’s and have a dipping sauce of your choice. Olive oil, Olive oil with some balsamic, sweet/sour. I have infused olive oil with scotch bonnet peppers. Enjoy!
Emilie Raffa says
Ok, my mouth is WATERING!!!! This is sooooo incredible I think you should make it all for us! x
Charly says
Love that tip! I have been suffering every time I throw the lovely yeasty smelling starter away. Pankakes is a great idea. Trying that tonight :-)
Emilie Raffa says
Isn’t it a great idea? Love it too!
Adri says
Again, a wonderfully informative post. Brava, amica.
Emilie says
Adri! Thank you my dear friend! xoxo
Janice says
Love the picture of the overflowing sourdough starter. I started both my starters (rye and gluten free) using your advice and both are healthy and happy and have made wonderful breads. If there’s one piece of advice I would pass on, it would be: “Be Patient”. My rye was started 2 years ago, and it has just started making amazing bread. I think it
Took time for the starter to be strong enough to build the bread. Gluten free starter has been a challenge to get sour enough, but it is young and I’m sure it will gain strength with time.
Emilie says
Hi Janice! I agree. Having (and maintaining) patience is key advice which certainly can be frustrating for some, but absolutely essential to good sourdough. Sometimes starters do need time to develop. Hopefully with the tips here, you’ll have continued success. Sounds like you’re well on your way!
Lou says
Hi Emilie
I have a wholemeal based starter (100% hydration) that I use to produce wholemeal bread. I’d like to try some white loaves – can I use my existing starter or should I develop a new one based on strong white flour?
Also; I need to get hold of a copy of your book having read some really great reviews. I can only see a paperback copy on the Amazon site – is a hardback copy available by any chance?
Emilie says
Hi Lou! You can do both. In my experience, the wholemeal starter will give the white loaves a slightly different look and taste (all depending on what recipe you’re following). So, you might want to experiment with the two types of starters and see what combination suits you best. Regarding the book, as of right now, it’s only available in paperback. :)
Rosemary Heather says
Hi, Probably off topic, but I started with your sourdough recipe, a year ago now. No Problems. None at all. Great bread, that has just improved, along with the Yeast, over the past year. I now bake for family and friends. Soooo Good. Thanks
Emilie says
Hi Rosemary! Off topic comments like this one are always welcome ;) Thank you for letting me know! Glad to hear your loaves are turning out with success. xx
Anne says
I seem to have a lazy starter. The top gets covered with bubbles but it’s never bubbled frothily like yours though I’ve noticed a slight difference since reading your book and feeding it with plain flour instead of strong flour. However, the bread it makes rises well (usually) and tastes good so maybe it just conserves its energy for the oven, which is fine by me. Just goes to show that every starter is different. Am now going to reread your post and see if I can’t get it a little frothier though.
Emilie says
Hi Anne! That’s the thing about starters; they will share similarities but each one is so different. I’m glad you’re having better luck with plain flour for the feedings. Using the right type of flour makes all the difference in the world. Also, I would be curious to see if the flour you’re using in the UK is enriched (like most US flours). This makes a difference in enzyme activity which would results in how the starter rises and bubbles. It’s not better by the way, just something to note. Feeding your starter following the 1:1:1 ratio really helps too (instead of eyeballing it.) xx
Jamie Dawn says
Emilie to take care of fruit flies mix up some vinegar and dish soap cover with plastic wrap rubber band it to a jar and poke holes in the top with the tip of a pencil. The fruit flies will fly inside in and become trapped in there. Works every time I’ve never had an issue with the buggers after using this. You can google the exact fruit fly eliminator recipe to find exact measurements.
Sarah says
You actually don’t even have to mix the vinegar and the soap, nor do you need to use a rubber band and plastic wrap. Cider vinegar, and a drop our two of dish soap in a small cup will attract and drown fruit flies.
Ricky says
Hi, my starter is just over a week old, should I be discarding any at this point or can I just continue to feed as normal? I’ve read so many conflicting reviews about discarding/not discarding starters.
Emilie Raffa says
Hi Ricky! It’s up to you. If you don’t discard, your starter will grow to be very large. For some bakers, this is not practical to maintain overtime. Additionally, when you discard before every feeding you are refreshing the acidity levels within the culture.
Laura says
Hi Emilie, I recently purchased your new book on making sourdough breads. I am at day 11 with my starter and am wondering if you know why I am getting a “skin” ( like when pudding isn’t covered with plastic ) on the surface of the starter. And it still has an odor until I remove the skin and feed it. It has bubbles but not as many as your picture on page 11 in the book. I am using organic all purpose unbleached flour and tepid water when I feed it. Because my house is kept cool I am storing the starter on top of my furnace, a warm place , but not too warm that I cannot touch it. I love to cook and bake and really want to develop sourdough skills. Any suggestions would be greatly appreciated. Thank you. Laura
Emilie says
Hi Laura! I’ve just re-posted your comment from a different post on my blog. I think the troubleshooting tips in the space will be very helpful. To answer your question: if your starter is developing a skin, in my experience, it simply means your starter has been exposed to too much air (like pudding). See Sections 5 & 6. Thank you for supporting the book!:)
Dag says
Hi I’ve been trying to get a rye starter going all winter but they were all very weak until this week when we got some warmer temps (my house is usually 19 degrees Celsius) and I followed your book’s directions and for the first time ever the starter rose above the rim of the jar. (It floated in water too!) So it then collapsed and I started feeding it but besides some bubbles, it hasn’t risen again. Is that normal? Is it only supposed to rise that first time or after every feeding too?
Emilie says
Hi there! I’ve just re-posted your comment from a different post on my blog. I think you’ll find the tips in this space more relevant to your question :). Your starter should bubble and rise after every feeding (it’s not supposed to rise only that first time). Have a look at the troubleshooting options above and see what applies to your personal situation. It could be a combination of temperature, ingredients, type & quantity of flour, feeding frequencies etc. You’ll get there!
Richard says
This is exactly what happens to me, seemingly every time (I suppose I should stop restarting and give it a chance!) I mix my flour and water, leave it 24 hours, then give it a bit more food and it always comes alive on day 2 or 3, at least doubling in volume over the next 12 hours or so. 18-20c temperature here (uk). Obviously it’s very exciting at this stage, but it never happens again! I use roughly a 1:1:1 replenishment, but, alas, to no joy!
Tyler says
I started my starter just over a week ago, and things started off great. I’m now on day 9, and my starter has lost a lot of vigorous, and has slowed down. I started using a heat pad to keep things warm (around 82ish), but I’ve noticed my jar is condensation inside…is this going to be a problem?
Emilie Raffa says
Hi there! Your starter is active, so that’s good news. Regarding the condensation, what you want to avoid is the possibility of mold. Scrape down and dry the inside of the jar where the condensation is, and move it to a slightly cooler spot. See how you go with this.