Description
My homemade sourdough pasta recipe requires only 3 ingredients: flour, eggs and active sourdough starter (or fresh sourdough discard). Please, do not use discard that’s 3 months old from the fridge! I’ve also included 2 pasta dough options: a same day “1 hour dough” and a longer, 24 hour fermented pasta to optimize sourdough’s natural digestibility. The dough can be made in a food processor, stand mixer or by hand (see all options below).
A few helpful tips:
- Make sure to weigh your ingredients, including the eggs to ensure the pasta dough is the correct texture.
- Flour: Italian Tipo 00 is considered “the best” for homemade pasta. It’s a fine-milled, soft wheat flour that feels like baby powder. Try Molino Grassi or Caputo. Substitute with King Arthur all purpose flour for similar results.
- Use a food processor (if you have one) for speedy results (the dough comes together in 10-15 seconds).
- Use a hand-crank pasta machine or KitchenAid pasta attachments to easily roll out the dough.
- Don’t forget to watch the video!
Ingredients
- 300 g Tipo 00 or all purpose flour (I recommend King Arthur flour)
- 165 g eggs, cracked weight, about 3 large US eggs (*see Notes)
- 40 g active sourdough starter or fresh sourdough discard
- Olive oil (*see notes)
- Semolina flour, for dusting
Instructions
Step 1: Make The Pasta Dough {Food Processor Method}
- Weigh the eggs (cracked) in a small bowl. If the weight is less than 165 g, use olive oil to make up the difference.
- Add the sourdough starter to the eggs; whisk thoroughly to combine.
- Add the flour to a food processor fitted with a metal blade. Pour the egg mixture on top.
- Process the ingredients (no need to pulse) until a dough forms, about 10-15 seconds. If the dough doesn’t form into a ball, and looks “crumbly” it’s OK. Unplug the food processor and pinch the dough together; if it sticks, it’s fine.
- Remove the dough to your work surface. Form into a rough ball. Cover with an upturned bowl and let rest for 5-10 minutes before kneading. It will be easier to work with.
- After resting, knead the dough (see video at 1:50 mark). Do this by pushing the heel of your hand into the dough, and then turning the dough over itself. Repeat this technique several times, in a continued rocking motion, until a smooth ball forms, about 1-2 minutes. If the texture is sticky as you knead the dough, add a sprinkle of flour. When finished, wrap the dough very tightly in plastic wrap.
- Now the dough needs to rest. Choose a fermentation option: for a same day dough, rest at room temperature (68- 75 F) for 1 hour. Alternatively, to maximize fermentation and digestibility, rest at room temperature for 1-2 hours, and chill overnight, up to 24 hrs. Whichever option you choose, the dough must be wrapped tightly; it will rise slightly. Note: before rolling, chilled dough must rest for 30 minutes to 1 hour at room temperature. Otherwise, it will be too stiff.
Stand Mixer Instructions:
Whisk the eggs and sourdough starter together; set aside. Add the flour to the bowl of a stand mixer. Add the flour. Add the egg mixture. Mix with the dough hook until combined. Knead on speed #1 or #2, about 4-5 minutes. Form the dough into a ball and cover tightly with plastic wrap.
By Hand Instructions: (click here)
Step 2: Roll The Dough Into Pasta Sheets
- Set up your station: Dust your work surface, a sheet pan, and the pasta machine with semolina flour to prevent sticking.
- Cut the dough into 4 equal pieces; flatten one piece into a thin 6-8-inch oval disc (re-wrap the remaining pieces so they don’t dry out). Use a rolling pin.
- Send the disc through the roller on the lowest/widest setting. This is “#1” on the Kitchen Aid attachment. Now, send it through a second or third time to smooth it out. Note: if using a hand-crank pasta machine, refer to their specific instructions for rolling the dough. The settings are different, but the rolling process is the same.
- Continue to roll the dough through settings #2-4 (2x on each setting) for spaghetti, fettuccine, pappardelle and tagliatelle. For homemade ravioli, the dough needs to be thinner- go up to #5. The higher the number, the thinner the dough will become. That’s the goal. The pasta sheet is ready when it’s slightly translucent and you can see your hand underneath.
- When finished, fold the pasta sheet in half, place onto a tray and cover.
- Repeat the rolling process for the remaining 3 pieces of dough.
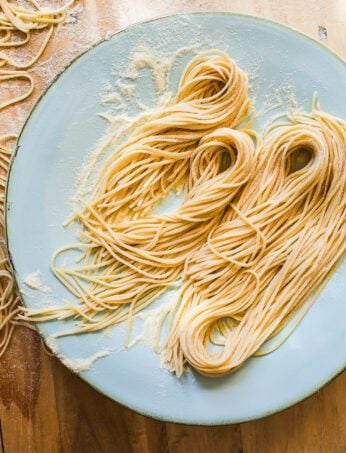
Step 3: Cut Sheets Into Pasta
- Before cutting, semi-dry or “cure” the pasta sheets ever so slightly. This gives the cut pasta strands a more firm and “leathery” finish, rather than a soft and doughy feel (this helps to prevent the strands from sticking together later on).
- To semi-dry: Hang the pasta sheets over the back of a chair or on a rod for about 5-15 minutes. Keep your eye on the time; you don’t want the sheets to dry out completely. Touch them occasionally. You will feel the difference in texture as time goes by.
- To cut: Take a pasta sheet and cut in half. Send it through your preferred cutter attachment.
- Dust the pasta noodles liberally with semolina flour to prevent sticking- don’t skimp here. Arrange strands loosely on a tray.
- Repeat the cutting process for the remaining pasta sheets.
How To Store, Freeze & Cook Sourdough Pasta
To Store (Short Term):
Toss freshly cut pasta with semolina flour and place it on a sheet pan. Cover with plastic wrap, inverted sheet pan, or store in an airtight container. Leave at room temperature if cooking within 1–2 hours, or refrigerate for up to 12 hours. The flavor will continue to deepen when the cut noodles are chilled. Note: fresh pasta might oxidize and stick together if chilled past 24 hrs.
To Freeze:
Air-dry pasta for 15–20 minutes first (uncovered) to reduce sticking. Portion into zip-top bags and freeze for up to 1 month (any longer and it might dry out). No need to thaw; cook straight from frozen.
To Cook:
Bring 6 quarts of generously salted water to a boil. I don’t give exact amounts for the salt, because the flavor of salt varies considerably. Add the pasta and cook for 2–7 minutes, depending on the thickness. Always taste it. It should be al dente- tender with a slight bite. Use tongs to transfer pasta directly to your sauce.
Notes
Here’s the deal with eggs: size varies. A large, US egg can weigh between 49- 55 g depending on the brand (and the chicken, obviously). The variance, which might seem nominal, is crucial. Pasta dough is not forgiving and can be too dry. So, I’ve taken out the guesswork and designed this recipe to go by total egg weight (not quantity). If 3 large eggs does not equal 165 g, add olive oil to make up the difference.