Description
Make homemade pappardelle pasta from scratch with only two ingredients: whole eggs and 00 flour. Hand-cut for wide, silky ribbons that pair perfectly with Bolognese, mushroom ragù or basil pesto.
For timing, the process is broken up into 3 parts: making the dough, rolling the dough into pasta sheets, and cutting the pasta into noodles. Tips shared below for using a Kitchen Aid Stand Mixer, food processor and doing it by hand.
Ingredients
Pasta Dough
(1x) Fresh Homemade Pasta Dough (ingredients below)
- 300 g Tipo 00 Flour*
- 3 large eggs*
- 1 large egg yolk
- Olive oil
- Semolina flour, for dusting
*Note: For the Tipo 00 flour, I recommend Molino Grassi or Caputo. For the eggs & yolk, the total combined weight (cracked) should be 185 g. Because eggs size vary, make up the difference, if needed, with an extra egg yolk or olive oil. Olive oil makes the dough more soft, supple and satisfying to work with.
Pasta Equipment (choose one to roll the dough)
Instructions
Step #1: Make The Dough
There are 3 different ways to make pasta dough: by hand, in a stand mixer or with a food processor. Choose one of the following options below.
The Traditional Way (by hand):
- Add the flour to a large bowl. Make a well in the center; add the eggs and yolk.
- Whisk together with a fork, and then combine with the flour. When the texture becomes stiff, finish by hand to form a rough dough. If dry bits of flour remain after a few minutes of mixing (be patient, it’s a dry dough) add a few drops of water or olive oil to bring the dough together.
- Form the dough into a ball, cover with an upturned bowl or with plastic wrap, and let rest at room temperature for 10-15 minutes- it will be easier to knead.
- Knead the dough for 5-7 minutes. Do this by folding the dough over itself, pushing it forward with the heel of your hand, turning slightly as you go. I literally rock the dough back and forth (watch the video). The texture will be very stiff at first- it’s not bread dough. But rest assured, by the 2 minute mark it will start to soften. Keep kneading until the dough is soft, malleable and has a talcum-like finish. It should “bounce back” slowly when poked.
- Form the dough into a ball, cover tightly with plastic wrap, and rest at room temperature for 30 minutes.
Stand Mixer Instructions:
Fit the machine with the dough hook. Add the flour and eggs to the bowl. Mix until combined. Knead on speed #1 or #2, about 4-5 minutes. Form the dough into a ball, cover tightly with plastic wrap, and rest at room temperature for 30 minutes.
Food Processor Instructions:
Add the flour and eggs to the bowl. Pulse several times until the dough comes together. Remove the dough to your work surface and let rest for 1 minute. If the dough is a bit sticky after resting, add a sprinkle of flour. Knead by hand for 1-2 minutes (the food processor does most of the kneading for you). Form the dough into a ball, cover tightly with plastic wrap, and rest at room temperature for 30 minutes.
Step #2: Roll The Dough Into Pasta Sheets
This can be done using a KitchenAid stand mixer with the roller attachment, with a hand crank pasta machine or by hand with a rolling pin.
- Dust your work surface with semolina flour. Cut the pasta dough into 4 pieces. Working with one piece at a time, flatten the dough into a 6-8inch oval patty. Keep the remaining doughs covered in wrap otherwise they will dry out.
- If using a KitchenAid stand mixer, set the pasta roller to #1 which is the lowest/widest setting. With the machine running, send the dough through the roller. Now, send it through again (so, 2x total). Note: if using a hand crank pasta machine instead, refer to the manufacture’s specific instructions for rolling the dough (the settings might differ but the rolling process is the same). You can also use a rolling pin to roll the dough as thin as you can, about 1/16 inch (1-2 mm).
- Continue to roll the dough through settings #2-4, (2x) on each setting. Do not pull on the sheet as it comes through the roller; just guide it along gently. If at any point the dough becomes sticky, dust with semolina flour. I keep my work surface dusted with semolina at all times. This way I can coat both sides of my pasta sheet easily and quickly while I work.
- Your pasta sheet is ready when it’s beautifully thin and somewhat translucent (you should be able to see your hand underneath). Don’t worry if the ends are not perfectly straight; you can always trim them with a knife.
- To finish, dust the pasta sheet generously with semolina, fold it in half, and place onto your floured sheet pan. Cover with a kitchen towel. Repeat the rolling process for the remaining 3 doughs.
Step #3: Cut Pappardelle Pasta
- Before cutting, I like to dry my pasta sheets ever so slightly. This firms up the final texture giving the strands a more “leathery” finish, rather than a soft and doughy feel (this will prevent the pasta from sticking together later on).
- To Semi-Dry: drape the pasta sheets over the back of a chair for about 10-15 minutes or so. Keep your eye on the time; you don’t want the sheets to dry out completely. You will be able to feel the difference.
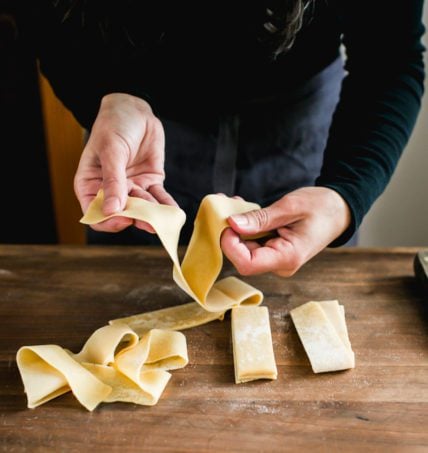
- To Cut: take a pasta sheet and cut it in half. Trim the ends, if you like. Run the sheet through your desired pasta cutter attachment to create strands. Alternatively, cut the dough by hand.
To Store: Arrange the pasta flat on a sheet pan dusted heavily with semolina flour. Doing so will keep the pappardelle’s broad and flat shape- it won’t curl. Cover with plastic wrap and hold at room temperature if cooking within 1-2 hours. Alternatively, refrigerate until ready to cook, up to 12 hrs. It’s best to cook homemade pasta on the same day it’s made, otherwise it might oxidize, discolor and stick together if chilled past 24 hrs.
To Freeze: Allow the pasta to air-dry, uncovered, for up to 20 minutes before freezing. This helps to prevent sticking. Portion into ziptop bags and freeze, up to 1 month. Cook directly from frozen, no need to defrost first.
To Cook: Add the pasta to a large pot of boiling water. Make sure to generously salt it first. Cooking time will depend on the pasta’s thickness. For pappardelle, plan on 5-7 minutes for al dente (soft but with a bite), but taste it first to be sure it’s ready. When finished, use tongs to transfer the pasta directly into the sauce.