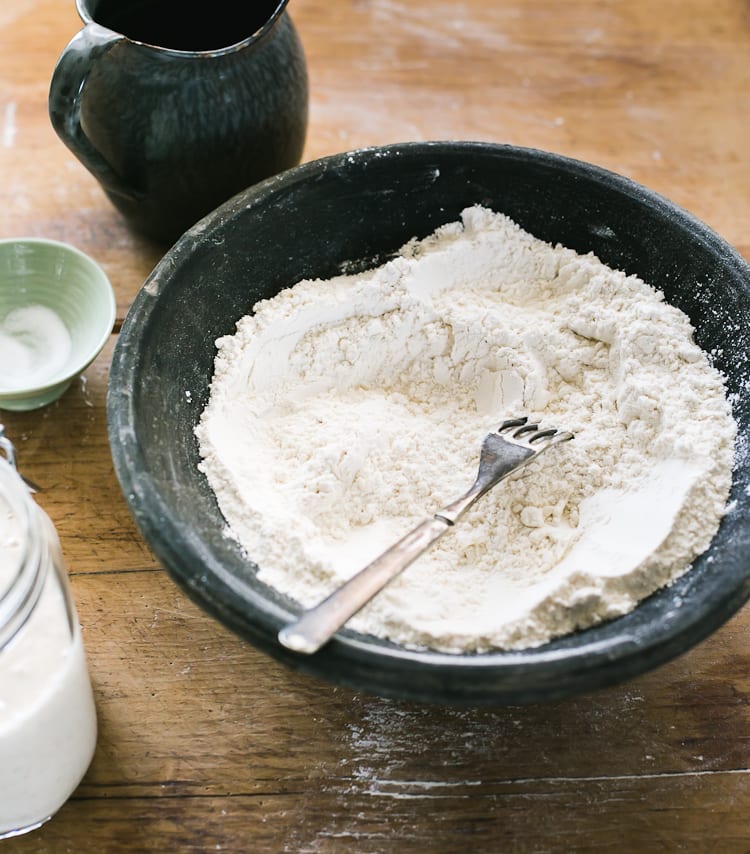
Imagine this: you’ve got a beautiful bubbly starter, you’re ready to make the dough, and everything is set for an overnight rise. You’ve followed the sourdough bread recipe to a T! Nothing could go wrong, right?
Except, when you wake up the following morning the dough has barely risen at all. Maybe only a few inches. The dough is cold, dense, and sort of lifeless (just like your mood).
What gives?
First, what you’re experiencing is totally normal.
We’ve all been there no matter how easy the recipe might be. Just ask any baker.
In my experience however, temperature is usually the main culprit and luckily there are ways to control it.
But first, you’ll need to consider (and rule out) additional culprits that like to throw a wrench in your rise time game.
What most people don’t know, is that sourdough is like a web; each step is connected to the next and when troubleshooting, it’s never just ‘one thing’ that causes your bread to flop. You have to consider how each step works together and what happens to the bigger picture when something goes wrong.
• • • • • • • •
Sourdough Rise Trouble Shooting Steps:
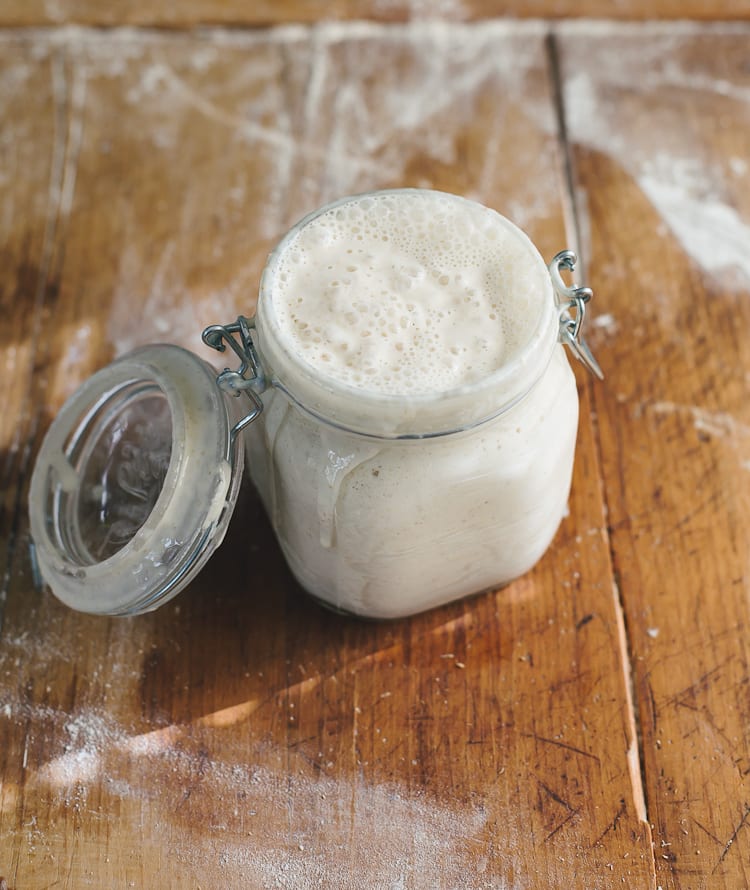
1.) Test Your Starter
First, let’s talk about your sourdough starter. If it lacks power and vibrancy, your bread won’t rise.
So, how can you test to be sure it’s okay?
After giving it a good feed, it’s ready to use when it shows all of the following signs:
- doubled in bulk size (use a rubber band to track its growth as it begins to rise and fall).
- bubbles on the surface and throughout the culture.
- spongy texture similar to roasted marshmallows.
You can find more info regarding sourdough starters, ongoing care, FAQ in my book (p 16-23).
Once your starter shows all of the signs, make sure it passes the float test. To do the test, drop 1 tsp. of the starter into a glass of water; if it floats to the top it’s strong and ready to use.
The more you get to know your starter the more it will ‘speak’ to you, and eventually you’ll bypass this test altogether.
2.) Check The Temperature
Assuming your starter is ready to use, the next step is to address the temperature.
As mentioned above, temperature is usually the culprit when your dough is taking forever to rise.
Why? Because temperature controls time.
Simply put: if the weather is cold, your dough will take longer to rise. If the weather is warm, your dough will rise faster. This concept applies to ALL bread recipes, so get used to it and be flexible.
As a guideline however, bakers will often provide a specific temperature with an approximate rise time to help you out.
Here’s an example:
For the purpose of this post, let’s use my Everyday Sourdough from Artisan Sourdough Made Simple. The approximate rise time is 8-10 + hours at room temperature, defined at 70 F.
What does this rise time and temperature mean exactly?
Let’s say it’s winter in New York, and the temperature is about -20 F outside. Your thermostat is set to 70 F inside. You’ve made the dough, let it rise overnight on the kitchen counter at 70 F, and in the morning it has barely risen. What happened?
Here’s the deal: regardless of what your thermostat says, if it’s – 20 F outside, I can guarantee the temperature inside is not 70 F.
It’s most likely colder than you think! I learned this the hard way. Drafts, poor insulation, doors opening and closing etc. will not only change your current room temperature, but it changes the temperature of the dough too. My kitchen is the coldest room in the house, so I know this all too well.
Plus, if your body is cold and you’re wrapped up in 100 cable-knit sweaters, think about how the dough feels…
So, to remedy this, you’ll need to deviate from the recipe to suit your personal environment.
In other words, in this example, your dough needs more time to rise beyond the 8-10+ hour timeframe- it’s just too cold. And this is okay.
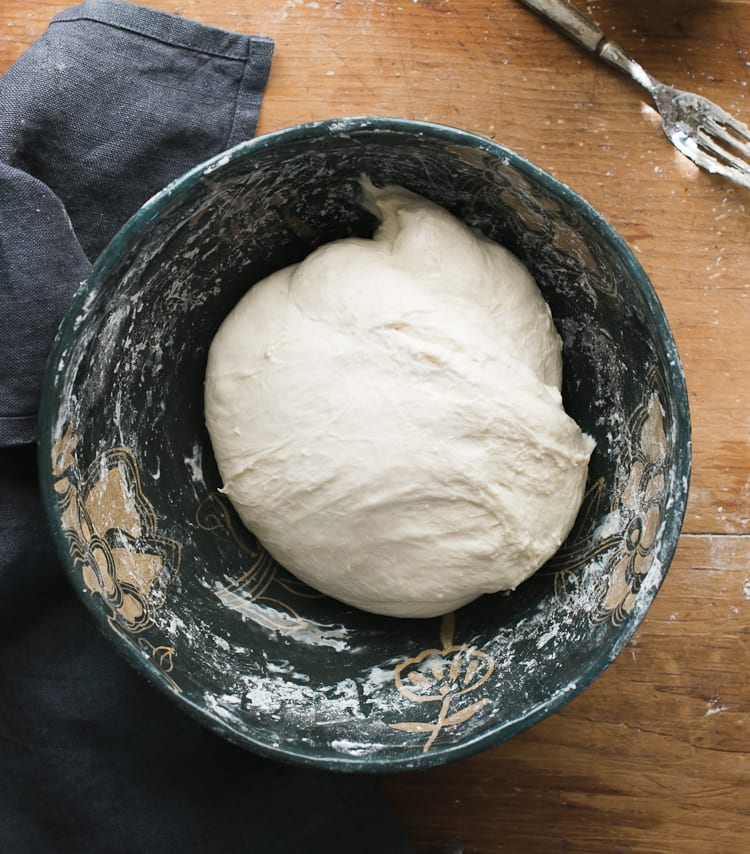
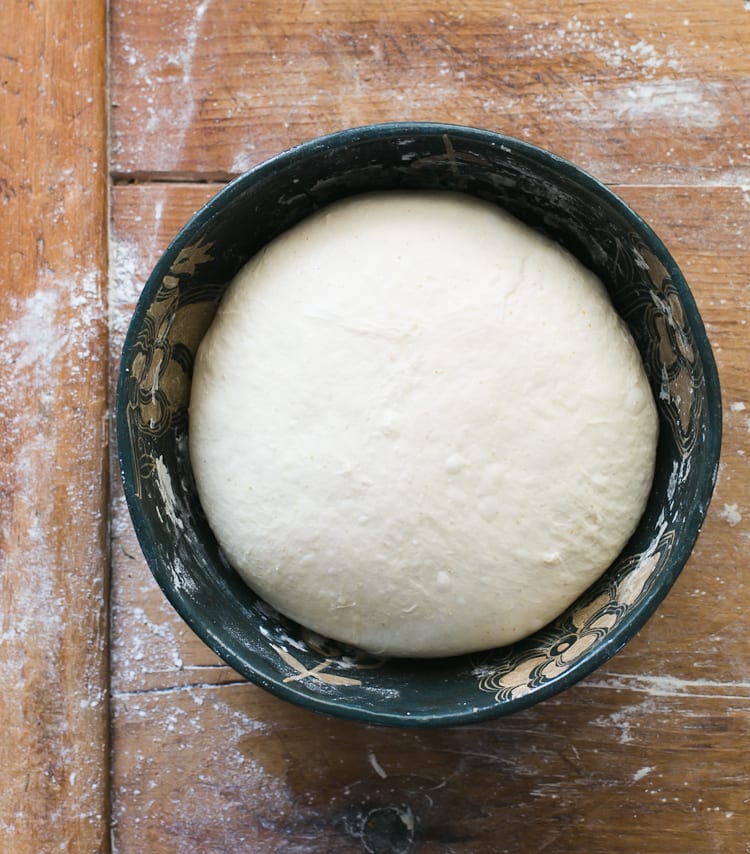
Remember, the dough is ready when it has doubled in size. This is your visual marker. Don’t even bother baking it if it still looks dense after 10 hours. Watch the dough and not the clock.
Conversely, if you live on an island and it’s 90 F, the dough might be ready in only 4-5 hours.
Get it?
While colder temperatures and extended rise times might initially frustrate you, the experience will always hand you a gift.
It develops your intuition and leads you away from second guessing yourself. Intuition is a baker’s secret weapon. With practice and repetition, you’ll learn how to marry the variables (time, temperature, specific instructions etc.) with intuition (adjusting rise times, rising locations, and just doing your own thing ) without thinking twice.
Trust the process, okay?
Now, let’s move on to see how we can control the temperature…
• • • • • • • •
3.) Use Warm Water to Control The Temperature
If the weather is cold and your dough won’t budge, please use warm water during the initial mixing phase. It will help to jumpstart the rising process.
I actually use warm water 90% of the time when making dough (I tend to use cooler water in the summer). The exact water temperature doesn’t really matter in my opinion. Between 80-90 F is good. It just shouldn’t be too hot. Use your judgement.
Also: do you store your flour in the fridge? Some people do this to prevent bugs from nesting in the bag. If you fall into this camp, remember, cold ingredients = cold dough.
4.) Use a Proofing Box To Control the Temperature
The only way to really keep your dough at a constant temperature free of drafts and fluctuations is to use a proofing box.
If you’re unfamiliar, proofing boxes are basically like mini green houses for your dough. You can set the box to your desired temperature and go about your day (or night) worry free. Except, they’re really not so mini come to think of it.
These boxes are about the size of a microwave, they take up prime counter space, and worst of all- they are not cheap! I have a proofing box that collapses flat for easy storage, which I love but it cost over $150. The brand name is Brod & Taylor.
If a proofing box is not an option for you, there’s an easy a way to create a bootleg version at home.
To do so, adjust your oven to the lowest setting (mine is 200 F). Once it’s ready, shut it off. Stick an oven thermometer inside and wait for the temperature to drop to about 75-80F. Then place your dough inside (the bowl must be oven-proof, and a damp cloth should rest over the top to prevent a skin from forming on the dough). Allow to the dough rise in this warm, somewhat controlled environment until it has doubled in size. You can also use this tip for the dough’s second rise too.
Note: Please make sure your oven does not go above 8o F. If the temperature is too hot, many things can happen that might wreck your dough. For example, extreme heat + cold dough creates excessive condensation, which leads to a wet and sticky texture. Wet and sticky dough is difficult to work with and shape. In fact, you might have to shape the dough more than once if it’s spreading too much.
Extreme temperature can also lead to over-proofed dough, if the bowl is left inside of the oven for too long. And finally, too much heat might kill your starter power, resulting in flat and dense loaves.
I’ve experienced all of the above factors and it’s really frustrating. My best advice? Please monitor your dough when it’s inside of the oven so you have an idea of what’s going on- all ovens are different, all doughs are different. Eventually, you’ll get a sense of how long the dough will take to rise and you’ll be able to make better adjustments as you continue to observe.
So, let’s re-imagine this scenario once more: you’ve got a beautiful bubbly starter, you’re ready to make the dough, and everything is all set for an overnight rise on the kitchen counter.
This time, you know it’s freezing cold outside and you have a hunch the dough might not be ready in the morning. Low and behold, you are correct.
Quick to think, the following morning you create a proofing box using the oven trick mentioned above. In just a few hours the dough is soft, supple, and double in size.
Success!
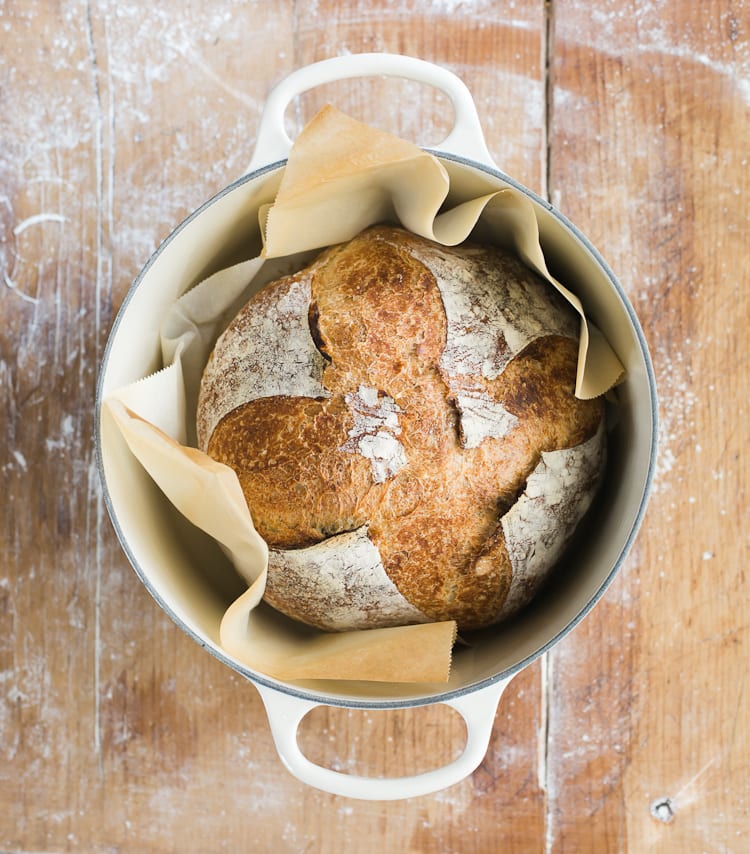
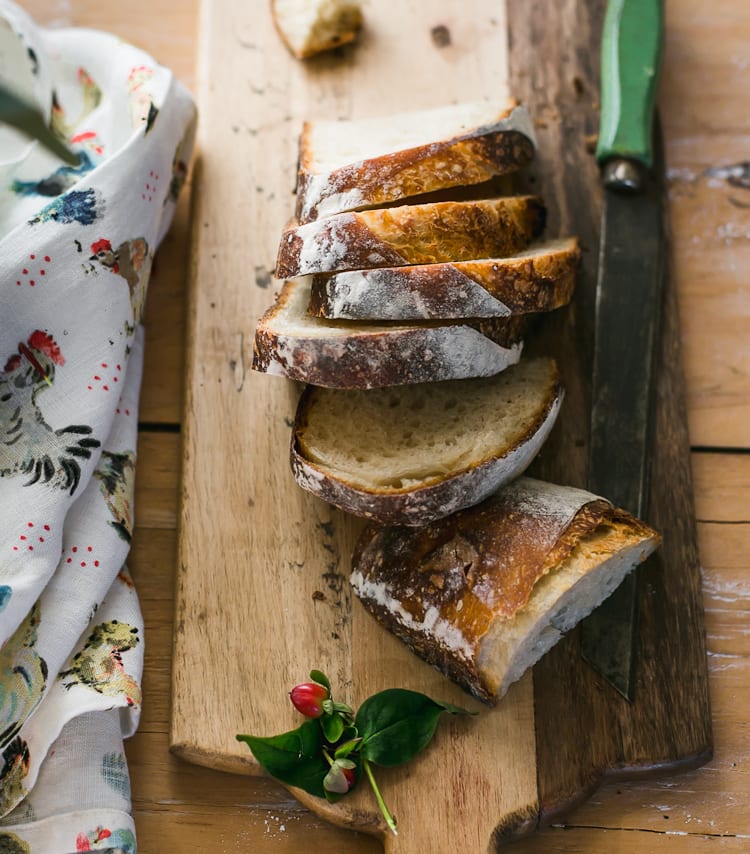
Once the dough is baked, you slice a piece of warm, crusty bread at just the right moment and inhale the aroma that has come from your creation.
Go ahead, slather on some salted butter and revel in your newfound accomplishment! You deserve it!
• • • • • • • •
If you have questions regarding the rise of your sourdough starter, please click here.
You’ll find everything you need to know over there!
**This post contains affiliate links. All opinions are my own! Thanks for the support.**

Comments
Brad says
This is a great article but I don’t think I see my problem listed. My problem is that my dough doesn’t hold its shape during the bulk ferment stretch and fold stage. The first stretch and fold is usually the best, where it seems like it is going to hold its shape but then on the subsequent stretch and folds I return to find the dough and completely conformed to the shape of the bowl. It is not so much like pancake batter that I can’t work it, but it is loose and not holding it’s shape. After the bulk ferment I am able to go to shaping the doughs with the help of a little flour. After refrigerating overnight, I wake up to dense, heavy, flat dough. I get a little spring, and a medium open crumb but it is not the bread I am looking for. I am very new to this. Part of my problem is I had beginner’s luck. My 1st four loaves were great and didn’t have this problem. This problem started when I switched to bleached enriched AP flour (which is all we can find nowadays). What do I need to do to get back to that early success? Thanks!
Emilie Raffa says
Brad, it could be a few things… I don’t know what specific recipe you’re following but if you swap ap flour for bread flour the texture of the dough will change. And then everything else after that will change. Bread recipes are formulated to work with specific flours and amounts of water, and when substitutions are made it doesn’t always work out the same. Have you tired my Artisan Sourdough with All Purpose Flour?
Becky says
Very helpful post! What effect would baking your loaf in an oven proof stainless steel pot with a cast iron top, instead of a Dutch oven, have on it? Mine comes out slightly dense and gummy, (which was a huge improvement over what happened before I trouble shooted with this post!) and I’m trying to see if I really just need a Dutch oven or if there’s something else I’m missing.
Emilie Raffa says
Hi there! Any oven safe pot (with lid) that can heat up to 450 F (including all handles, knobs etc) is fine for baking bread. Some argue that cast iron or enamel coated cast iron Dutch ovens are better conductors of heat. And while I agree, use what you have first and see how you go. Dense and gummy bread is a whole different issue! It’s not the pot ;)
Sarah says
It would be helpful if you would kindly post how to dough that doesn’t rise. I must have forgotten to feed my starter, skipped the drop test and went right into the recipe. So now, after an overnight rise, it didn’t rise. No surprise there. The million dollar question is…in what creative ways can I use the dough?
Bass says
That happened to me so may times! I finally wised up and added 1/4 teaspoon of instant dry yeast dissolved in 110F water. then incorporated in dough and let proof again for an hour.
Since it is cold here, used the microwave as proof box with cup of almost boiling water. Check with your thermometer should be about 80F. After dough finally doubled in size. shape and proof again til wobbly and 50% doubled.
Then bake as usual. Saved my pure sourdough with starter that was not strong enough in colder temps.
Emilie Raffa says
Thanks for your tips, Bass!
Sita Bouchie De Belle says
Hi, can you recommend a starter feeding schedule for baking a loaf daily?
Most info out there is for people that bake once a week and keep their starter in the fridge, however I’d like to keep mine on the bench, feed daily and bake daily (with the occasional skip day)
My starter is three weeks old and very active and bubbly. The feeding routine part is just still confusing to me.
Thanks!
Emilie Raffa says
Hi there! At what time would you like to bake the bread? This will help determine the proper feeding schedule. Thanks!
Brian says
I started my bread making journey roughly about 5 months ago. There have been a lot of failures and a lot of successes. This whole process has made me a much better cook and baker overall. This article in particular has helped me find my way through quite a few successes. Thank you for that!
Emilie Raffa says
You are very welcome Brian. Glad you found it helpful- I know the feeling!
Sarah says
Hello! I am exceedingly desperate for advice. I have a starter that bubbles up beautifully and doubles in volume with no problem after feeding it! I’ve been trying for literally years to get a loaf of sourdough that rises in the oven properly. Not one has done it yet. They are all pale with a thin weak crust, mostly flat (maybe A LITTLE rise?), and gummy on the inside. I’ve let the dough rise in the bowl for 2 hours. I’ve let it rise for 6 hours. I’ve got a heat pad I used to use for my snake to help keep my dough warm. I’ve tried a wet dough. I’ve tried a drier dough. I’ve tried hand kneading in different ways with different techniques. I’ve tried only using the dough hook. I’ve tried barely kneading it at all. I feel like I’ve tried literally everything and I KNOW it’s not my starter. I’ve baked it for 30 mins. I’ve baked it for an hour. I use bottled water and bread flour every time. I’m so so so frustrated. Please help me. I seriously cannot look into my oven one more time and see a pale, flat loaf of bread.
Emilie Raffa says
Hi Sarah! It sounds like your starter is doing great, so we can rule that out. The tricky part, is that you’ve tried so many different things it’s hard to pinpoint the exact cause.
Try my Artisan Sourdough with All Purpose Flour. It’s a beginner recipe. It’s also a 1/2 loaf so if you mess up, it’s not a waste.
Additionally: from what you’ve described, I think the issue is the bulk rise. In the above recipe, the dough needs to double in size in order for the gluten to develop properly. Once that’s established, your loaves should have a better rise and should not be pale at all. As for gummy loaves, they’re either undercooked or your oven temp. is off (use a thermometer).
Try this to start and see how you go. Hang in there!
Corey says
First time making sourdough today and it definitely came out too dense. But your tips will be beneficial to my next try. Thank you.
Amy says
I used a recipe that called for what seemed like a very small amount of starter (50 g). The dough did not rise after 5 hours. I’m worried it will not rise at all. What is the advisability of adding a cup of starter, kneading the whole thing, and restarting the clock? I hate to waste the flour I’ve already invested in the batch.
Emilie Raffa says
The dough needs a warmer spot to rise. Turn on your oven and let it heat up to 80 F (use a thermometer, it cannot go higher than this). Then stick the bowl of dough inside covered with wrap. It will rise faster in this warmer environment.
I wouldn’t advise adding more starter to the dough and restarting the clock. Starter + warm temperature = rising dough.
Alila says
Thank you so much for sharing all your knowledg so generously! I made my first sourdough loaves this weekend and everything yesterday went beautifully, my bulk fermentation was perfect. I shaped it and then left it to proof for about 2 hours (it rose again during this stage) and then put it in the fridge overnight. This morning I baked it in a cast iron pot. It did not rise at all in the oven, it has come out as a hard dense loaf. Any ideas? Sorry not sure if I’ve given you enough info for you to be able to advise…? Thanks!
Emilie Raffa says
Hello! You are very welcome :) Your second proof was too long, which resulted in over proofed dough in the morning (which was why the loaf was dense!).
How long was your bulk rise? This will dictate the amount of time for the second rise… Thanks!
Jonathan says
Hi,
I recently made a sourdough starter and it seems to be good: it double in size within 3 ou 4 hours, and it float. But the dough still doesn’t rise.
I let the dough in my oven with only the light on.
Did you ever have the same problem?
Emilie Raffa says
Hi there! It sounds like the dough needs a warmer spot to rise. And the oven light might not be warm enough. Try preheating your oven to 80 F and then shut it off immediately. Place your dough inside to rise and see how you go.
Lex Starwalker says
Hi Emilie!
I’m new to the world of sourdough, but I’ve been reading your blog, watching lots of YouTube videos, and reading your artisan sourdough book as well, so I feel well prepared!
I have a cold kitchen this time of year, so my starter has been going slowly. I hate to waste the electricity, but after a week of little progress, I started keeping my starter in the oven with the light on. This keeps it at about 78-80 degrees during the day, and around 70-72 days at night (I turn the heat down to 66 at night in my house). This definitely helped, but I still wasn’t getting to the doubling in volume we look for.
Then I found an addition to this trick from a video by America’s Test Kitchen. What you do is put a loaf pan on a cookie sheet on the shelf below your starter. Boil some water in a pot or tea kettle, and then pour into the loaf pan. Shut your oven door and leave the light on. Obviously, you want to monitor the temperature, but this will raise both the temperature and the humidity in your oven (this trick works for proofing your bread dough on baking day too). My experience is this method raises the temp in my oven from around 80 degrees to around 90 degrees. It will stay at that temp for a couple hours, and then slowly drop. If you repeat the method every 3-4 hours, you can keep the temp between 85 and 90 degrees.
This probably isn’t a great long-term solution, but works great for a quick acceleration of the fermentation of your bread dough or starter.
Also, an interesting side note for others like me that are concerned about energy usage. I saw a statement from the manufacturer of the bread proofer you use (which I hope to purchase one day) that it’s power consumption is equivalent to a 40 watt light bulb (it actually uses more than 40 watts, but the manufacturer estimates it’s only heating 30% of the time, so that’s how they came up with 40 watts). My oven has a 25 watt light bulb. So the oven light method is actually using less electricity than the proofer would, however it obviously has quite a few downsides compared to the proofer. I just thought that might be useful to people like me who hate the idea of leaving an incandescent (not LED!) light on all day and night.
Lex Starwalker says
Sorry, I misremembered the numbers. My oven light is a 40 watt bulb, and the proofer uses electricity comparable to a 60 watt light bulb on all the time.
Emilie Raffa says
Hello Lex! Thank you for this incredible post, chock full of detailed information. I love hearing tips from different bakers. Such a lovely community, you know? Another thing I’ve been doing lately, is leaving my starter in a water bath in the oven with the light tuned off. This also helps to control the temperature a bit. And thanks for the info re: the proofing box vs. oven method & electricity usage. So interesting!
Michelle Jenson says
I’m having similar problems. How long can you leave your dough out to rise before it’s just no good anymore? I’ve been trying for two days….. ?
Emilie Raffa says
Hi Michelle! What sourdough bread recipe are you following? Thanks!
Melanie says
I just attempted my first ever sourdough loaf, and this morning my dough hadn’t risen at all ( it could be the temperature, and I’ll monitor that), but I’m wondering if my starter wasn’t bubbly enough. If that is the case, will it ever rise, or should I start again? And if it never rises, can I use that dough for anything, rather than throw it out?
Emilie Raffa says
Hi Melanie! Your starter’s strength is absolutely VITAL to the rise of your dough (in addition to the other factors mentioned here). You can troubleshoot your starter by reading the tips on this post. Your starter will definitely rise; it’s not like instant yeast where you will see results fast. Sourdough is ‘slow bread.’ It just takes time and patience! For dough that doesn’t rise, I wouldn’t use it for anything else. Whatever you bake will just be a brick. If you’re worried about waste, you can always half the recipe you’re using.
Molly says
Hi Emilie, I love your blogs and your book!! I’m currently trying to make the every day sourdough from your book and I just cannot get it to rise during the bulk fermentation. During all of my attempts the dough has flattened out to a pancake! My starter passed the float test and has been wonderful while rising in the oven with the light on. I am letting my dough proof the same way, but to no avail. I took the oven temperature and it is reading 73 degrees farenheit.
1. Is there any other reason my dough won’t rise or could it be temperature related?
2. What can I do with the discarded dough? Are there recipes I can use so I feel less wasteful?
Thank you in advance!
Emilie Raffa says
Hi Molly! Thank you! If your starter is not the issue (it doesn’t sound like it from what you have described), it could be the temperature + the length of the bulk rise time. Bread dough always takes longer to rise in the winter, no matter what. How long are you letting it rise for? Regarding the discarded dough, there’s not much you can do because anything you use it for will bake up dense. However, you can always 1/2 the original recipe (not including the amount of sourdough starter), so that you feel less wasteful. That’s what I do when experimenting. Hope this helps!
Jennifer A says
I really appreciated your book when I started out (I bought the eBook version), thanks so much! Too many people are too technical with their instructions. I think you need to start out with some really simple instructions, and once you’ve got the hang, then it’s easy to try different or more technical approaches.
For me, when it’s cold, I do all my fermenting (starter, dough, kefir, vegetables etc) on a reptile/seedling mat. Cheap and takes almost no storage or even bench space – I have it on the bottom tier of a kitchen trolley. I let my dough rise in a lidded tub to stop it from drying out.
Emilie Raffa says
Hi Jennifer! You are quite welcome :) And thanks for the tips- they sound great! I need a kitchen trolley…
Linda KUlferst says
I am on my 4th loaf; getting better at it; This morning the dough was perfect, and I did as I was told. BUT it did not bake as high as it should be. WHY?? I could not score it and could that be the cause.? I followed your instructions to a T. We ate the third loaf but it still wasn’t as puffy as it should be.
I am getting very frustrated. Will have to go to town to buy a razor blade thingie??
Emilie Raffa says
Hi Linda! It’s hard to say without a picture… it might be over proofed. How long are you letting the dough rise for? And at what temperature? Thanks :)
gisela says
Hi Emilie,
I routinely make sourdough chocolate tear bread (16 small breads in a square pyrex) every week and they usually rise up/double up beautifully. I prepare the dough 7 days before and let it ferment in fridge for 7 days. Then on day 8, I will take it out of fridge and make 16 small breads and let them rise double in few hours before baking. These past weekends, the 16 small breads rose a bit only (in the same time frame) so the end result was not fluffy and soft bread. I suspected the culprit is the humidity in the house. I live in Queens by the way. My starter rises faster in this temperature and I think it is healthy. Do you think humidity and hot temperature are to blame. Thanks.
Kaitlyn says
So my starter rises very well (although sometimes it is a tiny bit thinner than I would like, but I think that’s because it spends time in the fridge occasionally). My first rise is also fine. However, the second rise never produces as large of a loaf as I would like. I check the dough consistently and let it rise in a warm place. I also don’t get a whole lot of oven spring. What am I doing wrong?
Emilie Raffa says
Hi Kaitlyn!
Thanks for the info- it sounds like your starter is fine (you can add more flour if it’s too thin- no problem). And regarding the first rise, if the dough has doubling in size, you’re fine there too. Is it possible the second rise needs more time? How long are you letting it go for at this stage? Alternatively, your second rise might be too long. This would account for lack of oven spring, as the dough might be over proofed.
Kaitlyn says
I usually let it go for somewhere between 45 minutes and 1 hour. Usually on the lesser side, just because I can’t wait to eat it. :)
I was wondering if I should try using more starter in the recipe? I usually just make your classic loaf (from the cookbook), but I looked at other recipes, and most use more in relation to the flour and water.
Anne says
Hi, I am an Aussie and have just recieved your book as a birthday present.At last Think I have mastered soughdough with your recipe.I at last have a crumb.Your book is my saviour,it was a wonderful gift from my daughter,I am recommending it to my friends who want to give it a try.I have spent six months googling and experimenting,but now I feel I can say I can bake a lovely sourdough.thankyou!
Emilie Raffa says
Hi Anne! Thanks so much for your feedback- I love comments like this :) And I’m thrilled to hear the book has been helpful towards your sourdough journey. Happy baking to you! x E
emilym says
Thank you for your post!
I often find my dough rises, but then when I transfer it from the bowl it was proofing in into the dutch oven for baking it really flattens out and then is too flat.
Any tips?
Emilie Raffa says
Hi Emily! You are quite welcome :) To clarify, are you doing the second rise in a bowl or proofing basket? Or in the Dutch oven itself? Thanks!
jackie says
Hi…I have the exact same problem: bubbly lively starter, great first rise, great second rise in dutch oven, dough is bubbly and rises to double at least. Have tried leaving it for 5, 8, and 12 hours but it still deflates when touched and there’s no oven rise. I put in dutch oven for 2nd rise because I don’t want to risk handling and totally deflating the dough! any help greatly appreciated!!
Dee dee says
I’m fairly new at sourdough making, only a couple years. My first year was filled with disasters. But I’ve learned a lot. One other oven method that I’ve found helpful when it’s super cold outside it to simply turn the oven light on. It generates a gentle warmth. It makes a nice proofing box.
Emilie says
Hi there! Agreed! I mention this too as a bootleg proofing box. It’s a fantastic tip- happy baking Dee dee! – E
Dave says
I had ordered one and cancelled the order…now I’m wondering if I should have or not for the collapsable proofer. The reason was I was looking over the negative reviews on the unit and some describe gaps between the folds of the square barrier that is used to enclose the dough. One person measured the internal temp and as a result there was fluctuation. What has been your experience? What about these gaps that let the air inside?
Emilie says
Hi Dave, I completely understand your concern. Honestly, it’s possible there might be some fluctuation in temperature (I haven’t tested this myself), but for me, I’ve never had a problem with this proofer. You really have to weigh out the pro’s and cons. If rising your dough in a temperature controlled environment AND saving space is a priority, you might want to take the plunge- you can always increase the temperature if you find there’s a fluctuation. I believe this model goes up to 85 F? I tend not to overthink these things too much. And if all else fails, you can always test drive the proofer, and return it if you really aren’t happy with the results. I would do that! Hope this helps… E
Mary Griggs says
does the book have a recipe for a sourdough starter?
Emilie says
It sure does! The book also comes with detailed information and a troubleshooting FAQ section. If you’re in a hurry, you can also order some starter from me directly. Click here.
girm says
my starter is runny, smells good and even tastes good. What do I need to do to save it??
Emilie says
Hi there! Please see this post.
Elena says
Hello!
I have a really hard time on rising my dough. Even the trick eith the oven does not do much.. My starter is active, I even tested it and it floated. I used another recipe, but defenetly next time I’ll try yours. I had to leave my dough rise in the oven for 5-6 hours and did not see so much of a difference. It is always warm in there. Some help?
Emilie says
Hi Elena, I’m not sure what recipe you followed initially, so I’m unable to advise! But in winter, when it’s cold, it’s not uncommon for your dough to look like nothing’s happening after 5-6 hours. It sounds like it just needs more time, which is normal. Good luck!
Lily says
Hi Emilie – First of all, I am loving your book and my starter has grown very strong following your tips! This past weekend I made your Everyday Sourdough twice. I’ve used a number of the tips you include in the recipe (float test to make sure my starter is ready, using warm water, and I bought a scale to make sure my measurements are accurate). My starter didn’t rise over night (10 hours) but I don’t think my kitchen was warm enough. I don’t have a light in my oven, or particularly warm spot in my kitchen, so I turned my gas oven on low and alternated putting my dough next to and on top of one of the burners – so there was no direct heat but helped keep the bowl warm. My dough doubled in size and I tried the poke test, but it didn’t feel firm enough by the time I was shaping it/it had it’s final rest. I also had an issue with getting the scoring pattern to stay as the dough did not feel firm enough. I baked the dough in my dutch oven, it came out with a nice crust, crackles when you squeeze it, and some very nice airy holes, but I don’t feel that it rose enough. The loaf ended up being 11 inches round, but is only about 3 inches tall. It also seems that the majority of the bigger holes are in the top half. I read an earlier post where you suggested that it may be that the dough was not baked enough, but the bottom outside of the loaf is quite well done and I moved the rack up when I baked it for the final ten minutes outside of the dutch oven. Do you have any tips for helping my loaf rise? Was putting it near the stove a bad idea/could that have made it more wobbly, or do I need to use a smaller bowl for resting/pan for baking? Sorry for all of the info here but I’ve tried to identify a number of factors and need your help!
Jenifer says
This is my problem, too. It either the dough doesn’t rise or it over proofs. I end up with dense loaves. It’s frustrating because my starter is beautiful! So far though my only successes come from using the discard to make biscuits or pasta.
Emilie says
See my notes below! -E
Emilie says
Hi Lily- apologies for the late reply! I’ve been out on maternity leave. Thank you for your detailed post. All of the info really helps :)
Ok, so with bread: it’s always hard to diagnose without a picture, additional details, and being there in person to examine etc etc. But from what I’m gathering here, it sounds like your dough was over proofed. This could have happened during the bulk fermentation, the second rise, or both. I have a feeling it was during the bulk fermentation. Anytime you have a loaf that doesn’t rise a lot in the oven AND has large holes at the top is indicative of over proofed dough.
The Everyday Sourdough (dough) shouldn’t be wobbly when ready. This is another indicator that it might have been over proofed. It’s also possible that the dough temp was too warm (warm dough is always more wobbly and harder to handle). But because I don’t know what the temp of your dough was, it’s hard to say. And another thing: all flours handle differently. Some absorb more water than others which would also effect the texture of the dough. You might have to add additional flour…
Here’s what I would do next time: start the dough in the evening around 8 PM (assuming it’s winter and it’s about 68-70F in your house). Rise the dough in an 8-inch pyrex bowl. This is exactly what I use. Skip the gas stove trick. In the morning, see how it feels… Firm? Wobbly? Did it rise too much? It’s going to take some experimenting. Shape the dough, give it a shorter second rise (appx. 30 minutes) in a proofing basket, and bake in the Dutch oven. Using a smaller baking pot will not necessarily solve your problem but it might help!
Hope I’ve answered your questions… good luck!
Jessica says
I just tried your walnut & raisin county loaf & it didn’t turn out too bad for my first bake. The dough rose wonderfully during bulk but the bread itself didn’t rise very much in the oven. Could it be that it was overproofed in the second rise? I gave it 20mins on the bench & then popped it in the fridge as I had to head out for a few hours. Would that have been my mistake?
Emilie says
Hi Jessica, it’s hard to say without knowing all of the details! However, if you’re sure it doubled during the bulk fermentation, and it didn’t get much rise in the oven, then it’s possible the dough over proofed during the second rise. Is it summer by you? If so, I would definitely decrease the second rise time (next time); warmer temperatures always speed things up! Hope this helps…
Ann says
Just made my first loaf of Everyday Sourdough from Artisan Sourdough Made Simple. It was amazing. This was something I was terrified to attempt for years, and when I did, had little success. Due to my house temperature, it took longer to rise, (I put it in the warm garage overnight), and what a beautiful loaf of bread I was able to send with my daughter to share with her colleagues on the night shift at her hospital. I’m expecting I’ll get more requests for this bread. Can’t wait to move on to the other awesome recipes in this wonderful book.
Emilie says
Hi Ann! That’s fantastic! I love reading about success stories like yours. Once you get the hang of it, or even over the initial fear, baking and sharing sourdough is one of the most rewarding things you can do. Enjoy!
Pauline Evill says
Hi thanks for the article it’s taken away for me to get a decent loaf but I have almost got there …. the recipie I’m using leaves the dough overnight in the fridge it’s not too bad when I bake it in the morning after a rest of about an hour before baking
Do you think I could leave it outside instead will it make it rise more or too much it’s winter at the moment about 10 degrees at night average
Emilie says
Hi Pauline,
In winter I always let my dough rise overnight at room temperature (instead of putting it in the fridge) with great results. Sometimes I have to play around with the start time, but other than that, it’s my go to method for colder temperatures.
However, with that said, I can’t say how much your bread will rise (or not) because I don’t know the recipe you’re using and how much starter it requires. My recommendation would be to just give it a go and see what happens! That’s what I would do. :)
Steve says
I’ve been having this problem with my starter for the last week and a half. I’ve done everything to adding half whole wheat to adjusting the hydration. My starter is only 2 months old so i expected some TLC. However it’s very active and healthy now but my dough just wasn’t rising but now I’m now realizing it’s most likely the room temp. This was very helpful
Emilie says
Hi Steve, glad you found this article helpful. Thanks for the feedback!
Filip says
Hi, I have question, let’s say my sourdough starter is not ready after the first week, do I just keep throwing half away and feed it same amount of flour and water of what’s left in the jar?
Emilie says
Hi Filip, I believe you will find the answer to your questions on this post: Troubleshooting Your Sourdough Starter.
kelli winter says
I live in a very chilly house so getting my dough to rise was a challenge.
I found that if i set it on my desk with a lamp above and a space heater below, I was able to get a very nice warm place for it to rise.
I keep the dough covered with plastic wrap to keep it moist and keep a room thermometer there to be sure the temperature is right. This always works great for me.
I’ve heard some sad tales of ovens being turned on and killing a dough or a starter by accident, and the oven temp does not stay stable the whole time anyway, it continues to cool after the initial warm up and not all ovens have lights in them.
I hope this trick can help some people who are struggling.
Emilie says
Hi Kelli, Great tip! My mom uses a desk lamp for warmth (she’s afraid of the oven light trick) with great success. Thanks for your feedback :)
Helga says
I understand now why my sourdough is slow to rise,i live in ICEland :-)
Emilie says
That will do it for you ;)
Paul says
Hi Emilie
I am writing to you from Australia where I have managed some quite good results baking white sourdough following the techniques in your book “Artisan Sourdough Made Simple”. While the results are quite good and very eatable, and my loaves have plenty of aeration, the one issue is that they are a little dense and a little doughy, especially at the bottom. Is there something you can suggest that might overcome this?
Regards
Paul
Emilie says
Hi Paul, it’s hard to say without seeing a picture of the loaf. And to be quite honest, it could be a number of things! However, if the dough definitely doubled in size during the bulk ferment, typically loaves that are dense and doughy towards the bottom might be undercooked. Or, there might be too much moisture in your bread (Aussie flours absorb water differently than American flours). Make sure to use an oven thermometer to troubleshoot your oven (adjusting the baking time if necessary) and/or cut back on the water by 20 g to start. See if that helps!
Paul says
Hi Emilie
Thanks for your suggestions. I’ll give them all a go and let you know what happens. The dough definitely doubles in the bulk rise. And I did bake my last loaf a little longer to see how it went and it was not quite so dense.
Cheers
Paul
Paul says
Hi Emilie
I tried each of your suggestions with my last bake, cutting back on the water and adding a few minutes baking time to each step. The result was a much better bake— certainly less dense—a real improvement on my previous efforts. The only thing I didn’t do was invest in an oven thermometer and troubleshoot the oven. That’s next. Many thanks.
Cheers
Paul
Emilie says
My pleasure, Paul! I’m glad to hear it worked out. Thanks for following up :)
Chantal White says
Hi Emilie,
I just wanted to say thank you! My first true sourdough was so good it almost made me cry. I’ve been baking bread for over five years now but I have never found a more useful resource than your gorgeous book (I hate myself for being so impatient that I bought the kindle version instead of the paperback which I would now love to have) and this amazing blog. My first loaf didn’t rise overnight (not because of Maurice, my beloved starter which you helped me build, but because it was too cold in the house) but the oven trick worked wonderfully and I’ve been using it ever since (and probably will until the warmer weather truly settles in).
Thank you for such a lovely and beautiful book and the amazing gift of delicious bread!
Violet Reid-Taylor says
Hi Ms Raffa,,
First of all, I love your Artisan Sourdough cookbook. My partner got it for me for Christmas and I’ve been working my way through the recipes with glee. I’ve run into a bit of a problem with a couple. I don’t know if my starter is less liquid-y, but I find some of my dough (primarily when made with whole wheat) drier than the recipe suggests it should be. The lack of rise and life in the dough is most likely also influenced by the temperature on my house. Would adding a little extra water totally throw things off? Could I be missing any other possible causes? My starter passes the float test and is very active, but my dough is still so dry!
Thanks so much
Wajela Moer says
Thanks a lot! I will try that.
Wajela Moer says
Hi. Thanks for your helpful article. I have a question or two though; my starter, made with spelt flour, is nice and bubbly, and definitely the texture of roasted marshmallows. However, it never doubles in size. It rises some, of course, but never doubles. Is it still active enough that my bread will rise properly? I have been having trouble with it rising enough, and am trying to identify my problem. Thank you!
Emilie says
Hi there! If you’re having trouble with the rise of your dough, I would definitely have a closer look at your starter first. I recommend waiting for it to double in size AND for it to pass the float test. This is key. Based on your description, I think your stater needs to be more active for best results. So keep on feeding it and/or refer to this post for troubleshooting tips. Hope this helps!
Haley says
Hi Emilie! Really enjoying your book so far! My starter isn’t passing the float test yet – do you think I should wait before trying to bake and just keep feeding it until it does pass? Thanks!
Emilie says
Hi Haley! Glad to hear you’re enjoying the book. I would definitely wait to bake until your starter passes the float test. You’ll have better results this way!
Maddy O'Shea says
Hi Emilie, I purchased your beautiful book Artisan Sourdough after reading Celia’s awesome blog!
Her last blog was so good and she also suggested you were selling Dillon starter via email…
Is it possible to for me to purchase I live in Sydney Australia?
Kind Regards
Maddy
Emilie says
Hi Maddy! Thank you! I love Celia :) I can send you some starter- please email me your postal code so I can look up shipping rates. Thanks!
alan says
thank you so much for your book and for this website and Instagram. When adapting a bread from a yeast recipe to natural levain, how do you know much to substitute? i.e., is a tsp of yeast (assuming Dry Active or some other common yeast) the same as a quarter cup of 100 g of starter at 100 hydration?
Emilie says
Hi Alan, this is actually a very good question and the answer all depends… Because a starter is made from water and flour, adding too much will change the consistency of the dough (whereas dry yeast would not). So depending on the recipe, this may or may not be a good thing. You might want to experiment with your example above, and add more flour as needed to create the consistency you’re after. Hope this helps!
Jessie says
Hi Emilie,
I recently purchased your book and my sourdough starter will be ready in a few days for my first loaf! I’m so excited to try baking sourdough after spending way too much money purchasing it. I’m having the opposite conditions to many of the people posting – where I live it’s approximately 30 degrees celcius (around 90F). For the bulk fermentation overnight, would you recommend doing this partly on the bench and then in the fridge?
Thanks!
Emilie says
Hi Jessie! Thank you for purchasing the book :) To answer your question, you can do a few things: use cooler water to slow down the rise, start the dough later than you normally would (I make my overnight doughs late in the evening when the weather is hot), and/or bulk ferment at room temperature for a few hours and then refrigerate the bowl overnight. As with anything, you’ll have to play around with these tips to see what works for you and your environment. But hopefully it will help!
Sally says
Thanks so much for all the info, I bought your book and it’s great. I’m in Australia and I tried the bulk fermentation in the oven overnight. My dough was looking lovely at 11pm but this morning it is like a wet batter – overproofed I suppose. We’re in a weird lockdown like the rest of the world it seems and I hate the idea of wasting these ingredients. Do you have any ideas as to how I can resurrect the dough? Or can I use it for something else? Many thanks for any help!
Emilie Raffa says
Thank you, Sally! I agree with you: it sounds like the dough was over proofed. When doing an overnight rise, especially in warm weather, make sure to start later in the evening to ensure that the dough will rise correctly.
To save the dough, make focaccia :) There is a recipe with baking times in the book… xx
Susan Morrison says
As you are experiencing, it’s been VERY cold where I live in northern Vermont (normal) and on the southeastern coast of Maine (abnormal) for the past several weeks. I’ve been baking all of our bread for over 40 years and since we’ve never lived in new or finished houses and almost always heated our houses and cooked on old wood stoves, I’m very familiar with (shall we call it) ‘fluctuating’ heat in the kitchen. In Montana the house was so cold I had to put my dough in my (airtight) VW Beetle on a south-facing driveway in order to get it to rise. In most places I just don’t let it sit over night – I start it early in the morning and let it rise throughout the day. In times when I have had access to a gas or electric oven, like Elizabeth, I found that simply using the light in the oven was enough to do the job. I’ve also experimented with DIY tricks like Mim’s great solar box, heating soapstones/pizza stones, warm towels, high shelves, etc. all to good effect and I make sure all my ingredients are at least at room temperature. The situation I find more challenging is the difference between high and low pressure or humidity – sometimes, you just have to wait a day to bake. I can’t imagine paying for a ‘proofing box’ – after all, humans have been figuring out ways to bake their bread for several thousand years without manufactured contraptions so our ‘superior’ modern brains and a little creativity ought to work just fine. Besides, a slow rise usually produces great texture! Tonight we’ll be remembering you with not only a loaf of your bread, but a simmering pot of Minestrone as well. Can’t wait! Stay Warm!
Emilie says
Susan, you are too funny! ” A VW Beetle and a south-facing window…” I can just picture it (what we do for love, right?). As you’ve outlined above, sourdough is a craft that forces us to be present and pushes us to find confidence in our own methods and abilities. What works for some may (or may not) work for others. And to me, that’s what bread baking is all about! Sharing these fantastic bits of wisdom (or crumbs, if you will) and forging real connections with others.You’ve shared some wonderful info here. Thank you for taking the time to tell your sourdough story. I hope you enjoyed that soup ;)
Quinn Losselyong says
We use a seed starter warming mat and that seems to work quite well.
Emilie says
That’s a really great idea, too! Thanks for sharing :)
Mel says
I use a heating pad set on medium. I cover it with a bath towel and then place the bowl on top. Then I cover the bowl with another towel.
I watch the temp carefully.
Works for me!
Emilie Raffa says
Hi Mel, what a great tip. Thank you!
Meg says
I use a silicone daisy cover and it seems to keep a constant temperature. I also find that if it’s not doubling, I put it in the proofing basket and wrap that…. I think when it’s taking too long to rise, it needs moving on to the next step. It means it’s longer in the proofing basket than usual. I make spelt loaves with a spelt starter and the starter never gets to that really bubbly stage but I know when she’s ready….. I also think in the colder weather, I adding more wet works…. I’ve been making a zucchini loaf like this…. And lighten then flour mix a bit…. And I always mix the starter with the warm water and make sure I always leave the dough after a first very gentle mix, no salt, before leaving to bulk rise…
Love the book…. If anyone hasn’t got it yet…. A must!
Emilie says
Thank you for all of your fantastic tips Meg! This is what bread baking is all about: sharing knowledge, advice, and the little bits of wisdom along the way :)
Elizabeth says
I find that leaving my dough in the oven with just the oven light on maintains the perfect temperature and is draft free.
Shirley ward says
Sounds great. I have a microwave that is above my range and I can leave the range light on which heats the microwave to a perfect temperature to raise the dough. Happy baking, Shirley
Emilie says
Hi Shirley! This is an excellent tip too. Thanks for sharing!
Sis Adger says
I tried the oven light twice, but both times, my dough overproofed and just did not work out. This tip might be great for some ovens but for mine, the light is much too warm.
Emilie says
This has happened to me as well… you might want to leave the oven light on for only a few hours (jnstead of all night) and then shut it off. You can also try mixing the dough later in the evening to buy yourself more time in the morning. Hope this helps!
Emilie says
Hi Elizabeth! Yes, I agree! It’s a great tip.
Traci | Vanilla And Bean says
Such great tips, Emilie! Thank you for sharing. Even though I’ve now baked at least 20 loaves from your book, I struggle a bit with knowing when the dough is ready after bulk fermentation. Like you said, it’s not about the time, rather, but when the dough is ready. Reading your book and tips here helps remind me of all the little things a sourdough baker needs to be aware of and I know with practice and patience, I’ll improve. BTW – I love the float test – wish there were one that specific for showing when the dough is ready after bulk! Thank you for your encouragement, Emilie! xo
Emilie says
Hey Traci! Knowing when the dough is ready definitely takes a bit of practice. Here’s a tip from the book that might help: for loaves made with 500g of flour, use an 8-inch clear bowl (nothing bigger!) for the dough to rise. When it reaches to about 3/4’s of the way up, or even slightly less, it’s most likely ready or ‘double in size.’ I use this tip ALL THE TIME. Even when I’m tempted to rush the dough, I look at the bowl to see if the dough has hit the 2/3- 3/4’s mark. And then I wait… I like clear bowls too, because I can see what’s going on inside of the dough. Look for airy bubbles! If you are using a different bowl that’s bigger and stainless let’s say, it’s a little harder to judge unless you have some experience under your belt. Please let me know if this helps! Your loaves are always seriously beautiful. xx
Melanie C. says
A clear bowl! Genius.
Anna says
Hi, my starter is at its peak in the morning, how can I change this or will it still give good results using it in the evening when it’s deflating? Ideally I need to make my loaf around 11 am, but that doesn’t work for bulk fermentation, or could I do the bulk fermentation in the fridge??
Emilie Raffa says
Anna, what time do you want to start making the dough?
Melanie C. says
Hi Emilie.
I commented on your last post (the one about the fabulous cinnamon buns) that I’ve been using the heating belt I usually surround my kombucha crock with to surround my starter jar and keep it happy and bubbly. It works very well. However, I have been having trouble with getting my bread dough to rise. I’ve tried the trick of heating my oven to 300F for one minute, then shutting it off. I also have a very cold kitchen and this did not work because the oven quickly became cold again during the night. Also, the damp towel placed over the bowl gets very cold which seems to hold
the cold temperature in the dough.
I have the old-fashioned steam heat radiators with wooden covers. My thermostat is set to 65 at night. I switched to covering the bowl with plastic wrap, placed the bowl on the radiator in my dining room at 10 PM, then covered the whole thing with a small blanket. When I got up at 5 AM, the dough had risen perfectly.
I once opened a bag of flour, only to find stringy stuff in there from whatever bugs had invaded.
And that was a brand new bag! Since then, I store everything in the largest Mason Jars. Keeps the
mice away too.
Thanks for all your information Emilie. And Happy New Year.
Emilie says
Hi Melanie! I remember you ;) In fact, I’m working on a sourdough starter post and I’ve referenced your tip re: kombucha heating pads to boost its rise time. Thanks again for that, by the way.
Regarding the rise of your dough: all ovens are different so I’m not surprised it was cold inside the following morning. It happens. You know what you can try instead? Just leave the oven light on all night while the dough rises inside. This way, your oven won’t be cold or at least not as cold in the morning; the heat from the light should provide steady warmth for the duration of the rise. As with anything however, you’ll have to play around with this tip to see if it even works for your conditions. I did the light bulb trick last night… My oven gets super hot, so I only left it on for 4 hours, turned it off, and then let the dough rise overnight in the dark. In the morning, it was almost over proofed!
On a different note- I love your radiator trick! I grew up with those steam heaters when I was a kid and I can totally imagine your setup. And yes, I’ve had many bugs and weird stringy things in my flour, too. Can’t they just nest somewhere else?!
Hope all this info helps, Melanie! xo
Melanie C. says
Thank you for the light bulb trick, Emilie. I will have to try this. I never thought the bulb in my oven would get the oven even slightly warm. I will definitely experiment with that one. If that fails – back to the radiator!
Always look forward to your new posts. :0)
Emilie says
You’re welcome! I know, me either! Same goes for a microwave lightbulb (if you have one). xx
Melissa says
FYI- bug eggs are in the flour when you buy it at the store, they get in there at the mill. My husband is in the industry. Some batches are worse than others, some have none. You never know! They just don’t always hatch unless the temperature is right. Just wanted to share in case you thought it was your storage issues! We keep all our flours in the freezer :)
Yocheved A says
I have to keep all grains and nuts in the freezer, because of bugs and mice. I bought a large chest freezer for cheap, and it’s paid for itself many times over.
Mim says
I solved the temperature problem by putting my covered bowl of dough in a black cardboard box that I set in the sun. I cut vents in the box so that the heat wouldn’t build up. Solar proofing box for about, oh, $1.59 tops. Worked like a charm.
Emilie says
Wow! That’s such a cool idea! I’ve never heard of that before, Mim. Thanks so much for sharing that tip with us. I know what I’ll be Googling later, lol.
sylvia says
I live in Southern Ca. and I love my Brod & Taylor home proofer. When things get slow or need an even controlled temperature I use my B&T . It folds up and slides into a kitchen draw when I’m done.
I can’t say enough about it…other than check it out. If you live where it get’s cold. I couldn’t imagine not having one these proofer’s. I’m not a rep. for this little home proofer but, I do love baking sourdough breads, pizza’s and pastries.
Warm Wishes,
Sylvia
Melanie C. says
Thanks for this info Sylvia. I had never heard of this and just checked it out.
It looks wonderful.
Emilie says
Hi Melanie! I use the same proofer- I highly recommend it.
Melanie C. says
If you say so, I think I’ll have to get one! :)
Emilie says
Hi Sylvia! Thanks so much for your comment. You know it’s funny, I have the exact same B&T proofer ;) I bought one when I was writing my book because I couldn’t wait around all day for my dough to rise! I love that it folds up (very convenient), although I have to admit: I bake so much I never end up breaking it down, lol. I also share the box with my mom, and when it’s not with me I have to come up with other ways to get that dough to rise (hence the reason for this post). But like you’ve mentioned, it’s very helpful and I couldn’t imagine baking without it when it’s cold. Thanks again! xo
Jim says
Same here. Bros and Taylor folding proofer is the BEST. During winter here in North Texas, I use it regularly. Yeast bread, sourdough, or Ciabatta. Works great. Stores nice. All good.
Annie says
Can i successfully add yeast to my sourdough? I use a potato starter. Putting it in a glass if water to test it doesnt work because it is mostly liquid. Thanks for the help.
Emilie says
Hi Annie,
Unfortunately, I’ve never worked with a potato starter and/or added yeast to my culture. If I were you, I would experiment. Perhaps you can pour out some of your starter in a separate jar, add the yeast, and see what happens? Good luck!
vincenzo says
what’s the point of adding yeast in your sourdough? would be like adding caffeine to a decaffeinated coffee
Emilie says
Hi Vincenzo, this particular article does not refer to adding commercial yeast to sourdough; perhaps you are referring to one of the comments? Some bakers (professional and home bakers a like) will add commercial yeast to sourdough to create a hybrid loaf to give the rise a guaranteed boost. This isn’t wrong necessarily; it’s just not pure sourdough bread. This of it like ordering a half caffeinated beverage from Starbucks ;) Hope this helps!
Amy says
Hello,
This is my first attempt at making sourdough from the beginning. I grew up with homemade breads of all kinds (Scottish Irish grandmother whom lived in a polish neighborhood that made ALL types of ethic foods, breads, from many cultures (so blessed) I have now been experimenting with different types from pita to now sourdough myself (she passed many years ago wish I would have learned more). My only worries are converting exact measurements (UK grams into US cups etc.), and the proofing of course. I was wondering if anyone has tried those thermal bags for transporting warm, cold, iced foods and beverages or small cooler-warmed up? I live in a manufactured home and not sure that it keeps a steady household temperature. The oven seemed to over proof other doughs. Actually have a couple other questions lol. Does it need to rise twice for 5hrs each? That’s what I’ve read. For baking, will a very seasoned cooking stone work? Thank you for this step, I stumbled upon it. Happy baking everyone!
Sorry so long
Emilie Raffa says
Hi Amy! Growing up with all kinds of homemade breads is a real treat! For best results, I wouldn’t convert UK grams to cups. Stick with the original weight measurements only. I haven’t tried the thermal bags for proofing, but it doesn’t hurt to experiment. You might have some luck with that. Do you have a microwave? If you stick the bowl of dough inside, with the door ajar, the light stays on and the whole thing acts like a small proofing box. I’ve tried it and it works. For my recipes/formulas, the dough doesn’t need to rise twice at 5 hrs each (that might be specific to another baker’s method). Finally, you can bake on a seasoned cooking stone, but you’ll need to invert some kind of oven proof lid/bowl over the dough to mimic baking in a a covered pot- you need the steam for a high rise. If not, you’ll need to find another way to steam your oven which can be quite cumbersome. Hope all this info helps! Happy baking to YOU!