
My cousin Claire turned me onto this.
She buys an amazing 3 layer hummus from Trader Joe’s and I’ve been eating it non-stop. The trio includes traditional, roasted red pepper, and jalapeño-cilantro.
Unfortunately, it only comes in a small tub and I needed a vat of this stuff to bring to a party. I couldn’t bring myself to spend $15 on puréed beans, so I just made it.

Simply take a batch of traditional hummus and divide it into thirds. Purée 1/3 with the peppers, 1/3 with the jalapeño & cilantro, and leave the rest plain. Dollop each layer into a pretty bowl (preferably clear) and you’re all set. It’s a little messy, but it tastes really good!
Alternatively, you could always use 3 of your favorite store-bought varieties. It’s more expensive this way, but sometimes you can’t put a price tag on convenience! Serve chilled or at room temperature with blue corn chips.
*This 3 layer hummus is similar but not identical to Trader Joe’s. It has less garlic and the texture is more rustic. Feel free to make it your own!
Print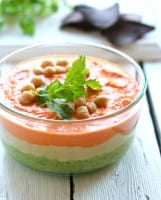
3 layer hummus
- Yield: 10-12
Ingredients
For the hummus
- 2x 15 oz. cans of chickpeas, rinsed & drained
- 2 tbsp. tahini
- 2–3 lemons
- 1 garlic clove
- 1 1/2 tsp. salt
- 1/4 c. water
- 1/3 c. olive oil
- 1 small roasted red pepper (about 1/4 c. chopped)
- 1 small jalapeno, ribs & seeds removed
- 1 c. cilantro leaves
Garnish
- cilantro sprigs
- chickpeas
Instructions
- In a blender, add the tahini, lemon juice, garlic, salt, and water. Process until smooth.
- Set aside 2 tbsp. of chickpeas (for garnish) and add the rest to the blender. Slowly stream in the olive oil to emulsify. If it seems too thick, add additional water or oil to loosen it up.
- Taste the hummus and add extra lemon juice and salt if necessary.
- Using a rubber spatula, divide the hummus equally into 3 bowls.
- To make the 1st layer, puree one bowl of hummus with the roasted red peppers. Transfer to a clean bowl and set aside. Rinse and dry the blender.
- For the 2nd layer, puree another bowl of hummus with 1/2 of the jalapeno and cilantro leaves. Give it a taste. Add the rest of the jalapeno if you like it spicy.
- Dollop the jalapeno-cilantro layer into the bottom of a serving bowl. Spread it out using the back of the spoon. To prevent the layers from mixing together, dollop along the edges and work your way in towards the center of the bowl.
- Repeat with the remaining layers.
- Garnish with extra cilantro sprigs and chickpeas.
- Serve chilled or at room temperature with blue corn chips.
Notes
To make this 1 day in advance, refrigerate all 3 layers in individual containers. Assemble the dip on the day that you are going to serve.

Comments
Catherine says
We wanted to let you know we shared your delicious recipe on our 40+ Skinny Recipes To Start Your Year Healthy post! Check it out! Feel free to share on social media! Happy & Healthy New Year!
http://www.theshoppingmama.com/2015/01/40-skinny-recipes-to-start-your-year-healthy-including-desserts/
Catherine @ The Shopping Mama
Stephanie says
Do you find that your hummus is not as creamy without the Tahini? I am trying to make hummus as home using chickpeas, lemon juice, garlic and water but it comes out kind of gritty and not creamy. Any suggestions?
Emilie says
Hi Stephanie! I totally get what you’re saying~ I’m not sure if tahini is what makes it creamy or not, but I have heard that peeling the skin off of your chickpeas before you puree them results in a super creamy texture. I’ve never tried it before, but people rave about it. I hope this helps :)
If you end up trying this, let me know how it goes! I’d love to hear about it!! Good luck :)
Sarah says
I add some plain greek yogurt to mine and it makes it super creamy and yummy!
Emilie says
What a great idea! I’ve never heard of that before… I’ll have to try that one for sure :)
Katie Randall says
this looks absolutely amazing and is going right into my “to make next week” folder! Thanks for sharing!
Emilie says
Thank you Katie! I hope you enjoy the recipe! It’s one of my favorites :)
Emma says
This is a fabulous idea. Hummus is always good in my book but this one with the great colours, and I imagine flavours looks especially delicious.
Kelly @ Inspired Edibles says
I’ve never come across 3-layer hummus in Canada (mind you, I tend to gravitate towards smaller stores). In any case, I love this idea! So fresh and innovative. And of course, wonderfully healthy. So happy to have discovered your site – beautiful work.
Emilie says
Thank you Kelly! It’s pretty simple to put together (if you don’t mind a little mess!) and makes for a great snack to have on hand. You can always play around with the flavors too and make it your own. Thank you for all of the lovely compliments :) Enjoy!
Maggie @ A Bitchin' Kitchen says
I love this idea! Hummus is one of my favorite foods ever, and I can literally house a whole tub of Sabra on my own.
Emilie says
Thanks Maggie! I totally hear you- I can eat a whole thing of Sabra myself! This recipe is fun because you get 3 flavors in 1! It takes the guess work out of which kind to buy :) Enjoy!!
Keegan says
Might have to make this for the Super Bowl! It looks fantastic. Seems like it might have a little spice to it with the jalapeño. Is that the case?
Emilie says
Hi Keegan! Yes, the jalapeno-cilantro layer has a kick to it. To control the amount of heat, make sure to remove the ribs and seeds first and only use half (or less) of the jalapeno. Blend everything together and give it a taste. If you’d like more spicy, simply add the other half! Hope you enjoy the recipe :)
Barbara Bamber | justasmidgen says
Since we don’t have a Trader Joe’s here in Canada, Emilie, this recipe is perfect! I love having a dip like this right after work so the kids can snack and it gives me time to make supper:) xx
Emilie says
Oh, yes- this recipe is perfect for that. I’ve had it in the fridge for a couple of days now, and it’s great to snack on. We like it with carrots too :)
Tata says
Emilie,
This site amazing. Your recipes and photographs are so creative. I am always looking forward to your next recipe and your photographs belong in an art gallery!
Tat
Emilie says
Aww, thanks Tat! You’re too sweet :) I’m glad you’re enjoying the recipes! I certainly have a lot of fun doing it.
celia says
Emilie, that’s really very clever! And so pretty too! I love hommus! :)
Emilie says
Celia, if you like hummus this recipe is definitely a fun one to make. You can use any flavors you’d like and it’s healthy too!
Mrs Mulberry says
Such gorgeous colors Emilie, and such a great match of flavours!! Perfect for a party – will keep this one bookmarked!!
Emilie says
Thanks Ella! Hope you enjoy it :)